8.3. Benutzer
Im Nutzer/innenmenü der Site-Administration können Sie:
- nach Nutzer/innen suchen
- Einstellungen für einzelne Nutzer/innen ändern
- Nutzer/innen zurückweisen und löschen
- Nutzer/innen zu Site-Mitarbeiter/innen oder Administrator/innen ernennen
- die Einstellungen zur Benachrichtigung von Administrator/innen prüfen
- add users manually or by CSV
8.3.1. Benutzersuche
Site-Administrator/innen können nach jedem Nutzer der gesamten Site suchen. Sie können aber auch gezielt suchen nach
- Vorname
- Nachname
- Anzeigename
- Benutzername
- E-Mail-Adresse
Bemerkung
The display name is not shown in the user list. That will be a feature of Mahara 1.5.
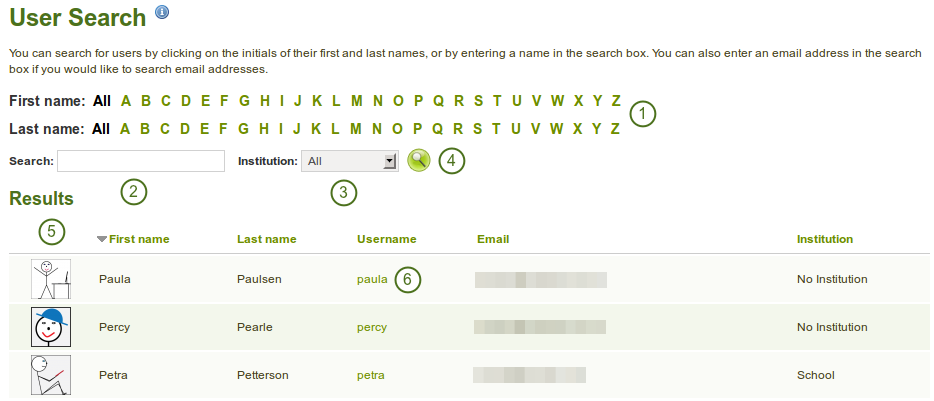
Benutzersuche
Sie können jede Suche kombinieren und Filter-Optionen verwenden. Wenn Sie zu viele Kriterien verwenden, kann es sein, dass Sie kein Ergebnis erzielen.
- Filtern Sie die angezeigten Nutzer/innen durch Eingabe der Initialen, des Vor- oder Nachnamens.
- Type the name, display name, username or email address or any partial thereof you wish to search for in the search field.
- Wählen Sie die Institution aus dem Drop-down-Menü in der Sie nach Nutzer/inen suchen wollen.
- Click the Search button
 to start searching.
 - Anzeige der Suchergebnisse. Die Ansicht erfolgt zunächst alphabetisch nach Vornamen sortiert. Durch einen Klick im Spaltenkopfbereich können Sie eine andere Sortierung und eine auf- oder absteigende Reihenfolge der Ergebnisse festlegen.
- Klicken Sie auf den Nutzernamen des Nutzers mit dem Sie weitere Aktionen ausführen wollen.
8.3.2. Nutzeraccounteinstellungen
On the Account settings page of a user in the administration area, you can perform a number of actions to manage the user’s account. However, you cannot change personal information about this user, e.g. name, email, from this page. This can only be done in the Content area of the user’s account.
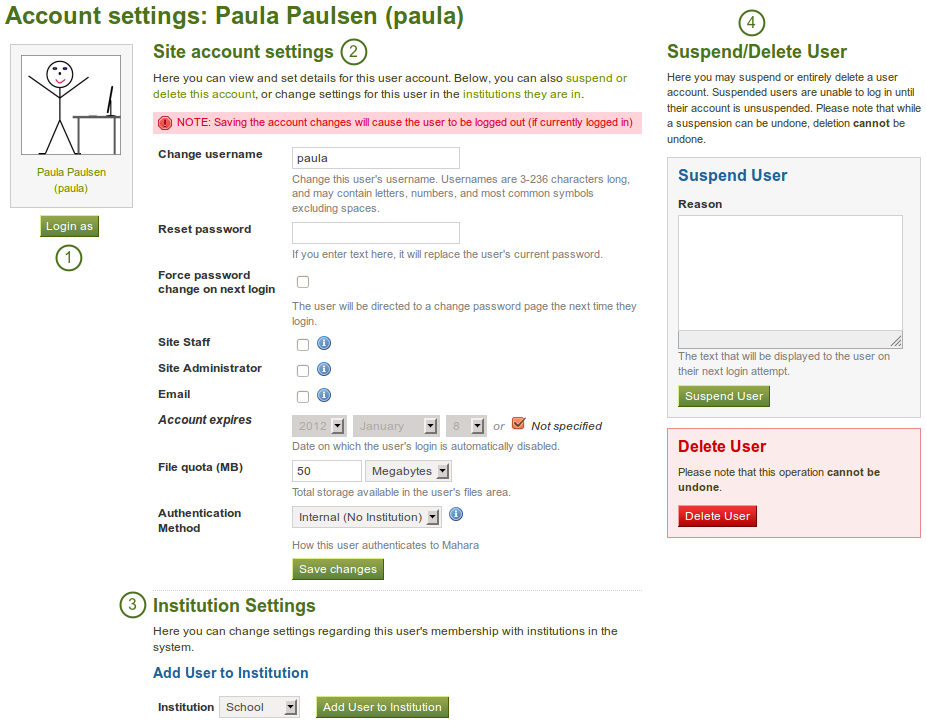
Overview of the user account settings page
- Login als dieser Nutzer
- System-Accounteinstellungen ändern
- Institutionseinstellungen ändern
- Suspend and / or delete this user
8.3.2.1. Einloggen als
As administrator you have the power to log in as any user that you manage ans masquerade as them. If you are a site administrator, you can log in as any user while institution administrators can only perform this action for any user who is in their user management.
It is a great function for troubleshooting a user account because you see everything as the user would without having to know his password.
Warnung
This function can easily be misused by an administrator because he can make changes to the user’s portfolio and artefacts as well as participate in groups while logged in as that user. Users should be aware of this function and that an administrator can enter their account.
Sie sollten klare Festlegungen darüber treffen wann diese Funktion und in welcher Weise sie von Administrator/innen genutzt werden darf. Zudem sollte die Zahl der Administrator/innen eng begrenzt sein.
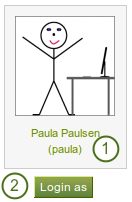
Login as another user
- Click on the user’s name to go to his profile page.
- Klicken Sie auf den Login als …-Button, um als dieser Nutzer zu agieren. Sie sehen einen rot markierten Hinweis oben auf der Seite, der Sie darauf hinweist, dass Sie in Names dieses Nutzers agieren.
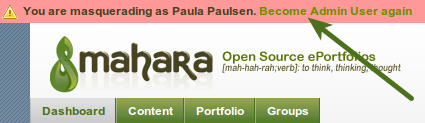
Stop masquerading as another user
When you want to return to your own account again, click the Become [your user name] again link at the top of the browser window.
8.3.2.2. System-Accounteinstellungen ändern
Sie können die Einstellungen für einen Nutzeraccount einsehen und verschiedene Änderungen vornehmen.
Bemerkung
Je nach Authentifizierungsmethode können Sie verschiedene Einstellungen nicht anpassen, da sie in einem externen System bearbeitet werden müssen.
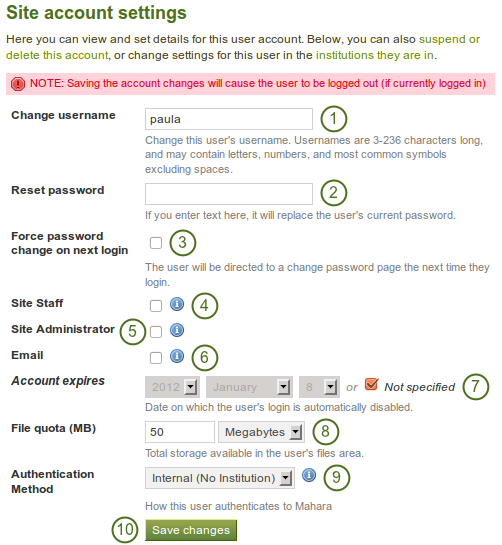
Site account settings of a user
- Nutzernamen ändern: Geben Sie den Nutzer einen anderen Nutzernamen. Diese Option ist nicht verfügbar wenn der Account durch eine externe Authentifizierung verwaltet wird.
- Passwort zurücksetzen: Ändern Sie das Passwort für diesen Nutzeraccount. Diese Option ist nicht verfügbar wenn der Account durch eine externe Authentifizierung verwaltet wird.
- Force password change on next login: Check this box if the user shall change his password when he next logs in. This field is not available when the account is managed by an external authentication method.
- Site staff: Check this box if the user shall be able to create controlled groups.
- Site administrator: Check this box if the user shall have full administrative rights.
- Email: Check this box to disable the sending of emails for this user. If email is disabled notifications and messages can only be viewed in the internal inbox. Depending on your setup, if emails are bounced back to the sender, then email may be automatically disabled.
- Accountablauf: Tragen Sie das Datum ein zu dem der Nutzeraccount automatisch deaktiviert wird. Die Voreinstellung ist, dass kein Datum gesetzt wird. Der Account ist damit unbegrenzt gültig. Das aktuelle Datum ist grau hinterlegt dargestellt. Sie können ein Datum für den automatischen Ablauf für alle Nutzer/innen unter Accounteinstellungen der Site-Konfiguration festlegen.
- File quota (MB): Change the storage allowance for a user’s personal files area. The default value as set in the files configuration in the plugin administration.
- Authentifizierungsmethode: Wählen Sie die Authentifizierungsmethode mit der der Nutzer sich in Mahara einloggt. Die Authentifizierungsmethoden werden unter Institutionsadministration festgelegt. Je nach Authentifizierungsmethode ist ein externer Nutzername einzutragen, um das Login des Nutzers zu ermöglichen.
- Klicken Sie auf den Änderungen speichern-Button, wenn alle Änderungen vorgenommen sind.
Warnung
Wenn die E-Mail-Adresse deaktiviert ist, können Nutzer/innen ihr Passwort selber nicht zurücksetzen, da keine E-Mail versandt werden kann.
8.3.2.3. Institutionseinstellungen ändern
Sie können die Einstellungen zur Mitgliedschaft in Institutionen einsehen und ändern. Abhängig von den Siteeinstellungen für Institutionen kann ein Nutzer zu mehr als einer Institution hinzugefügt werden.
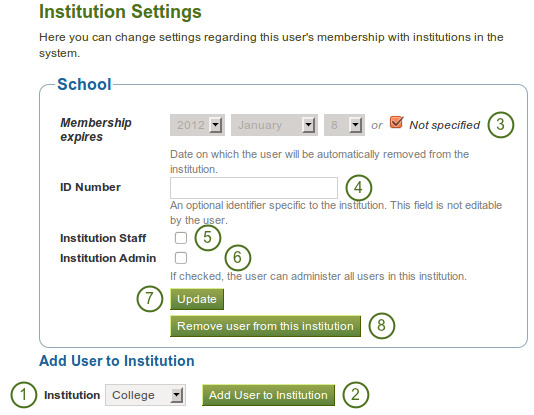
Institution settings for a user
- Choose the institution from the drop-down menu to which you want to add this user.
- Click the Add User to Institution button to make him a member of this institution.
- Ablaufen der Mitgliedschaft: wenn Sie wollen kann die Mitgliedschaft zu einem festgelegten Datum automatisch ablaufen. Wenn Sie ‚nicht festgelegt‘ wählen, endet die Mitgliedschaft nicht automatisch.
- ID-Nummer: Tragen Sie einen optionalen Identifier für den Nutzer dieser Institution ein. Das Feld ist für Nutzer/innen nicht bearbeitbar.
- Institution staff: Check this box if you want to give this user staff rights in this institution. This will allow him to create controlled groups.
- Institution admin: Check this box if you want to make this user an administrator of this institution. This will allow him to manage all users in this institution.
- Klicken Sie auf den Aktualisieren-Button, um die Änderungen zu speichern.
- Click the Remove user from this institution button to disassociate this user from this institution. The user will stay in any other institution that he may be in, and he will also keep his account no matter whether he is in an institution or not.
8.3.2.4. Benutzer sperren
Sperren Sie Benutzer, die die Nutzungsbedingungen nicht einhalten oder die Site in unangemessener Weise verwenden. Gesperrte Benutzer können sich nicht weiter einloggen. Der gesamte Inhalt bleibt jedoch erhalten.
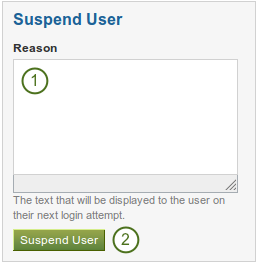
Suspend a user
- Tragen Sie einen Grund für die Sperre ein. Dies ist besonders hilfreich wenn Sie nicht der/die einzige Administrator/in sind und/oder sich später an den Grund der Sperre erinnern wollen.
- Click the Suspend User button to disallow the user from logging in.
When a user has been suspended, the following suspension message appears on his account settings stating the reason for the suspension and giving the administrators the possibility to unsuspend the user by clicking on the Unsuspend User button.

Suspension notice on the account settings page
When the user tries to log in, he will see the suspension message and the reason. He can then contact an administrator via the „Contact Us“ form for further action.

Suspended user tries to log in and gets suspension message
8.3.2.5. Nutzer/in löschen
A user can delete his own account from Mahara on his account settings if he is allowed to by his institution. Site administrators can also delete user accounts at any time.
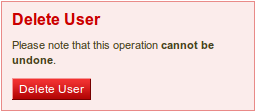
Delete a user account
Click the Delete User button to delete this user account permanently. This action cannot be undone. As this is a permanent action, you see a confirmation pop-up window that you will have to acknowledge.
Warnung
When you delete a user account, all personal data is wiped from the system. This applies to everything that is in a user’s Content and Portfolio area. This action cannot be undone. His contributions in groups, e.g. forum messages, uploaded files and pages created in a group, are still available, but are made anonymous by changing the name the „Deleted user“ as author where an author is shown.
Bemerkung
If an account was deleted by accident - either by a user or by an administrator - swift action may result in recovery of (most of) the data from a backup file. This requires access to the server’s backups and the backend of Mahara. More information is available on the wiki.
8.3.3. Suspended users
A list of all suspended users is available in the sub-menu Suspended users. Here you can unsuspend or delete them.

List of all suspended users
- Wählen Sie die Nutzer/innen, die Sie gemeinsam bearbeiten wollen.
- Click the Unsuspend Users button to reinstate the accounts for all selected users.
- Click the Delete Users button to delete all selected users in bulk. This account cannot be undone and all personal information of these users will be deleted (see delete user).
8.3.4. Staff users
Auf dieser Seite können Sie festlegen, welche Nutzer/innen Site-Mitarbeiterrechte erhalten sollen. Links sind alle potenziellen Nutzer/innen im System aufgelistet, denen Sie das Recht zuweisen können, rechts die derzeitigen Nutzer/innen mit Mitarbeiterberechtigungen.
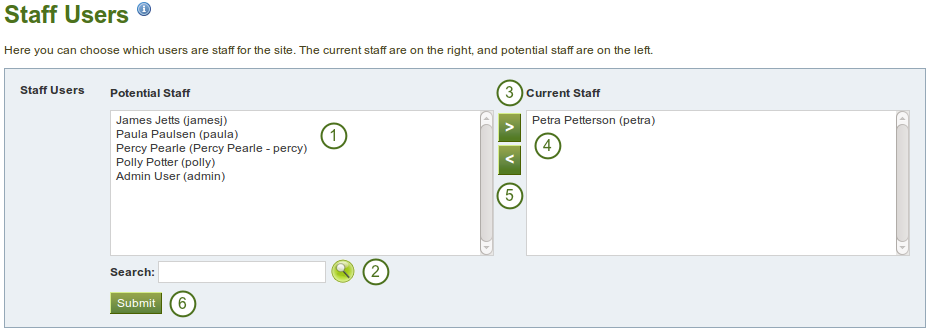
Give site staff rights
- From the list under Potential Staff, select the users you wish to make site staff. You can also select multiple users at once using Ctrl and Shift click.
- If you have too many users on your site and you cannot see / find the user you want, you can search for him in the Search box.
- Add the potential staff members to the right-hand side - Current Staff - by clicking on the right-arrow button
 .
. - If you want to remove an existing or accidentally added site staff member, you can remove him from the list on the right-hand side by clicking on him.
- Then click on the left-arrow button
 , and he is removed from the list.
 - Wenn Sie alle Mitarbeiter/innen ausgewählt haben, klicken Sie auf den Bestätigen-Button.
8.3.5. Site-Administrator/innen
Site administrators have powerful rights on Mahara. They can make far-reaching changes and also log in as other users. Be careful whom you give these rights. One site administrator is needed for each site. The total number of site administrators should be kept small.
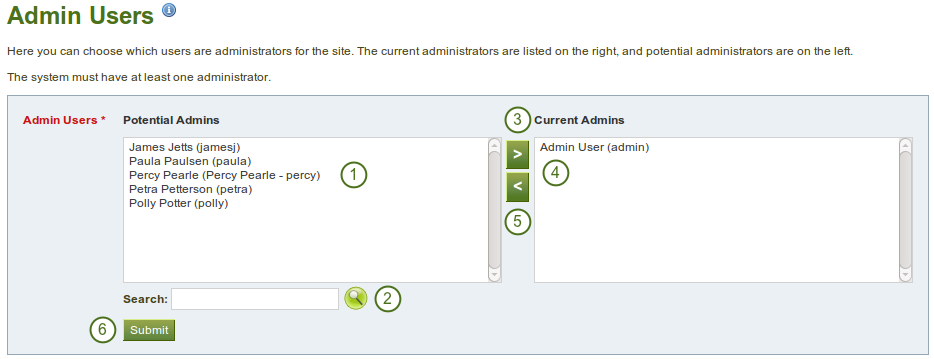
Give site admin rights
- From the list under Potential Admins, select the users you wish to make site administrators. You can also select multiple users at once using Ctrl and Shift click.
- If you have too many users on your site and you cannot see / find the user you want, you can search for him in the Search box.
- Klicken Sie auf den Pfeil nach rechts-Button , um die markierten Nutzer zu Administrator/innen zu machen und in die rechte Tabelle einzufügen.
- If you want to remove an existing or accidentally added site admin, you can remove him from the list on the right-hand side by clicking on him.
- Then click on the left-arrow button , and he is removed from the list.
- Nachdem Sie alle Personen zugeordnet haben, klicken Sie auf den Bestätigen-Button.
8.3.6. Benachrichtigungen für Administrator/innen
The Admin Notifications page lists all users with institution and site admin access on your site. It shows their selected notification preferences for all admin notifications. There should be at least one administrator receiving each type of message generated. Admin notifications are:
- Kontaktaufnahme
- Anstößiger Inhalt
- Wiederholter Virenupload
- Virenkennung Freigabe

Overview of the admin notification types
8.3.7. Nutzer/innen hinzufügen
Sie können Nutzer/innen zu Ihrer Site hinzufügen indem Sie sie manuell anlegen
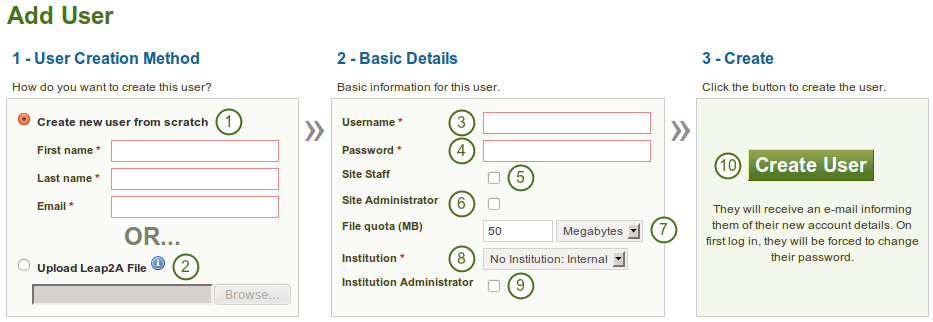
Add a user manually
- Klicken Sie auf den Nutzeraccount neu anlegen- Radiobutton, wenn Sie ein leeres Formular für einen neuen Nutzer anlegen möchten. Tragen Sie den Vor-, den Nachnamen und die E-Mailadresse ein.
- Click the Upload Leap2A File radio button if you want to import a user from another Mahara instance or a system that supports the Leap2A standard. Such a user could have exported his portfolio from another Mahara instance.
- Give the new user a username. The username may contain letters, numbers and most common symbols. It must be from 3 to 236 characters in length. Spaces are not allowed.
- Choose a password for the account. The password must be at least six characters long and contain at least one digit and two letters.
- Check this box if the new user should have site staff rights.
- Check this box if the new user should have site administrator rights.
- Review the allocated file quota. You may change it here for this user.
- Choose the institution of which the user should be a member.
- Check this box if the new user should have institution administrator rights in the chosen institution.
- Click the Create User account button.
- The user will receive an email with his account details.
Bemerkung
You can change the settings under Basic Details on the account settings page.
8.3.8. Add users by CSV
You can use this function to upload new users in bulk via a csv file (comma-separated file). The first row of your csv file should specify the format of your data. For example, it should look like this:
username,password,email,firstname,lastname,studentid
This row must include:
- Benutzername
- Passwort
- Vorname
- Nachname
Die Datei muss zudem Felder für alle Pflichtfelder, die alle Nutzer/innen ausfüllen müssen, und für eine Institution gesperrte Felder wenn Sie Nutzer in diese importieren.
All other fields are optional. This is the full list of fields that you can add in addition to your csv file upload
- studentid - Die StudentID wird im Profil angezeigt.
- preferredname - angezeigter Name
- introduction - die Einführung (Selbstbeschreibung) wird im Profil angezeigt
- officialwebsite - Berufliche Webseite
- personalwebsite - Private Webseite
- blogaddress - URL des eigenen Blogs
- address - Strasse
- town - Stadt
- city - City
- country - Land
- homenumber- private Telefonnummer
- businessnumber - berufliche Telefonnummer
- mobilenumber - Mobilrufnummer
- faxnumber - Faxnummer
- icqnumber - ICQ-Nickname
- msnnumber - MSN-Nickname
- aimscreenname - AIM-Screenname
- yahoochat - Yahoo-Chat-Nutzername
- skypeusername - Skype-ID
- jabberusername - Jabber-ID
- occupation - Beruf (wird im Profil angezeigt)
- industry - Branche (wird im Profil angezeigt)
- maildisabled - Festlegung, die E-Mail-Adresse zu deaktivieren
- remoteuser - externer Nutzername für externe Authentifizierung
When you have created your csv file, you are ready to upload it.
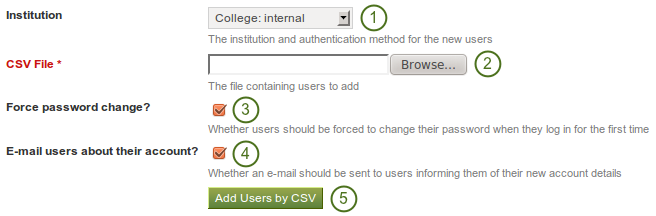
Add users by csv file
- Institution: Choose the institution and the authentication method for the user accounts that you upload. You cannot change the authentication method later on in bulk, but only for each user individually.
- CVS file: You must upload a csv file by clicking on the Browse button and then selecting it from the files on your computer.
- Force password change? If you select this option, users need to change their password before they can log in for the first time.
- Email users about their account? If you select this option, users will receive an email with their account information. This is in particular good for internal accounts. For user accounts that are managed for example by SSO with Moodle or through LDAP, you do not have to select this option because the users should already know their login information.
- Click the Add Users by CSV button to upload the users.
Bemerkung
Abhängig von Ihren Servereinstellungen und oder der Größe Ihrer Installation können Sie nicht alle Nutzer/innen auf einmal hochladen. Versuchen Sie es mit kleineren Einheiten von bis zu hundert Nutzer/innen in einer CSV-Datei.