4.1. Pages and collections
Main menu → Create → Pages and collections
Eine Ansicht enthält eine Auswahl von Artefakten, die Sie anordnen, um sie anderen zu präsentieren. Dies kann enthalten:
Ausgewählte Dateien
Details der Biografie
Text (Ihre eingefügten Kommentare, Anleitungen oder Orientierungen)
Blogeinträge
Video- und Audiodateien
RSS-Feeds zu einem externen Blog
etc.
You can re-use the artefacts that you collected in as many pages as you wish.
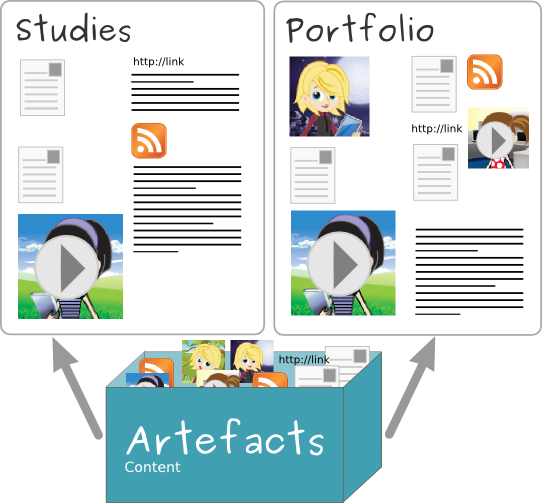
Artefakte können in mehreren Ansichten verwandt werden.
4.1.1. Übersichtsseite
On Pages and collections, you can do the following.
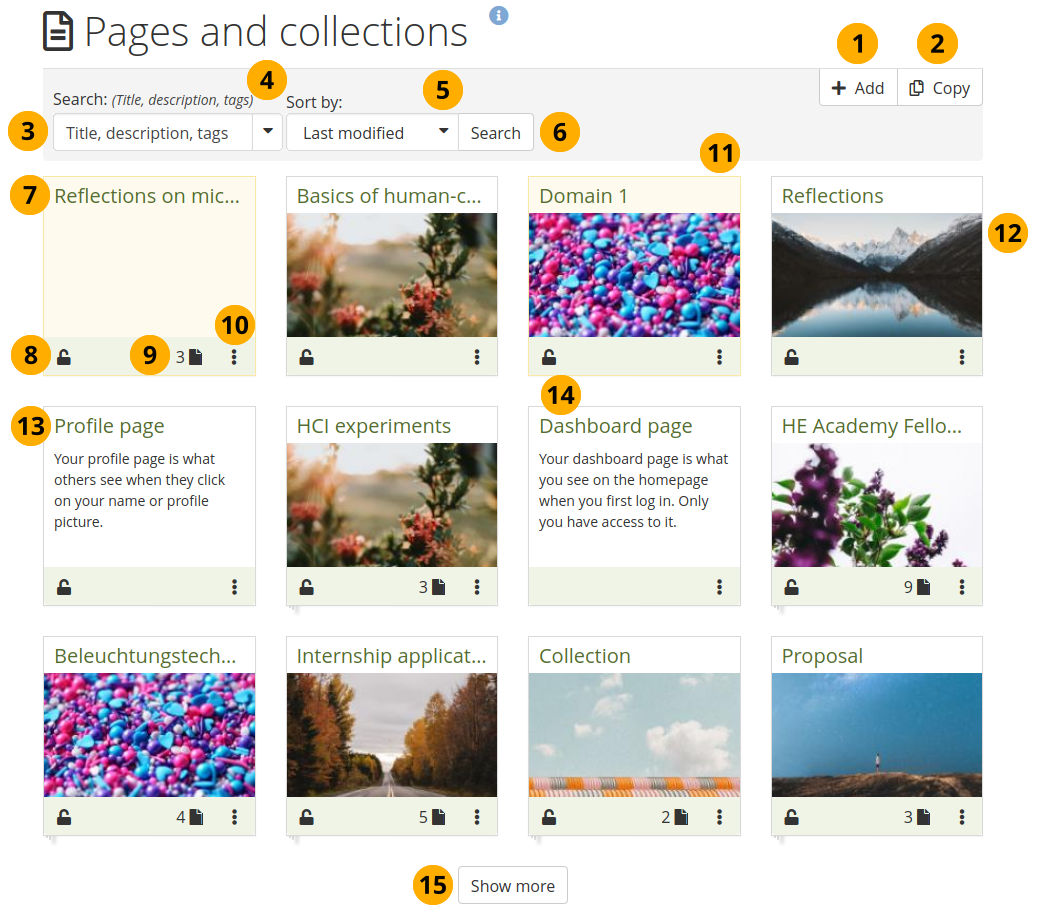
Overview page for ‚Pages and collections‘
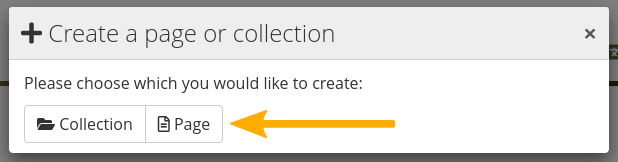
Click the Add button to start a new page or collection from scratch.
Bemerkung
A modal opens in which you can choose whether to create a page or collection.
Click the Copy button to choose an existing page or collection as basis for a new portfolio. You see all your personal portfolios as well as portfolios of others that they allowed to be copied and to which you have access.
Search: Type your search term into the search field.
Use the drop-down arrow to limit your search. The available options are:
Title, description, tags: Search for your search term in the title, description, and tags of your portfolios.
Title, description: This is the default option. It searches in the title and description of your portfolios.
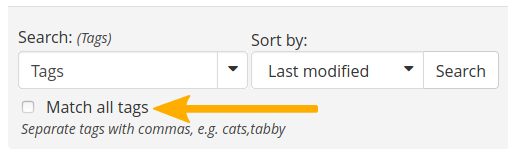
Tags: Search only within the tags of your portfolios.
Bemerkung
If you select to search only tags, you see an additional option to search for multiple tags and match on all of them.
Sort by: Decide on the sort order in which you wish to display your portfolios.
Alphabetical: Portfolios are displayed in alphabetical order.
Date created: List the portfolios in chronologically reverse order with the newest portfolios first.
Last modified: Display the portfolios in the order of their last modification with the most recent portfolios that have been changed first. This is the default display option.
Last viewed: Show the portfolios in the order in which they were viewed by you and others starting with the most recently viewed portfolios.
Most visited: Display the portfolios that have been visited most first in the list.
Most feedback: List the portfolios in descending order based on the amount of feedback they have received.
Bemerkung
The search option and the sort order that you choose do not change when you navigate away from the overview page or log out. When you change either setting, it will be used until you change it again.
Click the Search button to search your portfolios based on your search term and / or sorting criteria.
If you are on a computer, you can hover over the title of a portfolio and see its full length if it needed to be shortened.
Click the Locked icon or the Unlocked icon to manage the access to your portfolio.
Collections display the number of pages that they contain.
Click the More options icon to reach more options for the page or collection.
When you submitted a portfolio to a group, you cannot change a great number of the page’s content or delete it until the page is released again. It is displayed with a different coloured background to differentiate it quickly from non-submitted portfolios.
If you added a cover image to your page or collection, you see it here.
Profile page: Click the More options icon to make changes to your profile page. You cannot delete this page, but you can decide on different sharing options.
Dashboard page: Click the More options icon to make changes to your dashboard page. You cannot delete it though.
Click the Show more button to display more portfolios.
Siehe auch
All cover images displayed on this page are from Unsplash.
Blue and red shaped heart candies by Sharon McCutcheon
Free road by Thomas Lardeau
Mountains and mountain lake by Roman Manukyan
Person standing under stars in the sky by Jônatas Tinoco
Purple flowers by Artiom Vallat
Red flowers with green by Eduardo Gorghetto
White clouds and blue sky by Max Fuchs
4.1.2. Icons on the overview page
The page and collection information boxes display a number of icons, which are described in more detail here.
4.1.2.1. Share your portfolio with others
If you have not yet shared your portfolio with somebody else, you see the Locked icon .
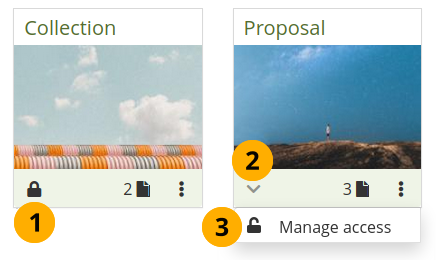
Ready to share your portfolio with others
Click the Locked icon to start sharing your portfolio.
The icon turns into a downwards facing menu chevron . A drop-down menu opens.
Click the Manage access option to share your portfolio with others on the site. You are taken to the Edit access screen where you can choose with whom to share your portfolio.
4.1.2.2. Review existing sharing permissions
If you already shared your portfolio with others, you see the Unlocked icon .
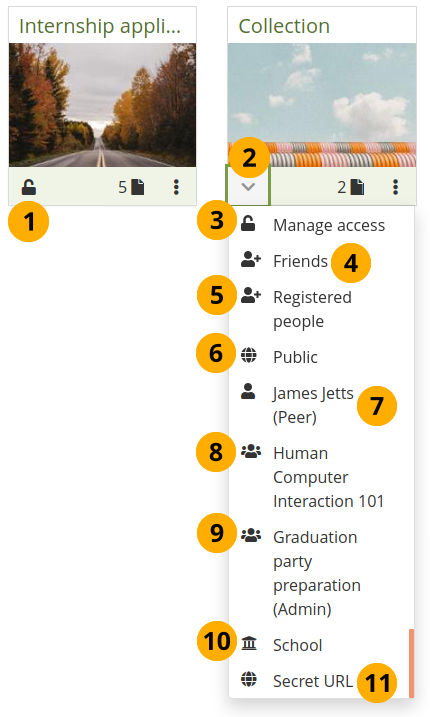
Review with whom you already shared your portfolio
Click the Unlocked icon to see with whom you have already shared your portfolio.
The icon turns into a downwards facing menu chevron . A drop-down menu opens.
Click the Manage access option to edit the existing sharing settings for your portfolio. You are taken to the Edit access screen where you can choose with whom to share your portfolio.
Friends: If you shared your portfolio with all your friends.
Registered people: If you gave all people with an account on your Mahara instance access to your portfolio.
Public: If you made your portfolio available to everyone on the internet.
Name of a person: If you shared your portfolio with a specific person. If that person has a special access role, it is noted in parentheses.
Group name: If you shared your portfolio with an entire group.
Group name (Qualifier): If you shared your portfolio with only a certain type of group members in that group or if you submitted it to the group, the respective qualifier is displayed in parentheses.
Institution name: If you shared your portfolio with all people in your institution.
Secret URL: If you set up a secret URL for your portfolio.
Bemerkung
Start or end dates or whether copying is allowed are not displayed in the drop-down menu. You need to go to the Share screen to see that additional information.
4.1.2.3. Access pages within a collection
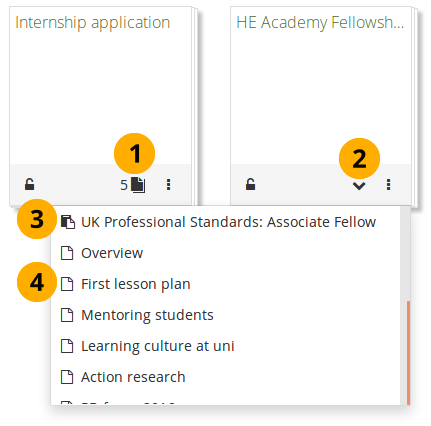
You can view how many pages are part of a collection and what their titles are by clicking the Pages icon .
View a list of pages within a collection
Click the Pages icon .
Bemerkung
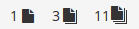
The icon depends on how many pages are in your collection:
0-2: One sheet of paper.
3-10: Two stacked sheets of paper.
11 or more: Three stacked sheets of paper.
The icon turns into a downwards facing menu chevron . A drop-down menu opens.
If you have a SmartEvidence collection, you see that listed first with the SmartEvidence page icon .
All other pages are are listed with the Single page icon .
Click the page you want to view.
4.1.2.4. More options
You can find additional options for pages or collections via the More options icon .
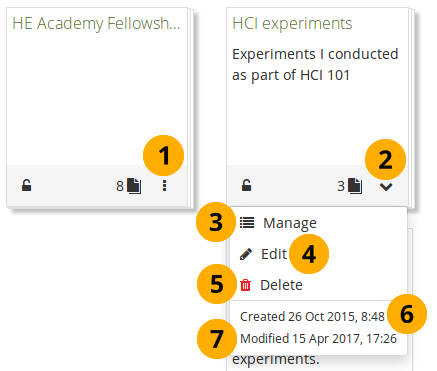
More options for pages and collections
Click the More options icon to see additional editing options.
The icon turns into a downwards facing menu chevron . A drop-down menu opens.
If you view the options for a collection, click Manage to add or remove pages from your collection.
Click Edit to edit the general information of a page or collection such as title, description, and tags.
Click Delete to delete the page or delete the collection.
Bemerkung
If you delete a collection, the pages and artefacts within it will be deleted.
Created: The date and time when you set up the page or collection.
Modified: The last time you made a change to the page or collection.
If you submitted a portfolio, you cannot edit or delete the page or collection until it has been released. Therefore, you don’t see those options any more. However, you see when you submitted the portfolio to which group.
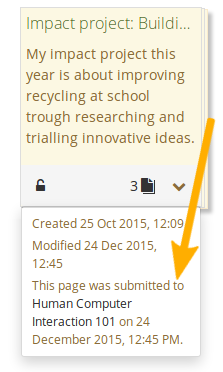
See submitted date and group
4.1.3. Profilansicht
Your profile page is visible to others on Mahara by default. If your administrator allowed it, you can also make it visible to everybody on the Internet. In certain circumstances, the site administrator may have allowed restricting access to your profile page to institution members only. In that case, you are able to remove the access for everybody who has an account on Mahara.
In der Grundeinstellung sind nur die folgenden Informationen auf Ihrer Profilseite eingestellt:
Ihr Anzeigename (oder der reale Name wenn Sie keinen Anzeigenamen eingetragen haben)
Your portfolios that are visible to the person viewing your profile page
Ihre Gruppen
Ihre Pinnwand
Ihre Kontakte
When other people have access to your profile page, they can perform a number of actions or get in touch with you, depending on their permissions.
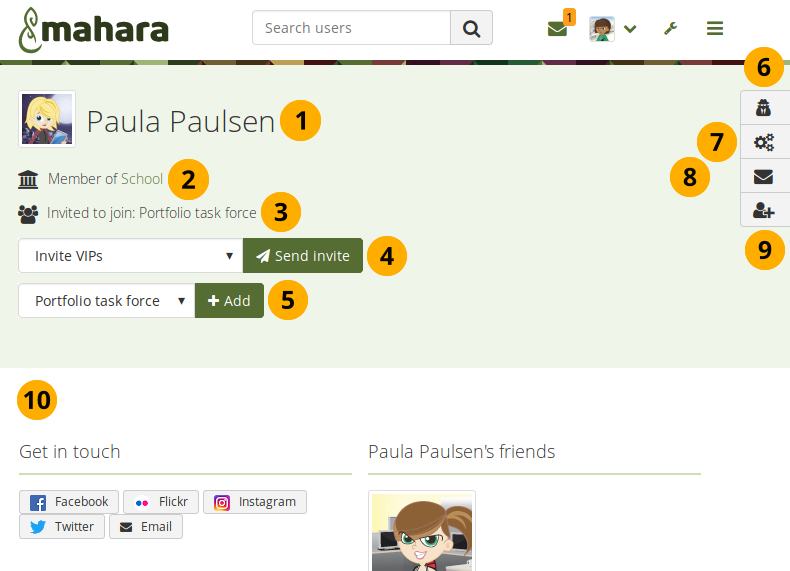
Full profile page access
Your display name and profile picture.
If you are a member of an institution, the institution name is stated and linked to the institution’s contact page.
If the person viewing your profile invited you to a group, this is stated.
If the person viewing your profile is a group administrator, they can invite you to one of their groups.
If the person viewing your profile is a group administrator of a controlled group, they can add you to the group immediately.
An institution or site administrator can click the Log in as [username] button and masquerade as you.
An institution or site administrator can view your account settings and make changes if needed by clicking the Account settings button .
If you allowed others to contact you, they can see the Send message button .
If you allowed friend requests, people can click the Request friendship button . Alternatively, if you automatically approve new friends, they are automatically added without you needing to approve them. If they don’t want to be your friend any longer, they can click the Remove from friends button .
Bemerkung
The buttons on the right-hand side stay no matter where you scroll to on the page making it easier to access these actions.
Your entire profile page is visible.
Warnung
We advise you do not use your profile page as your portfolio because you have less control over who can look at the information you make available on your profile. At minimum it is everybody in your institution or who has an account on Mahara. At maximum it can be everybody online.
Always remember to think about your own personal security before releasing contact information on a publicly available page or even just for other people on Mahara.
If you do not see the full profile of a person, but just ‚Full access to this profile is restricted‘, then you can only perform a few options for this person.
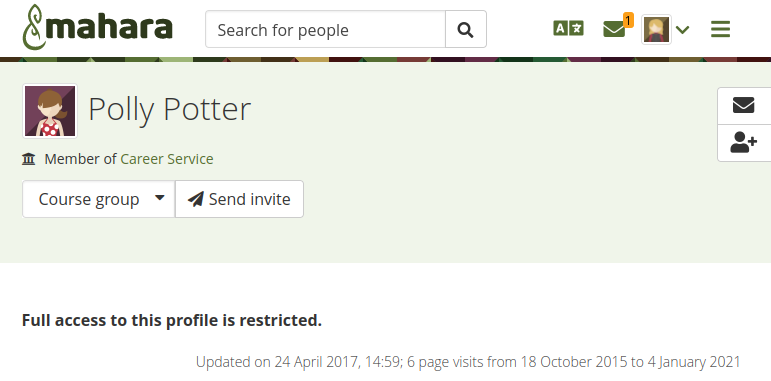
Access to the profile page is restricted
Bemerkung
Nachdem Sie Ihre Profilseite oder eine Portfolioansicht öffentlich gemacht haben, können Suchmaschinen wie Google diese Informationen indexieren und speichern. Selbst wenn Sie die früher öffentlichen Informationen später wieder zurücksetzen, bleibt die frühere Versionen in den Speichern der Suchmaschinen weiter verfügbar. Ansichten, die über geheime URL verfügbar gemacht werden, werden von den Suchmaschinen nicht gefunden. Es sei denn jemand setzt öffentlich auf einer Webseite einen Link zu dieser URL.
Use regular pages to create your portfolio and your profile page as a business card or brief introduction to you without disclosing lots of details.
Siehe auch
You can edit your profile page like any other page. You can find more information about editing a page in the section ‚Add content to a page‘.
4.1.4. Add a page and edit its settings
You add a new page in your portfolio when you want to display artefacts together, e.g. for presenting them to others, for showing your progress in a project etc.
Eine Portfolioansicht erstellen
On the Pages and collections page, click the Add button. In the modal that comes up, click the Page button. You are taken to the Settings.
Bemerkung
You can make changes to the page settings at any point in time.
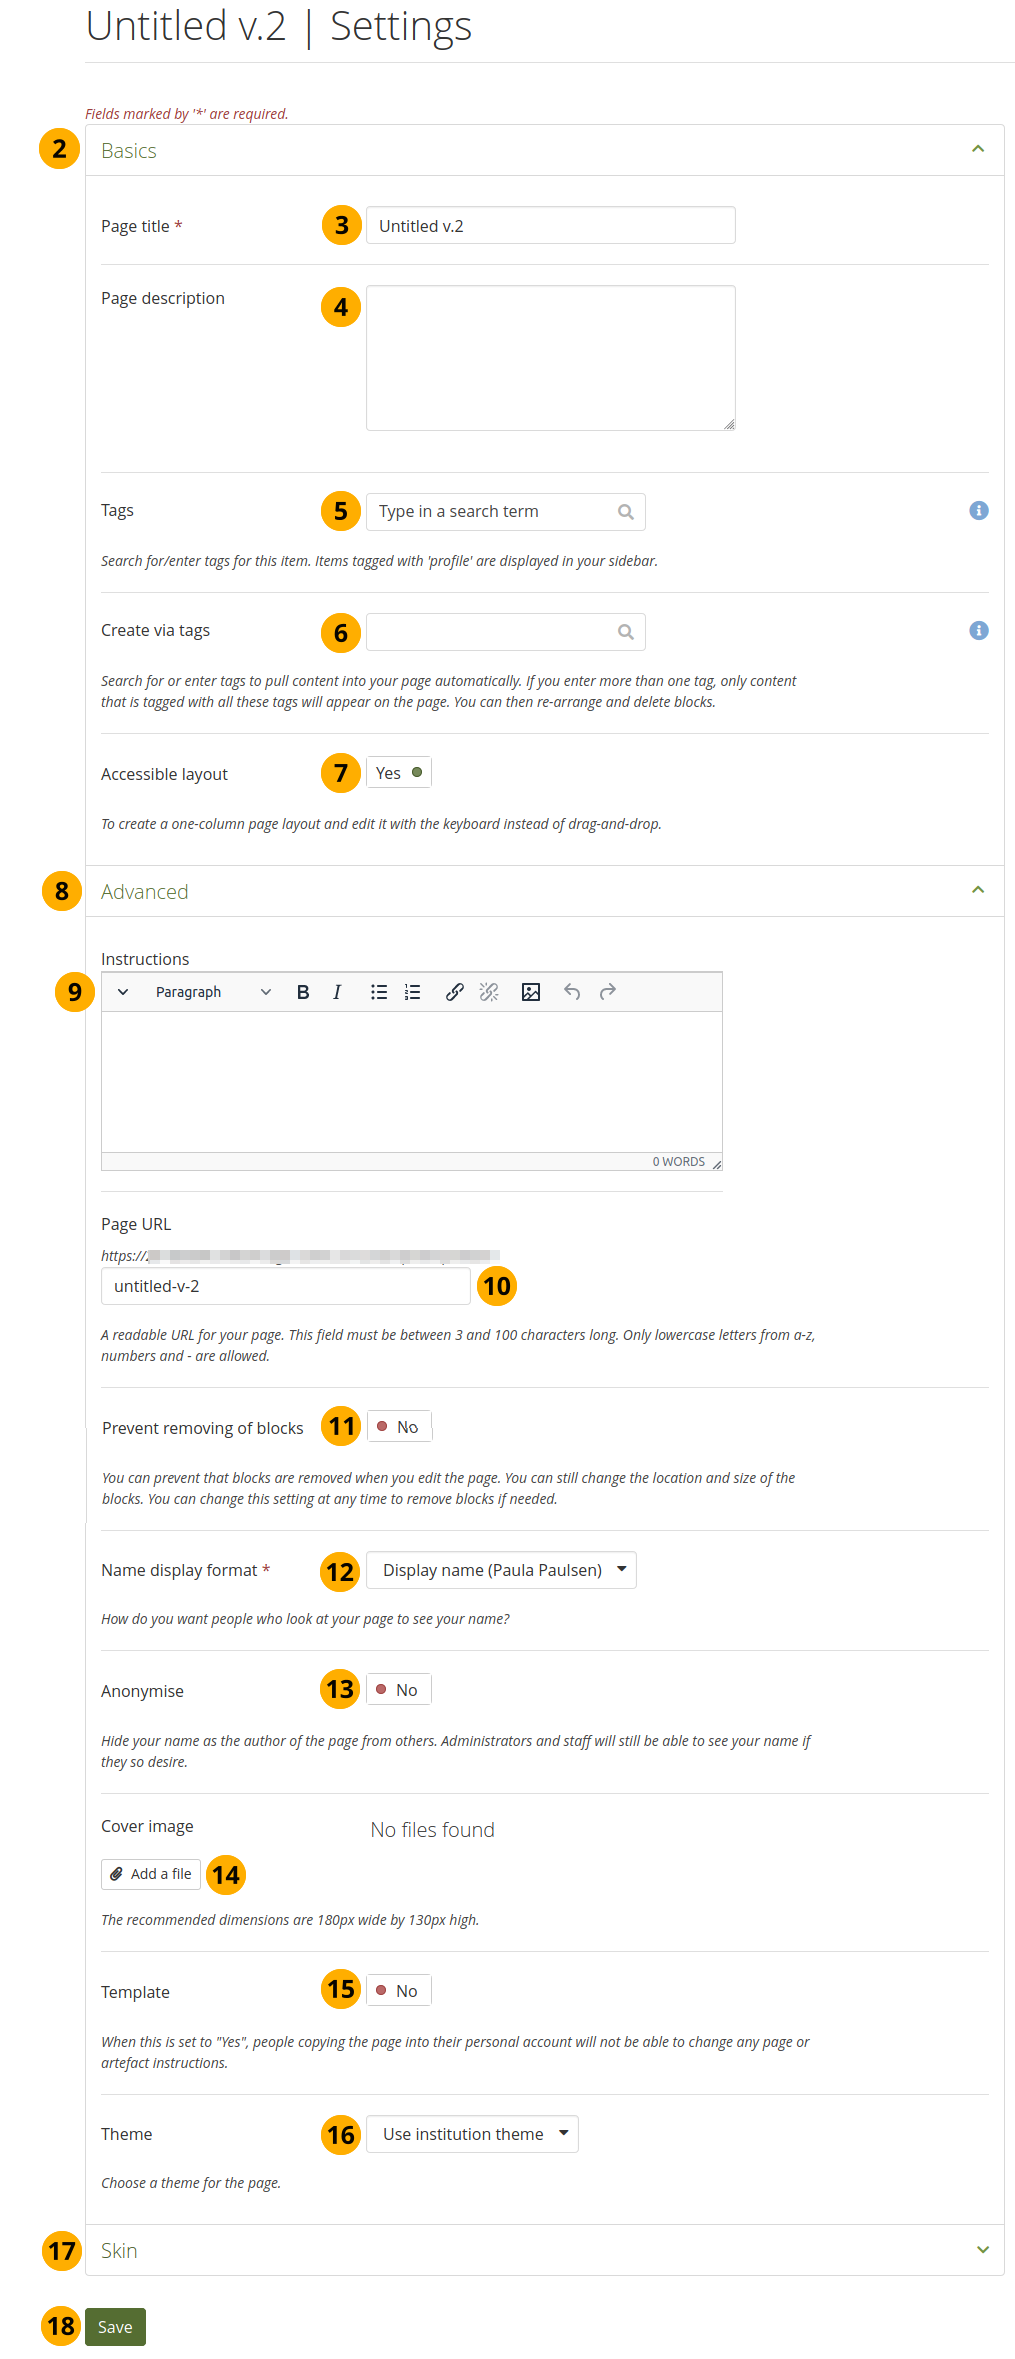
Basics: This section includes basic page settings:
Page title
Page description
Schlagworte
Create via tags
Bemerkung
If you cannot see these options, click the icon to make them visible.
Page title: Provide a title for your page. This field cannot be left empty. If you do not enter a title, the default ‚Untitled‘ will appear.
Beschreibung der Ansicht: Schreiben Sie eine kurze Beschreibung, die die Ziele oder den Zweck der Ansicht zusammenfasst. Sie erscheint in der Ansicht.
Bemerkung
The page description is not displayed on the page itself any more, but rather used on the ‚Pages and collections‘ overview page and on the ‚Portfolio completion‘ page.
If you used formatting options and images in your page description, this page description is turned into a block on your page so you don’t lose that content. You can then add a short description into your page settings.
Tags: Enter tags to find your page more easily at a later stage. You can choose from your existing tags by starting to type a letter and then selecting the tag you want to use. You can also type a new tag, select it, and it is added to your list of tags.
Siehe auch
You can find more information on how to use the tag selector in the ‚Tags‘ section.
Create via tags: You can select one or more tags to populate the page with all artefacts and blocks that have been tagged with them. If you select more than one tag, you only see content that matches all selected tags, i.e. it must match tag one and tag two.
Bemerkung
The page is only populated with already existing tagged content. If you tag new artefacts, they will not be added automatically. You will have to add them manually or use the ‚Create via tags‘ functionality again. Only artefacts that are not already on the page are added. That also means if you previously deleted tagged content, it will be added again.
Content that is on tagged pages is not not added unless the artefacts themselves have been tagged.
Once you have added artefacts automatically, you can re-arrange and also remove them as needed. Since there are several possibilities of adding artefacts and blocks to a page, the following content mappings are made when multiple artefacts of the same type are added:
1 image: Image block
2+ images: Image gallery
1 PDF: PDF block
2+ PDFs: Files to download block
1 audio / video: Internal media block (as long as the format is supported)
2+ audio / video: Files to download block
Generic file(s): Files to download block
Folder(s): 1 Folder block per folder
Journal(s): 1 Journal block per journal
Journal entry / entries: Tagged journal entries block
Note(s): 1 Note block per note
Plan / tasks: The entire plan that contains the tagged content
Accessible layout: This option is available if you set the Accessible page creation option in your account settings to ‚Yes‘. The following will happen:
The page is set to one column. All blocks will be placed underneath each other.
The Add block button can be clicked or navigated to via the keyboard and will add a block at the top or bottom of the page. Drag-and-drop is disabled.
You can change the position of a block by navigating to it, holding the Enter key pressed, and using the Up and Down arrow on your keyboard to change its position.
Advanced: Click the Arrow down icon to display all advanced settings options for a page:
Instructions
Page URL
Lock blocks
Name display format
Anonymise
Cover image
Theme
Page instructions: Write your instructions for setting up the page in the editor to scaffold the portfolio creation.
Bemerkung
The instructions are displayed in both edit and view mode of the page where you can collapse them if you don’t need them.
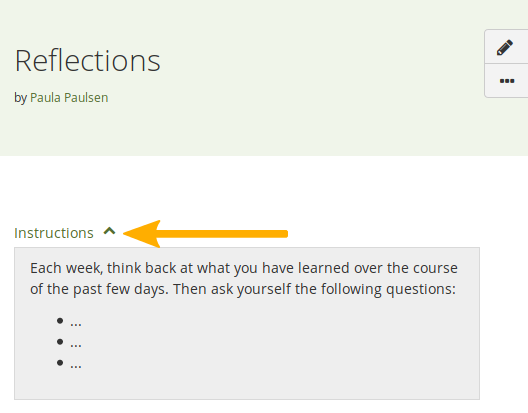
If you copied a template that had instructions, you are not able to change them on the immediate copy. You would need to make a copy of your copy to have all editing capabilities again.
Page URL: This option is only available if the site administrator allowed ‚Clean URLs‘. Choose the name for your page if you do not like the default one. It must be between 3 and 30 characters long. You can only use lowercase letters from a-z, numbers and - (hyphen).
Bemerkung
If you are just setting up your page, the default URL ‚Untitled v.2‘ (or similar) is displayed. As soon as you save the page, the URL is changed automatically to reflect your actual page title.
Warnung
Though you can change the URL to your page at any point, you shouldn’t do that because people who already know the URL to your page will not be able to access it any more after you have changed it.
The original, internal Mahara URL, e.g.
https://mahara-university.org/view/view.php?id=789will still work.Prevent removing of blocks: If you set this option to ‚Yes‘, you cannot remove blocks from the page. You can still add new blocks, re-arrange them, but cannot delete them.
Bemerkung
This is to prevent accidental deletion of blocks from a page, in particular if it is a template page that people copied into their own account.
Portfolio authors can change this setting if they wish to delete blocks once they copied the page to their own portfolio area.
Name display format: Choose how you want your name to appear on the page to others.
Anonymise: If the site administrator allowed anonymous pages, you can choose this option here. Instead of your (display) name, ‚Author’s name hidden‘ will be displayed to everyone. Administrators and staff can still see your real name.
Cover image: Click the Add a file button to upload or select a picture that you want to display as cover image for your page when you are on the Pages and Collections overview page. This will help you distinguish between your pages and collections. For best results, your cover image should be 180px wide and 130px high.
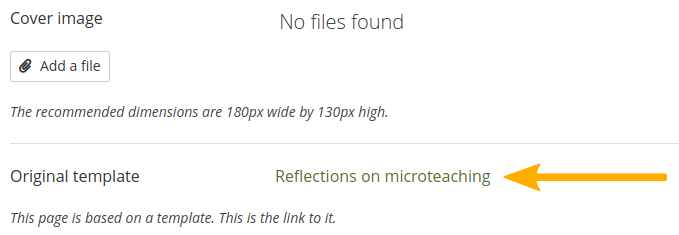
Template: You can mark any page as template. If a template is copied, the portfolio author will not be able to change page and artefact instructions on the copied page if there are any. These can only be changed if they make a copy of that copy.
Bemerkung
When a template page is copied, a link to the original template is placed into the page settings to make the template accessible and indicate that this page was copied from a template.
Theme: If the site administrator allowed authors to choose their own page theme, you can choose between the available themes.
Skins: Click the Arrow down icon to select a skin for your page.
Click the Save button to save your changes and to continue to the ‚Edit‘ screen.
You can upload or select an image for your cover image.
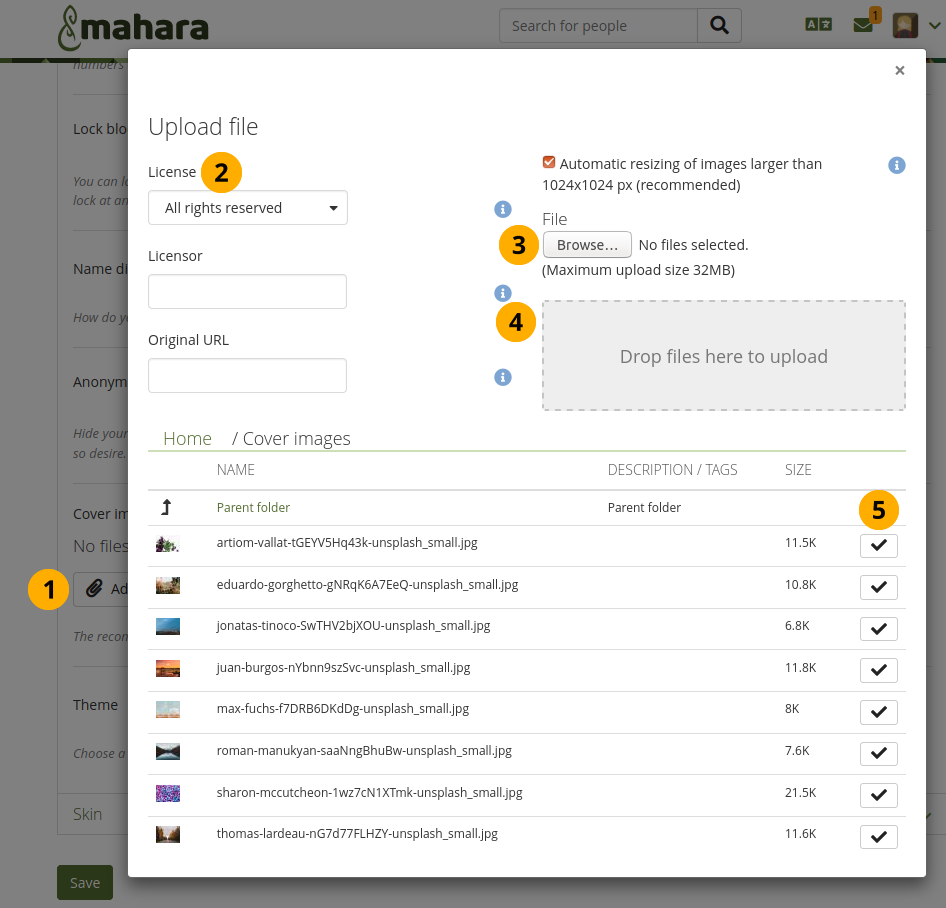
Add a cover image to your page
In the page settings, click the Add a file button.
If licenses are turned on, you can select a license for the image your are uploading.
You can then click the Browse button to upload an image from your computer, or
Drag and drop and image from your computer into the drop zone, or
Select a previously uploaded image from your Mahara file storage.
4.1.5. Edit a page
4.1.5.1. Navigation bar
You can add and remove content from a portfolio page on the Edit page screen.
The page navigation bar stays fixed in place on the right-hand side of the screen. That way, the buttons can be accessed on short and long pages without scrolling.
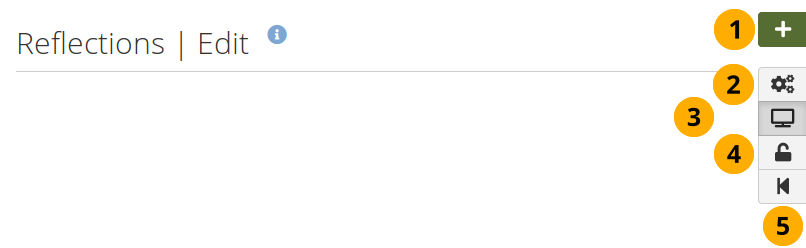
‚Edit page‘ navigation bar
Click the Drag to add a new block button onto the page to place a block.
Click the Settings button to add and modify page settings like title and description and skin.
Click the Display page button to review your page to see how others, who have access to it, will see it. When you are in edit mode, this button is highlighted.
Click the Share button to decide who shall have access to your page (or collection if the page is part of one). See ‚Edit access‘ for more details.
Click the Return to pages and collections button to return to the pages and collections overview page.
4.1.5.2. Add content to a page
The layout can be created on the fly directly on the Edit screen of a page.
The layout functionality is based on the Gridstack plugin for jQuery. It is well-suited for responsive pages, adapts to the page width, and blocks can be resized directly in edit mode.
An extension to this plugin is the accessibility options needed to allow people working with a keyboard only or a screenreader to continue being able to create and modify pages as well.
When a page is created with an accessible layout (this page option is available if you set the Accessible page creation option in your account settings to Yes), the following will happen:
The page is set to one column. All blocks will be placed underneath each other.
The Add block button can be clicked or navigated to via the keyboard and will add a block at the top or bottom of the page. Drag-and-drop is disabled.
You can change the position of a block by navigating to it, holding the Enter key pressed, and using the Up and Down arrow on your keyboard to change its position.
Bemerkung
Be careful when choosing 4 or more columns. Your portfolio page may look very good on your big 21“ screen, but a person looking at it on a laptop or tablet may not have the same experience. In most cases, up to 3 columns is the best choice.
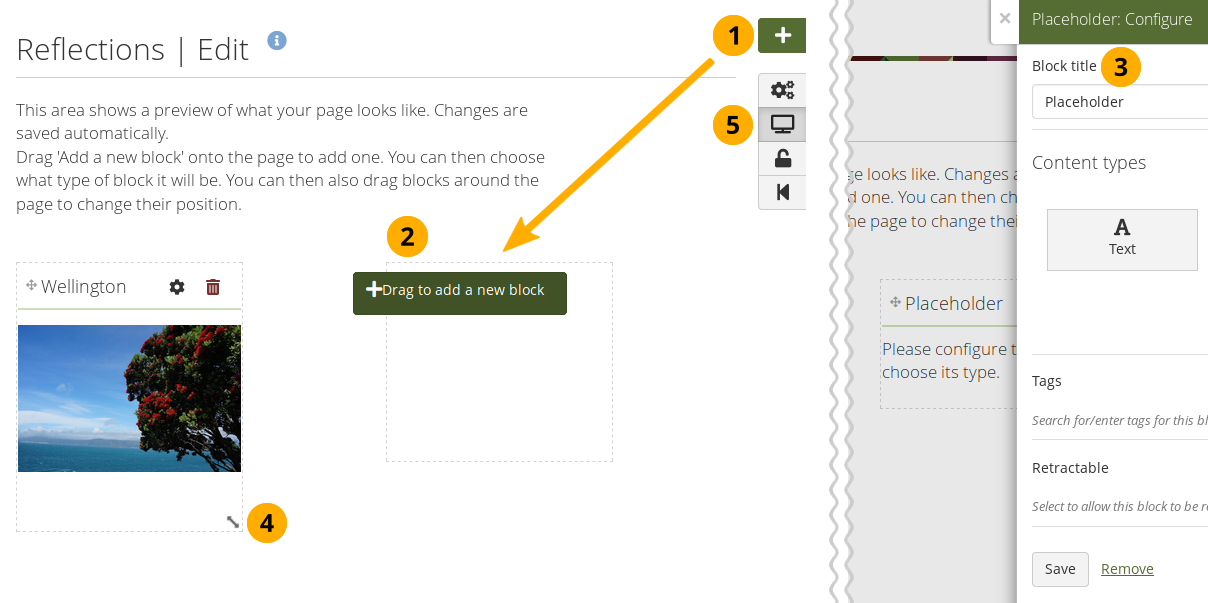
Drag a block onto a page and resize it
Drag the Drag to add a new block button onto the page.
Bemerkung
If you use only a keyboard to navigate Mahara, you can place blocks using that when you enabled the accessible page creation in your account preferences and set you page to have an accessible layout in your page settings.
When you see a dotted line around a rectangle, you know where you can drop the block.
Once the block is on the page, the block configuration modal is displayed and you can select the block type that you want to use. You can also just change the block title and leave the placeholder block in place deciding on the type of artefact you want to add later. This is in particular interesting for the creation of templates as you can leave it up to your learners to decide what content they want to place under a heading.
Siehe auch
Refer to the section ‚Blocks‘ for more information on the different block types.
A site administrator can change the order of the block types seen in the placeholder block configuration.
Resize the width and / or height of a block by dragging the Resize icon
 in the bottom right corner of a block to change its dimensions.
Bemerkung
Content within the block will adjust automatically to the new size when no specific restricting dimensions are provided.
Click the Display page button to view your page and its content without the edit controls.
Remember:
You can align your blocks into columns and rows. If a block in a second row is as wide as the block right above it and there is no other block in between, the block will snap up to the first block. You can still arrange blocks into rows by resizing your blocks to the correct width.
Blocks that contain dynamic content, e.g. the journal blocks, they may get longer with time and push other blocks down.
You can re-arrange a block by clicking its heading and dragging and dropping it elsewhere.
Sie können die Einstellungen für einen Block durch Anklicken des Konfiguration-Buttons ändern.
Changes to the layout and arrangement of blocks are saved automatically. As soon as you made changes inside blocks or on the page itself, they are also visible to any visitor of your page.
4.1.5.3. Convert an existing page to the new layout
In Mahara 19.10 we introduced a new page layout. Existing pages need to be converted to it in order to be editable.
When you attempt to edit an existing page that is not yet in the new layout, you are asked to convert it.
Once you have converted it, check what the page looks like and make block size adjustments as needed.
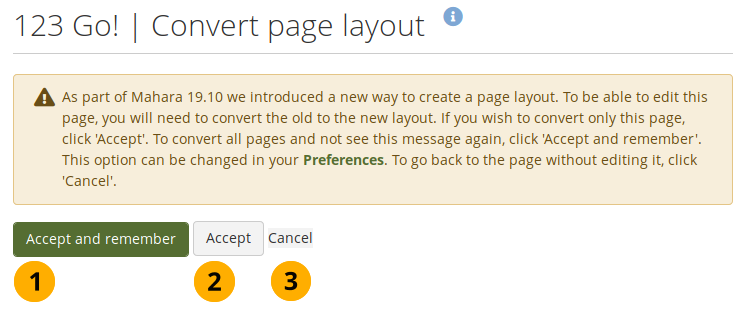
Accept to convert your page to the new layout
Click the Accept and remember button if you want to convert all your pages to the new layout whenever you enter the edit mode for the first time on a page that hasn’t yet been converted.
Bemerkung
If you do not want to have the automatic conversion done any more, you can revert it in your account preferences by setting the option Confirm before changing the page layout to ‚Yes‘.
Click the Accept button if you want to convert just the current page but don’t yet want to make a decision about other pages.
Click Cancel to leave the page in the old layout. You are not able to edit the page.
4.1.6. Edit access
The Edit access screen is displayed for the selected page. You can only select the sharing options for the page that you are editing (and the collection if the page is in a collection).
You can set a secret URL immediately rather than having to provide a secret URL separately from the other sharing options.
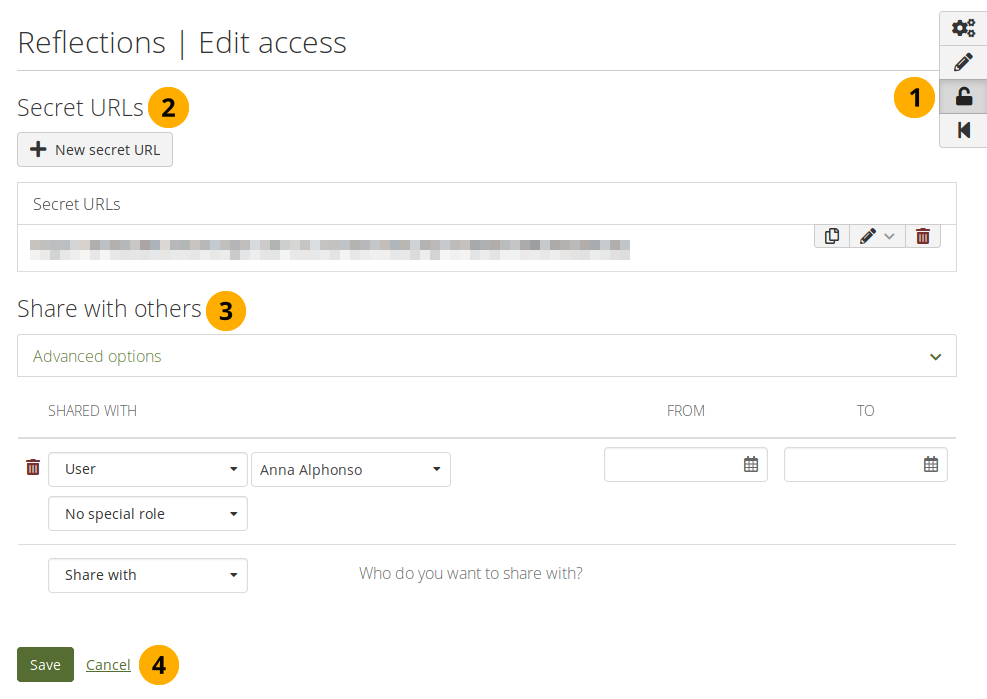
Edit access for the page you are editing
Click the Share button.
Secret URLs: Give your page a secret URL. For all available options, check out how to set up a secret URL.
Share with others: You can share your page with people who have an account on the site.
4.1.7. Eine Ansicht anzeigen
You can view a page to check what it looks like when somebody else sees it. Go to the Pages and collections overview page and click on the title of a page.
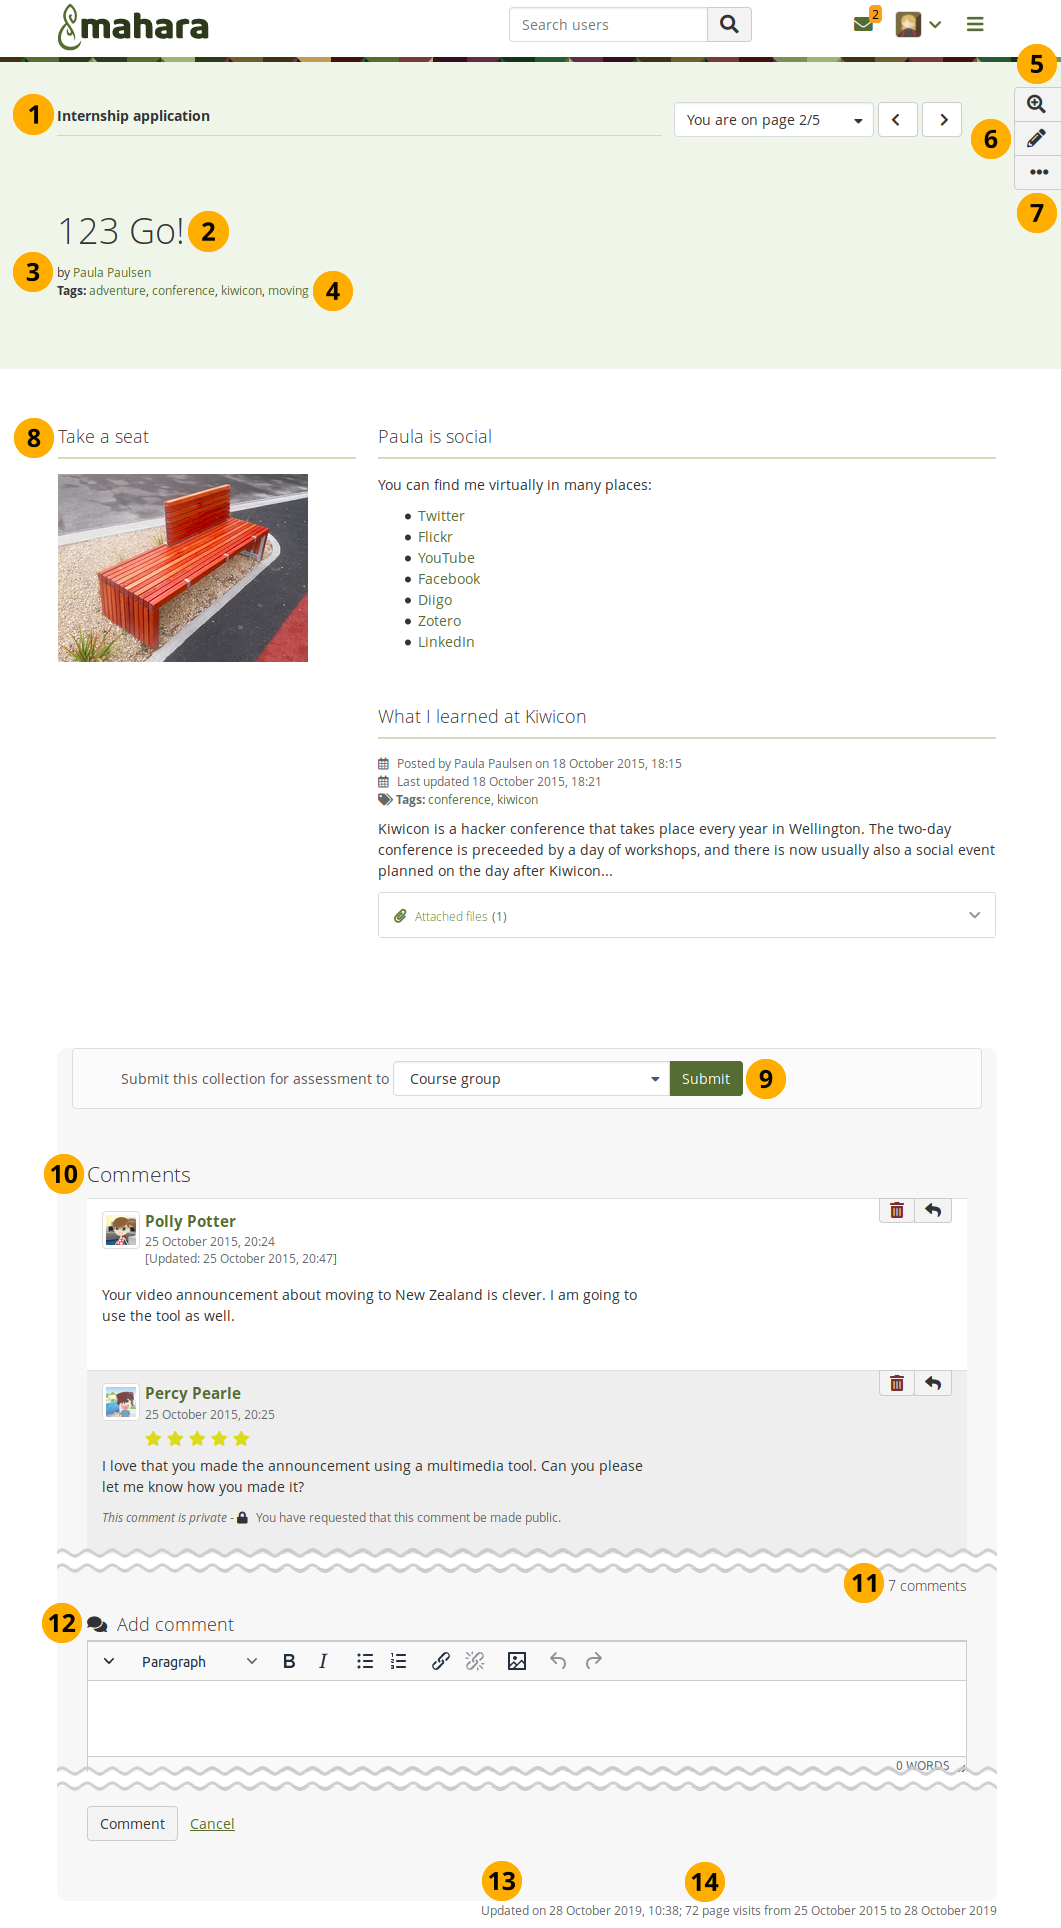
An example portfolio page
Collection title and navigation if the page is part of a collection.
Title of the page.
Author of the page.
Tags which you provided for your page. Certain artefact tags are also displayed here.
Click the Details button to see on which artefacts you can comment and where there are details available such as metadata or download links.
The Edit button is only visible if you are the page owner or belong to a group of people who can make changes to the page if it is a group, institution, or site page.
Click the More options button to reach lesser used functionality on a page.
Bemerkung
The Edit and More options buttons stay in place with the page and are always available.
On your own pages you can:
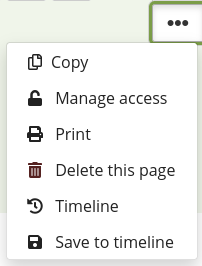
Click the Copy link to copy the page or collection.
Click the Manage access link to change the access permissions for the page or collection.
Click the Print link to open the print dialogue. Using this print functionality, your portfolio page is printed in the current layout, with collapsed blocks or artefacts uncollapsed so you can see their content. Note: Links are not yet active and linked files or embedded media are not accessible.
Click the Delete link to delete your page.
Click the Timeline link to view previous versions of your portfolio. This icon is only visible when you saved your page to your timeline.
Click the Save to timeline link when you want to save a particular state of your page to your timeline so you can go back to it later and compare it to your current state. The comparison would be manual.
As someone viewing another person’s portfolio, you can:

Click the Copy link to copy the page or collection. This option is only available if the portfolio author allowed copying.
Click the Print link to open the print dialogue. Using this print functionality, your portfolio page is printed in the current layout, with collapsed blocks or artefacts uncollapsed so you can see their content easily. Note: Links are not yet active and linked files or embedded media are not accessible.
Click the Reset statement link to have one of the statements you confirmed on the portfolio completion page reset. This option is only available on the portfolio completion page if you confirmed a statement.
Add or remove a page from your watchlist: Click the Add page to watchlist link if you want to be informed when changes are made to the page. When you make changes to the page or a block on the page, a notification is triggered and sent to anyone who is watching the page. This is also the case when you add a new journal entry to a journal that is displayed on your page even when you do not add the entry via the page. If you no longer wish to receive these notifications, remove the page from your watchlist by clicking the link Remove page from watchlist .
Click the Report objectionable material link if a page contains offensive artefacts. You can report them to the administrator and provide an explanation why you think the content is offensive. Once you have reported the material, you see Objectionable material reported instead of Report objectionable material. This option is not available on the portfolio completion and SmartEvidence pages.
Click the Remove access link if you don’t want to have access to the portfolio any more. The portfolio author will receive a notification, and you can provide a reason why you removed yourself from the portfolio. This link is only visible if the portfolio was shared with you directly. You don’t see it if you have access because you are a member of a group, institution, the site, or the portfolio is public.
Click the Timeline link if you want to view an older version of the page. This link is only visible if the portfolio author saved anything to the timeline.
Die Artefakte, die Sie in diese Ansicht eingefügt haben.
Bemerkung
You can click certain artefacts and see more details about them or comment on them without entering the Details mode. These are typically images, files to download, journal entries when in a list.
If you belong to a group that allows the submission of pages for feedback or assessment, you see the group displayed here or can choose it from the drop-down menu and can submit your page directly from here. For more information see the section on feedback for assessment.
Comments from people are displayed at the bottom of the page unless you display them with the comments block elsewhere on the page. Each comment includes:
Profilbilder und Namen der Kommentierenden. Sie sind mit dem Profil verlinkt.
Der Kommentar selber
Das Erstellungsdatum des Kommentars und ggfs. das Datum der letzten Bearbeitung mit Uhrzeit.
Kommentarbewertung.
Irgendwelche Anhänge.
Einen Hinweis falls der Kommentar privat ist. Nur für den Verfasser des Kommentars und den Eigner der Ansicht sichtbar.
Bemerkung
For more information on giving and receiving comments, please see section Feedback.
Die Gesamtzahl der Kommentare wird angezeigt.
You and others can use the Add comment section to leave comments on the page.
Siehe auch
Please refer to the section on making comments to see how that can be done.
Display the last update date and time of the page.
Zeigt an wie oft Ihre Ansicht aufgerufen wurde.
4.1.7.1. Details mode of a page
The Details mode of a page allows you to see more details for an artefact and also add and view comments when the page author allowed that.
When you view a page, click the Details button and every artefact that can have comments and / or has details receives a black bar at the top that you can click to see more details.
This functionality is sticky, meaning that you can refresh the page and continue being in the Details mode without having to click the button again. Also when you view another page, you will stay in this mode until you click the button again.
This facilitates the assessment of portfolios as assessors do not have to click that button all the time but can perform their assessment quickly across multiple portfolios.
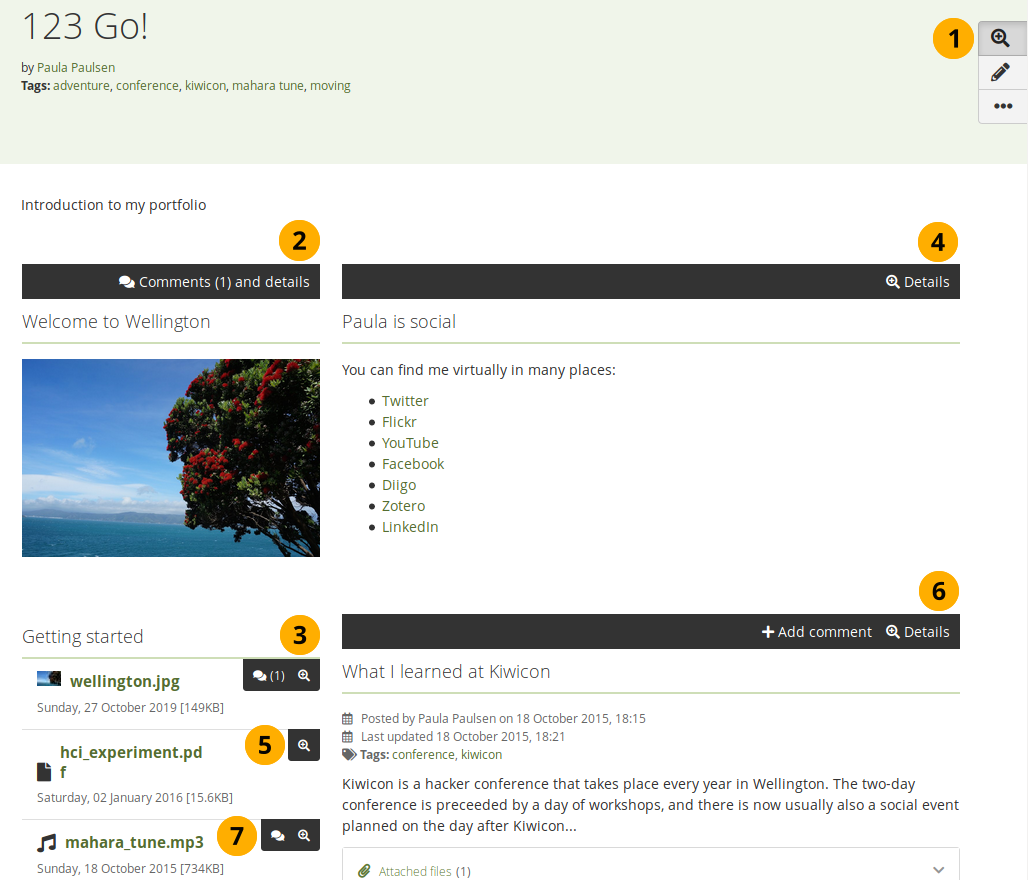
View details of the artefacts on a page
Click the Details button to highlight it. All blocks that contain artefacts where you can view details or comment on receive a black bar.
Bemerkung
The links to comments and details are put into a black bar to make it stand out for commenting and assessment. If you want to view the page without these distractions, you can click the Details button , and they are hidden.
Comments (number) and details: If an artefact in a block already has comments, the number of comments is shown in parentheses. You can click the black bar to open the modal with the details and also see the comments.
When there are multiple artefacts in a block, only the icons for comments and details are displayed
.Details: You see this black bar if you are not allowed to comment on a single-artefact block, but there is metadata available.
In a block with multiple artefacts, only the Details icon is shown on a black button.
Add comment Details: If an artefact allows comments but none have been made yet, you see this black bar.
The comment and details icons are shown in a black button group without the number of comments.
Siehe auch
For details on commenting on artefacts, go to the section ‚View artefact comments‘.
4.1.8. Eine Sammlung hinzufügen
If you want to organize your portfolio into multiple pages so as to find individual sections, you can create a collection that holds multiple pages.
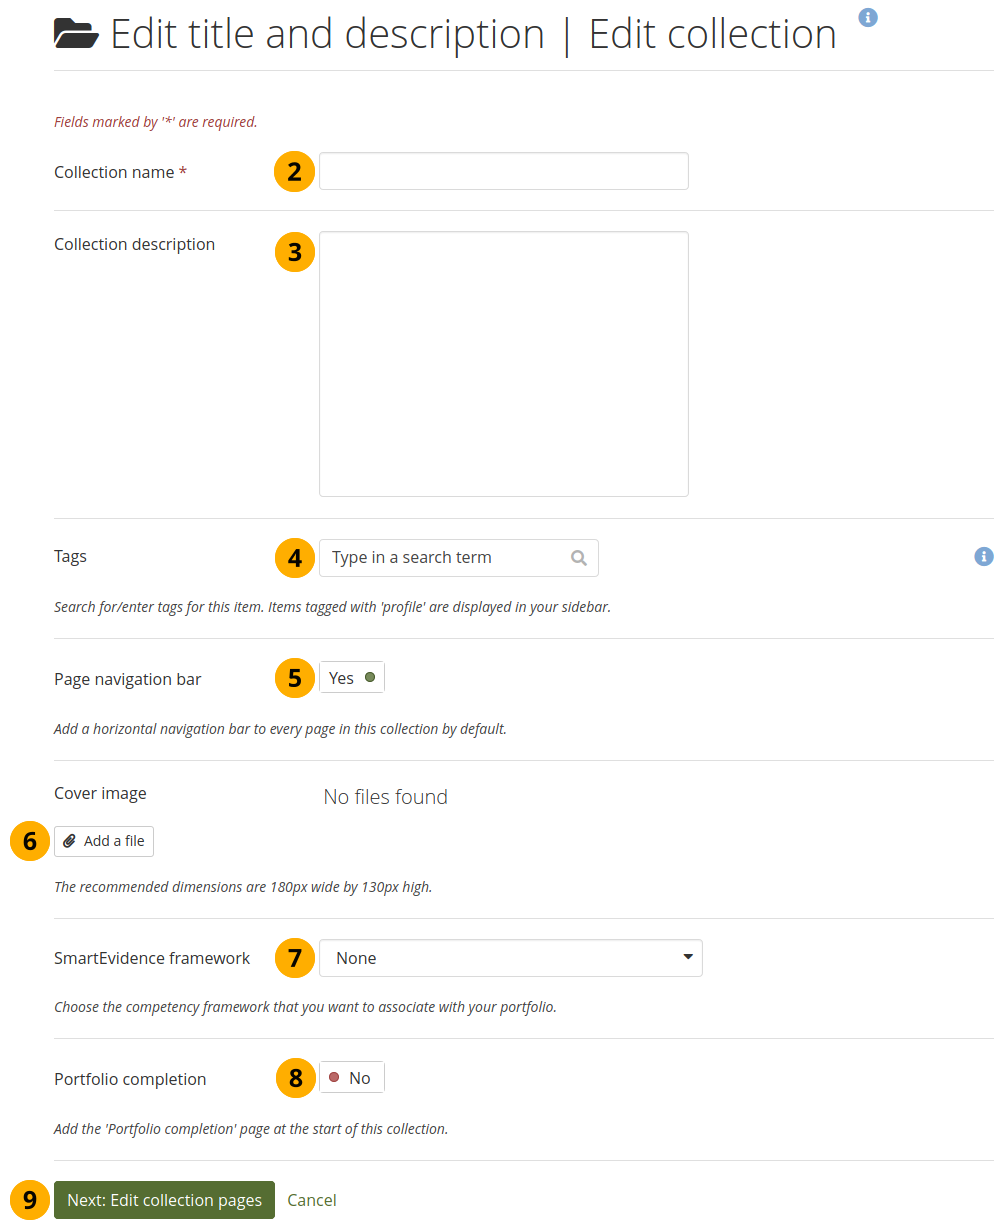
Erstellen Sie eine Sammlung
On the Pages and collections page, click the Add button. In the modal that comes up, click the Collection button. On the next screen…
Sammlungsname: Tragen Sie einen Titel für Ihre Sammlung ein.
Beschreibung der Sammlung: Erstellen Sie eine kurze Beschreibung für Ihre Sammlung. Es steht Ihnen kein Editor, sondern nur ein Texteingabefeld zur Verfügung. Dieser Feldeintrag ist optional.
Tags: Enter tags to find your collection more easily at a later stage. You can choose from your existing tags by starting to type a letter and then selecting the tag you want to use. You can also type a new tag, and it is added to your list of tags.
Ansichtennavigation: Wählen Sie, ob eine Navigation mit Tabs angelegt werden soll oder nicht. Wenn Sie sich entscheiden, dies nicht zu tun, müssen Sie den Navigationsblock einfügen, um von einer Ihrer Ansicht zu den anderen Ansichten zu wechseln.
Cover image: Click the Add a file button to upload or select a picture that you want to display as cover image for your collection when you are on the Pages and Collections overview page. This will help you distinguish between your pages and collections. For best results, your cover image should be 180px wide and 130px high.
Siehe auch
Check out how to add the cover image.
SmartEvidence framework: Select the framework that you want to associate with your collection. You can change the collection as long as you have not put an annotation onto a page within the collection.
Bemerkung
This functionality is available if your institution administrator allowed the use of SmartEvidence.
Portfolio completion: Choose this option if you want to display a progress page showing all sign-offs and verifications for the pages within the collection.
Bemerkung
This functionality is available if your institution administrator turned it on in the institution settings.
Click the Next: Edit collection pages button or click Cancel if you want to abort adding your collection.
4.1.9. Fügen Sie Ansichten zu einer Sammlung hinzu
Im nächsten Schritt nachdem Sie Ihre Sammlung erstellt haben, wählen Sie die Portfolio-Ansichten, die in die Sammlung eingebunden werden sollen. Sie sehen alle verfügbaren Ansichten. Wenn Sie eine Ansicht bereits in eine andere Sammlung eingebunden haben, wird sie hier nicht mehr angezeigt.
Fügen Sie Ansichten zu einer Sammlung hinzu
On Main menu → Create → Pages and collections, click the More options icon for the collection and then the Manage icon . On the next screen…
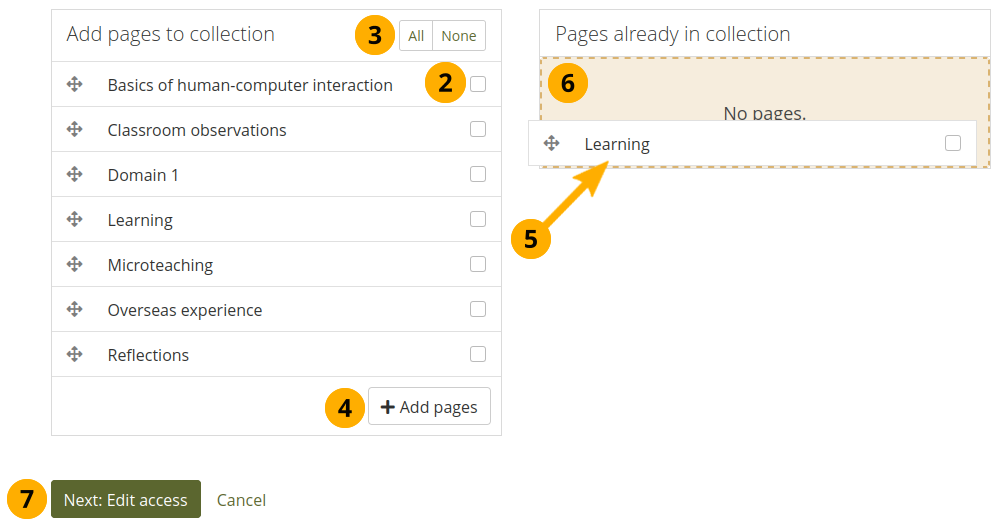
Markieren Sie jede Ansicht, die in die Sammlung aufgenommen werden soll.
Alternativ, können Sie auf den Alle-Link klicken, um zu allen verfügbaren Ansichten der Sammlung zu gelangen oder Sie klicken auf den Keine-Link, um zu Ihrer Auswahl zurückzukehren.
Klicken Sie auf den Ansichten hinzufügen-Button in Ihrer Sammlung.
Wenn Sie nicht alle Ansichten auswählen wollen, können Sie einzelne Ansichten auch über die Drag-and-Drop-Option in eine Sammlung verschieben, indem Sie auf deren Titel klicken und diese dann in den Bereich Ansichten, die sich schon in der Sammlung befinden ziehen.
Eine gepunktete Linie zeigt Ihnen an, wo Sie Ihre Ansicht hinziehen können, sodass Sie bespielsweise die Ansichten sofort in die von Ihnen bevorzugte Reihenfolge in eine Sammlung ziehen können.
Click the Next: Edit access button to finish this step.
4.1.10. Manage pages in a collection
Nachdem Sie Ihre Ansichten zu einer Sammlung hinzugefügt haben, können Sie die Ansichten darin hin-und herschieben.
Verwalten Sie die Ansichten, die in Ihrer Sammlung angezeigt werden
If you are not already in the page management, click the More options icon for the collection and then the Manage icon . On the next screen…
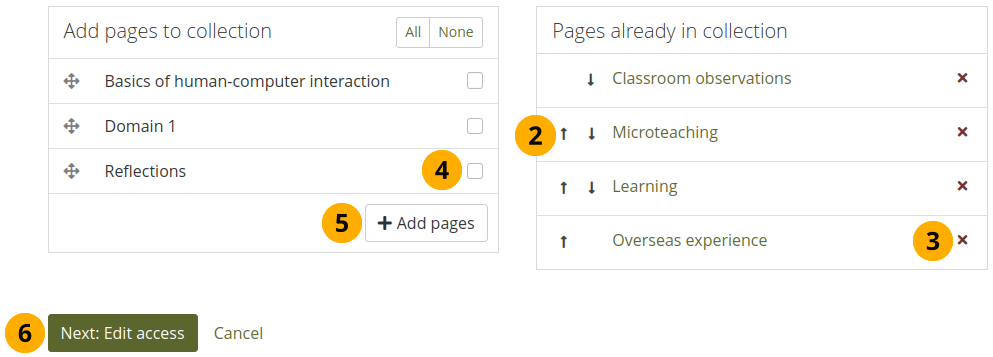
Benutzen Sie die Nach oben und Nach unten -Buttons, um Ihre Ansichten in einer unterschiedlichen Reihenfolge anzuordnen. Alternativ können Sie die Ansichten in der Liste auch über die Drag-and-Drop-Funktion anordnen.
Click the Remove icon to take a page out of a collection. The page itself is not deleted.
Setzen Sie eine Markierung neben jede Ansicht, um sie in einer Sammlung zu den schon vorhandenen hinzuzufügen.
Klicken Sie auf den Ansichten hinzufügen Button, um Ansichten zu Ihrer Sammlung hinzuzufügen und diese dann mit den Nach oben und Nach unten -Buttons anzuordnen. Alternativ können Sie auch die Drag-and-Drop-Funktion nutzen, um die Ansichten in der Liste anzuordnen.
Klicken Sie auf den Fertig-Button.
Wenn Sie Ansichten zu Ihrer Sammlung hinzufügen, die andere Zugangsberechtigungen aufweisen als die zu Ihrer Sammlung, so werden die Zugangsberechtigungen zu den Ansichten auch zu Ihrer Sammlung hinzugefügt. Auf diese Weise sind die Ansichten mit der gleichen Zugangserlaubnis zu der gesamten Sammlung erreichbar, weil diese Teil der Sammlung sind.
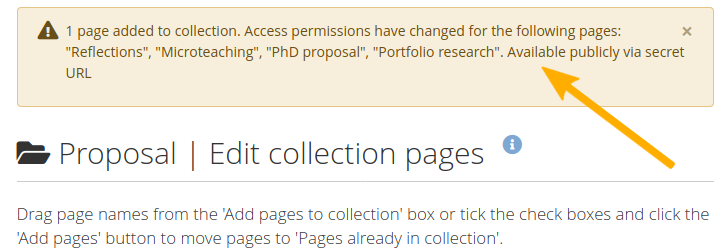
Anmerkung über Veränderungen bei den Berechtigungen
Wenn es eine Änderung bei den Zugangsberechtigungen gibt, wird Ihnen eine Warnung angezeigt.
View your collection by clicking on the collection title or any page that is part of your collection.
Bemerkung
On a mobile device, you can swipe left and right to navigate through a collection when it has the page navigation bar.
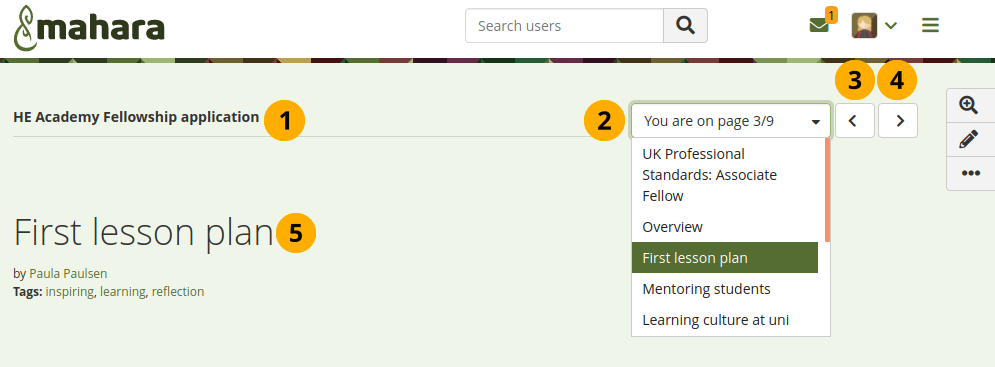
A collection with the page navigation bar
Title of the collection.
Drop-down menu: Select the page to which you want to jump within the collection.
Previous page button to navigate to the previous page.
Next page button to navigate to the next page.
Title of the page you are currently viewing.
4.1.11. Copy a portfolio
You can copy a portfolio by:
Clicking the Copy button when you view a portfolio and are allowed to copy it.
Searching for it.
4.1.11.1. Copy a portfolio directly from its location
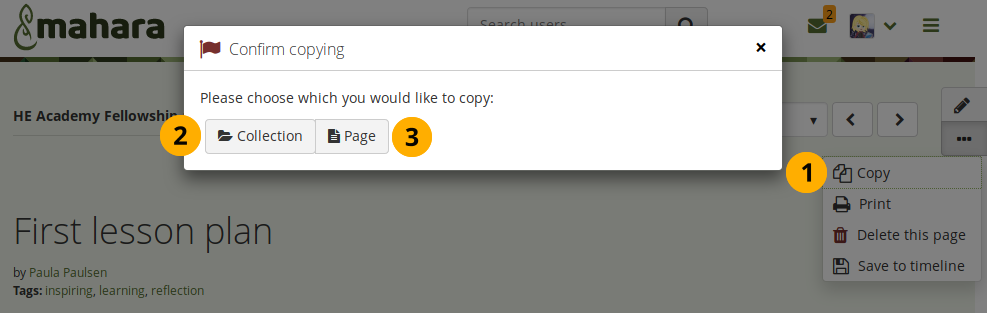
You can copy a page or collection directly when you view it by clicking the Copy icon after clicking the More options button when you see it in the menu.
The option is always available on your own pages and collections as well as on pages and collections owned by others when you have the permission to copy them.
Kopieren Sie eine Ansicht oder eine Sammlung
Click the Copy icon in the More options menu when you want to copy a page or collection that you can duplicate.
If the page is part of a collection, you need to decide in the pop-up window whether you want to copy the entire collection by clicking the Collection button…
Or just the page that you can see currently by clicking the Page button.
Edit the page or collection as you would do any other.
Bemerkung
When you allow copying on public portfolios or portfolios shared via a secret URL, people who are not logged into Mahara can download the portfolio as a Leap2A export.
4.1.11.2. Copy a portfolio by searching for it
You can duplicate your own pages or pages of others if they allowed you to do that.
Copy a portfolio
Click the Copy button under Main menu → Create → Pages and collections. On the next screen…
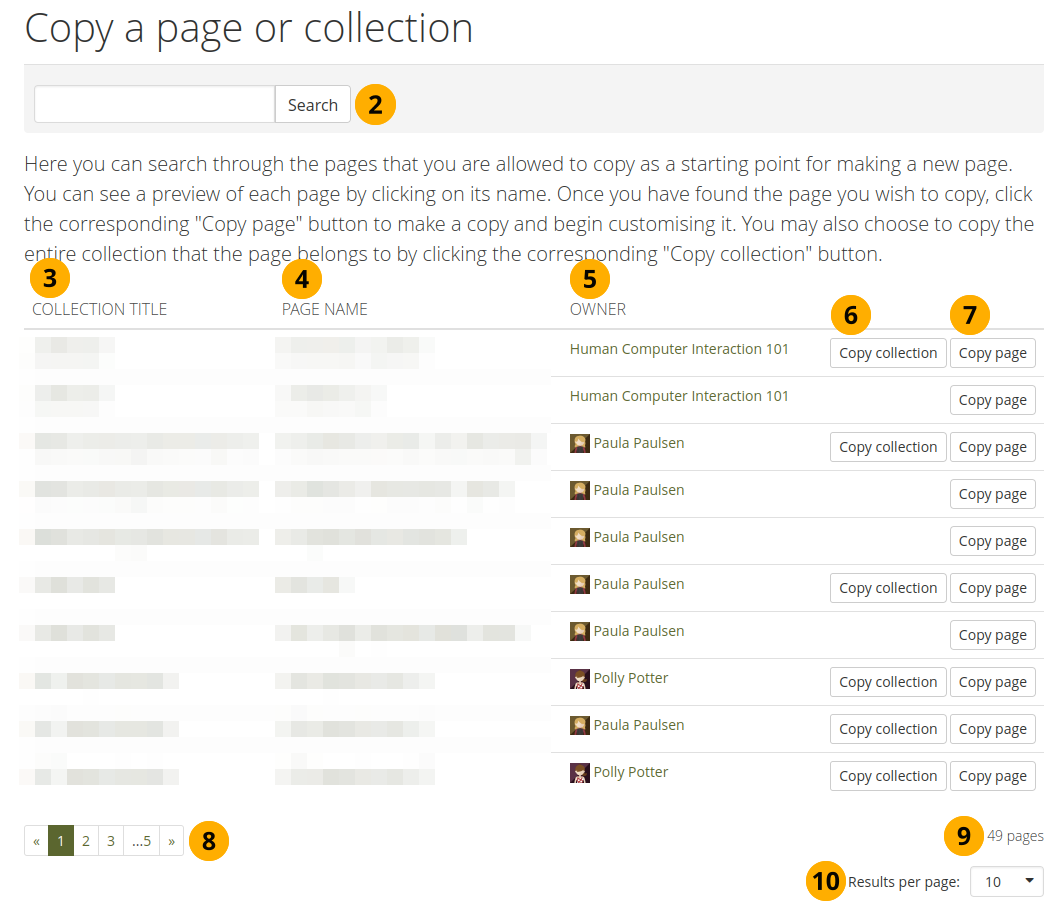
Suche: Wenn es generell sehr viele Ansichten oder Sammlungen gibt aus denen Sie wählen können, suchen Sie hier nach einem Kennwort in der Ansicht, einem Sammlungstitel oder beispielsweise nach dem Namen des Inhabers der Ansicht.
Sammlungstitel: Klicken Sie auf den Titel der Sammlung für eine Vorschau bevor Sie die Sammlung kopieren.
Bemerkung
Results are listed alphabetically according to their collection title.
Ansichtenname: Klicken Sie auf den Titel der Ansicht für eine Vorschau bevor Sie die Ansicht kopieren.
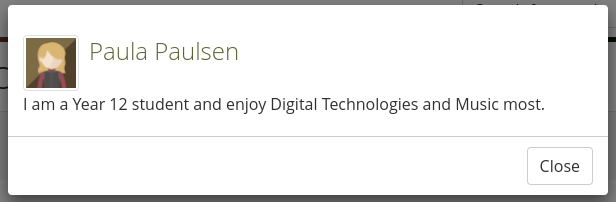
Eigentümer: Klicken Sie auf den Namen des Eigentümers, um ein größeres Profilbild und seine Selbstdarstellung oder um Informationen über eine Gruppe zu sehen, wenn diese der Eigentümer ist.
Klicken Sie auf den Ansicht kopieren-Button, um eine einzelne Ansicht in Ihr Portfolio zu kopieren oder
Klicken Sie auf den Sammlung kopieren-Button, um eine ganze Sammlung mit mehrere Ansichten in Ihr Portfolio zu kopieren. Alle Ansichten der Sammlung werden sodann kopiert.
You can navigate through the list of pages and collections to which you have access.
You see the total number of pages you can copy.
Results per page: Use this drop-down menu to change how many results you want to see per result page.
Edit the portfolio.
Bemerkung
If your copied pages and collections start with ‚Copy of‘, the site administrator decided to have copies renamed.
4.1.12. Give others access to your portfolio
Siehe auch
Please refer to the section on sharing your pages and collections for further information.
4.1.13. Delete a portfolio
You can delete a portfolio at any time unless it has been submitted for feedback.
Warnung
When you delete a page, text blocks and external content blocks are completely deleted. You cannot recover them. There is no revision history. Other artefacts are not deleted because they are stored in other parts of the site.
When you delete a collection, you also delete the pages within it.
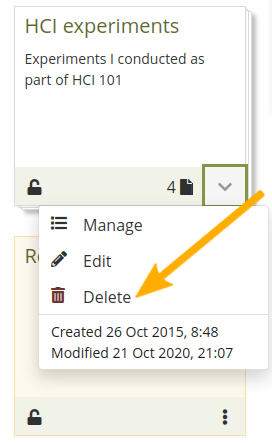
If you are allowed to delete a page, you see the Delete this page option in the More options button when you view your page directly.
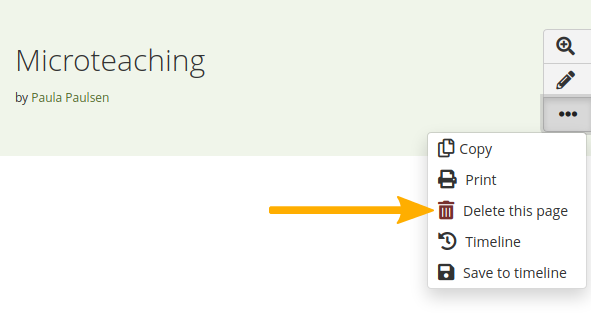
Click the ‚More options‘ button to find the ‚Delete‘ option
If you want to delete an entire collection, you can do so on Main menu → Create → Pages and collections by clicking the More options icon and then the Delete icon .
Delete a collection
When you attempt to delete a page or collection, you get the chance to export the portfolio first so that you can make an archive. If your page is part of a collection, the warning message also contains the title and a link to the collection for you to check whether you really want to delete the page and thus make changes to your collection.
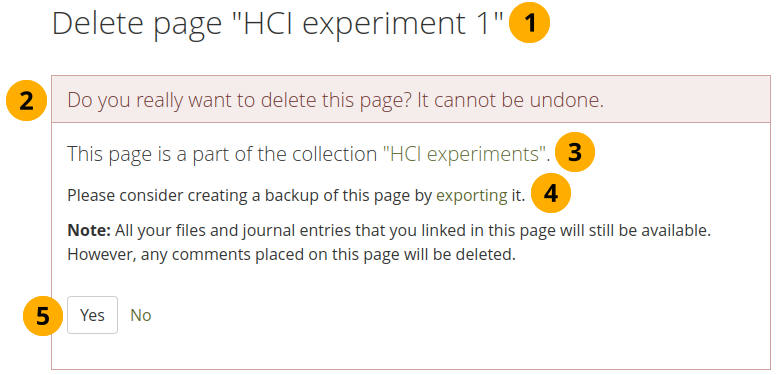
Warnhinweis wenn Sie versuchen eine Ansicht zu löschen, die in einer Sammlung eingesetzt wird.
The title of the portfolio you are about to delete is displayed so you can double-check it is the correct one.
An explicit warning about the deleting of the portfolio is displayed. Deletion cannot be undone.
If you delete a page that is part of a collection, the collection is linked so you can view your collection and double-check deleting of the page is OK.
Before you continue deleting your portfolio, you may want to export it first so you have a copy in case you do need it later again. Click the export link to be taken to the options for the export.
Click the Yes button if you want to continue with the portfolio deletion or No if you want to keep it.
The screen for deleting a collection looks similar.
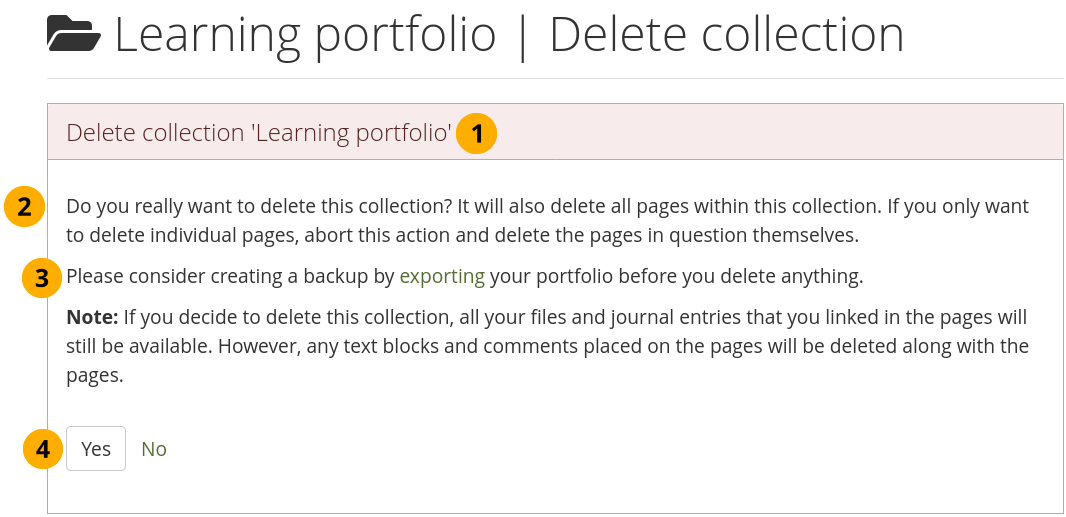
Warning when you attempt to delete a collection
The title of the portfolio you are about to delete is displayed so you can double-check it is the correct one.
An explicit warning about the deleting of the portfolio is displayed. Deletion cannot be undone.
Before you continue deleting your portfolio, you may want to export it first so you have a copy in case you do need it later again. Click the export link to be taken to the options for the export.
Click the Yes button if you want to continue with the portfolio deletion or No if you want to keep it.
4.1.14. Timeline of a page’s development
Warnung
This feature is experimental.
Portfolios often show progress over time. However, what did a particular portfolio page look like at the start of the development process, a month ago or two days ago? The timeline makes those changes over time visible and allows the viewer to go back in time and look at an old version of the portfolio page.
Bemerkung
Versions are not saved to the timeline automatically so as not to overload it with tiny changes in rapid succession. You can decide when you want to save a version of your portfolio to your timeline.
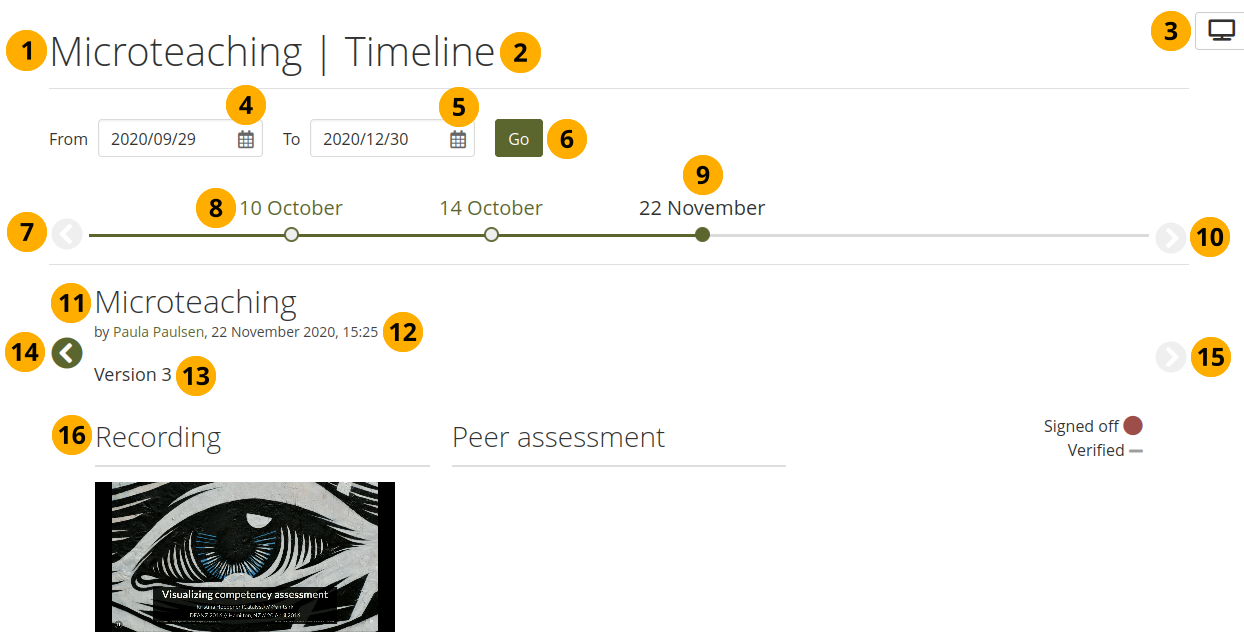
Jump between old versions of a portfolio
After you clicked the Timeline link on a page that has a timeline, you can see the page title.
The word ‚Timeline‘ indicates that you are in the timeline view of the page.
You can always return to the live view of the page by clicking the Display page button .
From: Choose a starting date for the first version that you want to see.
To: Choose an end date. The default date is the one is tomorrow’s date so that any version saved to the timeline today are still displayed.
If there is no previous version, the Previous version button is greyed out .
The dates for which timeline versions are available.
The date of the active version that you are viewing is highlighted.
Click the Next version button to scroll to later versions of the page.
The page title is shown.
The date and time when the version was saved is displayed.
The version number is shown.
Click the Go to the previous version button to go to the previous version of the portfolio.
Click the Go to the next version button to advance to the next version.
The content of the page is displayed as it appeared in that version.