8.3. Utilisateurs
Avec le menu Utilisateurs de l’administration du site vous pouvez :
- rechercher des utilisateurs
- modifier les préfrences pour un ou plusieurs utilisateurs
- suspendre et supprimer des utilisateurs
- promouvoir des utilisateurs au rôle d’administrateurs ou de membres du personnel
- contrôler les préférences de notification
- add users manually or by CSV
8.3.1. Recherche d’utilisateurs
Les administrateurs du site peuvent rechercher n’importe quel utilisateur sur l’entier du site. Vous pouvez rechercher un utilisateur en connaissant son
- prénom
- nom de famille
- nom d’affichage
- nom d’utilisateur
- adresse de courrier électronique
Note
The display name is not shown in the user list. That will be a feature of Mahara 1.5.
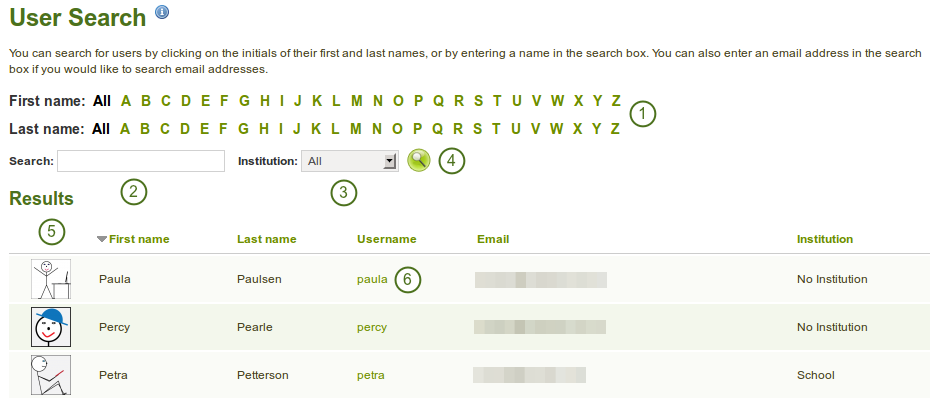
Recherche d’utilisateurs
Vous pouvez combiner la recherche avec des critères pour filtrer les résultats. Attention en utilisant trop de critères vous risquez de n’obtenir aucun résultat.
- Vous pouvez activer le filtre sur le nom ou le prénom, en cliquant sur les lettres en haut de l’écran.
- Type the name, display name, username or email address or any partial thereof you wish to search for in the search field.
- Sélectionnez depuis le menu déroulant l’institution dans laquelle vous désirez effectuer votre recherche d’utilisateurs.
- Click the Search button
 to start searching.
 - Affichez vos résultats. Le tri est effectué par défaut de manière alphabétique ascendante sur le prénom. Toutefois, vous pouvez changer le critère de tri, en cliquant sur la rubrique de votre choix; et l’ordre de tri en cliquant sur le triangle, qui permet passer du tri ascendant au tri descendant.
- Cliquez sur le nom d’utilisateur de l’utilisateur pour lequel vous désirez effectuer des actions supplémentaires.
8.3.2. Réglages compte
On the Account settings page of a user in the administration area, you can perform a number of actions to manage the user’s account. However, you cannot change personal information about this user, e.g. name, email, from this page. This can only be done in the Content area of the user’s account.
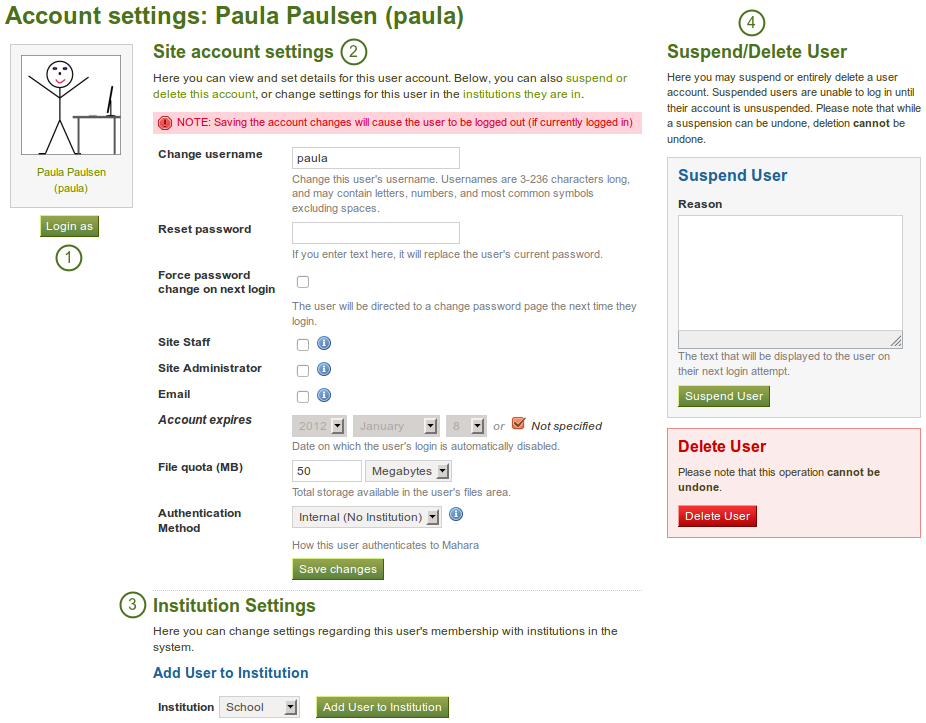
Overview of the user account settings page
- Se connecter sour le nom
- Modifier les réglages globaux du compte
- Modifier les paramètres des institution
- Suspend and / or delete this user
8.3.2.1. Se connecter comme
As administrator you have the power to log in as any user that you manage ans masquerade as them. If you are a site administrator, you can log in as any user while institution administrators can only perform this action for any user who is in their user management.
It is a great function for troubleshooting a user account because you see everything as the user would without having to know his password.
Avertissement
This function can easily be misused by an administrator because he can make changes to the user’s portfolio and artefacts as well as participate in groups while logged in as that user. Users should be aware of this function and that an administrator can enter their account.
La charte d’utilisation des sites utilisant Mahara devrait clairement faire état de cette possibilité, ainsi que de fixer le cadre éthique et légal de l’usage de cette fonction. Il est indispensable que le travail collaboratif ainsi que celui qui est effectué dans le cadre d’un portfolio personnel soient protégés. Il importe que, dans l’idéal, seul un nombre limité de personnes aient les droits d’administration au sein d’une institution et qu’une seule personne soit administrateur du site.
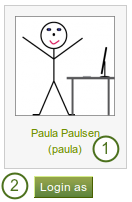
Login as another user
- Click on the user’s name to go to his profile page.
- Cliquez sur le bouton Se connecter comme pour devenir cet utilisateur. Vous verrez alors une barre rouge en haut de l’écran qui vous signalera pendant toute la durée de cette connexion sous une autre identité que vous n’êtes plus entrain de naviguer à travers le site comme administrateur mais comme la personne dont vous avez pris l’identité.
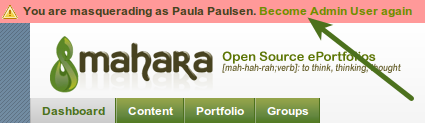
Stop masquerading as another user
When you want to return to your own account again, click the Become [your user name] again link at the top of the browser window.
8.3.2.2. Modifier les réglages globaux du compte
Vous pouvez afficher et régler un grand nombre de préférences globales dans le compte d’un utilisateur.
Note
En fonction de la méthode d’authentification associée à cet utilisateur, vous ne pourrez peut-être pas modifier tous les paramètres décrits ci-dessous.
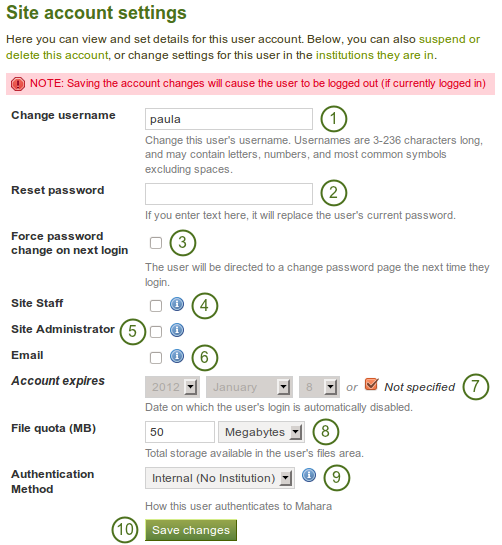
Site account settings of a user
- Changer le nom d’utilisateur : Donnez un nom d’utilisateur différent à ce compte. Cette rubrique n’est pas modifiable si le compte est géré par une méthode d’authentification externe à Mahara.
- Réinitialiser mot de passe : Donnez un nouveau mot de passe pour ce compte. Cette rubrique n’est pas modifiable si le compte est géré par une méthode d’authentification externe à Mahara.
- Force password change on next login: Check this box if the user shall change his password when he next logs in. This field is not available when the account is managed by an external authentication method.
- Site staff: Check this box if the user shall be able to create controlled groups.
- Site administrator: Check this box if the user shall have full administrative rights.
- Email: Check this box to disable the sending of emails for this user. If email is disabled notifications and messages can only be viewed in the internal inbox. Depending on your setup, if emails are bounced back to the sender, then email may be automatically disabled.
- Échéance du compte : Sélectionnez une date à laquelle le compte de cet utilisateur sera automatiquement désactivé. La valeur par défaut et que le compte ne sera jamais désactivé. La date du jour est toujours affichée comme option possible, mais en grisé, donc inactive. Vous pouvez décider d’une date automatique ou d’une durée maximale pour tous les comptes sur votre plateforme en vous rendant dans la zone des Options comptes utilisateurs de la page des Réglages du site.
- File quota (MB): Change the storage allowance for a user’s personal files area. The default value as set in the files configuration in the plugin administration.
- Méthode d’authentification : Sélectionnez la méthode d’authentification que cet utilisateur doit utiliser pour se connecter à votre Mahara. Les méthodes d’authentification peuvent être configurées dans la page d”administration de l’institution. En fonction de la méthode d’authentification que vous choisissez, vous devez indiquer un nom d’utilisateur distant pour faire le lien entre ce compte d’utilisateur et celui de la plateforme d’authentification.
- Cliquez sur le bouton Enregistrer lorsque vous avez terminé de modifier les paramètres globaux.
Avertissement
Quand l’adresse de courriel est désactivée, les utilisateurs ne peuvent pas demander de réinitialiser leur mot de passe, puisqu’aucun message électronique ne peut leur être envoyé.
8.3.2.3. Modifier les paramètres des institution
Vous pouvez afficher et modifier les paramètres pour chaque institution à laquelle appartient l’utilisateur. En fonction des paramètres fixés dans les paramètres des institutions du site, un utilisateur peut appartenir à plus d’une institution.
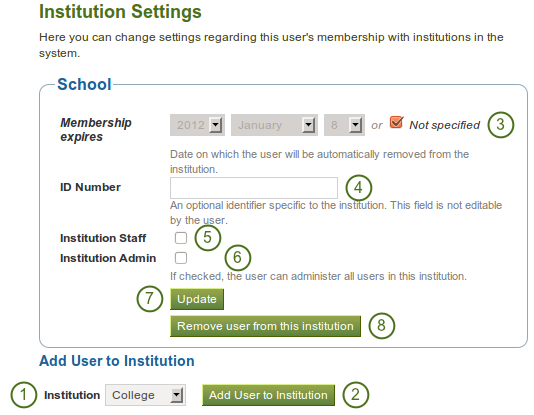
Institution settings for a user
- Choose the institution from the drop-down menu to which you want to add this user.
- Click the Add User to Institution button to make him a member of this institution.
- Échéance de l’affiliation : Si vous le désirez, vous pouvez fixer une date après laquelle l’utilisateur perdra automatiquement son appartenance à l’institution. Si vous choisissez l’option Non spécifié, l’utilisateur restera à jamais membre de l’institution.
- Idendifiant ID : Vous pouvez donner un numéro d’identifiant à cet utilisateur dans le cadre de cette institution. Cette rubrique ne peut pas être modifiée par l’utilisateur.
- Institution staff: Check this box if you want to give this user staff rights in this institution. This will allow him to create controlled groups.
- Institution admin: Check this box if you want to make this user an administrator of this institution. This will allow him to manage all users in this institution.
- Cliquez sur le bouton Mettre à jour pour enregistrer vos modifications.
- Click the Remove user from this institution button to disassociate this user from this institution. The user will stay in any other institution that he may be in, and he will also keep his account no matter whether he is in an institution or not.
8.3.2.4. Suspendre l’utilisateur
Les motifs qui poussent un administrateur à suspendre un utilisateurs comprennent généralement le non respect des conditions d’utilisations des services ou des comportements inadaptés pendant leur usages. Les utilisateurs suspendus ne peuvent plus se connecter à vos services mais leurs données restent toutefois stockées sur le serveur.
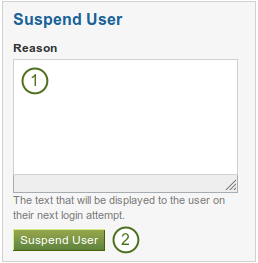
Suspend a user
- Il est recommander, dans un soucis de transparence, d’indiquer à l’utilisateur suspendu la raison de cette suspension. Cela permet aussi, lorsqu’il y a plusieurs administrateurs qui gèrent la plateforme, de se rappeler de ces raisons lorsqu’il convient de retraiter le cas de l’utilisateur en question.
- Click the Suspend User button to disallow the user from logging in.
When a user has been suspended, the following suspension message appears on his account settings stating the reason for the suspension and giving the administrators the possibility to unsuspend the user by clicking on the Unsuspend User button.

Suspension notice on the account settings page
When the user tries to log in, he will see the suspension message and the reason. He can then contact an administrator via the « Contact Us » form for further action.

Suspended user tries to log in and gets suspension message
8.3.2.5. Supprimer l´utilisateur
A user can delete his own account from Mahara on his account settings if he is allowed to by his institution. Site administrators can also delete user accounts at any time.
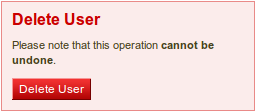
Delete a user account
Click the Delete User button to delete this user account permanently. This action cannot be undone. As this is a permanent action, you see a confirmation pop-up window that you will have to acknowledge.
Avertissement
When you delete a user account, all personal data is wiped from the system. This applies to everything that is in a user’s Content and Portfolio area. This action cannot be undone. His contributions in groups, e.g. forum messages, uploaded files and pages created in a group, are still available, but are made anonymous by changing the name the « Deleted user » as author where an author is shown.
Note
If an account was deleted by accident - either by a user or by an administrator - swift action may result in recovery of (most of) the data from a backup file. This requires access to the server’s backups and the backend of Mahara. More information is available on the wiki.
8.3.3. Suspended users
A list of all suspended users is available in the sub-menu Suspended users. Here you can unsuspend or delete them.

List of all suspended users
- Sélectionnez le(s) utilisateur(s) pour le ou lesquels vous désirez effectuer la même action.
- Click the Unsuspend Users button to reinstate the accounts for all selected users.
- Click the Delete Users button to delete all selected users in bulk. This account cannot be undone and all personal information of these users will be deleted (see delete user).
8.3.4. Staff users
Sur cette page vous pouvez décider quels utilisateurs vous désirez intégrer dans le personnel du site. Les membres potentiels – en fait tous les utilisateurs du site – sont listés dans la colonne de gauche, alors que celle de droite vous informe des utilisateurs qui appartiennent déjà au groupe du personnel du site.
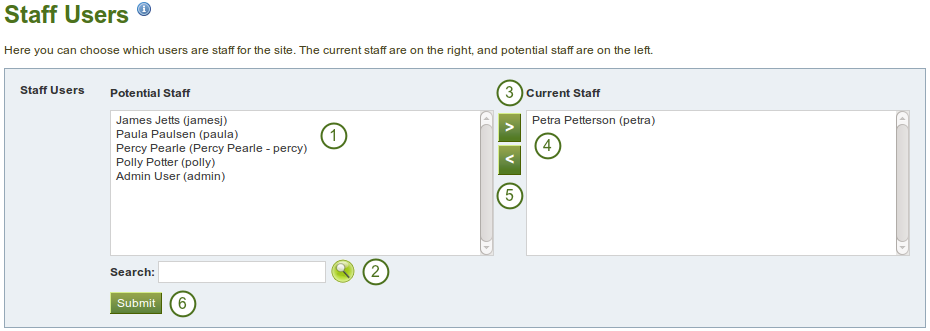
Give site staff rights
- From the list under Potential Staff, select the users you wish to make site staff. You can also select multiple users at once using Ctrl and Shift click.
- If you have too many users on your site and you cannot see / find the user you want, you can search for him in the Search box.
- Add the potential staff members to the right-hand side - Current Staff - by clicking on the right-arrow button
 .
. - If you want to remove an existing or accidentally added site staff member, you can remove him from the list on the right-hand side by clicking on him.
- Then click on the left-arrow button
 , and he is removed from the list.
 - Lorsque vous avez sélectionné tous les membres que vous désirez placer dans la liste des membres du personnel du site, cliquez sur le bouton Envoyer.
8.3.5. Administrateurs du site
Site administrators have powerful rights on Mahara. They can make far-reaching changes and also log in as other users. Be careful whom you give these rights. One site administrator is needed for each site. The total number of site administrators should be kept small.
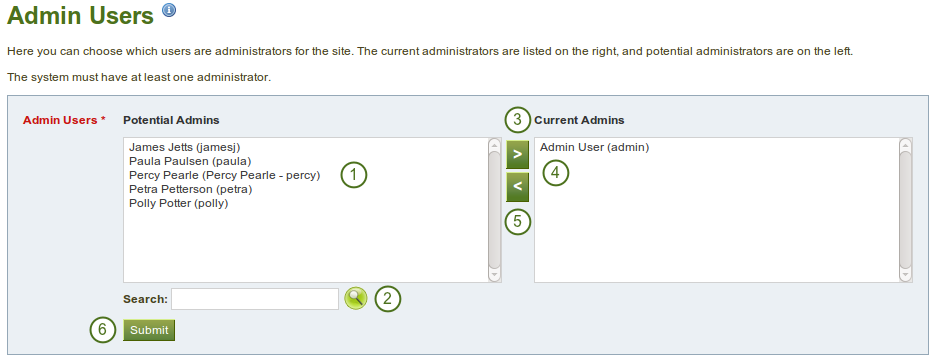
Give site admin rights
- From the list under Potential Admins, select the users you wish to make site administrators. You can also select multiple users at once using Ctrl and Shift click.
- If you have too many users on your site and you cannot see / find the user you want, you can search for him in the Search box.
- Ajoutez les utilisateurs sélectionnés dans la colonne de droite – Administrateurs actuels – en cliquant sur le bouton Flèche droite .
- If you want to remove an existing or accidentally added site admin, you can remove him from the list on the right-hand side by clicking on him.
- Then click on the left-arrow button , and he is removed from the list.
- Lorsque vous avez sélectionné tous les utilisateurs auxquels vous voulez accorder les droits d’administration du site, cliquez sur le bouton Envoyer
8.3.6. Notifications administrateurs
The Admin Notifications page lists all users with institution and site admin access on your site. It shows their selected notification preferences for all admin notifications. There should be at least one administrator receiving each type of message generated. Admin notifications are:
- Demandes de contact
- Contenu discutable
- Dépôts répétés de fichiers infectés
- Fichiers acceptés après nettoyage anti-virus

Overview of the admin notification types
8.3.7. Ajouter un utilisateur
Vous pouvez ajouter des utilisateurs à votre site en créer leur compte manuellement, l’un après l’autre.
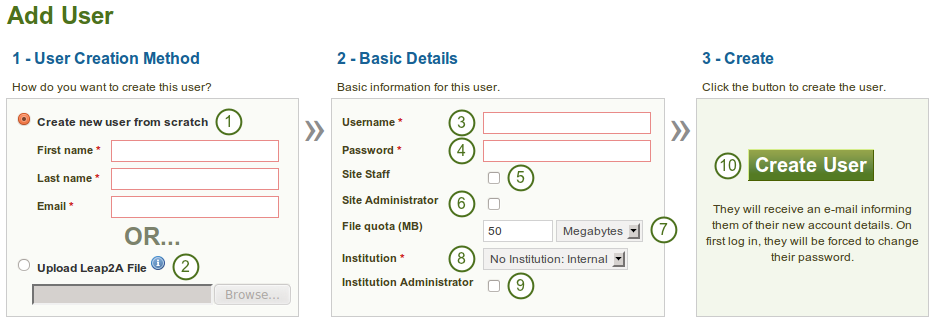
Add a user manually
- Cliquez sur le bouton radio Créer un nouvel utilisateur si vous désirez créer un nouveau compte vide pour un utilisateur. Indiquez alors le prénom, le nom de famille et l’adresse courriel de ce dernier.
- Click the Upload Leap2A File radio button if you want to import a user from another Mahara instance or a system that supports the Leap2A standard. Such a user could have exported his portfolio from another Mahara instance.
- Give the new user a username. The username may contain letters, numbers and most common symbols. It must be from 3 to 236 characters in length. Spaces are not allowed.
- Choose a password for the account. The password must be at least six characters long and contain at least one digit and two letters.
- Check this box if the new user should have site staff rights.
- Check this box if the new user should have site administrator rights.
- Review the allocated file quota. You may change it here for this user.
- Choose the institution of which the user should be a member.
- Check this box if the new user should have institution administrator rights in the chosen institution.
- Click the Create User account button.
- The user will receive an email with his account details.
Note
You can change the settings under Basic Details on the account settings page.
8.3.8. Add users by CSV
You can use this function to upload new users in bulk via a csv file (comma-separated file). The first row of your csv file should specify the format of your data. For example, it should look like this:
username,password,email,firstname,lastname,studentid
This row must include:
- nom d’utilisateur
- mot de passe
- courriel
- prénom
- nom
Le fichier doit aussi comprendre les informations des rubriques qui ont été marquées comme rubriques obligatoires pour tous les utilisateurs, et aussi pour toutes les rubriques qui sont marquées comme rubriques verrouillées pour l’institution dans laquelle vous ajoutez les utilisateurs.
All other fields are optional. This is the full list of fields that you can add in addition to your csv file upload
- studentid - Numéro de l’étudiant qui est affiché dans le profil
- preferredname - Nom d’affichage
- introduction - Le texte d’introduction affiché dans le profil
- officialwebsite - Site web officiel ou professionnel
- personalwebsite - Site web personnel
- blogaddress - URL vers les blogue de l’utilisateur
- address - Adresse postale de l’utilisateur
- town - Localité
- city - Ville
- country - Pays
- homenumber - Numéro de téléphone privé
- businessnumber - Numéro de téléphone professionel
- mobilenumber - Numéro de téléphone mobile
- faxnumber - Numéro de fax
- icqnumber - Nom d’utilisateur sur ICQ
- msnnumber - Nom d’utilisateur sur MSN
- aimscreenname - Nom d’utilisateur sur AIM
- yahoochat - Nom d’utilisateur sur Yahoo Chat
- skypeusername - Identifiant Skype
- jabberusername - Identifiant Jabber
- occupation - Emploi actuel, affichée dans le profil
- industry - Secteur d’activité, affiché dans le profil
- maildisabled - Option pour stopper l’envoi de courriel par Mahara
- remoteuser - Nom d’utilisateur sur la plateforme d’authentificaiton distante
When you have created your csv file, you are ready to upload it.
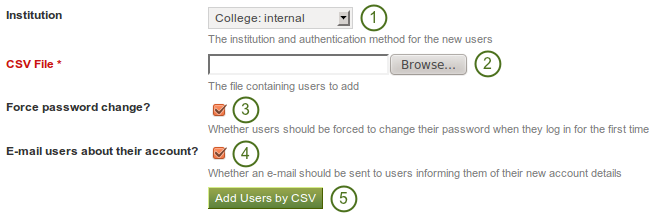
Add users by csv file
- Institution: Choose the institution and the authentication method for the user accounts that you upload. You cannot change the authentication method later on in bulk, but only for each user individually.
- CVS file: You must upload a csv file by clicking on the Browse button and then selecting it from the files on your computer.
- Force password change? If you select this option, users need to change their password before they can log in for the first time.
- Email users about their account? If you select this option, users will receive an email with their account information. This is in particular good for internal accounts. For user accounts that are managed for example by SSO with Moodle or through LDAP, you do not have to select this option because the users should already know their login information.
- Click the Add Users by CSV button to upload the users.
Note
En fonction de la configuration de votre serveur ou de la taille de votre installation, vous ne pourrez peut-être pas créer/mettre à jour tous les utilisateurs à la fois. Si cela devait vous arriver, travaillez alors avec plusieurs fichiers CSV contenant au maximum 100 lignes de création ou modifications de comptes utilisateur.