11.10. Web services
Administration menu → Web services
Bemerkung
Web Services stehen nur für Site-Administratoren zur Verfügung
WebServices ermöglichen Ihnen Mahara mit anderen Anwendungen zu verknüpfen, die ebenfalls über WebServices/APIs verfügen. Es kann sein, dass Sie zunächst einige Konfigurationen vornehmen müssen oder im Einzelfall auch neue WebServices entwickeln müssen, um die gewünschte Verbindung zu realisieren. Die Mahara WebServices sind ein Framework, dass die Entwicklung weiterer APIs erlaubt durch die Definiton einer Funktion für die erwünschte Aktion und der zugehörigen Interface-Definition.
In order to use web services, your site must use a SSL certificate. When your site is not in production mode, you can test web services without SSL.
11.10.1. Konfiguration
Administration menu → Web services → Configuration
Auf dieser Seite können Sie verschiedene Web-Service-Regeln anlegen, aktivieren oder deaktivieren.
11.10.1.1. Enable web service functionality
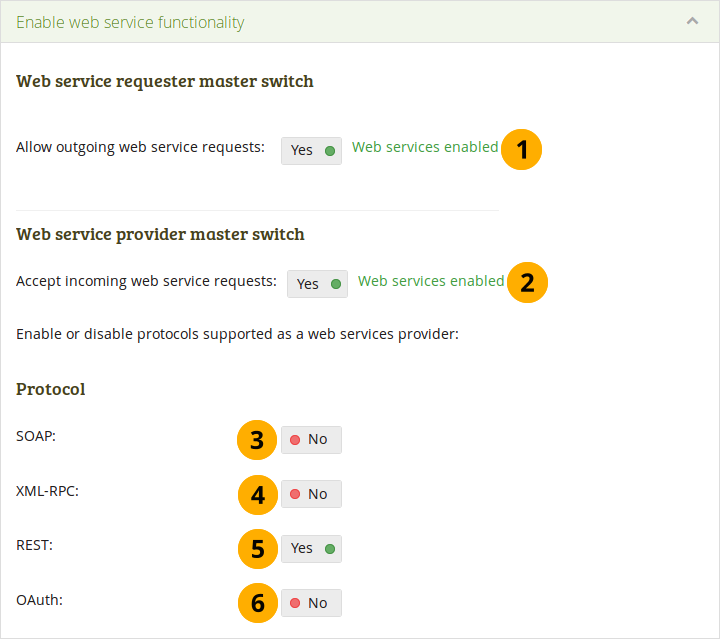
You can enable web services globally and then configure protocols individually to suit your needs. Once a protocol is enabled, it can be used for all functions, accounts, and tokens.
Switch web services and individual protocols on and off
Allow outgoing web service requests: If set to ‚Yes‘, web services are available to be used on your site for outgoing calls.
Accept incoming web service requests: If set to ‚Yes‘, web services are available to be used on your site for incoming calls, for example via Mahara Mobile.
SOAP: Erlaubt dieses Protokoll: Simple Object Access Protocol.
XML-RPC: Set this to ‚Yes‘ if you want to make remote procedure calls to XML content. This protocol is used by MNet.
Bemerkung
Solange MNet von Mahara unterstützt wird, können Sie dies für die Konfiguration Ihrer Verbindung zu Moodle nutzen.
REST: Allow the REpresentational State Transfer protocol by switching this setting to ‚Yes‘. The REST interface also supports JSON authentication.
OAuth: If you want to use the OAuth (Open Authentication) protocol, switch this setting to ‚Yes‘.
Bemerkung
If you disable web services, any activated individual protocols under “Protocol” are turned off and would need to be enabled manually again when you switch web services on again.
11.10.1.2. Netzwerkzertifikate
In this section, the public key of your Mahara certicate that is created on Administration menu → Configure site → Networking is displayed for convenience.
11.10.1.3. Verwalten Sie die Service-Gruppen
Service groups are the units of allocation of access to an account (authentication) or user tokens. They are a collection of functions. Mahara already comes with a series of service groups and functions that you can configure. More service groups can be added.
Übersicht über die verfügbaren Servicegruppen und ihre Grundeinstellungen
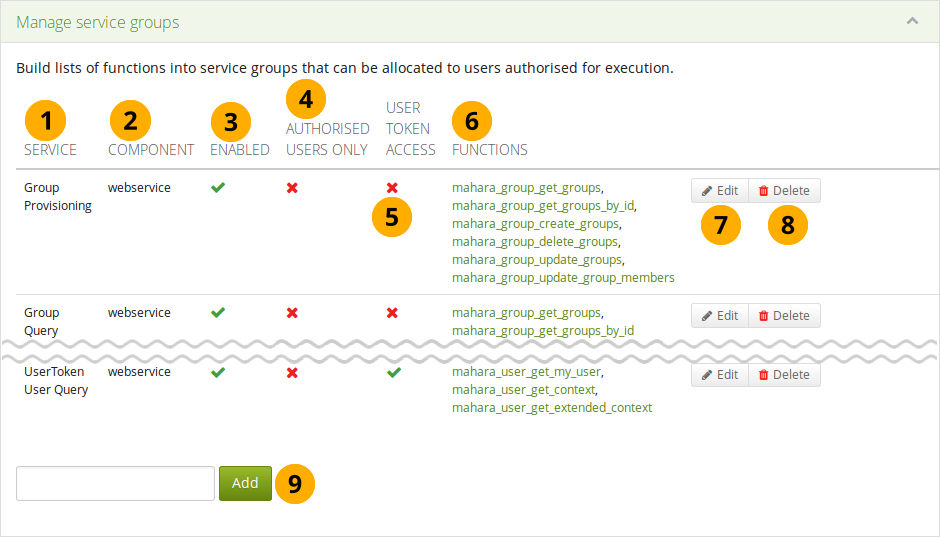
Service: Servicegruppe mit mehreren zugeordneten Funktionen, die an- oder abgeschaltet werden kann.
Component: The area through which a service group is available. It is generally ‚webservice‘.
Aktiviert: Sie sehen das Aktiviert-Icon wenn eine Servicegruppe aktiv ist. Andernfalls wird das Deaktiviert-Icon gezeigt .
Nur für autorisierte Nutzer: Wenn eine Servicegruppe für Nutzer verwandt wird, die mit Nutzerkennwort und Passwort eingeloggt werden sehen sie das Aktiviert-Icon. Falls es für diese Nutzer nicht verfügbar ist wird das Deaktiviert-Icon angezeigt
Nutzer-Token- Zugriff*: Sie sehen das Aktiviert-Icon wenn der Zugriff auf die Funktion einen Nutzer-Token erfordert. Das Deaktiviert-Icon ist sichtbar wenn der Zugriff über einen Nutzer-Token nicht zugelassen ist.
Funktionen: Dies ist eine Liste von Funktionen, die mit dieser Servicegruppe verbunden sind.
Bemerkung
Sie können die Funktionen anklicken und damit die Dokumentation des entsprechenden WebServices aufrufen. Diese enthält weitere Beschreibungen der Funktions API, Eingabe- und Ausgabe-Parameter und Fehlercode.
Klicken Sie auf den Bearbeiten-Button um Änderungen an der Servicegruppe vorzunehmen.
Klicken Sie auf den Löschen-Button , um die Servicegruppe zu löschen.
Bemerkung
In einigen Situationen ist es nicht sinnvoll eine Servicegruppe ganz zu löschen. Wenn Sie sie evtl. später bearbeiten oder erweitern wollen, sollten Sie sie nur deaktivieren.
Klicken Sie auf den Hinzufügen-Button, um eine neue Servicegruppe anzulegen. Die neue Gruppe wird in der Liste aufgenommen. Über den Bearbeiten-Button können sie ihn konfigurieren.
Nachdem Sie eine Servicegruppe zum Bearbeiten ausgewählt haben sehen Sie diese Seite.
Einstellungen einer Servicegruppe bearbeiten
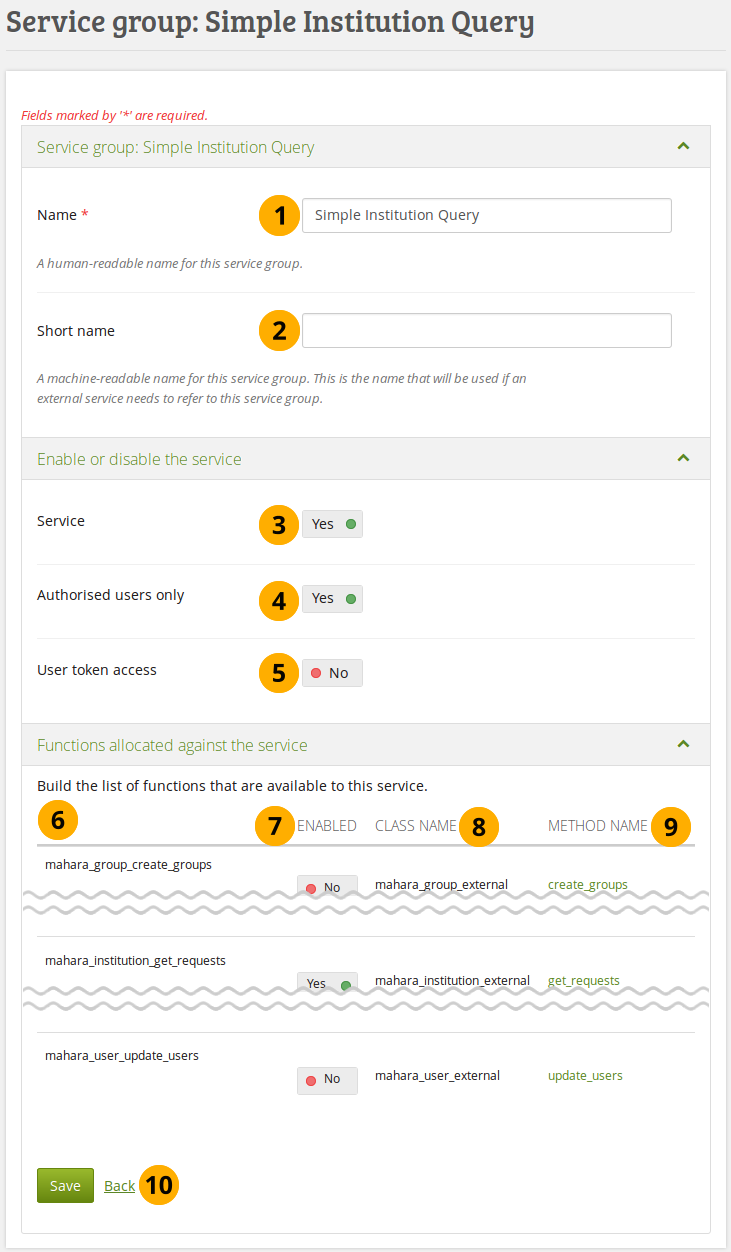
Name: Name of the service group
Short name: This is a short name for the service that is required by applications that connect to Mahara in order to refer to this service.
Service: Set this switch to ‚Yes‘ if you want to use this service group. You can tweak the individual functions below.
Authorised users only: Set this switch to ‚Yes‘ if only people with a username and password should be affected by this service group.
User token access: Set this switch to ‚Yes‘ if you want users to have individual tokens in order to access certain functionalities.
Bemerkung
Der Nutzer-Token-Zugriff gibt der gesamten Mahara-Nutzerbasis die Möglichkeit die API zu nutzen. Um dies zu kontrollieren sollte der Zugriff auf Servicegruppen beschränkt werden, den Zugriff wiederum bestimmten Nutzern vorbehalten wird. Ein Beispiel: mahara_user_get_my_user für die Details eines Nutzeraccounts.
Der Name der Funktion.
Aktiviert: Die Einstellung aktiviert bzw. deaktiviert den Gebrauch der Funktion.
Class-Name: Name der Class, die Teil der Funktion ist.
Methoden-Name: Name der aufgerufenen Methode. Der Link bringt Sie zur Dokumentation für die jeweilige Methode.
Click the Save button when you are finished making your changes, or click Back if you want to cancel the changes.
11.10.1.4. Verwalten Sie den Zugangsservice zu Token
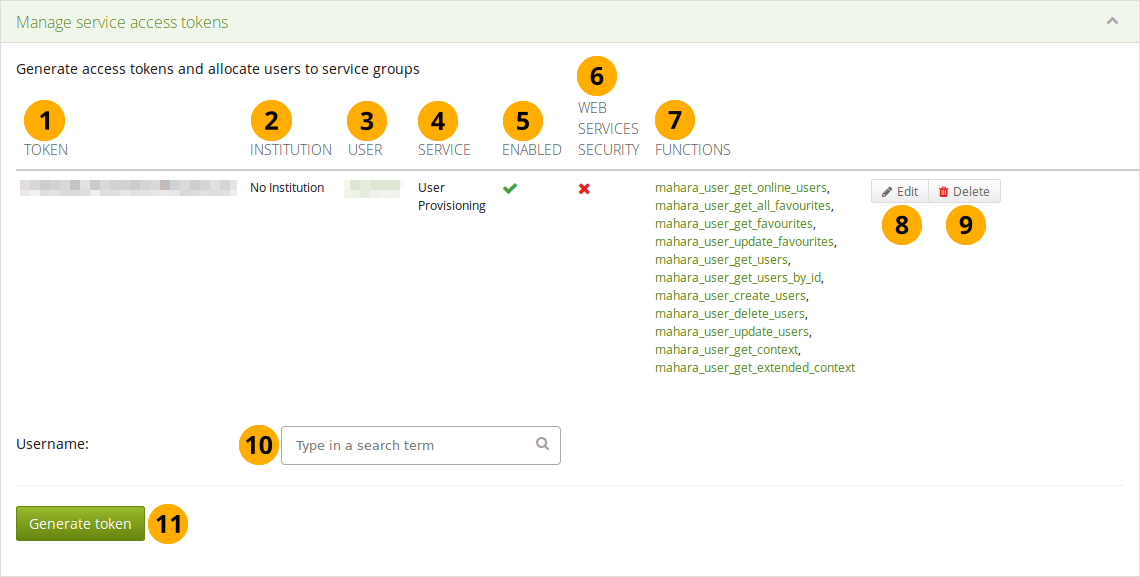
You can generate access tokens for individual accounts and associate service groups to which that account shall have access.
Übersicht über Zugriffstoken
Token: The token that was generated for a particular account.
Institution: Lists the institution to which the account belongs.
Nutzer: Der Nutzername wird angezeigt und zur Seite der Einstellungen für den Nutzer verlinkt
Service: Servicegruppe für die der Token erstellt wurde.
Aktiviert: wenn die Servicegruppe aktiviert wurde wird das Aktiviert-Icon , andernfalls das Deaktiviert-Icon gezeigt.
Web services security: If web services security is enabled, you see the Enabled icon . Otherwise, you see the Disabled icon .
Funktionen: Dies ist eine Übersicht über alle Funktionen auf die der Token für den gewählten Service Zugriff hat.
Klicken Sie auf den Bearbeiten-Button , um Einstellungsänderungen vorzunehmen.
Klicken Sie auf den Löschen-Button, um den Token zu entfernen.
Username: Type a username for whom you wish to add a token. You can either start typing the name or the username of a person registered on your site. You will receive suggestions for names as you type.
Click the Generate token button for a new access token to be created for that account. You are taken to a screen where you can associate a service group to this token (see below). You can only enter one username.
When you create a token, you need to provide some additional information.
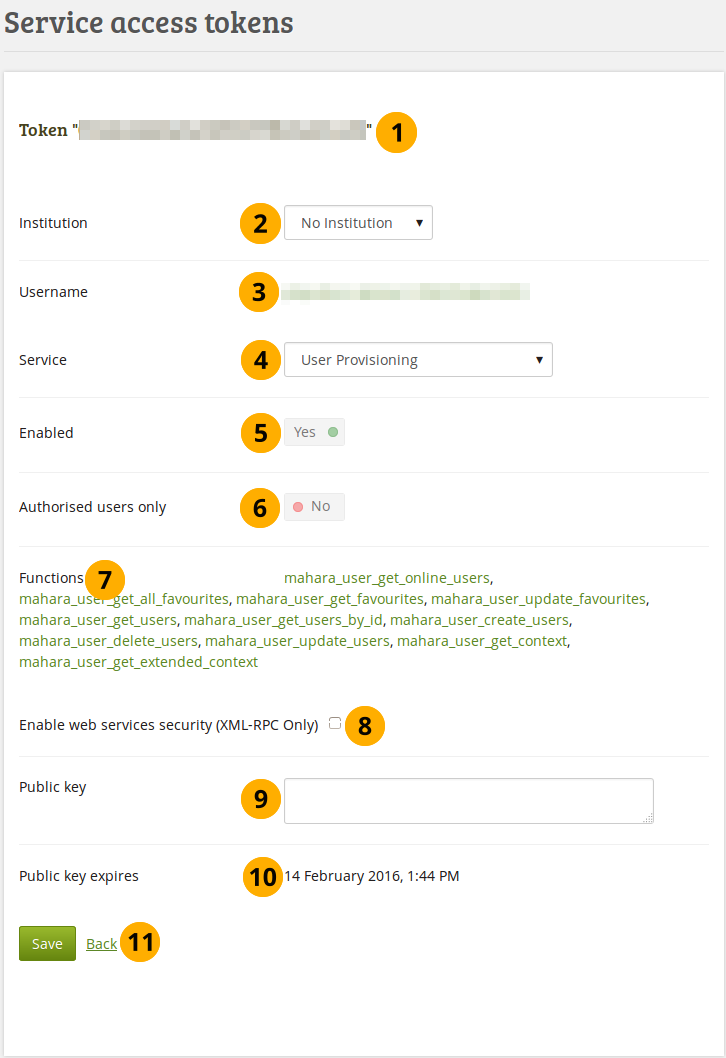
Service-Zugriffstoken konfigurieren
Stellen Sie fest, ob Sie den richtigen Token bearbeiten
Institution: Select the institution to which the account belongs.
Username: Verify that you have the correct username for which you want to set up a token. The username is linked to the person’s settings page in the administration.
Service: Choose the service group from the drop-down list for which you want to enable the token. Only services that allow token access can be chosen.
Aktiviert: Der Token wird automatisch aktiviert wenn die Service-Gruppe aktiviert wird.
Bemerkung
Wenn Sie eine Service-Gruppe deaktivieren tun Sie dies unter Service-Gruppen verwalten.
Authorised users only: This switch is not used in this context because here you create a token. That’s why it is disabled.
Funktionen: Eine Liste der Funktionen auf die der Token Zugriff hat.
Bemerkung
Wenn Sie den Service ändern wird die Liste der Services erst aktualisiert nachdem Sie die Seite abgespeichert haben.
Web-Services-Sicherheit aktivieren (nur für XML-RPC): Diese Funktion existiert nur für die XML-RPC basierte Authentifizierung.
Public Key: Geben Sie den Public Key für die Web Service Sicherheit ein (nur für XML-RPC basierte Authentifizierung).
Public Key Gültigkeit: Datum zu dem der eingegeben Public Key abläuft. Das Datum wird nur durch Speichern der Seite abgespeichert.
Click the Save button when you are finished making your changes, or click Back if you want to cancel the changes.
11.10.1.5. Service Nutzer verwalten
Wenn Sie nicht beabsichtigen einen Token für Ihre Nutzer zu verwenden, können Sie ihnen Zugriff auf Funktionen mittel Nutzernamen geben. Dazu können Sie diese Option nutzen. Nutzer müssen dann:
nur einmalig konfiguiriert.
have the ‚webservice‘ authentication method in an institution in which they are a member.
Bemerkung
Accounts with the authentication method ‚webservice‘ can only access Mahara via web services and cannot use the standard login form.
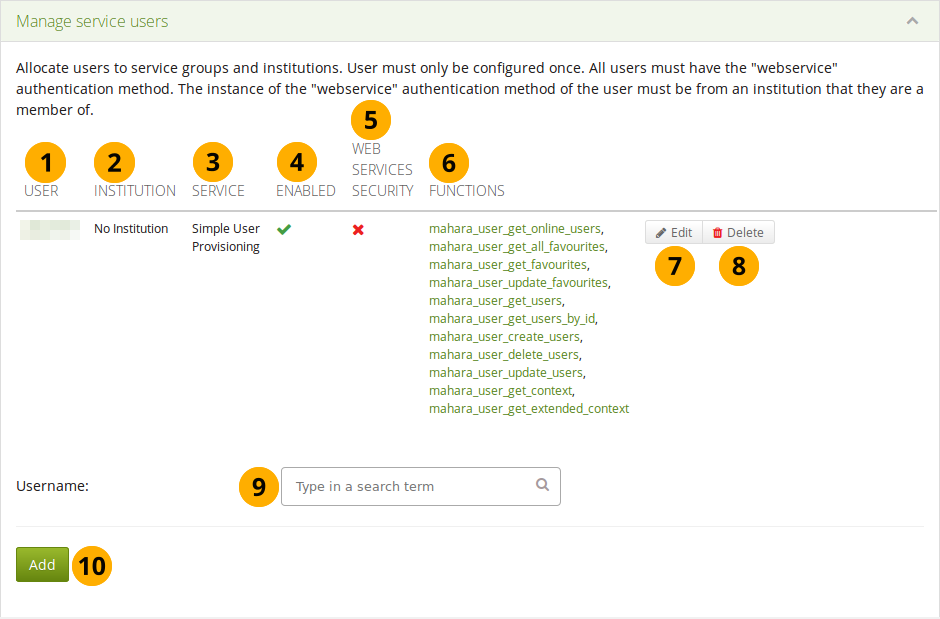
Verwaltung der Service Nutzer-Übersicht
Nutzer: Der Nutzername dem Sie eine Servicegruppe zugewiesen haben wird angezeigt. Er wird verlinkt mit der Accounteinstellungsseite in der Administration.
Institution: Lists the institution to which the account belongs.
Service: The service group that is associated with the account.
Aktiviert: wenn die Servicegruppe aktiviert wurde wird das Aktiviert-Icon , andernfalls das Deaktiviert-Icon gezeigt.
Web services security: If web services security is enabled, you see the Enabled icon . Otherwise, you see the Disabled icon .
Funktionen: Liste aller Funktionen auf die der Nutzer im gewählten Service Zugriff hat.
Klicken Sie auf den Bearbeiten-Button , um Einstellungsänderungen vorzunehmen.
Click the Delete button to remove the account from the access to the associated service group.
Username: Type a username for whom you wish to manage the services. You can either start typing the name or the username of a person registered on your site. You will receive suggestions for names as you type. The account must have web services as authentication method.
Click the Generate token button for a new access token to be created for that account. You are taken to a screen where you can associate a service group to this token (see below). You can only enter one username.
When you add an account, you need to provide some additional information.
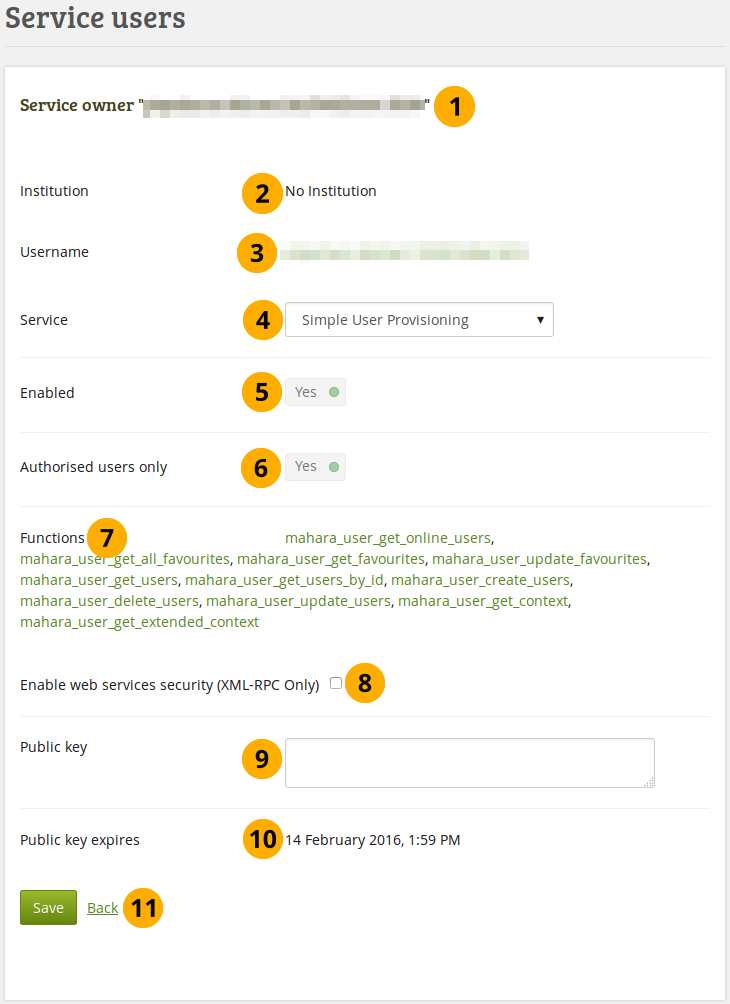
Verknüpfen Sie einen Nutzer mit einer Service-Gruppe.
Service owner: The username is displayed. It must match the username below.
Institution: Verify that the institution associated with the account is correct. If it is not, you can change the institution on the account settings page.
Nutzername: Überprüfen Sie, ob Sie den richtigen Nutzernamen ausgewählt haben.
Service: Choose the service group from the drop-down menu to which you want to give the person access. Only services that allow access via a username can be chosen.
Aktiviert: Die Einstellungen werden automatisch aktiviert wenn die Servicegruppe aktiviert wird.
Bemerkung
Wenn Sie eine Service-Gruppe deaktivieren tun Sie dies unter Service-Gruppen verwalten.
Authorised users only: This switch is set to ‚Yes‘ automatically when the service group is configured to allow access via a username.
Functions: A list of functions that the account has access to.
Bemerkung
Wenn Sie den Service ändern wird die Liste der Services erst aktualisiert nachdem Sie die Seite abgespeichert haben.
Web-Services-Sicherheit aktivieren (nur für XML-RPC): Diese Funktion existiert nur für die XML-RPC basierte Authentifizierung.
Public Key: Geben Sie den Public Key für die Web Service Sicherheit ein (nur für XML-RPC basierte Authentifizierung).
Public Key Gültigkeit: Datum zu dem der eingegeben Public Key abläuft. Das Datum wird nur durch Speichern der Seite abgespeichert.
Click the Save button when you are finished making your changes, or click Back if you want to cancel the changes.
11.10.2. Anwendungsverbindungen
Administration menu → Web services → Application connections
Dies ist eine Übersicht über alle Verbindungen, die Sie über persönliche Nutzertoken oder OAuth Zugriffstoken erlaubt haben.
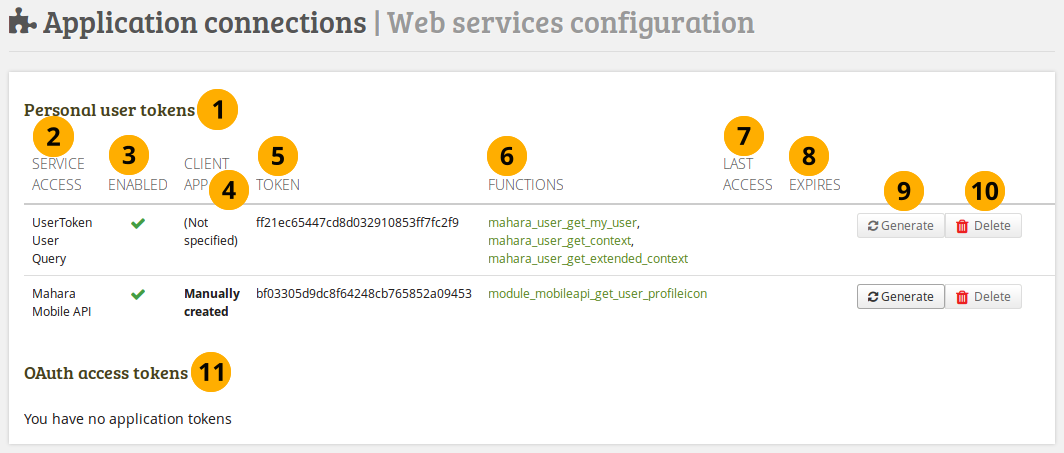
Übersicht über die Anwendungsverbindungen
The section Personal user tokens displays all the tokens that you have generated for individuals and whether they have been accessed or not amongst others.
Service-Zugriff: Die Spalte zeigt die Service-Gruppe für die ein Token erstellt wurde.
Aktiviert: Wenn die Servicegruppe aktiviert ist, sehen Sie das*Aktiviert*-Icon , andenfalls das Deaktiviert-Icon .
Client app: Display how the access token was generated.
Token: Der Token wird hier angezeigt.
Funktionen: Die Funktionen einer Servicegruppe sind hier aufgelistet und verlinkt. Die Links führen zur Webservice-Dokumentation der jeweiligen Funktion.
Last access: List the date and time of the last use of the token.
Expires: Show the expiry date of the token.
Click the Generate button to generate a new random token.
Click the Delete button to delete the token. The user group and functions are still available. You can then click the Generate button to create a new token.
Bemerkung
The Delete button is only available when a token was generated.
Im OAuth Zugriffstoken-Abschnitt sehen Sie die Token, die mit OAuth verwandt werden.
11.10.3. Connection manager
Administration menu → Web services → Connection manager
The connection manager facilitates the use of web services by making the setup of connections easier.
For more information, see the wiki (original idea) and the feature request item.
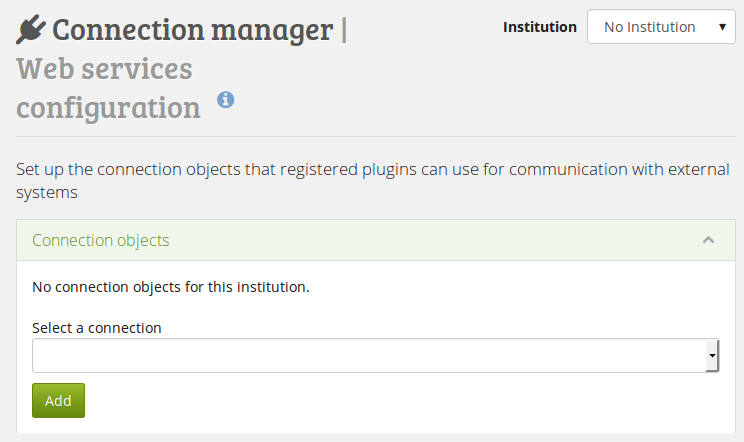
Overview for the connection manager
11.10.4. Registration of external apps
Administration menu → Web services → External apps
You can use this page to register external applications that are connected via OAuth. An example is LTI (Learning Tools Interoperability). You can enable external tools for institutions and specific service definitions, for which a consumer key and secret will be generated automatically.

Register an external application
Applikation: Liste der Applikationen, die über OAuth verbunden sind.
Owner: The person who has set up the OAuth service.
Consumer Key: Der Consumer Key für den OAuth Service.
Consumer Secret: Der Consumer Secret für den OAuth Service.
Aktiviert: Wenn die Applikation aktiviert wurde sehen Sie das Aktiviert-Icon. Andernfalls das Deaktiviert-Icon .
Institution: The institution for which the external app has been set up.
Klicken Sie auf den Bearbeiten-Button , um Einstellungsänderungen vorzunehmen.
Click the Delete button to remove the application so it cannot connect any more to Mahara via OAuth.
Click the Manage button to decide on more settings where available.
Application: Geben Sie der Applikation, die Sie verwenden wollen, einen Namen.
Legen Sie fest welche Institution Zugriff auf die gewählte Applikation über OAuth haben soll.
Wählen Sie die Service-Gruppe fest, die Sie mit der Applikation vernbinden wollen.
Klicken Sie auf den Hinzufügen-Button, um die OAuth Authentifizierung für den gewählten Service zu erstellen. Auf der nächsten Seite können Sie weitere Konfigurationen vornehmen.
You can see details about the connection that you are setting up by clicking the Edit button .
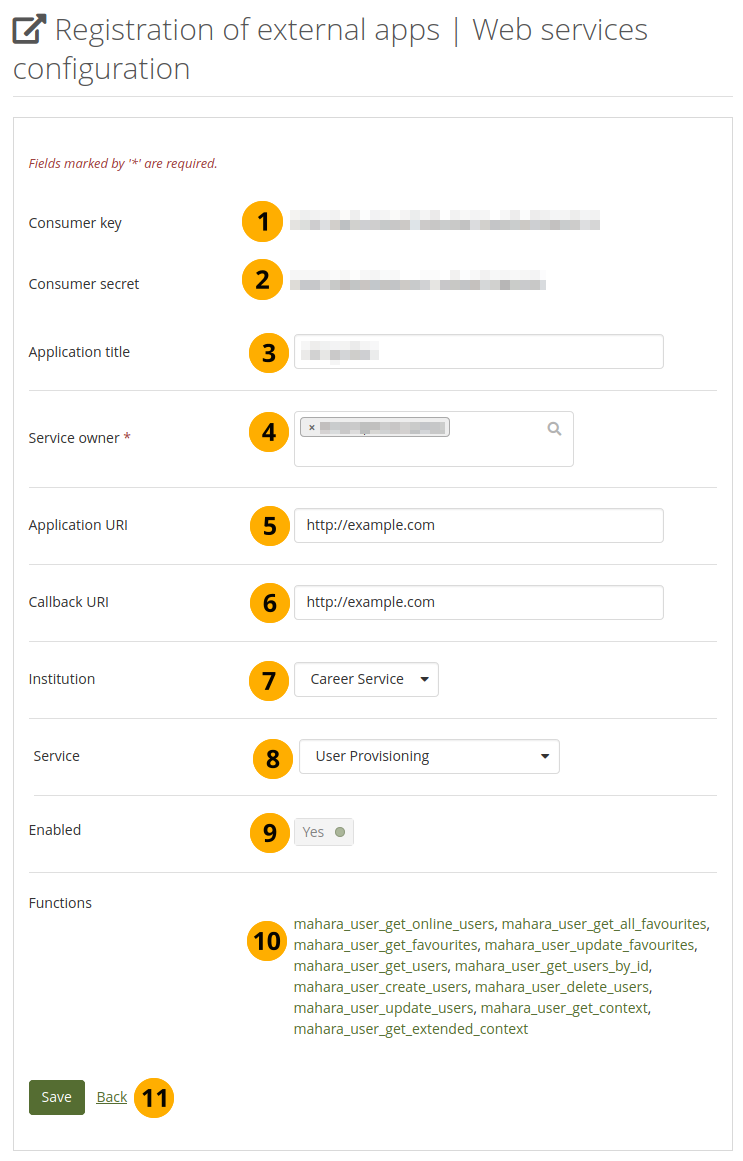
Einen OAuth Service konfigurieren
Consumer key: The consumer key for the external service.
Consumer secret: The consumer secret for the external service.
Application title: You can change the title for the application.
Service owner: Person who has set up the external service. You can change the owner of the service so that it is not all tied to a site administrator. This is handy when you want to set up a specific account that handles all web services calls.
Application URI: URI of the application. If it is not needed, it is ignored.
Bemerkung
 If you set up LTI and no other authentication method for your account holders to log in directly into Mahara, you can enter the URL to your LTI activity here so they are being redirected correctly for the login when they receive a notification.
Callback URI: The callback URI for the application. If it is not needed, it is ignored.
Institution: Select the institution for which you want to set up the external service.
Service: Select the service group that you want to set up.
Aktiviert: Die Applikation ist automatisch aktiv wenn OAuth aktiviert wird.
Funktionen: Eine Liste der Funktionen auf die die Applikation Zugriff erhält.
Bemerkung
Wenn Sie den Service verändern wird die Liste der Services nicht automatisch angepasst. Sie aktualisierten Services werden erst nach dem Abspeichern sichtbar.
Click the Save button when you are finished making your changes, or click Back if you want to cancel the changes.
11.10.5. Web Service-Protokolle
Administration menu → Web services → Web services logs
Sie können die Logs des WebServices einsehen und die Suche einschränken um nur die relevanten Informationen zu sehen.
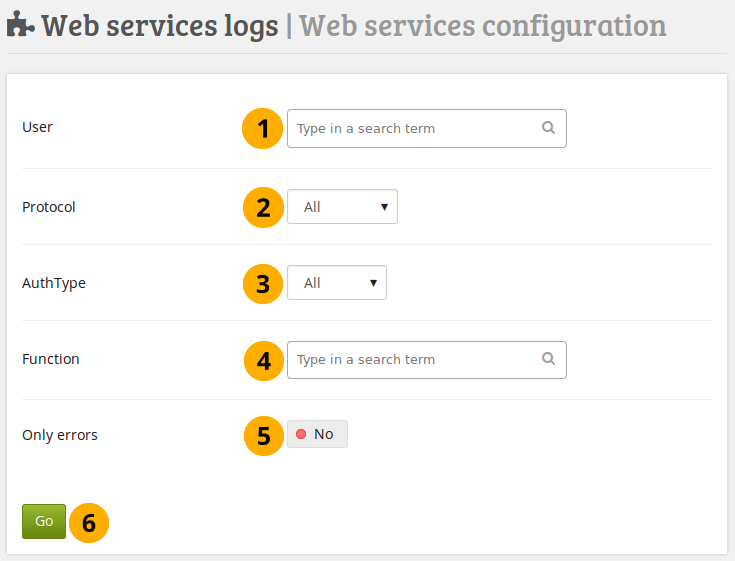
Suche in den WebService-Logs
User: Type the username of the person for whom you want to see the logs. You can only enter one username. You can either start typing the name or the username of a person registered on your site. You will receive suggestions for names as you type.
Protocol: Select the web services protocol that is associated with the account. You can only see the protocols that are enabled.
Auth type: Choose the type of authentication that you selected for the account. The options are:
Alle: Die Logs für jeden Authentifizierungstyp anzeigen.
Token: Only display logs when the account has a user token.
User: Display the logs when the account uses the username for the web service.
OAuth: Select this option if you only want to see logs when the person logs in via OAuth.
Funktion: Suche nach Funktionen.
Only errors: Switch to ‚Yes‘ if you only want to see log information that contains an error.
Klicken Sie auf den Starten-Button, um die Suche zu beginnen.
If there are any results for your search, you will see them in the Results area.
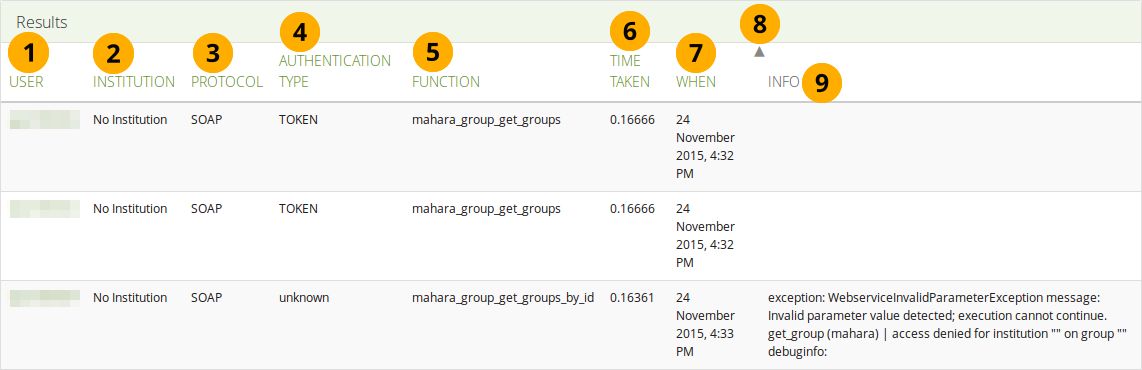
Results for the search of the web services logs
User: Display the username of the account for which there is a log entry.
Institution: Display the name of the institution to which the account belongs.
Protocol: Show the protocol that is associated with the account for the chosen context.
Authentication type: Show the authentication type that is associated with the account.
Function: Display the function for which there is a log entry.
Time taken: The time it took to fetch the log entry.
When: Display the date that the log entry was produced.
You can change the sort order for any column by clicking its column title.
Info: Fehlermeldungen werden hier angezeigt.
11.10.6. WebService Testclient.
Administration menu → Web services → Web services test client
The test client gives you the opportunity to test your settings. Please beware that the functions are executed on the system and not a separate test instance.
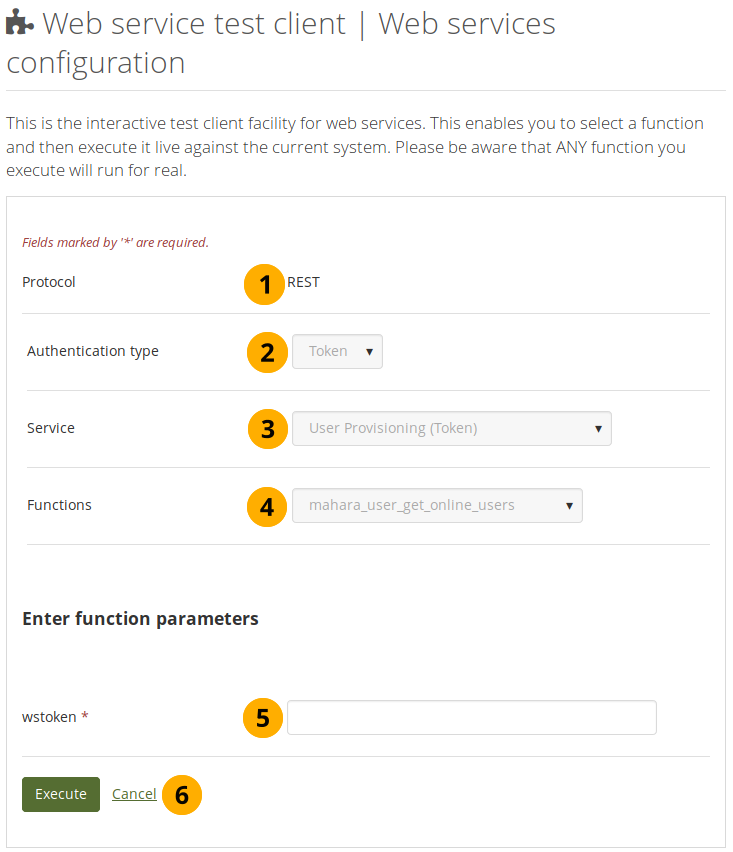
WebService Testclient.
Bemerkung
Wenn Sie die Konfiguration vornehmen sehen Sie zunächst nur das Protokoll und den Authentifizierungystyp, den Sie ausgewählt haben. Die anderen Felder werden erst sichtbar wenn Sie die Entscheidung getroffen haben,was Sie testen wollen.
Protokoll: Sie sehen die Web Services Protokolle, die aktuell aktiviert sind. Wenn Sie mehr als eines sehen, wählen Sie dasjenige aus, das Sie testen wollen.
Authentication type: Select the authentication type that you would like to include in your test. Click the Next button to see the following option.
Service: Choose the service group that you want to test. Click the Next button to see the following option.
Functions: Select the function that you want to include in your test. Click the Next button to see the following option.
wstoken: Enter the web services token for the account that you want to test.
Bemerkung
If you selected ‚User‘ for the authentication type, you’ll also see a field wspassword that you can fill in.
Click the Execute button if you want to run the test, or click Cancel if you want to abort the test.
Nachdem der Test durchgelaufen ist werden die Ergebnisse angezeigt.