4.12. Pläne
Main menu → Create → Plans
Plans are ToDo lists. They are particularly well-suited to plan medium and long-term endeavours. A plan can consist of a number of individual activities with which completion dates are associated.
You can use the functionality to:
sich selber Ziele für eine große Aufgabe zu setzen
Ihre persönlichen Lernaktivitäten in der gesetzten Zeit zu verwalten und im Auge zu behalten was schon erledigt und was noch zu tun ist.
Workshops, an denen Sie teilgenommen haben, aufzulisten
set personalised tasks for learners that they can choose to complete.

Gesamtansicht von Pläne
Klicken Sie auf den Neuer Plan-Button, um eine neue Planung anzulegen.
Your existing plans, their descriptions and tags are displayed. Click a title to see all the tasks that you associated with that plan.
Template: When a plan is marked as template, you can use it to create plans in groups without needing to set up the same plan manually in multiple groups.
Klicken Sie auf den Bearbeiten-Button , um den Titel, die Beschreibung, die Schlagworte und Lizenzen des Plans ändern
Klicken Sie auf den Verwalten-Button , um Aufgaben zu Ihrem Plan hinzuzufügen oder zu bearbeiten.
Klicken Sie auf den Löschen-Button , um Ihren Plan zu löschen.
The number of plans you created is displayed.
4.12.1. Einen neuen Plan erstellen
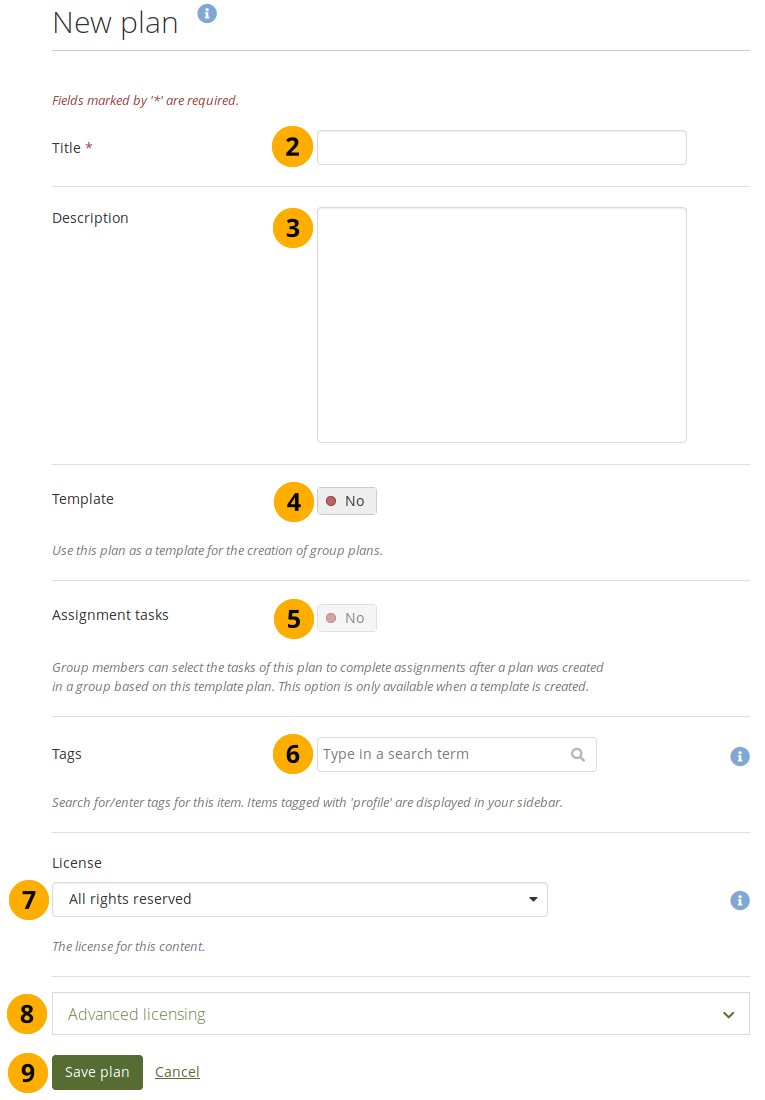
Einen neuen Plan erstellen
Klicken Sie auf den Neuer Plan-Button in der Pläne-Übersichtsseite.
Titel: Geben Sie Ihrem Plan einen Titel. Pflichtfeld.
Description: Give your plan a description. It is visible when you select a plan for inclusion into a portfolio page and on the portfolio page itself.
Template: Set this option to ‚Yes‘ if you want to create a template plan that you can re-use when creating plans in groups.
Assignment tasks: Say ‚Yes‘ for this option if you want learners to be able to choose certain plan tasks as activities.
Bemerkung
This option is only available when you create a template plan. Assignment plans can only be finalised as group plan.
Tags: Add tags to your plan for easier searching later on. You can choose from your existing tags by starting to type a letter and then selecting the tag you want to use. You can also type a new tag, and it is added to your list of tags.
Siehe auch
You can find more information on how to use the tag selector in the ‚Tags‘ section.
License: You see this field if the site administrator turned on license metadata. Choose the license for the plan. You can set your default license in your account settings.
Advanced licensing: You see this option if the site administrator turned on license metadata. If you click it, you see two additional license fields, ‚Licensor‘ and ‚Original URL‘, that you can fill in if this in not your own plan.
Bemerkung
Im Moment können Sie die Lizenzinformation in der Portfolioansicht nicht anzeigen, diese wird aber für die zukünftige Nutzung gespeichert wenn die Funktionalität erweitert wurde. Sie können die Lizenzinformation in der Detailansicht des Artefakts aber einsehen.
Click the Save plan button to keep your new plan. Click Cancel if you want to abort creating your plan or making changes to an existing plan.
Nun können Sie individuelle Aufgaben zum Plan hinzufügen
4.12.2. Aufgaben zum Plan hinzufügen
Es gibt verschiedene Wege, Aufgaben zu einem Plan hinzuzufügen:
Klicken Sie auf Aufgabe hinzufügen rechts neben dem gespeicherten Plan.
Click on Main menu → Create → Plans → the title of the plan → New task.
Click on Main menu → Create → Plans → the Manage tasks button → New task.
When editing a portfolio page that contains a plan, click the Add task button .
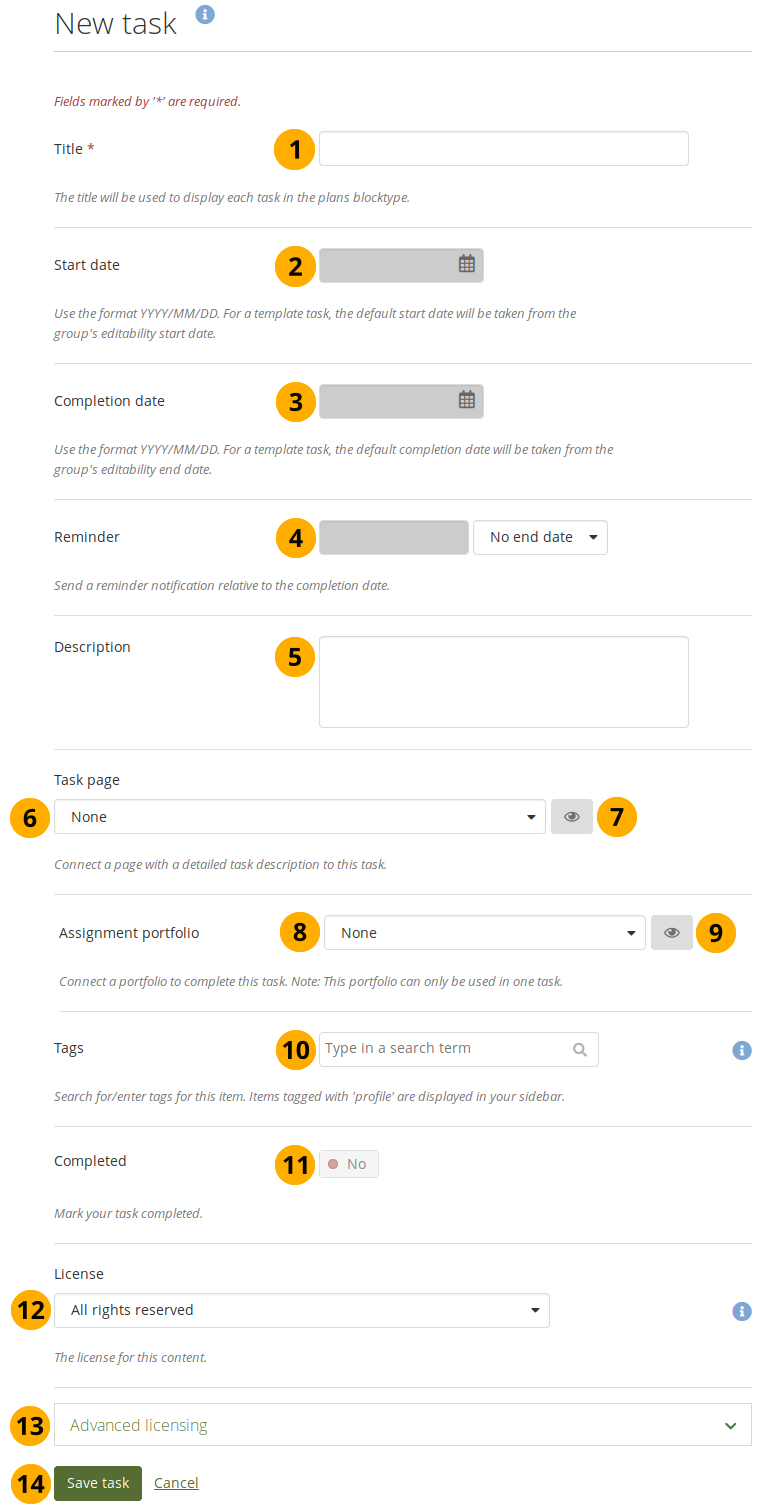
Wenn Sie im Neue Aufgabe-Bildschirm sind, können Sie eine neue Aufgabe erstellen.
Fügen Sie einem Plan eine neue Aufgabe hinzu
Titel: Geben Sie einen Titel für Ihre Aufgabe ein. Pflichtfeld.
Start date: Set a start date for the task. For a template task, the default start date will be taken from the group’s editability start date. Click into the field to show the calendar or enter it directly in the format YYYY/MM/DD (Year - 4 digits / Month - 2 digits / Date - 2 digits), e.g. 2019/11/27.
Bemerkung
When you create a template plan, you can’t set start and completion dates. They will only become active once the plan has been set up in a group.
Completion date: Provide a completion date. For a template task, the default completion date will be taken from the group’s editability start date. Click into the field to show the calendar or enter it directly in the format YYYY/MM/DD (Year - 4 digits / Month - 2 digits / Date - 2 digits), e.g. 2019/11/27.
Reminder: Set a reminder relative to the completion date. You will receive a notification to remind you about the outstanding task the selected number of days, weeks, months, or years before the completion date. You can only set one reminder per task, but you can change it at any point in time.
Beschreibung: Geben Sie weitere Informationen über die Aufgabe ein.
Task page: Select a page from your portfolio area as task page. This is useful if you have an elaborate task description for which the normal description field is too small.
Bemerkung
This option is designed for assignment plans.
Click the Preview button to check that you selected the correct page.
Assignment portfolio: Select a portfolio that you want to use to complete this task. It can’t include a page that you selected as task page. It can also only be used for one task.
Bemerkung
If you set up an assignment plan as template in your personal area or an assignment plan directly in a group, you can assign a template portfolio. That will then be copied into a learner’s account when they choose to complete this task.
Click the Preview button to check that you selected the correct portfolio.
Tags: Add tags to your task for easier searching later on. You can choose from your existing tags by starting to type a letter and then selecting the tag you want to use. You can also type a new tag, and it is added to your list of tags.
Siehe auch
You can find more information on how to use the tag selector in the ‚Tags‘ section.
Completed: Set to ‚Yes‘ if you have already completed the task.
Bemerkung
This option is disabled when you create a task in a template plan.
License: You see this field if the site administrator turned on license metadata. Choose the license for the plan’s task. You can set your default license in your account settings.
Advanced licensing: You see this option if the site administrator turned on license metadata. If you click it, you see two additional license fields, ‚Licensor‘ and ‚Original URL‘, that you can fill in if this in not your own plan’s tasks.
Bemerkung
Derzeit können Sie die Lizenzinformation nicht auf einer Portfolioansicht anzeigen lassen. Aber der Eintrag wird für die Zukunft gespeichert wenn diese Option geschaffen werden soll.
Klicken Sie auf den Aufgabe speichern-Button, um die Eingabe der Aufgabe abzuschließen.
Fügen Sie weitere Aufgaben jetzt direkt oder später ein.
4.12.3. Aufgaben in einem Plan bearbeiten
Click the Manage tasks button or the title of the plan on Main menu → Create → Plans.
Klicken Sie auf den Bearbeiten-Button neben der Aufgabe, die Sie ändern wollen.
Nehmen Sie Ihre Änderungen vor oder markieren Sie die Aufgabe als abgeschlossen.
Klicken Sie auf den Speichern-Button, um Ihre Änderungen zusichern.
4.12.4. Alle Aufgaben des Plans anzeigen
Sie können die Aufgaben des Plans in zweierlei Weise ansehen sofern Sie Autor/on des Plans sind.
At Main menu → Create → Plans → Click on a plan.
Fügen Sie einen Plan zu einer Ansicht hinzu.
4.12.4.1. View a plan under Create
Plans under Create
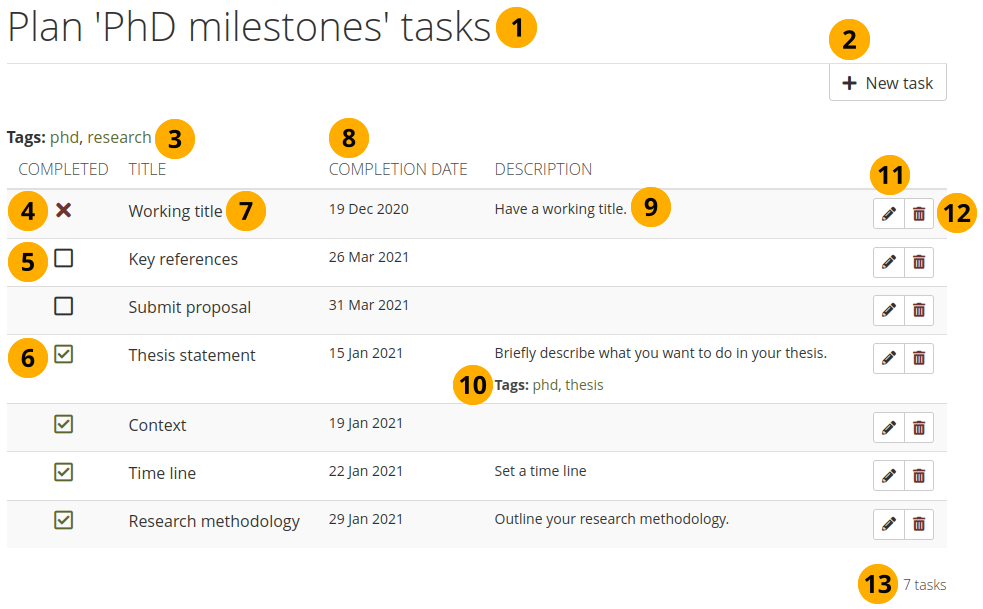
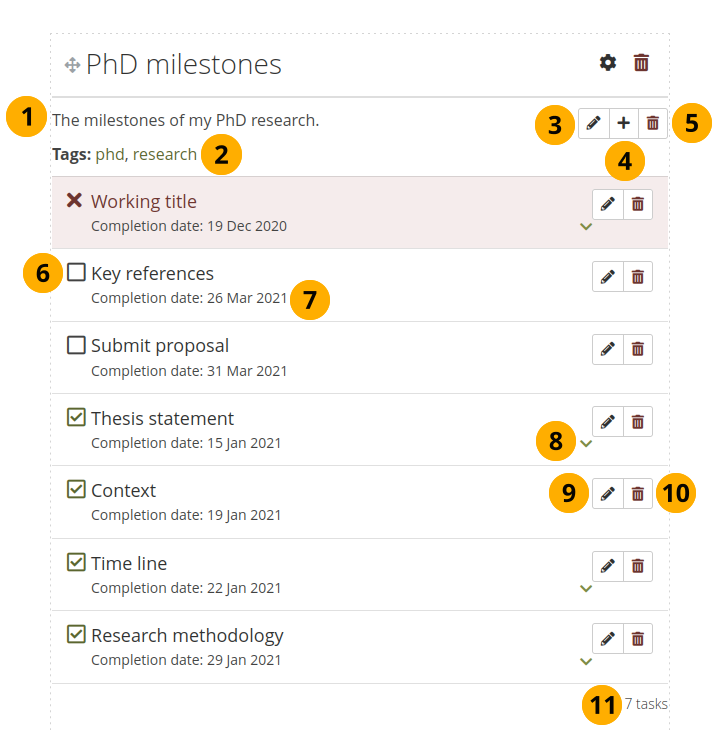
Der Titel des Plans in dem Sie die Aufgabe angelegt haben wird angezeigt.
Klicken Sie auf den Neue Aufgabe-Button, um eine neue Aufgabe in diesem Plan zu erstellen.
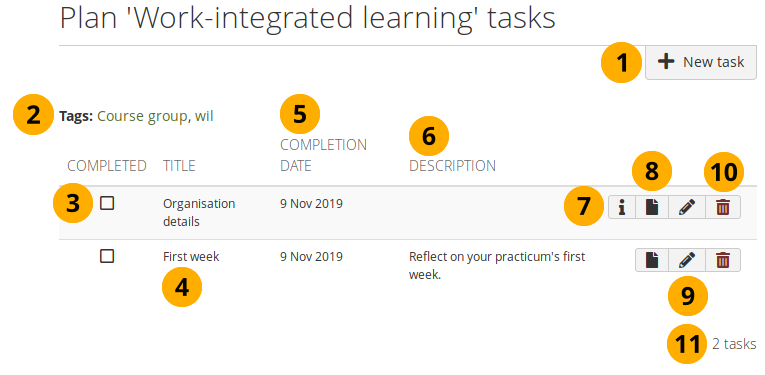
Schlagworte: Die Schlagworte, die Sie dem Plan zugeordnet haben, werden angezeigt.
Completed: The completion status of each task:
Tasks that are overdue show the Overdue icon .
Tasks that are not yet completed display the Not completed icon .
Tasks that are completed display the Completed icon .
Bemerkung
Not completed and overdue tasks are displayed at the top of a plan. All other tasks are displayed in chronological order.
Titel: Der Titel für jede Aufgabe wird angezeigt.
Abschlußdatum: Sie können das Abschlußdatum für jede Aufgabe einsehen.
Beschreibung: Die Beschreibung für jede Aufgabe wird angezeigt.
Tags: The tags that you associated with a task are shown.
Klicken Sie auf den Bearbeiten-Button , um die Aufgabe zu bearbeiten.
Klicken Sie auf den Löschen-Button , um die Aufgabe zu löschen.
Die Zahl der Aufgaben in Ihrem Plan wird angezeigt.
4.12.4.2. Einen Plan in einer Portfolioansicht anzeigen.
Plan in einer Portfolioansicht
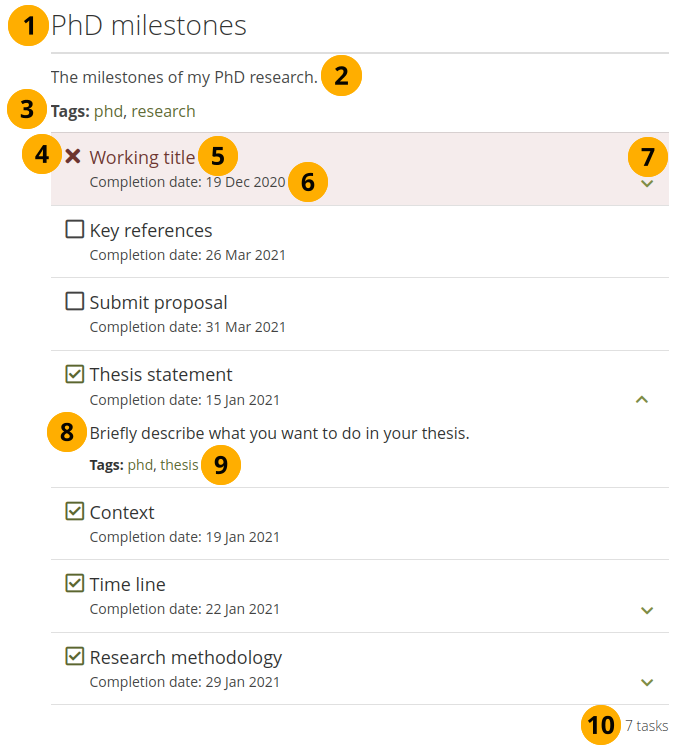
Der Titel Ihres Plans. Sie können diesen als Teil des Titels des Blocks anzeigen.
The plan’s description is displayed.
Schlagwörter: Die Schlagwörter, die Sie zu diesem Plan hinzugefügt haben, werden angezeigt.
The completion status of each task is displayed:
Tasks that are completed display the Completed icon .
Tasks that are overdue show the Overdue icon .
Tasks that are not yet completed show the Not completed icon .
Bemerkung
You can click the completion icon to change the status of a task and mark it completed or revoke the completion.
Titel: Der Titel für jede Aufgabe wird angezeigt.
Abschlußdatum: Sie können das Abschlußdatum für jede Aufgabe einsehen.
Click the title of the task or the Down arrow to see details for this task. Click the Up arrow to hide the details.
The description of this task is shown.
Tags: The tags that you added for the task are displayed.
Die Anzahl der Aufgaben in diesem Plan wird angezeigt.
4.12.4.3. Edit a plan on a page in edit mode
Make changes to your plan
The plan’s description is displayed.
Schlagwörter: Die Schlagwörter, die Sie zu diesem Plan hinzugefügt haben, werden angezeigt.
Click the Edit plan button to make changes to the basic information about your plan. You will be redirected back to this page.
Click the Add task button to create a new task within the plan. You will be redirected back to this page upon saving your new task.
Click the Delete plan button to delete your plan permanently.
Click the completion icon to change the status of a task. The completion status of each task is displayed:
Tasks that are completed display the Completed icon .
Tasks that are overdue show the Overdue icon .
Tasks that are not yet completed show the Not completed icon .
Bemerkung
You can click the completion icon to change the status of a task and mark it completed or revoke the completion.
View the title and completion date of a task.
Click the title of the task or the Down arrow to see details for this task. Click the Up arrow to hide the details.
Click the Edit task button to make changes to a task. You will be redirected back to this page after you finished editing.
Click the Delete task button to remove the task from your plan and delete it permanently. You will be redirected back to this page after you finished editing.
Die Anzahl der Aufgaben in diesem Plan wird angezeigt.
4.12.4.4. Work with an assignment plan
When you work with an assignment plan, there are a few extra things to consider. You can complete an assignment plan when there is a group plan set up as assignment plan to which you have access as regular member of the group. You activate certain tasks from a plan and then they are automatically copied into your personal ‚Plans‘ space.
Once you copied tasks into your personal space, you can work with the plan.
Bemerkung
You do not need to make an assignment plan available on a portfolio page. It is solely for your personal planning if you prefer.
Assignment plan in the personal ‚Plans‘ space
Click the New task button to add additional tasks. This is only relevant if you want to add this plan to a portfolio page and create tasks that are not assessed via the group in which the assignment plan was created.
Tags: The tags shown are the ones copied from the assignment plan and any that you may add. The group name is also added as a tag.
Completed: When you tick the Not completed icon , you are asked if you want to submit the portfolio associated with the task (if there is one) to the group in which the assignment plan was created. If you agree, your portfolio is locked for assessment, and the icon changes to the Completed icon .
Title: The title of the task.
Completion date: The date by when you are expected to complete the task.
Description: A description of the task.
Click the Task preview button next to a task to view the task page that is associated with this task if there is any.
Bemerkung
This page is not available in your portfolio area. It remains in the group in which the assignment plan was created.
Click the Open portfolio button next to a task to view the assignment portfolio that is associated with this task.
Click the Edit button to make changes to the task. For example, you can attach a different assignment portfolio, change the reminder or completion date.
Click the Delete button to remove the task from this plan.
Bemerkung
Deleting the task also resets the task when you view the plan in the group in which the assignment plan was given.
The number of tasks in the plan is shown.