6.3. Eine Gruppe anlegen
Main menu → Engage → Groups → Create group
Je nach Rolle können Sie verschiedene Arten von Gruppen anlegen.
All account holders
Open membership: Anyone on the site can become a member by visiting your group page and clicking the Join button.
Request membership Anyone can request to join your group. However, as owner you can choose to accept or decline this request. The requesting member will be notified of your decision automatically.
Mitarbeiter und Administratoren können Gruppen mit kontrollierter Mitgliedschaft anlegen.
Sie können Personen direkt zu Ihrer Gruppe hinzufügen.
Die Mitglieder können sich nicht aus der Gruppe austragen.
Sie können der Gruppe Tutor/innen zuordnen. Diese können Feedback geben für eingereichte Ansichten, aber keine Gruppenmitglieder verwalten.
Gruppenmitglieder können Portfolioansichten oder Sammlungen zum Feedback bzw. zur Bewertung einreichen. Diese Ansichten sind für Veränderungen geblockt bis sie wieder durch einen Gruppentutor oder Gruppenadministrator freigegeben werden.
Bemerkung
Der Site-Administrator kann die Erstellung von Gruppen auf Kontoinhaber mit Site-Mitarbeiter und / oder Site-Administrator Rechten beschränken. Wenn Sie keine Gruppe erstellen können, verfügen Sie höchstwahrscheinlich nicht über die entsprechende Berechtigung und müssen sich an Ihren Site-Administrator wenden, z. über das Formular Kontaktaufnahme, um Informationen zum Aufbau einer Gruppe zu erhalten.
6.3.1. Create a group as a regular account holder
If you are allowed to create a group, you see the Create group button on the ‚Groups‘ overview page.
Create a group as a regular account holder
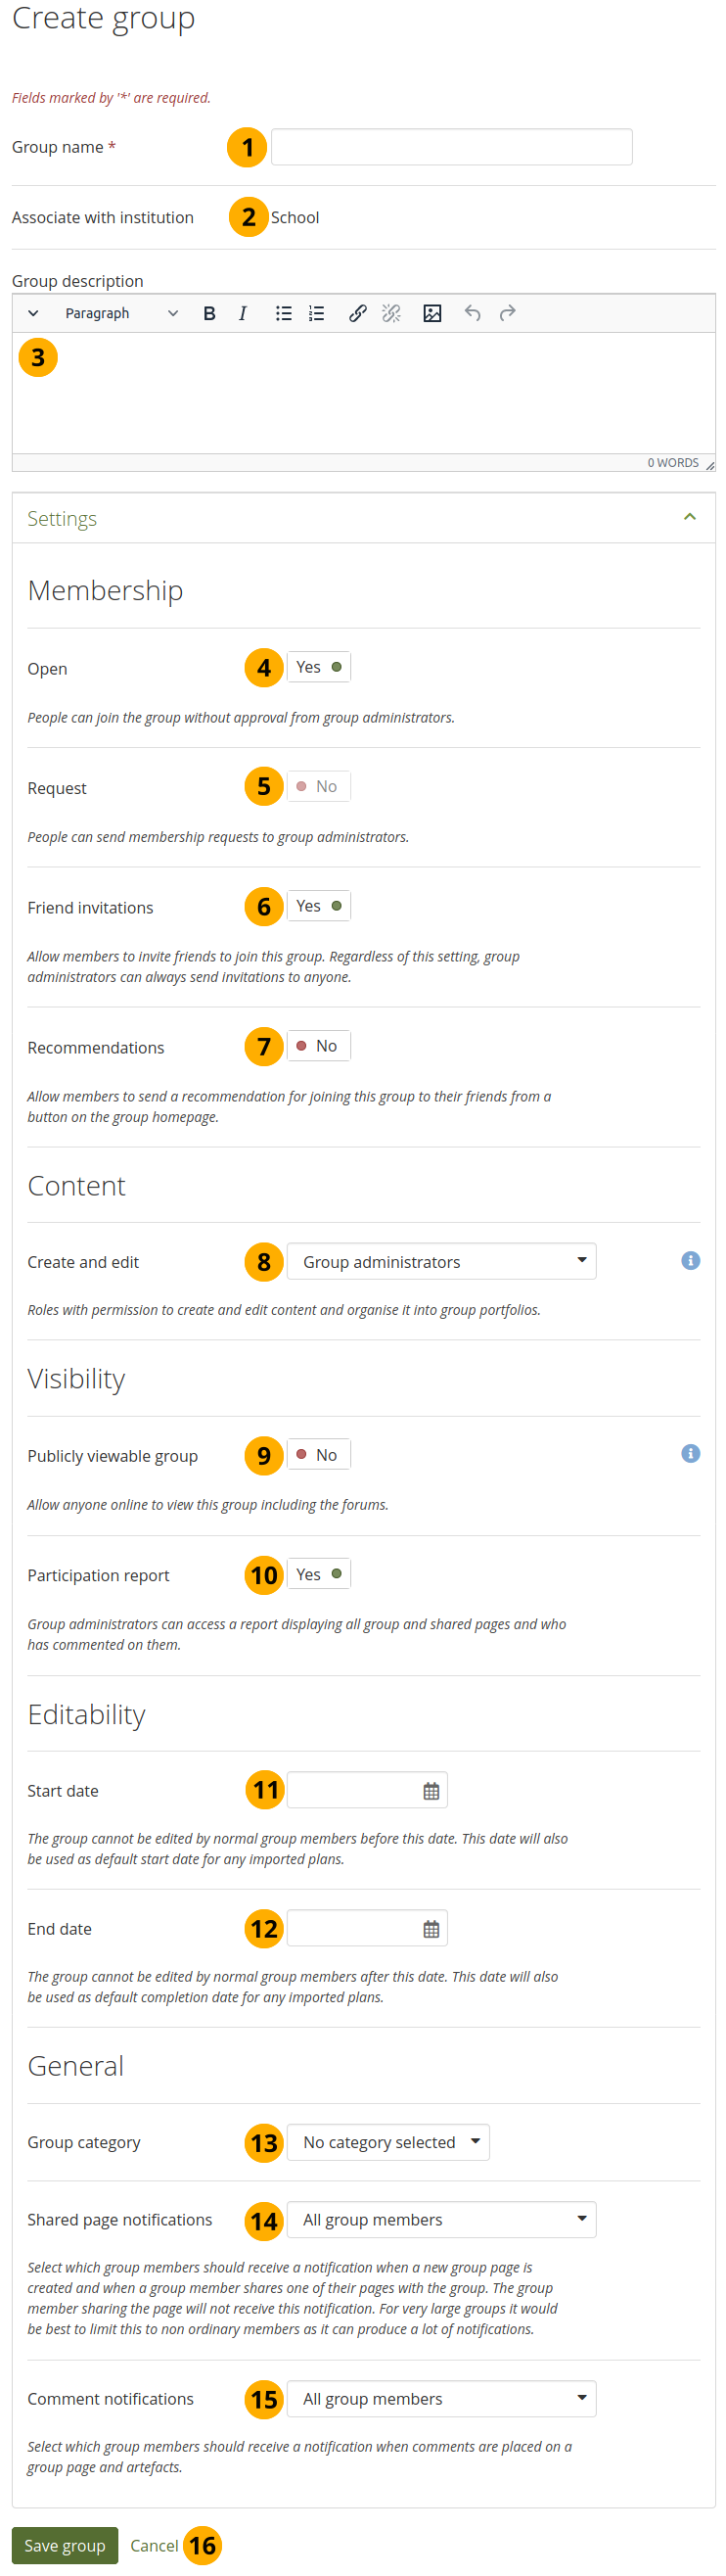
Name der Gruppe: geben Sie einen Namen für Ihre Gruppe ein. Pflichtfeld.
Bemerkung
The group name that you choose has to be unique.
 If you choose a group name that has already been taken, a suggestion for an alternative name is made.
Associate with institution: The group is automatically associated with the institution in which the person creating the group is a member.
Bemerkung
If the person is in multiple institutions or a site administrator, they can select in which institution they want to create the group.
Gruppenbeschreibung: Kurzbeschreibung wozu die Gruppe angelegt wird.
Open: Switch this option to ‚Yes‘ if you want to create an open membership group. This allows anyone on the site to join the group without approval from group administrators.
Request: Set this option to ‚Yes‘ if you wish to create a request membership group. People will have to send a membership request that requires group administrator approval.
Bemerkung
Open and request membership groups are mutually exclusive.
Friend invitations: Switch to ‚Yes‘ if you want to allow group members to invite friends to join the group. Regardless of this setting, group administrators can always send invitations to anyone. If the friends accept, they will be added automatically to the group.
Recommendations: Set this option to ‚Yes‘ if you want to allow group members to send their friends a recommendation for joining this group from a button on the group homepage. If a request membership group has been recommended and the friends are interested in it, they would still need the approval of the group administrator to join.
Bemerkung
Friend invitations and recommendations are mutually exclusive options.
Create and edit: Decide who shall be able to create and edit content in the group:
Alle Gruppenmitglieder
Jeder mit Ausnahme einfacher Gruppenmitglieder, z.B.: Gruppenadministrator/innen und Tutor/innen je nach Gruppentyp
Nur Gruppenadministrator/innen
Bemerkung
When you want to create assignment plans that learners should complete individually, you cannot select ‚All group members‘.
Publicly viewable group: Set this option to ‚Yes‘ if everybody shall have access to content of this group. You only see this setting if the site administrator allowed you to have it. Anybody online can see the group homepage and the discussion forum(s). Depending on the membership visibility, they may also see group members. Only members of the group can see the group’s pages, unless they have been made public, and the files area.
Participation report: Switch this option to ‚Yes‘ if you as group administrator want to view a report displaying all group portfolios and those that have been shared with the group and see who commented on them.
Start date: As group administrator you can decide when regular group members shall be able to create and edit content, forum discussions, pages and collections in the group. Click in the field to see the calendar and select the start date.
End date: You can allow the editing of group content for regular members up to a certain time. After that they will only be able to view forum discussions, pages, collections and files, but not edit them. Click in the field to see the calendar and select the end date.
Bemerkung
Group administrators can always edit content in a group.
The start and end date of a group are used as automatic start and completion dates for plans when they are copied into a group.
Group category: Choose a category if you want to associate your group with one, allowing you to filter groups on the Groups page. This setting is only available if the site administrator turned it on.
Shared page notifications: Select from the drop-down menu who shall be notified when new group portfolios are created and when group members share their portfolios with the group. The options in the drop-down menu are:
Alle Gruppenmitglieder
Bemerkung
You may not want to use this option in very large groups where lots of portfolios are shared but members do not have to be notified to prevent lots of notifications going out.
Jeder mit Ausnahme einfacher Gruppenmitglieder, z.B.: Gruppenadministrator/innen und Tutor/innen je nach Gruppentyp
Nur Gruppenadministrator/innen
Bemerkung
The portfolio owner who shares their portfolio with the group does not receive a notification.
Comment notifications: Select from the drop-down menu who shall be notified when feedback is placed on a page or artefacts.
Alle Gruppenmitglieder
Jeder mit Ausnahme einfacher Gruppenmitglieder, z.B.: Gruppenadministrator/innen und Tutor/innen je nach Gruppentyp
Nur Gruppenadministrator/innen
Click the Save group button to finish creating your group, or click Cancel to abort the group creation process.
6.3.2. Erstellen Sie eine Gruppe als Mitarbeiter oder Institutionsadministrator
In addition to the group settings that a regular account holder has, institution staff and administrators have a few more options.

Zusätzliche Optionen für Personal oder Admininstratoren von Institutionen.
Controlled: Create a controlled group if you wish to add people who cannot leave the group. This is a useful setting for course groups where you do not want members to leave.
Rollen: Entscheiden Sie, ob Sie nur Mitglieder und Administrator/innen oder auch Tutor/innen benötigen. Letztere können Feedback geben und Ansichten wieder freigeben wenn Einreichungen zulässig sind. Sie können jedoch keine Gruppeneinstellungen ändern.
Allow submissions: Use this option to allow group members to submit pages or collections for feedback or assessment. These pages and collections as well as a number of content items in them are locked until released by a group administrator or tutor.
Allow archiving of submissions: Use this option when you want to archive pages or collections that have been submitted to this group. The archive will be made on the server. Administrators can download the archived submissions and vital information about them.
Bemerkung
The archive is made at the point of the release of a portfolio.
Hide group: Switch this option to ‚Yes‘ if you do not want to list this group on the Groups page.
Hide membership: You can hide members of the group from non-members. Decide whether to hide:
nobody
all group members (except administrators)
group tutors only
Hide membership from members: Decide whether to hide the group members to people in the group. Only group administrators can see the members listed. Administrators are still shown on the group homepage. You can hide:
nobody
all group members (except administrators)
group tutors only
Bemerkung
If people have the My groups block on their profile page, their group memberships are still listed there. The hiding of the membership and / or group only refers to the Groups page.
Send forum posts immediately: If allowed, any group member can send a forum post immediately, without needing to wait for the forum post delay time. If not allowed, then only group administrators, tutors, and moderators can do so.
6.3.3. Erstellen Sie als Site-Administrator/in eine Gruppe
When you have site administrator rights, you have a couple of additional settings when you create or edit a group.
Site administrator-only group settings
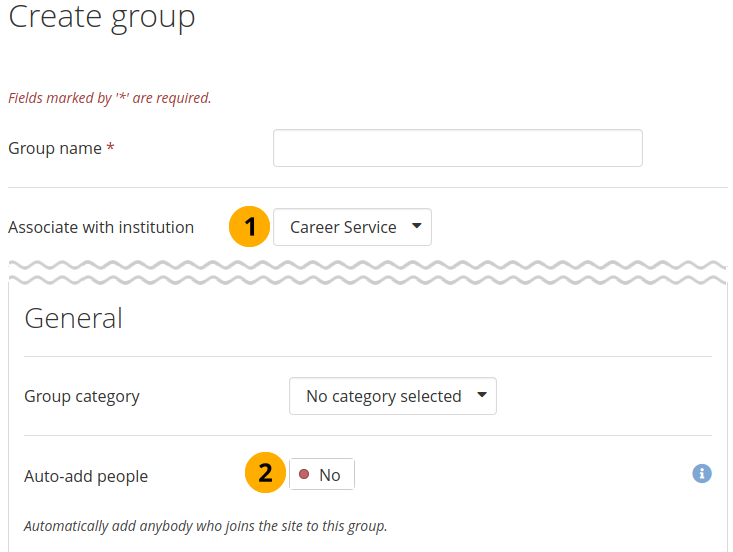
Associate with institution: You can create a group in any institution on the site. Select the institution to which the group should belong from the drop-down menu.
Auto-add people. When you switch this setting to ‚Yes‘, new account holders on the site are added to the group automatically.
Bemerkung
This is a great option when you want to set up a group that everyone should join to participate in forum discussions. On mahara.org this is used to make everybody a member of the ‚Community‘ group in which discussions around Mahara take place.
6.3.4. Generelle Gruppeneinstellungen bearbeiten
You can start out editing a group’s settings from two places by clicking the Edit button on:
the Groups page
die Gruppenstartseite
You are then taken to the same screen as if you were creating a group and make the necessary changes.
Warnung
You can change the group type to a different one. Please be careful if you do so especially when you have allowed submissions of pages and collections to the group. If group members have submitted portfolios to that group, they remain locked when you disable the setting Allow submissions. You must enable this setting again in order to release these pages or collections.

Ändern Sie die URL für Ihre Gruppenhomepage
Short name: You can view the group’s short name, which is needed to administer the group in bulk.
Bemerkung
Only site administrators can change the short name.
Group short names can be from 2 to 255 characters in length and contain only alphanumeric characters, ‚.‘, ‚-‘, and ‚_‘.
Group homepage URL: If the site administrator activated clean URLs, your group (homepage) has a human-readable URL which you can change to a certain extend. Choose the name for your group (homepage) if you do not like the default one. It must be 3-30 characters long. You can only use lowercase letters from a-z, numbers and - (hyphen). Your group will then be available via a URL like
https://sitename/group/name-of-the-group, for example:https://mahara-university.org/group/portfolio-task-force.
Warnung
Though you can change the URL to your group at any point, you should not do that because people who already know the URL to your group will not be able to access it any more after you have changed it.
The original, internal Mahara URL such as https://mahara-university.org/group/view.php?id=456 will still work.