4.3. Oberflächen
Main menu → Create → Skins
If you see the menu item Skins under Main menu → Create, you can create skins yourself, edit them, and use other people’s skins on your portfolio pages and your profile page.
Bemerkung
Wenn Sie den Menueintrag Skins nicht sehen können, sprechen Sie Ihren Administrator an. Es gibt zwei Möglichkeiten warum Sie diese Option nicht sehen können:
Skins have not been enabled for the site. A server administrator will need to enable skins for the site.
If skins are enabled for the site in general, your Mahara institution may not allow the use of skins. Your institution administrator can change that in the institution settings.
Ihre Skin-Übersicht
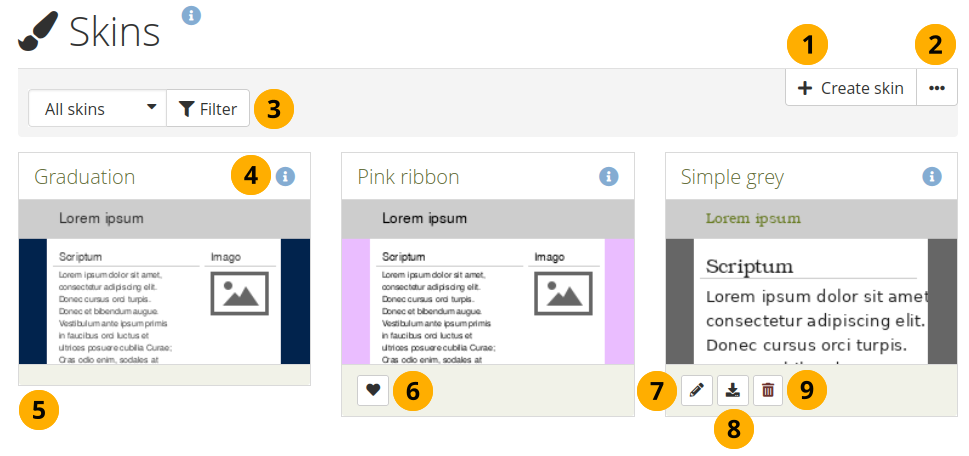
Klicken Sie auf den Oberfläche erstellen-Button, um eine neue Oberfläche zu erstellen.
Click the More options button to see the following additional options:
Import: Click this option to import skins that others have shared online.
Export: Click this option to export all your personal skins.
In the drop-down menu, decide which skins you want to display and click the Filter button:
Alle Oberflächen: Alle Oberflächen auf die Sie zugreifen können
Site-Oberflächen: Nur Oberflächen, die vom Site-Administrator angelegt wurden
Meine Oberflächen: von mir selbst erstellte Oberflächen
Öffentliche Oberflächen: Oberflächen, die andere Nutzer bereitgestellt haben
Click the View skin information icon to see metadata in a pop-up window about the skin such as:
Titel
Benutzer/innen
Beschreibung
Erstellungsdatum
Änderungsdatum
Bemerkung
Sie sehen die Bearbeiten-, Exportieren- und Löschen-Buttons wenn Ihnen die Berechtigungen für die entsprechenden Aktionen zugewiesen wurden.
When a skin doesn’t have any options, it is a site skin that is available to everybody.
Click the Like button to mark someone else’s skin as one that you want to use on your own pages. The icon will change to a filled in heart . Clicking the button again will allow you to remove the skin from your list of favourite skins.
Bemerkung
You can only like another person’s skin, but not site skins. You can always select a site skin for a page, but only select other people’s skins when you liked them.
Klicken Sie auf den Bearbeiten-Button , um Änderungen an der Oberfläche vorzunehmen.
Click the Export button to export only this skin.
Klicken Sie auf den Löschen-Button , um diese Oberfläche zu entfernen.
4.3.1. Eine Oberfläche erstellen
You can create skins:
in your personal portfolio area
on the site level
Depending on the settings of your skin, it will be available only to you or also to others.
In the following, the individual skin settings will be described. A skin is applied on top of the theme that is currently used for a page. You do not have to change all settings for a skin but can pick and choose which elements you want to overwrite in the theme.
4.3.1.1. Allgemein
Allgemeine Einstellungen für Ihre Skins
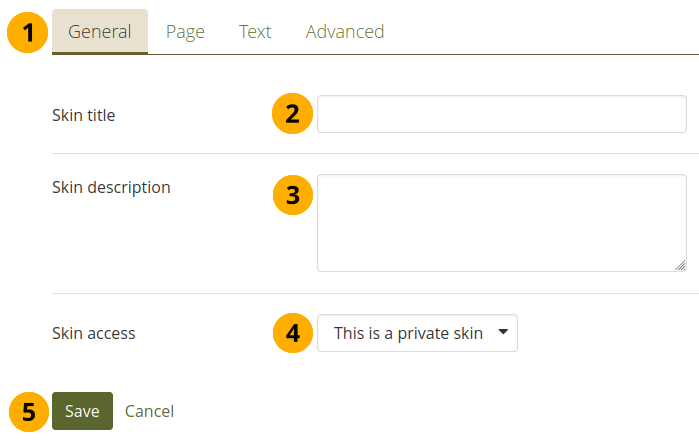
After you click the Create skin button, make sure you are on the General tab.
Titel der Oberfläche: Geben Sie Ihrer Oberfläche einen Titel. Dieser wird in der Übersicht der Oberflächen angezeigt.
Skin description: Describe your skin here and add any details that will help you in the future to remember why you created the skin, what is special about it etc. You can expand the text box if you need to enter a long description by dragging its bottom right corner.
Skin access: Decide here who shall have access to your skin:
This is a private skin: Only you can use this skin on pages. This is the default option.
This is a public skin: Others can see your skin and use it as well.
Click the Save button to accept your changes or click Cancel to abort your changes. You are taken back to the skins overview page.
Bemerkung
You can click on any other tab and continue creating or editing your skin and click the Save button only once you are done.
4.3.1.2. Page
You can change as few or as many of the settings as you like. If you only want to create a different header area to personalise your page’s header where you can see the page (and collection) title, you do not have to change any other settings but the header ones.
Choose the background or header for your skin
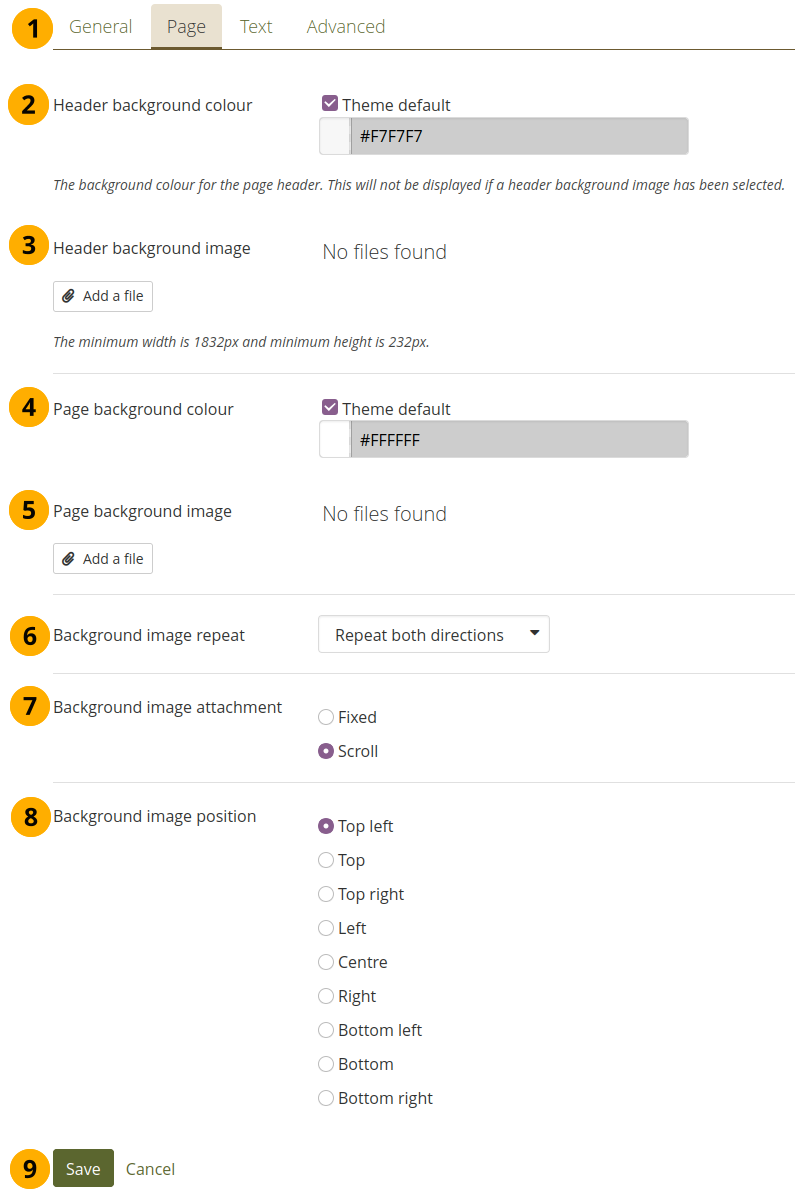
Click the Page tab to change header and page background colours or images.
Header background colour: Untick the ‚Theme default‘ checkbox to choose a background colour for your page header. You can click into the field that shows the colour code and select a colour from the colour palette. Alternatively, you can enter the hexadecimal colour code manually if you know it.
Header background image: You can display an image in the header area. Click the Add a file button to choose an image from your files area.
Bemerkung
For best results, crop your image to be 1,832px wide and 232px high. If you do not crop your image, a random part of it will be shown.
The header background image overwrites the header background colour.
Page background colour: Untick the ‚Theme default‘ checkbox to choose a colour for your page background that surrounds the content area. You can click into the field that shows the colour code and select a colour from the colour palette. Alternatively, you can enter the hexadecimal colour code manually if you know it.
Page background image: You can display an image as background. Click the Add a file button to choose an image from your files area.
Hintergrundbild wiederholen: Legen Sie fest, ob das Hintergrundbild wiederholt dargestellt werden soll (Kacheln). Die Einstellung ist sinnvoll wenn Sie ein sehr kleines Bild verwenden. Wenn Sie dies nicht tun, wird das Bild nicht die gesamte Hintergrundfläche ausfüllen. Sie haben folgende Optionen:
Nicht wiederholen: Keine Wiederholung der Anzeige des Bildes. Dies sollten Sie nur bei sehr großen Bildern oder wenn das Bild größer als Ihre Ansicht ist verwenden.
Nur horizontal wiederholen: Ihr Bild wird horizontal, nicht aber vertikal wiederholt. Die Einstellung kann bei sehr breiten aber niedrigen Ansichten genutzt werden.
Nur vertikal wiederholen: Ihr Bild wird vertikal, nicht aber horizontal wiederholt. Die Einstellung kann bei sehr schmalen aber langen Ansichten genutzt werden.
In beide Richtungen wiederholen: Ihr Bild wird sowohl horiziontal wie vertikal wiederholt. Dies ist die flexibelste Einstellung
Hintergrundbildanhang: Legen Sie fest, ob Ihr Bild beim Scrollen mitläuft oder stehenbleibt.
Feststehend: Wenn Sie diese Option wählen, bleibt das Bild im Hintergrund beim Scrollen stehen. Nur der Inhalt wird über das Bild scrollen.
Scrollen: Bei dieser Einstellung bleibt das Bild im Hintergrund und scrollt mit der Seite mit.
Background image position: Decide where your background image shall be anchored. Click one of the options to select the position.
Click the Save button to accept your changes or click Cancel to abort your changes.
4.3.1.3. Text
You can change certain text properties and distinguish between the header area and the rest of the page.
Change text properties
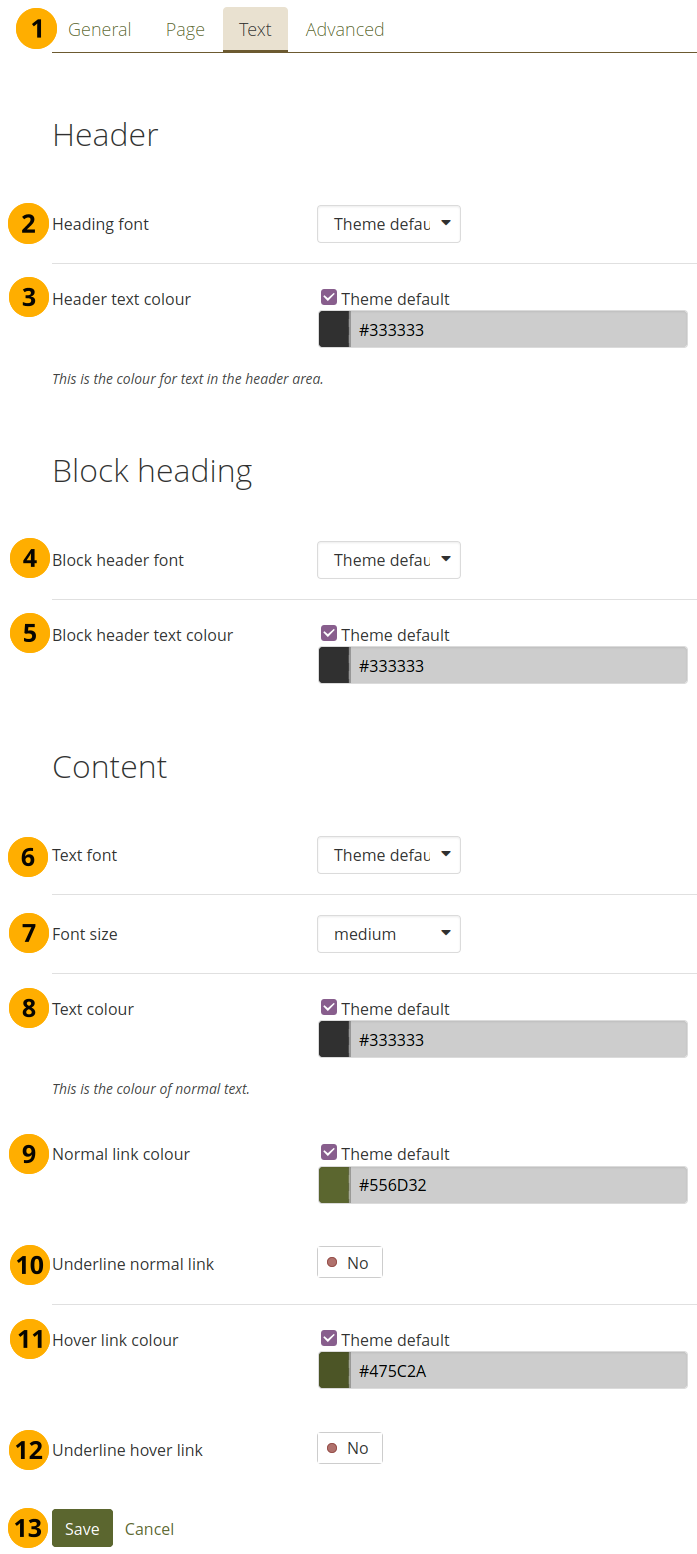
Click the Text tab to make changes to the text settings for your skin.
Heading font: Choose the font for your page (and collection) heading in the header area. The default setting is to choose your theme’s font. That way you can change the header background but can leave the font the same. You can choose from any of the installed fonts, including all theme fonts.
Header text colour: Change the text colour used for any text in the page header area.
Siehe auch
You can check the colour contrast between your selected text colour and the background you have chosen by using the WebAIM Contrast Checker.
Block header font: Choose the font for all the block headings on the page to which the skin is applied. The default setting is to choose your theme’s font. You can choose from any of the installed fonts, including all theme fonts.
Block header text colour: Select the colour for the block header. The default setting is to choose your theme’s colour.
Text font: Choose the font for all other text. You can choose from any of the installed fonts, including all theme fonts.
Schriftgröße: Wählen Sie die Schriftgröße. Überschriften werden proportional angepasst.
Text colour: Decide on the colour for text that appears on the page. The default setting is to choose your theme’s colour.
Normal link colour: Choose the colour in which links shall be displayed. The default setting is to choose your theme’s colour.
Underline normal link: Change the switcher to ‚Yes‘ if you want your links to be underlined per default.
Hover link colour: Choose the colour of your links when you hover over them.
Underline hover link: Change the switcher to ‚Yes‘ if you want your hover links to be underlined.
Click the Save button to accept your changes or click Cancel to abort your changes.
Bemerkung
Überall wo ein Farbauswahlfeld angezeigt wird, können Sie entweder in das Feld klicken, um eine Farbe auszuwählen oder den Farbcode direkt eingeben.
If you do not want to use a custom colour but retain the theme colour, tick the checkbox Theme default.
4.3.1.4. Erweitert
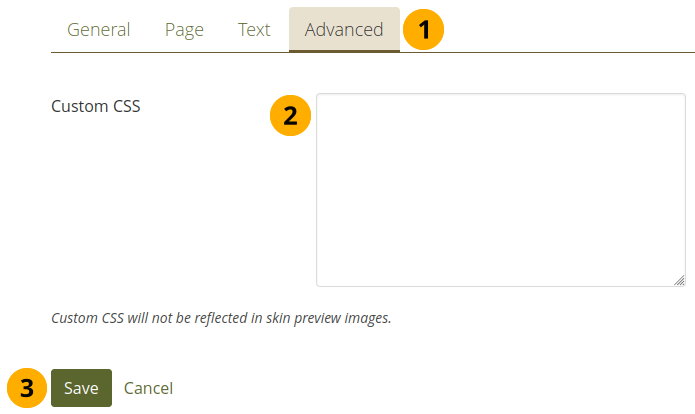
Individuelles CSS hinzufügen
Click the Advanced tab to add custom CSS.
Custom CSS: If you know how to change CSS, you can change other styles for your skin here and overwrite further elements on a page.
Click the Save button to accept your changes or click Cancel to abort your changes.
4.3.2. Wählen Sie eine Oberfläche
Main menu → Create → Pages and collections → Edit a page
When the Skins feature is turned on, you see the Skins panel in the page settings.
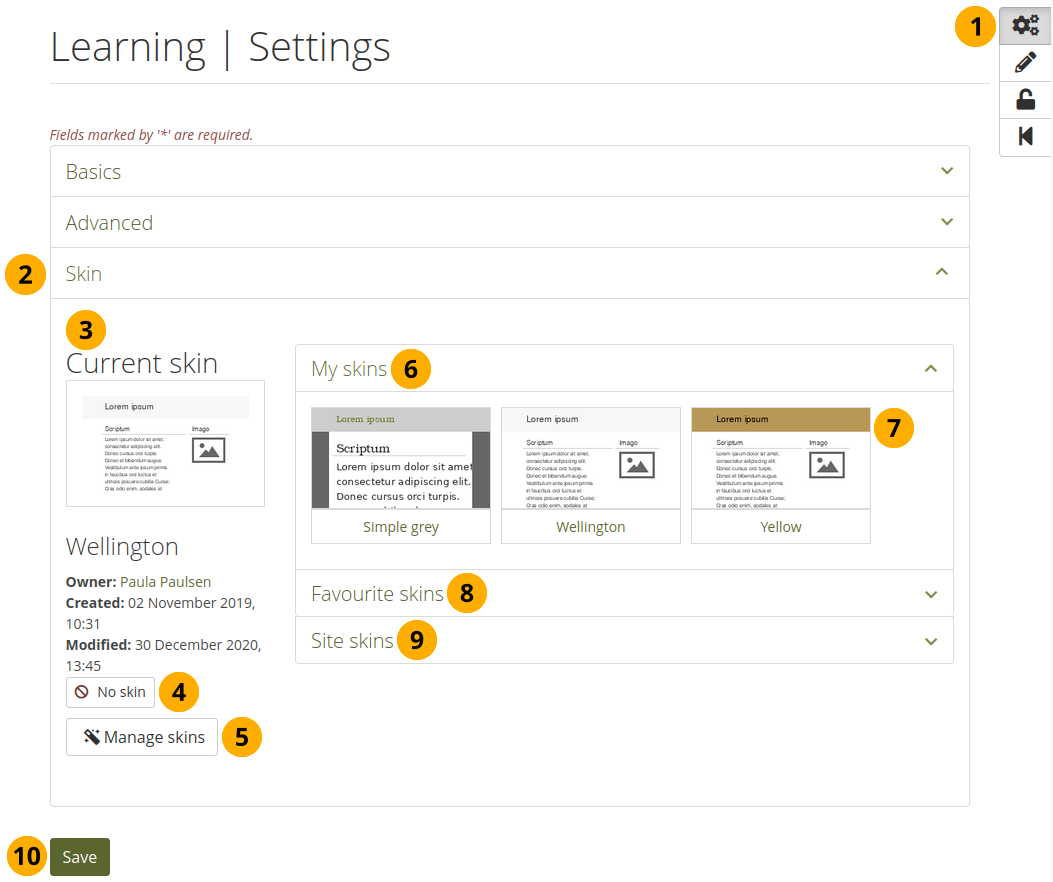
Select a skin for a page
Click the Settings button when you are in edit mode of a page.
Open the Skin panel to see select a skin.
If a skin is already selected, you can see it as well as its metadata.
You can remove the selected skin from the page by clicking the No skin button.
If you do not see a skin that you are looking for, click the Manage skins button. You will be taken to Main menu → Create → Skins where you can add or remove skins.
My skins: Skins that you created are displayed in this area.
Click the title of a skin or the preview image to select it.
Favourite skins: Skins from other people that you liked are displayed here. If you do not see a skin, click the Manage skins button. You will be taken to Main menu → Create → Skins where you can favourite more skins. Click the title of a skin or the preview image to select it.
Site-Oberflächen: Skins, die vom Site-Administrator erstellt wurden, werden angezeigt. Zur Auswahl klicken Sie auf den Titel, um eine Vorschau zusehen und die Oberfläche auszuwählen.
Once you have selected your skin, click the Save button to apply the skin to your page.
Bemerkung
The skin is only shown when you display your page. When you edit your page, you see the standard theme that is applied to the page.
4.3.3. View a page with a skin
This is what a skin applied to a page could look like.
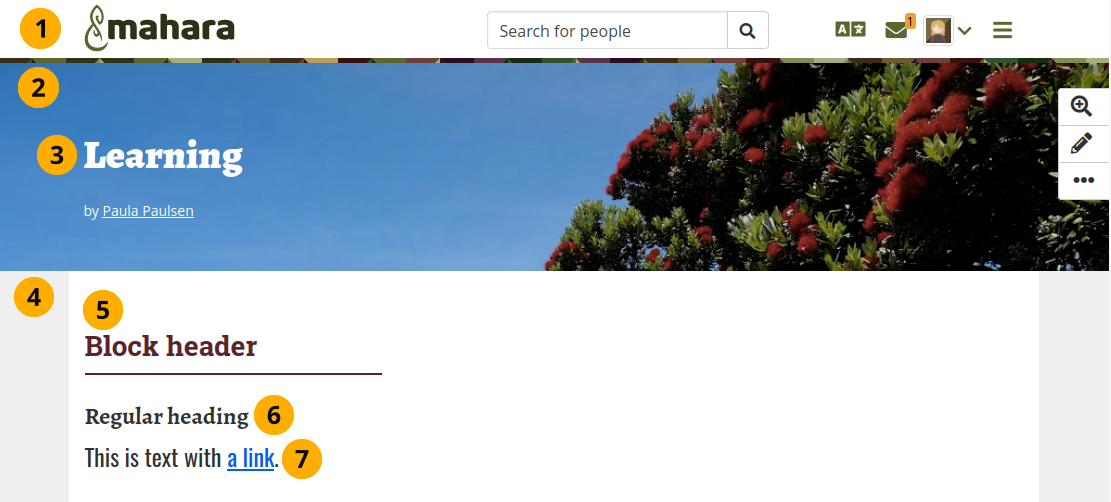
Example of a skin on a page
The top navigation bar is not changed.
Header background. This is either a solid colour or an image.
Heading font and Header text colour
Page background colour (or an image)
Block header font and Block header text colour
Block header font
Text font, Font siz, and Text colour
Normal link colour and decision on whether to underline the link or not
The bottom of the page is not changed either.
4.3.4. Was ist der Unterschied zwischen Themes und Ansichtenoberflächen?
Themes
Gibt es in Mahara in ihrer jetzigen Form seit Version 1.2.
Müssen vom Site-Administrator direkt auf den Webserver geladen werden.
Überschreiben die Ansichtenvorlage für jeden einzelnen Bildschirm in Mahara und geben die komplette Kontrolle über die Darstellung.
Abhängig von den Einstellungen auf Site- bzw. Institutionsebene kann
ein einziges Theme überall
ein Theme pro Institution
the possibility for people to choose their own theme for browsing the site
the possibility for authors to apply a particular theme to each portfolio page, the page themes
Oberflächen
Can be created, shared, exported and uploaded by people via Main menu → Create → Skins.
Are less powerful than themes. They can only change page colours, fonts and background images, and add extra CSS. Basically they add additional CSS to a page on top of a theme.
Can only be applied to personal portfolio pages. They don’t change the way any other part of Mahara is displayed.
Wenn Oberflächen und Themes miteinander kollidieren
If portfolio authors apply a skin to one of their pages, it adds one additional CSS stylesheet to the page. This is in addition to the CSS from the theme.
Es ist klar, dass nicht jede Oberfläche in Verbindung mit jedem Theme gut aussieht. Das gilt besonders werden die Ansichtenvorlage durch ein geändertes Theme anders aussieht.
Eine gute Nachricht gibt es für Theme-Designer. Das Oberflächen Stylesheet ist selbst eine Vorlage (
skin/style.tpl). Sie können damit selber festlegen welche Elemente in den Oberflächeneinstellungen zur Auswahl zur Verfügung stehen sollen.
4.3.5. Skins für ein Theme untersagen
If you use Mahara at an institution, you may wish to prevent anyone making changes to your institution theme with a skin so that your corporate design is preserved and that portfolios created for assessment purposes or as showcases of work done at your institution for example are recognizable as belonging to your institution. However, at the same time, you do want to give portfolio authors in your institution the freedom to create personal portfolios with other themes and apply skins to them.
Themes are allowed to use skins per default. If you want to change that, you need to add the parameter $theme->skins = false; to the file themeconfig.php in your theme folder. Once done, people who use this theme will see the following message:
‚Your Mahara site theme „Name of the theme“ does not support page skins. This means the skin you select will have no effect on how you see this page, but it may affect the page’s appearance for others viewing the site with a different theme.‘
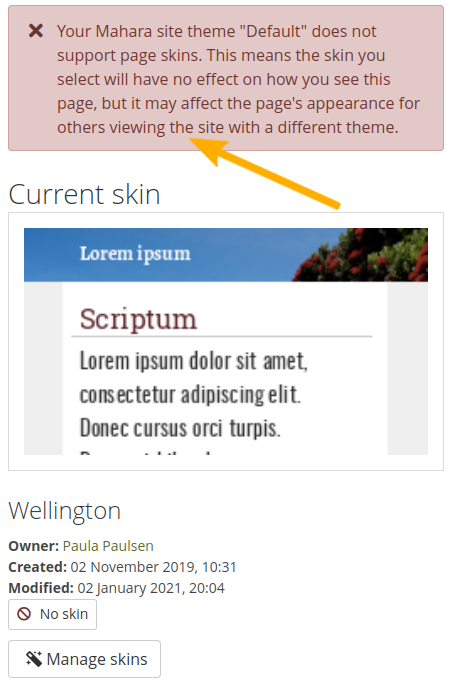
Hinweis: das Skin kann nicht zugewiesen werden.
Bemerkung
This option works best when authors cannot choose the theme in which they want to browse the site. If they do, and choose a different theme from the institution theme, then they could see the skin applied to the page because then the underlying theme is their personal one which may allow skins.