4.9. Dateien
Main menu → Create → Files
The Files area is a repository, i.e. a document storage for folders and files, that you can use within your portfolio. Both folders and files are considered artefacts and as such can be added to a page. You may create any number of folders or sub folders. To view which subfolders and files sit within a folder, click on the folder name. Use the Home link to return to the top level folder directory.
You can arrange files and folders by dragging and dropping the icon in front of the file / folder name onto another folder icon. A suitably named and organised filing structure will help you with the long-term organisation and retrieval of your artefacts. If you want to move a file or folder out of a subfolder, move it onto the parent folder icon .
Einige Ordner werden automatisch vom System erstellt, z. B. Dateianzeige oder Bilder. Der Dateianzeige-Ordner enthält Dateien aus importierten Ansichten. Der Bilder-Ordner enthält Ihre hochgeladenen Profilbilder. Wie mit allen anderen Bildern können Sie auch diese aus dem Ordner an andere Orte verschieben.
Bemerkung
Sie können Dateien und Ordner verschieben, ohne dass bestehende Verlinkungen auf diese Artefakte unterbrochen werden. Sie können diese Artefakte auch umbenennen. Die Verlinkungen bleiben erhalten.
4.9.1. Dateibrowser
In the Files area you have a file browser in which you can organise your files so you can find them. You can sort your files into folders and also create subfolders.
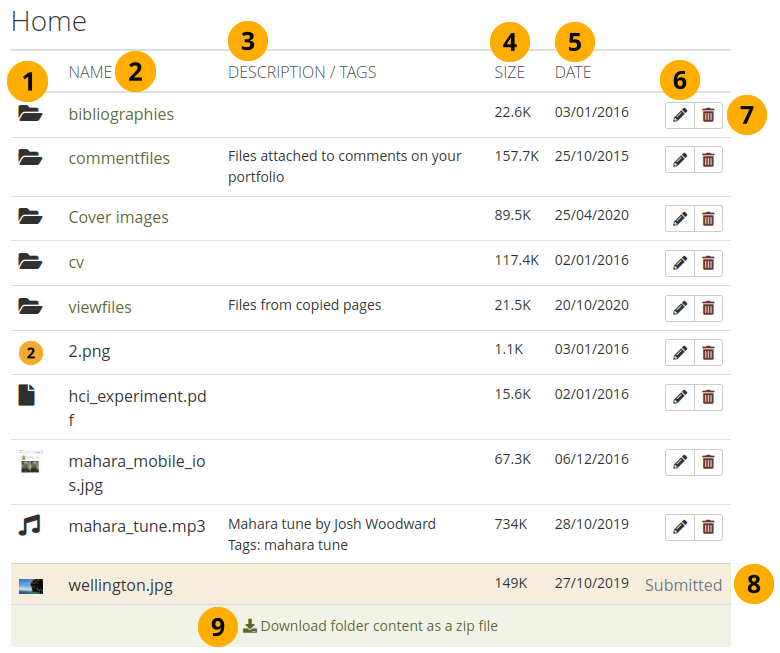
Ihr Dateibrowser
Click a file or folder icon and drag and drop it onto a folder to move the file or folder within that folder.
Name: You see all your folders and files that are not in folders listed to access them.
Bemerkung
When you click on the name of an image, you see a preview of it. You are presented with a download option when you click on another file.
Description / Tags: View the description and tags of your folders or files to know quickly what the content of them is.
Bemerkung
If you do not give an image a description, the file name is used as
alt tagto identify the image when you place it into an image block or display it embedded in text.Size: The size of your files and folders is displayed.
Datum: Zeigt den Termin zu dem ein Ordner erstellt oder eine Datei hochgeladen wurde.
Klicken Sie auf den Bearbeiten-Button , um Ordner oder Dateieinstellungen zu bearbeiten. Weiter mit Datei bearbeiten.
Klicken Sie auf den Löschen-Button um eine Datei oder einen Ordner zu löschen.
Warnung
A pop-up window requires you to confirm the deletion because you will not be able to recover the file once it is deleted. If you use a file in a journal entry and / or on a page, the warning message tells you that this file is in use elsewhere so that you don’t delete it by accident.
If a folder or file is used in a portfolio that has been submitted, you are not able to edit or delete it.
Click the Download folder content as a zip file link in order to get a zip file which contains all files and folders of the current folder.
Siehe auch
Site administrators decide in the Artefact type: File settings for how long the zip file is kept on the server.
4.9.2. Datei hochladen
Bevor Sie eine Datei hochladen, prüfen Sie, ob Sie dazu berechtigt sind. Für jedes Artefakt, das Sie in Ihrem Portfolio veröffentlichen wollen, benötigen Sie die entsprechenden Nutzungsrechte. Das meint:
das Artefakt ist Ihr eigenes oder
Sie dürfen sie verwenden und weitergeben. Urheberrechte werden dadurch nicht verletzt und
das Artefakt verstösst nicht gegen die Nutzungsbedingungen der Mahara-Site, die Sie verwenden
Bemerkung
It can be that you have to agree to an upload agreement before you can upload any files to your Files area. The site administrator decides about that in Administration menu → Extensions → Plugin administration → Plugin type: artefact: file.
Datei hochladen
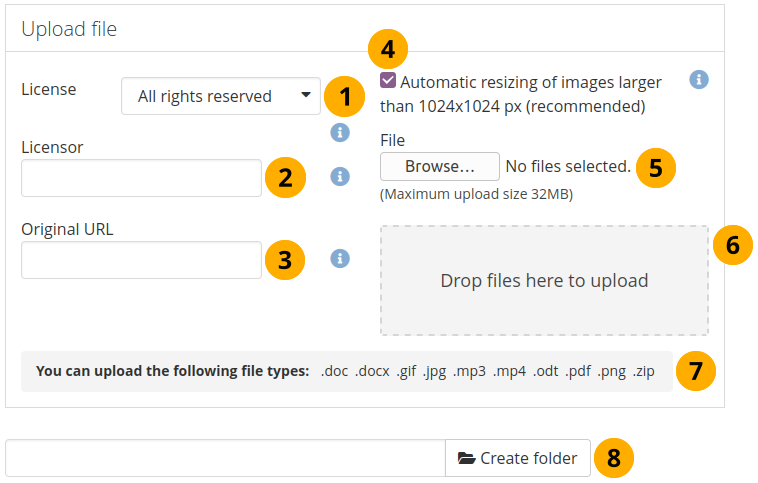
License: You see this field if the site administrator turned on license metadata. Choose the license for the artefact that you are about to upload. You can set your default license in your account settings.
Licensor: You see this field if the site administrator turned on license metadata. If you are uploading a file that somebody else created, you can attribute the work to them here and provide their name for example.
Original URL: You see this field if the site administrator turned on license metadata. If you are uploading somebody else’s file, provide a link to the original Internet address so that others can go there and view the original file.
Wenn der Siteadministrator die Bildgrößenanpassung aktiviert hat, können Sie festlegen ob ein von Ihnen hochgeladenes Bild in der Größe angepasst wird, sofern es größer als vorabdefiniert ist. Mit der Option können Sie Speicherplatz in Ihrer persönlichen Dateiablage einsparen.
Dateiupload: Zum Upload einer Datei klicken Sie auf den Durchsuchen-Button zum Zugriff auf Ihren PC. Die Größe von Dateien beim Upload ist beschränkt. Achten Sie darauf, dass keine größeren Dateien verwandt werden.
Instead of clicking the Browse button to upload files, you can drag and drop files from your computer directly onto the ‚drop zone‘. You must still observe the maximum file size upload for each file and the maximum total file size cannot be exceeded either.
Bemerkung
You can drag and drop an entire folder without zipping it into the Files area using Chrome. The files are uploaded, but not the folder itself. So if all files should be in a separate folder, create a folder in Mahara first. This feature does not exist in Firefox and Safari.
If the site administrator restricted which types of files can be uploaded, you see the list of allowed file type extensions. If there is no list, you can upload any file type.
Geben Sie den Verzeichnisnamen ein und klicken Sie dann auf Verzeichnis erstellen wenn Sie vor dem Dateiupload Verzeichnisse anlegen wollen. Klicken Sie auf den Ordner wenn Dateien direkt in den Ordner hochgeladen werden sollen.
4.9.3. Hochladen mehrerer Dateien
Sie können mehrere Dateien auf einmal hochladen. Dazu stehen Ihnen drei Wege zur Verfügung.
Sie können mehrere Dateien hochladen wenn Sie auf den ‚Durchsuchen‘-Button geklickt haben. Halten Sie die ‚Strg‘-Taste (Oder ‚cmd‘ auf Mac) und klicken Sie alle Dateien an, die Sie hochladen wollen.
Sie können mehrere Dateien in die Hochladezone verschieben.
Sie können alle Dateien auch in einen komprimierten Zip-Ordner packen und nach Mahara hochladen. Sie können damit auch Dateien aus mehreren Ordnern hochladen. Nachdem Sie die Dateien markiert haben, können Sie mit einem Rechtsklick die Dateien Packen… ( z.B. Windows: Senden an … -> komprimierter Ordner). Achten Sie vor dem Packen darauf, dass die Dateinamen und Ordnertitel keine Sonderzeichen (äüöß) und keine Leerzeichen enthalten. Diese können beim Entpacken zu Problemen führen.
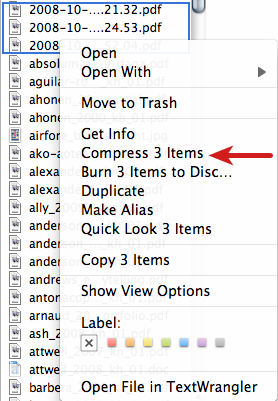
ZIP-Dateien im Finder unter MacOSX
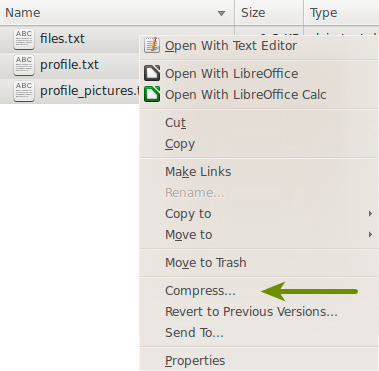
ZIP-Dateien in Ubuntu’s Nautilus
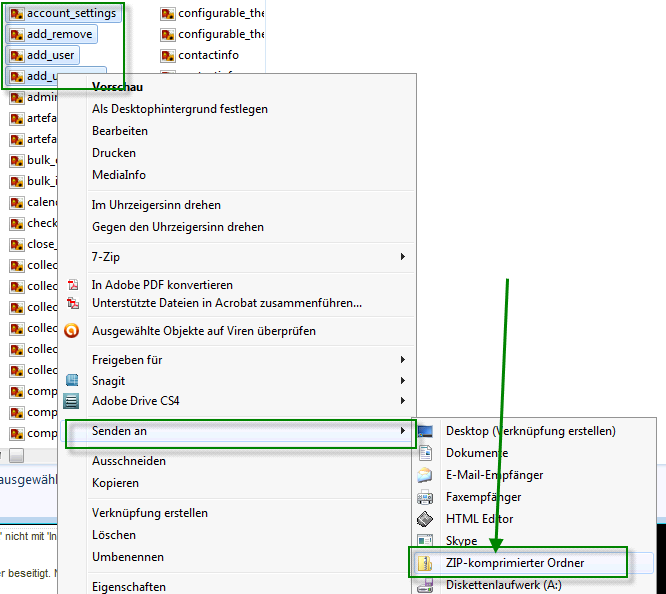
ZIP-Dateien im Windows Explorer
Nachdem Sie die Dateien nach Mahara hochgeladen haben, können Sie sie dort entpacken. Klicken Sie auf den Entpacken-Button neben dem Bearbeiten-Button . Folgen Sie dann den Anleitungen am Bildschirm.
4.9.4. Eine Datei oder einen Ordner bearbeiten
Sie können jederzeit die Berechtigungen für eine Datei oder einen Ordner bearbeiten. Die Verlinkung in Ihre Portolio-Ansichten bleibt dabei erhalten. Die geänderten Einstellungen werden sofort wirksam.
Datei bearbeiten
Klicken Sie auf den Bearbeiten-Button , um Ordner oder Dateien zu bearbeiten.
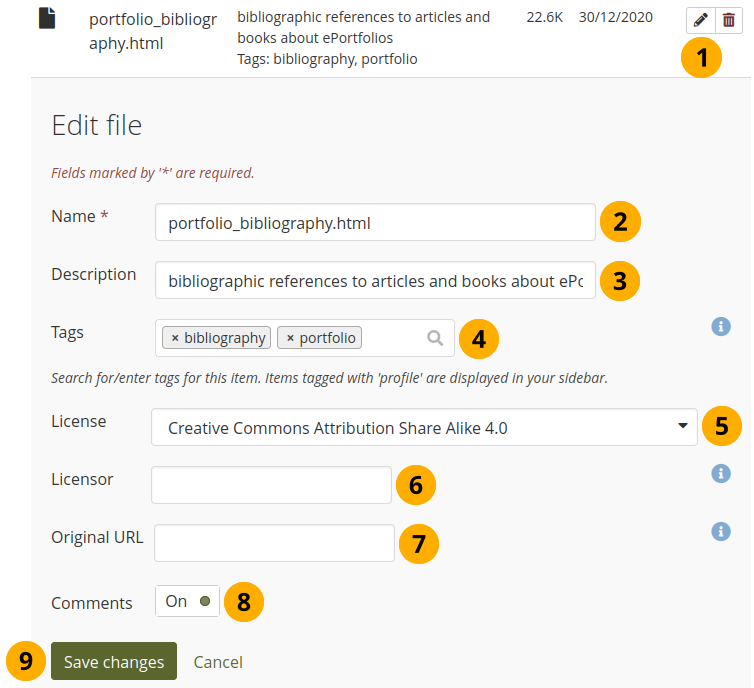
Name: Ändern Sie den Namen einer Datei (oder eines Ordners). Die Dateiendung muss nicht unbedingt beibehalten werden. Mahara speichert sie intern. Meist ist es aber besser, sie unverändert zu lassen. Andere Nutzer haben andernfalls vielleicht Probleme die Datei nach einem Download zu öffnen. Das Namensfeld ist ein Pflichtfeld.
Description: Give the file (or folder) a description.
Bemerkung
If you do not give an image a description, the file name is used as
alt tagto identify the image when you place it into an image block or display it in text.Tags: Give the file (or folder) one or more tags. You can choose from your existing tags by starting to type a letter and then selecting the tag you want to use. You can also type a new tag, and it is added to your list of tags.
Siehe auch
You can find more information on how to use the tag selector in the ‚Tags‘ section.
License: You see this field if the site administrator turned on license metadata. Choose the license for the artefact that you are editing.
Licensor: You see this field if the site administrator turned on license metadata. If you are editing a file that somebody else created, you can attribut the work to them here and provide their name for example.
Original URL: You see this field if the site administrator turned on license metadata. If you are editing somebody else’s file, provide a link to the original Internet address so that others can go there and view the original file.
Allow comments: Decide if viewers should be allowed to comment directly on the file artefact page when they view it.
Click the Save changes button to keep your changes or click Cancel to abort the action.
4.9.5. Rotate an image
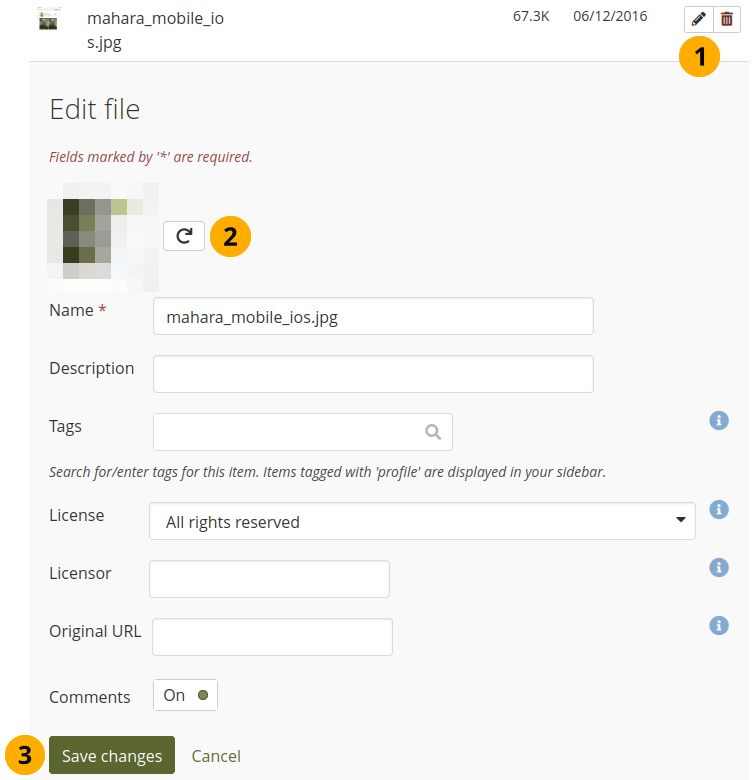
When you upload images directly from a mobile device, the orientation may not be correct, and a landscape image might be displayed in portrait mode. By rotating the image in Mahara on the fly, you can correct its orientation.
Rotate an image
Click the Edit button next to the image that you want to rotate.
Orientation: Click the Rotate button until you reach the desired orientation. The new orientation is applied wherever that image is used in blocks on a page.
Click the Save changes button to keep your changes or click Cancel to abort the action.
4.9.6. Dateiablagegröße
Der Siteadministrator Ihrer Mahara-Seite legt fest wie viel Raum Sie zum Ablegen von Dateien in Anspruch nehmen können. Dies kann je nach Institution stark abweichen.

Dateiablagegröße