4.2.4. Persönliche Informationen
The artefact blocks in this tab allow you to include information that you provided in the profile into your portfolio. If you want to make changes to the text or the images, go to Account menu → Profile.
Sie können ausserdem bestimmte Blöcke auf Ihrer Profilseite anlegen, die nur dort erscheinen.
Meine Kontakte
Meine Gruppen
Meine Ansichten
Pinnwand
4.2.4.1. Meine Kontakte
Fügen Sie einen Block mit Ihren Kontakten ein. Gezeigt werden deren Profilbilder und Namen. Dies ist ein Standardblock der Profilseite.
Sie brauchen den Block nur auf der Profilseite anlegen. Weitere Konfigurationen sind nicht erforderlich.
4.2.4.2. Meine Gruppen
Fügen Sie einen Block hinzu, der Ihre Gruppen in Ihrer Profilansicht anzeigt. Es handelt sich dabei um einen standardgemäßen Profilansichts-Block. Sie können entscheiden, in welcher Reihenfolge Ihre Gruppen dargestellt werden sollen und die Anzahl der vor der Nummerierung angezeigten Gruppen begrenzen.
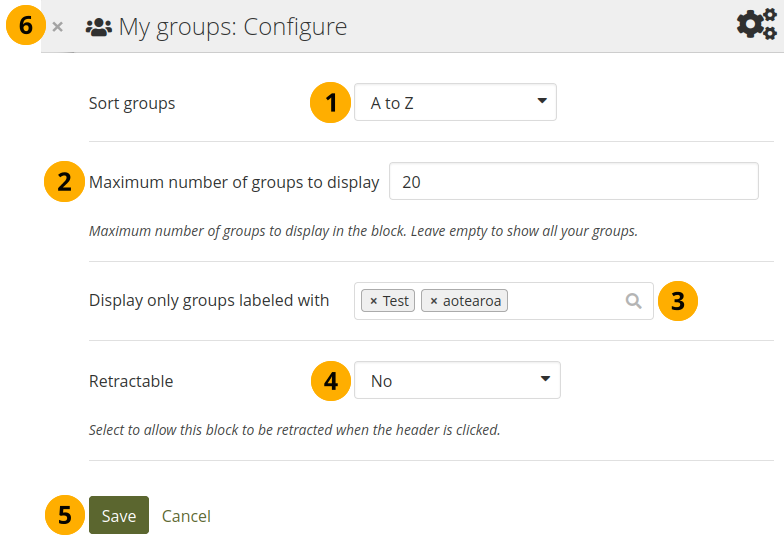
Konfigurieren des Meine Gruppen-Blocks
Gruppen sortieren: Entscheiden Sie, in welcher Reihenfolge Ihre Gruppen dargestellt werden sollen:
Zuletzt beigetreten: Gruppen werden in chronologisch umgekehrter Reihenfolge angezeigt, um Ihnen an erster Stelle anzuzeigen, welchen Gruppen Sie zuletzt beigetreten sind.
Zuerst beigetreten: Diese Option zeigt Ihnen Ihre Gruppen in der Reihenfolge an, in welcher Sie den Gruppen beigetreten sind.
A bis Z: Alphabetisch von A bis Z. Dies ist die Standardoption.
Maximale Anzahl an Gruppen, die angezeigt werden soll: Entscheiden Sie wie viele Gruppen Sie gerne in dem Block vor der Nummerierung darstellen wollen; die verbleibenden Ansichten erscheinen dann in der nächsten Ansicht im Block. Lassen Sie dieses Feld frei, wenn Sie all Ihre Gruppen anzeigen lassen wollen.
Display only groups labelled with: Select the label(s) of groups by which you want to filter your groups. You will only see filtered groups.
See also
You can label your groups on the Groups overview page.
Retractable: Choose whether you want to allow people to reduce the block to its heading on a page or see just the heading only automatically. The options are:
Nein: Der Block und dessen Inhalt wird immer angezeigt.
Yes: Allow people to reduce the block to just the heading by clicking the Retractable icon .
Automatically retract: Only the heading of the block is visible, and people can click the Retracted icon to view its content.
Click the Save button to accept your changes, or click Cancel to leave the block’s content as it is. Remove is shown only when you place the block into the page for the first time.
You can also click the Close button in the top left-hand corner of the modal window to either remove a newly created block before it is being saved or to cancel any changes and leave the block’s content as it is.
4.2.4.3. My portfolios
Add a block that displays your pages and collections on your profile or dashboard page. It is a standard profile page block. This block should stay on your profile page because others can see all your portfolios to which they have acceess.
Sie brauchen den Block nur auf der Profilseite anlegen. Weitere Konfigurationen sind nicht erforderlich.
Note
When others view your profile page, they only see the pages and collections to which they have access. That also means that you see all your pages and collections while others may see none or just a few.
You see the following when you use the block.
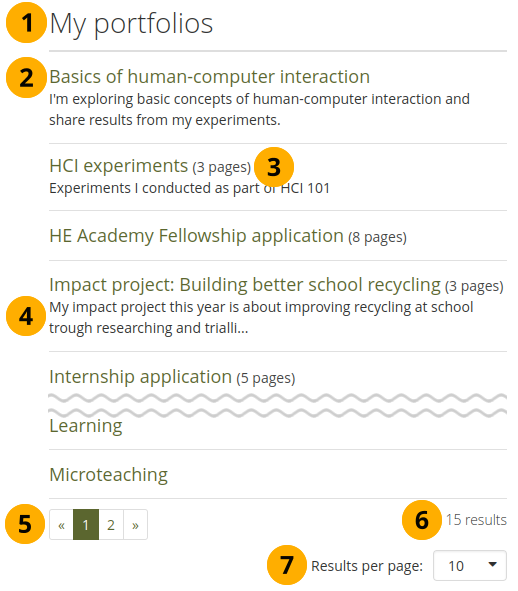
The My portfolios block displayed in a page
Block title
Title of the page or collection to which you have access.
If it is a collection, you see the number of pages contained within.
Page or collection description.
Paginator to view more portfolios.
Number of portfolios that you can view.
If you would like to see fewer or more portfolios, you can change that here. Per default, 10 portfolios are displayed.
4.2.4.4. Profilinformation
Fügen Sie einen Block mit Ihren Profilfeldern in Ihre Ansicht
Note
Only display as much information as you wish anybody to see. Especially when you make your pages available to the public, i.e. everybody on the Internet, or all logged-in people, decide carefully whether you want to display your street address and / or phone number.
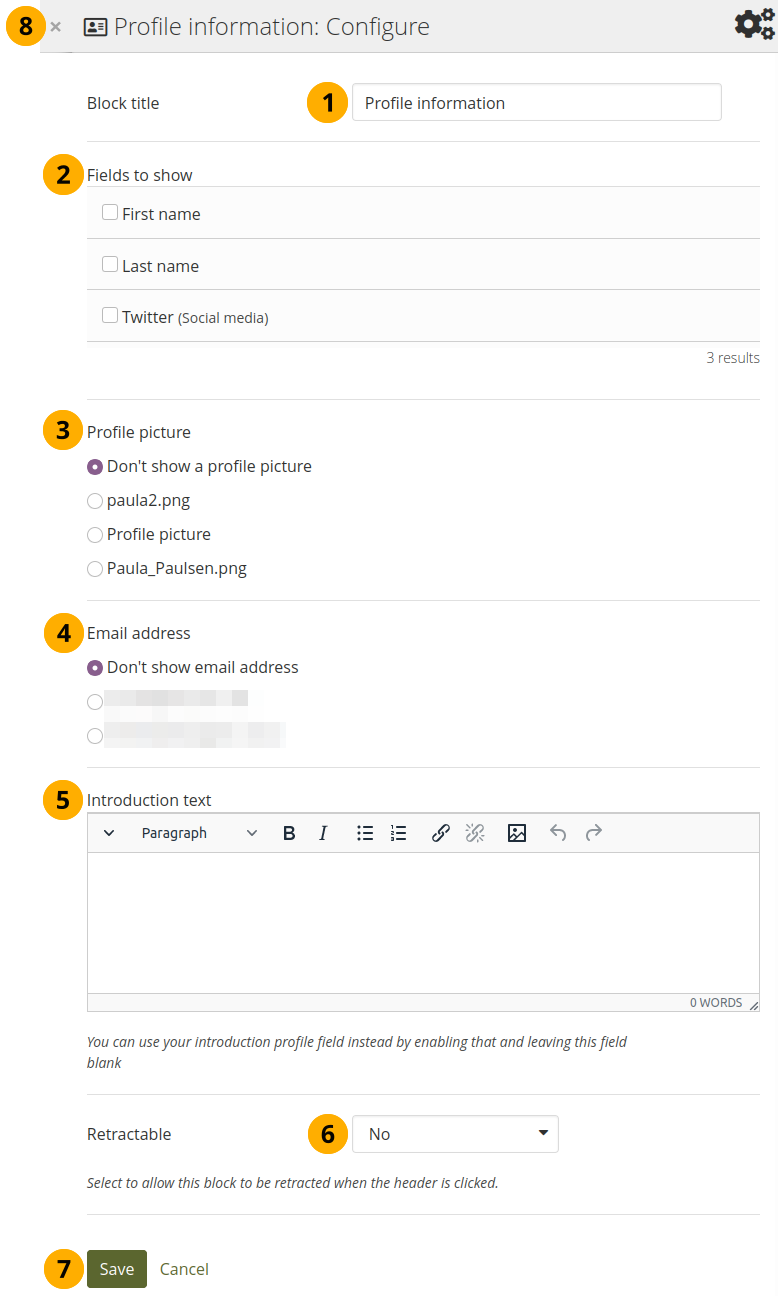
Konfigurieren Sie den Profilinformationen-Block
Blocktitel: Vergeben Sie einen Titel für Ihren Block
Anzuzeigende Felder: Legen Sie die Felder fest, die in der Ansicht gezeigt werden sollen. Markieren Sie vorne die Felder, die Sie zeigen wollen. Angezeigt werden nur Felder, die tatsächlich von Ihnen mit Inhalt gefüllt wurden.
Profile picture: Choose to display one of your profile pictures or ‚Don’t show a profile picture‘.
Email address Decide whether to display one of your email addresses that you have entered in your profile under Account menu → Profile.
Vorstellungstext: Wenn Sie den Text aus Ihrem Profil hier nicht anzeigen wollen, können Sie speziell für diese Ansicht einen neuen Text verfassen. Beim Löschen dieses Blocks wird der Text mitgelöscht.
Retractable: Choose whether you want to allow people to reduce the block to its heading on a page or see just the heading only automatically. The options are:
Nein: Der Block und dessen Inhalt wird immer angezeigt.
Yes: Allow people to reduce the block to just the heading by clicking the Retractable icon .
Automatically retract: Only the heading of the block is visible, and people can click the Retracted icon to view its content.
Click the Save button to accept your changes, or click Cancel to leave the block’s content as it is. Remove is shown only when you place the block into the page for the first time.
You can also click the Close button in the top left-hand corner of the modal window to either remove a newly created block before it is being saved or to cancel any changes and leave the block’s content as it is.
4.2.4.6. Pinnwand
Add a block that displays your wall on your profile page. It is a standard profile page block. Others can leave messages for you, i.e. write on your wall, and they can decide whether everyone looking at your profile page can see them or only they and you.
Sie brauchen den Block nur auf der Profilseite anlegen. Weitere Konfigurationen sind nicht erforderlich.
Wenn Sie Ihre eigene Pinnwand auf der Profilseite oder die einer anderen Person ansehen, so sehen sie folgendes.
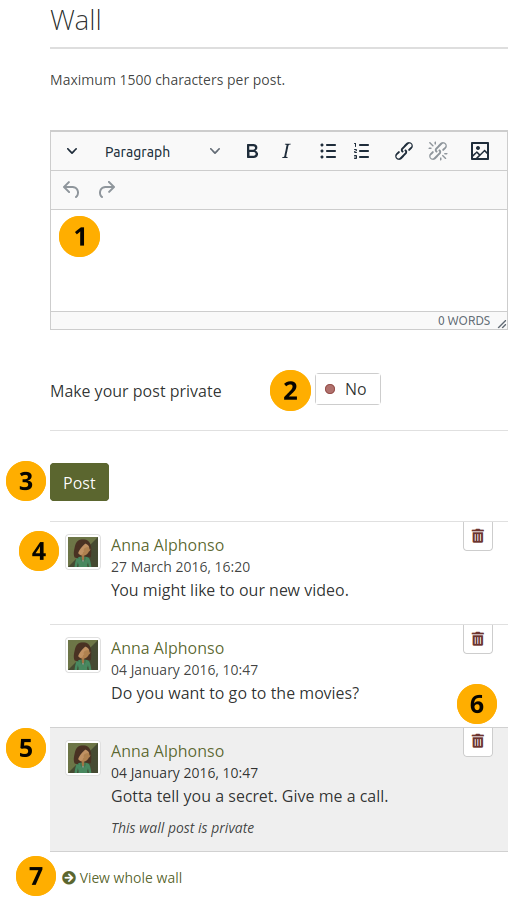
Eine Pinnwand in einer Profilansicht
Enter your message in the text box. You can use the visual editor to format your message.
Setzen Sie Ihren Beitrag auf privat: Legen Sie fest wer den Pinnwandeintrag sehen darf. Wen Sie ihn auf privat setzen können nur Sie selber und die Person auf deren Pinnwand Sie veröffentlichen den Eintrag lesen.
Klicken Sie auf den Veröffentlichen-Button, um den Beitrag auf der Pinnwand anzuheften.
A wall post always contains the name of the person who made the post, the date and the actual message. A public wall post can be viewed by anyone who has access to the profile page.
Wall posts that are private are highlighted.
Click the Delete icon if you do not want to have a specific post on your wall. The post authors and you as owner of your wall can delete posts.
Click the View whole wall link to see all wall posts.
When somebody else leaves a message on your wall, you receive a notification and have that sent to your inbox. Other people are not notified about new messages on your wall.
4.2.4.7. Biografie
Sie können den gesamten Lebenslauf oder Teile in Ihrer Portfolioansicht anzeigen. Wenn Sie nur Teile anzeigen, haben Sie mehr Einfluß auf die Anordnung der Elemente.
4.2.4.7.1. Meine gesamte Biografie
Einen Block mit Ihrem gesamten Lebenslauf in der Ansicht einfügen
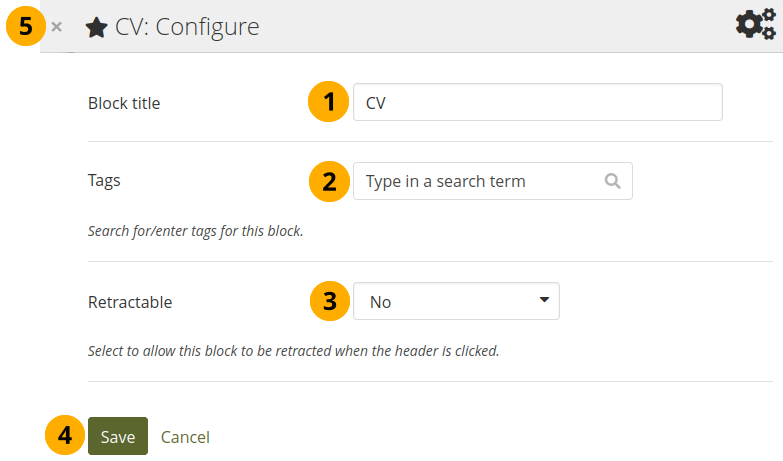
Konfigurieren des Blocks „Mein ganzer Lebenslauf“
Blocktitel: Vergeben Sie einen Titel für Ihren Block
Tags: Enter tags for this block to find this content more easily. The tags are displayed as part of the page tags.
Retractable: Choose whether you want to allow people to reduce the block to its heading on a page or see just the heading only automatically. The options are:
Nein: Der Block und dessen Inhalt wird immer angezeigt.
Yes: Allow people to reduce the block to just the heading by clicking the Retractable icon .
Automatically retract: Only the heading of the block is visible, and people can click the Retracted icon to view its content.
Click the Save button to accept your changes, or click Cancel to leave the block’s content as it is. Remove is shown only when you place the block into the page for the first time.
You can also click the Close button in the top left-hand corner of the modal window to either remove a newly created block before it is being saved or to cancel any changes and leave the block’s content as it is.
Note
When you use this block, you do not have control over the order in which the information is displayed, but Mahara decides that. In order to be more flexible, you can choose to display one résumé field at a time with the One résumé field block.
4.2.4.7.2. Ein Biografiefeld
Einen Block mit einem einzelnen Feld des Lebenslaufs in die Ansicht einfügen.
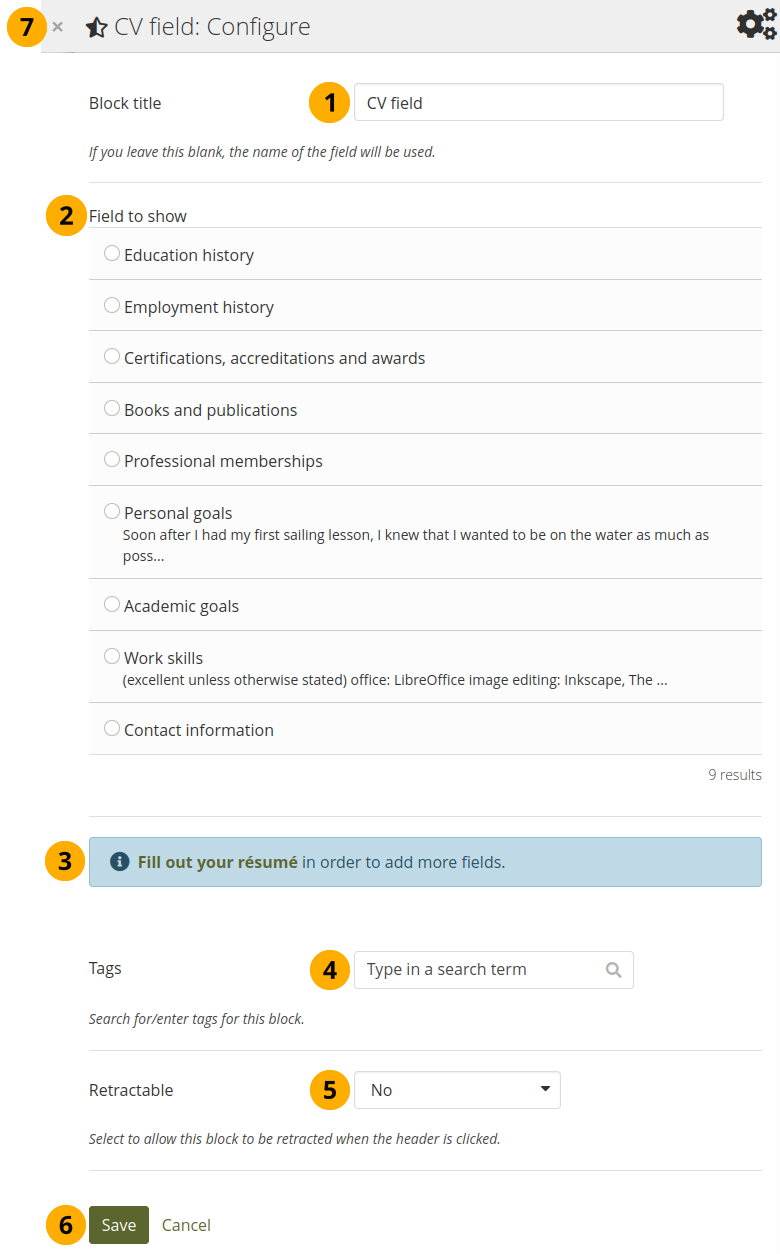
Konfigurieren des Blocks „Ein Feld des Lebenslaufs“
Blocktitel: Der Titel des Feldes des Lebenslaufs, das Sie ausgewählt haben, wird automatisch eingetragen wenn Sie keinen Eintrag selber vornehmen.
Feld auswählen: Wählen Sie die Biografieinformation, die Sie anzeigen wollen. Sie können einen Bereich auswählen.
You can jump to the résumé section directly from this modal window in order to fill in more content.
Tags: Enter tags for this block to find this content more easily. The tags are displayed as part of the page tags.
Retractable: Choose whether you want to allow people to reduce the block to its heading on a page or see just the heading only automatically. The options are:
Nein: Der Block und dessen Inhalt wird immer angezeigt.
Yes: Allow people to reduce the block to just the heading by clicking the Retractable icon .
Automatically retract: Only the heading of the block is visible, and people can click the Retracted icon to view its content.
Click the Save button to accept your changes, or click Cancel to leave the block’s content as it is. Remove is shown only when you place the block into the page for the first time.
You can also click the Close button in the top left-hand corner of the modal window to either remove a newly created block before it is being saved or to cancel any changes and leave the block’s content as it is.

4.2.4.5. Social Media
Fügen Sie einen Block mit Verlinkungen zu Ihren sozialen Netzwerken zu Ihrer Ansicht hinzu.
Konfigurieren Sie den Social Media-Block
Blocktitel: Vergeben Sie einen Titel für Ihren Block
Social Media-Accounts anzeigen: Entscheiden Sie welche Accounts in der Ansicht erscheinen sollen. Setzen Sie ein Häkchen vor jeden Account, den Sie anzeigen lassen wollen. Dargestellt werden nur die, die Sie auch zur Verfügung gestellt haben.
Display settings: Click this panel heading to show the possible display settings.
Die Accounts der Social Media anzeigen als: Wählen Sie aus, wie Sie die Links zu Ihren Social Media-Accounts darstellen lassen wollen:
Button nur mit Symbolen: Lassen Sie nur die Logos Ihrer sozialen Netzwerke anzeigen. Diese Option passt gut, wenn Sie sehr viele Accounts besitzen und in Ihrer Ansicht Platz sparen möchten. Zugleich wird es aber auch für andere kniffliger sofort zu erkennen, welche Accounts dargestellt werden, wenn sie sich nicht mit den unterschiedlichen Logos auskennen.
Button mit Symbolen und Text: Dies ist die Standardeinstellung. Das Logo des sozialen Netzwerks wird zusammen mit dessen Namen dargestellt.
Button nur mit Text: Diese Option zeigt nur den Namen des sozialen Netzwerks an.
Display default email link as button? Switch this option to ‚Yes‘ if you want to provide a button for your primary email address.
Retractable: Choose whether you want to allow people to reduce the block to its heading on a page or see just the heading only automatically. The options are:
Nein: Der Block und dessen Inhalt wird immer angezeigt.
Yes: Allow people to reduce the block to just the heading by clicking the Retractable icon .
Automatically retract: Only the heading of the block is visible, and people can click the Retracted icon to view its content.
Click the Save button to accept your changes, or click Cancel to leave the block’s content as it is. Remove is shown only when you place the block into the page for the first time.
You can also click the Close button in the top left-hand corner of the modal window to either remove a newly created block before it is being saved or to cancel any changes and leave the block’s content as it is.
Hier können Sie sehen, wie die einzelnen Optionen in Ihrer Ansicht dargestellt werden.
Drei Optionen wie Sie die Accounts Ihrer Social-Media anzeigen lassen können
Buttons nur mit Icons
Buttons mit Icons und Text
Buttons nur mit Text