8.2. Profile
Account menu → Profile
Your Profile area stores your contact and personal information. Each of the profile fields can be considered separate artefacts which you can add independently to your profile page or any portfolio page. Thus, you can reveal as little or as much information about yourself to others as you wish.
8.2.1. About me
Account menu → Profile → About me
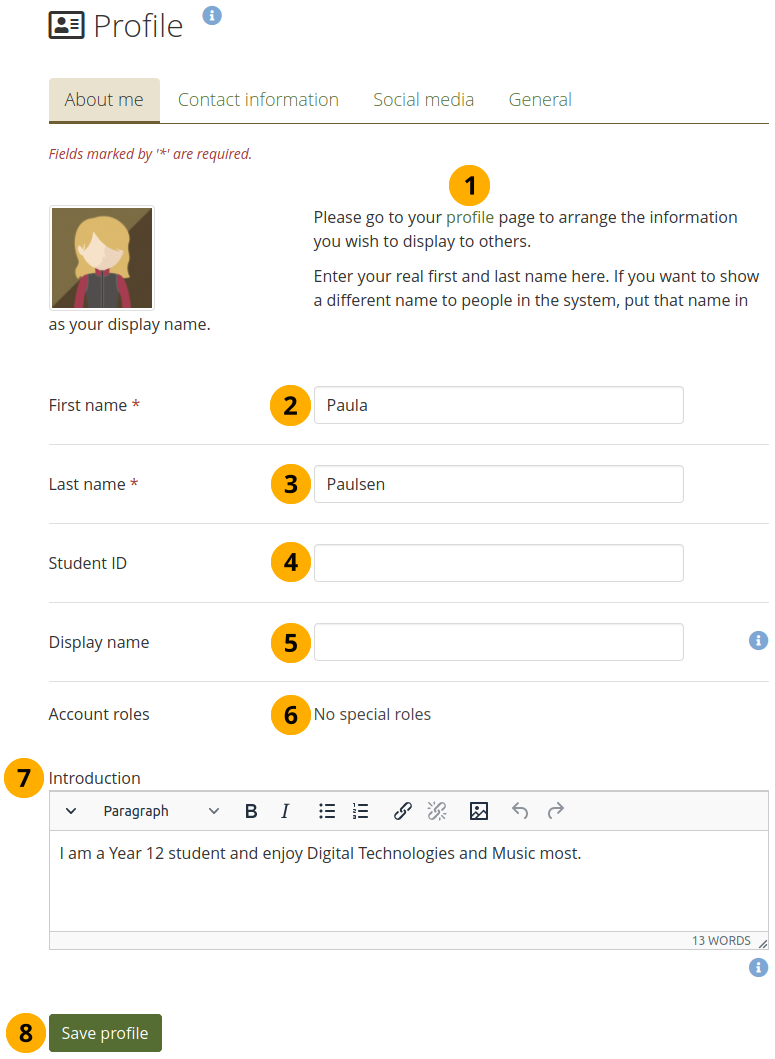
You must provide a first and last name. All other information is optional. You name is visible to others on Mahara. You may choose to have a Display name. You can change the information here at any time unless an administrator locked certain fields.

Profile: About me
The link Profile takes you directly to the edit screen of your profile page where you can arrange the information you wish to display on this page.
First name: Your real given name
Last name: You real last name
Student ID: Fill it in if it is required
Display name: The name by which you want to be known around Mahara. If you have a display name, your real name will not be visible to regular Mahara account holders. Only administrators can see your real name and your username at all times.
Account roles: If you have any special role on the platform, it is displayed here.
Introduction: You can write about yourself. This text is placed onto your profile page automatically unless you take the introduction out of your profile page.
Note
If you log in via Moodle and your information is updated upon each login, your introduction will be overwritten by what you have in your Moodle profile description.
Click the Save profile button to save your changes.
8.2.2. Contact information
Account menu → Profile → Contact information
8.2.2.1. General information
You may wish to provide some of your contact information for later use in a page. All details you fill in here are only visible to others when you put them into a page. Until then only you can see them.
Warning
You are not required to provide any of the information asked for on this screen (except for one email address). Do not enter any private information in here that you do not want people to know. When choosing the Profile information block for any of your pages, you can decide which information to show on the particular page for which you choose the block.
However, be very vigilant with your private information. Think about it like providing information on a business card. How much or how little would you want to display there? Do you need to give out your home phone number and postal address? If not, leave them out.

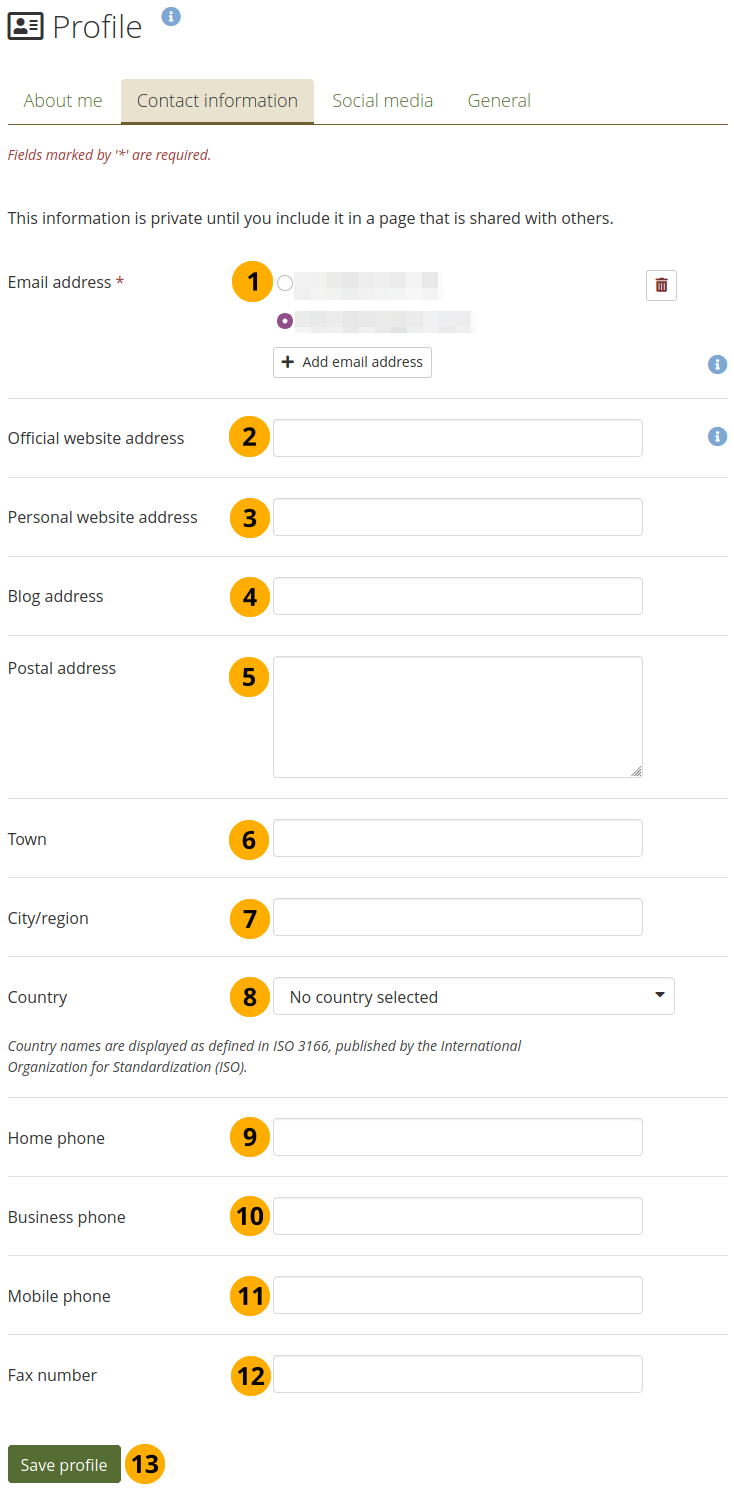
Profile: Contact information
Email address: You must have at least one email address in the system. Your primary email address, i.e. the first one shown, is the one that is used for any notification from Mahara. You can choose to display your secondary email addresses on specific pages.
Official website address: If you have a business and want to put the URL to its website into your portfolio, you can enter it here.
Personal website address: If you have a website for yourself, you can enter its URL in here and include it into your pages.
Blog address: If you have a blog, copy its URL in here so you can use display it in your pages.
Postal address: Enter your postal address in here if you wish.
Town: Enter the town you live in / work at here. It should match your postal address.
City / Region: If you have a further distinguisher to where you live, enter it here.
Country: Choose the country you live in from the drop-down menu.
Home phone: Enter your home phone number here.
Business phone: Enter your business phone number here if you wish.
Mobile phone: You can also provide your mobile phone number.
Fax number: If you have a fax number where people can send you documents, enter it here.
Click the Save profile button to save your changes.
8.2.2.2. Add and delete email addresses
The email address with which you registered on Mahara is displayed. You can add other email addresses to your profile so that you can use them later on.

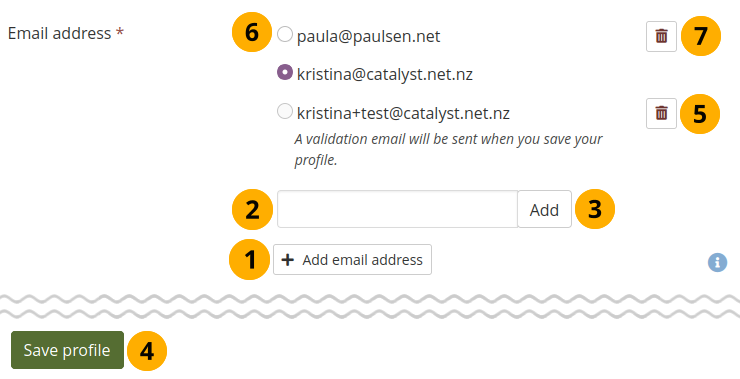
Profile: Add or delete an email address
On Account menu → Profile → Contact information click the button Add email address. A text field is being displayed.
Enter your email address into the text field. Make sure you do not have any spelling mistakes in it.
Click the Add button.
Click the Save profile button at the bottom of the page. Only then is the authorization email sent to this email address to verify that it can be added. Follow the instructions in that email to continue.
Until you verify your email address, it is displayed, but cannot be used. You can delete it at any time by clicking the Delete button .
Once you verified your email address, it is added as secondary address.
Note
If you mark one of your secondary email addresses with the radio button and click the Save profile button, this address becomes your primary email address and the one to which all notifications are sent.
Click the Delete button to delete an email address that is not your primary one.
8.2.4. General
Account menu → Profile → General
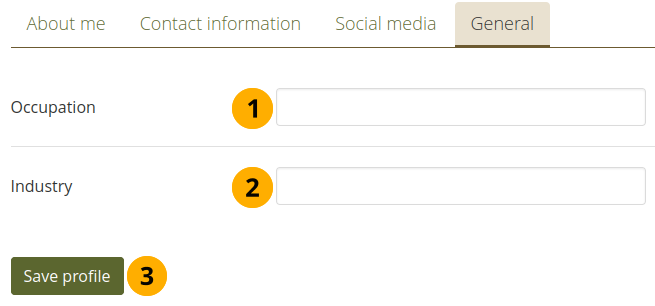
This tab is primarily for those who wish to use their portfolio in an employment context.

Occupation: Enter your job title if you wish.
Industry: Enter the industry in which you work.
Click the Save profile button to save your changes.
8.2.3. Social media
Account menu → Profile → Social media
If you use social media, you can enter your usernames / profile URLs here so you can use them in your portfolio later.
8.2.3.1. View your list of social media accounts
Profile: Social media
The icon of the social media service is displayed if Mahara knows it.
Social network: The name of the social network is displayed for which you provide a link to your profile.
Your URL or username: Display your username for the social network or URL depending on what is asked for when you select the network. The username or URL is linked so you can click on it and verify it.
Click the Edit button if you want to make changes to a certain social network.
Click the Delete button if you want to remove a certain social network from the list.
Click the New social media account button if you want to add another account.
8.2.3.2. Add a social media account
Profile: Add a social media account
Click the New social media account button if you want to add another account.
Social network: Choose the social network from the drop-down menu for which you want to add a profile. If your social network is not displayed, choose the option ‘Other’.
If you chose ‘Other’ as your social network, enter the name of the site in this field.
Your URL or username: Enter your username or the URL to your profile into this field. If you chose ‘Other’, you need to enter the URL so that it can be linked properly to your profile. Also enter the URL if you want to link to your Facebook or Tumblr account.
Click the Save button to add your social network profile to your list of profiles or click the Cancel button to abort your changes.
8.2.3.3. Delete a social media account
Profile: Delete a social media account
Click the Delete button next to the social media account that you want to remove from your profile.
On the next page, click the Delete a social media account button.
Note
You do not delete your social media account itself. You only delete the reference to it in your Mahara profile. As long as you have the actual social media account, you can always add it back.