2. Information for Mahara manual writers and translators
This is a list in progress. There are a number of things for which conventions were created. Here is the central space to keep them so that everyone has access to them.
The list is not in any particular order.
2.1. Install Sphinx
The Mahara manual requires that Sphinx is installed on your computer. You can find information on how to install Sphinx on the Sphinx website.
The following instructions are for Debian / Ubuntu based systems and require that you work in the terminal.
Install the Python virtual environment:
sudo apt-get install python-virtualenvIf you also want to generate PDFs, you will need to install all the LaTeX dependencies:
sudo apt-get install texlive-xetex texlive-lang-all texlive-fonts-extraCreate a folder on your computer (if you don’t already have one) where you place git repositories, e.g.
code.In the terminal, enter the folder ‘code’:
cd codeDo a checkout of the code for the manual:
via SSH:
git clone git@git.mahara.org:user-manual/manual.gitORvia HTTS:
git clone https://git.mahara.org/user-manual/manual.git
In the terminal, enter the folder ‘manual’:
cd manualInstall the virtual environment for this folder:
virtualenv venvActivate the virtual environment:
. venv/bin/activateInstall all requirements:
pip install -r requirements.txtBuild the manual in HTML:
make htmlNote
This will create all translations that are available for the manual and will take a bit. If you only want to create the English manual, you can compile it with
make preview MAHARA=18.10If you want to compile a PDF, you can do so via
make latexpdfOpen the
index.htmlfile in a browser to view the manual. You can find it in the folderbuild/en/18.10.Once you are done editing the manual, you can deactivate the virtual environment by typing
deactivatein the terminal.
2.2. Make changes to the manual
Once you installed the manual on your computer, you can make changes. The following actions are performed in the terminal.
Enter your manual folder:
cd code/manualStart the virtual environment so you can compile the manual using Sphinx:
. venv/bin/activateNow make any changes in your preferred editor.
Compile a preview of the manual just in English:
make preview MAHARA=18.10Note
Change the version number depending on the version of Mahara that you are compiling.
Deactivate the virtual environment once you are done editing:
deactivate
2.3. Screenshots
are placed using the ‘figure’ directive.
always include alt text and a figure description. That sets them apart from the text.
are generally placed above a list if they are part of step-by-step instructions.
should have as few instructions as possible about the steps that are to be taken in them. Preferably, only the step numbers so that they can be exchanged and the text of the steps is translatable because it is text and not part of the image. That could also mean that translators can translate the steps but don’t immediately have to change the screenshots.
get callouts that are pre-made and can be found in the Gimp file
/images_originals/z_callouts.xcf.only get an arrow if an item is to be pointed out but there are no steps involved. The arrow can be found in the file
/images_originals/z_arrow.png.that have callouts refer to the steps that need to be taken and that are explained below the figure.
should only show the necessary area and not the entire screen or URL address bars etc. where not necessary.
Most screenshots are added with the figure directive.
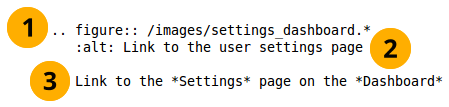
Example of including a screenshot
The first line provides the path to the file.
Note
The * replaces the file extension and Sphinx chooses the file that is most appropriate. Thus, files could have different image extensions, or you could have the same screenshots in different file formats that are then chosen by the programme to best suit the end format of the manual.
For the Mahara manual we use .png files in general as we work with screenshots. It is still good to use the * instead of the .png extension in case the file format is changed at some point.
The second line represents the alt text that is displayed when hovering over the image, when no images are displayed or when viewing the page via a screen reader.
The third line must follow an empty line. This is the text that is displayed below the screenshot as figure description. In the PDF output, the descriptions will be numbered continuously.
If you don’t want to display all the information from a screen but only the top and the bottom part, you can use the file
/images_originals/z_omission.xcfand place it into your screenshot. The sinus waves were created using the gimp plugin Shape paths with the following settings:Sine Wave
Start X: 0
Start Y: 200 and upon the second run 215 to get the gap between the lines
Amplitude: 3
Wavelength: 25
Number of cycles: 40 (but depends on how wide the screenshot is)
Tick for Stroke path
Stroke color: CCCCCC
Note
If you want to include an image inline with the text and don’t want to or can’t use the regular figure, you should create a substitution and place it into the shortcuts.rstext file. There are plenty of examples in that shortcuts file already.
2.4. Admonitions in use are
note: for anything that should receive a bit more attention
Note
Notes can be placed directly within a bulleted list. As usual, an empty line before and after the note must be placed and the admonition must be indented by 3 spaces.
warning: for anything that needs to be done with caution
Warning
Try not to put everything into an admonition because then the truly important information is lost.
seealso: for references to other documents if they need special attention. References to other documents can also be included in the text inline.
See also
The Sphinx documentation is a great place to deepend your knowledge and understanding of using rST with Sphinx. If you have any questions, you can also check out the Sphinx discussion group.
todo: for keeping a running ToDo list. ToDo lists are currently disabled.
2.5. Conventions
Note
Languages that do not use spaces between words
Sphinx assumes that there is always a space before a command starts and after one ends. That is the only way that it has to recognize the markup characters as ones that tell Sphinx what to do.
This poses a problem in languages such as Japanese as there are no spaces between words.
You do need to put spaces into the text though. Otherwise, formatting won’t happen, index entries won’t get created, and substitutions are not done. Thus, replicate the spacing that you see in the English version. For example, put a space:
before and after a substitution such as
|edit|,before
:index:and:ref:and when the index entry or reference ends.before
*when it is followed by a word and after the closing*, e.g.*word*because that indicates that the formatting is changed to word. The same goes for words that begin and end with**.
Each section that is related to a navigation menu item should have the path listed, e.g. Main menu → Create → Files. It is best if you copy the arrow to get the correct one.
Buttons such as Save or Copy page and also portfolio sections such as Create, Share etc. are highlighted as emphasized text (with a single *).
Little buttons can be included in the text like , . They are added through a substitution. All replacements are kept in the file shortcuts.rstext which is included in each file in which a substitution is used by placing ‘
.. include:: /shortcuts.rstext’ in the first line of the file. Substitutions are referenced in the text as ‘*Edit* button |edit|’ for example pointing out what the action is that you do with them. Translators should not edit the substitution ‘|edit|’ itself, but only change ‘*Edit* button’ taking care to include the * again without placing any spaces between the * and the text to ensure that the word appears highlighted.An index entry should be created for each section.
New features receive an index entry as well in the form ‘single: New in Mahara x, [the functionality that is new]’. Index entries can be placed either above an entire section or inline. Inline is preferable for small functional changes so that readers are directly taken to the new functionality. This can be done like so:
:index:`Decide on the sort order <single: Sort order of files in the 'Folder' block>`Warning
If there is not a punctuation mark just before ‘:index:’ and/or after ‘>`’, you have to insert a space just before ‘:index:’ and/or after ‘>`’.
Long sections like the administration are broken up into several pages to make the editing more manageable instead of having everything on one very long page.
reStructuredText does not have a set hierarchy of heading levels. They depend on the individual files. However, to be consistent, the following convention exists:
Heading 1, e.g. 1.: ===============
Heading 2, e.g. 1.1.: —————
Heading 3, e.g. 1.1.1.: ~~~~~~~~~~~~~~~
Heading 4, e.g. 1.1.1.1.: ^^^^^^^^^^^^^^^
Headings below h4 should be avoided.
The index page does not have headings besides the main heading. That prevents the table of contents and the other sections that have headings to be the main chapters of the manual. Keep index page headings to just bold with **.
2.6. In-text formatting
Bulletted lists have * as symbol to start each bullet point.
Numbered lists have #. to start each numbered item.
If you require an indented bulleted or numbered list, place a free line before the indented list and then indent each line with 3 spaces. There also needs to be an empty line when the indented list ends.
Emphasized text starts and ends with 1 *, e.g.
*this*. It will then look like this.Bold text starts and ends with 2 *, e.g.
**this**. It will then look like this.
2.7. Hyperlinks
External links: ‘
`[text that is linked] <URL>`_’ - Translators should only replace ‘[text that is linked]’.Internal references to which can be linked from elsewhere in the manual are created by placing ‘
.. [reference_text]:’ in a line right before a heading. I usually leave an empty line between the reference and the heading.Linking to an internal reference: ‘
:ref:`[text that is linked] <the internal reference>`’ - Translators should only replace ‘[text that is linked]’.The ` is an accent mark and not a straight single quote.
An in-text target can be achieved by placing the text to be linked within accent marks preceded by an underscrore:
_`the internal reference`. Referencing is the usual:ref:`[text that is linked] <the internal reference>`.
2.8. Translators beware
Do not change the target for internal links that is placed between < >. If you do, the reference cannot be found. There should always be an explanatory text right before the pointy brackets. You can change that.
Similarly, you can change the text for a URL but not the URL itself unless you want to replace it with a URL to a site in your language.
If you translate the screenshots and other images, please ensure that you keep the folder structure of the ‘images’ folder as you can see in the respective branch of the manual version you are editing in Git, for example for Mahara 18.10.
You can find original images used for the manual in the folder ‘images_original’ and then their respective subfolders. You can use them for your own translations if you only want to exchange the background but keep the callouts.
You do not have to redo any images that you do not ‘translate’, e.g. block icons, general buttons around Mahara and the text editor buttons. Any images that are not in your translation will be taken from the English original.
The manual is updated once a day and new translation strings pulled in from Launchpad and images uploaded to Git prior to the compilation of the manual if there are any changes.
Note
If you want to mention the names of the main translators of the manual for your language, you can add a sentence right after ‘The Mahara manual is written by Mahara community members.’ That paragraph appears before the table of contents. There is no equivalent sentence in the English manual because it is not a translation.