
11.6. Setup in Canvas
You can set up the LTI connection to Mahara either for all your courses in Canvas or for a single course.
The advantage of setting up the connection for your entire instance of Canvas is that your teachers do not have to set up the connection themselves and everybody connects to the same instance of Mahara and to the same institution.
If you want to have more control to what institution in Mahara your learners shall connect, you can set up the LTI connection on the course level.
You can choose to set up the connection via the Edu App Center or via manual configuration. The manual configuration allows you to open Mahara in its own window rather than within Canvas.
11.6.1. Setup via the Edu App Center
When you set up Mahara via the Edu App Center, your Mahara instance is opened as iframe within Canvas reducing the space you have available to view Mahara. You will always see the Canvas navigation around it as well.
Warning
For security reasons, Mahara prevents being embedded as iframe in another website. If you want to use the Edu App Center and not set up Mahara manually (just slightly longer setup time), you will need to disable a security feature on Mahara, which is not recommended. You can do so by adding $cfg->sameoriginframes = false; to your config.php.
See also
If you want to have Mahara opened in a separate window, you can follow the setup instructions for that.
Choose Mahara from the Edu App Center
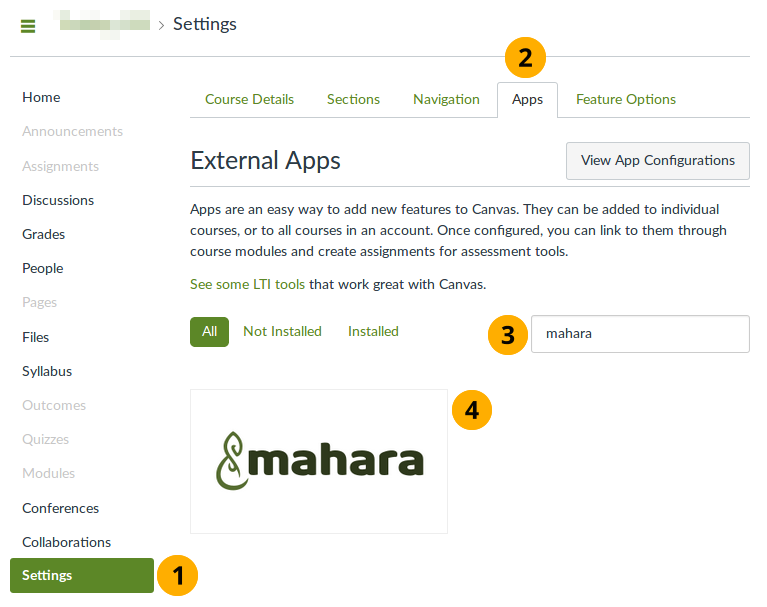
Select Settings in your Canvas site or course.
Note
If you choose to put the link in your site, all courses will have the link in their navigation. If you decide to put the link only into your course, only your course participants will be able to access Mahara.
Select the Apps tab. You have access to the Edu App Center.
Search for ‘mahara’ in the search field.
Select the Mahara app that is presented to you. You are taken to a screen that shows you more information about the app itself.
Select the Add App button to start the configuration.
In order to add the connection to Mahara, you need to have set up Canvas as external tool in Mahara for your institution because you require the consumer key and consumer secret.
Configure Mahara via the Edu App Center
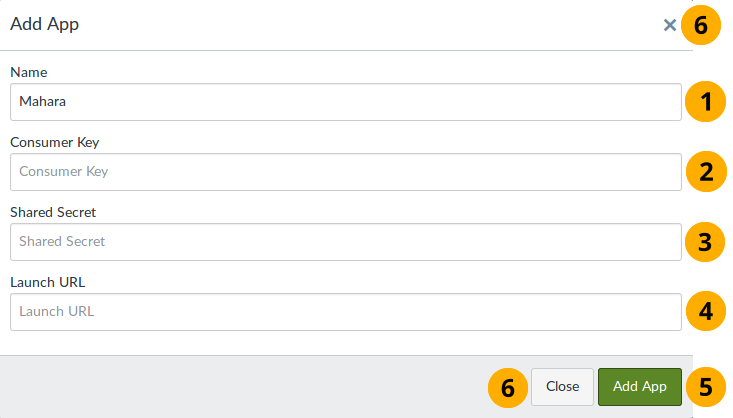
Name: You can decide what you want to call the app. The name you choose here will be the one displayed in your course navigation.
Consumer Key: Paste the consumer key from Mahara for the LTI connection that you set up earlier.
Shared Secret: Paste the consumer secret from Mahara for the LTI connection that you set up earlier.
Launch URL: Paste the URL of your Mahara instance.
Select the Add App button to finish the setup.
Select the Close button or the Close icon close to abort the setup.
The app appears in your course navigation when you refresh the page.
Select the app to be authenticated in your Mahara instance.
Note
If you already have an account in the institution in Mahara with the email address you use in Canvas, you are taken to that account.
If your email address does not yet exist in Mahara and you allowed for automatic account creation, an account will be set up for you.
If your email address exists in Mahara but you are not a member of the institution for which you set up the Canvas integration, you receive an error message and will need to become a member of that institution before you can log in via Canvas.
11.6.2. Manual setup
You may prefer the manual setup of the connection to Mahara at times.
Choose to set up Mahara manually
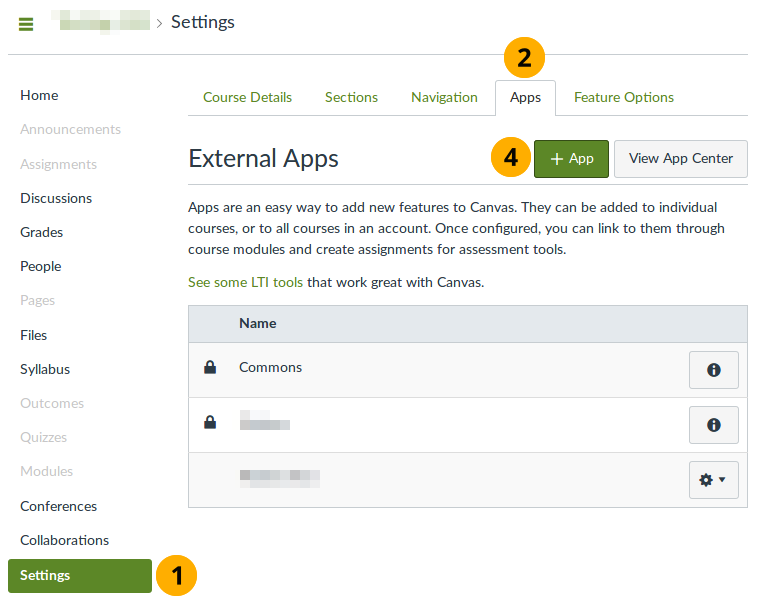
Select Settings in your Canvas site or course.
Note
If you choose to put the link in your site, all courses will have the link in their navigation. If you decide to put the link only into your course, only your course participants will be able to access Mahara.
Select the Apps tab.
Select the View App Configurations button.
Select the App button to add your Mahara app manually.
You add the details for your Mahara instance in the pop-up window.
Configure the connection to Mahara
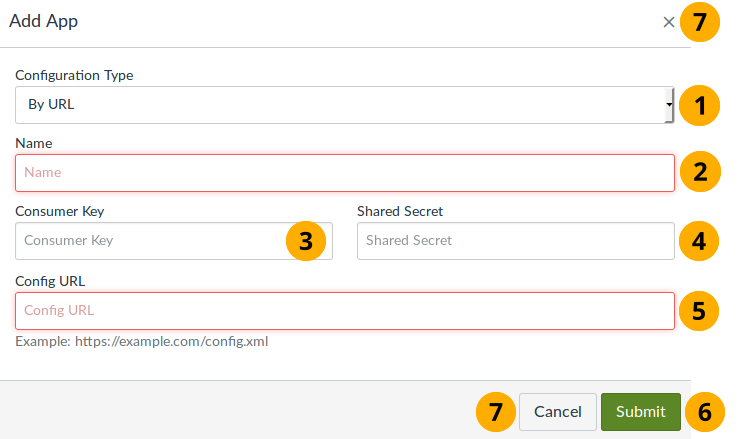
Configuration Type: Select ‘By URL’. The configuration parameters are available in your Mahara instance.
Name: You can decide what you want to call the app. The name you choose here will be the one displayed in your course navigation.
Consumer Key: Paste the consumer key from Mahara for the LTI connection that you set up earlier.
Shared Secret: Paste the consumer secret from Mahara for the LTI connection that you set up earlier.
Config URL: Paste the URL of your Mahara instance and add the following to the end of it:
/module/lti/configxml.phpSelect the Submit button to finish the setup.
Select the Cancel button or the Close icon close to abort the setup.
You are taken to the ‘External Apps’ page.
You will need to add a custom parameter in order to use the assignment submission functionality.
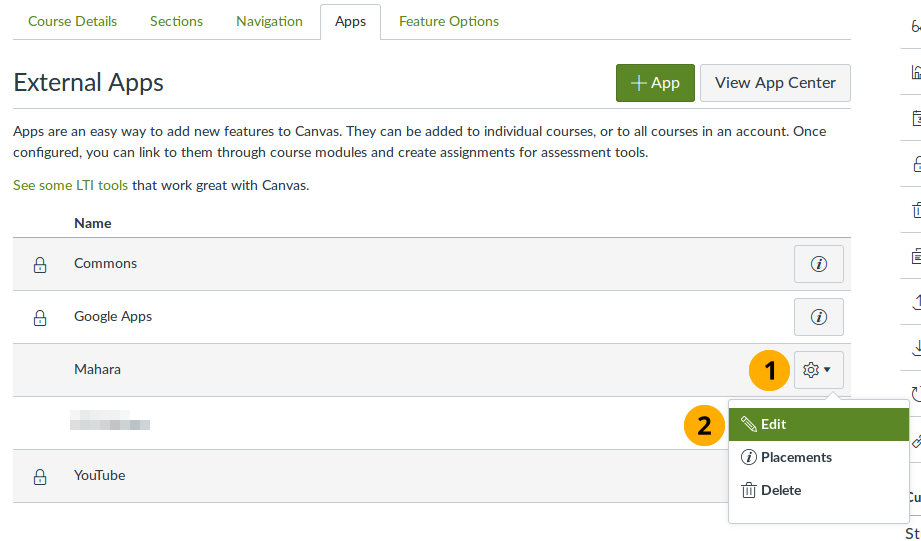
Make changes to the LTI setup
Next to the app that you just created, select the Configure button.
Select the Edit option.
Now you can enter the additional parameter without which the connection cannot be established properly.
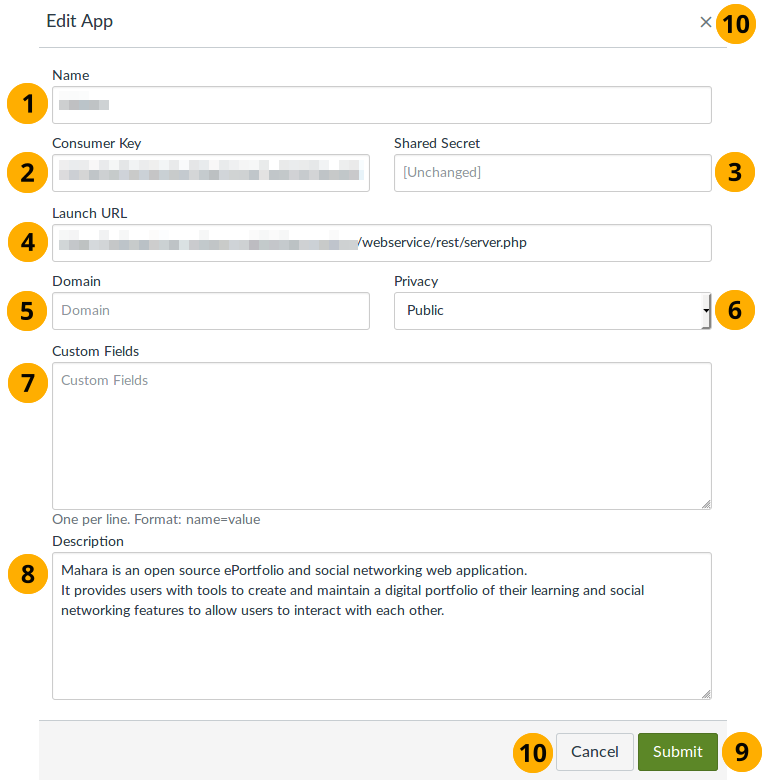
Edit the LTI configuration in Canvas
Name: The name of your external application.
Consumer Key: Review or change the consumer key here that you have from your Mahara instance.
Shared Secret: That is the ‘Consumer secret’ on Mahara. If it has changed, update it here.
Launch URL: The launch URL is the domain of your Mahara instance with
/webservice/rest/server.phpat the end of it.Note
This URL is different from the one that you entered when setting up the connection. That is correct. When you set up the connection, you need to use
/module/lti/configxml.phpfor Canvas to complete the setup properly.Domain: Do not enter anything here.
Privacy: Leave this set to ‘Public’.
Custom Fields: Add
wsfunction=module_lti_launchhere so that the assignment submission process works.Description: You can leave the default text here.
Select the Submit button to finish the setup.
Select the Cancel button or the Close icon close to abort the setup.
You are taken to the ‘External Apps’ page.
The app appears in your course navigation when you refresh the page.
Select the app to be authenticated in your Mahara instance.
Note
If you already have an account in the institution in Mahara with the email address you use in Canvas, you are taken to that account.
If your email address does not yet exist in Mahara and you allowed for automatic account creation, an account will be set up for you.
If your email address exists in Mahara but you are not a member of the institution for which you set up the Canvas integration, you receive an error message and will need to become a member of that institution before you can log in via Canvas.
11.6.3. Set up an assignment in Canvas
Prerequisite: You have set up the connection to Mahara already via the setup instructions.
In Canvas you can set up the LTI assignment submission as part of the assignment functionality.
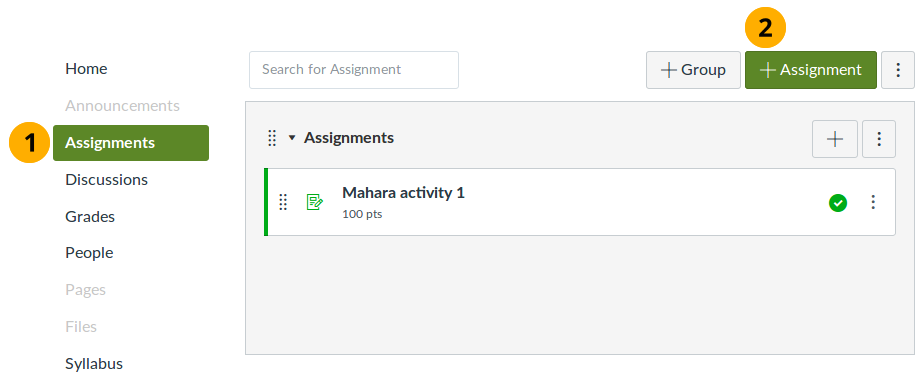
Add an assignment to your Canvas course
In your course navigation, select the Assignments navigation item.
On the resulting page, select the Assignment button to set up a new assignment.
Note
You can add the assignment to a group of assignments as you wish.
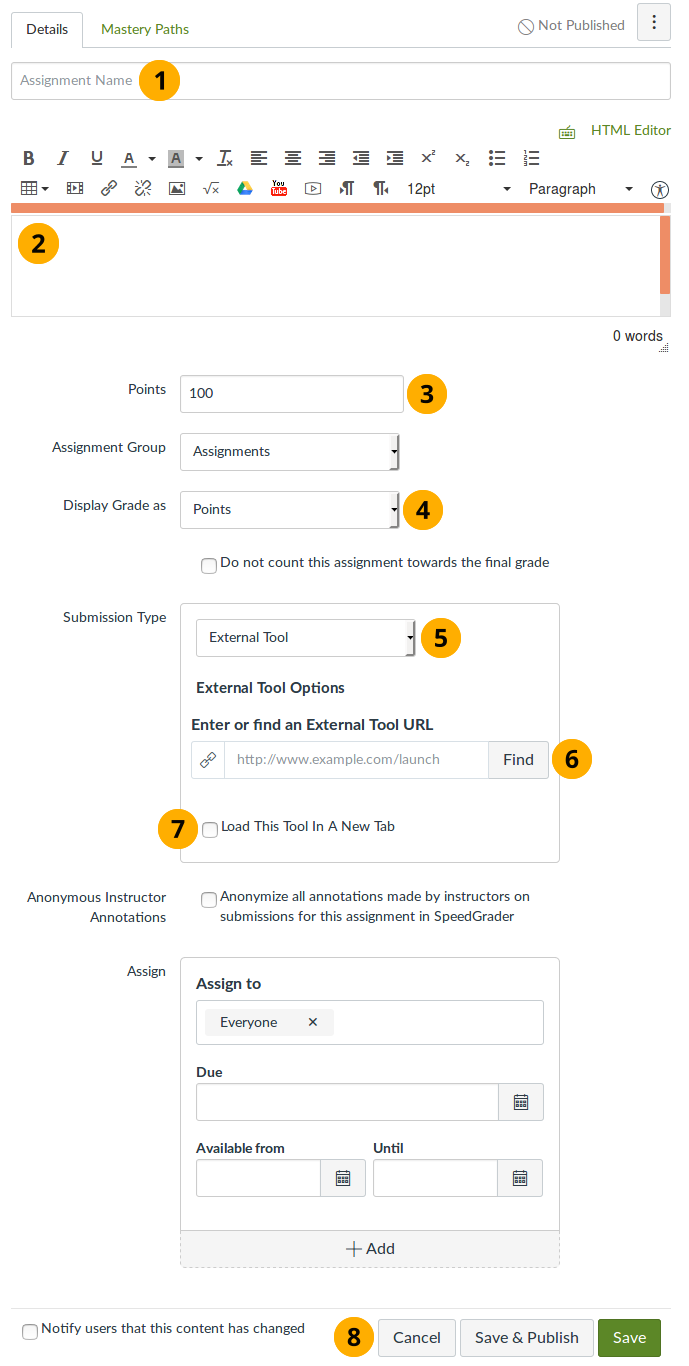
Assignment settings for your LTI activity
Once you created an assignment, you can change its parameters, including the assignment name.
Provide a description or task for the assignment.
Points: Enter ‘100’ here as LTI expects a scale from 0 to 100.
Display Grade as: Decide how you want to display the final grade for the assignment.
Submission type: Select ‘External Tool’ from the drop-down menu.
Select the Find button to see all external tools that are available in your course and select the Mahara one. Select the Save button to confirm your selection.
Load This Tool In A New Tab: Tick this checkbox if you want to load Mahara in a new tab. Note that there is no navigation visible on the Mahara submission screens because they are meant to be embedded in the assignment activity.
Select the Save button if you want to save an preview your assignment or select the Save & Publish button if you are ready to take the assignment live. Select the Cancel button to abort setting up the activity.
Select the activity name or button to finalize the assessment settings. Learners are not able to use the activity until these settings have been saved.