15. Mahara mobile
Vous pouvez utiliser Mahara, dans une certaine mesure, depuis des outils mobiles comme un téléphone ou une tablette. En fonction des possibilités du navigateur web embarqué dans l’outil mobile, certaines fonctions de Mahara ne seront pas disponibles.
Si vous possédez un appareil fonctionnant sous le système d’exploitation Android ou un iPhone, vous pouvez utiliser des applications spécifiques pour téléverser des documents directement depuis votre appareil dans Mahara.
15.1. Accès à l’aide de terminaux mobiles
Mahara est développé pour permettre un affichage adapté à chaque écran. Le but est de proposer le meilleur affichage sur n’importe quel type de machine, mais surtout de veiller à un bon affichage sur les téléphones portables et les tablettes.
Tous les thèmes de Mahara suivent les règles d’accessibilité.
15.2. Mahara Mobile
Mahara Mobile is available in the Android App Store for Android 8.1 or later and in the Apple Store for iOS devices.
15.2.1. Qu’est-ce que Mahara Mobile ?
Mahara Mobile is an app that allows you to collect your learning evidence on your handheld device to easily upload it into Mahara. You can use the app offline during the collection process and only need an internet connection when you are ready to upload your learning evidence to your Mahara site.
That way, gathering evidence in the field, in rural areas, at sea, in space, or even close to home if you have limited or no internet is still possible. Once you have access to a good internet connection again, you can upload your previously gathered content.
On Android devices, you can upload any file: images, video, audio, documents from Google Drive, and so on. On iOS devices, you require an additional app such as iCloud, Dropbox, or Google Drive to upload any file.
Vous pouvez aussi enregistrer un article de journal comme un brouillon et continuer sa rédaction depuis Mahara ou le publier.
15.2.2. Exigences
Mahara Mobile requires Mahara 16.10 or later, and the Mahara site must be protected by a SSL certificate, which is by now the standard.
15.2.3. Lier Mahara Mobile à votre compte
To use Mahara Mobile, the site administrator needs to enable the Mobile API. If you see the option “Mahara Mobile” in your “Connected apps” settings, you can connect Mahara Mobile to your account.
Vous pouvez utiliser Mahara Mobile sur plusieurs sites à la fois. Vous pouvez aussi connecter plusieurs mobiles sur un seul compte Mahara.
Note
Manage your access tokens for your different devices on the “Mahara Mobile” page in your “Connected apps” settings.
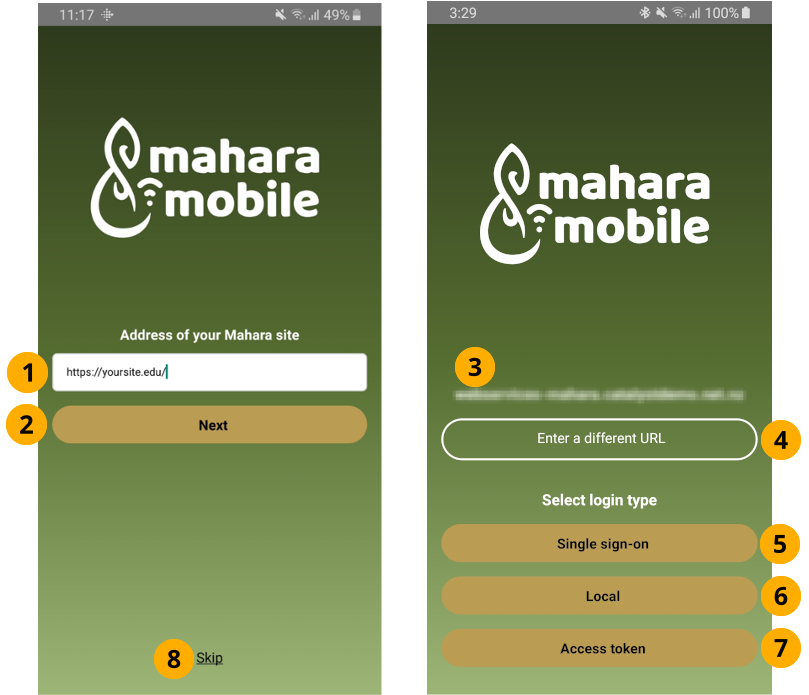
Home screen
Enter the URL of your Mahara site, including the
https://.Tap the Next button. Mahara Mobile checks which authentication methods are available for you to use.
On the next screen you can confirm the URL of your Mahara site.
Tap the Enter a different URL button if the URL is incorrect.
Select how you want to log in to your Mahara site. Depending on the authentication methods that are available on your site, you may see one or more of the following options:
SSO: Vous êtes redirigé vers le formulaire standard de connexion où vous pouvez taper sur le bouton SSO et entrer vos informations de connexion.
Connexion locale : Vous arrivez devant un formulaire de connexion. Veuillez y entrer votre nom d’utilisateur et votre mot de passe. Cette méthode d’authentification est la même pour les comptes internes à Mahara et ceux gérés par un serveur LDAP.
Access token: Generate a token on Mahara in a browser and enter it in the text field. This option is for authentication methods MNet and LTI that don’t allow you to log in via Mahara itself but via a different application such as a learning management system.
Note
When you authenticated successfully, you see your name and profile picture (if you uploaded one to Mahara) on the “Preferences” screen.
Tap the Skip button if you don’t want to connect to a Mahara instance just yet. You can still explore the app, but won’t be able to upload files.
15.2.4. Change your preferences
The Preferences screen displays your profile information. You can choose the default upload destination folder for files you wish to upload and your default journal. You can change these for individual uploads if needed.
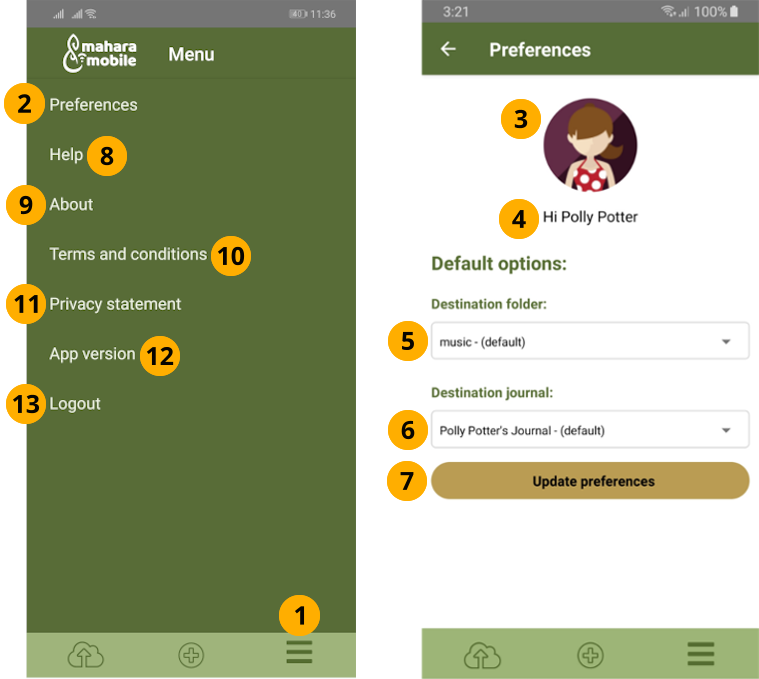
“Preferences” screen with profile information
Tap the Menu icon on the right end of the navigation bar at the bottom of your screen.
Tap the Preferences option at the top of the Menu screen.
Your profile picture from Mahara is displayed.
Note
Les services comme Gravatars ne peuvent pas être affichés pour l’instant.
Your name is shown. If you have a display name set, it will be shown instead.
Tap the Destination folder drop-down menu to select a different folder to be the default folder for file uploads. Any folder that exists in your Mahara account is displayed.
Tap the Destination journal drop-down menu to select a different journal to be the default journal for your entries. Only journals that already exist in your Mahara account are displayed.
Tap the Update preferences button to save your changes.
Help: Information on how you can get help if you have questions about using Mahara and Mahara Mobile.
About: General information about Mahara Mobile.
Terms and conditions: Legal information about Mahara Mobile.
Privacy statement: Information on how your privacy is secured in Mahara Mobile.
App version: Shows which version of Mahara Mobile you have installed. If you report any issues with the app, you should mention the version number.
Logout: Log out of the app.
Avertissement
If you log out, you will lose photos you’ve taken in the app, audio you recorded, and journal entries you have written.
Photos and audio do not get lost if they already exist on your device prior to you selecting them for upload to Mahara.
15.2.5. Add content
You can upload any file that your operating system allows you to upload, and you can create journal entries. The app will ask for permission to access the files, camera, and microphone of your device.
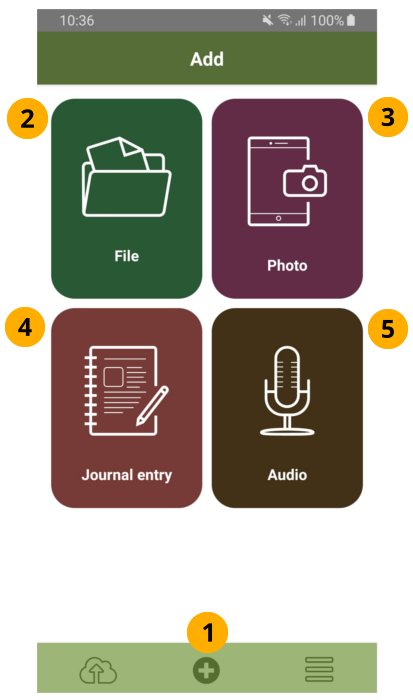
“Add” screen where you can upload files, take photos, record audio, and add journal entries.
Tap the Add icon at the centre of the navigation bar at the bottom of your screen.
Tap the File button to upload a file. You can upload any file to which your operating system gives you access.
Tap the Photo button to take a photo.
Tap the Journal entry button to write a journal entry.
Tap the Audio button to record audio.
Once you’ve added your file(s) or finished your journal entry, you are taken to the Upload queue screen automatically.
15.2.5.1. Add a file
Vous pouvez téléverser n’importe quel fichier auquel votre système d’exploitation vous donne accès.
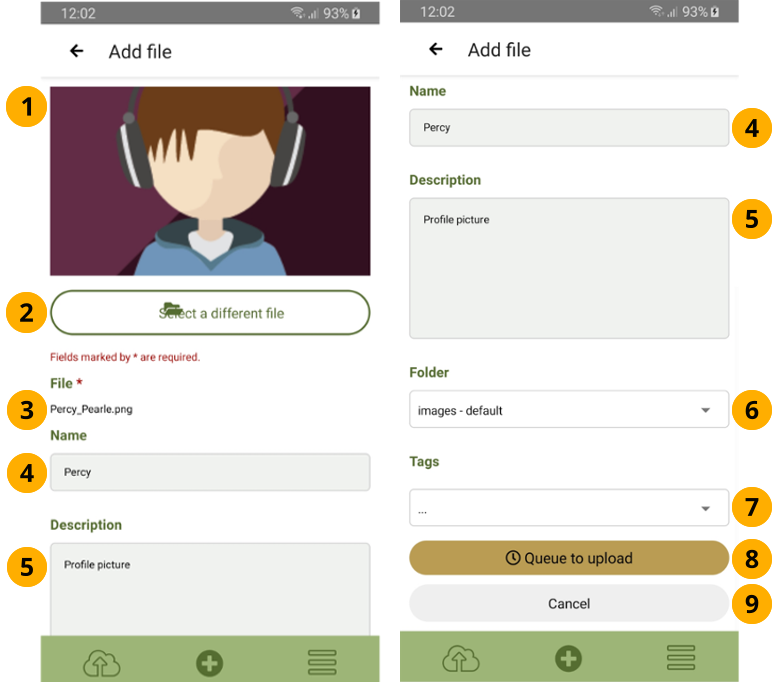
“Add file” screen where you can upload files
A preview image of your file is shown.
Tap the Select a file button, browse to the file that you want to upload, and select it. If you selected the wrong file, tap the Select a different file button and choose a new file.
Note
Vous ne pouvez pas sélectionner plus d’un fichier à la fois.
File: The file name appears.
Name: You can enter a name to replace the current file name.
Description: Enter details about this file. This can be a short description or “alt text” for images that describes what can be seen in the image.
Folder: Select the destination folder on your Mahara site using the drop-down menu.
Tags: Add tags using the drop-down menu. You can also remove tags or add new ones that are not yet in the list.
Tap the Queue to upload button to add this file to the Upload queue and you are taken to the upload queue screen.
Note
If no file is selected, the Queue to upload button is greyed out and.
Tap the Cancel button to abort the file upload.
Note
You can only upload files that are not larger than the allowed upload size for an individual file. Furthermore, you need to have space available in your Mahara “Files” area.
15.2.5.2. Ajouter un article de journal
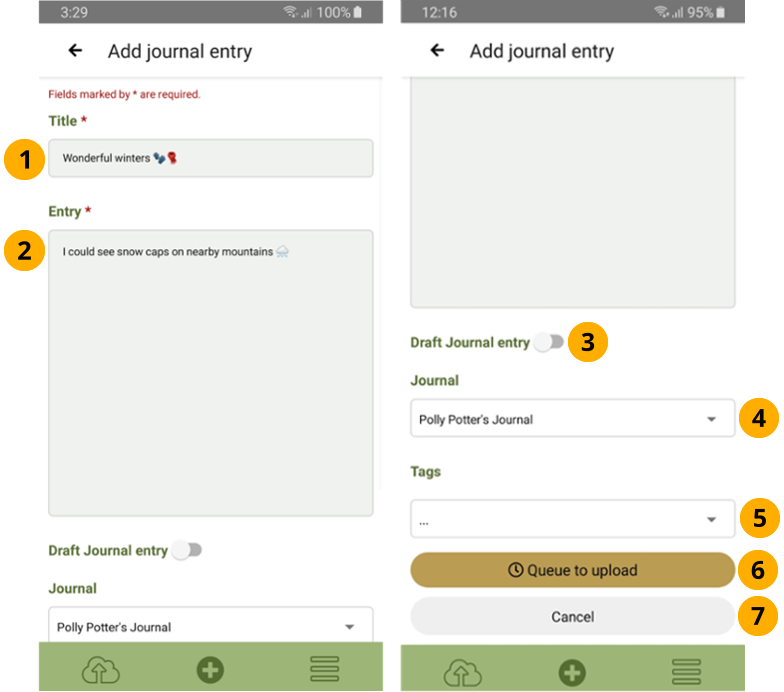
Ajouter un article de journal
Titre : Entrez un titre pour votre article.
Entry: Write your journal entry.
Note
If you want to add images or use styles in your entry, you can edit the entry on Mahara once you have uploaded it to your site.
Draft journal entry: Toggle this switch to green (with the dot on the right-hand side of the switch) for this entry to be a draft.
Journal: Pick a journal for this entry. The default journal you selected in your “Preferences” is displayed. Use the drop-down menu to select a different journal if you have multiple in your Mahara account.
Tags: Add tags using the drop-down menu. You can also remove tags or add new ones that are not yet in the list.
Note
If you cannot see any tags, but you know that you have tags, you can go to the Preferences screen and swipe down on the screen. That will synchronize Mahara Mobile and retrieve your tags.
Tap the Queue to upload button to save your entry.
Tap the Cancel button to abort your journal entry.
15.2.5.3. Add an audio recording

Add an audio recording
Tap the Record button to begin a recording. Upon starting, the button turns red and “Stop” will be displayed. Tap Stop to complete the recording.
File: The auto-generated file name is shown.
Name: Enter a name to replace the current file name.
Description: Enter details about the recording.
Folder: Select the destination folder on your Mahara site using the drop-down menu.
Tags: Add tags using the drop-down menu. You can also remove tags or add new ones that are not yet in the list.
Tap the Queue to upload button.
Tap the Cancel button to abort your action.
You can listen to the recording before you proceed:
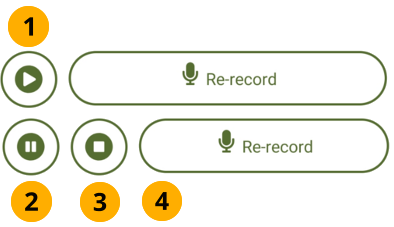
Listen to your recording
Tap the Play button to listen to your recording. The Pause and Stop buttons become visible.
Tap the Pause button to stop the recording, but be able to continue listening to it when you tap Play again.
Tap the Stop button to stop the recording. If you tap Play again, the recording will start at the beginning.
Tap the Re-record button to remove the existing recording and make a replacement recording.
Note
You can only upload files that are not larger than the allowed upload size for an individual file. Furthermore, you need to have space available in your Mahara “Files” area.
15.2.5.4. Add a photo
You can take a photo directly from within Mahara Mobile.
Avertissement
Photos you take in Mahara Mobile are not added to your camera roll on your device. Once they are uploaded to Mahara, they are not available on your device any more. Also, if you log out of the app before uploading your photos that you took directly in Mahara Mobile, you will lose them.
If you want to keep photos on your device, take them before you add them to Mahara Mobile. You can then add them via the “File” upload option rather than the “Photo” option.

Add a photo
Tap Take a photo to open the camera. You may be asked to confirm that Mahara Mobile can have access to your camera.
Note
If you don’t like the photo that you have taken, you can take another one: The Take a photo button will have changed into Re-take photo.
File: The auto-generated file name is shown.
Name: Enter a name to replace the current file name.
Description: Enter details about this photo. This will be used as “alt text” in Mahara. Therefore, describe what is shown in the photo.
Folder: Select the destination folder on your Mahara site using the drop-down menu.
Tags: Add tags using the drop-down menu. You can also remove tags or add new ones that are not yet in the list.
Tap the Queue to upload button to get ready to upload this file to Mahara.
Tap the Cancel button to abort your action.
Note
You can only upload files that are not larger than the allowed upload size for an individual file. Furthermore, you need to have space available in your Mahara “Files” area.
15.2.6. Review your items before uploading them
All items that you are planning to upload to Mahara are listed in the Upload queue. You can delete or edit them before you continue with the upload.
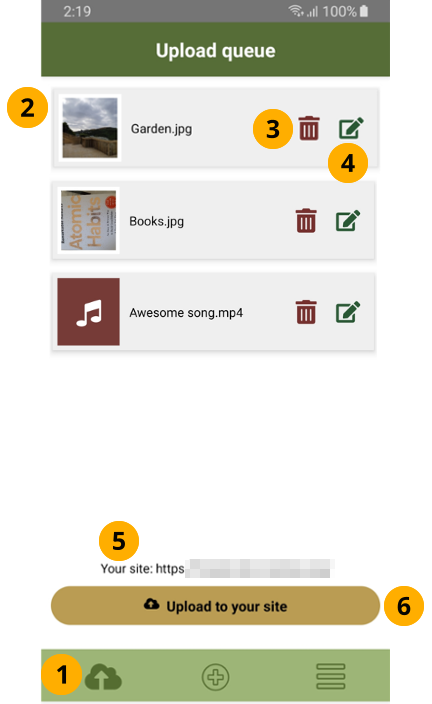
“Upload queue” screen where you can review the items that you want to upload
Tap the Upload queue icon in the navigation bar at the bottom of your screen.
Your items that you want to upload are listed with a thumbnail and their file name or journal entry title.
Tap the Delete icon next to an item if you don’t want to upload it after all. You are asked to confirm your action.
Avertissement
Photos you took directly in Mahara Mobile, audio recordings you made from within Mahara Mobile, and journal entries will be deleted permanently and cannot be retrieved again.
If you want to have photos and audio recordings to be available after you upload them to Mahara or if you remove them from Mahara Mobile prior to upload, use your built-in apps to take photos and record audio and then add that content as files. If files already exist on your mobile device, they won’t be deleted when you remove them from Mahara Mobile.
Tap the Edit icon next to an item if you want to change its title, destination folder or journal, and other details.
The site to which you are uploading your items is displayed.
Tap the Upload to your site button to start the upload. You need to be online. Once all items have been uploaded successfully, your upload queue will be empty.
Note
Depending on your internet connection and the size of your files, the upload may take a few minutes.
If you have problems uploading your items, check that:
You have enough space in your Mahara “Files” area to upload the files.
The individual files do not exceed the maximum file upload size in your Mahara “Files” area.
You are online and can reach your Mahara site in a web browser.
15.2.7. Informations techniques
Mahara Mobile is built using React Native.
If you want to contribute, you can download the code from the Mahara Git or GitHub.
15.2.8. Previous mobile apps
Only the most recent version of Mahara Mobile is supported. If you use an old version, in particular the one built using React JS, you cannot connect to Mahara. MaharaDroid, the original mobile app for Mahara for Android devices and PortfolioUp, which was an app for iOS, are not supported any more.