
6.6. Outcomes portfolio
6.6.1. Introduction
The outcomes portfolio allows you to track progress against outcomes. This is a more structured approach and allows you to define activities to complete, therefore also allowing for collaboration on the portfolio more than had already been possible through SmartEvidence, for example, or also the portfolio completion. So it’s a much more guided approach, supporting learners in their portfolio journey and assisting them with creating their portfolios and documenting their learning.
Watch the walk through of this functionality to get an overview.
Outcomes portfolios are available in groups only as they are designed to be collaborative portfolios, thus leveraging functionalities available in groups. Regular group portfolios are enhanced by a series of features that allow for different roles on the porfolios and also new workflows to facilitate the creation of relevant content and maintaining the portfolio.
Originally, this functionality was developed to support neurodiverse learners in a college setting that required additional assistance in creating their portfolios. Sometimes support staff would upload content on behalf of the students and also provide a progress update.
Outcomes portfolios can be used by anybody though who wants a structured portfolio that focuses on specific outcomes that should be tracked individually.
Due to the original implementation of the outcomes portfolio, there are currently some restrictions to the functionality that can be lifted in future projects:
The functionality is only available in 『Outcomes』 group types.
Outcomes portfolios cannot be copied.
Outcomes portfolios cannot be shared with non-group members.
The support structures are hard-coded. Language strings can be changed, but the options cannot be removed entirely.
Permissions are based on group roles.
6.6.2. Enable outcomes portfolios
You enable outcomes portfolios on an institution basis in the institution settings. That way you control who can work with that functionality on the site.
Note
When you upgrade a site, make sure that the 『Outcomes』 group type is installed in the 『Plugin administration』.
Once the functionality is enabled, you see the option 『Outcomes』 as group type when you are logged in as instituion staff member, support administrator, administrator or site administrator.
6.6.3. Set up outcome categories and types
You must set up outcome categories and types your portfolio. These are associated with a specific institution and can be used for different levels or programmes. For example, you could set up a series of outcome types for three different categories that represent study programmes.
You set up the outcome types as CSV files that are then uploaded via CLI.
Sample CSV file for outcome types
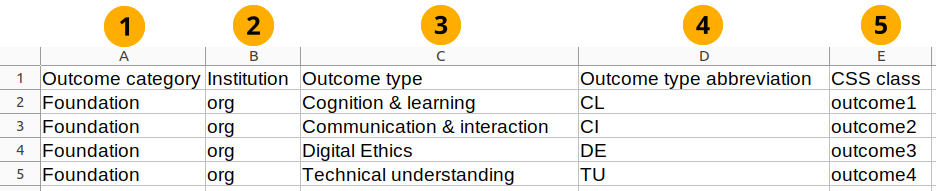
Outcome category: Define the category to which the outcome type belongs. That’s how to can differentiate different outcome types for different levels or programmes.
Institution: Add the shortname of the institution for which you want to add the outcome types. You can set up outcome types for different institutions in one file.
Outcome type: The name of the outcome. This cannot be longer than 100 characters.
Outcome type abbreviation: The abbreviation for the outcome type that is displayed on a portfolio page. You can enter up to 10 characters, but ideally, keep it short as this then appears in a coloured bubble.
CSS class: Select the CSS class that you want to associate with the outcome. Per default, there are eight defined.
Note
You can define the colours in your theme by creating the
_outcomes.cssfile in your/themefolder/sass/componentswhich would then overwrite the colours set in the 『Raw』 theme.
Your CSV file could like this:
Outcome category,Institution,Outcome type,Outcome type abbreviation,CSS classFoundation,org,Cognition & learning,CL,outcome1Foundation,org,Communication & interaction,CI,outcome2Foundation,org,Digital Ethics,DE,outcome3Foundation,org,Technical understanding,TU,outcome46.6.4. Set up subjects
In addition to outcome types, you can set up subjects to indicate in which subject area a particular outcome can be achieved. Subjects are institution and outcome category specific, allowing you to flexibly set them up within a larger organisation.
You set up the subjects as CSV files that are then uploaded via CLI.
Sample CSV file for subjects
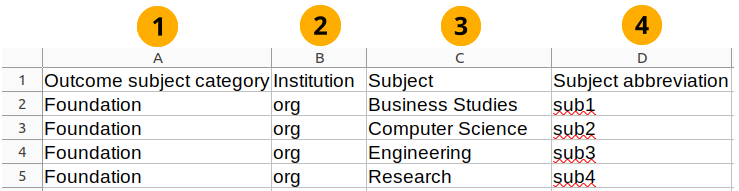
Outcome subject category: Define the category to which the subject belongs. That’s how you can differentiate between different study programmes, for example, within a single organisation.
Note
This category does not need to match the outcome type category. They are independent of each other.
Institution: Add the shortname of the institution for which you want to add the subject. You can set up subjects for different institutions in one file.
Subject: The name of the outcome. This cannot be longer than 100 characters.
Subject abbreviation: The abbreviation for the subject that is used internally only at this stage. You can enter up to 10 characters, but ideally, keep it short.
Your CSV file could like this:
Outcome subject category,Institution,Subject,Subject abbreviationFoundation,org,Business Studies,sub1Foundation,org,Computer Science,sub2Foundation,org,Engineering,sub3Foundation,org,Research,sub46.6.5. Permissions for the outcomes portfolio
There are extensive permission controls on the outcomes portfolio functionality to ensure that learners are not overwhelmed with settings that they should not change.
Note
Only people who have at minimum a 『Staff』 role, i.e. 『Instituion staff』 or 『Site staff』, can set up 『Outcomes』 groups.
Group tutors and group administrators do not need to have the staff role though to complete their tasks.
Feature |
Group member |
Group tutor |
Group administrator |
|---|---|---|---|
Set up portfolios in the group, including outcomes portfolios |
|||
Configure outcomes for a portfolio |
|||
Add an activity page and configure it |
|||
Decide with whom to share an outcomes portfolio |
|||
Mark an outcomes as completed |
|||
Mark an activity page as signed off |
|||
Mark a checkpoint as achieved |
|||
Add blocks to an activity page, including the 『Checkpoint』 block |
|||
Add a checkpoint comment |
|||
Edit your own checkpoint comment |
|||
Delete a checkpoint comment |
6.6.6. Set up a group for outcomes portfolios
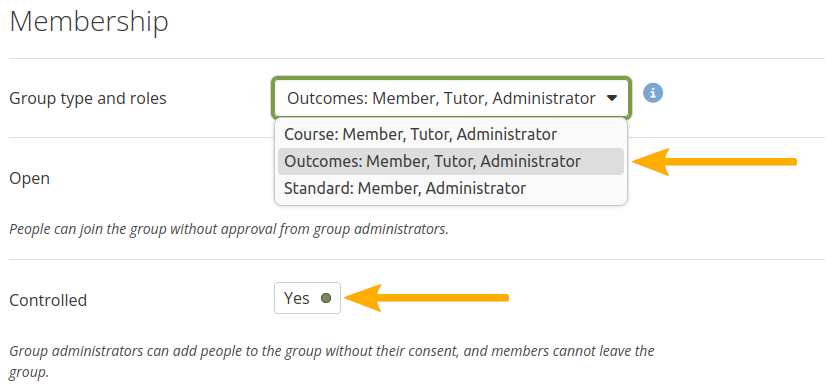
When the group type 『Outcomes』 is enabled in the 『Plugin administration』 and in the institution settings, you can select 『Outcomes』 in the Group type and roles when you set up a group. Automatically, it becomes a 『Controlled』 group.
Group setting to switch on 『Outcomes』 portfolio functionality
You can then set up portfolios with outcomes. They are turned on by default.
6.6.7. Configure a portfolio with outcomes
Outcomes portfolio functionality is available in group collections in groups of the type 『Outcomes』.
Note
Usually, when you start a portfolio, you create a page. With outcomes portfolios though, you start immediately with a collection because pages are added directly from within the collection.
This is a workflow we are experimenting with to facilitate the creation of larger portfolios, in particular structured ones.
Configure the main collection settings for outcomes
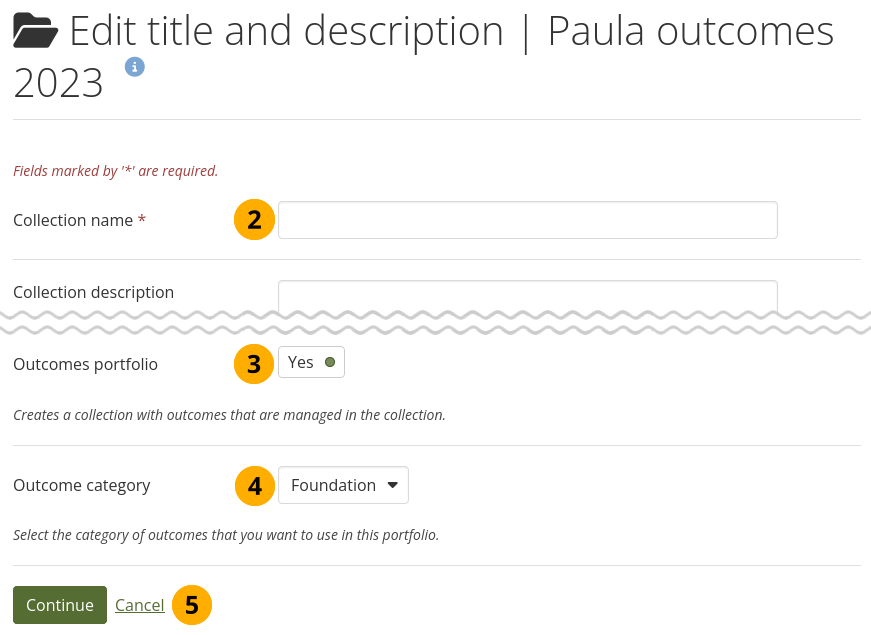
Click the Create button in the group portfolios area and select Collection.
Collection name: Give your collection a title.
Outcomes portfolio: This switch is automatically on 『Yes』 when a new collection is set up in an 『Outcomes』 group.
Note
This collection option is only available in 『Outcomes』 groups.
Outcome category: Select the category to which you want to associate the outcomes.
Note
The category determines which outcomes types are presented to you when you set up the outcomes.
Click the Confirm button to go to the next screen. Click Cancel to abort creating the collection.
On the following screen, you configure the outcomes associated with this collection.
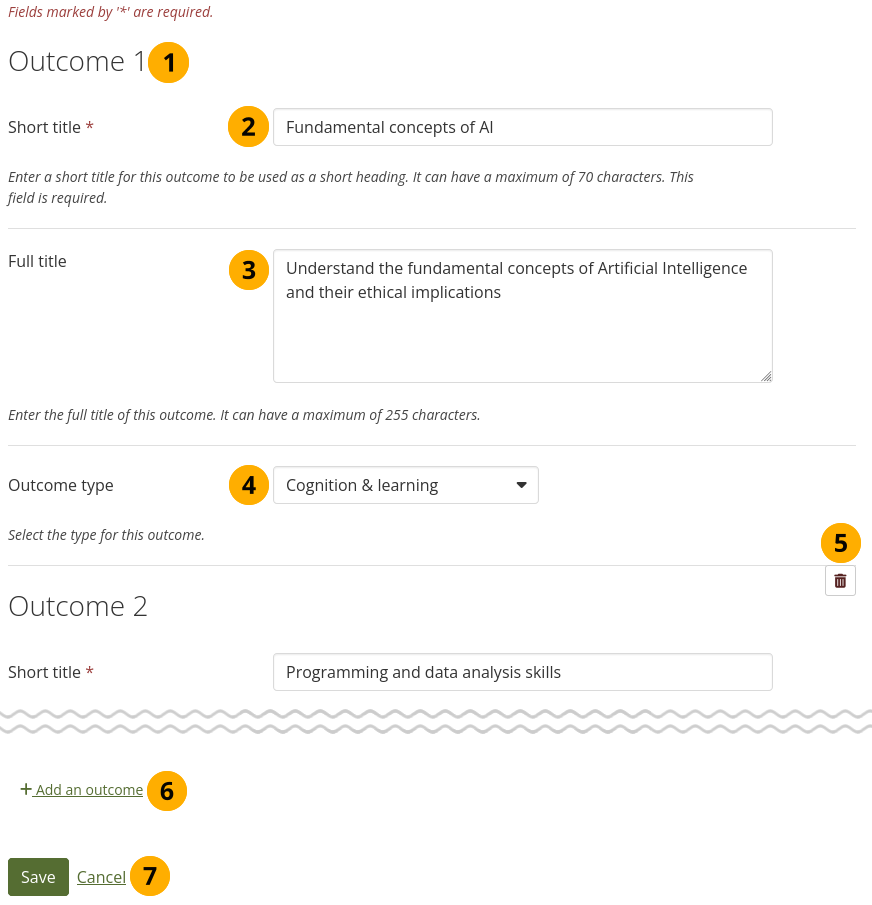
Configure the outcomes for an outcomes portfolio collection
The outcomes are numbered automatically. This numbering does not appear on the portfolio pages though. When you delete an outcome, the outcomes that follow after it are renumbered.
Short title: Give your outcome a title. It cannot be longer than 70 characters and is meant to be a short description of the outcome.
Full title: You can provide more information for your outcome if you require more space. You have up to 255 characters available.
Outcome type: Select the outcome type that matches this outcome.
Note
The type depends on the outcome category that you selected when you set up the collection.
You can delete each outcome individually.
Click Add an outcome to add another outcome.
Click the Save button to go finish setting up your outcomes or click Cancel to abort setting up outcomes. You can come back to this screen later and set up more outcomes or change existing ones.
Note
Be careful in which order you set up your outcomes as you cannot re-order them later. If they need to follow a specific order, map it out beforehand.
6.6.8. Outcomes portfolio overview page
Similarly to SmartEvidence and portfolio completion collections, outcomes portfolios come with an overview page or their collection dashboard page. That pages gives you a quick view of the entire collection.
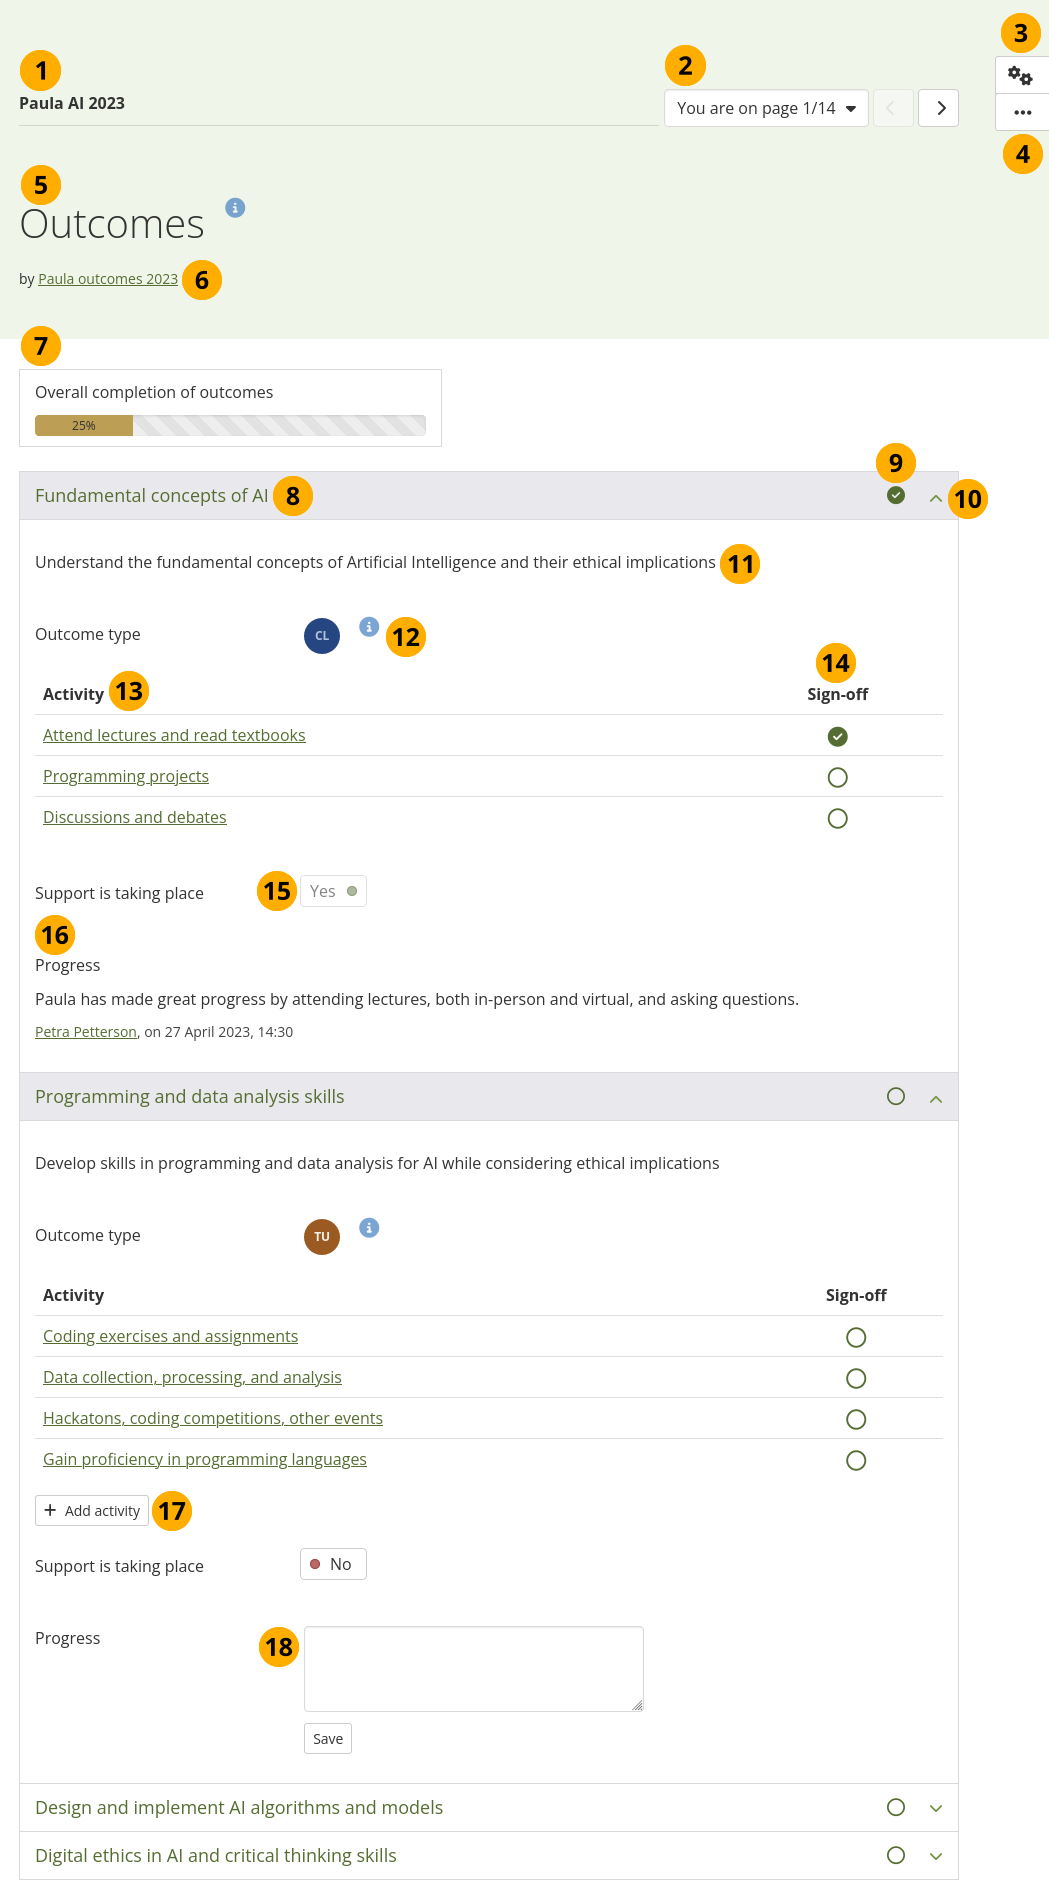
Overview page of an outcomes portfolio with outcomes configured
The collection title is displayed.
You can see the collection navigation drop-down menu and buttons to quickly go through the collection.
Note
You cannot re-order the pages within a collection. They are listed in the order in which they appear in the collection.
Click the Configure button to edit the outcomes. This button is not available to regular group members.
Click the More options button to see other actions you can take in your current role.
『Outcomes』 is the title of the overview page. It cannot be changed.
The group name is mentioned as the author.
Overall completion of outcomes: A visual percentage indicator how many outcomes have already been signed off.
The short title of the outcome is displayed as title of the collapsable section.
The completion icon for the outcome is displayed. You can click it to mark an outcome as completed if you are a group tutor or administrator. If it is a ring, the outcome has not yet been completed. If it is a green checkmark, the outcome has been completed. Certain functionalities are not available any more:
You cannot add more activities (pages) to the outcome.
You cannot indicate whether support has taken place or not and leave a note to that effect.
Click the Close arrow to hide details for an outcome and click the Open arrow to see the details.
Note
You can also click in the title bar of the outcome to open and close the details.
If you added a full title for your outcome, it is displayed.
The abbreviation of the outcome type is displayed. Click the Help icon to see all outcome types and the long form of their abbreviation.
Activity: List of all the activities associated with the outcomes. These are portfolio pages.
Note
When a page has not yet been signed off, you enter it directly in 『Edit』 mode to make it faster to add content. Once a page has been signed off, you are taken directly to the 『Display』 mode of the page.
Sign-off: The status of the page sign-off is displayed here. You can sign off a page directly here or on the page itself. Group members cannot sign off pages. Only group tutors and group administrators can.
Support is taking place: Set the switch to 『Yes』 if support has been provided to the learner for this outcome. When an outcome is marked as completed, you cannot change this setting. This option is not available to group members.
Progress: When the outcome is marked as completed, the last note that was added is displayed along with when it was added and by whom, and it cannot be changed any more.
Click the Add activity button to add a new page to demonstrate your skills and achievements for this outcome.
Progress: Add your notes for the progress on this outcome and click the Save button to save your changes. The page is not reloaded.
6.6.9. Set up an activity page
When you click the Add activity button on the outcomes overview page, you create a new page in your portfolio. Bcause it is associated with an outcome, there are additional fields that you can fill in to provide guidance to your learners and track their progress.
Note
Pages can only be added to an outcomes portfolio via the Add activity button to ensure that they are associated with the correct outcome. At this stage, you cannot move a page from one outcome to another.
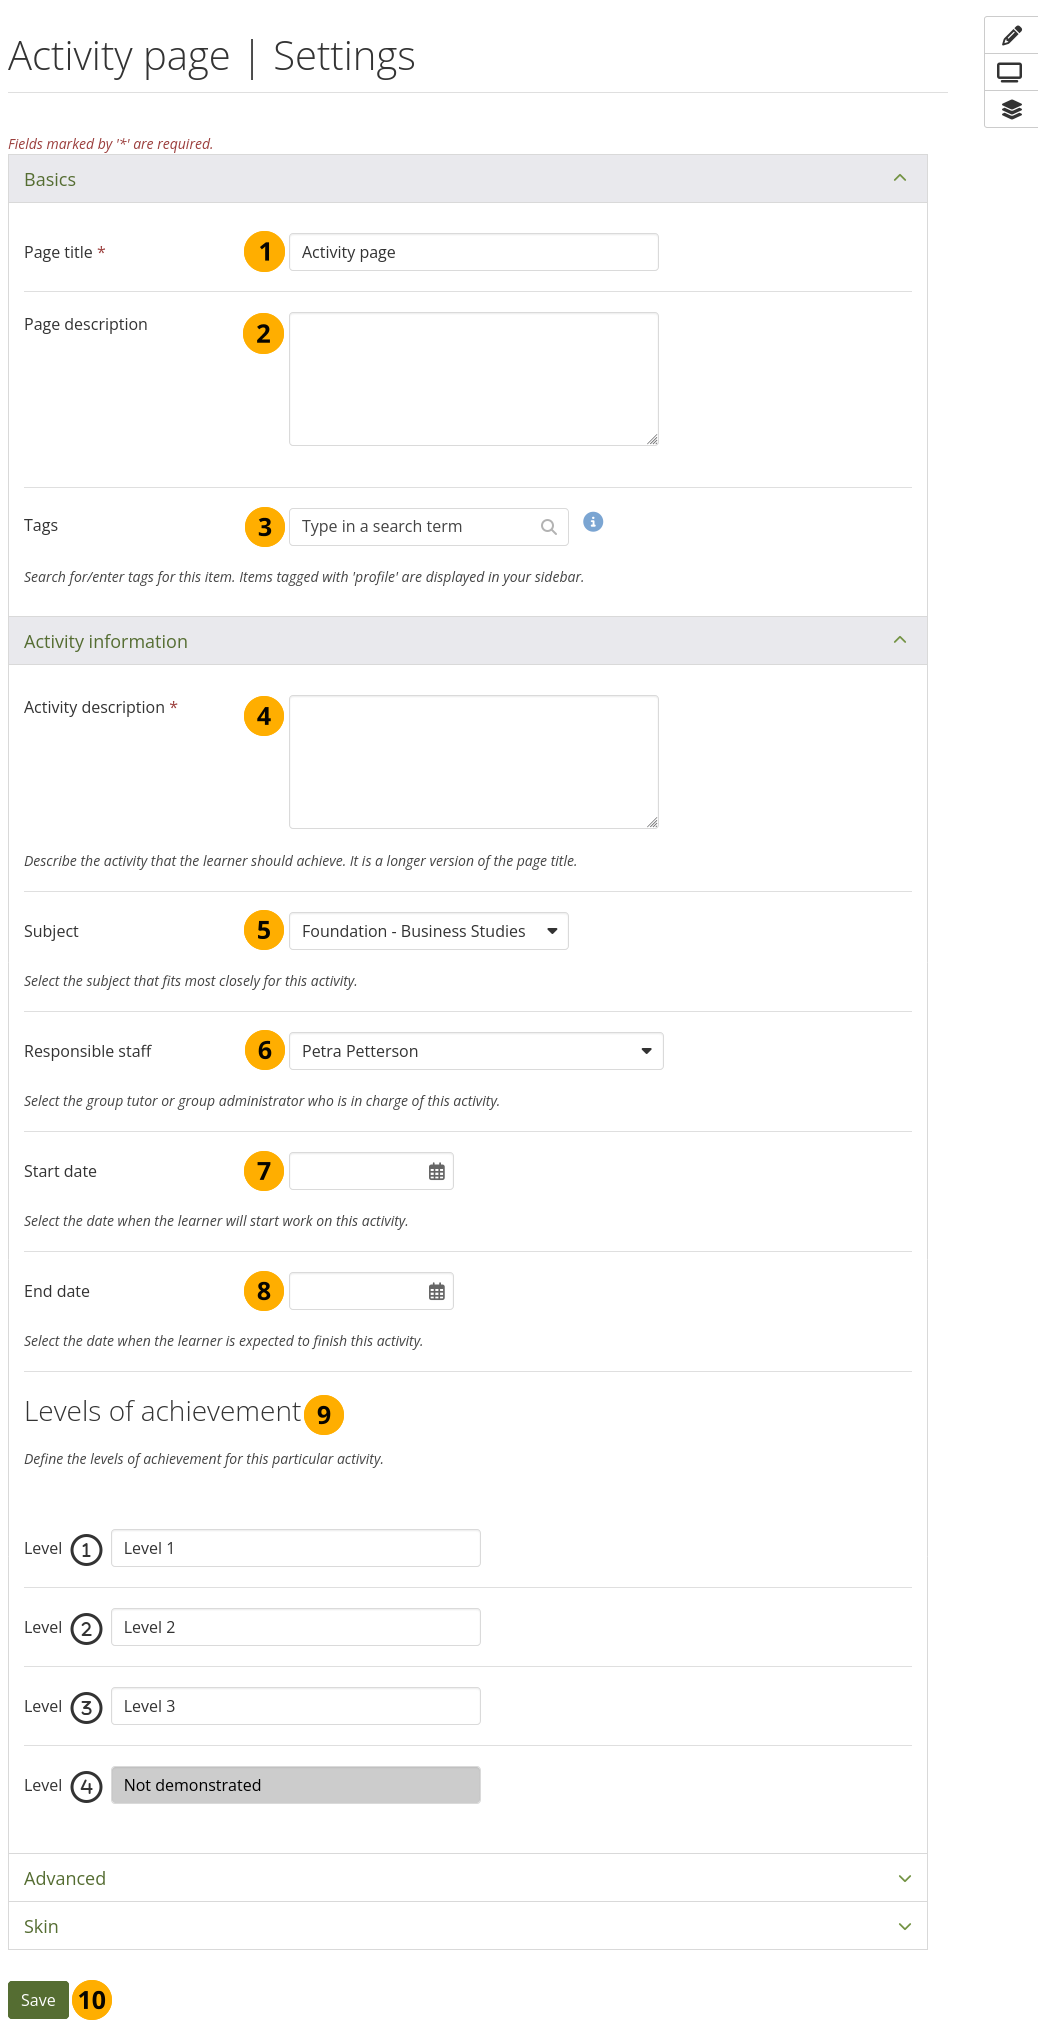
Configuring an activity page
Page title: This is the normal page title. Keep it short. You can provide more information on the activity later on.
Page description: This is the normal page description that is not displayed on the page itself, but only on your portfolio overview page.
Tags: Give your page tags to find it more easily later on.
Activity description: Here you can provide more information about the activity that you ask your learner to complete for the outcome that is associated with this activity page.
Subject: Select the subject that you want to associate with this activity.
Responsible staff: You can select which staff member is the primary contact person for the learner or provides support for this activity. Anybody with the group tutor and group administrator role is listed. Automatically, the tutor or administrator setting up the page is selected by default.
Start date: You can select a start date for the activity.
End date: You can select an end date for the activity.
Levels of achievement: You have four levels of achievement available that you configure here. The fourth level, the lowest, is predefined, but you can change the wording for the other three. These levels are used in the checkpoint blocks to indicate when parts of the activity have been achieved.
Click the Save button to finish the setup of the page. You can always come back to this configuration screen to make changes.
6.6.10. Edit an activity page
Once you have configured the activity page, you are taken into the 『Edit』 mode of it immediately and can edit the page as you would normally do any portfolio page.
There is a number of additional information and editing options for support staff, which is designed to support the learner and provide additional information for other support staff that might be checking in.
Note
When an activity page has been signed off, e.g. the activity has been completed, you are taken into the 『Display』 mode instead of the 『Edit』 mode as it is assumed that you are not going to edit the page any more. You can still enter 『Edit』 mode and make changes if necessary.
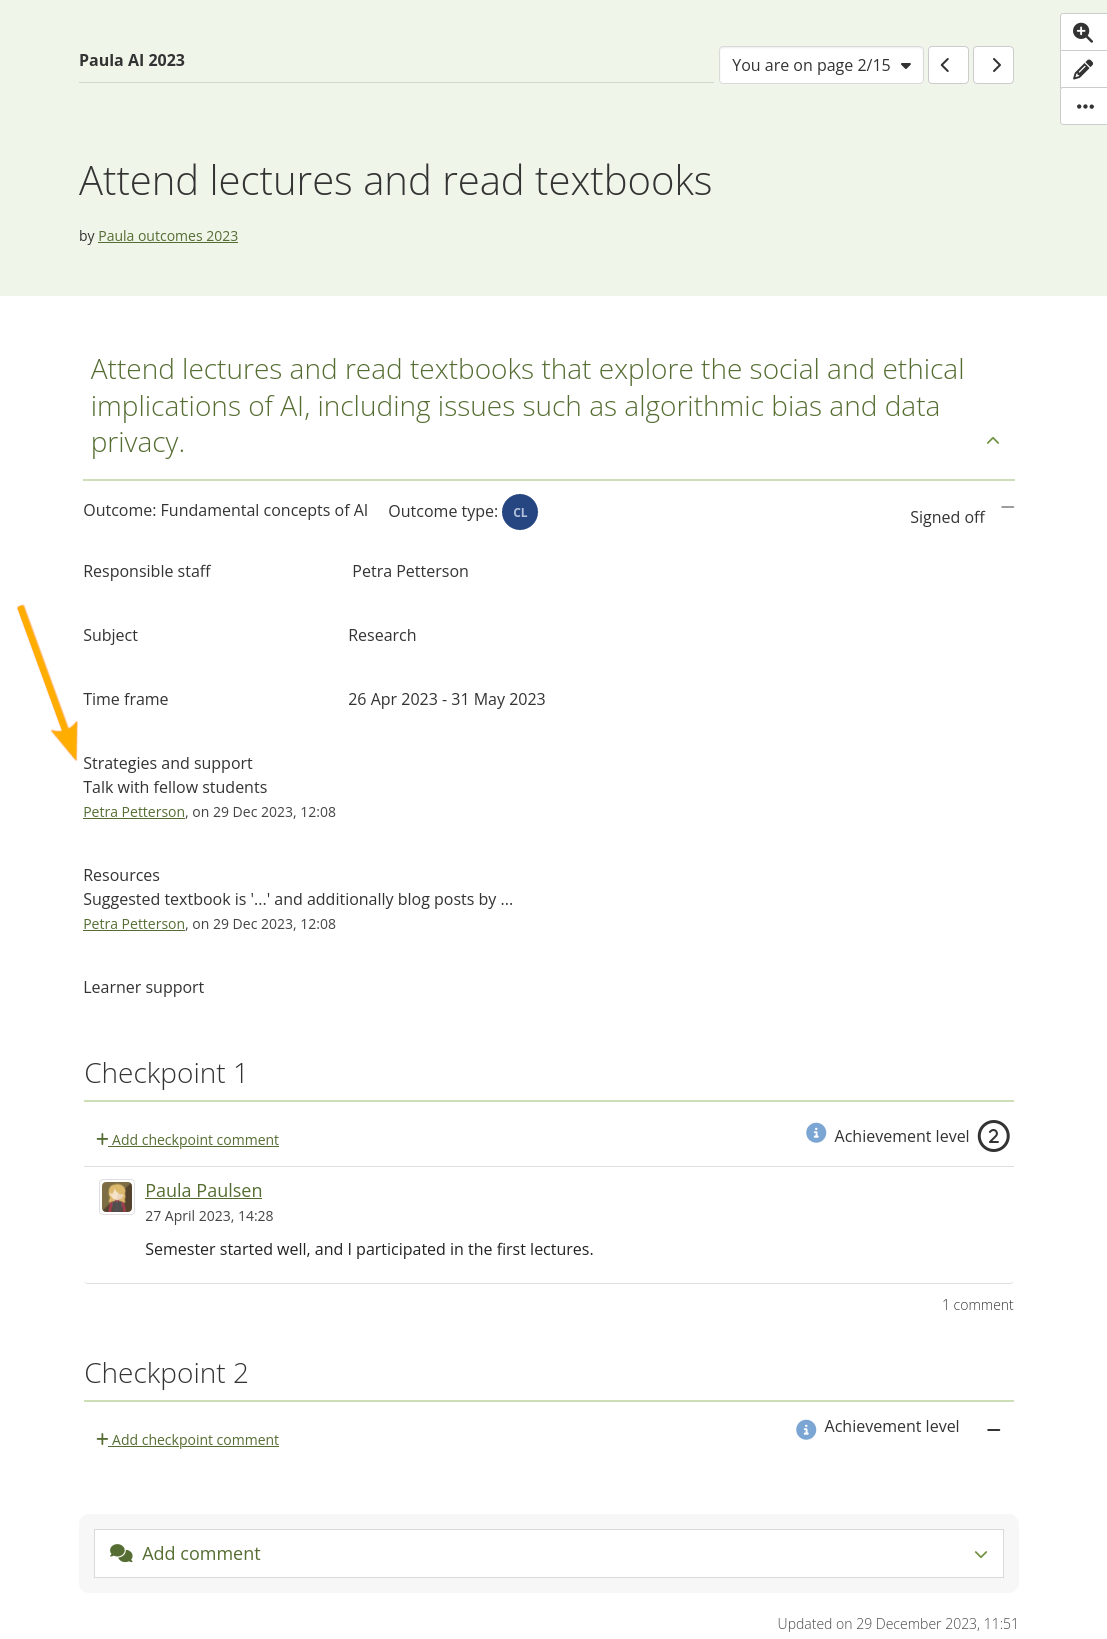
Editing an activity page
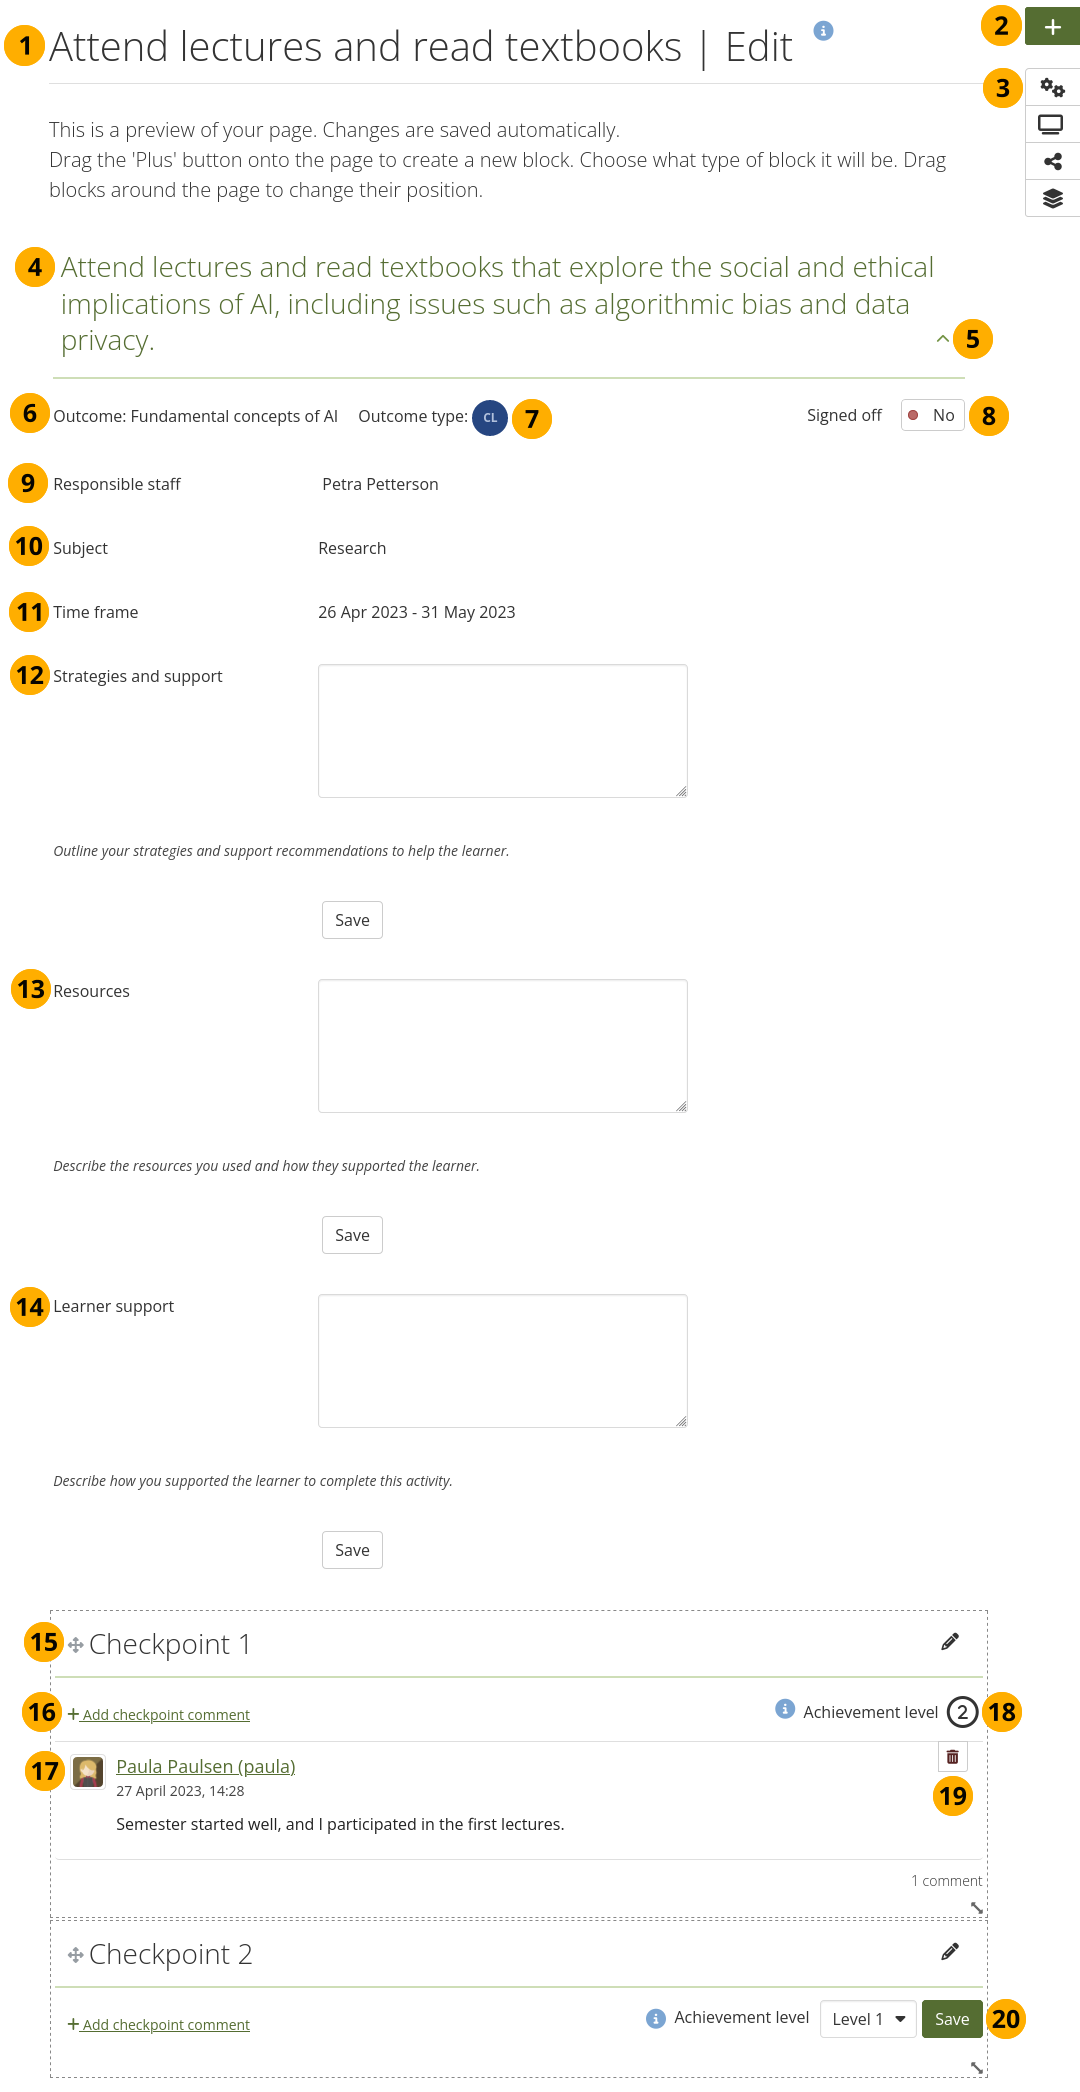
The title of the activity page is displayed.
Click the Add button to add blocks to the page.
The Configure button to access page settings is not available to regular group members, i.e. the learners, so they can’t change the information.
The activity description is displayed.
Click the Open arrow to show details for the tracking of the activity and click the Close arrow to hide the details.
Outcome: The short title of the outcome is pulled into the page automatically.
Outcome type: The outcome type is displayed automatically as you associate an activity page with an outcome.
Signed off: Switch to 『Yes』 when the entire activity has been completed. This cannot be done by regular group members.
Responsible staff: The member of staff responsible for providing support primarily is displayed.
Subject: The subject with which the activity is associated is displayed.
Time frame: The start and end date of the activity are displayed.
Strategies and support: Support staff, i.e. group tutors and administrators, can provide information here.
Resources: You can provide information on the resources that were used to support the learner in their activity.
Learner support: Add information on how you supported the learner in achieving the outcome.
Note
When you finished adding your commentary to the 『Strategies and support』, 『Resources』, and 『Learner support』 fields, make sure to click the Save button on each comment to save your changes. Only the latest comment is saved and displayed to learners.
You can add commentary both in 『Edit』 and 『Display』 mode of a page.
Add a Checkpoint block to the page to track progress over time on this activity. Learners can add it as well. Checkpoint blocks are numbered automatically.
Click Add checkpoint comment to add a comment on the learner’s progress. Learners can add comments themselves as well. A notification is sent to the people who have access to the page to alert them of the new comment if they allowed notifications.
When someone leaves a comment, their profile picture and name are displayed along with the comment and when it was left.
When the part of an activity is finished that corresponds to a checkpoint, the support staff can assign an achievement level that is then displayed. It cannot be changed once saved.
Click the Delete button to remove a checkpoint comment. A notification is sent to the person who left the comment to inform them of the deletion. The comment itself is included in the notification in case they want to restore it.
Note
Regular group members, i.e. learners, can only edit their last comment for 10 minutes or until a new comment is left if that is done in fewer than 10 minutes. Support staff can delete any comments.
When a checkpoint has not yet been achieved, support staff see a drop-down menu with the achievement levels. The Help icon next to it shows the long form of the levels. Click the Save button to mark a checkpoint as achieved.
6.6.11. View an activity page as a learner
When you view an activity page as a learner, no matter whether it is in 『Display』 or 『Edit』 mode, you cannot change details about the activity page, but can only view commentary the support staff have added.
View an activity page as a learner
While you may not be able to change activity page settings as a learner, you can add content blocks to your page to build your portfolio.