6.3. Algemeen
The artefacts in this tab are of a general nature or do not fit into any other category and can be used around the site.
When you create a page in a group, you do not have the plans block available as you cannot create plans in groups. Additionally, you can choose the following blocks when you edit the group homepage:
6.3.1. Creative Commons license

Add a block to your page which lets users know under which Creative Commons license your page is published.
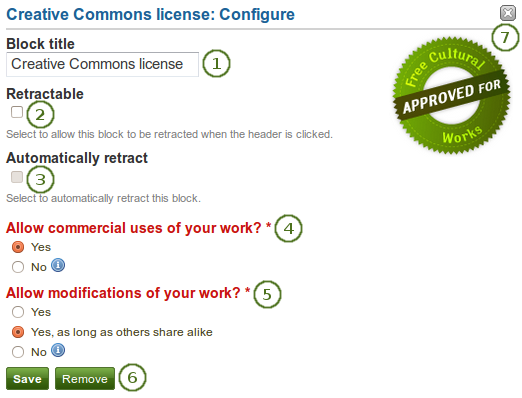
Configure the Creative Commons license block
- Block title: Choose a title for your block.
 Retractable: Tick this checkbox if you want to allow users to reduce the block to its heading on a page. The user can click the Retractable icon
  to just show the heading.
- Automatically retract: Tick this checkbox if you want to show only the block’s heading when a user views the page. The user can click the Retracted icon
 to view the entire block.
 - Allow commercial uses of your work? Decide whether users can re-use your work for commercial purposes.
- Allow modifications of your work? Decide whether others can remix your work and create something new and if so under which conditions.
- Click the Save button to accept your changes, or click the Cancel button to leave the block’s content as it is. The Remove button is shown only when you place the block into the page for the first time.
- You can also click the Remove / Cancel button
 in the top right-hand corner to either remove a newly created block before it is being saved or to cancel any changes and leave the block’s content as it is.
Zie ook
For more information about the licenses and their terms, visit the Creative Commons web site.
6.3.2. Navigation

Add a navigation block to display links to pages in a collection.
Notitie
You must create at least one collection in order to use this block.
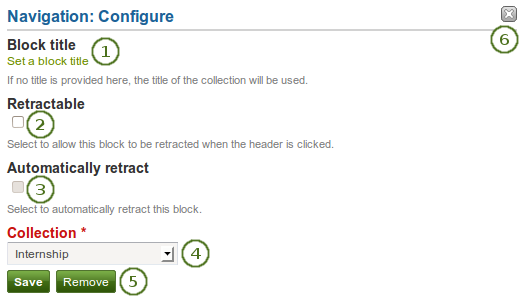
Configure the Navigation block
- Block title: The title of the collection is chosen automatically unless you provide a different one.
- Retractable: Tick this checkbox if you want to allow users to reduce the block to its heading on a page. The user can click the Retractable icon to just show the heading.
- Automatically retract: Tick this checkbox if you want to show only the block’s heading when a user views the page. The user can click the Retracted icon to view the entire block.
- Collection: Choose the collection from the drop-down menu for which you wish to display links in the block.
- Click the Save button to accept your changes, or click the Cancel button to leave the block’s content as it is. The Remove button is shown only when you place the block into the page for the first time.
- You can also click the Remove / Cancel button in the top right-hand corner to either remove a newly created block before it is being saved or to cancel any changes and leave the block’s content as it is.
6.3.3. Plans

Display one of your plans in a block.
Notitie
You must create at least one plan in order to use this block.
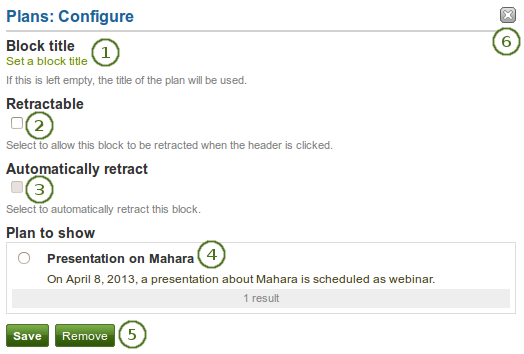
Configure the Plans block
- Block title: The title of the plan is chosen automatically unless you provide a different one.
- Retractable: Tick this checkbox if you want to allow users to reduce the block to its heading on a page. The user can click the Retractable icon to just show the heading.
- Automatically retract: Tick this checkbox if you want to show only the block’s heading when a user views the page. The user can click the Retracted icon to view the entire block.
- Plan to show: Choose the plan which you want to display in your page.
- Click the Save button to accept your changes, or click the Cancel button to leave the block’s content as it is. The Remove button is shown only when you place the block into the page for the first time.
- You can also click the Remove / Cancel button in the top right-hand corner to either remove a newly created block before it is being saved or to cancel any changes and leave the block’s content as it is.
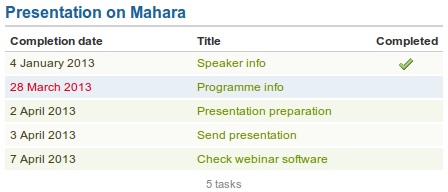
Result of an embedded plan in a portfolio page. By clicking on the linked titles, you can show the descriptions of the individual tasks.
6.3.4. Recent forum posts

Display a specified number of recent forum posts from one group on a page.
Notitie
You must be a member of at least one group in order to use this block.
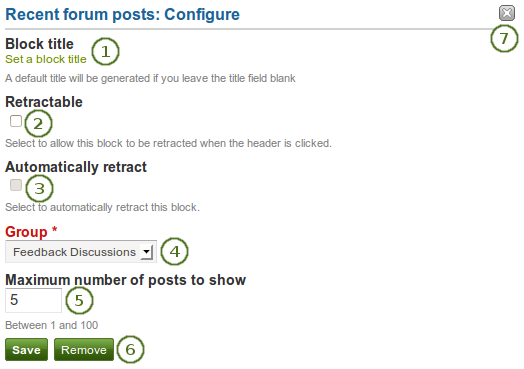
Configure the Recent forum posts block
- Block title: The title of the block is generated automatically unless you provide a different one. The default title is “Recent forum posts”.
- Retractable: Tick this checkbox if you want to allow users to reduce the block to its heading on a page. The user can click the Retractable icon to just show the heading.
- Automatically retract: Tick this checkbox if you want to show only the block’s heading when a user views the page. The user can click the Retracted icon to view the entire block.
- Group: Choose the group whose forum posts you wish to display.
- Maximum number of posts to show: Decide how many of the latest forum posts you wish to show. The default value is 5. You can show up to 100 posts.
- Click the Save button to accept your changes, or click the Cancel button to leave the block’s content as it is. The Remove button is shown only when you place the block into the page for the first time.
- You can also click the Remove / Cancel button in the top right-hand corner to either remove a newly created block before it is being saved or to cancel any changes and leave the block’s content as it is.
6.3.5. Text box

Add text to your page. This feature is used when you do not want to keep the text in a journal, e.g. just for small snippets of text.
6.3.5.1. Add a new text box
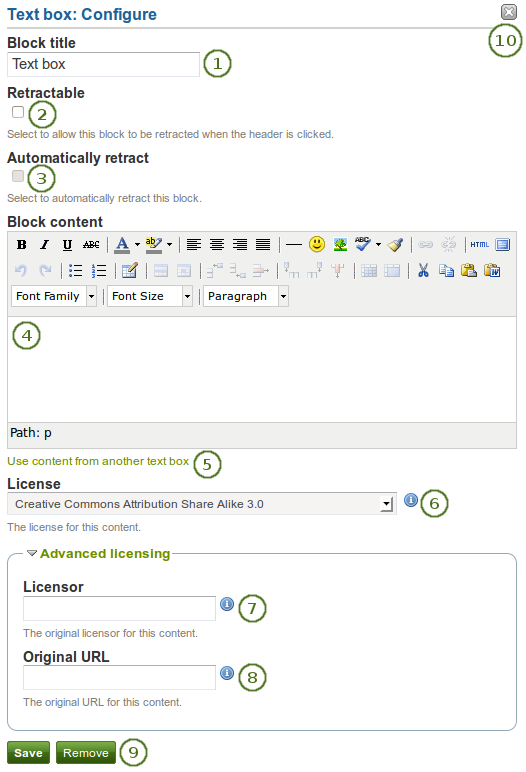
Configure the Text box block
- Block title: Provide a title for your text.
- Retractable: Tick this checkbox if you want to allow users to reduce the block to its heading on a page. The user can click the Retractable icon to just show the heading.
- Automatically retract: Tick this checkbox if you want to show only the block’s heading when a user views the page. The user can click the Retracted icon to view the entire block.
- Block content: Write your text. You can include formatting, external images etc.
- Alternatively, you can also use text from another note that you have already written.
- License: You see these fields if the site administrator turned on license metadata. Additionally, if you are in an institution, your institution administrator may require you to provide a license. Your default license is displayed. You can set your default license in your account settings. You may choose a different license for each individual artefact.
- Licensor: If you are copying text that somebody else created, you can attribute the work to them here and provide their name for example.
- Original URL: You see this field if the site administrator turned on license metadata. If you are copying somebody else’s text, provide a link to the original Internet address so that others can go there and view the original file.
- Click the Save button to accept your changes, or click the Cancel button to leave the block’s content as it is. The Remove button is shown only when you place the block into the page for the first time.
- You can also click the Remove / Cancel button in the top right-hand corner to either remove a newly created block before it is being saved or to cancel any changes and leave the block’s content as it is.
Notitie
We recommend you do not include images that you have uploaded to Mahara in a text box. It cannot be guaranteed that they are displayed for other users if they do not have access to the image via another portfolio page. All access in Mahara is granted to pages and through them to the artefact blocks. An image in a text box is not recognized as artefact and can therefore not receive its proper permissions.
6.3.5.2. Re-use text from an existing text box
You can re-use text from other text boxes (a.k.a. Notes) from one page in another.
Waarschuwing
If you do not make a copy of a text box content and change it, the text is changed in all other instances where this text box is used.
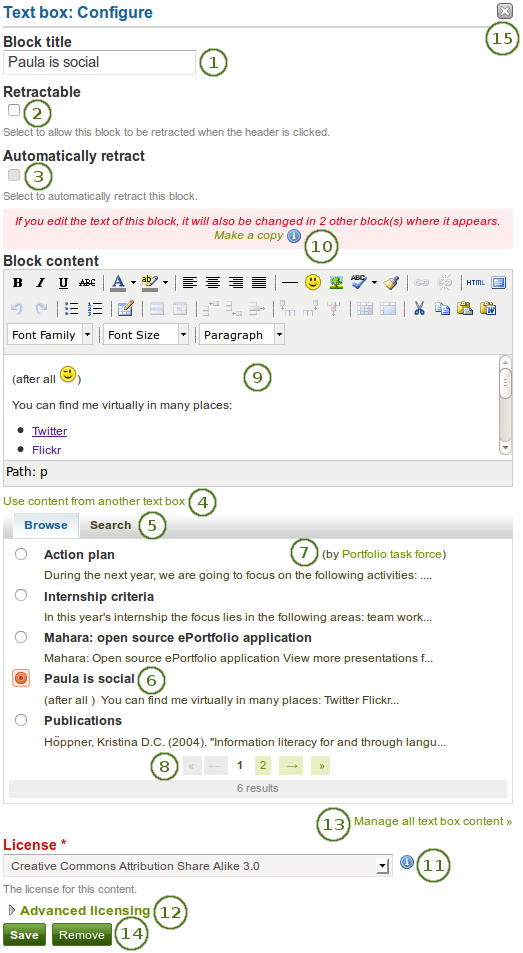
Configure the Text box block by copying text
- Block title: Provide a title for your text. You should only enter it after you selected the text box to re-use as the title of the original text box will be entered.
- Retractable: Tick this checkbox if you want to allow users to reduce the block to its heading on a page. The user can click the Retractable icon to just show the heading.
- Automatically retract: Tick this checkbox if you want to show only the block’s heading when a user views the page. The user can click the Retracted icon to view the entire block.
- Click the link Use content from another text box to view all the text boxes to which you have access. These can be:
- your own notes
- text boxes from group pages that you can copy
- text boxes from institution or site pages to which you have access
- Click Browse or Search to find the text box that you want to re-use.
- All text boxes are listed with their title and the first line. Click the radio button next to the text box that you want to use again.
- If a text box does not belong to you but a group for example, you see the author next to the text box title.
- Use the pager to move between your notes if more than 5 are displayed.
- The content of the text box that you have selected is displayed in the Block content box. You can now make changes. The text will be changed in all other instances where this text box appears.
- If you wish to make changes to the text but do not want to change it everywhere else, click the Make a copy link above the Block content in the red box. The text is then retained, but it is treated like a new text box.
- License: You see this drop-down menu if the site administrator turned on license metadata. Additionally, if you are in an institution, your institution administrator may require you to provide a license. Your default license is displayed. You can set your default license in your account settings. You may choose a different license for each individual artefact.
- Advanced licensing: If you can / must enter license information, you can also provide information about the original licensor and a URL where the original can be found.
- Click the Manage all text box content link to be taken to your personal Notes to make changes there instead of in an existing text box from this popup window here.
- Click the Save button to accept your changes, or click the Cancel button to leave the block’s content as it is. The Remove button is shown only when you place the block into the page for the first time.
- You can also click the Remove / Cancel button in the top right-hand corner to either remove a newly created block before it is being saved or to cancel any changes and leave the block’s content as it is.
Zie ook
You can watch a demo of this feature in action.
6.3.6. Inbox

The Inbox block displays the latest messages that you have received.
Notitie
This block can only be used on your dashboard.
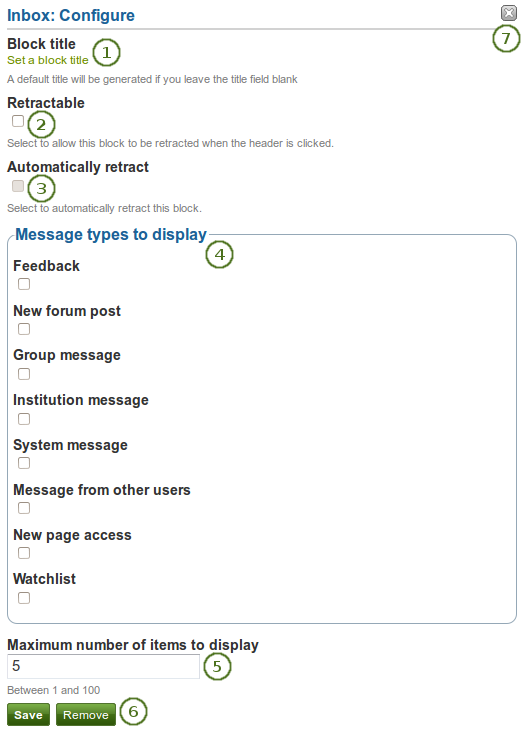
Configure the Inbox block
- Block title: The automatic title for this block is “Inbox”. You can set another one if you wish.
- Retractable: Tick this checkbox if you want to allow users to reduce the block to its heading on a page. The user can click the Retractable icon to just show the heading.
- Automatically retract: Tick this checkbox if you want to show only the block’s heading when a user views the page. The user can click the Retracted icon to view the entire block.
- Message types to display: Place a check mark for each message type that you want to display in this block.
- Maximum number of items to display: Decide how many messages shall be shown on your dashboard. You can choose between 5 and 100.
- Click the Save button to accept your changes, or click the Cancel button to leave the block’s content as it is. The Remove button is shown only when you place the block into the page for the first time.
- You can also click the Remove / Cancel button in the top right-hand corner to either remove a newly created block before it is being saved or to cancel any changes and leave the block’s content as it is.
6.3.7. Latest pages

The Latest pages block displays the latest pages to which you have access across Mahara.
Notitie
This block can only be used on your dashboard.
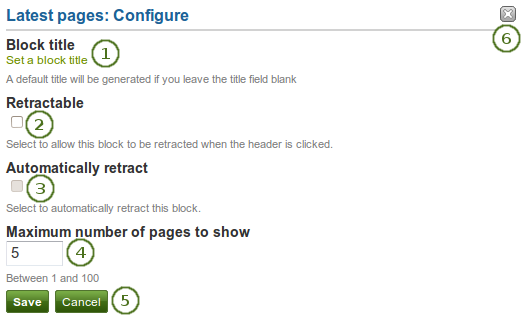
Configure the Latest pages block
- Block title: The automatic title for this block is “Latest pages”. You can set another one if you wish.
- Retractable: Tick this checkbox if you want to allow users to reduce the block to its heading on a page. The user can click the Retractable icon to just show the heading.
- Automatically retract: Tick this checkbox if you want to show only the block’s heading when a user views the page. The user can click the Retracted icon to view the entire block.
- Maximum number of pages to show: Decide how many pages shall be shown on your dashboard. You can choose between 5 and 100.
- Click the Save button to accept your changes, or click the Cancel button to leave the block’s content as it is. The Remove button is shown only when you place the block into the page for the first time.
- You can also click the Remove / Cancel button in the top right-hand corner to either remove a newly created block before it is being saved or to cancel any changes and leave the block’s content as it is.
6.3.8. Watched pages

The Watched pages block displays the pages that are on your watchlist.
Notitie
This block can only be used on your dashboard.

Configure the Watched pages block
- Block title: The automatic title for this block is “Watched pages”. You can set another one if you wish.
- Retractable: Tick this checkbox if you want to allow users to reduce the block to its heading on a page. The user can click the Retractable icon to just show the heading.
- Automatically retract: Tick this checkbox if you want to show only the block’s heading when a user views the page. The user can click the Retracted icon to view the entire block.
- Items to show: Decide how many pages shall be shown on your dashboard.
- Click the Save button to accept your changes, or click the Cancel button to leave the block’s content as it is. The Remove button is shown only when you place the block into the page for the first time.
- You can also click the Remove / Cancel button in the top right-hand corner to either remove a newly created block before it is being saved or to cancel any changes and leave the block’s content as it is.
6.3.9. Group info

This block is a default block on the group homepage. There is no configuration possible.
Items in the group info block
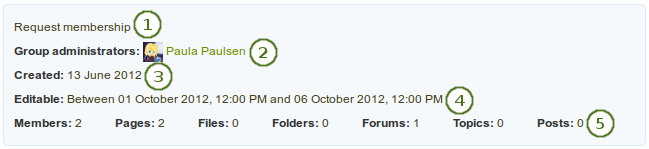
The block contains information about:
- group characteristics
- group administrator
- group creation date
- dates between which regular group members can participate in group activities
- group statistics
- number of group members
- number of pages created in the group
- number of files uploaded to the group
- number of folders created in the group
- number of forums created in the group
- number of forum topics created in the group
- number of posts in forum topics in the group
6.3.10. Group members

This block is a default block on the group homepage. You can display member profile pictures and their names.

Configure the Group members block
- Block title: The automatic title for this block is “Members”. You can set another one if you wish.
- Retractable: Tick this checkbox if you want to allow users to reduce the block to its heading on a page. The user can click the Retractable icon to just show the heading.
- Automatically retract: Tick this checkbox if you want to show only the block’s heading when a user views the page. The user can click the Retracted icon to view the entire block.
- Shown members: Choose how many members (between 1 and 100) are shown on the group homepage. All others are accessible via the Members tab in the group. The default number of members displayed is 12.
- Order: Choose the order in which members are displayed. Options are
- latest: display members according to their group joining date in reverse chronological order
- random: let Mahara decide which members to display
- Click the Save button to accept your changes, or click the Cancel button to leave the block’s content as it is. The Remove button is shown only when you place the block into the page for the first time.
- You can also click the Remove / Cancel button in the top right-hand corner to either remove a newly created block before it is being saved or to cancel any changes and leave the block’s content as it is.
6.3.11. Group pages

This block is a default block on the group homepage. You can display pages created in and / or shared with the group in this block.
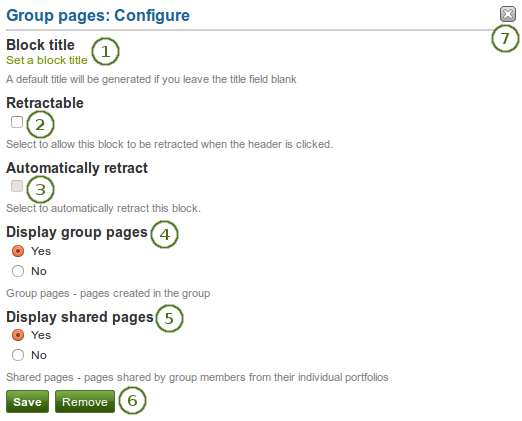
Configure the Group pages block
- Block title: The automatic title for this block is “Group pages”. You can set another one if you wish.
- Retractable: Tick this checkbox if you want to allow users to reduce the block to its heading on a page. The user can click the Retractable icon to just show the heading.
- Automatically retract: Tick this checkbox if you want to show only the block’s heading when a user views the page. The user can click the Retracted icon to view the entire block.
- Display group pages: Decide whether to display pages that were created in the group. “Yes” is the default option.
- Display shared pages: Decide whether to display pages that users shared with the group. “No” is the default option.
- Click the Save button to accept your changes, or click the Cancel button to leave the block’s content as it is. The Remove button is shown only when you place the block into the page for the first time.
- You can also click the Remove / Cancel button in the top right-hand corner to either remove a newly created block before it is being saved or to cancel any changes and leave the block’s content as it is.