2. Informatie voor schrijvers van de Mahara handleiding en vertalers
Door Kristine D.C. Hoeppner
Dit is een lijst die wijzigt tijdens het werken aan de handleiding. Er zijn een aantal conventies. De conventies worden hier centraal bewaard, zodat anderen ze kunnen zien en zodat ik er kan naar verwijzen ;-)
Deze lijst staat niet in een bepaalde volgorde.
2.1. Install Sphinx
The Mahara user manual requires that Sphinx is installed on your computer. You can find information on how to install Sphinx on the Sphinx website.
2.2. Getting the code
The code for the Mahara user manual is managed in git.
- Create a folder on your computer (if you don’t already) where you place git repositories, e.g.
code. - In the terminal, enter the folder “code”:
cd code - Do a checkout of the code:
- via SSH:
git clone git@git.mahara.org:user-manual/manual.gitOR - via HTTS:
git clone https://git.mahara.org/user-manual/manual.git
- via SSH:
- In the terminal, enter the folder “manual”:
cd manual - Compile the user manual in English only. The following command assumes that you want to compile it for Mahara 15.10:
make preview MAHARA=15.10 - Open the
index.htmlfile in a browser to view the manual. You can find it in the folderbuild/en/15.10.
2.3. Schermafdrukken
- worden geplaatst door gebruik te maken van het label “figure”.
- always include alt text and a figure description. That sets them apart from the text.
- worden meestal geplaatst boven een lijst als ze deel zijn van stap voor stap-instructies.
- zouden zo weinig mogelijk instructies moeten bevatten over de stappen die er voor moeten genomen worden. Bij voorkeur enkel de stapnummers, zodat ze gemakkelijk uitgewisseld en vertaald kunnen worden vermits de tekst dan geen deel is van de afbeelding. Dat kan ook betekenen dat de vertalers de stappen kunnen vertalen en niet onmiddellijk de afbeeldingen moeten vervangen.
- get callouts that are pre-made and can be found in the Gimp file
/images_originals/z_callouts.xcf. - only get an arrow if an item is to be pointed out but there are no steps involved. The arrow can be found in the file
/images_originals/z_arrow.png. - hebben tekstballonnetjes die refereren naar de stappen die genomen moeten worden en die onder de figuur uitgelegd worden.
- zou enkel de nodige zone mogen tonen en niet het hele scherm, de URL, knoppenbalken en dergelijke.
Most screenshots are added with the figure directive.
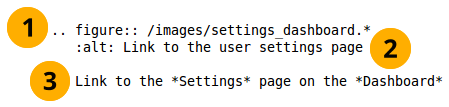
Example of including a screenshot
The first line provides the path to the file.
Notitie
The * replaces the file extension and Sphinx chooses the file that is most appropriate. Thus, files could have different image extensions, or you could have the same screenshots in different file formats that are then chosen by the programme to best suit the end format of the manual.
For the Mahara user manual we use .png files in general as we work with screenshots. It is still good to use the * instead of the .png extension in case the file format is changed at some point.
The second line represents the alt text that is displayed when hovering over the image, when no images are displayed or when viewing the page via a screen reader.
De derde regel moet na een lege regel komen. Dit is de tekst die getoond wordt onder het screenshot als afbeeldingsbeschrijving. In de PDF worden de beschrijvingen doorlopend genummerd.
If you don’t want to display all the information from a screen but only the top and the bottom part, you can use the file
/images_originals/z_omission.xcfand place it into your screenshot. The sinus waves were created using the gimp plugin Shape paths with the following settings:- Sine Wave
- Start X: 0
- Start Y: 200 and upon the second run 215 to get the gap between the lines
- Amplitude: 3
- Wavelength: 25
- Number of cycles: 40 (but depends on how wide the screenshot is)
- Tick for Stroke path
- Stroke color: CCCCCC
Notitie
If you want to include an image inline with the text and don’t want to or can’t use the regular figure, you should create a substitution and place it into the shortcuts.rstext file. There are plenty of examples in that shortcuts file already.
2.4. Gebruikte waarschuwingen zijn
note: voor alles wat wat meer aandacht nodig heeft
Notitie
Notes can be placed directly within a bulleted list. As usual, an empty line before and after the note must be placed and the admonition must be indented by 3 spaces.
warning: voor alles wat voorzichtig moet gebeuren
Waarschuwing
Try not to put everything into an admonition because then the truly important information is lost.
seealso: voor referenties naar andere documenten als daar speciale aandacht voor nodig is. referneties naar andere documenten kunnen ook in de tekst inline opgenomen worden.
Zie ook
The Sphinx user documentation is a great place to deepend your knowledge and understanding of using rST with Sphinx. If you have any questions, you can also check out the Sphinx discussion group.
todo: for keeping a running ToDo list. ToDo lists are currently disabled.
2.5. Conventies
Elke sectie die met het navigatiemenu te maken heeft, zou het pad moeten tonen, vb Inhoud → Bestanden. Je kunt best te pijl kopiëren om de juiste te hebben.
Buttons such as Save or Copy page and also portfolio sections such as Content, Portfolio etc. are highlighted as emphasized text (with a single *).
Little buttons can be included in the text like , . They are added through a substitution. All replacements are kept in the file shortcuts.rstext which is included in each file in which a substitution is used by placing “
.. include:: /shortcuts.rstext” in the first line of the file. Substitutions are referenced in the text as “*Edit* button |edit|” for example pointing out what the action is that you do with them. Translators should not edit the substitution “|edit|” itself, but only change “*Edit* button” taking care to include the * again without placing any spaces between the * and the text to ensure that the word appears highlighted.Er moet een indexverwijzing gemaakt worden voor elke sectie.
New features receive an index entry as well in the form “single: New in Mahara x, [the functionality that is new]”. Index entries can be placed either above an entire section or inline. Inline is preferable for small functional changes so that readers are directly taken to the new functionality. This can be done like so:
:index:`Decide on the sort order <single: New in Mahara 15.04; Sort order of files in the "Folder" block>`Long sections like the administration are broken up into several pages to make the editing more manageable instead of having everything on one very long page.
reStructuredText heeft geen hiërarchische set voor hoofding. Ze hangen af van de individuele bestanden. Om consistent te zijn, bestaat volgende afspraak:
- Hoofding 1, vb. 1.: ===============
- Hoofding 2, vb. 1.1.: —————
- Hoofding 3, vb. 1.1.1.: ~~~~~~~~~~~~~~~
- Hoofding 4, vb. 1.1.1.1.: ^^^^^^^^^^^^^^^
Hoofdingen kleiner dan h4 moeten vermeden worden.
The index page does not have headings besides the main heading. That prevents the table of contents and the other sections that have headings to be the main chapters of the manual. Keep index page headings to just bold with **.
2.6. In-text opmaak
- Ongenummerde lijsten krijgen een * als symbool om elk bolletje te beginnen.
- Genummerde lijsten krijgen # om elk genummerd item mee te beginnen.
- Als je lijst moet inspringen, zet dan een lege regel voor de inspringende lijst en laat elke regel met 3 spaties inspringen. Er moet ook een lege regel zijn aan het einde van de inspringende lijst.
- Benadrukte tekst begint en eindigt met 1 *, vb.
*dit*. Het zal er uitzien als dit. - Bold text starts and ends with 2 *, e.g.
**this**. It will then look like this.
2.7. Hyperlinks
- Externe links: “
`[gelinkte tekst] <URL>`_” - Vertalers moeten enkel de “[gelinkte tekst]” vervangen. - Internal references to which can be linked from elsewhere in the manual are created by placing “
.. [reference_text]:” in a line right before a heading. I usually leave an empty line between the reference and the heading. - Linken naar een interne verwijzing: “
:ref:`[gelinkte tekst] <de interne verwijzing>`” - Vertalers mogen enkel “[gelinkte tekst]” vervangen. - Het ` is een accent en geen recht enkel aanhalingsteken.
- An in-text target can be achieved by placing the text to be linked within accent marks preceded by an underscrore:
_`the internal reference`. Referencing is the usual:ref:`[text that is linked] <the internal reference>`.
2.8. Translators beware
- Do not change the target for internal links that is placed between < >. If you do, the reference cannot be found. There should always be an explanatory text right before the pointy brackets. You can change that.
- Similarly, you can change the text for a URL but not the URL itself unless you want to replace it with a URL to a site in your language.
- If you translate the screenshots and other images, please ensure that you keep the folder structure of the “images” folder as you can see in the respective branch of the manual version you are editing in Git, for example for Mahara 15.10.
- You can find original images used for the manual in the folder “images_original” and then their respective subfolders. You can use them for your own translations if you only want to exchange the background but keep the callouts.
- You do not have to redo any images that you do not “translate”, e.g. block icons, general buttons around Mahara and the text editor buttons. Any images that are not in your translation will be taken from the English original.
- The user manual is updated once a day and new translation strings pulled in from Launchpad and images uploaded to Git prior to the compilation of the manual.
- Currently, not everything can be translated in Sphinx. Hopefully, later versions will fix that.
Notitie
If you want to mention the names of the main translators of the user manual for your language, you can add a sentence right after “The Mahara user manual is written by Mahara community members.” That paragraph appears before the table of contents. There is no equivalent sentence in the English manual because it is not a translation.