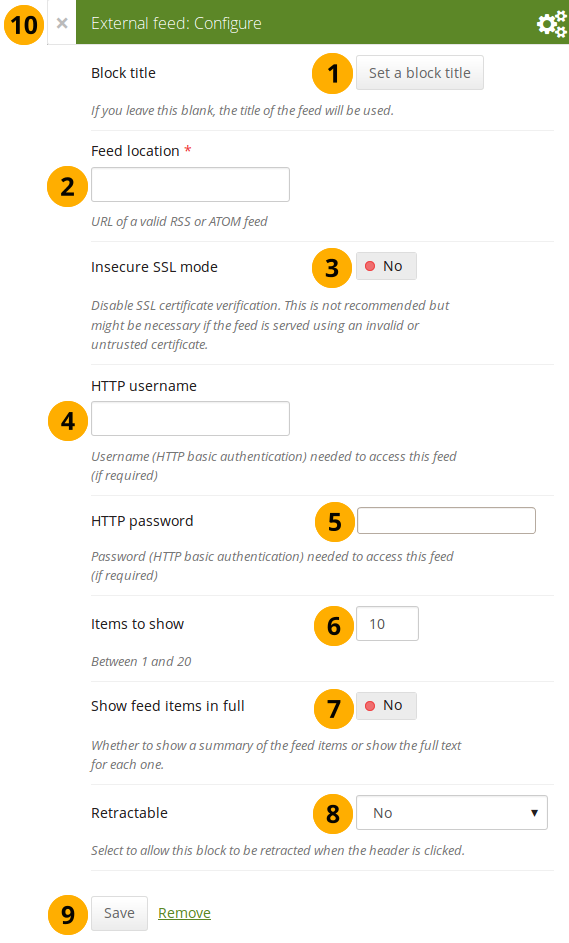
Blok titel: als je de titel leeg laat, dan zal de titel van de feed gebruikt worden.
Feed location: Put the entire feed URL from a valid RSS or ATOM feed in here. If the feed is not displayed, try to view it in a regular feed reader to make sure that the URL is correct. You must provide a feed URL here.
Notitie
Unfortunately, Firefox and Chrome do not display the RSS feed icon for a page immediately near the address bar anymore. In Firefox you will have to go to View → Toolbars → Customize and then drag the RSS icon to your toolbar. It lights up orange / white when a feed is available.
Insecure SSL mode: Switch this option to “Yes” if you wish to enable the insecure SSL mode. This mode allows you to override certificate errors generated by a feed.
HTTP username: Provide a username if you wish to access a feed that requires authentication. This is the username to access the feed and not your portfolio system.
HTTP password: Provide a password to access a feed that requires authentication. This is the password to access the feed and not your portfolio system.
Items to show: Decide how many of the latest items in the feed you wish to display. You can choose up to 20.
Show feed items in full: Switch this option to “Yes” if you want to see the entire feed content and not only the heading of a blog post.
Retractable: Choose whether you want to allow users to reduce the block to its heading on a page or see just the heading only automatically. The options are:
No: The block and its content is displayed at all times.
Yes: Allow users to reduce the block to just the heading by clicking the Retractable icon .
Automatically retract: Only the heading of the block is visible, and the user can click the Retracted icon to view its content.
Click the Save button to accept your changes, or click Cancel to leave the block’s content as it is. Remove is shown only when you place the block into the page for the first time.
You can also click the Close button in the top left-hand corner of the modal window to either remove a newly created block before it is being saved or to cancel any changes and leave the block’s content as it is.
Notitie
If your feed is not updated automatically, please ask your site administrator to check the cron settings.
If you click an entry in the RSS feed, it will open in a new window.
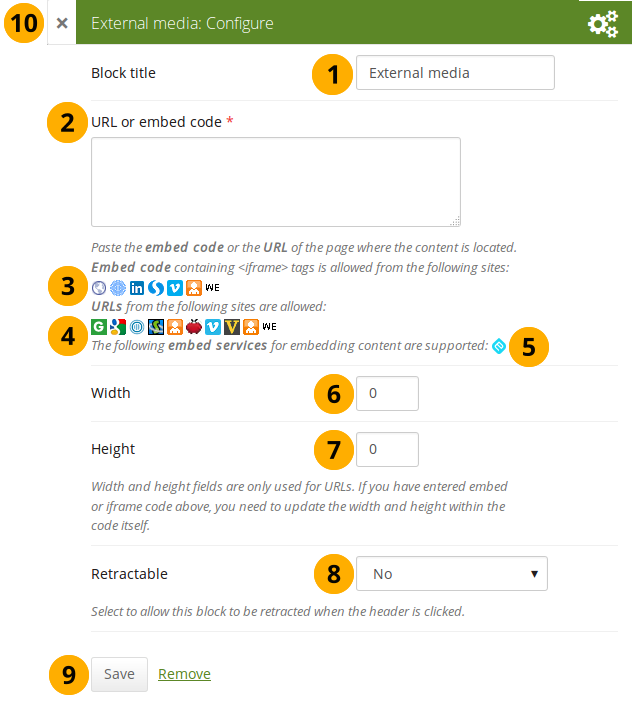
With this block you can embed content from a wide variety of third-party sites. The sites that are allowed are listed below the text area in the configuration screen. You see only their favicons, but when you hover over an icon with your mouse, you see the site’s name as well.
Zie ook
Mahara comes with a number of sites that are allowed per default. These are listed on the page. Your site administrator can add additional iframe sources.
Bloktitel: kies een titel voor je ingebedde inhoud.
URL or embed code: Paste the URL or the embed code of a page where the content is located.
Embed code: Content from the sites listed in this section can be embedded using the <iframe> embed code. Any new site that the site administrator allows will be added in alphabetical order. The default sites are:
URLs: Content from the sites listed in this section can be embedded by simply grabbing the page URLs where the content can be found. The default sites are:
You can also paste an Embedly embed code and display your content that way.
Width: Choose the width (in pixels) that the content should take up on the page. This only goes for the content for which you provided the URL.
Notitie
If you use the embed code, you need to provide the correct width and height directly in the embed code and can ignore this setting here.
Height: Choose the height (in pixels) that the content should take up on the page. This only goes for the content for which you provided the URL.
Notitie
If you use the embed code, you need to provide the correct width and height directly in the embed code and can ignore this setting here.
Retractable: Choose whether you want to allow users to reduce the block to its heading on a page or see just the heading only automatically. The options are:
No: The block and its content is displayed at all times.
Yes: Allow users to reduce the block to just the heading by clicking the Retractable icon .
Automatically retract: Only the heading of the block is visible, and the user can click the Retracted icon to view its content.
Click the Save button to accept your changes, or click Cancel to leave the block’s content as it is. Remove is shown only when you place the block into the page for the first time.
You can also click the Close button in the top left-hand corner of the modal window to either remove a newly created block before it is being saved or to cancel any changes and leave the block’s content as it is.
Notitie
You can use the same iframe embed code around Mahara in notes, text and journal entries as well.
Zie ook
Watch the video Saving a video from iPad to MyPortfolio if you want to see how you can embed a YouTube video into your Mahara portfolio using an iPad. You can use a similar work flow for adding YouTube videos also via Android or on your computer. “MyPortfolio” is the name of a Mahara instance in New Zealand for schools.
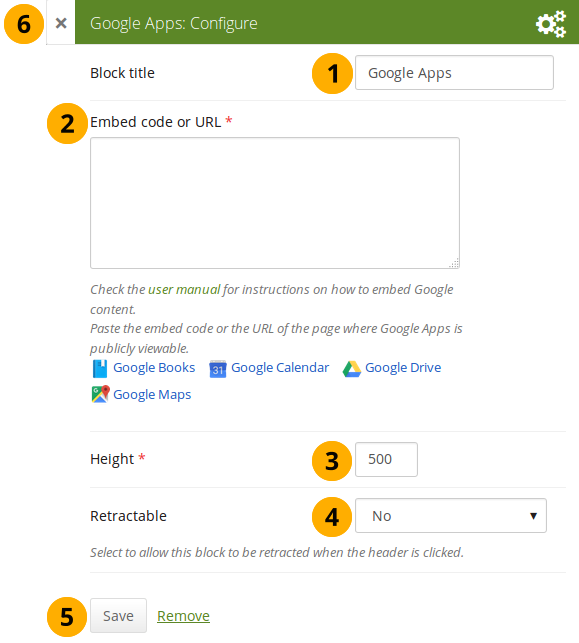
Embed any of the following content available via Google (Apps):
Boeken
calenders
documenten, rekenbladen, presentaties
kaarten
You can only display the content, but not immediately edit documents, spreadsheets or presentations. You will have to be logged in to your Google (Apps) account to do so. You can use this block with a regular, personal Google account or if you have a Google Apps account via an institution, e.g. your school or university.
Notitie
If certain documents are restricted to a Google Apps domain or to specific people, a login screen is displayed.
Bloktitel: kies een titel voor je ingebedde inhoud.
Embed code or URL: Depending on what kind of content you wish to display, you either provide the embed code or the URL. Click the Help button for more information on how to embed each Google component.
Height: Choose the height for the embedded content. The width is adjusted to the column width of the block automatically.
Retractable: Choose whether you want to allow users to reduce the block to its heading on a page or see just the heading only automatically. The options are:
No: The block and its content is displayed at all times.
Yes: Allow users to reduce the block to just the heading by clicking the Retractable icon .
Automatically retract: Only the heading of the block is visible, and the user can click the Retracted icon to view its content.
Click the Save button to accept your changes, or click Cancel to leave the block’s content as it is. Remove is shown only when you place the block into the page for the first time.
You can also click the Close button in the top left-hand corner of the modal window to either remove a newly created block before it is being saved or to cancel any changes and leave the block’s content as it is.
Google document
Open the document.
Click File in the menu bar and then Publish to the Web.
Click the Start publishing button.
Copy the document link or embed code.
Paste the link or embed code into the Embed code or URL box in the Google Apps block.
Google spreadsheet
Open the spreadsheet.
Click File in the menu bar and then Publish to the Web.
Click the Start publishing button.
Read through the other options and decide on them.
Copy the link for the option Web page or the embed code for the option HTML to embed in a page.
Paste the link or embed code into the Embed code or URL box in the Google Apps block.
Google presentation
Open the presentation.
Click File in the menu bar and then Publish to the Web.
Click the Start publishing button.
Copy the link or embed code.
Paste the link or embed code into the Embed code or URL box in the Google Apps block.
Google Drive folder
Select the folder that you want to share.
Click the Link icon. A shareable link is created.
Copy the link.
Paste the link into the Embed code or URL box in the Google Apps block.
Google Calendar
Open Google Calendar.
Click on the little triangle next to the calendar that you wish to embed.
Click on Calendar settings.
On the Calendar details tab scroll down to Embed This Calendar.
Customize the calendar appearance and then copy the embed code.
Paste the embed code into the Embed code or URL box in the Google Apps block.
Google Maps
Open Google Maps.
Click the My Places button.
Click on the name of the map that you wish to embed.
Click on the Link icon to the left of the map.
Customize the appearance of the map and copy the embed code.
Paste the embed code into the Embed code or URL box in the Google Apps block.
Notitie
Use steps 2 and 3 only if you wish to embed one of your Google maps. If you wish to embed any Google map, you can skip these steps.
Google Books
Open Google Books.
Find the book that you wish to embed.
Click on the book title.
Click on the Link icon above the book.
Copy the embed code of the book.
Paste the embed code into the Embed code or URL box in the Google Apps block.
Notitie
The link icon only appears if you are allowed to embed this book.
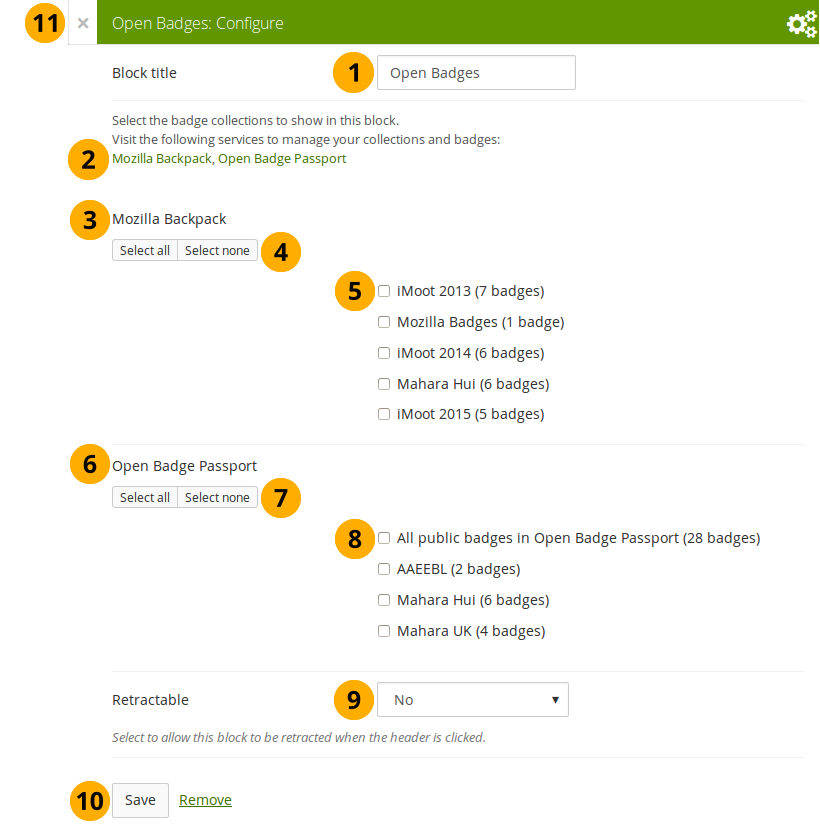
If you do not see all your public badge collections, click the links to verify that you have made all badges publicly available that you want to see.
Mozilla Backpack: All public badge collections from your backpack are displayed.
Use the Select all or Select none buttons to select all badge collections or to revert your selection.
You can also select individual badge collections if you prefer by ticking their checkboxes.
Open Badge Passport: All public badge collections from your Open Badge Passport are displayed.
Zie ook
If you have other “backpacks” that contain badges, the site administrator would need to allow them in the config.php.
Use the Select all or Select none buttons to select all badge collections or to revert your selection.
You can also select individual badge collections if you prefer by ticking their checkboxes.
Retractable: Choose whether you want to allow users to reduce the block to its heading on a page or see just the heading only automatically. The options are:
No: The block and its content is displayed at all times.
Yes: Allow users to reduce the block to just the heading by clicking the Retractable icon .
Automatically retract: Only the heading of the block is visible, and the user can click the Retracted icon to view its content.
Click the Save button to accept your changes, or click Cancel to leave the block’s content as it is. Remove is shown only when you place the block into the page for the first time.
You can also click the Close button in the top left-hand corner of the modal window to either remove a newly created block before it is being saved or to cancel any changes and leave the block’s content as it is.
Notitie
Since your badges need to be fetched from an external service, it may take a little bit until they are displayed on the page.
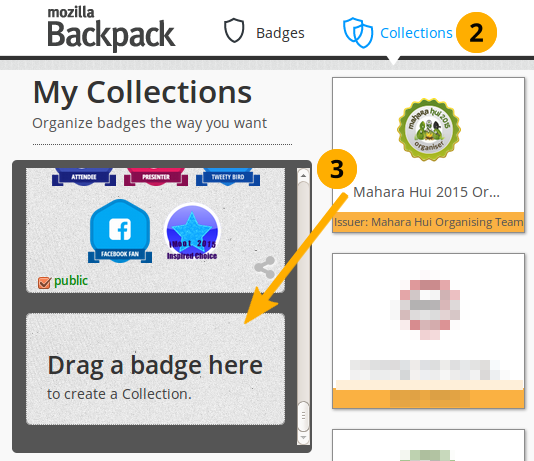
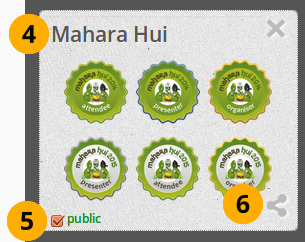
7.5.4.2. Create a collection of badges in the Mozilla Backpack