12. External apps via LTI
You can use web services and authentication methods to connect other applications to Mahara. Depending on the type of integration you are seeking, you may be able to simply set the connection up in Mahara itself. In other cases, some development work may be needed.
Learning Tools Interoperability (LTI) allows learning applications like learning management systems (LMS) to talk to each other and exchange information in a standard way making it possible to easily connect the systems without extensive configuration each time.
At the moment Mahara supports LTI for authentication purposes.
The following describe how you can connect Mahara to some learning management systems via LTI.
12.1. Setup on Mahara
In order to use LTI for authentication purposes, you need to complete the setup on Mahara as well as on the LMS.
Instructions are provided for Canvas and Moodle later one. If you use a different LMS, please check that documentation on how to set up an LTI connection.
12.1.1. Enable LTI for the site
You need to ensure that LTI is enabled for your Mahra site. You do that by activating it in the Plugin administration.
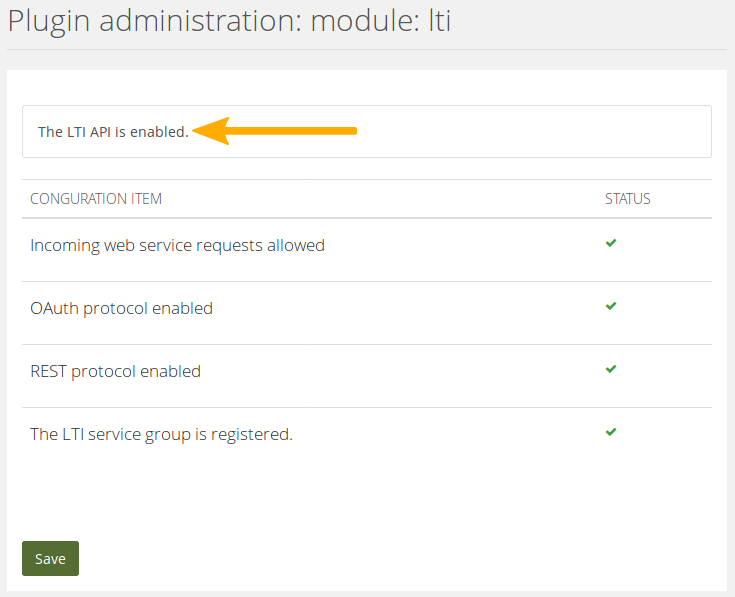
The LTI plugin is enabled
The LTI plugin is enabled when there are no warning signs on the plugin page and the text at the top reads “The LTI API is enabled”.
12.1.2. Enable LTI for an institution
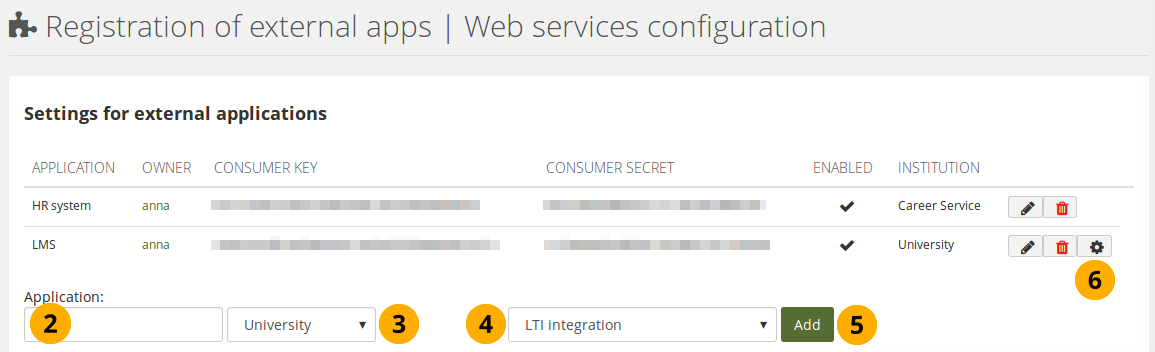
You can enable LTI for an institution as site administrator. Institution administrators cannot set up LTI for their own institution.
Enable LTI for an institution
Go to Administration → Extensions → Web services → External apps.
Application: Give your application that you want to connect a name. This is an identifier that only you need to understand.
Choose the institution in which you want to set up the application.
Select “LTI integration” from the drop-down menu.
Click the Add button to generate the consumer key and secret.
Notitie
If your institution does not already have the “Web services” authentication method, it will be added automatically.
Click the Manage button if you want to see more options and make a decision on them.
Notitie
At the moment, you can only choose to have users created automatically when they log in via LTI for the first time. Setting the switch to “Yes” is typically a good thing because then any user from your LMS can go into Mahara directly without having to have an account set up beforehand.
See further down for information on using LTI with another authentication method.
12.2. Use LTI with a second authentication method
You can allow your users to log in via LTI and another authentication method within the same institution. There are two possible ways:
Users log in via Mahara first and only then via LTI.
Users log in via LTI first and then via Mahara.
The first case, users log in via Mahara initially, is the easier one as you don’t have to adjust their account settings manually. If users log in via LTI first, their authentication method needs to be adjusted so that they don’t end up with two accounts.
Technically, you can use any authentication method that you have available in Mahara as second authentication method for LTI, including MNet. However, since MNet doesn’t allow you to log in via the Mahara homepage and LTI is a replacement for MNet, this authentication method is not mentioned as one to be connected.
 You can set the SAML authentication method as parent authentication method to LTI. That allows people to log in via SAML or LTI and be put into the same account.
Notitie
This is currently only possible for SAML authentication but not for LDAP / Active Directory or a third-party authentication method.
Set a parent authentication method for LTI
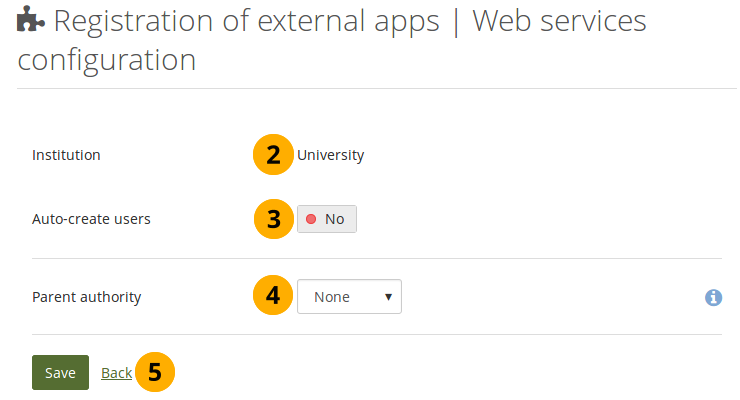
Click the Manage button next to the LTI app on Administration → Extensions → Web services → External apps.
Institution: The institution for which you created the LTI app is listed.
Auto-create users: Flip the switch to “Yes” if you want to allow anybody who has access to the LTI link to create an account automatically.
- Parent authority: Select the authentication method that should be the parent to LTI thus allowing people to log in directly via both and be in the same account.
12.2.1. Log in via Mahara and then LTI
Your users can log in via Mahara and the LMS.
Ensure that the authentication method that your users shall use is set up for your institution.
Make sure that you have web services set up as authentication method as well for your institution.
Set up the consumer secret and key for the LTI integration as described under “Enable LTI for an institution”
Complete the setup of the integration on your LMS of choice.
Ask your users to log into Mahara first, set up their accounts manually or via a CSV file, synchronize their accounts via LDAP, or have accounts auto-created by SAML on first login.
As a user:
Log in on the Mahara homepage.
Your account is set up if it doesn’t already exist.
Go to your LMS.
Click the link that takes you into your portfolio. You can often find that link in the course in which you are asked to create a portfolio or on your profile page in your LMS.
You get access to the same account that you had already set up on Mahara.
12.2.2. Log in via LTI and then Mahara
If you want your users to log in via LTI first and then Mahara, you need to change the authentication method of the users to make the second authentication method, i.e. internal, LDAP, SAML or IMAP, the primary one. If you don’t do that, a second account will be created.
The following describes the work flow and includes the steps that you need to take in order to allow a user to log in via both authentication methods if they logged in via LTI first.
Ensure that the authentication method that your users shall use is set up for your institution.
Make sure that you have web services set up as authentication method as well for your institution.
Set up the consumer secret and key for the LTI integration as described under “Enable LTI for an institution”
Complete the setup of the integration on your LMS of choice.
Your users go to the LMS and click the link to the portfolio, which creates an account for them.
Waarschuwing
If you leave things here and don’t continue with the next steps, and your users log in via the Mahara homepage, they will have a second account created.
Change the authentication method of the user to the non-LTI one. In the case of single sign-on via the SAML plugin, you will also need to provide a remote username.
Zie ook
You can learn how to change the authentication method for internal and LDAP accounts and for accounts that require a remote username.
12.3. Setup in Canvas
You can set up the LTI connection to Mahara either for all your courses in Canvas or for a single course.
The advantage of setting up the connection for your entire instance of Canvas is that your teachers do not have to set up the connection themselves and everybody connects to the same instance of Mahara and to the same institution.
If you want to ive more control to what institution in Mahara your learners shall connect, you can set up the LTI connection on the course level.
You can choose to set up the connection via the Edu App Center or via manual configuration. The manual configuration allows you to open Mahara in its own window rather than within Canvas.
12.3.1. Setup via the Edu App Center
When you set up Mahara via the Edu App Center, your Mahara instance is opened as iframe within Canvas reducing the space you have available to view Mahara. You will always see the Canvas navigation around it as well.
Waarschuwing
For security reasons, Mahara prevents being embedded as iframe in another website. If you want to use the Edu App Center and not set up Mahara manually (just slightly longer setup time), you will need to disable a security feature on Mahara, which is not recommended. You can do so by adding $cfg->sameoriginframes = false; to your config.php.
Zie ook
If you want to have Mahara opened in a separate window, you can follow the setup instructions for that.

Choose Mahara from the Edu App Center
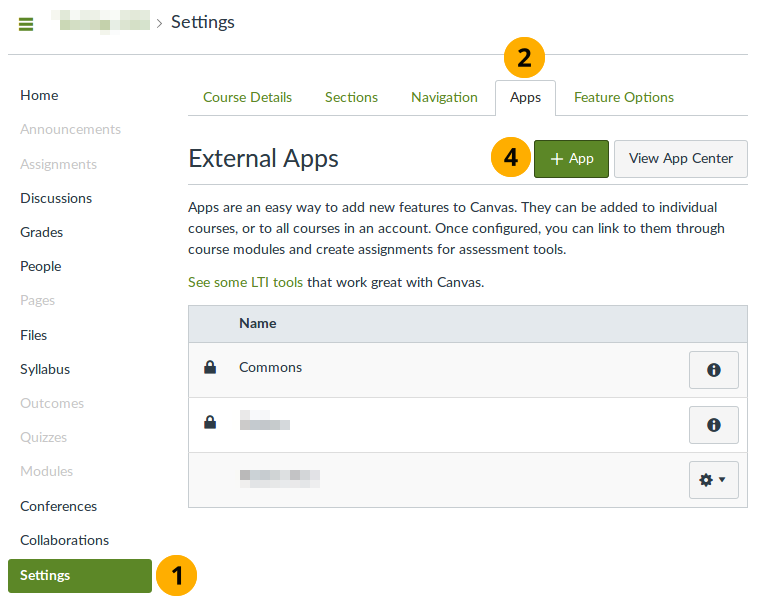
Click Settings in your Canvas site or course.
Notitie
If you choose to put the link in your site, all courses will have the link in their navigation. If you decide to put the link only into your course, only your course participants will be able to access Mahara.
Click the Apps tab. You have access to the Edu App Center.
Search for “mahara” in the search field.
Click the Mahara app that is presented to you. You are taken to a screen that shows you more information about the app itself.
Click the Add App button to start the configuration.
In order to add the connection to Mahara, you need to have set up Canvas as external tool in Mahara for your institution because you require the consumer key and consumer secret.
Configure Mahara via the Edu App Center
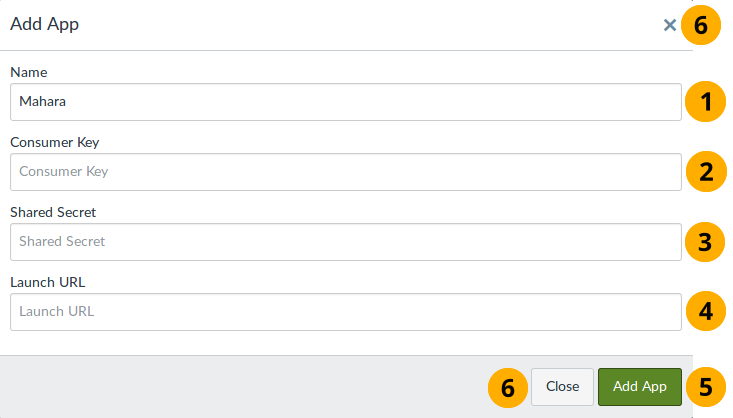
Name: You can decide what you want to call the app. The name you choose here will be the one displayed in your course navigation.
Consumer Key: Paste the consumer key from Mahara for the LTI connection that you set up earlier.
Shared Secret: Paste the consumer secret from Mahara for the LTI connection that you set up earlier.
Launch URL: Paste the URL of your Mahara instance.
Click the Add App button to finish the setup.
Click the Close button or the Close icon to abort the setup.
The app appears in your course navigation when you refresh the page.
Click the app to be authenticated in your Mahara instance.
Notitie
If you already have an account in the institution in Mahara with the email address you use in Canvas, you are taken to that account.
If your email address does not yet exist in Mahara and you allowed for automatic account creation, an account will be set up for you.
If your email address exists in Mahara but you are not a member of the institution for which you set up the Canvas integration, you receive an error message and will need to become a member of that institution before you can log in via Canvas.
12.3.2. Manual setup
The manual setup of the connection to Mahara is also easy.
Choose to set up Mahara manually
Click Settings in your Canvas site or course.
Notitie
If you choose to put the link in your site, all courses will have the link in their navigation. If you decide to put the link only into your course, only your course participants will be able to access Mahara.
Click the Apps tab.
Click the View App Configurations button.
Click the App button to add your Mahara app manually.
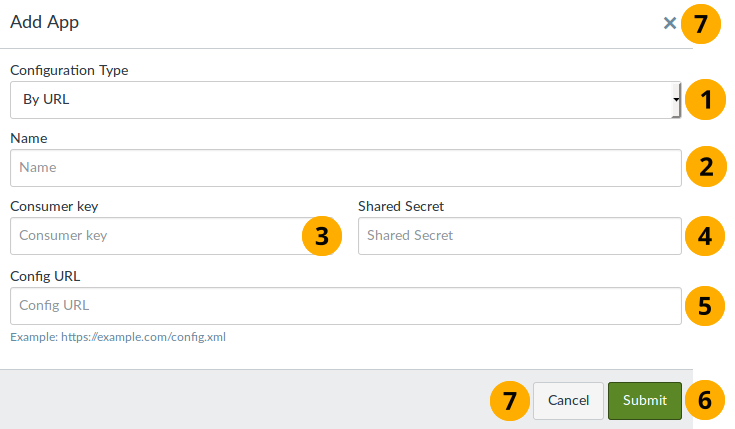
You add the details for your Mahara instance in the pop-up window.
Configure the connection to Mahara
Configuration Type: Select “By URL”. The configuration parameters are available in your Mahara instance.
Name: You can decide what you want to call the app. The name you choose here will be the one displayed in your course navigation.
Consumer Key: Paste the consumer key from Mahara for the LTI connection that you set up earlier.
Shared Secret: Paste the consumer secret from Mahara for the LTI connection that you set up earlier.
Config URL: Paste the URL of your Mahara instance and add the following to the end of it:
/module/lti/configxml.phpClick the Submit button to finish the setup.
Click the Cancel button or the Close icon to abort the setup.
The app appears in your course navigation when you refresh the page.
Click the app to be authenticated in your Mahara instance.
Notitie
If you already have an account in the institution in Mahara with the email address you use in Canvas, you are taken to that account.
If your email address does not yet exist in Mahara and you allowed for automatic account creation, an account will be set up for you.
If your email address exists in Mahara but you are not a member of the institution for which you set up the Canvas integration, you receive an error message and will need to become a member of that institution before you can log in via Canvas.
12.4. Setup in Moodle
You can set up Mahara in two different ways for use in Moodle:
General setup on the site level to make it easier for teachers as they won’t require the technical details
Manual setup on the course level
12.4.1. Preconfigure LTI for all courses to use
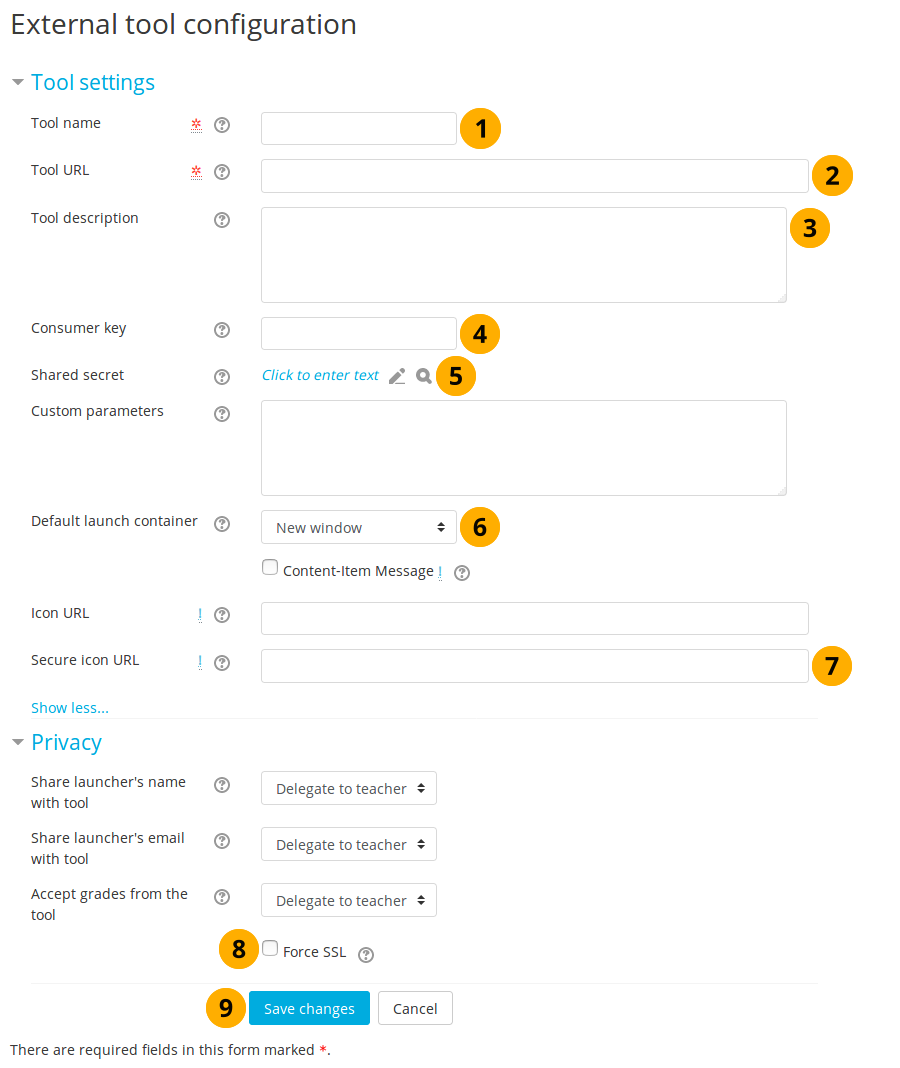
Go to Site administration → Plugins → Activity modules → Manage activities → Edit preconfigured tool
Configure Moodle to connect to Mahara
Tool name: Give a name that your teachers will recognize.
Tool URL: Provide the launch URL. It consists of the base URL of your Mahara site and the following added to the end of it:
/webservice/rest/server.php?wsfunction=module_lti_launchTool description: This field is optional. Providing a description will help your teachers to identify the tool more easily.
Consumer key: Paste the consumer key from Mahara for the LTI connection that you set up earlier.
Shared secret: Paste the consumer secret from Mahara for the LTI connection that you set up earlier.
Default launch container: Choose “New window” or “Existing window”. Do not choose to embed Mahara. That will not work as you are not allowed to embed Mahara into other websites. Furthermore, it will reduce the space that you have available to work in Mahara.
Secure icon URL: If you don’t want to display the regular Moodle icon for external tools, you can provide a link to your favorite icon. It is recommended that you provide one that sits on your Mahara site and has the dimensions needed by Moodle for best results.
Force SSL: You can use LTI in Mahara only via SSL (unless you have a test instance). Tick this box to ensure that the connection is done via SSL only. That requires that Moodle also runs over SSL, which is recommended.
Click the Save changes button to accept the configuration or the Cancel button if you want to abort setting up the tool.
Notitie
You do not have to make changes to any of the other settings on the page.
12.4.2. Use a preconfigured Mahara site in a course
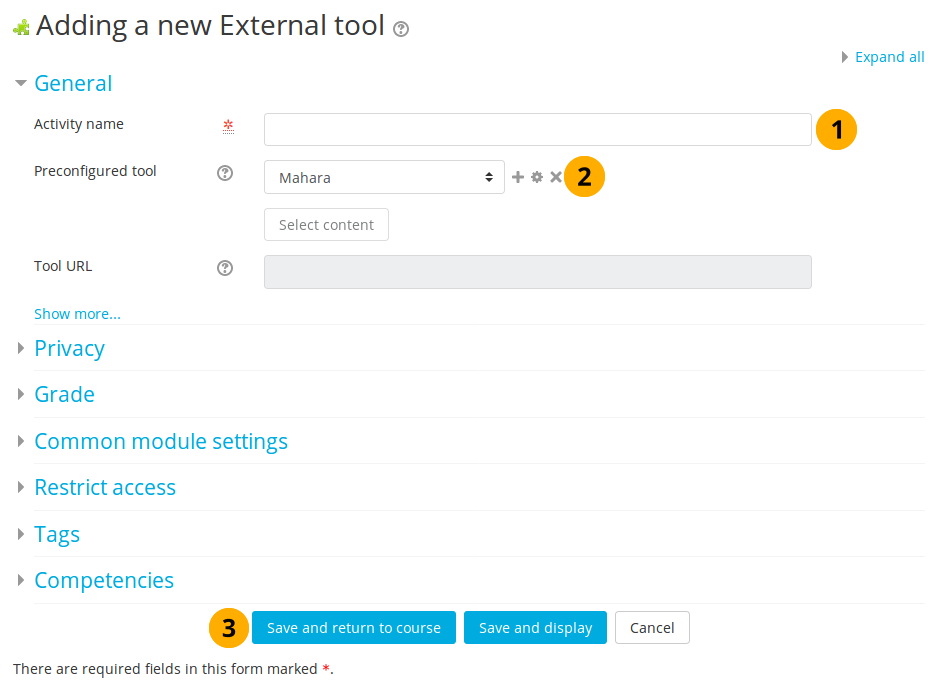
If Mahara was already set up as external tool on the site level in Moodle, a teacher only needs to select it when adding the “External tool” activity in Moodle.
Choose a preconfigured Mahara instance in Moodle
Activity name: Give your activity a title.
Preconfigured tool: Select your Mahara instance from the drop-down menu. It may not be called “Mahara”. Certain fields are not editable when you choose this option as they are determined by the existing site-wide configuration.
Notitie
Click the Show more… link if you want to make some additional changes.
Click the Save and return to course button to be taken back to your course page, click the Save and display button to launch into Mahara immediately, or click the Cancel button to abort adding Mahara to your course as activity.
12.4.3. Configure Mahara in a course activity manually
You can set up the connection to Mahara also on the activity level in Moodle without having preconfigured it first on the site level. This can be beneficial if your course is the only one connecting to a specific Mahara site that other courses should not have access to.
If everyone should have access to the same Mahara site, setting up a preconfiguration on the site level is advised though.
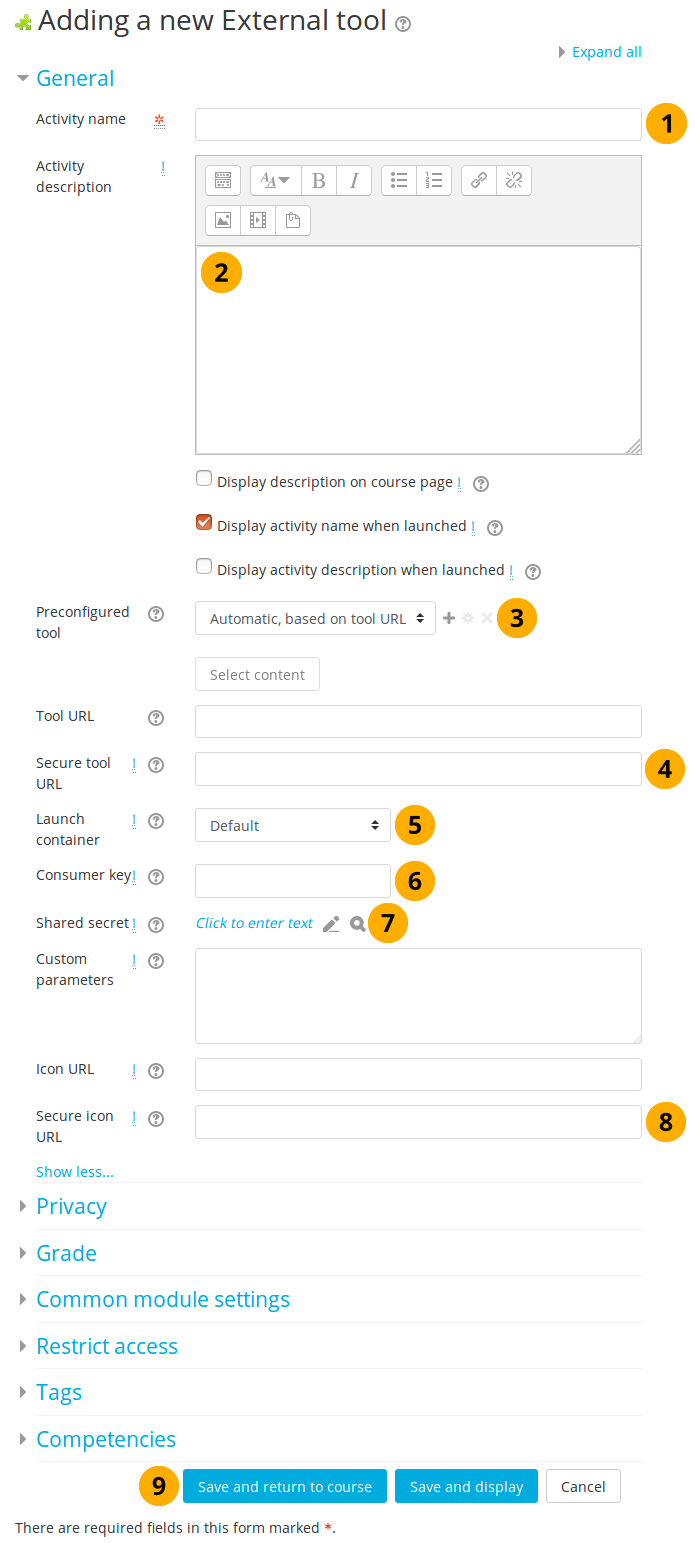
Set up Mahara as external tool in a Moodle course
Activity name: Give your activity a title.
Activity description: Provide a description of your activity. This field is optional.
Preconfigured tool: Select “Automatic, based on tool URL”.
Secure tool URL: Provide the launch URL. It consists of the base URL of your Mahara site and the following added to the end of it:
/webservice/rest/server.php?wsfunction=module_lti_launchNotitie
You could use the “Tool URL” field, but since web services in Mahara only work over SSL (unless you have a developer instance), choosing the “Secure tool URL” is recommended.
Launch container: Choose “New window” or “Existing window”. Do not choose to embed Mahara. That will not work as you are not allowed to embed Mahara into other websites. Furthermore, it will reduce the space that you have available to work in Mahara.
Consumer key: Paste the consumer key from Mahara for the LTI connection that you set up earlier.
Shared secret: Paste the consumer secret from Mahara for the LTI connection that you set up earlier.
Secure icon URL: If you don’t want to display the regular Moodle icon for external tools, you can provide a link to your favorite icon. It is recommended that you provide one that sits on your Mahara site and has the dimensions needed by Moodle for best results.
Click the Save and return to course button to be taken back to your course page, click the Save and display button to launch into Mahara immediately, or click the Cancel button to abort adding Mahara to your course as activity.
Notitie
You do not have to make changes to any of the other settings on the page.
12.5. Setup in Blackboard
You can set up the connection to Mahara via LTI through the built-in “Basic LTI Tools” in Blackboard.
12.5.1. Configure LTI for the site
An administrator needs to set up an LTI tool before it can be added to a course.
12.5.1.1. Set up a building block
Choose to set up an LTI tool
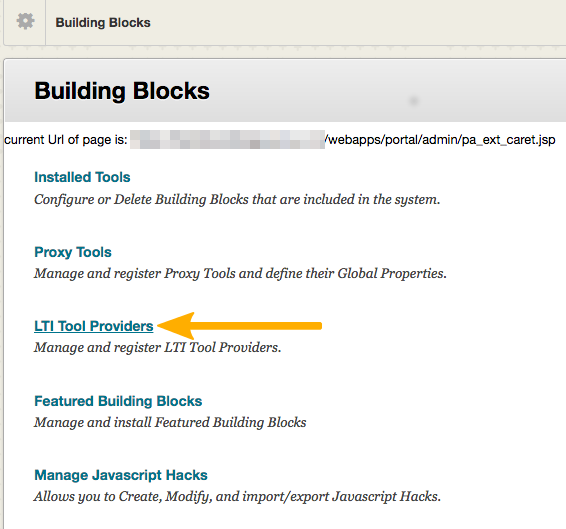
When you are in the Building Blocks area, select LTI Tool Providers to start setting up the connection to Mahara.
On the next screen, click the Register Provider Domain button.
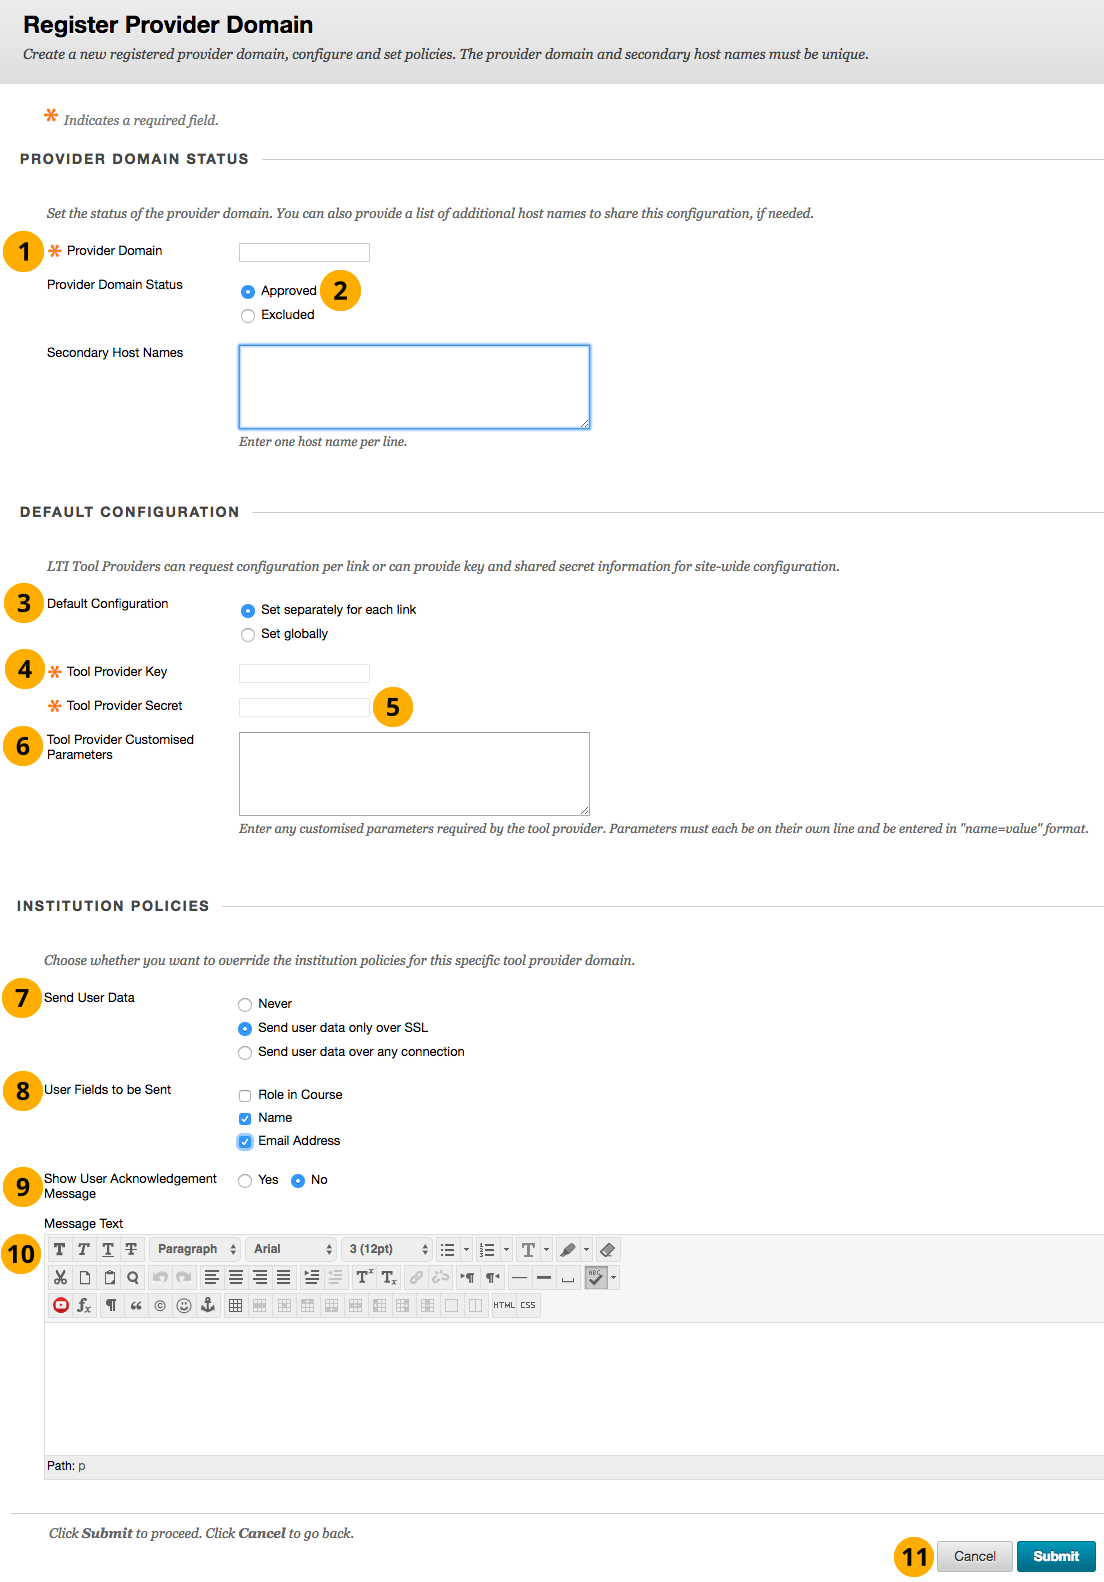
Register the LTI provider
Provider Domain: Enter the URL of your Mahara site.
Provider Domain Status: If you want to use the LTI connection, you should select “Approved”.
Default Configuration: You can decide whether to provide a separate configuration for each instance in which you want to use LTI in a course or set it globally.
Set separately for each link: Use this option if you want to connect to different institutions in one Mahara instance. Note that you will need to provide the consumer key and secret each time you want to add an LTI building block to a course.
Set globally: Use this option when everyone shall enter the same institution in Mahara. You do not need to provide the consumer key and secret when a link to Mahara is added in a course as it is set here.
Tool Provider Key: Paste the consumer key from Mahara for the LTI connection that you set up earlier.
Tool Provider Secret: Paste the consumer secret from Mahara for the LTI connection that you set up earlier.
Tool Provider Customised Parameters: Enter the following parameter:
wsfunction=module_lti_launch.Send User Data: Decide how you want to send user data to Mahara:
Never: No user data is sent.
Send user data only over SSL: User data is sent encrypted. This option is the preferred option for production sites. The web services in Mahara require that an SSL connection is established unless you are connection to a site that is not in production mode.
Send user data over any connection: You can choose this option because web services in Mahara require an SSL connection when in production mode. This option is useful for testing purposes as your testing instance may not have an SSL certificate.
User Fields to be Sent: Select, which user fields you want to send across to Mahara.
Role in Course: Currently, Mahara ignores this field.
Name: The first name and last name are sent to Mahara.
Email Address: The email address of the person clicking the LTI link is sent to Mahara.
Show User Acknowledgement Message: You can require anyone clicking the link to acknowledge that they are getting set up on Mahara. This can be useful if you want to provide a special message upon logging in.
Message Text: Enter the text for the “User Acknowledgement Message”.
Click the Submit button to continue or click the Cancel button to abort the changes.
12.5.1.2. Manage the placement of the building block
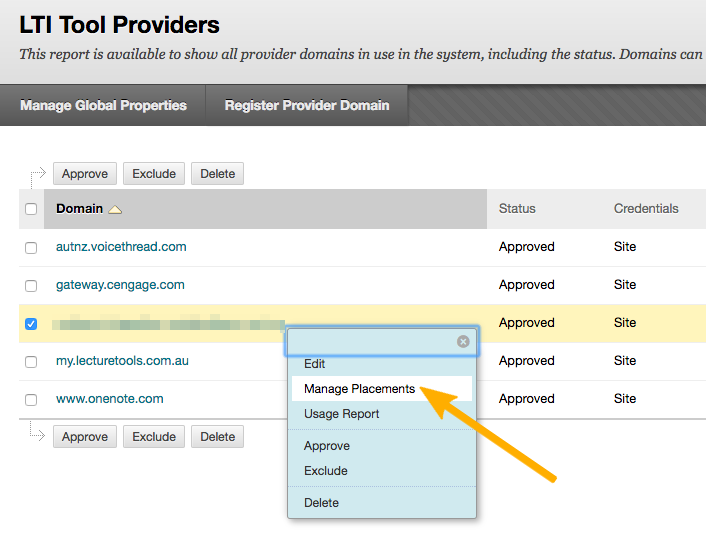
Manage the placement of the LTI connection
When you are back on the LTI Tool Providers screen, make a right mouse click on the Mahara URL and select Manage Placements in order to create a placement for your courses. On the following screen, click the Create Placement link.
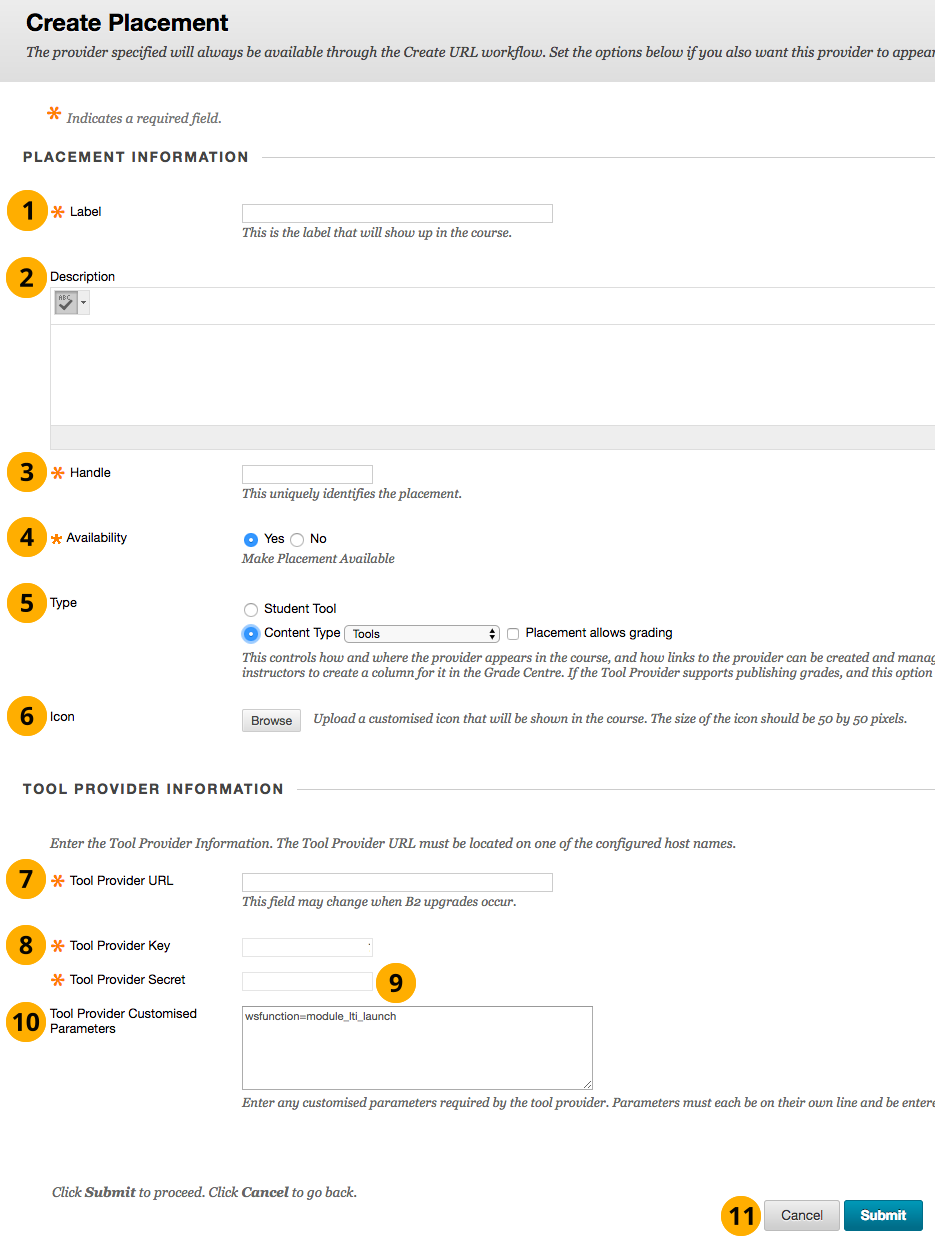
Create a placement for the LTI connection
Label: Give your connection a name that is displayed to students and teachers in the course.
Description: You can enter a description for the connection.
Handle: Give the placement a unique name. It does not appear in the course navigation.
Availability: Choose to make the placement available or not. If you select “No”, you can prepare the placement, but your students will not see it.
Type: The type decides how students can interact with the tool. Choose “Content Type” and select the “Tools” option.
Icon: You can upload a custom icon for the placement to identify it more easily. The icon needs to have the dimensions 50 x 50 pixels.
Tool Provider URL: Enter the URL of your Mahara site.
Tool Provider Key: Paste the consumer key from Mahara for the LTI connection that you set up earlier.
Tool Provider Secret: Paste the consumer secret from Mahara for the LTI connection that you set up earlier.
Tool Provider Customised Parameters: Enter the following parameter:
wsfunction=module_lti_launch.Click the Submit button to continue or click the Cancel button to abort the changes.
12.5.1.3. Add the placement to a course
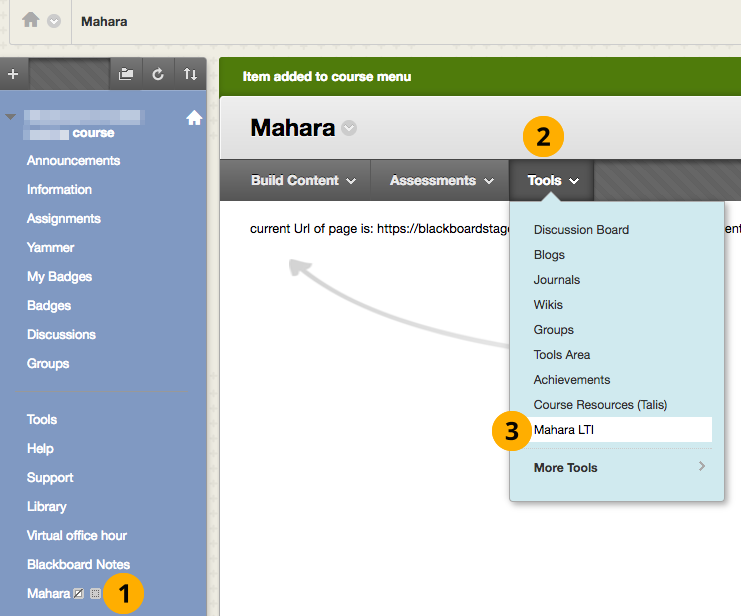
Select the placement in your course
Click the “Mahara” placement in your course navigation.
Click the Tools button.
Select the Mahara LTI tool. Note: You may have given it a different name than is displayed here.
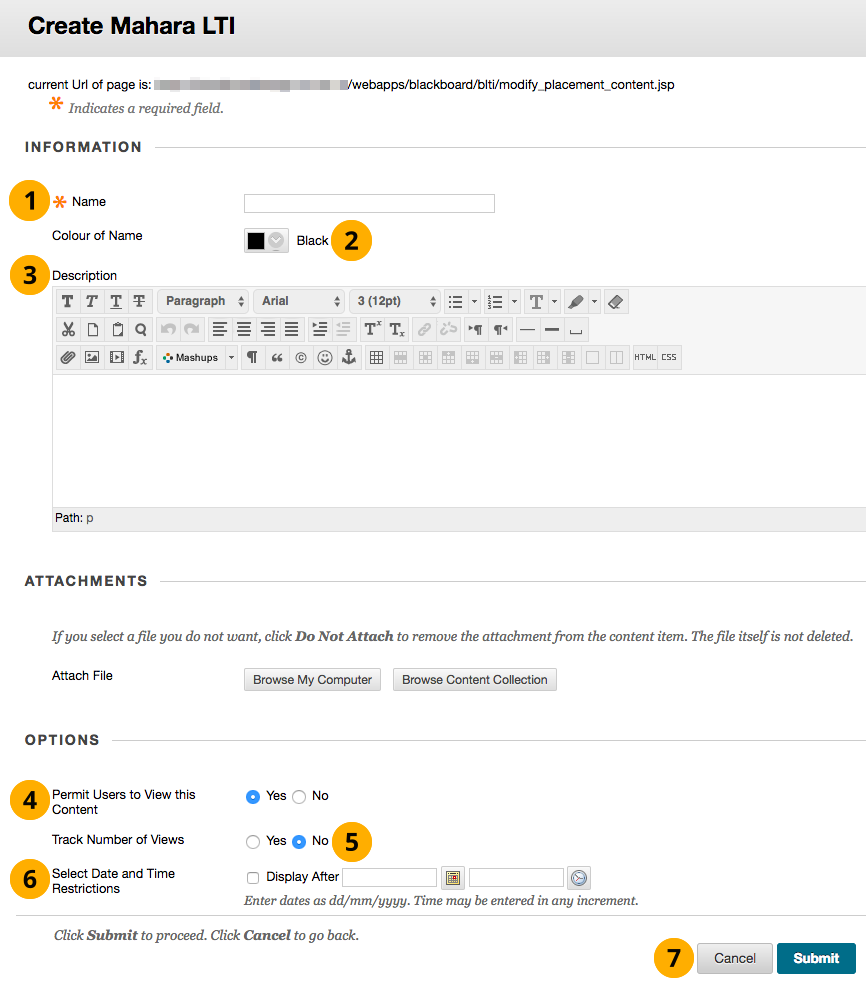
Finalize the settings for the course link
Name: You can change the default name if you want to display a different one.
Colour of Name: Choose the color of the link in the course.
Description: Enter a description if you like that is displayed to the students and teachers in the course.
Permit Users to View this Content: Decide whether students and teachers can see the link in the course.
Track Number of Views: Decide whether you want to include the clicking of the link in your reporting.
Select Date and Time Restrictions: Enter a date and time if you want to make the link available automatically at a specific time.
Click the Submit button to continue or click the Cancel button to abort the changes.
Your link is now ready to be used. Students and teachers in the course can log into Mahara via it.