4.2.1. Bestanden, afbeeldingen en video
These artefacts are internal Mahara ones to display:
links to files that you have uploaded
folders that contain files
show images
embed audio and video files
If you are on a mobile device and select to upload a file, you can take a photo or make a video or audio recording (Android only for audio) directly.
4.2.1.1. Ingebedde media
Display an embedded video or audio file from your uploaded files. Mahara comes with the Video.js media player that allows for the display of a number of file formats without having another player installed on the device.
Notitie
The site administrator must allow media formats. Some of them can be displayed directly within Mahara while others need additional software installed on a device. See the list of allowed media formats.
Videos placed onto a page in this block scale to the width of their column. They also scale automatically when your browser space gets smaller.
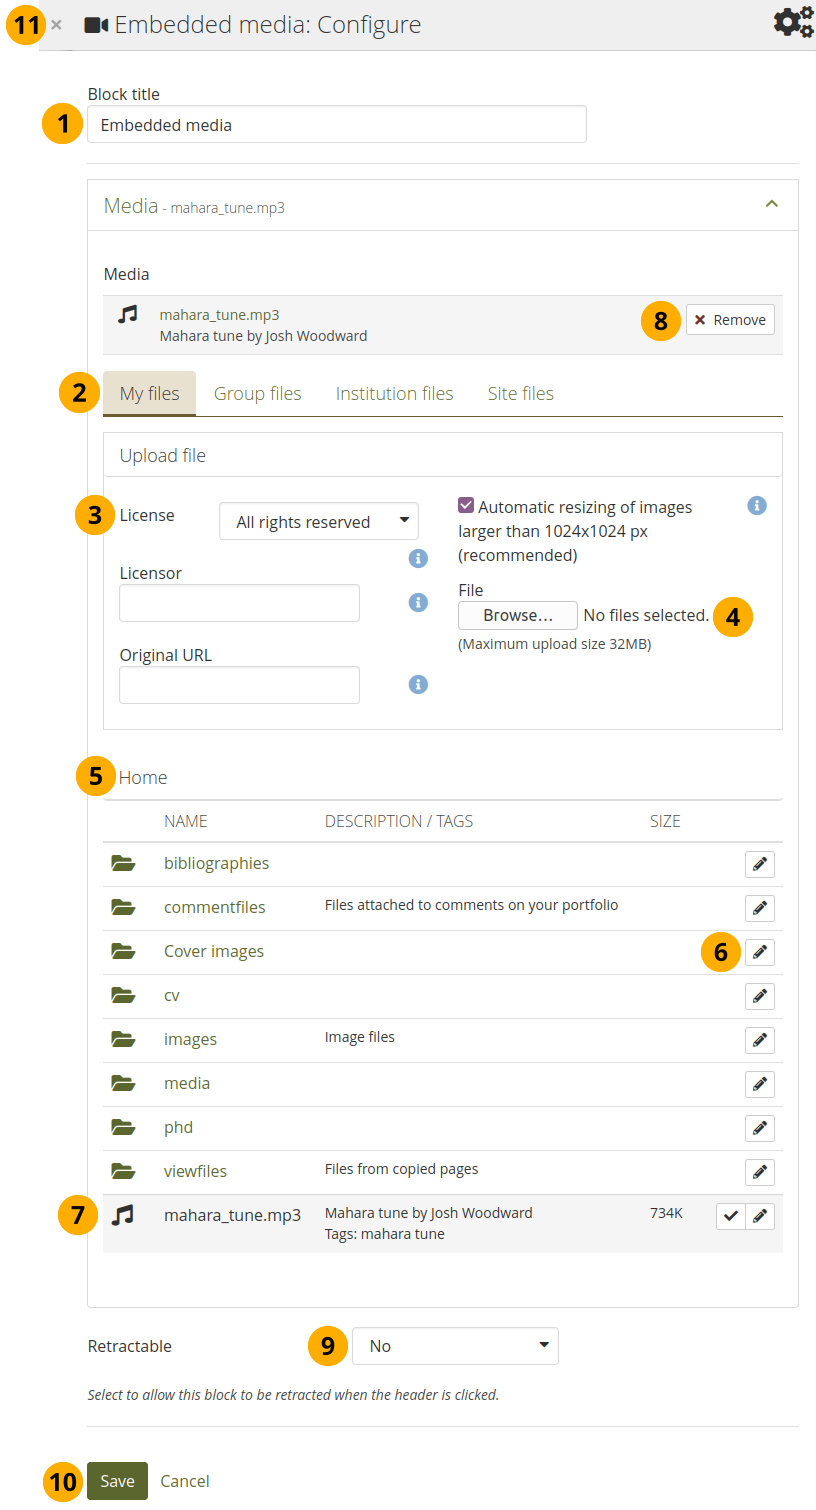
Configure the Embedded media block
Block title: Choose a title for your block.
Files area: Choose from which files area you would like to select a media file:
My files: You see all the folders and files that you have created.
Group files: You see all the folders and files that you are allowed to publish.
Institution files: If you are an institution administrator, you will see institution folders and files.
Site files: If you are a site administrator, you will see all site folders and files. Otherwise, you can only see the ones that are in the folder public in the Site files.
License information: You see these fields if the site administrator turned on license metadata. Additionally, if you are in an institution, your institution administrator may require you to provide a license.
License: Your default license is displayed. You can set your default license in your account settings. You may choose a different license for each individual artefact.
Licensor: If you are uploading a file that somebody else created, you can attribute the work to them here and provide their name for example.
Original URL: If you are uploading somebody else’s file, provide a link to the original Internet address so that others can go there and view the original file.
File: You do not have to go back to your Files area in Create in order to upload a file. You can do so directly from this screen.
Folder path: The breadcrumbs show in which folder you are currently.
Click the Edit button to change any component of a folder or file, i.e. its name, description and tags. If you have a folder or file included in a page that you submitted for feedback, you will not be able to edit them.
Notitie
You can still select files that have been submitted in another portfolio page.
Click into the row that contains the file you wish to display in the block to select it or click the Select button .
Waarschuwing
When you place group, institution, or site files into a page, beware that these files may not be available at some point any more when the person in charge deletes them.
Click Remove if you want to revert your selection.
Retractable: Choose whether you want to allow viewers to reduce the block to its heading on a page or see just the heading only automatically. The options are:
No: The block and its content is displayed at all times.
Yes: Allow viewers to reduce the block to just the heading by clicking the Retractable icon .
Automatically retract: Only the heading of the block is visible, and the viewer can click the Retracted icon to view its content.
Click the Save button to accept your changes, or click Cancel to leave the block’s content as it is. Remove is shown only when you place the block into the page for the first time.
You can also click the Close button in the top left-hand corner of the modal window to either remove a newly created block before it is being saved or to cancel any changes and leave the block’s content as it is.
Notitie
Only the files that you are allowed to embed are displayed. If you uploaded a mp4 file but it does not show here, you may have to check if it has the correct codec. Only H.264 mp4 files can be embedded.
iOS devices can even be trickier as these devices may only recognize the MPEG4 ‘Baseline’ profile rather than the ‘High’ profile. You can read the Apple specifications and convert a video if needed using Handbrake. Newer iOS devices (from the iPhone 5S on) should play ‘High’ profile videos.
4.2.1.2. Files
Select files that viewers of your portfolio can download.
Notitie
 This block was renamed in Mahara 22.10 from ‘File(s) to download’ to ‘Files.’
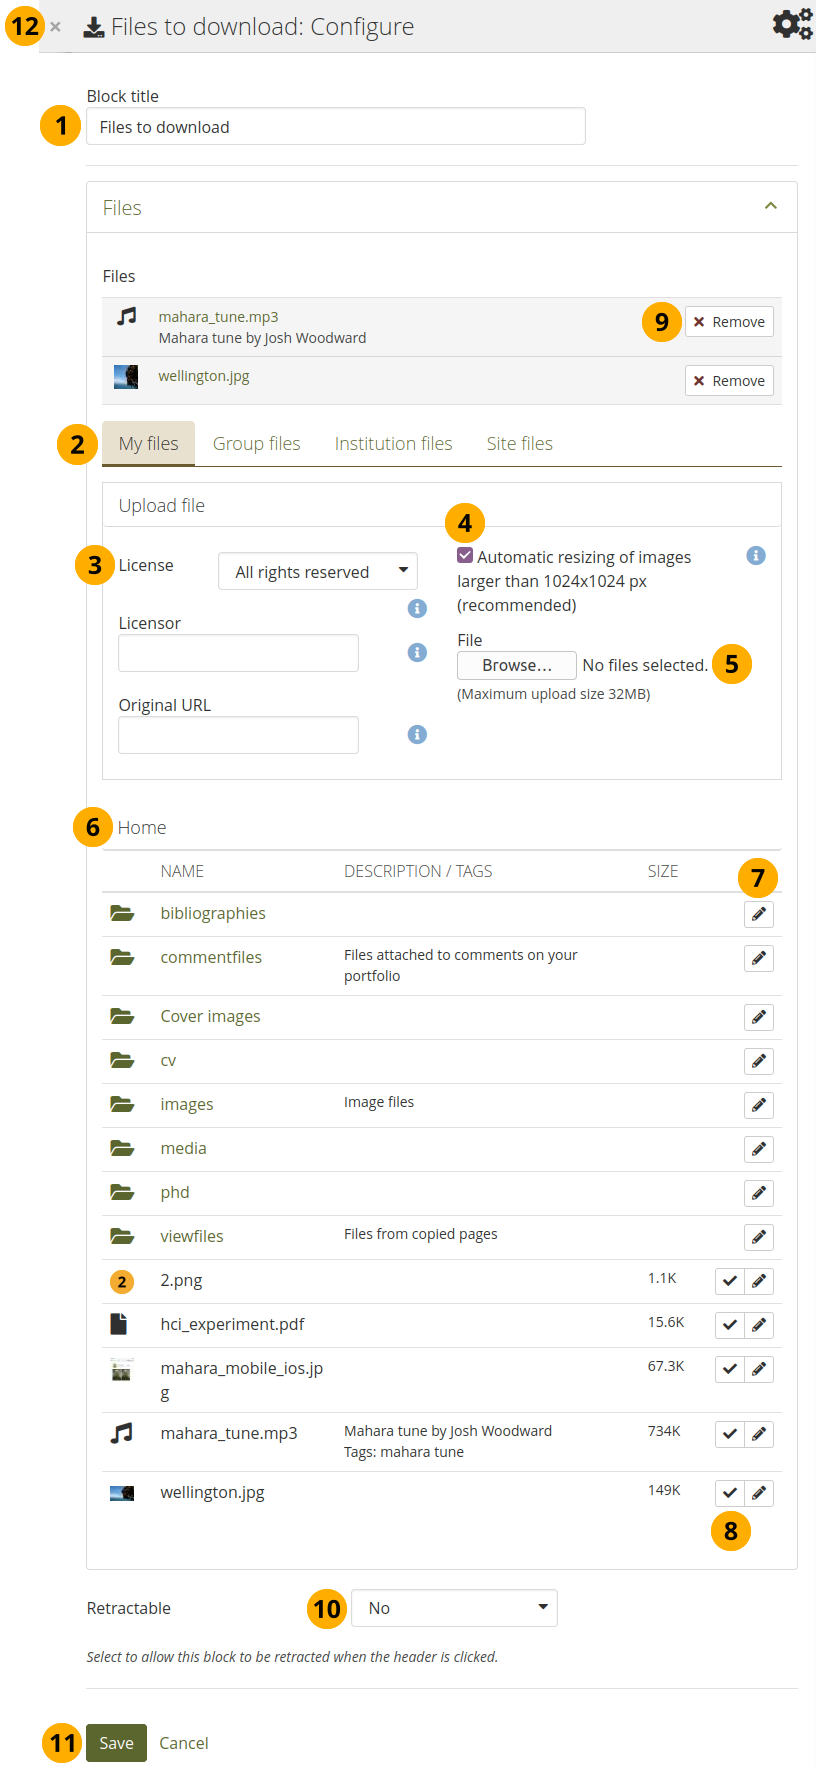
Edit the Files block
4.2.1.2.1. Edit the Files block
Block title: Choose a title for your files block.
Files area: Choose from which files area you would like to select a file:
My files: You see all the folders and files that you have created.
Group files: You see all the folders and files that you are allowed to publish.
Institution files: If you are an institution administrator, you will see institution folders and files.
Site files: If you are a site administrator, you will see all site folders and files. Otherwise, you can only see the ones that are in the folder public in the Site files.
License information: You see these fields if the site administrator turned on license metadata. Additionally, if you are in an institution, your institution administrator may require you to provide a license.
License: Your default license is displayed. You can set your default license in your account settings. You may choose a different license for each individual artefact.
Licensor: If you are uploading a file that somebody else created, you can attribute the work to them here and provide their name for example.
Original URL: If you are uploading somebody else’s file, provide a link to the original Internet address so that others can go there and view the original file.
If the site administrator turned on the image resizing option, you can decide whether you want to have your images resized if they are larger than the specified dimensions. This option is recommended to save space in your portfolio.
File: You do not have to go back to your Files area in Create in order to upload a file. You can do so directly from this screen.
Folder path: The breadcrumbs show in which folder you are currently.
Click the Edit button to change any component of a folder or file, i.e. its name, description and tags. If you have a folder or file included in a page that you submitted for feedback, you will not be able to edit them.
Notitie
You can still select files that have been submitted in another portfolio page.
Click into the row that contains the file you wish to display in the block to select it or click the Select button .
Waarschuwing
When you place group, institution, or site files into a page, beware that these files may not be available at some point any more when the person in charge deletes them.
Click Remove if you want to revert your selection.
Retractable: Choose whether you want to allow viewers to reduce the block to its heading on a page or see just the heading only automatically. The options are:
No: The block and its content is displayed at all times.
Yes: Allow viewers to reduce the block to just the heading by clicking the Retractable icon .
Automatically retract: Only the heading of the block is visible, and the viewer can click the Retracted icon to view its content.
Click the Save button to accept your changes, or click Cancel to leave the block’s content as it is. Remove is shown only when you place the block into the page for the first time.
You can also click the Close button in the top left-hand corner of the modal window to either remove a newly created block before it is being saved or to cancel any changes and leave the block’s content as it is.
Notitie
You cannot re-order files once you have selected them. You would need to remove them and select them again in the correct order.
4.2.1.2.2. View the Files block
When the block is placed on the portfolio page, you can view more information or download the files.
file name
file description
size
upload date
a link to more details
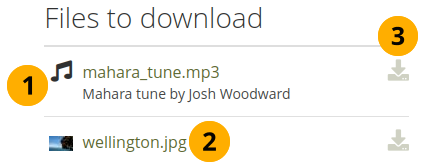
Details about files that can be downloaded.
View information about the file:
file name
file description
Click the file name to see metadata about the file, e.g. upload date, owner, tags, and comments if they are allowed.
Click the download icon to download the file. When you hover over it, you see the size of the file.
When you click the file name, a modal slides out with more metadata.
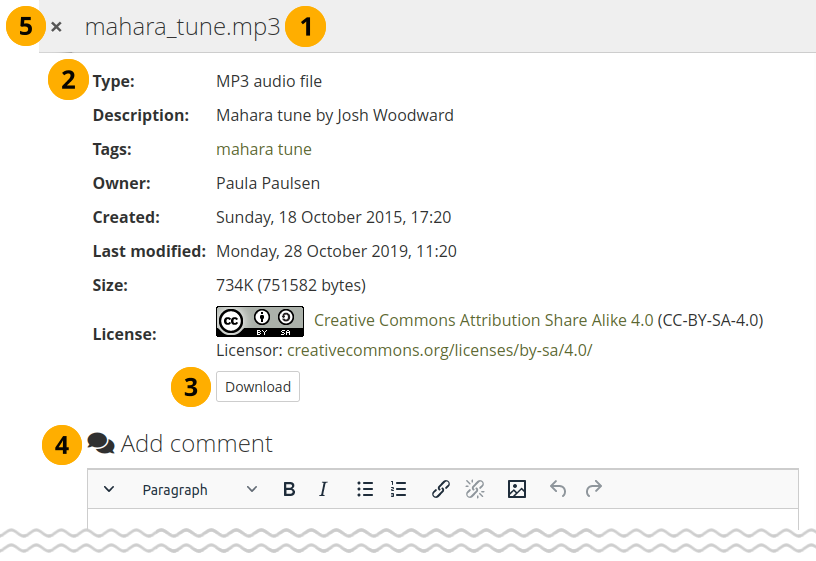
More details about a file that can be downloaded.
The name of the file is displayed.
Additional metadata is displayed for the file:
file type
description
tags
owner
creation date
last modified date
size
license (if license information is turned on by the site administrator)
Click the Download button to download the file to your computer.
If the owner of the file allowed comments, you can comment directly on the file.
You can click the Close button in the top left-hand corner of the modal window to close it.
4.2.1.2.3. Quick edit the Files block
When you are in ‘Display’ mode of a page, you can quickly edit the block content without entering ‘Edit’ mode, thus preventing that you accidentally change the page layout.
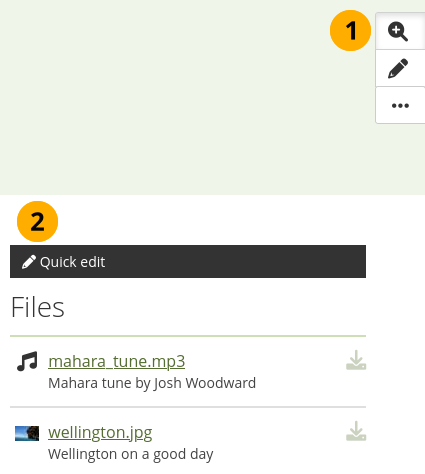
Enter ‘Quick edit’ mode for the Files block
Click the Details button . That enables the ‘Details’ mode for the blocks.
Click the ‘Quick edit’ bar for the block to update its content.
4.2.1.3. Een map
Select a folder to display all files within it as links on your page.
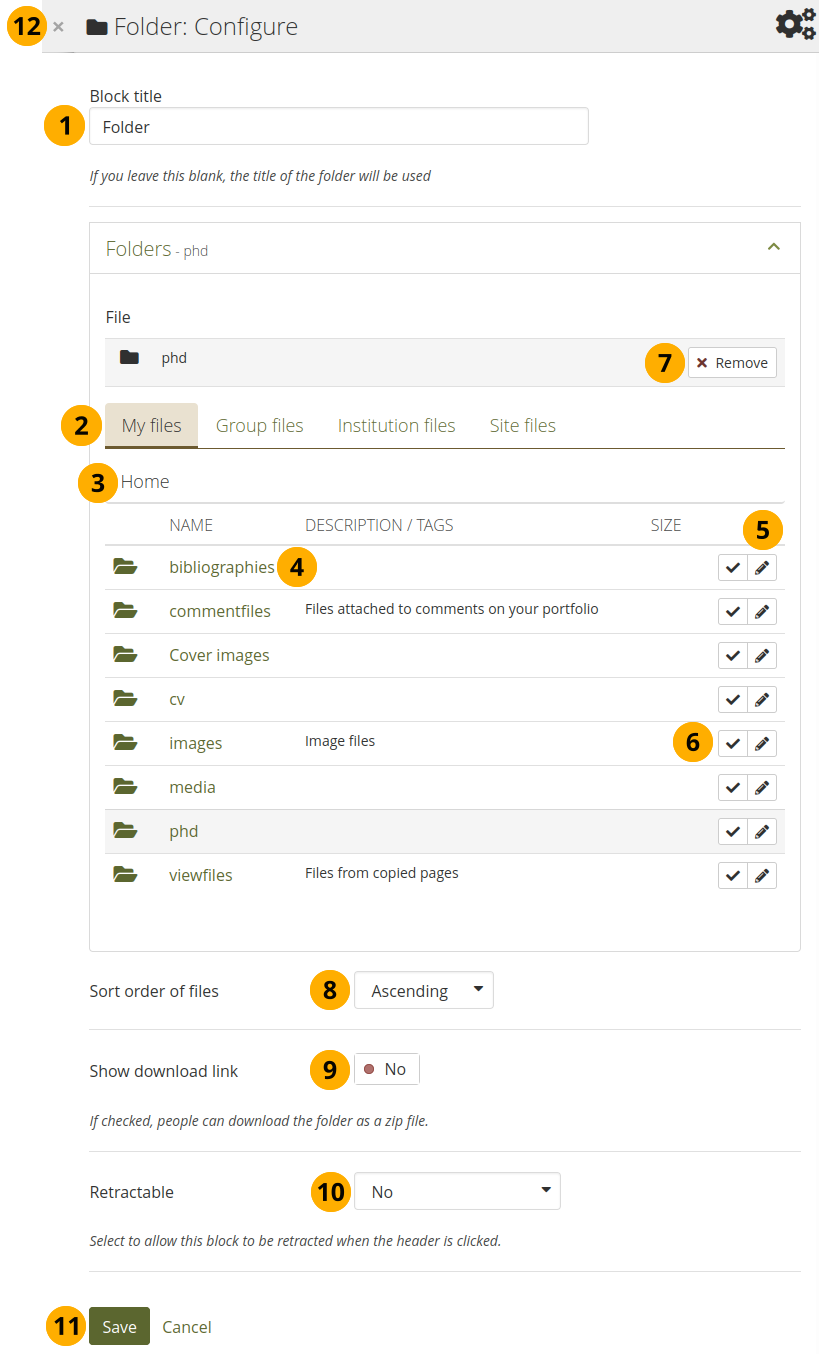
Configure the Folder block
Block title: If you do not set a title, the name of the folder that you choose to display will be used.
Files area: Choose from which files area you would like to select a folder:
My files: You see all the folders and files that you have created.
Group files: You see all the folders and files that you are allowed to publish.
Institution files: If you are an institution administrator, you will see institution folders and files.
Site files: If you are a site administrator, you will see all site folders and files. Otherwise, you can only see the ones that are in the folder public in the Site files.
Folder path: The breadcrumbs show in which folder you are currently.
Click the folder name if you want to reach a sub folder.
You can edit any component of the folder, i.e. its name, description and tags by clicking the Edit button .
Click into the row that contains the folder you wish to display in the block to select it or click the Select button .
Notitie
You can also still select folders that have been submitted in another portfolio page.
Click Remove if you wish to revert your choice.
Sort order of files: Decide on the sort order of files in the block when they are displayed on the page. You can choose between:
Ascending
Descending
Zie ook
Site administrators decide on the default sort order of content within folder in the Blocktype: File / folder settings.
Show download link: Switch this option to ‘Yes’ if you wish to allow the viewers of your page to download the folder contents as zip file.
Zie ook
Site administrators decide in the Blocktype: File / folder settings whether viewers are allowed to display the download link or not.
Retractable: Choose whether you want to allow viewers to reduce the block to its heading on a page or see just the heading only automatically. The options are:
No: The block and its content is displayed at all times.
Yes: Allow viewers to reduce the block to just the heading by clicking the Retractable icon .
Automatically retract: Only the heading of the block is visible, and the viewer can click the Retracted icon to view its content.
Click the Save button to accept your changes, or click Cancel to leave the block’s content as it is. Remove is shown only when you place the block into the page for the first time.
You can also click the Close button in the top left-hand corner of the modal window to either remove a newly created block before it is being saved or to cancel any changes and leave the block’s content as it is.
Waarschuwing
When you place a folder with group, institution, or site files into a page, beware that these files may not be available at some point any more when the person in charge deletes them.
You can see information about the folder as well as the files contained within it when the block is placed on a page.
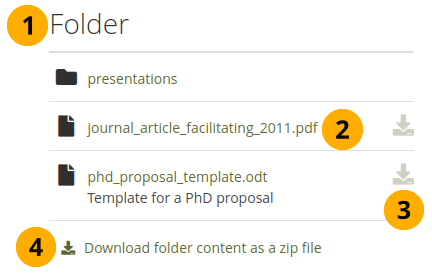
‘Folder’ block on a page
Block title.
Click the file name to see metadata about the file, e.g. upload date, owner, tags, and comments if they are allowed.
Notitie
If you click the name of a folder within the displayed folder, the modal displays the files contained within that folder. You can then click the name of the file to be taken to its metadata.
Click the download icon to download the file. When you hover over it, you see the size of the file.
Click the Download folder content as zip file link to download all files in one go to your computer.
4.2.1.4. Een Afbeelding
Display a single image in a block.
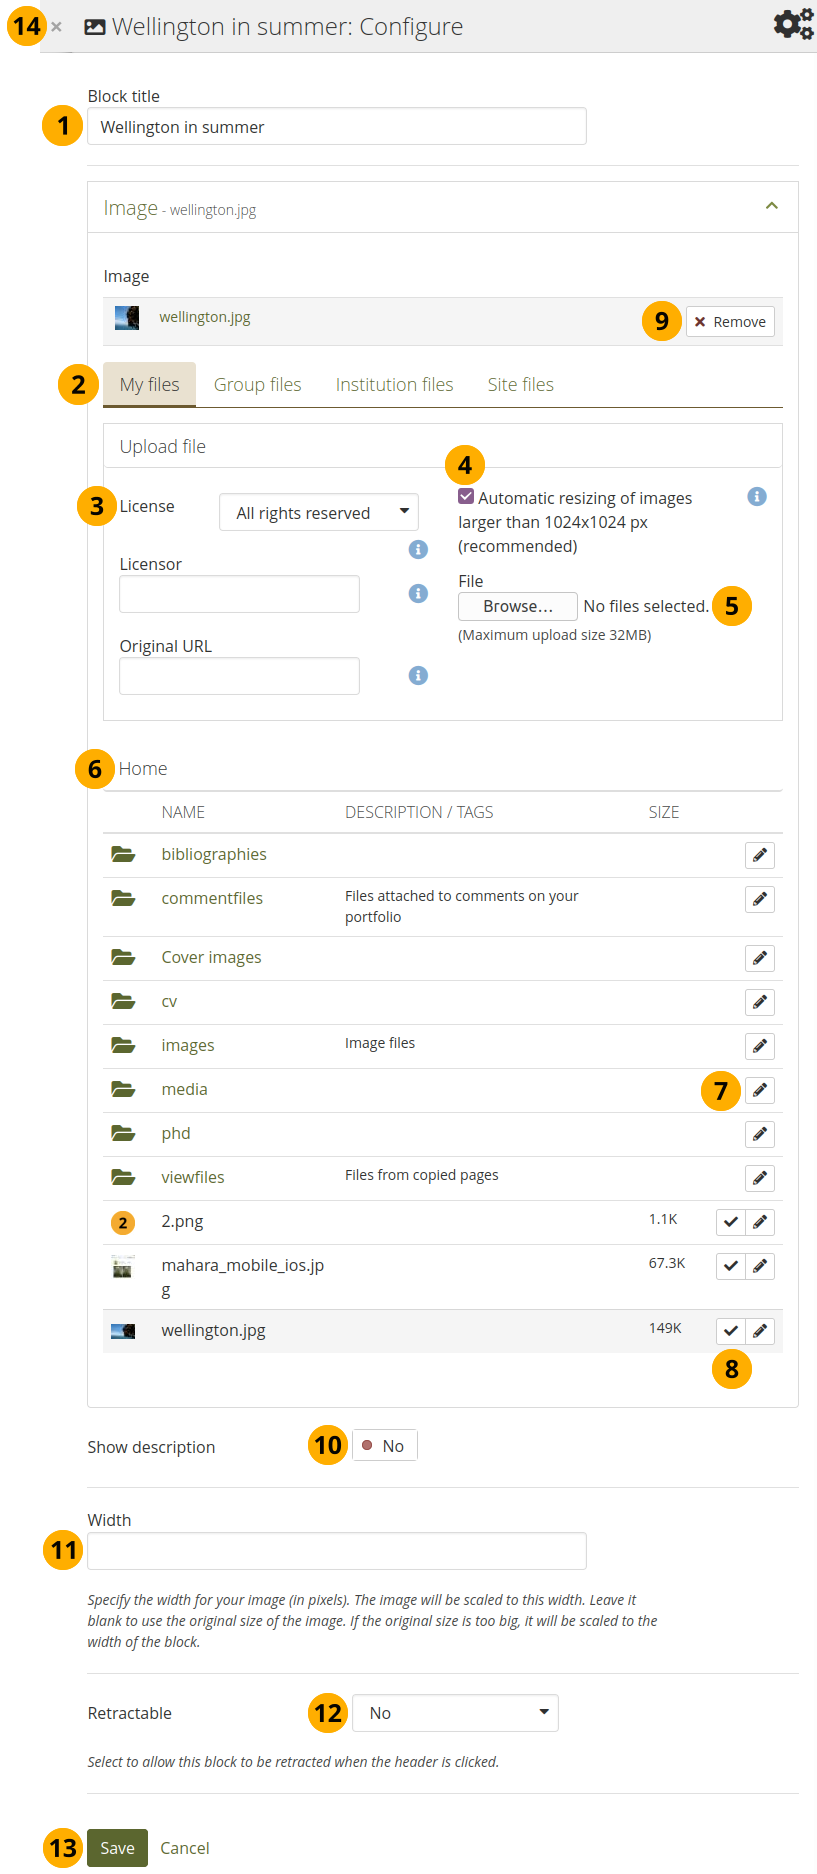
Configure the Image block
Block title: Choose a title for your block.
Files area: Choose from which files area you would like to select an image:
My files: You see all the folders and files that you have created.
Group files: You see all the folders and files that you are allowed to publish.
Institution files: If you are an institution administrator, you will see institution folders and files.
Site files: If you are a site administrator, you will see all site folders and files. Otherwise, you can only see the ones that are in the folder public in the Site files.
License information: You see these fields if the site administrator turned on license metadata. Additionally, if you are in an institution, your institution administrator may require you to provide a license.
License: Your default license is displayed. You can set your default license in your account settings. You may choose a different license for each individual artefact.
Licensor: If you are uploading a file that somebody else created, you can attribute the work to them here and provide their name for example.
Original URL: If you are uploading somebody else’s file, provide a link to the original Internet address so that others can go there and view the original file.
If the site administrator turned on the image resizing option, you can decide whether you want to have your images resized if they are larger than the specified dimensions. This option is recommended to save space in your portfolio.
File: You do not have to go back to your Files area in Create in order to upload a file. You can do so directly from this screen.
Folder path: The breadcrumbs show in which folder you are currently.
Click the Edit button to change any component of a folder or file, i.e. its name, description, rotation, and tags. If you have a folder or file included in a page that you submitted for feedback, you will not be able to edit them.
Notitie
You can still select files that have been submitted in another portfolio page.
If you rotate an image via this dialogue, it will be rotated in all other places where it is used as well.
Click into the row that contains the file you wish to display in the block to select it or click the Select button . You only see image files that you are allowed to use in the block.
Waarschuwing
When you place group, institution, or site files into a page, beware that these files may not be available at some point any more when the person in charge deletes them.
Click Remove if you want to revert your selection.
Show description: Set the switch to ‘Yes’ if you wish to display the description of your photo. It could contain the source of it for example.
Width: Choose the width (in pixels) for your image. If you do not provide a number, the image will be scaled to the width of the block.
Retractable: Choose whether you want to allow viewers to reduce the block to its heading on a page or see just the heading only automatically. The options are:
No: The block and its content is displayed at all times.
Yes: Allow viewers to reduce the block to just the heading by clicking the Retractable icon .
Automatically retract: Only the heading of the block is visible, and the viewer can click the Retracted icon to view its content.
Click the Save button to accept your changes, or click Cancel to leave the block’s content as it is. Remove is shown only when you place the block into the page for the first time.
You can also click the Close button in the top left-hand corner of the modal window to either remove a newly created block before it is being saved or to cancel any changes and leave the block’s content as it is.
4.2.1.5. Afbeeldinggalerij
Select a folder with images or individual images to show in a gallery or embed an external image gallery.
4.2.1.5.1. Image gallery with uploaded images

Configure the Image gallery block with internal images
Block title: Choose a title for your image gallery block.
Image selection: You can choose to display all images from a specific folder or you can select the images individually. See embedding images from an external gallery for that option.
Notitie
If you choose to display an image gallery based on a folder and you rename images within that folder, they will be reordered accordingly.
Files area: Choose from which files area you would like to select an image:
My files: You see all the folders and files that you have created.
Group files: You see all the folders and files that you are allowed to publish.
Institution files: If you are an institution administrator, you will see institution folders and files.
Site files: If you are a site administrator, you will see all site folders and files. Otherwise, you can only see the ones that are in the folder public in the Site files.
Folder path: The breadcrumbs show in which folder you are currently.
Click the name of the folder to reach a sub folder.
Click the Edit button to change any component of the folder, i.e. its name, description and tags. If you have a folder or file included in a page that you submitted for feedback, you will not be able to edit the file.
Click into the row that contains the folder or image you wish to display in the block to select it or click the Select button . You only see image files that are allowed to be used in the block. You can also still select folders or files that have been submitted in another portfolio page.
Notitie
If you selected to display an entire folder in your image gallery, new images that you upload to that folder are added to your gallery automatically.
Click Remove if you want to revert your selection.
Style: Decide to show all selected images as thumbnails or as slideshow where you only see one image at a time. If you select the option ‘Thumbnails (square)’, all your images will be displayed in the same size as thumbnails.
Notitie
If you select to display your images in a slideshow, you can navigate all images with the help of the icons Next and Previous . Use the icons First and Last to start or end your slideshow.
Show descriptions: Turn this option on if you want to display the image descriptions in the gallery.
Use photo frame: Using this option will put a frame around each photo.
Width: Specify the width (in pixels) for your images. The images are scaled to this width.
Retractable: Choose whether you want to allow viewers to reduce the block to its heading on a page or see just the heading only automatically. The options are:
No: The block and its content is displayed at all times.
Yes: Allow viewers to reduce the block to just the heading by clicking the Retractable icon .
Automatically retract: Only the heading of the block is visible, and the viewer can click the Retracted icon to view its content.
Click the Save button to accept your changes, or click Cancel to leave the block’s content as it is. Remove is shown only when you place the block into the page for the first time.
You can also click the Close button in the top left-hand corner of the modal window to either remove a newly created block before it is being saved or to cancel any changes and leave the block’s content as it is.
Waarschuwing
When you place group, institution, or site files into a page, beware that these files may not be available at some point any more when the person in charge deletes them.
4.2.1.5.2. Image gallery from external images
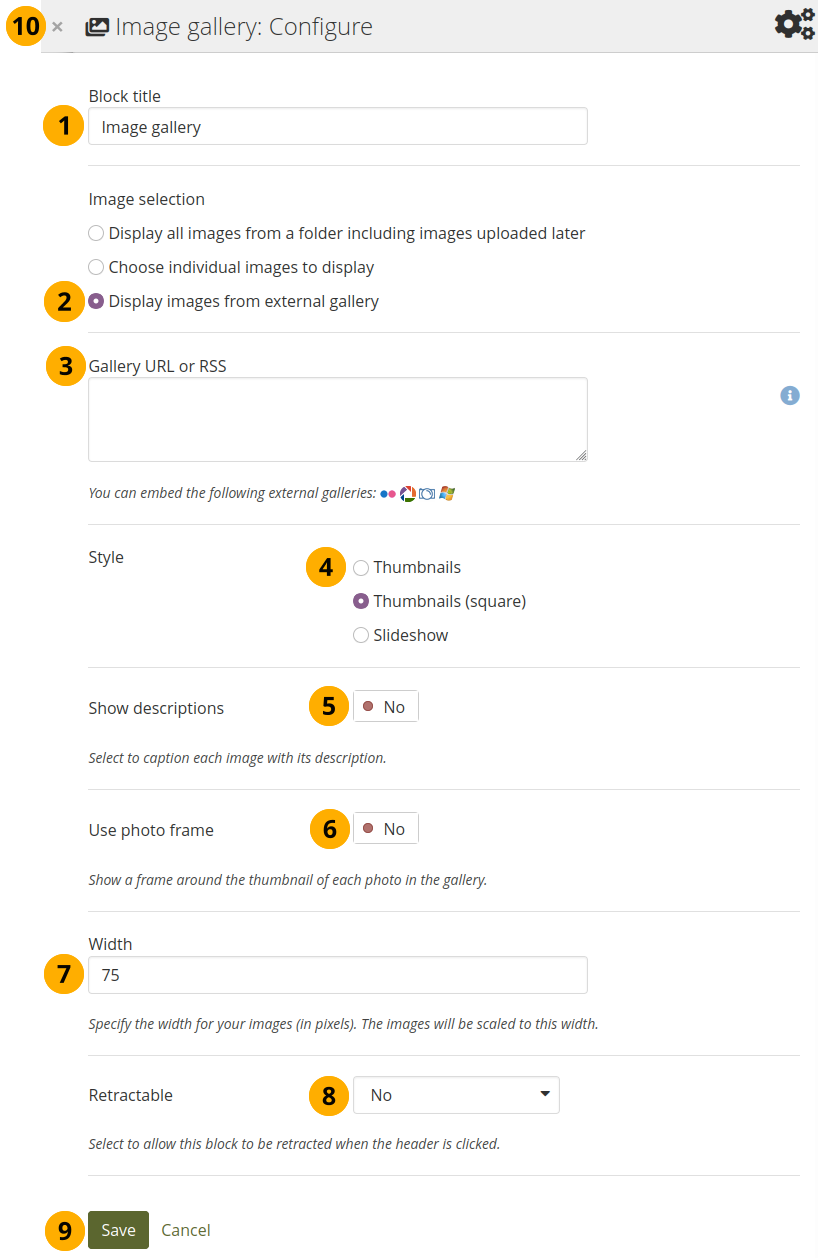
Configure the Image gallery block with external images
Block title: Choose a title for your image gallery block.
Image selection: Select the option ‘Display images from external gallery’.
Gallery URL or RSS: Copy the link to the external gallery and past it into the text box. You can embed the following external galleries:
Flickr, e.g. https://www.flickr.com/photos/12345678@N01/sets/98765432123456789/
Photobucket, vb. http://s1234.photobucket.com/albums/ee123/username/ or http://s1234.photobucket.com/albums/ee123/username/AlbumName/
Picasa, vb. http://picasaweb.google.com/user.name/AlbumName#
Windows Live Photo Gallery, vb. http://cid-123456ab7890cd12.photos.live.com/self.aspx/AlbumName/photo.jpg
Notitie
To use Flickr, the site administrator has to provide a valid API key.
To use Photobucket, the site administrator has to provide a valid API key and a secret API key.
For Windows Live Photo Gallery to work properly, the link to one of the photos inside the album must be copied and pasted into the text box in order to show the entire album.
Style: Decide to show all selected images as thumbnails or as slideshow where you only see one image at a time. If you select the option ‘Thumbnails (square)’, all your images will be displayed in the same size as thumbnails.
Show descriptions: Turn this option on if you want to display the image descriptions in the gallery.
Use photo frame: Using this option will put a frame around each photo.
Width: Specify the width (in pixels) for your images. The images are scaled to this width.
Retractable: Choose whether you want to allow viewers to reduce the block to its heading on a page or see just the heading only automatically. The options are:
No: The block and its content is displayed at all times.
Yes: Allow viewers to reduce the block to just the heading by clicking the Retractable icon .
Automatically retract: Only the heading of the block is visible, and the viewer can click the Retracted icon to view its content.
Click the Save button to accept your changes, or click Cancel to leave the block’s content as it is. Remove is shown only when you place the block into the page for the first time.
You can also click the Close button in the top left-hand corner of the modal window to either remove a newly created block before it is being saved or to cancel any changes and leave the block’s content as it is.
4.2.1.6. PDF
Embed PDFs into a page.
Configure the PDF block
4.2.1.6.1. Edit the ‘PDF’ block
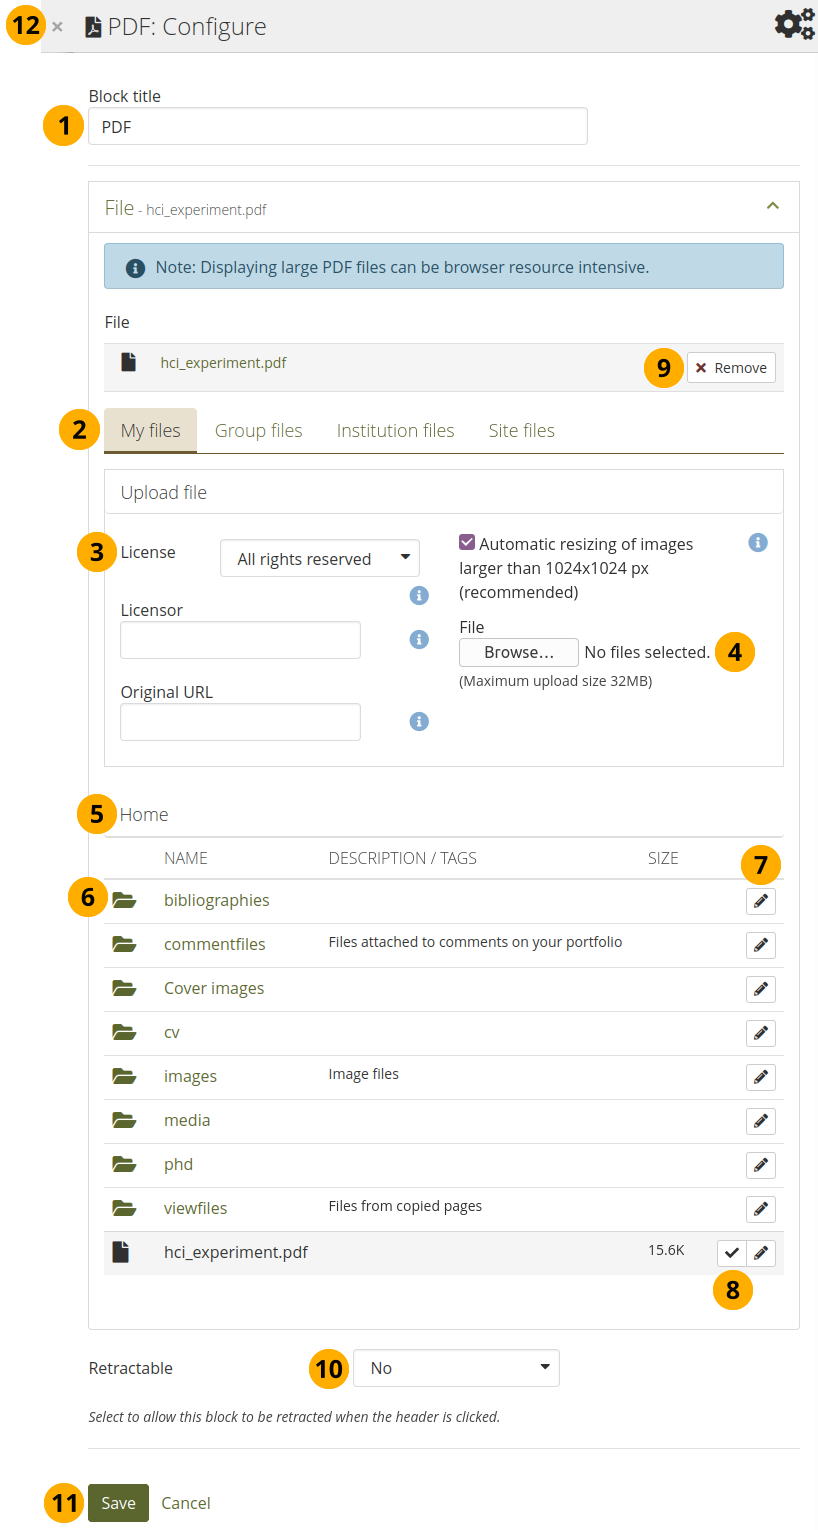
Block title: Choose a title for your PDF block.
Files area: Choose from which files area you would like to select a file:
My files: You see all the folders and files that you have created.
Group files: You see all the folders and files that you are allowed to publish.
Institution files: If you are an institution administrator, you will see institution folders and files.
Site files: If you are a site administrator, you will see all site folders and files. Otherwise, you can only see the ones that are in the folder public in the Site files.
License information: You see these fields if the site administrator turned on license metadata. Additionally, if you are in an institution, your institution administrator may require you to provide a license.
License: Your default license is displayed. You can set your default license in your account settings. You may choose a different license for each individual artefact.
Licensor: If you are uploading a file that somebody else created, you can attribute the work to them here and provide their name for example.
Original URL: If you are uploading somebody else’s file, provide a link to the original Internet address so that others can go there and view the original file.
File: You do not have to go back to your Files area in Create in order to upload a file. You can do so directly from this screen.
Folder path: The breadcrumbs show in which folder you are currently.
Click the folder name if you want to reach a sub folder.
Click the Edit button to change any component of a folder or file, i.e. its name, description and tags. If you have a folder or file included in a page that you submitted for feedback, you will not be able to edit them.
Notitie
You can still select files that have been submitted in another portfolio page.
Click into the row that contains the PDF you wish to display in the block to select it or click the Select button . You only see PDF files.
Waarschuwing
When you place group, institution, or site files into a page, beware that these files may not be available at some point any more when the person in charge deletes them.
Click Remove if you want to revert your selection.
Retractable: Choose whether you want to allow viewers to reduce the block to its heading on a page or see just the heading only automatically. The options are:
No: The block and its content is displayed at all times.
Yes: Allow viewers to reduce the block to just the heading by clicking the Retractable icon .
Automatically retract: Only the heading of the block is visible, and the viewer can click the Retracted icon to view its content.
Click the Save button to accept your changes, or click Cancel to leave the block’s content as it is. Remove is shown only when you place the block into the page for the first time.
You can also click the Close button in the top left-hand corner of the modal window to either remove a newly created block before it is being saved or to cancel any changes and leave the block’s content as it is.
4.2.1.6.2. View the ‘PDF’ block on a page
Once the PDF is embedded on a page, you can scroll through it and also download it for example. The PDF is displayed in its best possible fit to show one page completely.
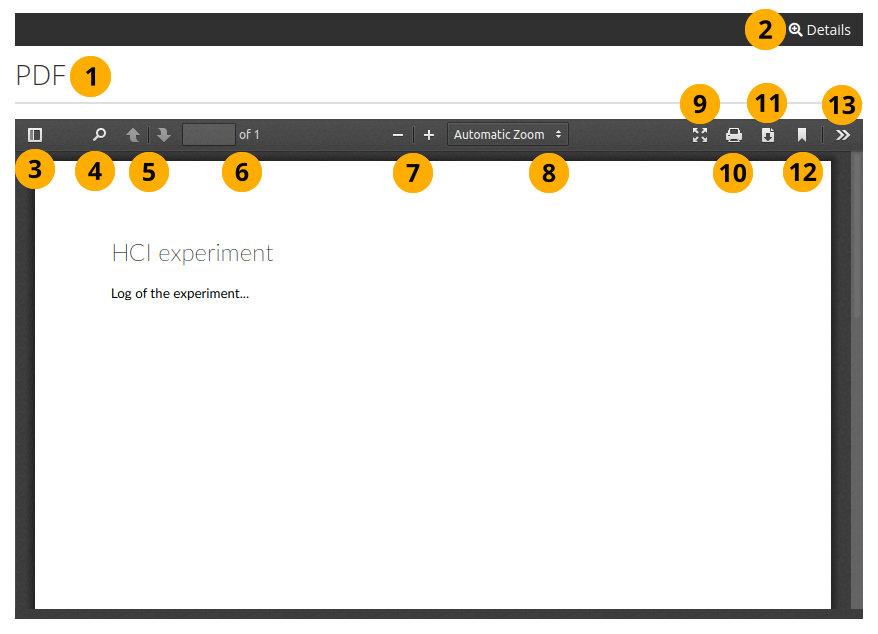
Embedded PDF on a page
Title of the block.
Click the Details link to see the metadata for the file. You can see the link by clicking the Details button on the page (when it is not in Edit mode). It is displayed in the Details bar.
Toggle to the sidebar where you can jump from one page to another either in the thumbnail or document outline view.
Click the Search icon to search within the document.
You can move to the previous or next page using the Arrow icons.
The number of the current page is displayed. You can put a different number in and hit the Enter or Tab key and jump to that directly.
The total number of pages is shown.
Decrease the page size by clicking the Minus, or increase the page size by clicking the Plus. The block size does not increase.
Use the Automatic zoom drop-down menu to choose a different zoom size instead of using the Plus and Minus buttons.
Click the Presentation mode icon
 to see the PDF in full screen.
Click the Print icon
 to print the PDF.
Click the Download icon
 to download the PDF to your computer. The suggested file name is the one the file has on the site.
Click the Current view icon
 to copy the current view of the PDF or to open it in a new window.
Click the Tools icon
 to see more options available for this PDF.
4.2.1.6.3. Quick edit the PDF block
When you are in ‘Display’ mode of a page, you can quickly edit the block content without entering ‘Edit’ mode, thus preventing that you accidentally change the page layout.
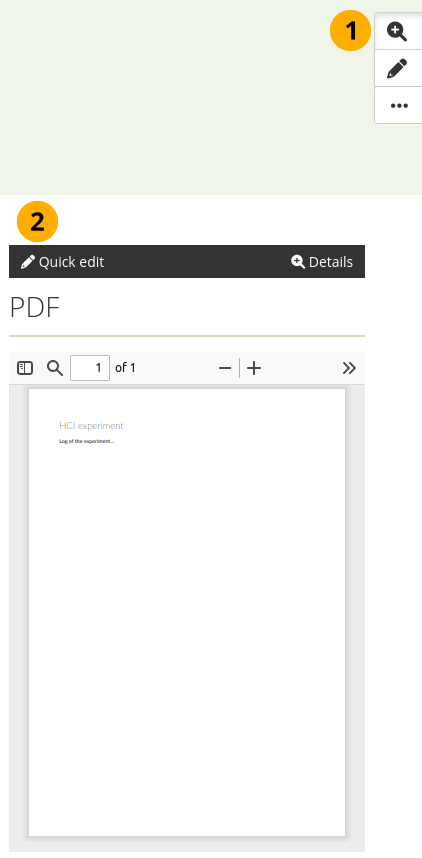
Enter ‘Quick edit’ mode for the PDF block
Click the Details button . That enables the ‘Details’ mode for the blocks.
Click the ‘Quick edit’ bar for the block to update its content.
4.2.1.7. Some HTML
Display the content of an HTML file in a page.
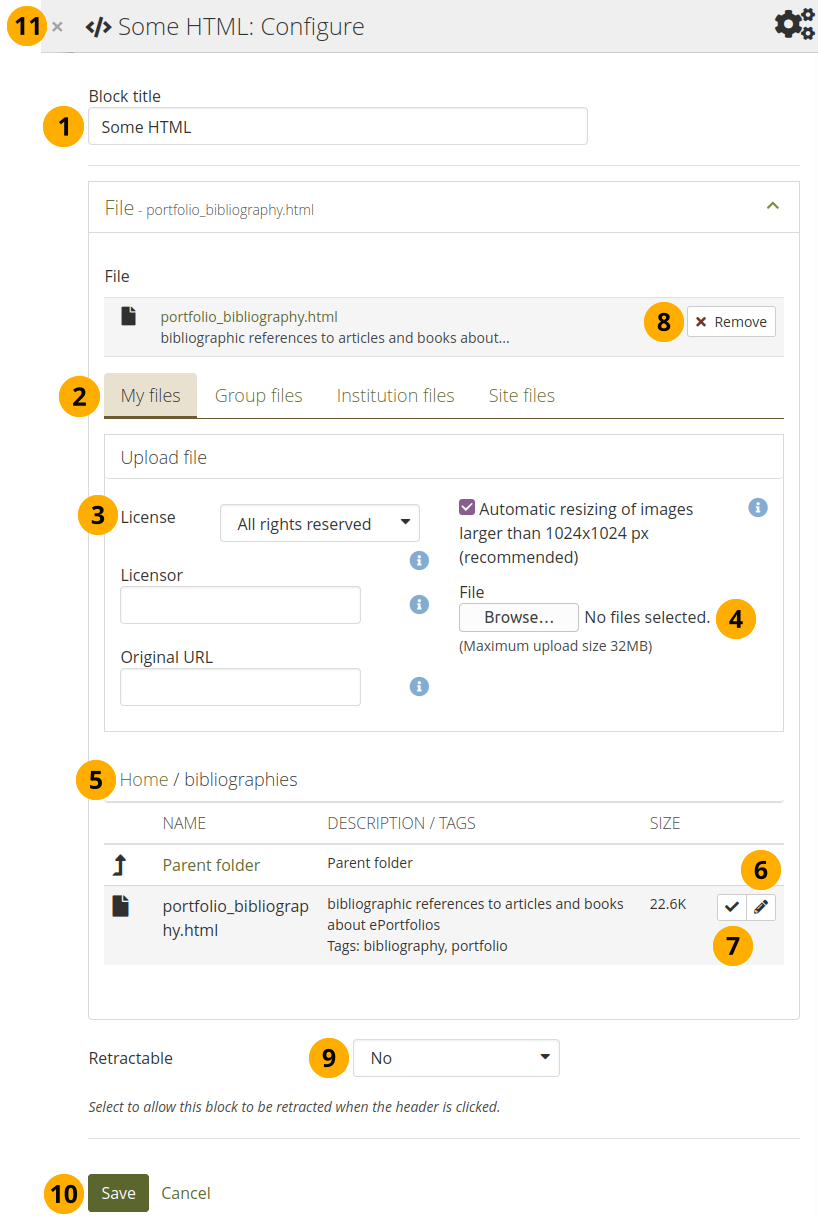
Configure the HTML block
Block title: Choose a title for your block.
Files area: Choose from which files area you would like to select an HTML file:
My files: You see all the folders and files that you have created.
Group files: You see all the folders and files that you are allowed to publish.
Institution files: If you are an institution administrator, you will see institution folders and files.
Site files: If you are a site administrator, you will see all site folders and files. Otherwise, you can only see the ones that are in the folder public in the Site files.
License information: You see these fields if the site administrator turned on license metadata. Additionally, if you are in an institution, your institution administrator may require you to provide a license.
License: Your default license is displayed. You can set your default license in your account settings. You may choose a different license for each individual artefact.
Licensor: If you are uploading a file that somebody else created, you can attribute the work to them here and provide their name for example.
Original URL: If you are uploading somebody else’s file, provide a link to the original Internet address so that others can go there and view the original file.
Upload file: You do not have to go back to your Files area in Create in order to upload a file. You can do so directly from this screen.
Folder path: The breadcrumbs show in which folder you are currently.
Click the Edit button to change any component of a folder or file, i.e. its name, description and tags. If you have a folder or file included in a page that you submitted for feedback, you will not be able to edit them.
Notitie
You can still select files that have been submitted in another portfolio page.
Click into the row that contains the file you wish to display in the block to select it or click the Select button . You only see HTML files.
Waarschuwing
When you place group, institution, or site files into a page, beware that these files may not be available at some point any more when the person in charge deletes them.
Click Remove if you want to revert your selection.
Retractable: Choose whether you want to allow viewers to reduce the block to its heading on a page or see just the heading only automatically. The options are:
No: The block and its content is displayed at all times.
Yes: Allow viewers to reduce the block to just the heading by clicking the Retractable icon .
Automatically retract: Only the heading of the block is visible, and the viewer can click the Retracted icon to view its content.
Click the Save button to accept your changes, or click Cancel to leave the block’s content as it is. Remove is shown only when you place the block into the page for the first time.
You can also click the Close button in the top left-hand corner of the modal window to either remove a newly created block before it is being saved or to cancel any changes and leave the block’s content as it is.
Notitie
You can only display a self-contained HTML file in a page, but not an entire site because the links to the files are not retained correctly when you upload files.