14.2. Open Badges
Open Badges ist Mozilla’s Open Source Antwort, um online erworbene Kenntnisse und Kompetenzen zu dokumentieren. Moodle 2.5 unterstützt Badges seit Mai 2013 und Mahara wird dies in Zukunft unterstützen. Vorläufig gibt es zwei Wege, um Ihre Open Badges anzuzeigen:
- Installieren Sie das Plugin Open Badge Displayer installed (verfügbar seit 8. August 2013).
- Nutzen Sie einen iFrame. Diese Methode wird jedoch nicht empfohlen, da keine Prüfung der E-Mail-Adresse erfolgt und es möglich ist, die Badges anderer Personen anzeigen zu lassen.
Siehe auch
This tip was first published in the blog post „Open Badges in Mahara: The quick way“ by Kristina D.C. Hoeppner.
14.2.1. Erstellen Sie eine Sammlung von Badges
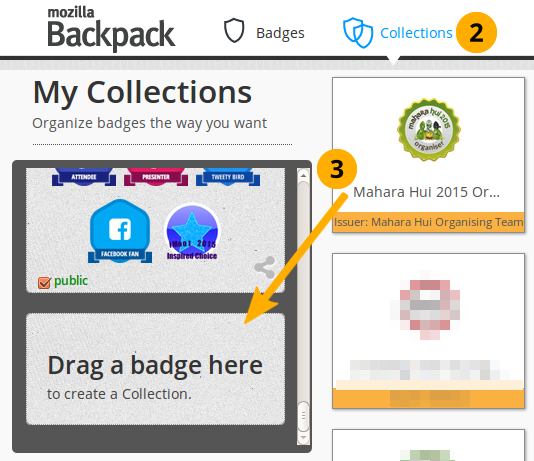
Ziehen Sie ein Kennzeichen in einen neuen Sammlungsbereich
Gehen Sie auf Mozilla Backpack. Sie müssen mindestens ein Badge hier abgelegt haben, um die folgenden Schritte durchführen zu können.
Klicken Sie auf den Sammlung-Navigationspunkt um Ihr Badge der Sammlung hinzuzufügen.
Ziehen Sie eine Ihrer Badges in den (neuen) Sammlungsbereich.
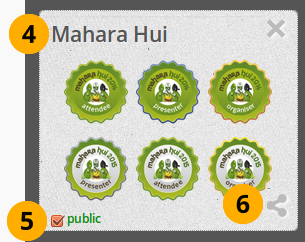
Erstellen Sie eine neue Sammlung
Geben Sie Ihrer neuen Sammlung einen Namen. Klicken Sie auf „Neue Sammlung“ und vergeben Sie einen Titel.
Klicken Sie auf die Checkbox Öffentlich, damit andere Ihre Auszeichnungen sehen können.
Klicken Sie auf den Teilen-Button. Sie kommen nun zur Seite mit allen Badges in der von Ihnen erstellten Sammlung.
14.2.2. Wählen Sie die Badge-Sammlung in Mahara aus.
Bemerkung
Follow this section if you have the Open Badge Displayer plugin installed.
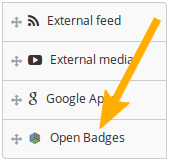
Wählen Sie den Block mit den offenen Kennzeichen aus
Create a page in your portfolio or edit an existing portfolio page where you want to display your badge collection, and then drag the Open Badges block onto your page. This block is only available when you have the plugin installed.
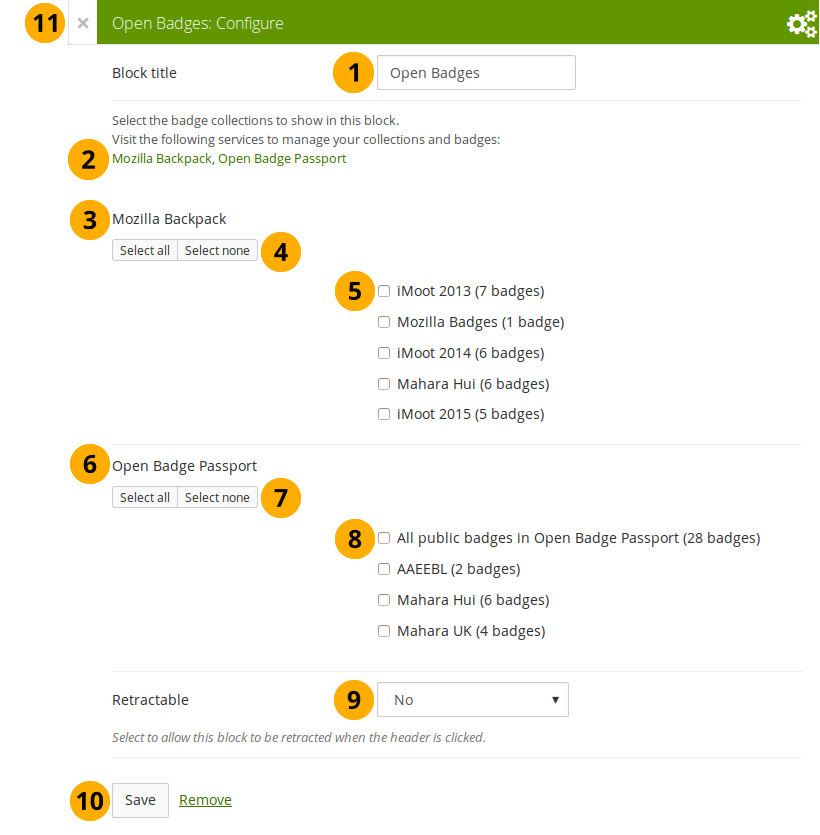
Konfigurieren Sie den Block mit den offenen Kennzeichen
Blocktitel: Vergeben Sie einen Titel für Ihren Block
If you do not see all your public badge collections, click the links to verify that you have made all badges publicly available that you want to see.
Mozilla Backpack: All public badge collections from your backpack are displayed.
Use the Select all or Select none buttons to select all badge collections or to revert your selection.
You can also select individual badge collections if you prefer by ticking their checkboxes.
Open Badge Passport: All public badge collections from your Open Badge Passport are displayed.
Bemerkung
Per default, only the Mozilla Backpack is configured to be displayed. Your site administrator can make the Open Badge Passport available by placing the following into the
config.phpfile:// Pull badges from Mozilla Backpack and openbadgepassport.com$cfg->openbadgedisplayer_source = array('backpack' => 'https://backpack.openbadges.org/','passport' => 'https://openbadgepassport.com/');Use the Select all or Select none buttons to select all badge collections or to revert your selection.
You can also select individual badge collections if you prefer by ticking their checkboxes.
Retractable: Choose whether you want to allow users to reduce the block to its heading on a page or see just the heading only automatically. The options are:
- No: The block and its content is displayed at all times.
- Yes: Allow users to reduce the block to just the heading by clicking the Retractable icon .
- Automatically retract: Only the heading of the block is visible, and the user can click the Retracted icon to view its content.
Click the Save button to accept your changes, or click Cancel to leave the block’s content as it is. Remove is shown only when you place the block into the page for the first time.
You can also click the Close button in the top left-hand corner of the modal window to either remove a newly created block before it is being saved or to cancel any changes and leave the block’s content as it is.
Bemerkung
Wenn Sie das Plugin „Open Badge Displayer“ nicht installiert haben, können Sie folgenderweise vorgehen.
14.2.3. Erstellen Sie einen iFrame für Ihre Badge Sammlung.
Kopieren Sie die URL in Ihre öffentliche Sammlung
Erstellen Sie einen iFrame, um es in eine Mahara-Ansicht einzubinden.
Siehe auch
You can use the Online iFrame generator for example to create your iFrame easily. Or you can copy this iframe code and replace the URL with your own.
<iframe src=”http://backpack.openbadges.org/share/da6db5b196b80bb3fda3d3e89a552028/” style=”border:0px #FFFFFF none;” scrolling=”no” frameborder=”1″ marginheight=”0px” marginwidth=”0px” height=”800px” width=”800px”></iframe>Kopieren Sie den vollständigen iFrame-Code
14.2.4. Betten Sie die Badge-Sammlung in Ihre Mahara-Ansicht ein.
Erstellen Sie eine Ansicht in Ihrem Portfolio setzen Sie das Layout auf 1 Spalte.
Bemerkung
Damit die nächsten Schritte durchgeführt werden können, muss der Administrator ``backpack.openbadges.org/share``auf die Liste zugelassener iFrame Quellen eingetragen haben. Wenn diese URL sich ändert, muss Ihr Site Administrator sie erneut anpassen, damit Ihre Badges weiter angezeigt werden.
Wenn andere Badge-Backpacks verfügbar werden, muss jede als zugelassene iFrame-Quelle hinterlegt werden.
Ziehen Sie den „externe Inhalte“-Block in Ihre Ansicht.
Kopieren Sie den iFrame in das URL oder eingebetteter Code Feld.
Geben Sie dem Block einen Titel.
Speichern Sie Ihre Änderungen. Ihre Badge-Sammlung ist nun in Ihre Ansicht eingebettet.