4.2.5. Externe Inhalte
Mit Hilfe des Blocks für externen Inhalt, können Sie RSS-Feeds, externe Medien oder Google-App-Dokumente in eine Ansicht einfügen.
4.2.5.1. Externer Feed
Betten Sie einen RSS- oder ATOM-Feed zur Darstellung dessen Inhalts in einen externen Block ein.
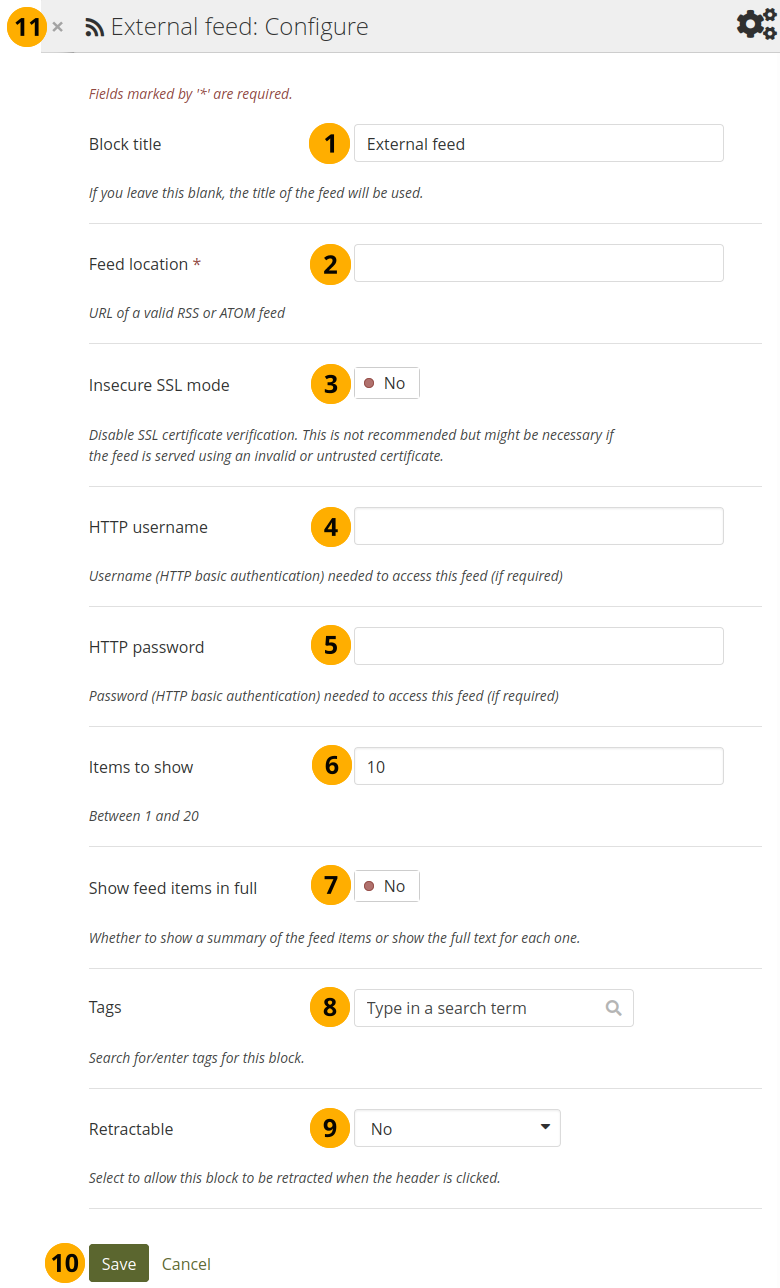
Konfigurieren Sie den Block für externe Feeds
Blocktitel: Wenn Sie den Titel leer lassen, wird der Titel des Feeds verwendet.
Feed-Quelle: Jeder RSS-Feed wird über eine Internet-Adresse aufgerufen. Dies ist nicht die Seite des Blogs, sondern eine Unterseite. Meist findet man sie über das orangefarbene RSS-Symbol. Tragen Sie die vollständige URL eines gültigen RSS oder ATOM-Feed hier ein. Wenn der Feed nicht angezeigt wird, versuchen Sie ihn in einem Feed-Reader-Programm einzusetzen, um seine Funktionsfähigkeit zu prüfen.
Bemerkung
Unfortunately, Firefox and Chrome do not display the RSS feed icon for a page immediately near the address bar any more. In Firefox you will have to go to View → Toolbars → Customize and then drag the RSS icon to your toolbar. It lights up orange / white when a feed is available.
Wenn Sie Chrome verwenden, können Sie die RSS Subscription Extension installieren.
Insecure SSL mode: Switch this option to ‚Yes‘ if you wish to enable the insecure SSL mode. This mode allows you to override certificate errors generated by a feed.
HTTP Nutzername: Tragen Sie einen Nutzernamen ein, um Zugriff auf einen Feed zu erhalten, der eine Authentifizierung erfordert. Dies ist der Nutzername für den Zugriff auf den Feed und nicht auf das Portfolio.
HTTP Passwort: Tragen Sie einen Nutzernamen ein, um Zugriff auf einen Feed zu erhalten, der eine Authentifizierung erfordert. Dies ist der Nutzername für den Zugriff auf den Feed und nicht auf das Portfolio.
Zahl der angezeigten Beiträge: Legen Sie fest wie viele der letzten Beiträge angezeigt werden sollen. Sie können bis zu 20 wählen.
Show feed items in full: Switch this option to ‚Yes‘ if you want to see the entire feed content and not only the heading of a blog post.
Tags: Enter tags for this block to find this content more easily. The tags are displayed as part of the page tags.
Retractable: Choose whether you want to allow viewers to reduce the block to its heading on a page or see just the heading only automatically. The options are:
Nein: Der Block und dessen Inhalt wird immer angezeigt.
Yes: Allow viewers to reduce the block to just the heading by clicking the Retractable icon .
Automatically retract: Only the heading of the block is visible, and the viewer can click the Retracted icon to view its content.
Click the Save button to accept your changes, or click Cancel to leave the block’s content as it is. Remove is shown only when you place the block into the page for the first time.
You can also click the Close button in the top left-hand corner of the modal window to either remove a newly created block before it is being saved or to cancel any changes and leave the block’s content as it is.
Bemerkung
Wenn Ihr Feed nicht automatisch aktualisiert wird, bitten Sie die Site-Administration, die Cron-Einstellungen zu prüfen. Hinweis: wenn in der externen Quelle (z.B. externer Blog) ein neuer Beitrag verfasst wird, ändert sich die RSS-Feed-Anzeige im Mahara-Block nicht sofort mit. Die Aktualisierung erfolgt von Zeit zu Zeit.
If you click an entry in the RSS feed, it will open in a new window.
4.2.5.2. Externes Medium
With this block you can embed content from a wide variety of third-party sites. The sites that are allowed are listed below the text area in the configuration screen. You see only their favicons, but when you hover over an icon with your mouse, you see the site’s name as well.
Siehe auch
Mahara comes with a number of sites that are allowed per default. These are listed on the page. Your site administrator can add additional iframe sources.
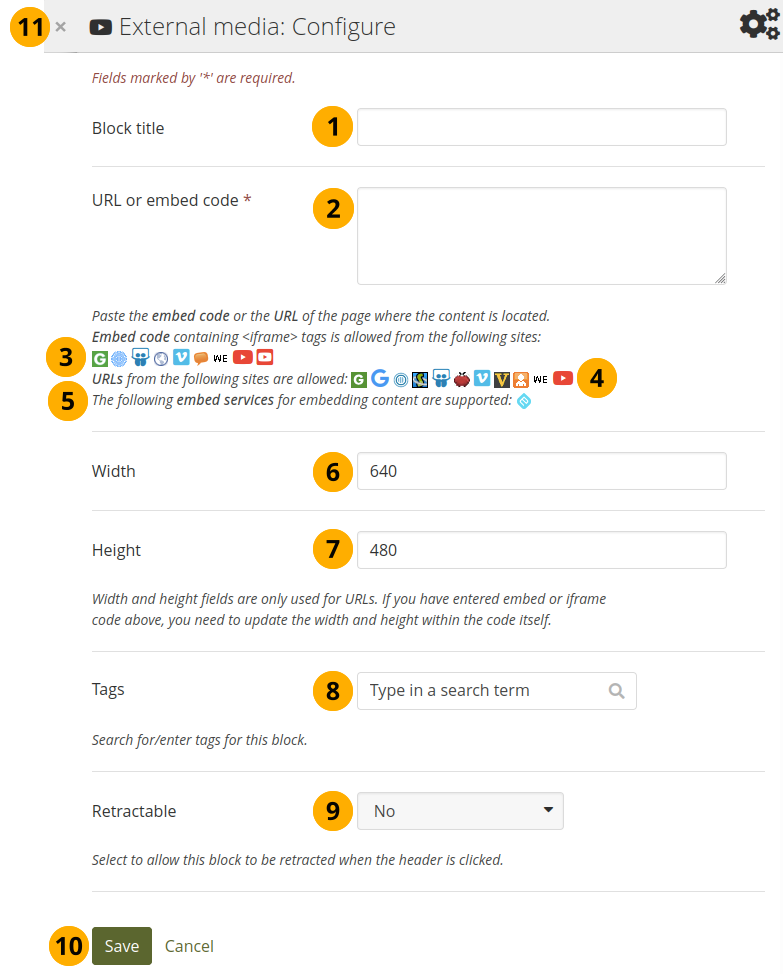
Konfigurieren Sie den externe Medien-Block
Blocktitel: Wählen Sie einen Titel für den eingebetteten Inhalt.
URL oder HTML-Code: Kopieren Sie die URL oder den HTML Code zum einbetten (Embed) der Seite mit dem Inhalt.
Embed code: Content from the sites listed in this section can be embedded using the <iframe> embed code. Any new site that the site administrator allows will be added in alphabetical order. The default sites are:
URLs: Content from the sites listed in this section can be embedded by copying the page URLs where the content can be found. The default sites are:
You can also paste an Embedly embed code and display your content that way.
Breite: Legen Sie die Breite (in Pixeln) für den Inhalt der Ansicht fest. Dies gilt für Inhalt der angegebenen URL.
Bemerkung
Wenn Sie den eingebetteten Code verwenden, geben Sie Breite und Höhe direkt im Embed-Code an. Die Einstellungen hier können Sie ignorieren.
Höhe: Legen Sie die Höhe (in Pixeln) für den Inhalt der Ansicht fest. Dies gilt für Inhalt der angegebenen URL.
Bemerkung
Wenn Sie den eingebetteten Code verwenden, geben Sie Breite und Höhe direkt im Embed-Code an. Die Einstellungen hier können Sie ignorieren.
Tags: Enter tags for this block to find this content more easily. The tags are displayed as part of the page tags.
Retractable: Choose whether you want to allow viewers to reduce the block to its heading on a page or see just the heading only automatically. The options are:
Nein: Der Block und dessen Inhalt wird immer angezeigt.
Yes: Allow viewers to reduce the block to just the heading by clicking the Retractable icon .
Automatically retract: Only the heading of the block is visible, and the viewer can click the Retracted icon to view its content.
Click the Save button to accept your changes, or click Cancel to leave the block’s content as it is. Remove is shown only when you place the block into the page for the first time.
You can also click the Close button in the top left-hand corner of the modal window to either remove a newly created block before it is being saved or to cancel any changes and leave the block’s content as it is.
Bemerkung
Sie können denselben eingebetteten iFrame-Code in Notizen, Text und auch in Blogeinträgen benutzen.
Siehe auch
Watch the video Saving a video from iPad to MyPortfolio if you want to see how you can embed a YouTube video into your Mahara portfolio using an iPad. You can use a similar work flow for adding YouTube videos also via Android or on your computer. ‚MyPortfolio‘ is the name of a Mahara instance in New Zealand for schools.
4.2.5.3. Google Apps
Sie können die folgenden Inhaltsarten von Google (Apps) einbetten:
Bücher
Kalender
Dokumente, Kalkulationen, Präsentationen
Karten
Sie können den Inhalt nur anzeigen, nicht aber zugleich Dokumente, Kalkulationen oder Präsentationen aus dem Block heraus bearbeiten. Dazu müssen Sie in Google (Apps) eingeloggt sein. Sie können diesen Block mit Ihrem persönlichen Google Account oder dem Ihrer Institution verwenden.
Bemerkung
Wenn der Zugriff auf bestimmte Dokumente eingeschränkt ist auf eine bestimmte Personengruppe, wird eine Login-Maske angezeigt.
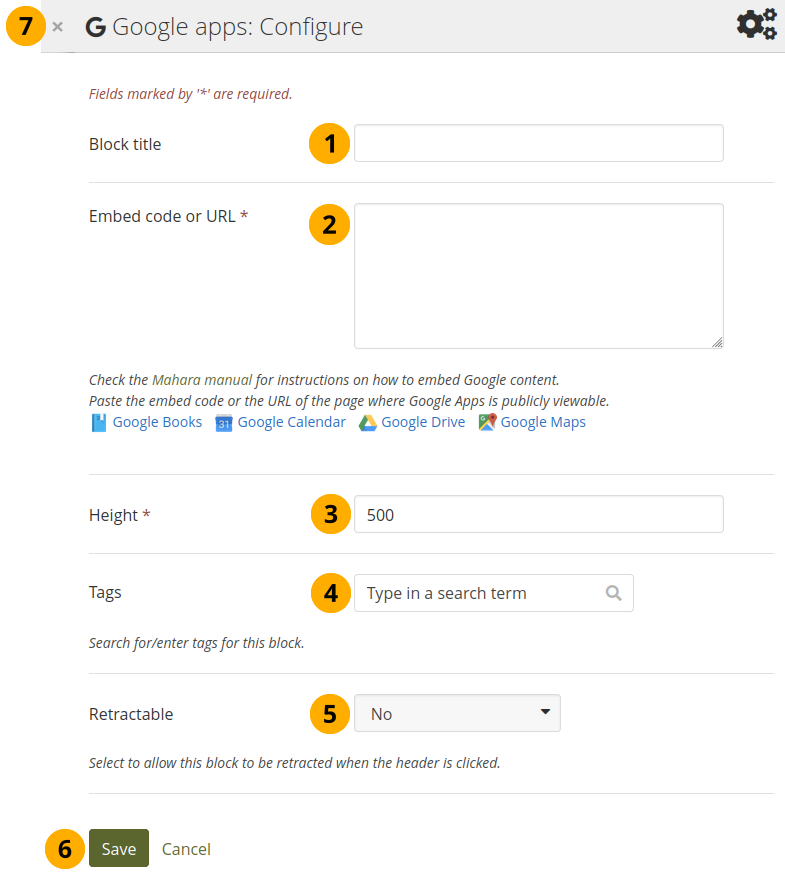
Konfigurieren Sie den Google-Apps-Block
Blocktitel: Wählen Sie einen Titel für den eingebetteten Inhalt.
Embed Code oder URL: Ob Sie Embed Code oder die URL-Adresse verwenden hängt von der Art des eingebetteten Codes ab. Klicken Sie auf den Hilfe-Button für weitere Informationen. Sie erfahren dort auch mehr über die einzelnen Google-Komponenten.
Höhe: Wählen Sie die Höhe des einzubettenden Inhalts. Die Breite ergibt sich automatisch aus der Breite des Blocks in den der Inhalt eingebettet wird.
Tags: Enter tags for this block to find this content more easily. The tags are displayed as part of the page tags.
Retractable: Choose whether you want to allow viewers to reduce the block to its heading on a page or see just the heading only automatically. The options are:
Nein: Der Block und dessen Inhalt wird immer angezeigt.
Yes: Allow viewers to reduce the block to just the heading by clicking the Retractable icon .
Automatically retract: Only the heading of the block is visible, and the viewer can click the Retracted icon to view its content.
Click the Save button to accept your changes, or click Cancel to leave the block’s content as it is. Remove is shown only when you place the block into the page for the first time.
You can also click the Close button in the top left-hand corner of the modal window to either remove a newly created block before it is being saved or to cancel any changes and leave the block’s content as it is.
Google-Dokument
Öffnen Sie das Dokument
Klicken Sie auf Datei im Menu und dann Im Web veröffentlichen.
Klicken Sie den Veröffentlichen starten-Button
Kopieren Sie den Dokumentenlink oder den Embed Code.
Fügen Sie den Link oder den HTML Code in das HTML Code oder URL-Feld im Google-Apps-Block ein.
Google-Tabellen
Öffnen Sie die Tabelle.
Klicken Sie auf Datei im Menu und dann Im Web veröffentlichen.
Klicken Sie den Veröffentlichen starten-Button
Lesen Sie sich die anderen Optionen durch und entscheiden Sie dann.
Kopieren Sie den Link für die Option Webseite oder den HTML Code für die Option HTML zum Einbetten in Webseite.
Fügen Sie den Link oder den HTML Code in das HTML Code oder URL-Feld im Google-Apps-Block ein.
Google-Präsentation
Öffnen Sie die Präsentation.
Klicken Sie auf Datei im Menu und dann Im Web veröffentlichen.
Klicken Sie den Veröffentlichen starten-Button
Kopieren Sie den Link oder den HTML Code.
Fügen Sie den Link oder den HTML Code in das HTML Code oder URL-Feld im Google-Apps-Block ein.
Google Drive folder
Select the folder that you want to share.
Click the Link icon. A shareable link is created.
Kopieren Sie den Link.
Fügen Sie den Link in die HTML Code oder URL-Box im Google-Apps-Block ein.
Google Kalender
Öffnen Sie den Google Kalender.
Klicken Sie auf das kleine Dreieck neben dem Kalender, den Sie einbetten wollen.
Klicken Sie auf Kalender-Einstellungen.
Im Kalenderdetails-Tab scrollen Sie hinunter bis zu Diesen Kalender einbetten.
Passen Sie die Darstellung des Kalenders Ihren Wünschen entsprechend an und kopieren Sie dann den HTML Code.
Fügen Sie den HTML Code dann in die Box HTML Code oder URL des Google Apps Block ein.
Google Maps
Öffnen Sie die Google Karte.
Klicken Sie auf den Meine Orte-Link. Loggen Sie sich ggfs. zuvor ein.
Klicken Sie auf den Namen der Karte, die Sie einbetten wollen.
Klicken Sie auf das Link-Icon links von der Karte.
Passen Sie die Darstellung der Karte nach Ihren Wünschen an und kopieren Sie den HTML Code.
Fügen Sie den HTML Code dann in die Box HTML Code oder URL des Google Apps Block ein.
Bemerkung
Verwenden Sie die Schritte 2 und 3 nur wenn Sie eine Ihrer persönlichen Google-Maps-Karten einbetten wollen. Wenn Sie eine beliebige Karte einbetten wollen, können Sie die Schritte auslassen.
Google Bücher (books)
Öffnen Sie Google Books.
Suchen Sie das Buch, das Sie einbetten wollen.
Klicken Sie auf den Titel des Buches.
Klicken Sie auf das Link-Icon über dem Buch.
Kopieren Sie den HTML Code des Buches.
Fügen Sie den HTML Code dann in die Box HTML Code oder URL des Google Apps Block ein.
Bemerkung
Das Link-Icon erscheint nur wenn Sie berechtigt sind, das Buch einzubetten
4.2.5.4. Badges
Open Badges are an answer for showing recognition of skills and competencies online with the help of an open framework.
4.2.5.4.1. Configure the block
Configure the Open Badges block
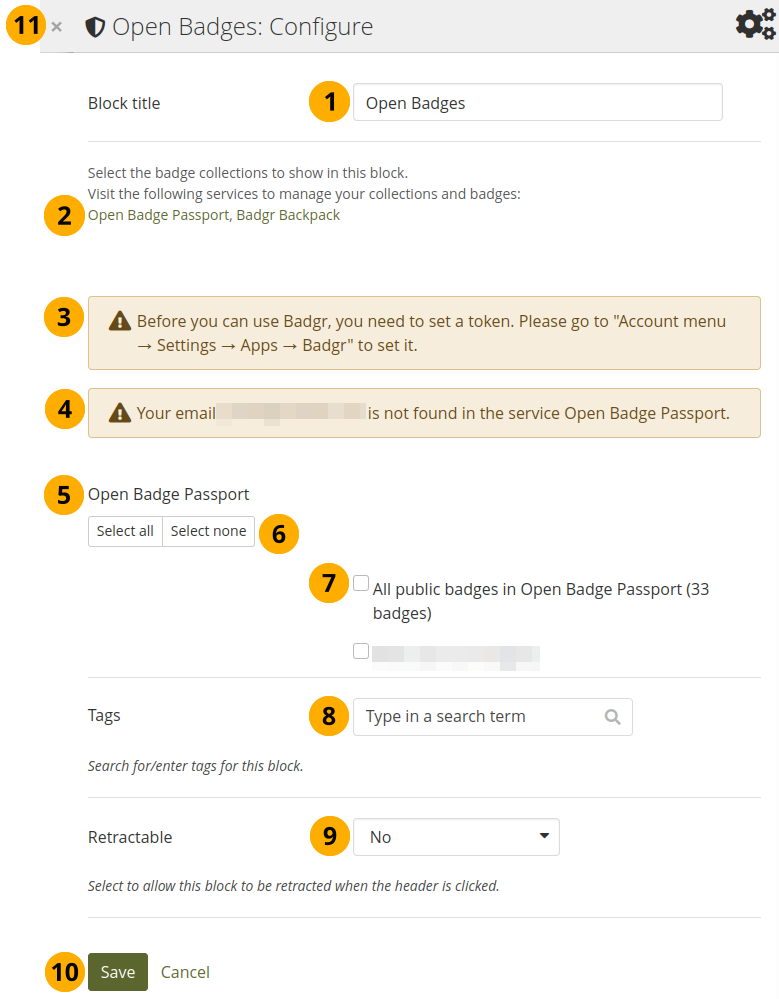
Blocktitel: Vergeben Sie einen Titel für Ihren Block
If you do not see all your public badge collections, click the links to verify that you have made all badges publicly available that you want to see.
Bemerkung
The Mozilla Backpack was deprecated as the service does not exist any more. Badges from that Backpack cannot be displayed any more. If you are on an upgraded site and used to display Open Badges through the Mozilla Backpack, they are not displayed any more.
If you had a Mozilla Backpack, you would have received an email with all your badges latest in 2019. It is best to import them either to Badgr or the Open Badge Passport (or both) to keep using them. Once you moved your badges, you can re-add them here in the block.
If your site administrator allowed the use of Badgr, but you have not yet set a token, you are alerted to rectify that in the connected app settings.
Mahara checks the backpacks for all email addresses that are associated with your account. If it can’t find any badges to display for a particular address, it will show a notice.
Open Badge Passport: All public badge collections from your Open Badge Passport are displayed.
Siehe auch
If you have other ‚backpacks‘ that contain badges, the site administrator would need to allow them in the config.php.
Use the Select all or Select none buttons to select all badge collections or to revert your selection.
You can also select individual badge collections if you prefer by ticking their checkboxes.
Tags: Enter tags for this block to find this content more easily. The tags are displayed as part of the page tags.
Retractable: Choose whether you want to allow viewers to reduce the block to its heading on a page or see just the heading only automatically. The options are:
Nein: Der Block und dessen Inhalt wird immer angezeigt.
Yes: Allow viewers to reduce the block to just the heading by clicking the Retractable icon .
Automatically retract: Only the heading of the block is visible, and the viewer can click the Retracted icon to view its content.
Click the Save button to accept your changes, or click Cancel to leave the block’s content as it is. Remove is shown only when you place the block into the page for the first time.
You can also click the Close button in the top left-hand corner of the modal window to either remove a newly created block before it is being saved or to cancel any changes and leave the block’s content as it is.
Bemerkung
Since your badges need to be fetched from an external service, it may take a little bit until they are displayed on the page.
4.2.5.5. Course completion
The Course completion block requires that you have a web services connection established to a learning management system (LMS) that supports course completions. Follow the steps provided in the Plugin administration for the blocktype ‚courseinfo‘.
This functionality was developed with Moodle and Totara in mind.
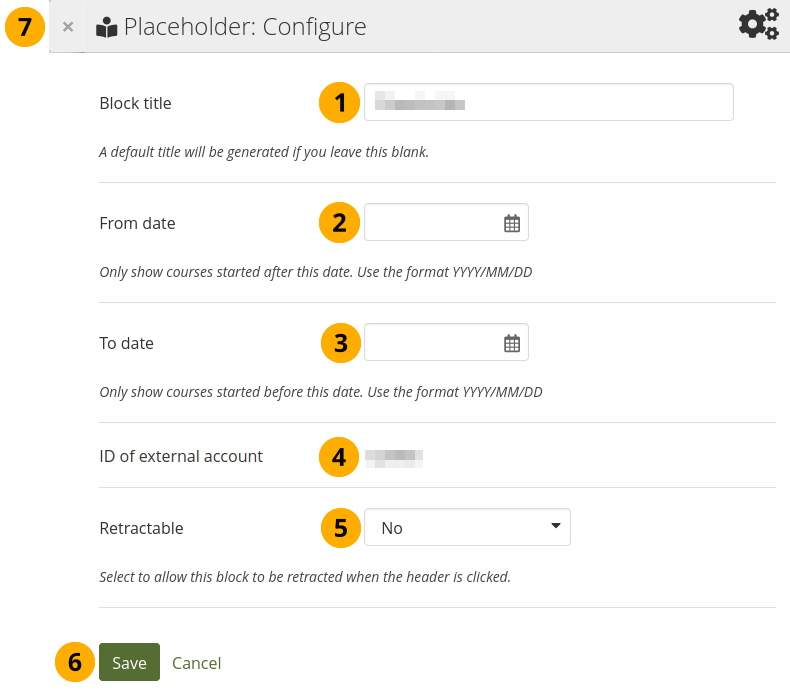
Configure the Course completion block
Blocktitel: Vergeben Sie einen Titel für Ihren Block
From date: Select the start date from which you want to display completion data.
To date: Select the end date up to which you want to display completion data.
ID of external account: The ID that the portfolio author has in the LMS to confirm that the correct records are displayed.
Retractable: Choose whether you want to allow viewers to reduce the block to its heading on a page or see just the heading only automatically. The options are:
Nein: Der Block und dessen Inhalt wird immer angezeigt.
Yes: Allow viewers to reduce the block to just the heading by clicking the Retractable icon .
Automatically retract: Only the heading of the block is visible, and the viewer can click the Retracted icon to view its content.
Click the Save button to accept your changes, or click Cancel to leave the block’s content as it is. Remove is shown only when you place the block into the page for the first time.
You can also click the Close button in the top left-hand corner of the modal window to either remove a newly created block before it is being saved or to cancel any changes and leave the block’s content as it is.
When the block is placed on a page, it will look like the following screenshot.
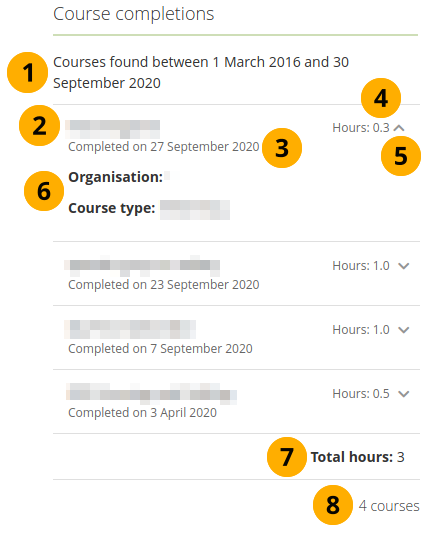
Display of the Course completion block in a page
The time frame for which the course completion data is gathered.
The title of the course.
The date when the course was completed.
The number of hours associated with the course.
Click the Down arrow icon to show more information. Use the Up arrow icon to hide the additional information.
For example, you can display the organisation and the course type in the additional information, depending on how the web services are configured.
Total hours: The total number of hours over the reporting time frame.
The number of courses that are included in this report.