4.2.3. Allgemein
Die Artefakte in diesem Tab sind genereller Natur oder passen nicht in andere Kategorien und können überall genutzt werden.
Wenn Sie eine Ansicht in einer Gruppe erzeugen, steht Ihnen der Pläne-Block nicht zur Verfügung. In Gruppen können keine Pläne erstellt und verwaltet werden. Zur Gestaltung der Gruppenstartseite können folgende Blöcke verwandt werden:
4.2.3.1. Annotation
Fügen Sie Ihrer Ansicht einen Block hinzu, sodass Sie eine Anmerkung zu Ihrer Ansicht hinterlassen können.
Bemerkung
This feature is used in conjunction with SmartEvidence.
4.2.3.1.1. Write an annotation
Konfigurieren Sie den Anmerkungen-Block
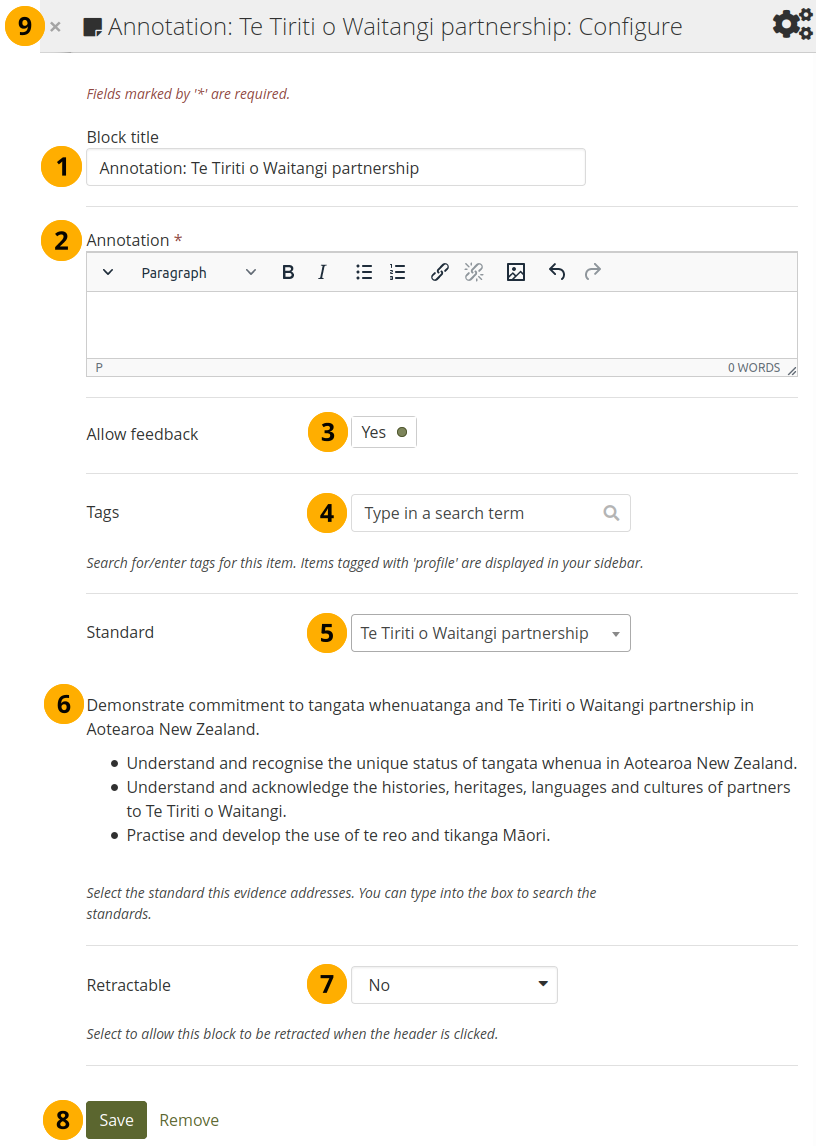
Block title: The block title is set automatically based on the standard selected. It takes the form of ‚Annotation: Shortname of the standard‘ and cannot be changed.
Annotation: Write your annotation for your portfolio page. The annotation helps connect the evidence on the page to the standard or competency you selected to associate it with in the competency framework.
Bemerkung
Once you saved an annotation, you cannot change it any more. You can still add changes as part of the feedback functionality. There is a wishlist item to make it possible to update an annotation as long as it hasn’t received any feedback or the assessment status has changed.
Allow feedback: When you allow feedback on your annotation, others can leave feedback as usual. However, as soon as the first feedback has been added, you will not be able to make changes to your annotation text any more. That is to ensure that the feedback still relates back to the annotation.
Schlagwörter: Geben Sie Schlagwörter ein, um Ihre Anmerkung an einem späteren Zeitpunkt leichter finden zu können. Trennen Sie Ihre Schlagwörter durch Kommata. Wenn Sie bereits an anderer Stelle ein paar Schlagwörter ausgewählt haben, können Sie auf den Link Schlagwörter anzeigen gehen und diejenigen auswählen, bei denen Sie denken, dass diese auch in diese Sammlung passen würden. Die Schlagwörter werden dann automatisch in das Textfeld eingefügt.
Standard: When you place the Annotation block on the page, you can select the standard with which the page shall be associated based on the SmartEvidence framework selected for the collection. You can change the standard until somebody leaves feedback or makes an assessment. If you select the page from the SmartEvidence overview page, the standard is pre-selected and cannot be changed.
Bemerkung
You can use the Annotation block without SmartEvidence, but then you can’t choose a competency standard.
The description of the selected standard is displayed so you can reference it.
Retractable: Choose whether you want to allow viewers to reduce the block to its heading on a page or see just the heading only automatically. The options are:
Nein: Der Block und dessen Inhalt wird immer angezeigt.
Yes: Allow viewers to reduce the block to just the heading by clicking the Retractable icon .
Automatically retract: Only the heading of the block is visible, and the viewer can click the Retracted icon to view its content.
Click the Save button to accept your changes, or click Cancel to leave the block’s content as it is. Remove is shown only when you place the block into the page for the first time.
You can also click the Close button in the top left-hand corner of the modal window to either remove a newly created block before it is being saved or to cancel any changes and leave the block’s content as it is.
4.2.3.1.2. Respond to an annotation on the SmartEvidence map
When you have access to a collection that contains a SmartEvidence map, you can leave feedback on an annotation. You may be able to assess it if you have staff or institution administrator permissions in the same institution as the portfolio author unless it is a self-assessment framework.

Respond to an annotation
Click the annotation on the SmartEvidence map that you wish to take a closer look at. A modal window opens with the annotation. There are four different icons that indicate the current assessment:
: The author connected this page to this standard.
: This page does not meet this standard.
: This page partially meets this standard.
: This page meets this standard.
Read the annotation.
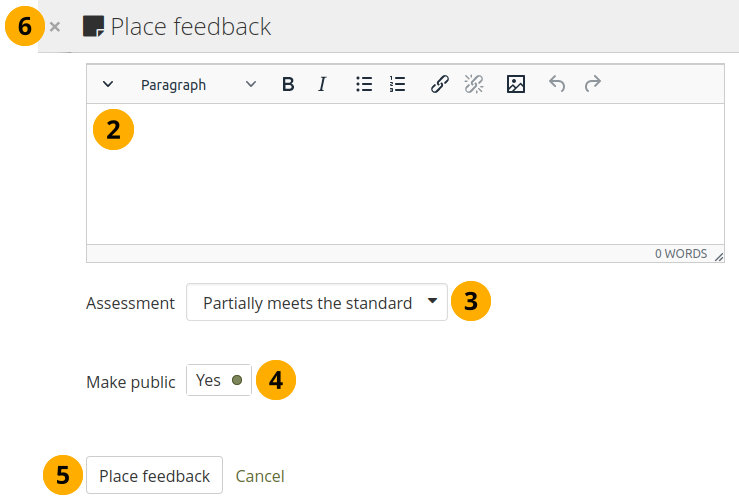
Place feedback: You can leave feedback on the annotation.
Make public: Decide whether everybody who has access to the page can view your feedback or just the portfolio author.
Click the Place feedback button to add your feedback to the annotation.
If an assessment was already made, you can see it here. This also serves as log of the assessment changes throughout the lifetime of the annotation.
You can view the feedback of others.
Assessment: If you have the permission to assess the standard, you see a drop-down menu here with the possible statuses that you can use. Select one of them.
Bemerkung
The assessment statuses are defined in the SmartEvidence framework and can use different terms. The icons are defined in the code.
Click the Save button to keep your selection or click Cancel to abort the assessment.
You can also click the Close button in the top left-hand corner of the modal window to either remove a newly created block before it is being saved or to cancel any changes and leave the block’s content as it is.
4.2.3.1.3. Respond to an annotation on a page
You can provide feedback to an annotation, and assess it if you have the appropriate permission, also from the portfolio page on which the annotation is placed.
Respond to an annotation on a page
Click the Place feedback link at the bottom of the Annotation block.
Write your feedback.
Assessment: If you have the permission to assess the standard, you see a drop-down menu with the possible statuses that you can use. Select one of them.
Bemerkung
The assessment statuses are defined in the SmartEvidence framework.
Make public: Decide whether everybody who has access to the page can view your feedback or just the portfolio author.
Click the Place feedback button to add your feedback to the annotation or click Cancel to abort the assessment.
You can also click the Close button in the top left-hand corner of the modal window to either remove a newly created block before it is being saved or to cancel any changes and leave the block’s content as it is.
4.2.3.1.4. Delete an annotation
When you delete an annotation, all its feedback is deleted as well. You cannot retrieve it again.
4.2.3.3. Course information
The Course information block requires a connection to an LMS to pull relevant information.
4.2.3.4. Creative Commons Lizenz
Add a block to your page which lets viewers know under which Creative Commons license your page is published.
Konfigurieren Sie den Creative Commons Lizenz-Block
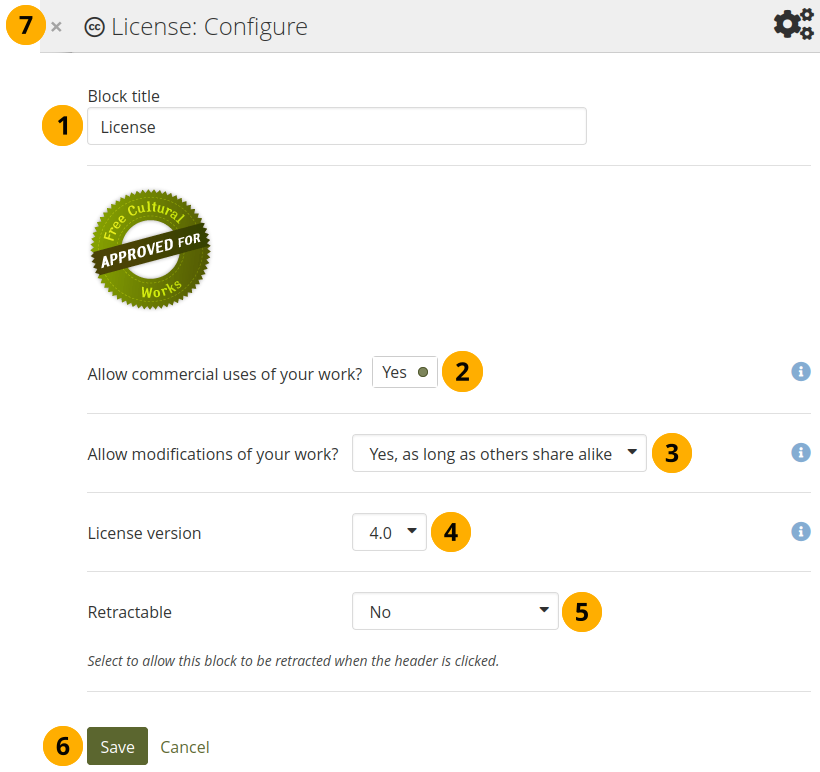
Blocktitel: Vergeben Sie einen Titel für Ihren Block
Allow commercial uses of your work? Decide whether viewers can re-use your work for commercial purposes.
Veränderungen an Ihrem Werk zulassen?: Entscheiden Sie, ob andere Nutzer Ihre Ansicht verwenden dürfen, um mit weiteren Inhalten daraus etwas Neues zu erstellen und wenn ja unter welchen Konditionen.
License version: Select under which Creative Commons license you wish to publish your work. You can choose between
Creative Commons 3.0
Creative Commons 4.0
Siehe auch
Check out what is new in Creative Commons 4.0, and why you may want to choose that license.
Retractable: Choose whether you want to allow viewers to reduce the block to its heading on a page or see just the heading only automatically. The options are:
Nein: Der Block und dessen Inhalt wird immer angezeigt.
Yes: Allow viewers to reduce the block to just the heading by clicking the Retractable icon .
Automatically retract: Only the heading of the block is visible, and the viewer can click the Retracted icon to view its content.
Click the Save button to accept your changes, or click Cancel to leave the block’s content as it is. Remove is shown only when you place the block into the page for the first time.
You can also click the Close button in the top left-hand corner of the modal window to either remove a newly created block before it is being saved or to cancel any changes and leave the block’s content as it is.
4.2.3.5. Gruppeninformation
Der Block wird auf der Gruppenseite automatisch bereitgestellt. Er kann nicht konfiguriert werden.
Bemerkung
Dieser Block kann nur auf der Startseite von Gruppen verwendet werden.
Elemente im Gruppen-Info-Block
Der Block enthält Informationen über:
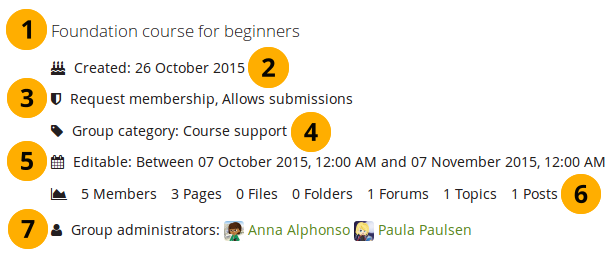
Description of the group
Group creation date
Type of group
Group category if any was chosen
Dates between which regular group members can participate in group activities. This information is only visible if any dates were entered in the group settings.
Group statistics
Anzahl der Gruppenmitglieder
Anzahl der in der Gruppe erstellten Ansichten
Anzahl der in der Gruppe hochgeladenen Dateien
Anzahl der in der Gruppe erstellten Ordner
Anzahl der Foren, die in der Gruppe angelegt wurden
Anzahl der Forenthemen in der Gruppe
Anzahl der Forenbeiträge in der Gruppe
Group administrators
4.2.3.6. Gruppenmitglieder
Dieser Block ist ein Standardblock auf der Gruppenstartseite. Sie können Profilbilder der Mitglieder und ihre Namen anzeigen.
Bemerkung
Dieser Block kann nur auf der Startseite von Gruppen verwendet werden.
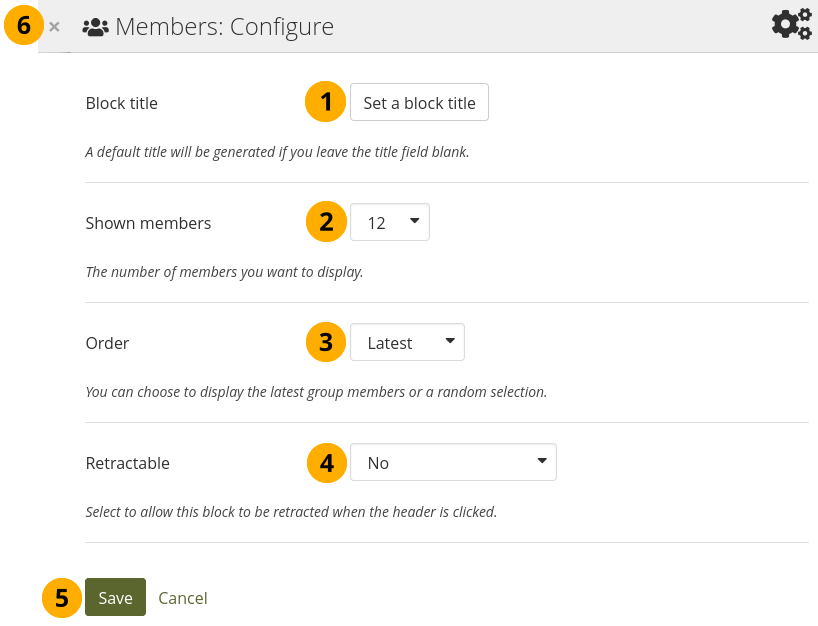
Konfigurieren Sie den Gruppenmitglieder-Block
Block title: The automatic title for this block is ‚Members‘. You can set another one if you wish.
Anzahl der Mitglieder: Legen Sie fest wie viele Mitglieder (zwischen 1 und 100) auf einer Seite der Gruppen-Startseite angezeigt werden. Weitere Mitglieder sind über den Tab Mitglieder sichtbar. Der Standardwert für die Darstellung beträgt 12.
Reihenfolge: Wählen Sie die Anzeigereihenfolge für die Mitglieder. Möglich sind:
Latest: Display members according to their group joining date in reverse chronological order.
Random: Let Mahara decide which members to display.
Retractable: Choose whether you want to allow viewers to reduce the block to its heading on a page or see just the heading only automatically. The options are:
Nein: Der Block und dessen Inhalt wird immer angezeigt.
Yes: Allow viewers to reduce the block to just the heading by clicking the Retractable icon .
Automatically retract: Only the heading of the block is visible, and the viewer can click the Retracted icon to view its content.
Click the Save button to accept your changes, or click Cancel to leave the block’s content as it is. Remove is shown only when you place the block into the page for the first time.
You can also click the Close button in the top left-hand corner of the modal window to either remove a newly created block before it is being saved or to cancel any changes and leave the block’s content as it is.
4.2.3.7. Group portfolios
This block is a default block on the group homepage. You can display pages and collections created in and / or shared with the group in this block.
Bemerkung
Dieser Block kann nur auf der Startseite von Gruppen verwendet werden.
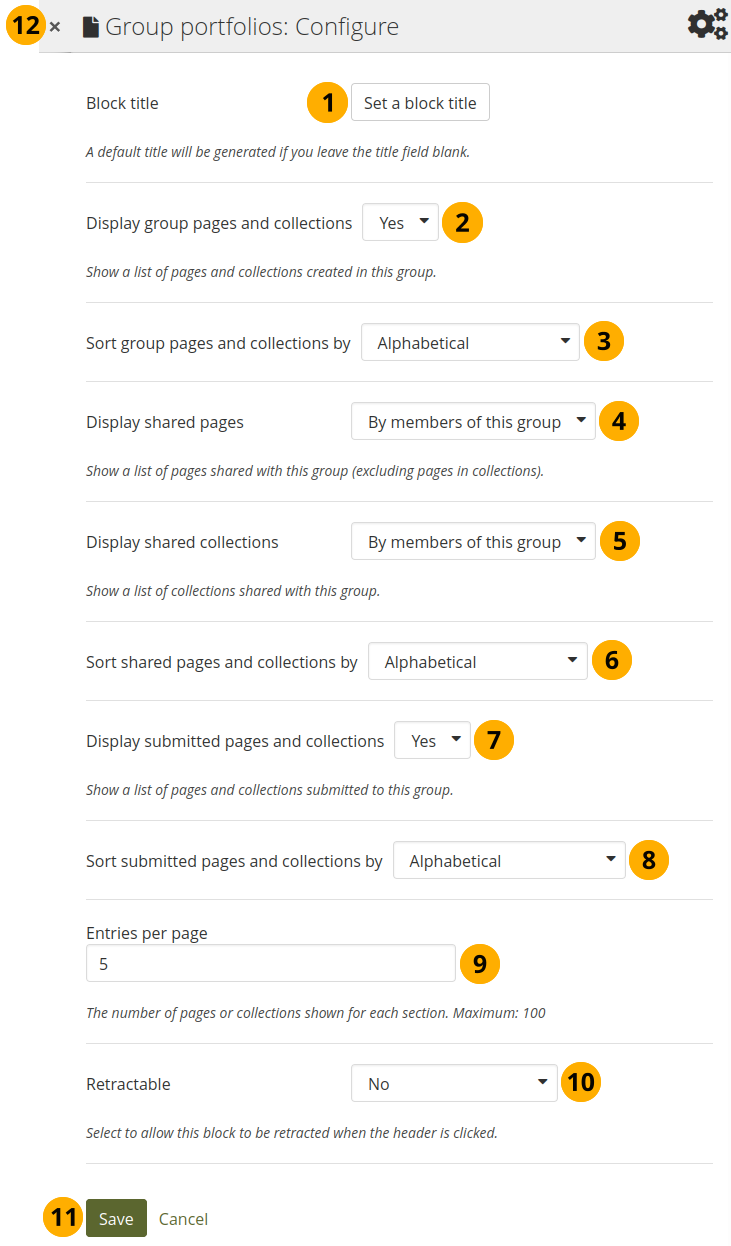
Configure the Group portfolios block
Block title: The automatic title for this block is ‚Group portfolios‘. You can set another one if you wish.
Display group pages and collections: Decide whether to display pages and collections that were created in the group. ‚Yes‘ is the default option.
Sort group pages and collections by: Choose in which order to display portfolios created in the group. ‚Alphabetical‘ is the default option, but you can also display them based on when they were last updated.
Display shared pages: Decide whether to display pages that people shared with the group. Pages that are in collections are not displayed. The options are:
Keine: Geteilte Ansichten werden nicht angezeigt.
By members of this group: Display only pages that have been shared by members of the group.
Bemerkung
This option is particularly well-suited for groups that are used for class purposes. That way, students can share their pages or collections with the group for a long time, but the administrator can choose to display only pages of group members but not those that are not members any more. The pages of non-group members are still accessible via the Shared with me functionality.
Von jedem: Es werden alle Ansichten angezeigt, die jemals mit der Gruppe geteilt worden sind.
Display shared collections: Decide whether to display collections that people shared with the group. The options are:
Keine: Geteilte Sammlungen werden nicht angezeigt.
By members of this group: Display only collections that have been shared by members of the group.
Von jedem: Es werden alle Sammlungen angezeigt, die jemals mit der Gruppe geteilt worden sind.
Bemerkung
Submitted pages are not displayed in the section of ‚Shared pages‘ and ‚Shared collections‘ to avoid confusion whether they have been shared with the group or not.
Sort shared pages and collections by: Choose in which order to display pages and collections shared with the group. ‚Alphabetical‘ is the default option, but you can also display them based on when they were last updated.
Display submitted pages and collections: Decide whether to display pages and collections that group members submitted to the group. There is no distinction made between pages and collections. ‚Yes‘ is the default option.
Bemerkung
When you choose this option, you also see which regular members have not yet submitted a portfolio to the group. This is helpful in particular in large groups with lots of portfolio submissions.
 Group tutors and group administrators are not displayed though as they are not expected to submit portfolios.
Sort submitted pages and collections by: Choose in which order to display pages and collections submitted to the group. ‚Alphabetical‘ is the default option, but you can also display them based on when they were last updated.
Einträge pro Ansicht: Wählen Sie die maximale Anzahl von Ansichten und Sammlungen aus, die auf der Gruppenhomepage erscheinen sollen. Sie können eine maximale Anzahl von 100 Elementen pro Kategorie anzeigen lassen.
Retractable: Choose whether you want to allow viewers to reduce the block to its heading on a page or see just the heading only automatically. The options are:
Nein: Der Block und dessen Inhalt wird immer angezeigt.
Yes: Allow viewers to reduce the block to just the heading by clicking the Retractable icon .
Automatically retract: Only the heading of the block is visible, and the viewer can click the Retracted icon to view its content.
Click the Save button to accept your changes, or click Cancel to leave the block’s content as it is. Remove is shown only when you place the block into the page for the first time.
You can also click the Close button in the top left-hand corner of the modal window to either remove a newly created block before it is being saved or to cancel any changes and leave the block’s content as it is.
Bemerkung
A page is considered as modified when the content of at least one block is updated, including the adding of a new Mahara journal entry into the journal block.
4.2.3.8. Eingangsbox
Der Eingangs-Block zeigt die letzten Benachrichtigungen an, die Sie erhalten haben.
Bemerkung
Dieser Block kann nur im Dashboard genutzt werden.
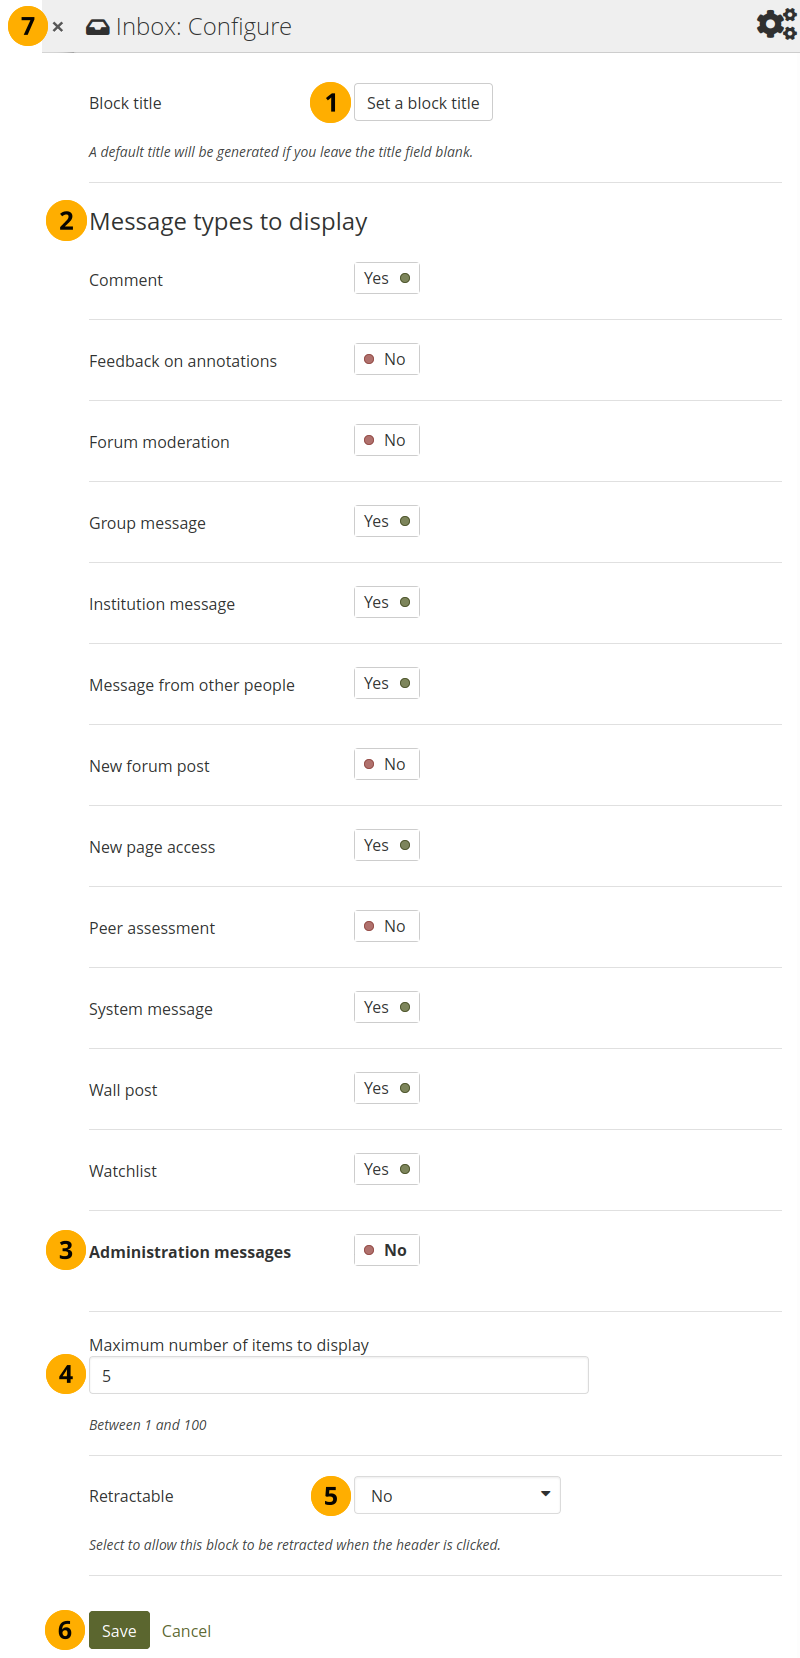
Konfigurieren Sie den Posteingangs-Block
Block title: The automatic title for this block is ‚Inbox‘. You can set another one if you wish.
Message types to display: Change the switch to ‚Yes‘ for each message type that you want to display in this block.
Administration messages: If you are an institution or site administrator, you see this option. All administration messages such as for objectionable content, virus upload, contact, etc. are grouped in ‚Administration messages‘.
Höchstzahl der angezeigten Einträge: Legen Sie fest wie viele Mitteilungseinträge maximal in Ihrem Dashboard angezeigt werden. Sie können zwischen 1 und 100 wählen.
Retractable: Choose whether you want to allow viewers to reduce the block to its heading on a page or see just the heading only automatically. The options are:
Nein: Der Block und dessen Inhalt wird immer angezeigt.
Yes: Allow viewers to reduce the block to just the heading by clicking the Retractable icon .
Automatically retract: Only the heading of the block is visible, and the viewer can click the Retracted icon to view its content.
Click the Save button to accept your changes, or click Cancel to leave the block’s content as it is. Remove is shown only when you place the block into the page for the first time.
You can also click the Close button in the top left-hand corner of the modal window to either remove a newly created block before it is being saved or to cancel any changes and leave the block’s content as it is.
If you set your notification preferences to ‚Inbox‘ for certain notification types, you can see quickly which messages you have not read in the Inbox block. They are marked in bold.
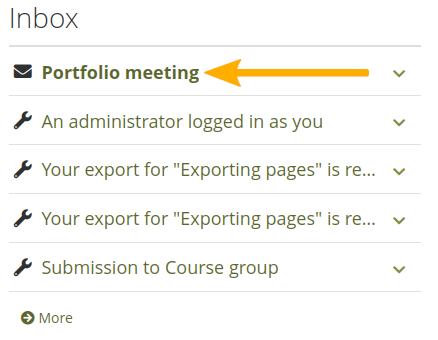
Unread messages are displayed in bold
Bemerkung
If you set your notification preferences to ‚Email‘ or ‚Email digest‘ for certain types, they are set to being read automatically because it is assumed that you have seen them in your emails already and thus don’t need to review them again.
4.2.3.9. Latest changes I can view
The Latest changes I can view block displays the latest portfolios to which you have access across Mahara. This includes pages and collections.
Bemerkung
Dieser Block kann nur im Dashboard genutzt werden.
You decide which portfolios you want to see in this block based on how the portfolios were shared with you.
The site administrator sets the default in the ‚Dashboard‘ template for new account holders, but you can make changes on your own dashboard independently.
Bemerkung
When a site is upgraded to Mahara 21.04, the block is set to only show results for ‚Me‘, ‚Friends‘, and ‚Groups‘. That selection was made because feedback from several institutions mentioned that portfolio authors were confused when they could suddenly see other people’s portfolios on their dashboard whom they didn’t know.
Configure the Latest changes I can view block
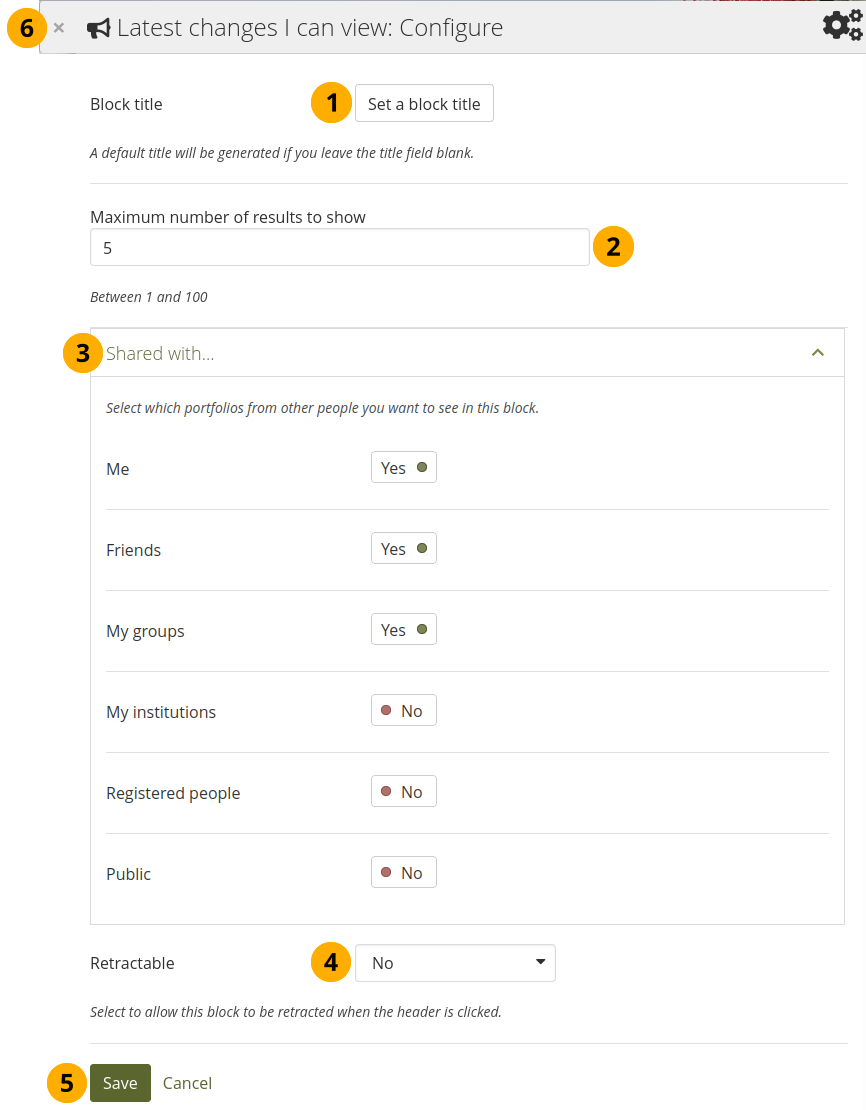
Block title: The automatic title for this block is ‚Latest changes I can view‘. You can set another one if you wish.
Maximum number of results to show: Decide how many pages and collections shall be shown on your dashboard. You can choose between 1 and 100.
- Shared with: Decide which portfolios from other people you want to see on your dashboard. Per default, you see portfolios shared with you personally, with you as a friend, and with you as a group member.
Retractable: Choose whether you want to allow viewers to reduce the block to its heading on a page or see just the heading without the block content automatically. The options are:
Nein: Der Block und dessen Inhalt wird immer angezeigt.
Yes: Allow viewers to reduce the block to just the heading by clicking on the heading of a block where the Retractable icon is shown.
Automatically retract: Only the heading of the block is visible, and the viewer can click on the heading of a block where the Retracted icon is shown to view its content.
Klicken Sie auf den Speichern-Button, um die Änderungen zu sichern. Mit Abbrechen bleibt alles unverändert. Der Entfernen-Button wird nur beim erstmaligen Einbinden in eine Ansicht gezeigt.
You can also click the Close icon in the top left-hand corner to either remove a newly created block before it is being saved or to cancel any changes and leave the block’s content as it is.
The block on your dashboard page looks like the following.
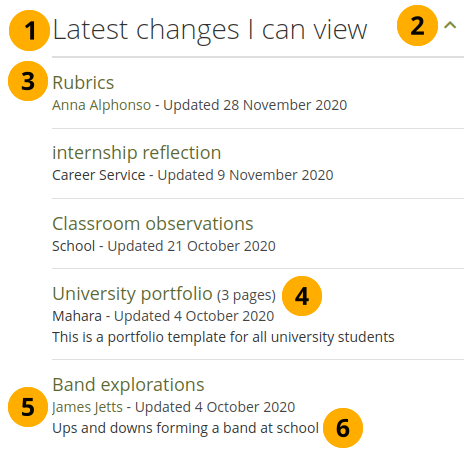
Example of the Latest changes I can view block
Titel des Blocks.
If you chose a retractable option, you can click on the title or anywhere in the title space to change the block’s behaviour.
Title of the page or collection to which you have access.
If it is a collection, you see the number of pages contained within.
Name of the portfolio author, and when the portfolio was last updated.
Page or collection description.
4.2.3.10. Navigation
Einen Navigationsblock zur Anzeige von Links auf Ansichten in einer Sammlung hinzufügen.
Bemerkung
You must create at least one collection in order to use this block.
Konfigurieren Sie den Navigations-Block
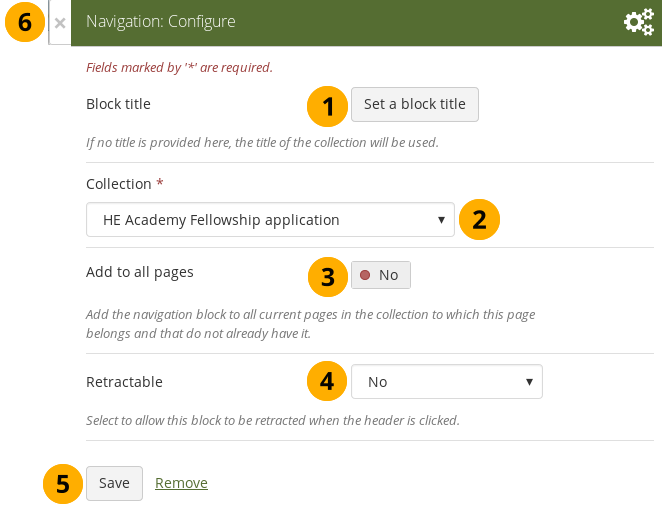
Blocktitel: Der Titel der Sammlung wird automatisch gewählt, wenn Sie keinen Eintrag vornehmen.
Sammlung: Wählen Sie die Sammlung aus dem Drop-down-Menu in dem Links im Block angezeigt werden sollen.
Add to all pages: Automatically add the block to all pages in the current collection with links to the selected collection.
Bemerkung
If you add another page to the collection, it does not automatically receive the navigation block. You need to add it manually.
Retractable: Choose whether you want to allow viewers to reduce the block to its heading on a page or see just the heading only automatically. The options are:
Nein: Der Block und dessen Inhalt wird immer angezeigt.
Yes: Allow viewers to reduce the block to just the heading by clicking the Retractable icon .
Automatically retract: Only the heading of the block is visible, and the viewer can click the Retracted icon to view its content.
Click the Save button to accept your changes, or click Cancel to leave the block’s content as it is. Remove is shown only when you place the block into the page for the first time.
You can also click the Close button in the top left-hand corner of the modal window to either remove a newly created block before it is being saved or to cancel any changes and leave the block’s content as it is.
4.2.3.11. Notiz
Fügen Sie Ihrer Ansicht eine Notiz hinzu. Diese Funktion kann genutzt werden, wenn Sie Ihren geschriebenen Text nicht im Blog veröffentlichen, sondern auf diesen zurückgreifen wollen, wenn Sie andere Ansichten bearbeiten.
4.2.3.11.1. Fügen Sie eine neue Notiz hinzu
Konfigurieren Sie den Notiz-Block
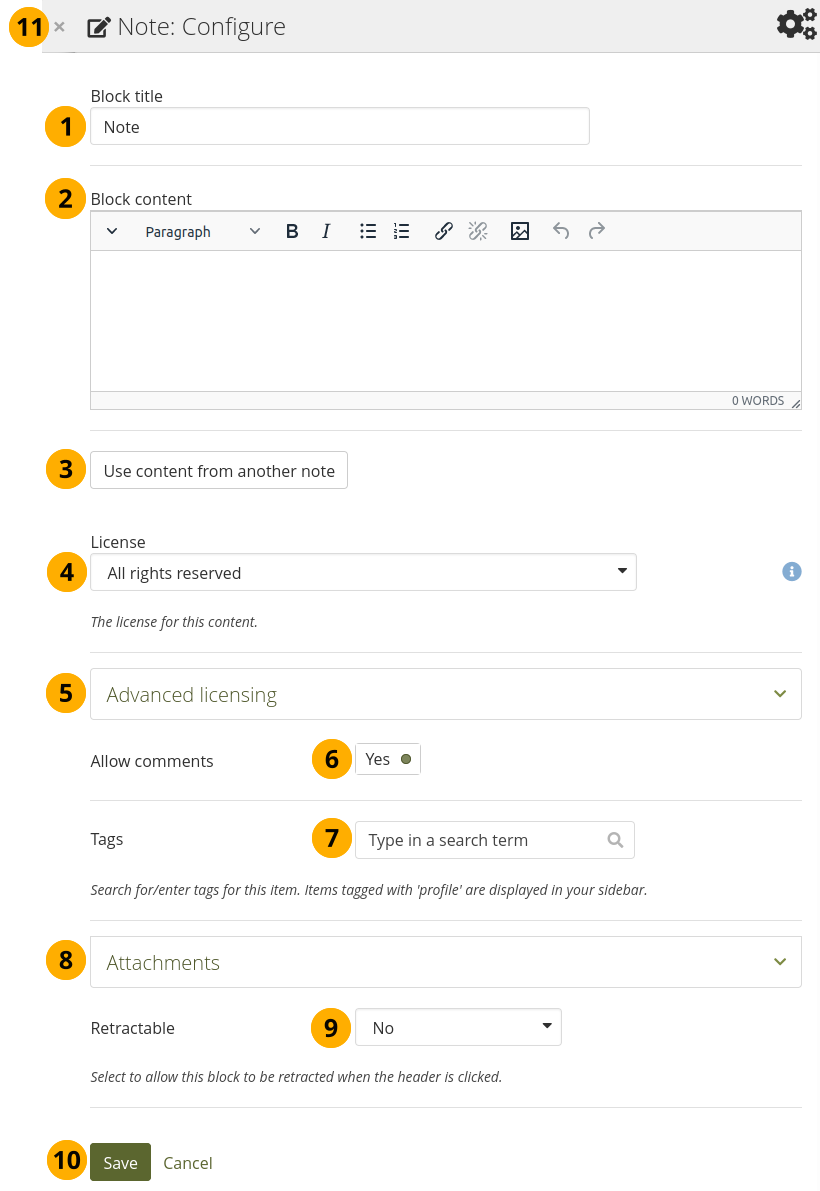
Blocktitel: Geben Sie Ihrer Notiz einen Titel.
Blockinhalt: Schreiben Sie Ihren Text. Sie können den Text formatieren und externe Bilder einfügen.
Alternatively, you can also use text from another note that you have already written. Click the Use content from another note button to do so.
License: You see this drop-down menu if the site administrator turned on license metadata. Additionally, if you are in an institution, your institution administrator may require you to provide a license. Your default license is displayed. You can set your default license in your account settings. You may choose a different license for each individual artefact.
Erweiterte Lizensierungen: Wenn Sie Lizenzinformationen eintragen können oder müssen, können Sie ebenfalls Informationen über einen ursprünglichen Lizenzgeber hinterlegen. Sie können hier auch eine URL zur Originalfundstelle hinterlegen.
Allow comments: Switch this setting to ‚No‘ if you do not want others to comment on your note. This option is set to ‚Yes‘ by default.
Tags: Enter tags to find your note more easily at a later stage. You can choose from your existing tags by starting to type a letter and then selecting the tag you want to use. You can also type a new tag, and it is added to your list of tags.
Siehe auch
You can find more information on how to use the tag selector in the ‚Tags‘ section.
Attachments: Attach a file to a note as additional evidence for the text you are writing.
Retractable: Choose whether you want to allow viewers to reduce the block to its heading on a page or see just the heading only automatically. The options are:
Nein: Der Block und dessen Inhalt wird immer angezeigt.
Yes: Allow viewers to reduce the block to just the heading by clicking the Retractable icon .
Automatically retract: Only the heading of the block is visible, and the viewer can click the Retracted icon to view its content.
Click the Save button to accept your changes, or click Cancel to leave the block’s content as it is. Remove is shown only when you place the block into the page for the first time.
You can also click the Close button in the top left-hand corner of the modal window to either remove a newly created block before it is being saved or to cancel any changes and leave the block’s content as it is.
4.2.3.11.2. Ein Bild zu einer Notiz hinzufügen
Bemerkung
Please refer to the section ‚Insert an image into text‘ for more information.
4.2.3.11.3. Eine Datei an eine Notiz anhängen
Eine Datei an einen Notiz-Block anhängen
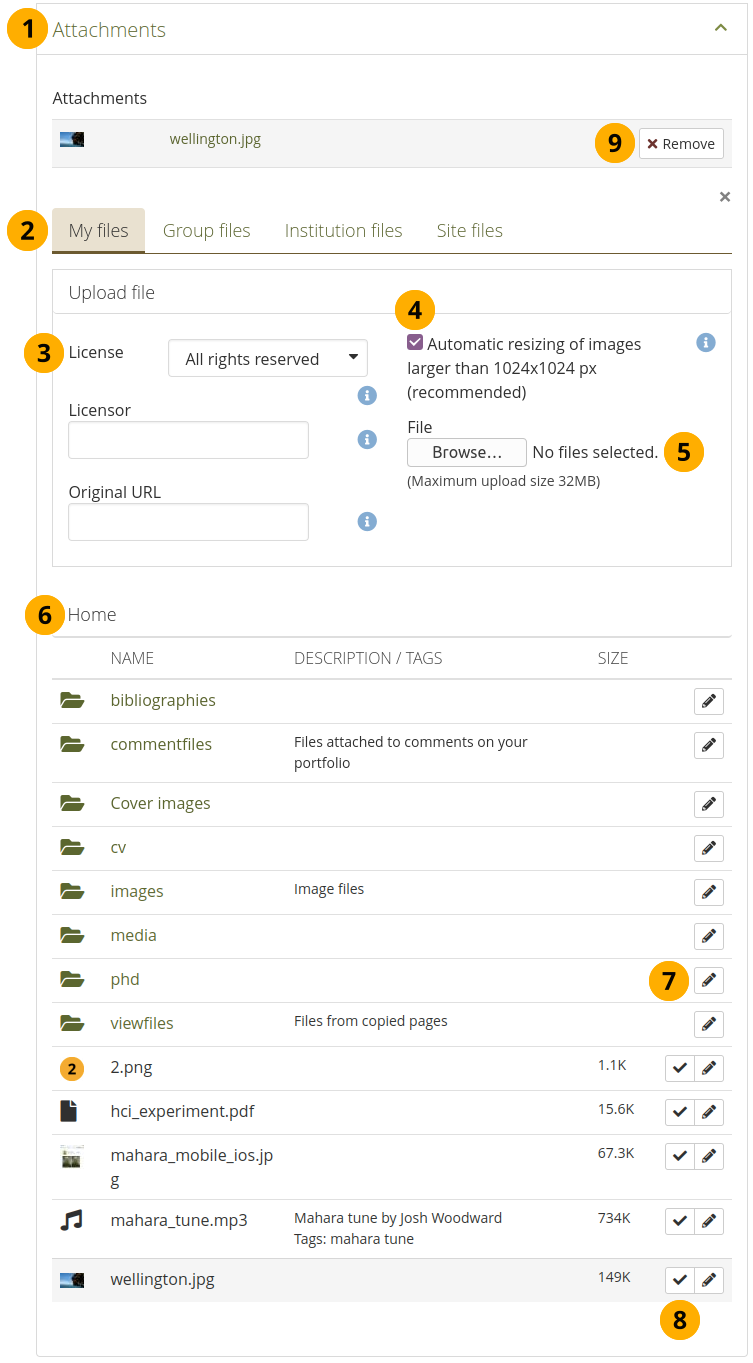
Click the Attachments panel if you wish to add one or more files to a note.
Dateibereich: Wählen Sie aus welchem Dateibereich Sie eine Dateie auswählen wollen:
Meine Dateien: Sie sehen alle Ordner/Verzeichnissse und Dateien, die Sie dort abgelegt haben.
Gruppendateien: Sie sehen alle Verzeichnisse und Dateien, die zur Veröffentlichung freigegeben sind.
Institutionsdateien: Als Institutionsadministrator sehen Sie alle Institutionsverzeichnisse und Dateien.
Site-Dateien: Als Site-Administrator sehen Sie alle Verzeichnisse und Dateien auf Systemebene. Anderenfalls sehen Sie nur Dateien aus dem öffentlich-Ordner auf Site-Ebene.
License information: You see these fields if the site administrator turned on license metadata. Additionally, if you are in an institution, your institution administrator may require you to provide a license.
Lizenzinformationen: Ihre Standardlizenz wird angezeigt. Ihre Voreinstellungen können Sie in den Accounteinstellungen festlegen. Sie können für jedes einzelne Artefakt einen andere Lizenz festlegen.
Lizenzgeber: Wenn Sie eine Datei verwenden, die von einer anderen Person stammt, können Sie hier den Namen des Urhebers hinterlegen.
Original URL: Wenn Sie eine Datei verwenden, die von einer anderen Person stammt, können Sie hier einen Link zur Internetseite von der die Datei stammt hinterlegen.
Wenn der Siteadministrator die Bildgrößenanpassung aktiviert hat, können Sie festlegen ob ein von Ihnen hochgeladenes Bild in der Größe angepasst wird, sofern es größer als vorabdefiniert ist. Mit der Option können Sie Speicherplatz in Ihrer persönlichen Dateiablage einsparen.
File: You do not have to go back to your Files area in Create in order to upload a file. You can do so directly from this screen.
Ordnerpfad: Die sog. Brotkrumen-Navigation zeigt Ihnen in welchem Ordner Sie sich gerade befinden.
Klicken Sie auf den Bearbeiten-Button, um eine Komponente des Ordners oder der Datei zu ändern, z. B. den Namen, die Beschreibung oder ein Schlagwort. Wenn Sie einen Ordner oder eine Datei zum Feedback eingereicht haben, können Sie diesen nicht ändern.
Bemerkung
Sie können auch Dateien von eingereichten Portfolioansichten auswählen.
Click into the row that contains the file you wish to display in the block to select it.
Warnung
When you place group, institution or site files into a page, beware that these files may not be available at some point any more when the person in charge deletes them.
Click Remove if you want to revert your selection.
Continue editing your note and save it.
4.2.3.11.4. Verwenden Sie den Text einer schon vorhandenen Notiz
Sie können den Text von anderen Notizen aus einer Ansicht wiederbenutzen ohne die ganze Ansicht zunächst kopieren zu müssen.
Warnung
Wenn Sie den Inhalt einer Notiz ändern und vorher keine Kopie des alten Texts aus der Block-Konfiguration erstellt haben, wird der Text auch in allen anderen Bereichen, in denen die Notiz genutzt wird, geändert.
Konfigurieren Sie den Notiz-Block, indem Sie einen Text kopieren
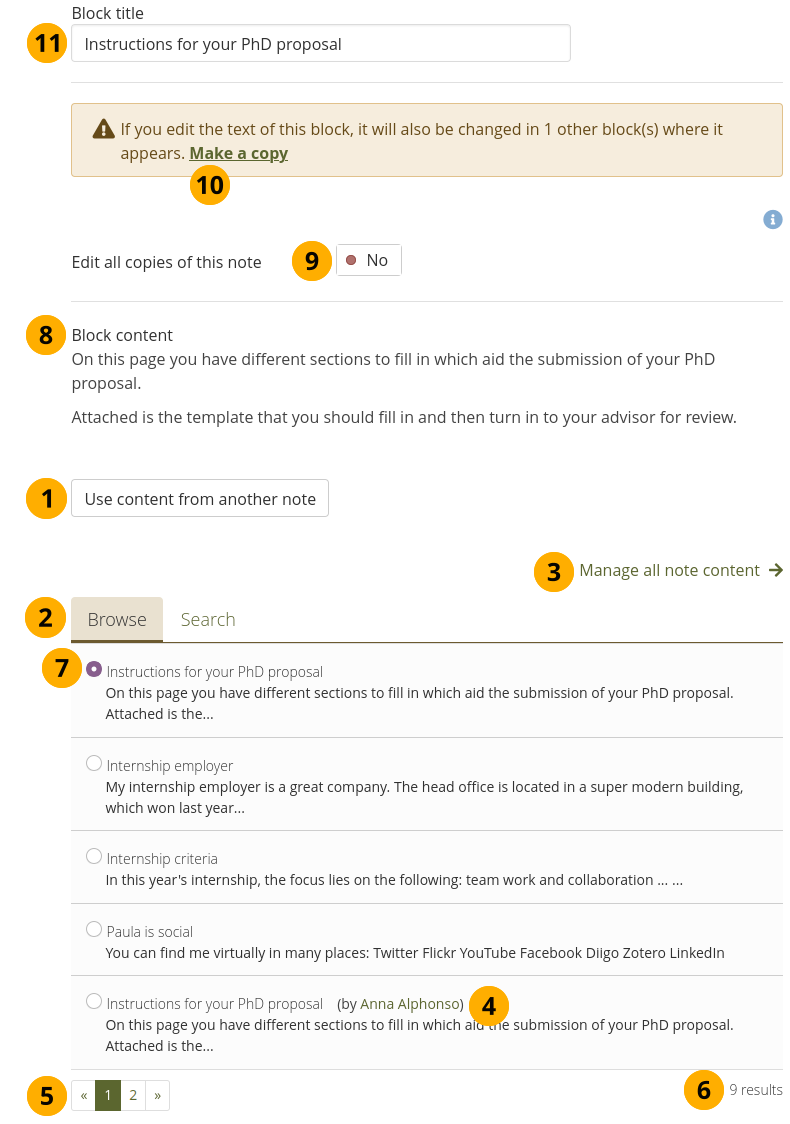
Click the button Use content from another note to view all notes to which you have access. These can be:
Ihre eigenen Notizen
Notizen von Gruppenansichten, die Sie kopieren können
Notizen von Institutions- oder Site-Ansichten, zu denen Sie Zugang haben
Klicken Sie auf Durchsuchen oder Suchen, um eine Notiz zu finden, die Sie noch einmal verwenden wollen
Bemerkung
The search is performed in the title, description, and tags.
Click the Manage all note content link to be taken to your personal Notes if you can’t find what you are looking for.
All notes are listed with their title and the first line. If a note does not belong to you but for example to a group, you see the author next to the note’s title.
Benutzen Sie den Seitenwechsler, um Ihre Notizen zu verschieben wenn mehr als fünf angezeigt werden.
You see the number of notes that you have access to.
Click the radio button in front of a note that you want to use in this page.
The content of the note that you have selected is displayed in the Block content area. You cannot make any changes at this stage unless you…
change the switch Edit all copies of this note to ‚Yes‘. Only then do you see the note content as editable text. This step is necessary so you make a conscious decision about changing the text in all instances where the block is displayed.
If you wish to make changes to the note, but do not want to change it everywhere else, click the Make a copy link above the Block content. The text is then retained, but it is treated like a new note, and the original note is not changed.
Block title: Review the block title and make changes if necessary. Once you copied a note, the original block title is entered here.
Bemerkung
You can change the block title no matter whether you change the content of the note or not.
Alle anderen Funktionen, die Sie auf dem Bildschirm sehen, sind dieselben wie eine neue Notiz hinzufügen.
When you open a note that is used on a page that is currently submitted, you cannot make changes to it but must copy it if you want to change the text.
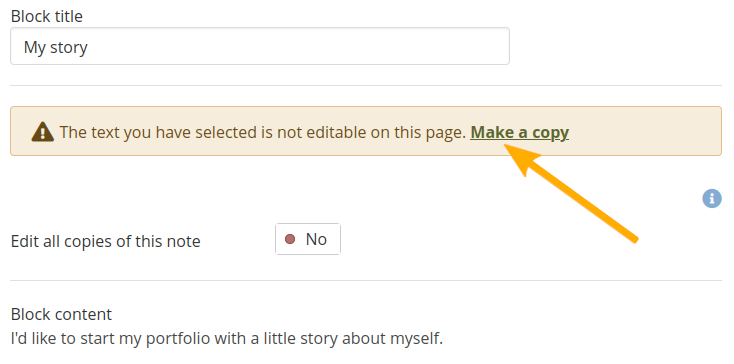
Open a note that is submitted for assessment in another portfolio
4.2.3.12. Peer assessment
Allow peer reviewers to give feedback. There are two options:
Blind feedback: The peer reviewer can see block headings, but not the content in the blocks themselves. If the portfolio consists of multiple pages, and one of them does not contain a peer block, the peer reviewer does not see the page content at all.
Bemerkung
If the page is in a collection that contains pages that don’t have the peer assessment block, the peer assessor doesn’t see any content on those pages but the notice ‚You cannot see the content on this page because it does not require a peer assessment.‘
- Open feedback: The peer assessor can see the entire content of the portfolio.
The type of feedback depends on the institution setting ‚Allow peers to see portfolio content‘.
4.2.3.12.1. Add the peer assessment block to a page
You can place this block onto a page multiple times so that a peer can give feedback for different sections.
Bemerkung
You must give a person the ‚Peer‘ role when sharing the portfolio page for them to be able to add their assessment.
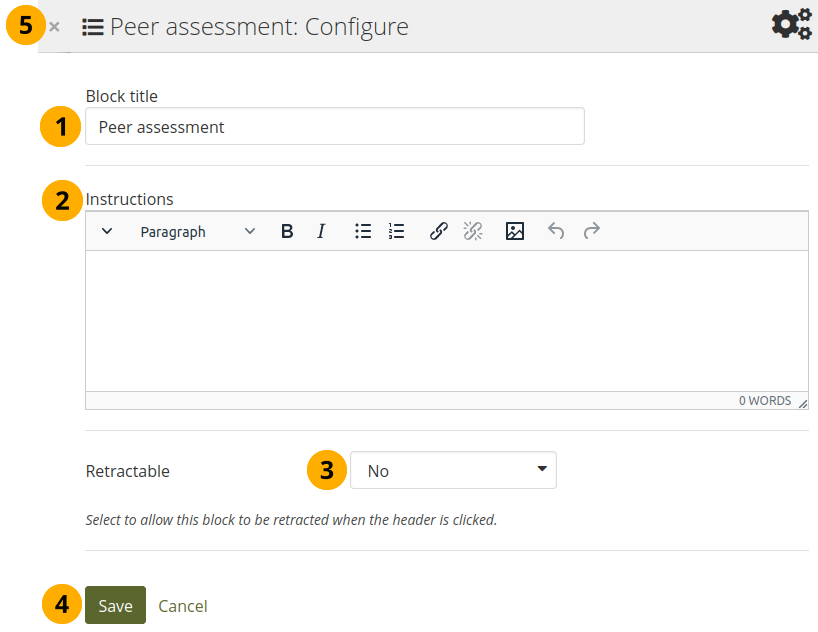
Configure the Peer assessment block
Block title: The title that you want to give this particular block.
Instructions: Provide instructions for the peer reviewer to help them with their assessment.
Retractable: Choose whether you want to allow viewers to reduce the block to its heading on a page or see just the heading only automatically. The options are:
Nein: Der Block und dessen Inhalt wird immer angezeigt.
Yes: Allow viewers to reduce the block to just the heading by clicking the Retractable icon .
Automatically retract: Only the heading of the block is visible, and the viewer can click the Retracted icon to view its content.
Click the Save button to accept your changes, or click Cancel to leave the block’s content as it is. Remove is shown only when you place the block into the page for the first time.
You can also click the Close button in the top left-hand corner of the modal window to either remove a newly created block before it is being saved or to cancel any changes and leave the block’s content as it is.
4.2.3.12.2. Set up a peer assessor
You can give someone the peer assessment permissions on the Edit access screen of your portfolio page.
Give someone peer assessment permissions
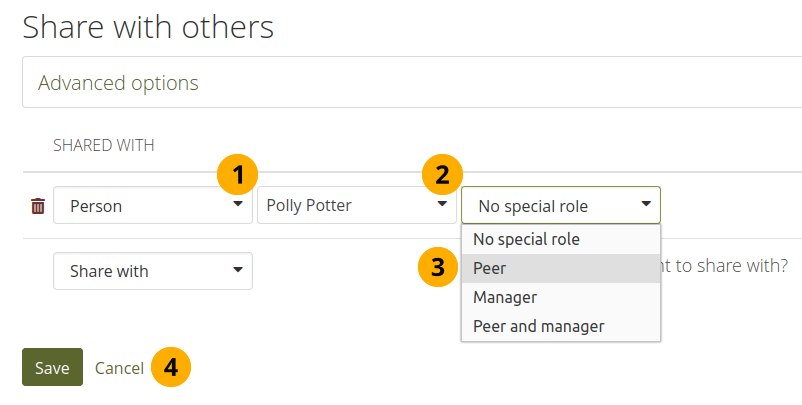
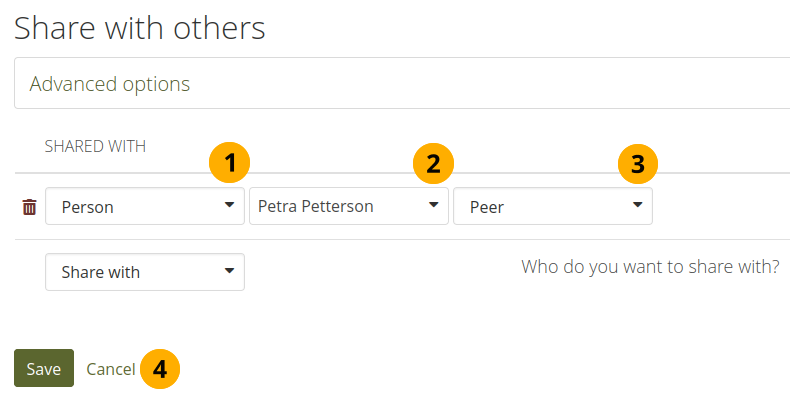
In the Share with drop-down menu, select ‚Person‘ under ‚Search for…‘.
In the second drop-down menu that becomes available, type the name of the person who shall be the peer assessor and select them.
In the third drop-down menu, select the ‚Peer‘ option. You can also select the ‚Peer and manager‘ option if the peer is also the manager and can verify the page in the end.
Bemerkung
If a peer is also a manager, they can always see the content of a portfolio, no matter whether someone with only the ‚Peer‘ role cannot as they need to see the content as a manager.
Click the Save button to keep your selection or click the Cancel link to abort your changes.
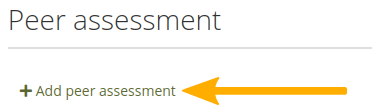
4.2.3.12.3. Add a peer assessment
When you are the peer assessor on someone’s portfolio, and a page contains a peer assessment block, you can add your assessment by clicking the Add peer assessment link.
Add a peer assessment
Bemerkung
An alert is displayed when the page was already signed off. In that case, peers cannot add a peer assessment any more and need to contact the portfolio author to have the sign-off revoked.

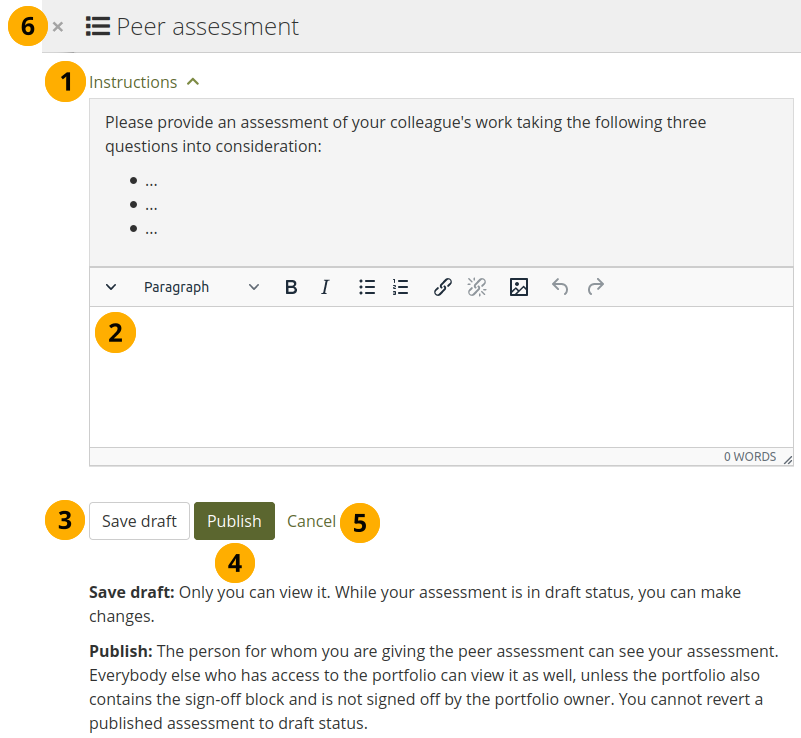
Write a peer assessment
Click the Instructions link to view the instructions for the peer assessment.
Write your peer assessment.
Click the Save draft button if you are not yet ready for the portfolio author to view your assessment, and you want to save a draft status.
Click the Publish button when you finished your assessment, and the portfolio author can view it. A notification is also sent to the portfolio author.
Bemerkung
If the peer assessment block is used in conjunction with the sign-off block, the portfolio author must sign off the page before anybody other than themselves and the peer assessor can see published peer assessments.
Click Cancel if you do not want to save any of your changes.
4.2.3.12.4. View a peer assessment
If a peer assessment is in draft mode, only the peer assessor can see it. Once it’s published, others can view it as well.
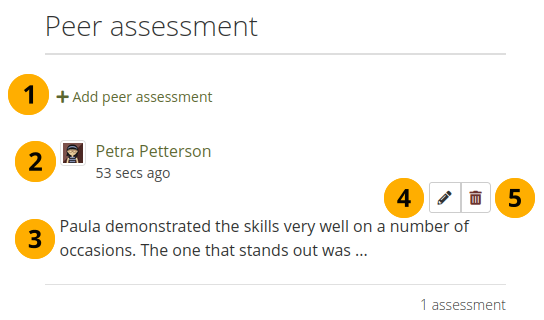
View a peer assessment
Click the Add peer assessment link if you want to add (another) peer assessment when you cannot edit an earlier one in the same block any more.
The profile picture and name of the peer assessor are displayed along with the date and time when the peer assessment was made.
The peer assessment is displayed.
The Edit button is only displayed to the peer assessor for 10 minutes after publishing the assessment in case there are last minute changes they want to make.
The Delete button is only shown to the peer assessor, and they can delete their assessment at any point. If they do, the portfolio author receives an email about that with the text of the assessment included.
4.2.3.13. Pläne
Display your plans in a block.
Bemerkung
Sie müssen zunächst mindestens einen Plan erstellen, um diesen Block nutzen zu können.

Konfigurieren Sie den Pläne-Block
Blocktitel: Der Titel des Plans wird automatisch gesetzt, wenn Sie keinen Eintrag vornehmen.
Plans to show: Choose the plan or plans which you want to display in your page.
Tasks to display: Decide how many tasks you want to display for each plan before a paginator is displayed.
Retractable: Choose whether you want to allow viewers to reduce the block to its heading on a page or see just the heading only automatically. The options are:
Nein: Der Block und dessen Inhalt wird immer angezeigt.
Yes: Allow viewers to reduce the block to just the heading by clicking the Retractable icon .
Automatically retract: Only the heading of the block is visible, and the viewer can click the Retracted icon to view its content.
Click the Save button to accept your changes, or click Cancel to leave the block’s content as it is. Remove is shown only when you place the block into the page for the first time.
You can also click the Close button in the top left-hand corner of the modal window to either remove a newly created block before it is being saved or to cancel any changes and leave the block’s content as it is.
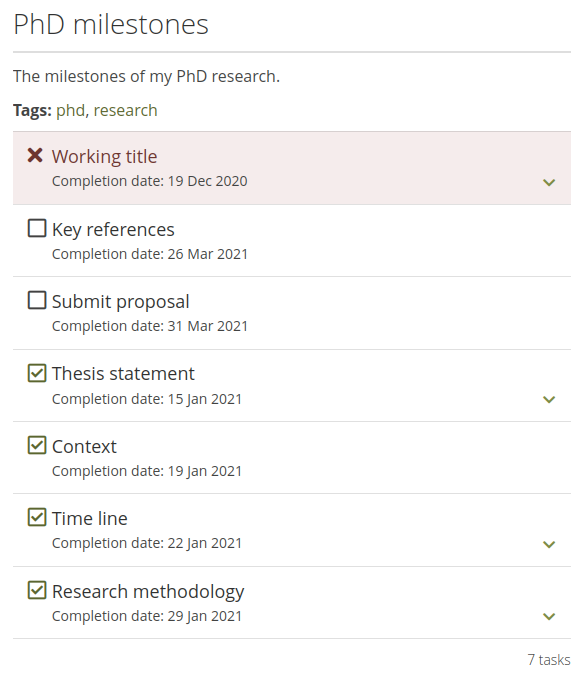
Ergebnis eines eingebetteten Plans in eine Portfolio-Ansicht. Indem Sie auf die verlinkten Titel klicken, können Sie die Beschreibungen der einzelnen Aufgaben aufrufen.
4.2.3.14. Portfolio review
This block type is only available when an institution allowed the use of the portfolio completion page as it is the only page where this block can appear. It allows a reviewer to make an overall statement or statements for the entire portfolio.
4.2.3.14.1. Configure the portfolio review block
The block is highly configurable and can be used with reviewers whom portfolio authors shall know and also those where the portfolio author shall not know who confirmed a statement or left a comment, e.g. in the cause of portfolio moderation or an audit. You can place multiple instances of the block onto a portfolio completion page and assign them to different roles to allow different people to confirm statements.
If the block is on a template that is copied to the portfolio author, the portfolio author will not see the content of a portfolio review block until its content has been confirmed by a reviewer. This allows for audit blocks to be placed on a page but not seen by the majority of portfolio authors when only a small number of portfolios is audited.
You can confirm a statement in three different ways:
Tick a box in a pre-set statement.
Add your own comment.
Confirm a pre-set statement and add your own comment.
The template creator decides which is available.
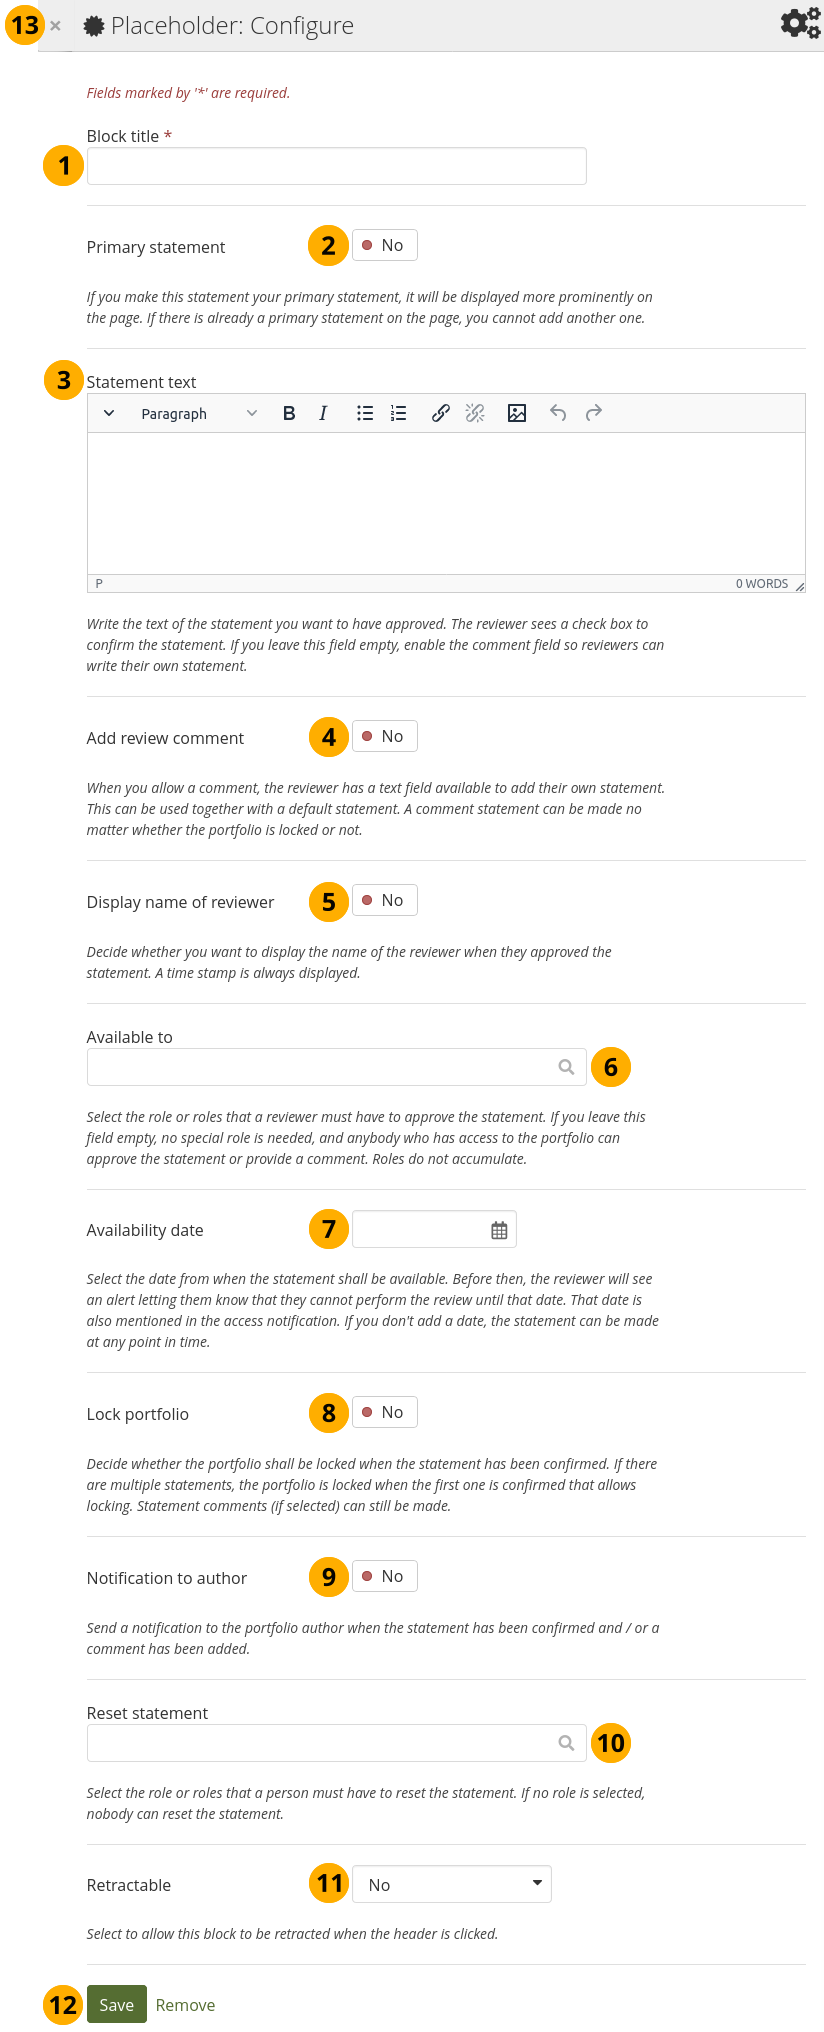
Configure the Portfolio review block
Block title: Add a title for your block.
Primary statement: Decide whether this block shall be a primary statement. It will be set apart from other review blocks by a different colour. Only one review block on a portfolio completion page can be a primary statement.
Statement text: Add the text that a reviewer has to confirm as part of their review. The reviewer cannot change that text. They can confirm it by checking a box next to the statement.
Add review comment: Allow the reviewer to write their own comment as part of the review. This can stand alone, e.g. as moderation or audit comment, or used in conjunction with the ‚Statement text‘. If it is used with a pre-set statement, the statement does not have a check box, but adding the comment will approve it.
Display name of reviewer: When a statement is made, it is time stamped. It can also contain the name of the reviewer if that shall be known. Alternatively, you can keep it anonymous.
Available to: Decide which role(s) can confirm the statement. If you do not select at least one role, anybody who has access to the portfolio can confirm the statement.
Bemerkung
The role Reviewer was created for this functionality. It is tied to the reports in the administration area for the primary statement. However, you can assign other roles to narrow down who can confirm a statement or write a comment.
Availability date: Select a date after which a reviewer can confirm a statement. Before then, they can view the portfolio and comment on individual pages and artefacts, but they won’t be able to confirm a statement or leave a review comment.
Lock portfolio: Decide whether the portfolio shall be locked from editing once a particular statement was confirmed. The portfolio will stay locked for six months.
Bemerkung
When a reviewer asks to have their statement reset, and it is the last statement that locks the portfolio, the portfolio will be unlocked, and the portfolio author can continue editing it.
Notification to author: The portfolio author can be notified when a statement has been confirmed. The notification contains the statement itself.
Reset statement: Decide which role(s) can reset a statement when the reviewer requests this. The person who can reset a statement receives temporary access to the portfolio to reset the status of the statement and then loses it automatically once they performed that action. The portfolio author and the reviewer both receive a notification when a statement was reset.
Retractable: Choose whether you want to allow viewers to reduce the block to its heading on a page or see just the heading only automatically. The options are:
Nein: Der Block und dessen Inhalt wird immer angezeigt.
Yes: Allow viewers to reduce the block to just the heading by clicking the Retractable icon .
Automatically retract: Only the heading of the block is visible, and the viewer can click the Retracted icon to view its content.
Click the Save button to accept your changes, or click Cancel to leave the block’s content as it is. Remove is shown only when you place the block into the page for the first time.
You can also click the Close button in the top left-hand corner of the modal window to either remove a newly created block before it is being saved or to cancel any changes and leave the block’s content as it is.
4.2.3.14.2. Confirm a statement
You can confirm a standard or a primary statement if the template allows you to do so.
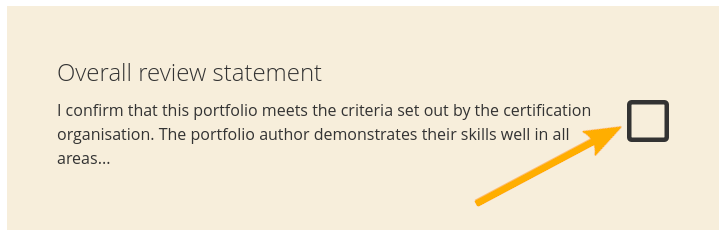
Confirm a pre-set portfolio review statement
If you are allowed to confirm a statement, you will see a check box and can click it. This action may lock the portfolio from editing. Read the information in the modal that is displayed carefully, especially when you think the portfolio author still needs to make changes.
4.2.3.14.3. Add a review comment
You can add your own comment if the template allows you to do so.
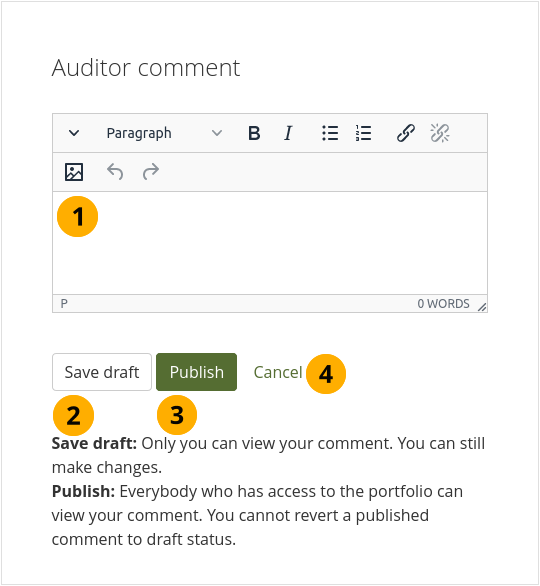
Add a review comment to the portfolio completion page
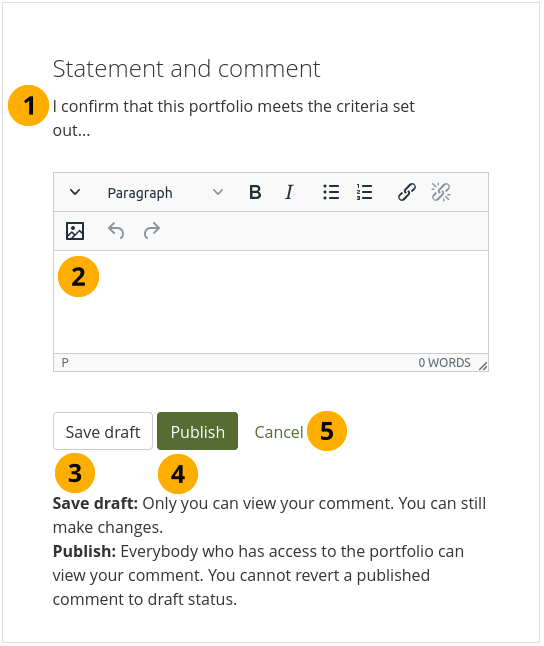
Write your comment in to the text box. You can use formatting options.
Click the Save draft button to save your comment as draft if you haven’t finished it yet and want to look it over or complete later on. The portfolio author cannot see that comment.
Click the Publish button to make your comment visible to others once you are finished. The portfolio author and others who have access to the portfolio can see it.
Click the Cancel link if you want to abort your changes.
4.2.3.14.4. Confirm a statement and add a review comment
You may see a pre-set statement and also have the ability to add your own comment. If that is the case, you cannot tick the box next to the pre-set statement. Your comment is the confirmation of that statement.
Confirm a statement and add a review comment to the portfolio completion page
The pre-set statement is visible to you.
Write your comment in to the text box. You can use formatting options.
Click the Save draft button to save your comment as draft if you haven’t finished it yet and want to look it over or complete later on. The portfolio author cannot see that comment.
Click the Publish button to make your comment visible to others once you are finished. The portfolio author and others who have access to the portfolio can see it.
Click the Cancel link if you want to abort your changes.
4.2.3.14.5. Reset a statement
If you need to make a change to a comment that you published or the portfolio author still needs to add some content, you can ask to have your statement reset if the template creator allowed for that.
Request to have a statement reset
As reviewer, click the More options button on the portfolio completion page.
Follow the link Reset statement.
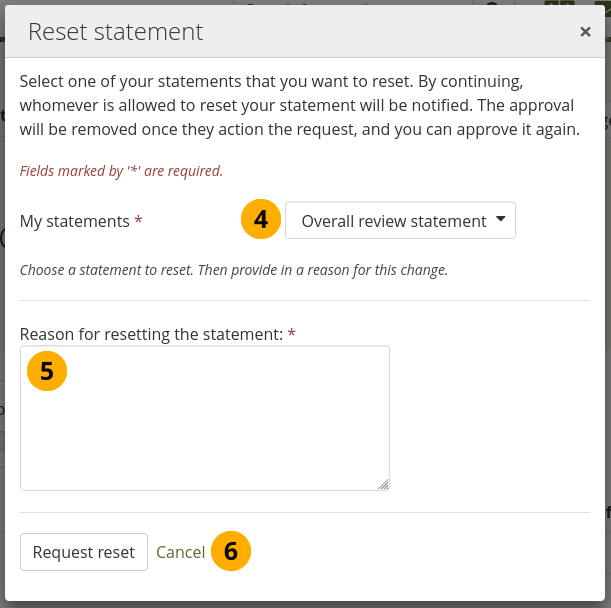
A modal is displayed in which you can request to have one or more statements reset.
My statements: Select the statement you want to have reset. You only see statements to which you have access. If you want to reset more than one statement, fill in the form for each statement.
Reason for resetting the statement: Provide a reason for the person whom you ask to reset your statement. They receive that in a notification.
Click the Request reset button to send the notification.
4.2.3.15. Aktuellste Forenbeiträge
Anzeige der zuvor festgelegten Anzahl aktuellster Forenbeiträge einer Gruppe.
Bemerkung
Sie müssen Mitglied mindestens einer Gruppe sein, um diesen Block verwenden zu können.
Konfigurieren Sie den Neueste Foreneinträge-Block
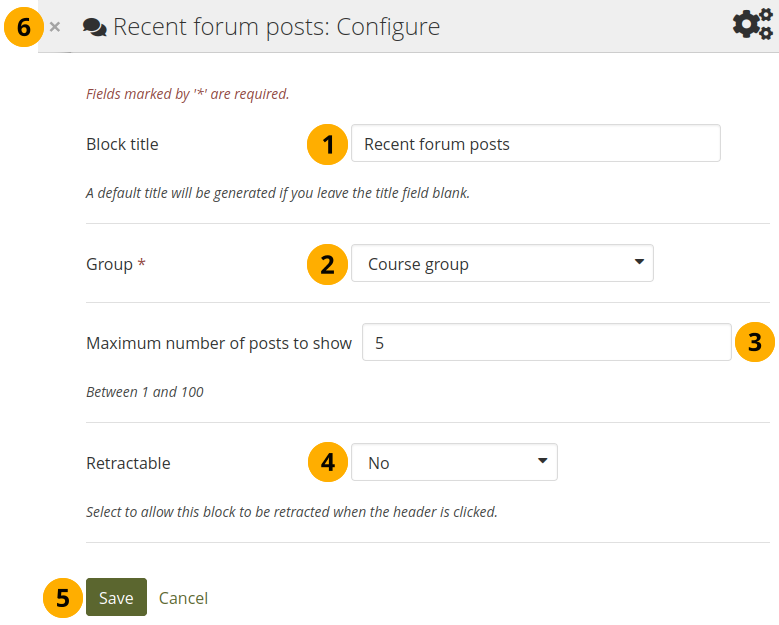
Block title: The title of the block is generated automatically unless you provide a different one. The default title is ‚Recent forum posts‘.
Gruppe: Wählen Sie die Gruppe, deren Forenbeiträge Sie anzeigen lassen wollen.
Maximale Anzahl der angezeigten Beiträge: Legen Sie fest wie viele Beiträge angezeigt werden sollen. Der Standardwert ist ‚5‘. Sie können bis zu ‚100‘ einstellen.
Retractable: Choose whether you want to allow viewers to reduce the block to its heading on a page or see just the heading only automatically. The options are:
Nein: Der Block und dessen Inhalt wird immer angezeigt.
Yes: Allow viewers to reduce the block to just the heading by clicking the Retractable icon .
Automatically retract: Only the heading of the block is visible, and the viewer can click the Retracted icon to view its content.
Click the Save button to accept your changes, or click Cancel to leave the block’s content as it is. Remove is shown only when you place the block into the page for the first time.
You can also click the Close button in the top left-hand corner of the modal window to either remove a newly created block before it is being saved or to cancel any changes and leave the block’s content as it is.
4.2.3.16. Sign-off
Portfolio authors can sign off a page, and a manager can verify it.
The sign-off and verification process allows for a visual indicator on a portfolio page showing whether the page has been finished and whether a manager has verified it before it can go for the final assessment. The verification by a manager is optional.
4.2.3.16.1. Set up a page for sign-off and verification
Configure the Sign-off block
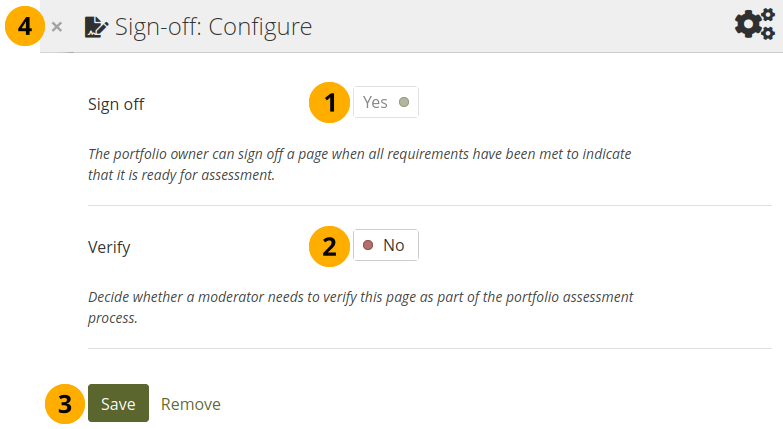
Sign off: A sign-off by the portfolio author is always required.
Verify: Give a person with the ‚Manager‘ permission the opportunity to verify a page and state that fact to carry it one step further in the assessment. Page content will not be locked when the verification has been made.
Bemerkung
The manager cannot revoke the verification. This can only be done by the portfolio author in form of revoking the sign-off for the page.
You cannot set a block title because the block is always put into the top right-hand corner of a page right below the page title without a block title.
4.2.3.16.2. Set up a manager for verification
You can give someone the manager permissions on the Edit access screen of your portfolio page to allow them to verify your portfolio.
Give someone manager permissions
In the Share with drop-down menu, select ‚Person‘ under ‚Search for…‘.
In the second drop-down menu that becomes available, type the name of the person who shall be the manager and select them.
In the third drop-down menu, select the ‚Manager‘ option. You can also select the ‚Peer and manager‘ option if the manager is also the peer and can write a peer assessment.
Click the Save button to keep your selection or click the Cancel link to abort your changes.
4.2.3.16.3. Sign off a page
When you have a sign-off block on your page and you view it, you can see the sign-off and verification options below the page heading to the right.
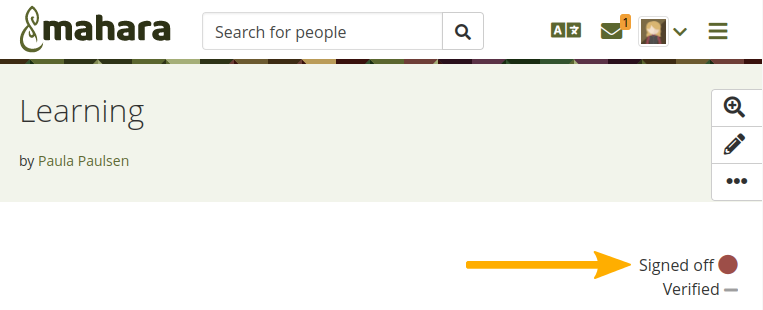
View the sign-off as portfolio author
When you are ready to sign off your page, you can click the red dot icon , and it will turn into a green tick icon to indicate that the page has been signed off. In addition, the Info icon is displayed where additional information about the sign-off and verification can be viewed.
If the page also needs a verification, your manager can now perform it.
4.2.3.16.4. Verify a page
As manager, you can see the sign-off and verification options below the page heading to the right. You can only tick the verification option.
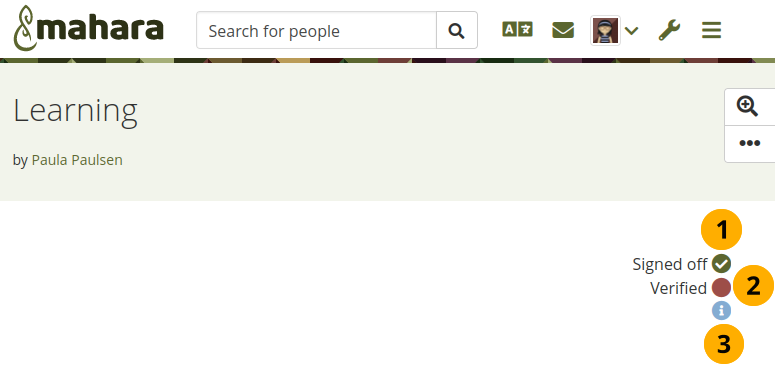
Verify a page as manager
You see the green tick icon when a page has been signed off.
When you are ready to verify a page that allows for verification, you can click the red dot icon , and it will turn into a green tick icon to indicate that the page has been verified.
Bemerkung
As manager, you cannot revoke the verification. Only the portfolio author can do so by revoking the sign-off.
You can click the Info icon to find out when the portfolio author has signed off the page and when the verification had taken place.
4.2.3.16.5. Portfolio completion progress page
The Portfolio completion progress page shows in a quick overview how many sign-offs and verifications have already been done in the portfolio, and what still needs to be completed.
This page is only beneficial when you have the sign-off block on at least two of your portfolio pages.
Bemerkung
An institution or site administrator needs to activate this setting for your institution before you can use it.
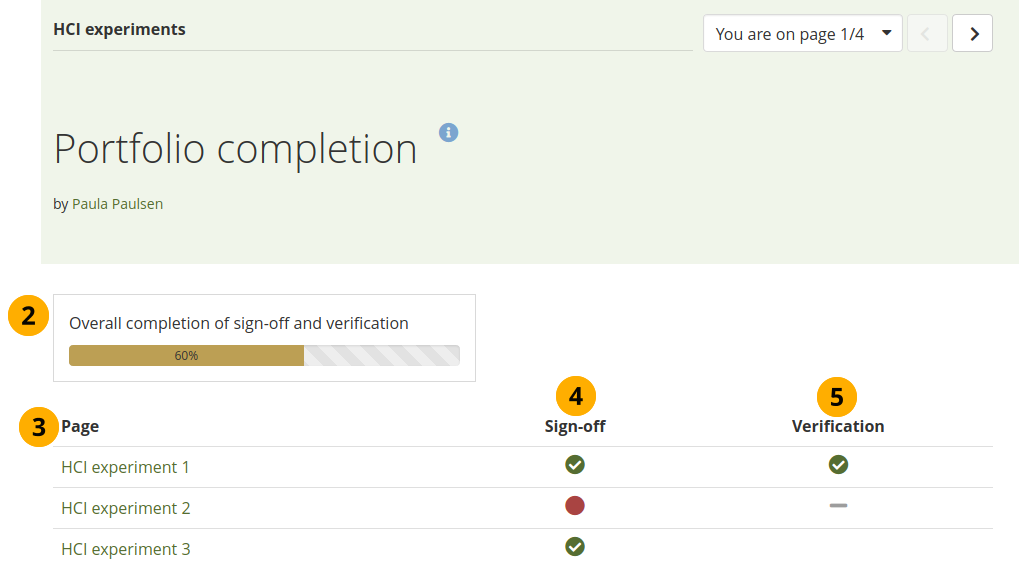
The portfolio completion progress page
Activate the portfolio completion progress page when you create or edit your collection. It will place the page ‚Portfolio completion‘ as first page in your collection.
Bemerkung
If you also add SmartEvidence to your collection, the SmartEvidence page becomes the second page in it.
Overall completion of sign-off and verification: The progress bar indicates how many percent of sign-offs and verifications combined have already been completed. If none of the pages require verification, only sign-offs are counted.
Page: Each page that is in the collection is listed and can be clicked.
Sign-off: When a page has been signed off, the icon is changed upon the next page load. As portfolio author, you can also click the sign-off icon here to change its status. It is changed on the page itself as well. There are two statuses:
Green tick icon : The page has been signed off.
Red dot icon : The page is awaiting sign-off.
Verification: Once a page has been signed off and still requires verification, a person who has the ‚Manager‘ or ‚Peer and manager‘ role can verify the page, either by clicking the icon on the portfolio completion progress page or on the portfolio page itself. The following statuses are available in the ‚Verification‘ column:
Green tick icon : The page has been verified.
Red dot icon : The page is awaiting verification.
Grey line icon : Verification is not yet possible because the page hasn’t been signed off yet.
4.2.3.17. Text
4.2.3.17.1. Add a ‚Text‘ block
Text zu Ihrer Ansicht hinzufügen. Diese Funktion wird benutzt, wenn Sie einen Teil Ihres Texts in einer Ansicht verwenden wollen, die nicht noch einmal benutzt werden soll.
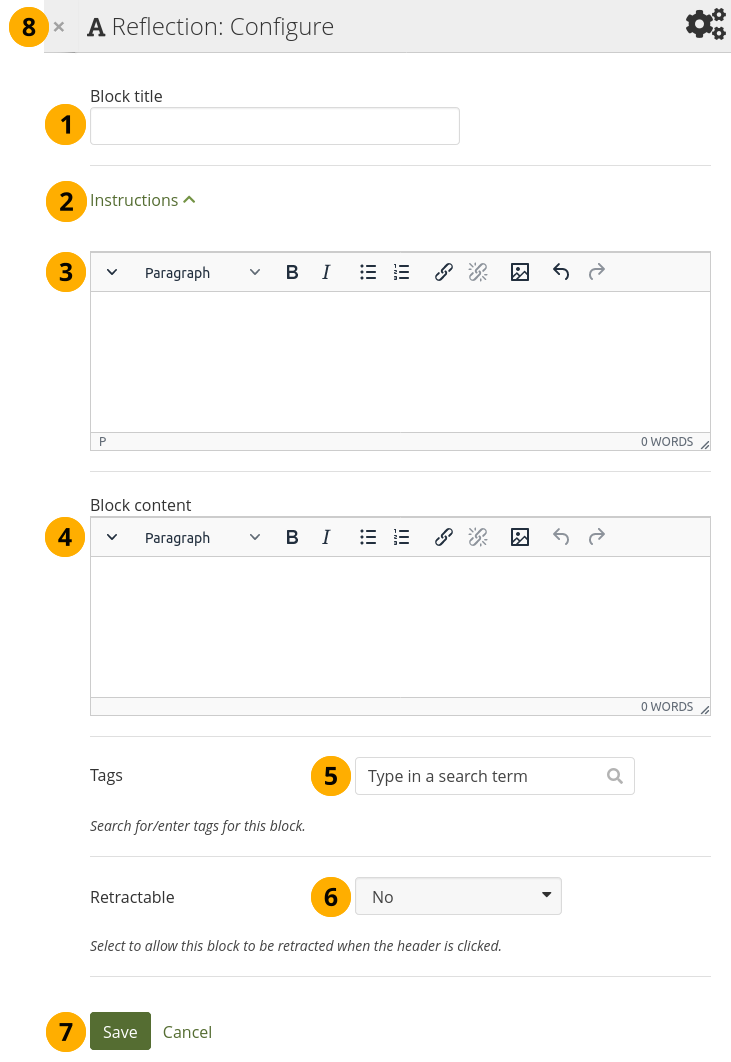
Konfigurieren Sie den Text-Block
Blocktitel: Geben Sie dem Text einen Titel.
Instructions: Click the link to view the text box for the instructions that you can add to this block.
Bemerkung
The Text and Peer assessment blocks are the only ones that can have instructions built into the block at the moment.
You can use full formatting, images, etc. in your instructions.
Block content: Write your text. You can include full formatting.
Tags: Enter tags for this block to find this content more easily. The tags are displayed as part of the page tags.
Retractable: Choose whether you want to allow viewers to reduce the block to its heading on a page or see just the heading only automatically. The options are:
Nein: Der Block und dessen Inhalt wird immer angezeigt.
Yes: Allow viewers to reduce the block to just the heading by clicking the Retractable icon .
Automatically retract: Only the heading of the block is visible, and the viewer can click the Retracted icon to view its content.
Click the Save button to accept your changes, or click Cancel to leave the block’s content as it is. Remove is shown only when you place the block into the page for the first time.
You can also click the Close button in the top left-hand corner of the modal window to either remove a newly created block before it is being saved or to cancel any changes and leave the block’s content as it is.
Siehe auch
Please refer to the section ‚Insert an image into text‘ for more information on adding an image to the text block.
4.2.3.17.2. View the ‚Text‘ block

View a Text block on the page
Click Instructions to expand or collapse the instructions for this block.
The instructions are displayed in a grey box to differentiate them from the regular text.
View the content of the block.
4.2.3.17.3. Quick edit a ‚Text‘ block
The Quick edit functionality allows you to update an existing Text block directly from the page without needing to enter the Edit mode of the page. This helps prevent accidental size changes or deletions of that block and allows you to focus on updating the text.
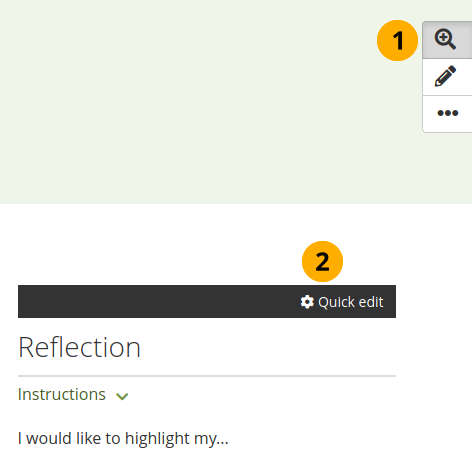
Use the ‚Quick edit‘ functionality on the Text block
Click the Details button .
The Quick edit bar
is displayed.Click the Quick edit bar to display the block configuration screen. You can make any changes that you wish to make.
4.2.3.18. Meine beobachteten Ansichten
The Watched pages block displays the pages that are either on your watchlist or belong to your friends and you have access to them.
Bemerkung
You can only use this block on your dashboard.
4.2.3.18.1. Pages on my watchlist
If you want pages to be displayed, you need to add them to it first by clicking the More options button on a page and then add the page to your watchlist.
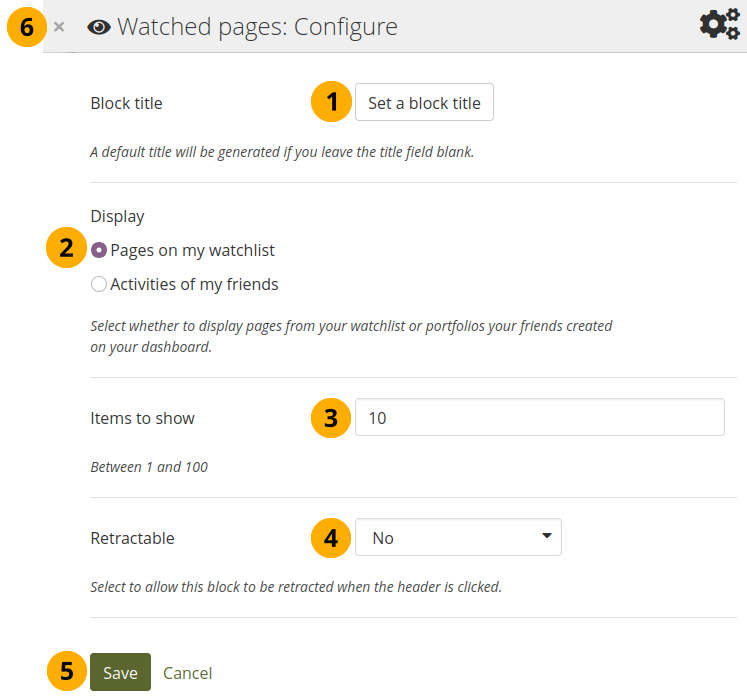
Configure the Watched pages block for your watchlist
Block title: The automatic title for this block is ‚Watched pages‘. You can set another one if you wish.
Select to display Pages on my watchlist.
Anzuzeigende Werte: Legen Sie fest wie viele Ansichten in Ihrem Dashboard angezeigt werden sollen. Wählen Sie zwischen 1 und 100.
Retractable: Choose whether you want to allow viewers to reduce the block to its heading on a page or see just the heading without the block content automatically. The options are:
Nein: Der Block und dessen Inhalt wird immer angezeigt.
Yes: Allow viewers to reduce the block to just the heading by clicking the Retractable icon .
Automatically retract: Only the heading of the block is visible, and the viewer can click the Retracted icon to view its content.
Klicken Sie auf den Speichern-Button, um die Änderungen zu sichern. Mit Abbrechen bleibt alles unverändert. Der Entfernen-Button wird nur beim erstmaligen Einbinden in eine Ansicht gezeigt.
Sie können auch auf den Schließen-Button rechts oben klicken, um einen neu erstellten Block zu entfernen bevor er gespeichert wird oder alle Änderungen rückgängig zu machen und den Inhalt zu belassen wie er zuvor war.
View your watchlist on your dashboard.
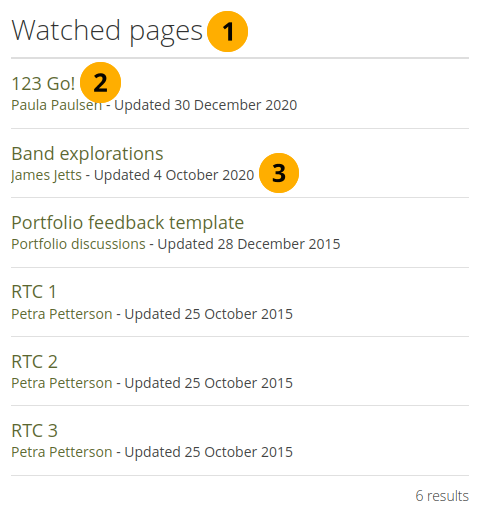
View the Watched pages block
Titel des Blocks.
Bemerkung
If you chose a retractable option, you can click on the title or anywhere in the title space to change the block’s behaviour.
Title of the watched page. You can click the link to be taken to her.
View the page owner and the date when the page was last updated. This is in particular important information when all your watched pages have the same or a similar title.
4.2.3.18.2. Activities of my friends
If you have friends on Mahara, then you can use this block to display their portfolios when they have shared them with you:
personally
as a member of a group
as an institution member
as a registered person
publicly
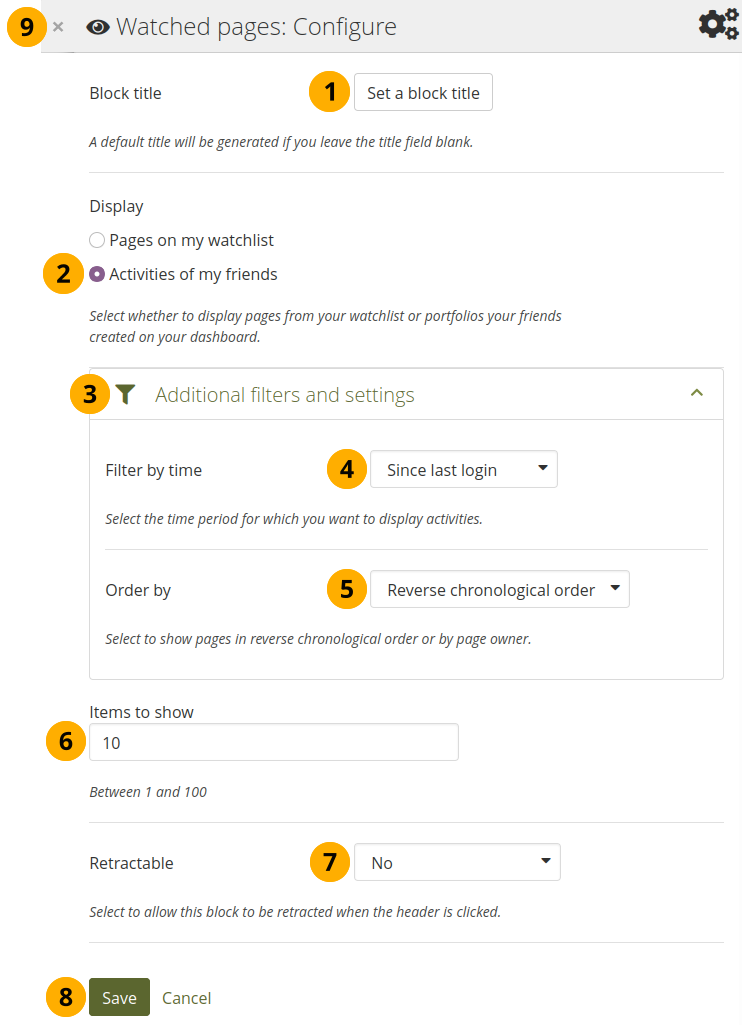
Configure the Watched pages block for your friend activity
Block title: The automatic title for this block is ‚Watched pages‘. You can set another one if you wish.
Select to display Activities of my friends.
Click Additional filters and settings to make additional changes.
Filter by time: You can select the time period over which you want to see changes. Your options are:
Last week
Last month
Last 2 months
Last 3 months
Last 6 months
Last year
Since last login
Order by: Decide how the portfolios are to be ordered. Your choices are:
Reverse chronological order: Display the latest changes first
Page owner: Display all pages by their owner with the one having made changes last first.
Anzuzeigende Werte: Legen Sie fest wie viele Ansichten in Ihrem Dashboard angezeigt werden sollen. Wählen Sie zwischen 1 und 100.
Retractable: Choose whether you want to allow viewers to reduce the block to its heading on a page or see just the heading without the block content automatically. The options are:
Nein: Der Block und dessen Inhalt wird immer angezeigt.
Yes: Allow viewers to reduce the block to just the heading by clicking the Retractable icon .
Automatically retract: Only the heading of the block is visible, and the viewer can click the Retracted icon to view its content.
Klicken Sie auf den Speichern-Button, um die Änderungen zu sichern. Mit Abbrechen bleibt alles unverändert. Der Entfernen-Button wird nur beim erstmaligen Einbinden in eine Ansicht gezeigt.
Sie können auch auf den Schließen-Button rechts oben klicken, um einen neu erstellten Block zu entfernen bevor er gespeichert wird oder alle Änderungen rückgängig zu machen und den Inhalt zu belassen wie er zuvor war.
4.2.3.2. Kommentare
Sie können den Kommentarbereich vom Ende einer Seite an eine andere Stelle auf Ihrer Seite verschieben, um ihn besser in Ihren Seiteninhalt zu integrieren. Bitte beachten Sie Folgendes:
Für diesen Block gibt es keine Konfigurationseinstellungen
Sie sehen Kommentare nur, wenn Sie eine Seite anzeigen, jedoch nicht im Bearbeitungsmodus.
Sie können auf einer Seite nur einen Kommentarblock platzieren.
Comments for individual artefacts is still placed at the bottom of the artefact details pages because you cannot put a block onto these pages.
You can move the block like any other block on your page. If you delete the block, the comments are displayed at the bottom of the page again.
Wie der Feedback-Block in einer Ansicht aussieht
You can choose the block title.
When you click the Add comment link, a modal window is displayed in which you can enter your comments with all the usual functionality.