4.2.1. Dateien, Bilder und Video
Diese internen Artefakte von Mahara können angezeigt werden:
Links auf hochgeladene Dateien
Verzeichnisse/Ordner mit Dateien
Bilder
Audio- und Videodateien einbetten
If you are on a mobile device and select to upload a file, you can take a photo or make a video or audio recording (Android only for audio) directly.
4.2.1.1. Eingebettete Medien
Display an embedded video or audio file from your uploaded files. Mahara comes with the Video.js media player that allows for the display of a number of file formats without having another player installed on the device.
Bemerkung
The site administrator must allow media formats. Some of them can be displayed directly within Mahara while others need additional software installed on a device. See the list of allowed media formats.
Videos placed onto a page in this block scale to the width of their column. They also scale automatically when your browser space gets smaller.
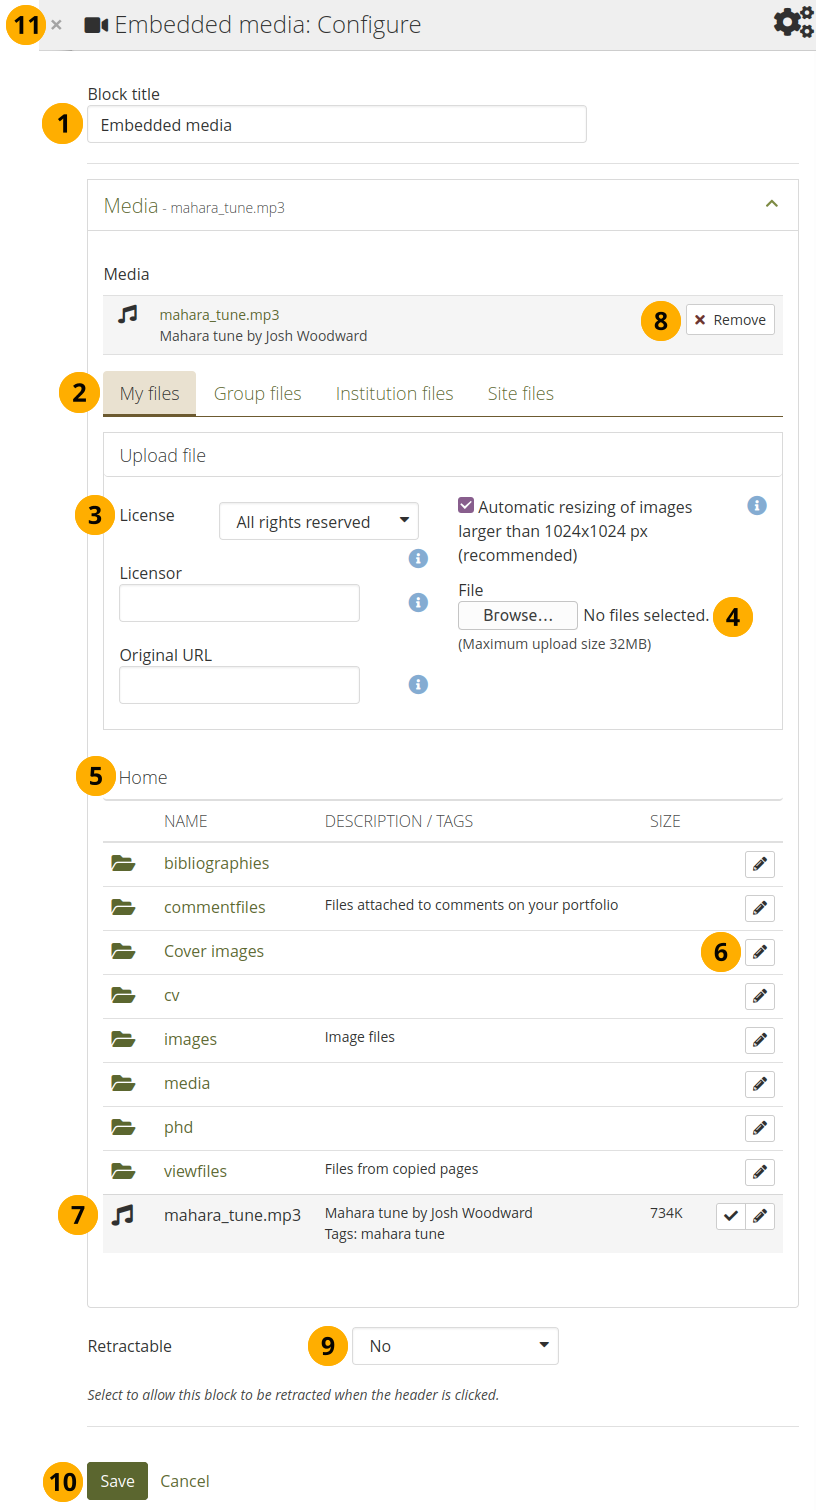
Konfigurieren Sie den Eingebettete Medien-Block
Blocktitel: Vergeben Sie einen Titel für Ihren Block
Dateibereich: Wählen Sie aus welchem Dateibereich Sie eine Mediendatei auswählen wollen.
Meine Dateien: Sie sehen alle Ordner/Verzeichnissse und Dateien, die Sie dort abgelegt haben.
Gruppendateien: Sie sehen alle Verzeichnisse und Dateien, die zur Veröffentlichung freigegeben sind.
Institutionsdateien: Als Institutionsadministrator sehen Sie alle Institutionsverzeichnisse und Dateien.
Site-Dateien: Als Site-Administrator sehen Sie alle Verzeichnisse und Dateien auf Systemebene. Anderenfalls sehen Sie nur Dateien aus dem öffentlich-Ordner auf Site-Ebene.
License information: You see these fields if the site administrator turned on license metadata. Additionally, if you are in an institution, your institution administrator may require you to provide a license.
Lizenzinformationen: Ihre Standardlizenz wird angezeigt. Ihre Voreinstellungen können Sie in den Accounteinstellungen festlegen. Sie können für jedes einzelne Artefakt einen andere Lizenz festlegen.
Lizenzgeber: Wenn Sie eine Datei verwenden, die von einer anderen Person stammt, können Sie hier den Namen des Urhebers hinterlegen.
Original URL: Wenn Sie eine Datei verwenden, die von einer anderen Person stammt, können Sie hier einen Link zur Internetseite von der die Datei stammt hinterlegen.
File: You do not have to go back to your Files area in Create in order to upload a file. You can do so directly from this screen.
Ordnerpfad: Die sog. Brotkrumen-Navigation zeigt Ihnen in welchem Ordner Sie sich gerade befinden.
Click the Edit button to change any component of a folder or file, i.e. its name, description and tags. If you have a folder or file included in a page that you submitted for feedback, you will not be able to edit them.
Bemerkung
You can still select files that have been submitted in another portfolio page.
Click into the row that contains the file you wish to display in the block to select it or click the Select button .
Warnung
When you place group, institution, or site files into a page, beware that these files may not be available at some point any more when the person in charge deletes them.
Click Remove if you want to revert your selection.
Retractable: Choose whether you want to allow viewers to reduce the block to its heading on a page or see just the heading only automatically. The options are:
Nein: Der Block und dessen Inhalt wird immer angezeigt.
Yes: Allow viewers to reduce the block to just the heading by clicking the Retractable icon .
Automatically retract: Only the heading of the block is visible, and the viewer can click the Retracted icon to view its content.
Click the Save button to accept your changes, or click Cancel to leave the block’s content as it is. Remove is shown only when you place the block into the page for the first time.
You can also click the Close button in the top left-hand corner of the modal window to either remove a newly created block before it is being saved or to cancel any changes and leave the block’s content as it is.
Bemerkung
Nur Dateien, deren Typ zugelassen ist, können angezeigt werden. Bei mp4-Dateien wird der H.264mp4-Typ unterstützt. Sollten mp4-Videos nicht angezeigt werden, prüfen Sie den Codec Ihres Video.
iOS devices can even be trickier as these devices may only recognize the MPEG4 ‚Baseline‘ profile rather than the ‚High‘ profile. You can read the Apple specifications and convert a video if needed using Handbrake. Newer iOS devices (from the iPhone 5S on) should play ‚High‘ profile videos.
4.2.1.2. Datei(en) zum Download
Dateien auswählen, die Betrachter Ihres Portfolios herunterladen dürfen.
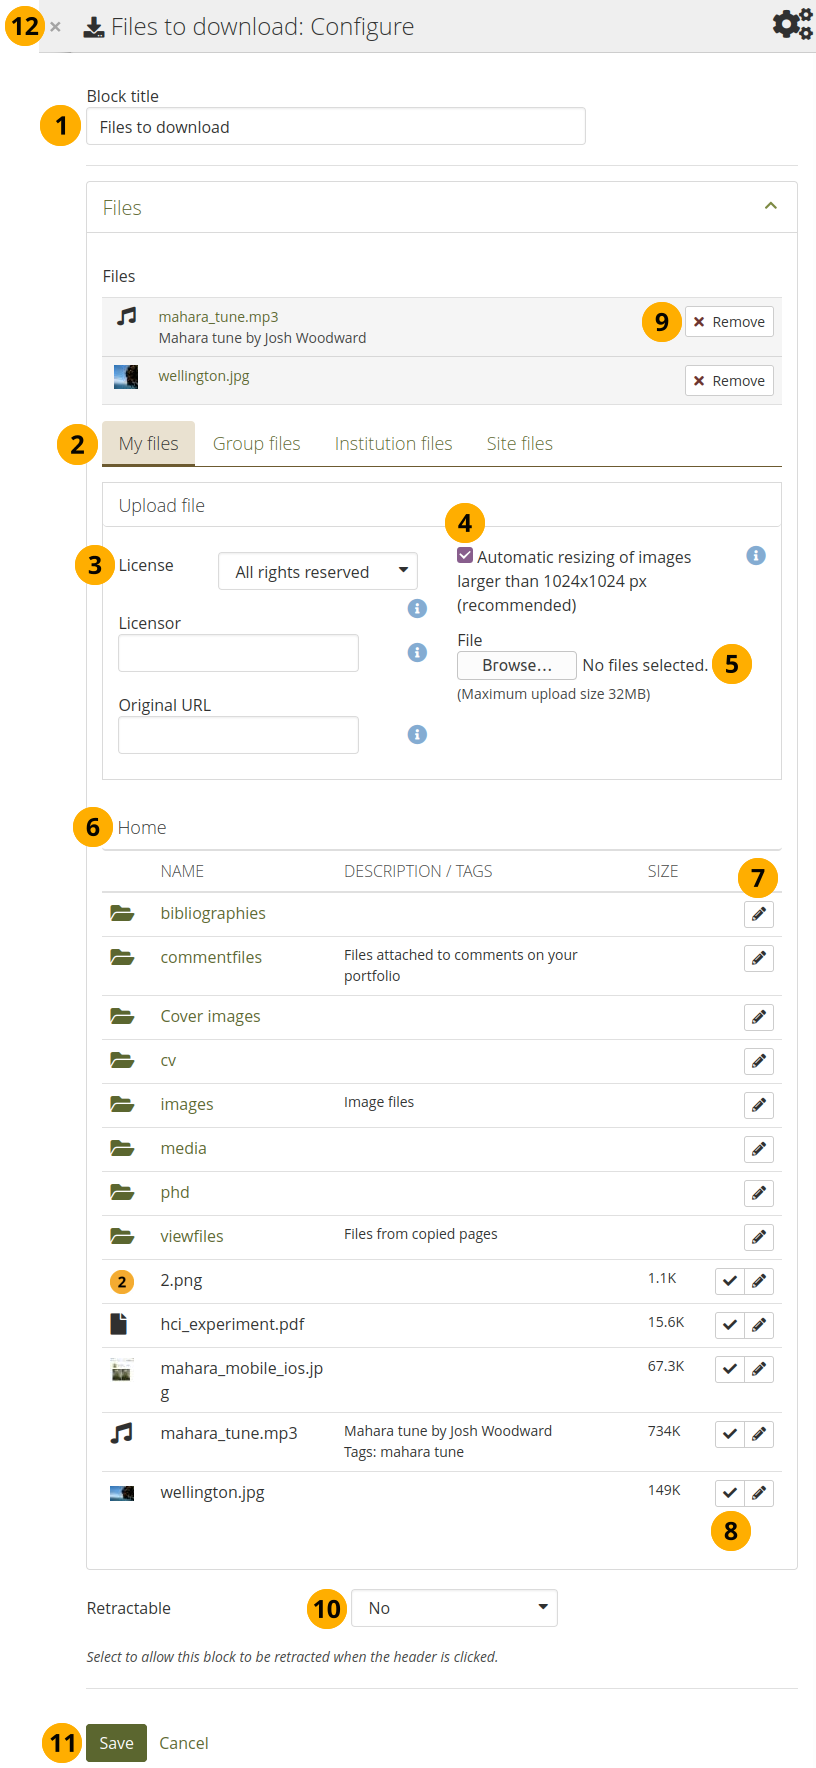
Konfigurieren Sie den Datei(en) herunterladen-Block
Blocktitel: Wählen Sie einen Titel für den Dateienblock.
Dateibereich: Wählen Sie aus welchem Dateibereich Sie eine Dateie auswählen wollen:
Meine Dateien: Sie sehen alle Ordner/Verzeichnissse und Dateien, die Sie dort abgelegt haben.
Gruppendateien: Sie sehen alle Verzeichnisse und Dateien, die zur Veröffentlichung freigegeben sind.
Institutionsdateien: Als Institutionsadministrator sehen Sie alle Institutionsverzeichnisse und Dateien.
Site-Dateien: Als Site-Administrator sehen Sie alle Verzeichnisse und Dateien auf Systemebene. Anderenfalls sehen Sie nur Dateien aus dem öffentlich-Ordner auf Site-Ebene.
License information: You see these fields if the site administrator turned on license metadata. Additionally, if you are in an institution, your institution administrator may require you to provide a license.
Lizenzinformationen: Ihre Standardlizenz wird angezeigt. Ihre Voreinstellungen können Sie in den Accounteinstellungen festlegen. Sie können für jedes einzelne Artefakt einen andere Lizenz festlegen.
Lizenzgeber: Wenn Sie eine Datei verwenden, die von einer anderen Person stammt, können Sie hier den Namen des Urhebers hinterlegen.
Original URL: Wenn Sie eine Datei verwenden, die von einer anderen Person stammt, können Sie hier einen Link zur Internetseite von der die Datei stammt hinterlegen.
Wenn der Siteadministrator die Bildgrößenanpassung aktiviert hat, können Sie festlegen ob ein von Ihnen hochgeladenes Bild in der Größe angepasst wird, sofern es größer als vorabdefiniert ist. Mit der Option können Sie Speicherplatz in Ihrer persönlichen Dateiablage einsparen.
File: You do not have to go back to your Files area in Create in order to upload a file. You can do so directly from this screen.
Ordnerpfad: Die sog. Brotkrumen-Navigation zeigt Ihnen in welchem Ordner Sie sich gerade befinden.
Click the Edit button to change any component of a folder or file, i.e. its name, description and tags. If you have a folder or file included in a page that you submitted for feedback, you will not be able to edit them.
Bemerkung
You can still select files that have been submitted in another portfolio page.
Click into the row that contains the file you wish to display in the block to select it or click the Select button .
Warnung
When you place group, institution, or site files into a page, beware that these files may not be available at some point any more when the person in charge deletes them.
Click Remove if you want to revert your selection.
Retractable: Choose whether you want to allow viewers to reduce the block to its heading on a page or see just the heading only automatically. The options are:
Nein: Der Block und dessen Inhalt wird immer angezeigt.
Yes: Allow viewers to reduce the block to just the heading by clicking the Retractable icon .
Automatically retract: Only the heading of the block is visible, and the viewer can click the Retracted icon to view its content.
Click the Save button to accept your changes, or click Cancel to leave the block’s content as it is. Remove is shown only when you place the block into the page for the first time.
You can also click the Close button in the top left-hand corner of the modal window to either remove a newly created block before it is being saved or to cancel any changes and leave the block’s content as it is.
Bemerkung
Sie können Dateien nachdem Sie sie eingefügt haben nicht anders anordnen. Sie müssen sie dazu entfernen und in der richtigen Reihenfolge erneut einbinden.
When the block is placed on the portfolio page, you can view more information or download the files.
Dateiname
Dateibeschreibung
Größe
Datum des Uploads
ein Link zu weiteren Details

Details zu Dateien, die heruntergeladen werden können.
View information about the file:
Dateiname
Dateibeschreibung
Click the file name to see metadata about the file, e.g. upload date, owner, tags, and comments if they are allowed.
Click the download icon to download the file. When you hover over it, you see the size of the file.
When you click the file name, a modal slides out with more metadata.
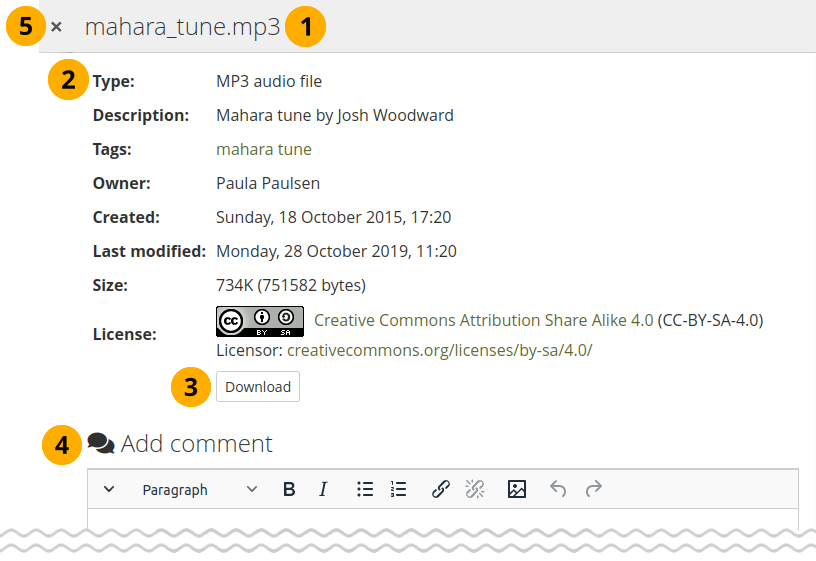
Weitere Details zu einer Datei, die heruntergeladen werden kann.
Der Name der Datei wird angezeigt.
Weitere Metadaten werden für die Datei angezeigt:
Dateityp
Beschreibung
Schlagworte
Nutzer/in
Erstellungsdatum
Datum der letzten Änderung
Größe
license (if license information is turned on by the site administrator)
Click the Download button to download the file to your computer.
If the owner of the file allowed comments, you can comment directly on the file.
You can click the Close button in the top left-hand corner of the modal window to close it.
4.2.1.3. Ordner
Wählen Sie einen Ordner, um alle Dateien darin als Link in Ihrer Ansicht anzuzeigen.
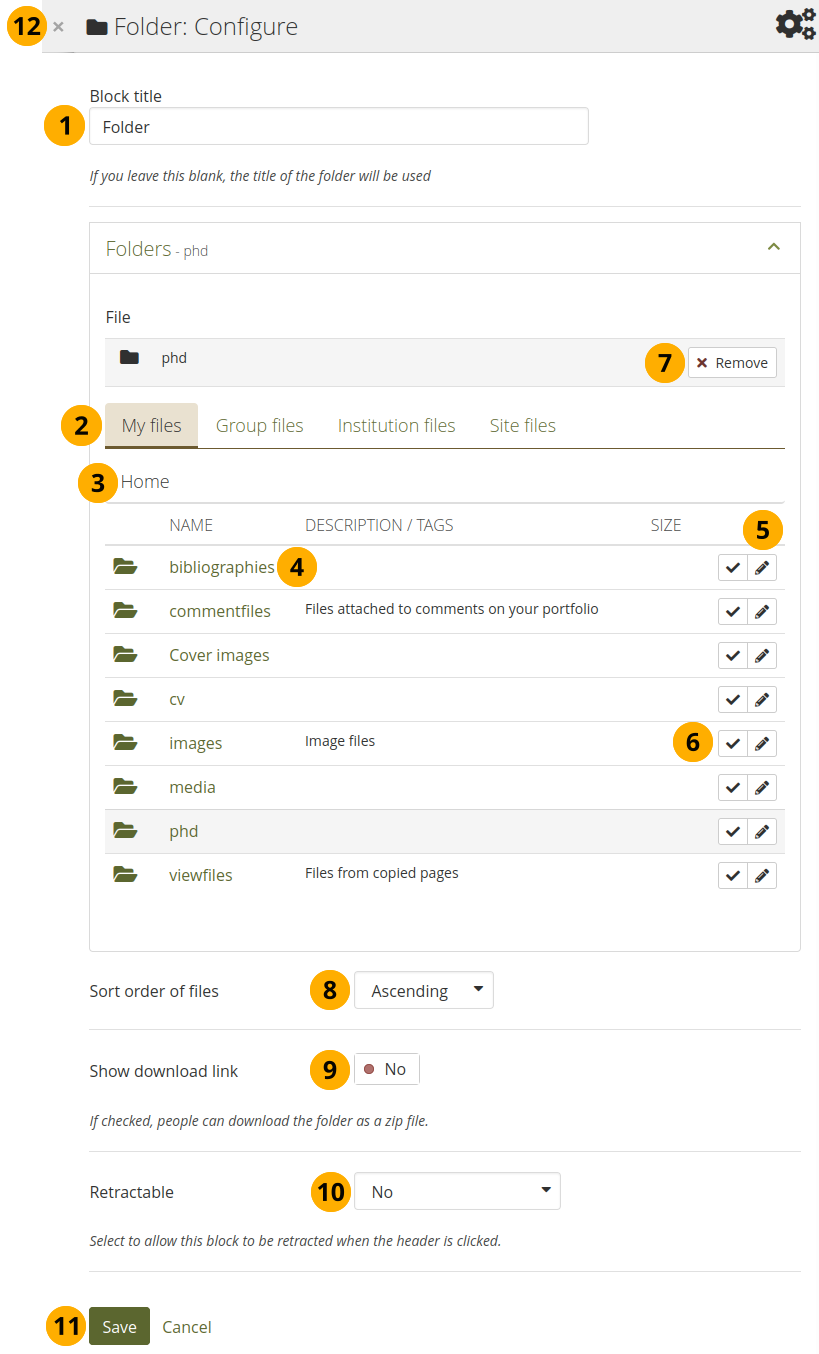
Konfigurieren Sie den Ordner-Block
Blocktitel: Wenn Sie für diesen Block keinen Titel angeben, wird der Name des Verzeichnisses eingesetzt.
Dateibereich: Legen Sie fest aus welchem Dateibereich Sie einen Ordner auswählen möchten:
Meine Dateien: Sie sehen alle Ordner/Verzeichnissse und Dateien, die Sie dort abgelegt haben.
Gruppendateien: Sie sehen alle Verzeichnisse und Dateien, die zur Veröffentlichung freigegeben sind.
Institutionsdateien: Als Institutionsadministrator sehen Sie alle Institutionsverzeichnisse und Dateien.
Site-Dateien: Als Site-Administrator sehen Sie alle Verzeichnisse und Dateien auf Systemebene. Anderenfalls sehen Sie nur Dateien aus dem öffentlich-Ordner auf Site-Ebene.
Ordnerpfad: Die sog. Brotkrumen-Navigation zeigt Ihnen in welchem Ordner Sie sich gerade befinden.
Click the folder name if you want to reach a sub folder.
You can edit any component of the folder, i.e. its name, description and tags by clicking the Edit button .
Click into the row that contains the folder you wish to display in the block to select it or click the Select button .
Bemerkung
Sie können ebenfalls Ordner auswählen, die auf anderen Portfolio-Ansichten bereitgestellt wurden.
Click Remove if you wish to revert your choice.
Sort order of files: Decide on the sort order of files in the block when they are displayed on the page. You can choose between:
Aufsteigend
Absteigend
Siehe auch
Site administrators decide on the default sort order of content within folder in the Blocktype: File / folder settings.
Show download link: Switch this option to ‚Yes‘ if you wish to allow the viewers of your page to download the folder contents as zip file.
Siehe auch
Site administrators decide in the Blocktype: File / folder settings whether viewers are allowed to display the download link or not.
Retractable: Choose whether you want to allow viewers to reduce the block to its heading on a page or see just the heading only automatically. The options are:
Nein: Der Block und dessen Inhalt wird immer angezeigt.
Yes: Allow viewers to reduce the block to just the heading by clicking the Retractable icon .
Automatically retract: Only the heading of the block is visible, and the viewer can click the Retracted icon to view its content.
Click the Save button to accept your changes, or click Cancel to leave the block’s content as it is. Remove is shown only when you place the block into the page for the first time.
You can also click the Close button in the top left-hand corner of the modal window to either remove a newly created block before it is being saved or to cancel any changes and leave the block’s content as it is.
Warnung
When you place a folder with group, institution, or site files into a page, beware that these files may not be available at some point any more when the person in charge deletes them.
You can see information about the folder as well as the files contained within it when the block is placed on a page.

‚Folder‘ block on a page
Block title.
Click the file name to see metadata about the file, e.g. upload date, owner, tags, and comments if they are allowed.
Bemerkung
If you click the name of a folder within the displayed folder, the modal displays the files contained within that folder. You can then click the name of the file to be taken to its metadata.
Click the download icon to download the file. When you hover over it, you see the size of the file.
Click the Download folder content as zip file link to download all files in one go to your computer.
4.2.1.4. Bild
Anzeige eines einzelnen Bilds in einem Block

Konfigurieren Sie den Bilder-Block
Blocktitel: Vergeben Sie einen Titel für Ihren Block
Dateibereich: Legen Sie fest aus welchem Dateibereich Sie ein Bild auswählen möchten:
Meine Dateien: Sie sehen alle Ordner/Verzeichnissse und Dateien, die Sie dort abgelegt haben.
Gruppendateien: Sie sehen alle Verzeichnisse und Dateien, die zur Veröffentlichung freigegeben sind.
Institutionsdateien: Als Institutionsadministrator sehen Sie alle Institutionsverzeichnisse und Dateien.
Site-Dateien: Als Site-Administrator sehen Sie alle Verzeichnisse und Dateien auf Systemebene. Anderenfalls sehen Sie nur Dateien aus dem öffentlich-Ordner auf Site-Ebene.
License information: You see these fields if the site administrator turned on license metadata. Additionally, if you are in an institution, your institution administrator may require you to provide a license.
Lizenzinformationen: Ihre Standardlizenz wird angezeigt. Ihre Voreinstellungen können Sie in den Accounteinstellungen festlegen. Sie können für jedes einzelne Artefakt einen andere Lizenz festlegen.
Lizenzgeber: Wenn Sie eine Datei verwenden, die von einer anderen Person stammt, können Sie hier den Namen des Urhebers hinterlegen.
Original URL: Wenn Sie eine Datei verwenden, die von einer anderen Person stammt, können Sie hier einen Link zur Internetseite von der die Datei stammt hinterlegen.
Wenn der Siteadministrator die Bildgrößenanpassung aktiviert hat, können Sie festlegen ob ein von Ihnen hochgeladenes Bild in der Größe angepasst wird, sofern es größer als vorabdefiniert ist. Mit der Option können Sie Speicherplatz in Ihrer persönlichen Dateiablage einsparen.
File: You do not have to go back to your Files area in Create in order to upload a file. You can do so directly from this screen.
Ordnerpfad: Die sog. Brotkrumen-Navigation zeigt Ihnen in welchem Ordner Sie sich gerade befinden.
Click the Edit button to change any component of a folder or file, i.e. its name, description, rotation, and tags. If you have a folder or file included in a page that you submitted for feedback, you will not be able to edit them.
Bemerkung
You can still select files that have been submitted in another portfolio page.
If you rotate an image via this dialogue, it will be rotated in all other places where it is used as well.
Click into the row that contains the file you wish to display in the block to select it or click the Select button . You only see image files that you are allowed to use in the block.
Warnung
When you place group, institution, or site files into a page, beware that these files may not be available at some point any more when the person in charge deletes them.
Click Remove if you want to revert your selection.
Show description: Set the switch to ‚Yes‘ if you wish to display the description of your photo. It could contain the source of it for example.
Breite: Wählen Sie die Breite (in Pixeln) für Ihr Bild. Wenn Sie keinen Wert eingeben, wird das Bild in der Breite des Blocks angezeigt.
Retractable: Choose whether you want to allow viewers to reduce the block to its heading on a page or see just the heading only automatically. The options are:
Nein: Der Block und dessen Inhalt wird immer angezeigt.
Yes: Allow viewers to reduce the block to just the heading by clicking the Retractable icon .
Automatically retract: Only the heading of the block is visible, and the viewer can click the Retracted icon to view its content.
Click the Save button to accept your changes, or click Cancel to leave the block’s content as it is. Remove is shown only when you place the block into the page for the first time.
You can also click the Close button in the top left-hand corner of the modal window to either remove a newly created block before it is being saved or to cancel any changes and leave the block’s content as it is.
4.2.1.5. Bildgalerie
Wählen Sie einen Ordner mit Bildern oder einzelne Bilder, die in einer Galerie angezeigt werden sollen oder betten Sie eine externe Bildgalerie ein.
4.2.1.5.1. Bildgalerie mit hochgeladenen Bildern
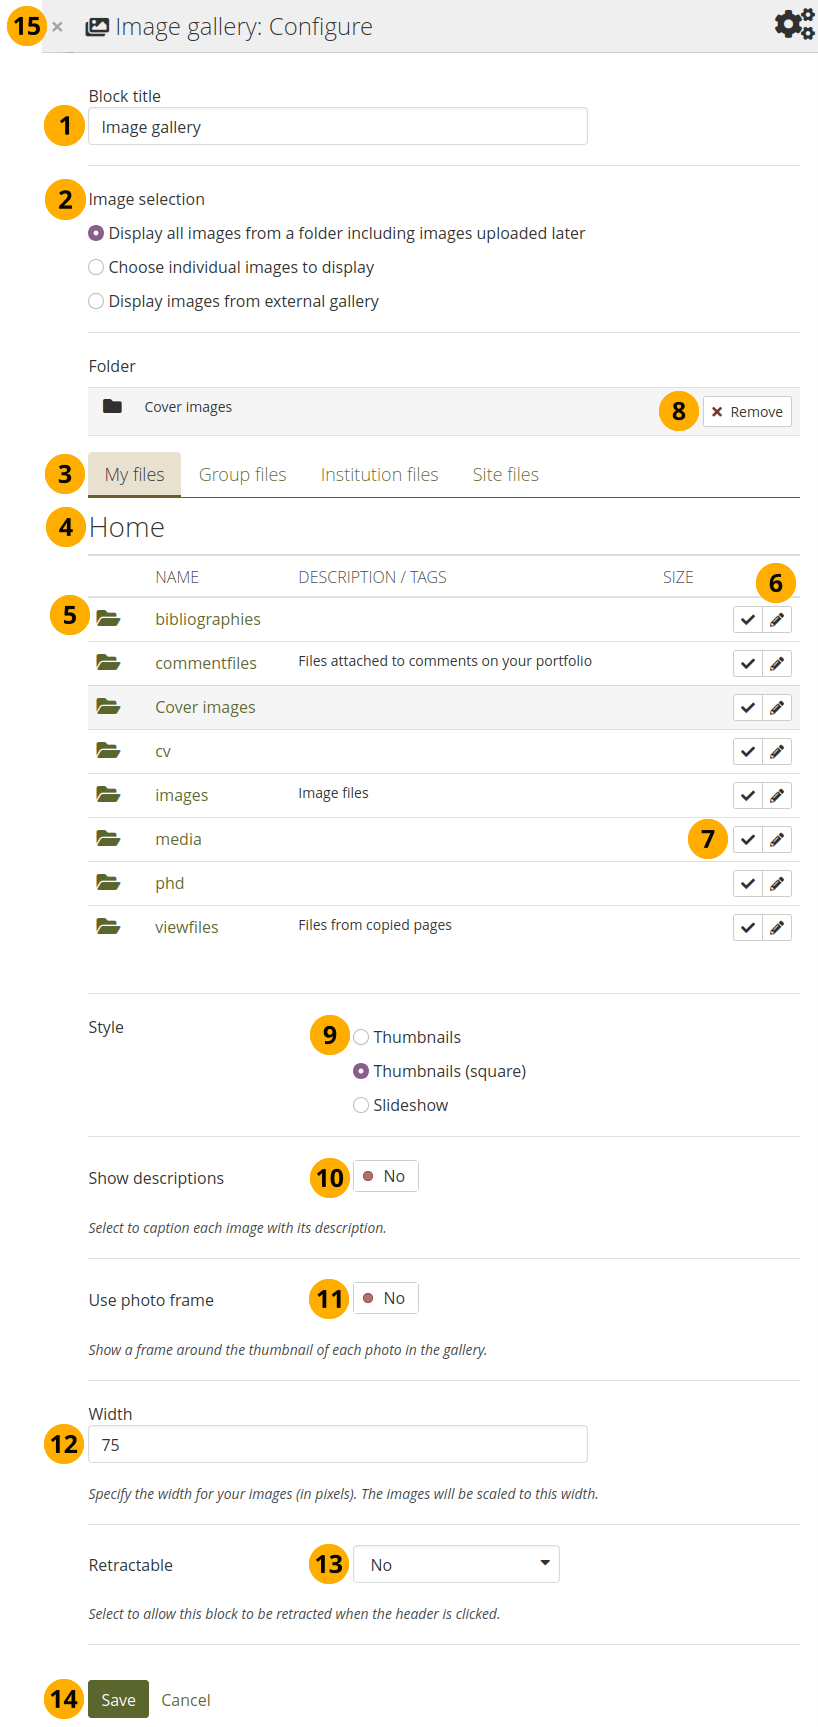
Konfigurieren Sie den Bildgalerie-Block mit internen Bildern
Blocktitel: Wählen Sie einen Titel für Ihren Bildgalerieblock.
Image selection: You can choose to display all images from a specific folder or you can select the images individually. See embedding images from an external gallery for that option.
Bemerkung
If you choose to display an image gallery based on a folder and you rename images within that folder, they will be reordered accordingly.
Dateibereich: Legen Sie fest aus welchem Dateibereich Sie ein Bild auswählen möchten:
Meine Dateien: Sie sehen alle Ordner/Verzeichnissse und Dateien, die Sie dort abgelegt haben.
Gruppendateien: Sie sehen alle Verzeichnisse und Dateien, die zur Veröffentlichung freigegeben sind.
Institutionsdateien: Als Institutionsadministrator sehen Sie alle Institutionsverzeichnisse und Dateien.
Site-Dateien: Als Site-Administrator sehen Sie alle Verzeichnisse und Dateien auf Systemebene. Anderenfalls sehen Sie nur Dateien aus dem öffentlich-Ordner auf Site-Ebene.
Ordnerpfad: Die sog. Brotkrumen-Navigation zeigt Ihnen in welchem Ordner Sie sich gerade befinden.
Click the name of the folder to reach a sub folder.
Click the Edit button to change any component of the folder, i.e. its name, description and tags. If you have a folder or file included in a page that you submitted for feedback, you will not be able to edit the file.
Click into the row that contains the folder or image you wish to display in the block to select it or click the Select button . You only see image files that are allowed to be used in the block. You can also still select folders or files that have been submitted in another portfolio page.
Bemerkung
Wenn Sie einen kompletten Ordner für Ihre Bildgalerie ausgewählt haben, werden neue Bilder, die später in diesen Ordner eingefügt werden, ebenfalls in der Bildgalerie angezeigt werden.
Click Remove if you want to revert your selection.
Style: Decide to show all selected images as thumbnails or as slideshow where you only see one image at a time. If you select the option ‚Thumbnails (square)‘, all your images will be displayed in the same size as thumbnails.
Bemerkung
If you select to display your images in a slideshow, you can navigate all images with the help of the icons Next and Previous . Use the icons First and Last to start or end your slideshow.
Show descriptions: Turn this option on if you want to display the image descriptions in the gallery.
Use photo frame: Using this option will put a frame around each photo.
Breite: Definieren Sie die Breite der Bilder (in Pixeln). Die Bilder werden auf die entsprechende Größe angepasst.
Retractable: Choose whether you want to allow viewers to reduce the block to its heading on a page or see just the heading only automatically. The options are:
Nein: Der Block und dessen Inhalt wird immer angezeigt.
Yes: Allow viewers to reduce the block to just the heading by clicking the Retractable icon .
Automatically retract: Only the heading of the block is visible, and the viewer can click the Retracted icon to view its content.
Click the Save button to accept your changes, or click Cancel to leave the block’s content as it is. Remove is shown only when you place the block into the page for the first time.
You can also click the Close button in the top left-hand corner of the modal window to either remove a newly created block before it is being saved or to cancel any changes and leave the block’s content as it is.
Warnung
When you place group, institution, or site files into a page, beware that these files may not be available at some point any more when the person in charge deletes them.
4.2.1.5.2. Bildgalerie mit externen Bildern
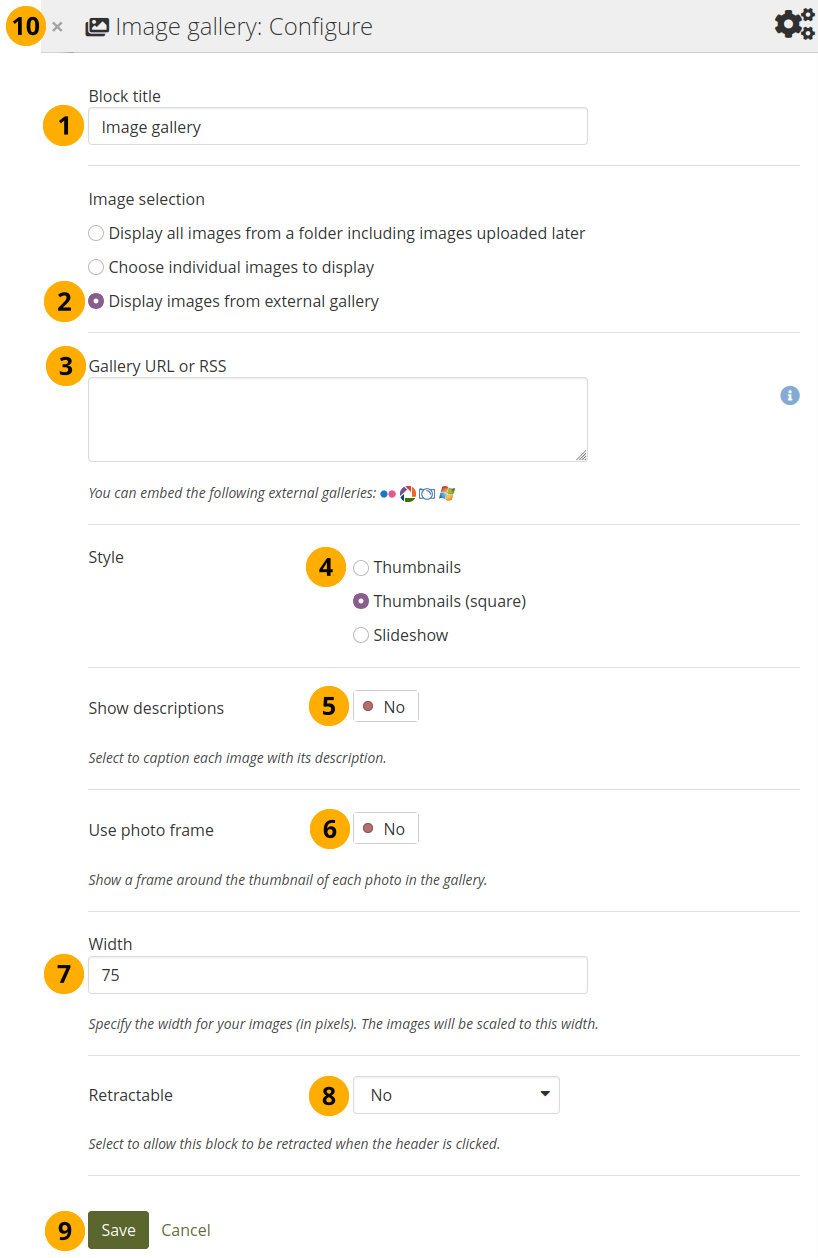
Konfigurieren Sie den Bildergalerie-Block mit externen Bildern
Blocktitel: Wählen Sie einen Titel für Ihren Bildgalerieblock.
Image selection: Select the option ‚Display images from external gallery‘.
Galerie URL oder RSS: Kopieren Sie den Link zur externen Galerie und fügen Sie ihn in die Textbox. Sie können folgende externe Galerien einbinden:
Flickr, e.g. https://www.flickr.com/photos/12345678@N01/sets/98765432123456789/
Photobucket, z.B. http://s1234.photobucket.com/albums/ee123/username/ or http://s1234.photobucket.com/albums/ee123/username/AlbumName/
Picasa, z.B. http://picasaweb.google.com/user.name/AlbumName#
Windows Live Photo Gallery, z.B. http://cid-123456ab7890cd12.photos.live.com/self.aspx/AlbumName/photo.jpg
Bemerkung
Zur Nutzung von Flickr, muss der Siteadministrator einen gültigen API key eintragen.
Zur Nutzung von Photobucket, muss der Siteadministrator einen gültigen API key und einen geheimen API key eintragen.
Damit die Windows Live Photo Gallery genutzt werden kann, muss der Link zu einem der Bilder im Album kopiert und hier eingefügt werden, um das gesamte Album anzuzeigen.
Style: Decide to show all selected images as thumbnails or as slideshow where you only see one image at a time. If you select the option ‚Thumbnails (square)‘, all your images will be displayed in the same size as thumbnails.
Beschreibungen anzeigen: Stellen Sie diese Option ein, wenn Sie die Bildbeschreibungen in der Galerie anzeigen lassen möchten.
Use photo frame: Using this option will put a frame around each photo.
Breite: Definieren Sie die Breite der Bilder (in Pixeln). Die Bilder werden auf die entsprechende Größe angepasst.
Retractable: Choose whether you want to allow viewers to reduce the block to its heading on a page or see just the heading only automatically. The options are:
Nein: Der Block und dessen Inhalt wird immer angezeigt.
Yes: Allow viewers to reduce the block to just the heading by clicking the Retractable icon .
Automatically retract: Only the heading of the block is visible, and the viewer can click the Retracted icon to view its content.
Click the Save button to accept your changes, or click Cancel to leave the block’s content as it is. Remove is shown only when you place the block into the page for the first time.
You can also click the Close button in the top left-hand corner of the modal window to either remove a newly created block before it is being saved or to cancel any changes and leave the block’s content as it is.
4.2.1.6. PDF
Eingebettete PDF-Dateien in Ansicht
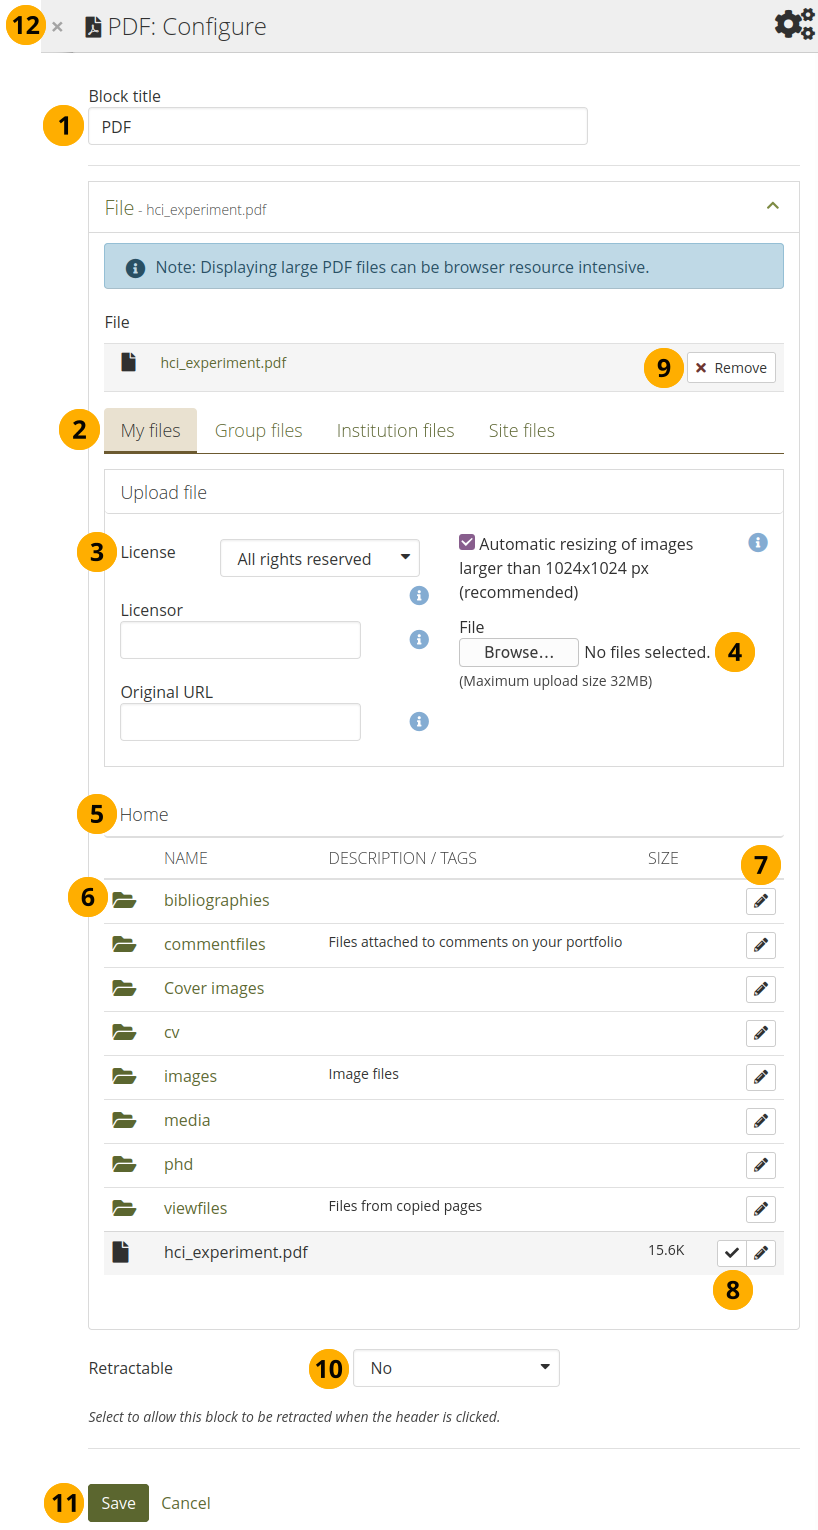
Konfigurieren Sie den PDF-Block
Blocktitel: Wählen Sie einen Titel für den PDF Block.
Dateibereich: Wählen Sie aus welchem Dateibereich Sie eine Dateie auswählen wollen:
Meine Dateien: Sie sehen alle Ordner/Verzeichnissse und Dateien, die Sie dort abgelegt haben.
Gruppendateien: Sie sehen alle Verzeichnisse und Dateien, die zur Veröffentlichung freigegeben sind.
Institutionsdateien: Als Institutionsadministrator sehen Sie alle Institutionsverzeichnisse und Dateien.
Site-Dateien: Als Site-Administrator sehen Sie alle Verzeichnisse und Dateien auf Systemebene. Anderenfalls sehen Sie nur Dateien aus dem öffentlich-Ordner auf Site-Ebene.
License information: You see these fields if the site administrator turned on license metadata. Additionally, if you are in an institution, your institution administrator may require you to provide a license.
Lizenzinformationen: Ihre Standardlizenz wird angezeigt. Ihre Voreinstellungen können Sie in den Accounteinstellungen festlegen. Sie können für jedes einzelne Artefakt einen andere Lizenz festlegen.
Lizenzgeber: Wenn Sie eine Datei verwenden, die von einer anderen Person stammt, können Sie hier den Namen des Urhebers hinterlegen.
Original URL: Wenn Sie eine Datei verwenden, die von einer anderen Person stammt, können Sie hier einen Link zur Internetseite von der die Datei stammt hinterlegen.
File: You do not have to go back to your Files area in Create in order to upload a file. You can do so directly from this screen.
Ordnerpfad: Die sog. Brotkrumen-Navigation zeigt Ihnen in welchem Ordner Sie sich gerade befinden.
Click the folder name if you want to reach a sub folder.
Click the Edit button to change any component of a folder or file, i.e. its name, description and tags. If you have a folder or file included in a page that you submitted for feedback, you will not be able to edit them.
Bemerkung
You can still select files that have been submitted in another portfolio page.
Click into the row that contains the PDF you wish to display in the block to select it or click the Select button . You only see PDF files.
Warnung
When you place group, institution, or site files into a page, beware that these files may not be available at some point any more when the person in charge deletes them.
Click Remove if you want to revert your selection.
Retractable: Choose whether you want to allow viewers to reduce the block to its heading on a page or see just the heading only automatically. The options are:
Nein: Der Block und dessen Inhalt wird immer angezeigt.
Yes: Allow viewers to reduce the block to just the heading by clicking the Retractable icon .
Automatically retract: Only the heading of the block is visible, and the viewer can click the Retracted icon to view its content.
Click the Save button to accept your changes, or click Cancel to leave the block’s content as it is. Remove is shown only when you place the block into the page for the first time.
You can also click the Close button in the top left-hand corner of the modal window to either remove a newly created block before it is being saved or to cancel any changes and leave the block’s content as it is.
Wenn die PDF-Datei in einer Ansicht eingebettet wurde, können Sie durch Sie hindurchblättern und herunterladen. Die PDF wird so angezeigt, dass möglichst eine ganze Seite dargestellt wird.
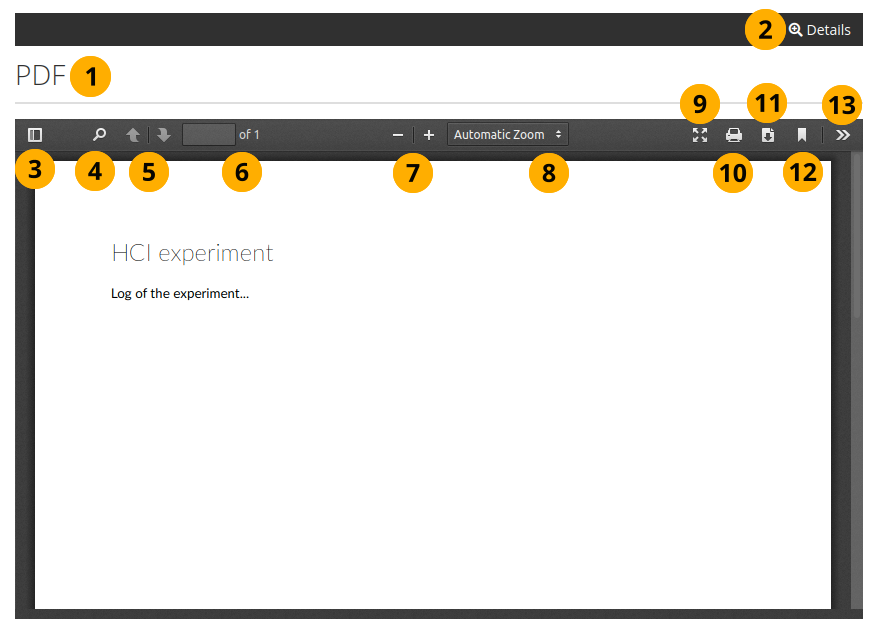
Eingebettetes PDF in der Ansicht
Titel des Blocks.
Click the Details link to see the metadata for the file. You can see the link by clicking the Details button on the page (when it is not in Edit mode). It is displayed in the Details bar.
Toggle to the sidebar where you can jump from one page to another either in the thumbnail or document outline view.
Click the Search icon to search within the document.
You can move to the previous or next page using the Arrow icons.
Die Seitenzahl der aktuellen Seite im Dokument wird angezeigt. Sie können eine Zahl eingeben und mit der Enter- oder Tab-Taste zu dieser Seite springen.
Die Gesamtzahl der Seiten im Dokument wird angezeigt.
Decrease the page size by clicking the Minus, or increase the page size by clicking the Plus. The block size does not increase.
Use the Automatic zoom drop-down menu to choose a different zoom size instead of using the Plus and Minus buttons.
Click the Presentation mode icon
 to see the PDF in full screen.
Click the Print icon
 to print the PDF.
Click the Download icon
 to download the PDF to your computer. The suggested file name is the one the file has on the site.
Click the Current view icon
 to copy the current view of the PDF or to open it in a new window.
Click the Tools icon
 to see more options available for this PDF.
Siehe auch
If you have trouble embedding a PDF file, you might have come across an issue that others have also experienced. The mimetype of the PDF may not be recognized correctly. The correct ‚mimetype‘ is ‚pdf‘, but programmes can circumvent using this mimetype for PDFs to ensure that their file is downloaded instead of viewed in the browser for example. There is not an easy fix to this issue, and the discussion of possible solutions has started.
In the meantime, you can delete the incorrect mimetypes from your browser and ensure that only ‚PDF‘ is left.
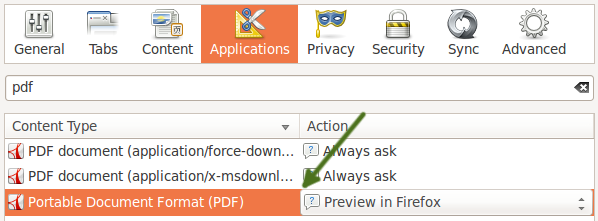
Mit folgenden Schritten löschen Sie falsche mimetypes:
Firefox schließen.
Öffnen Sie die mimeTypes.rdf Datei in einem Texteditor.
Suche nach pdf.
Löschen Sie alle Einträge ausser application/pdf.
Löschen Sie alle weiteren PDF Referenzen mit Ausnahme von
<RDF:Description ...> to </RDF:Description>.Öffnen Sie Firefox und gehen Sie zu Extras → Einstellungen → Anwendungen.
Search for pdf. You should now only see one entry that reads ‚Portable Document Format (PDF)‘.
4.2.1.7. Text-Block (HTML)
Den Inhalt einer HTML-Datei in einer Ansicht anzeigen.
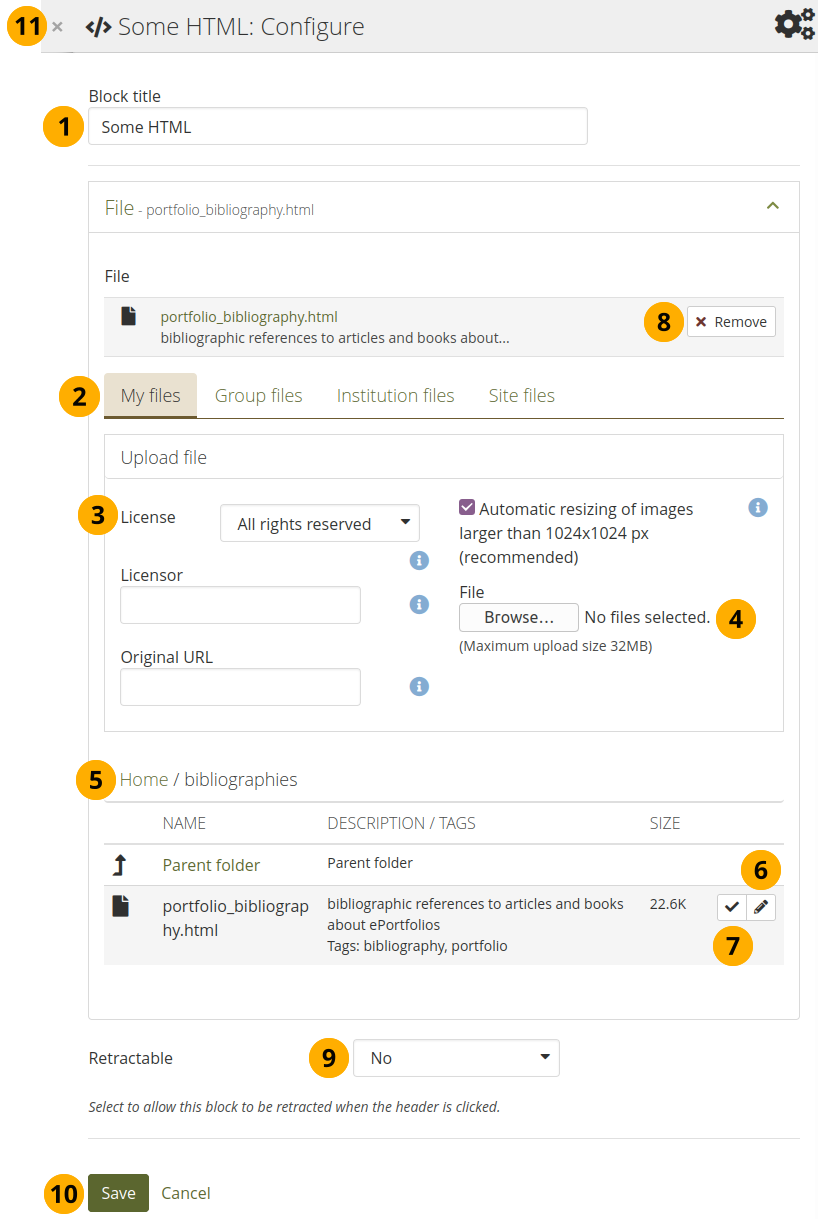
Konfigurieren Sie den HTML-Block
Blocktitel: Vergeben Sie einen Titel für Ihren Block
Dateibereich: Wählen Sie welchen Dateibereich Sie zur Auswahl einer HTML-Datei verwenden wollen.
Meine Dateien: Sie sehen alle Ordner/Verzeichnissse und Dateien, die Sie dort abgelegt haben.
Gruppendateien: Sie sehen alle Verzeichnisse und Dateien, die zur Veröffentlichung freigegeben sind.
Institutionsdateien: Als Institutionsadministrator sehen Sie alle Institutionsverzeichnisse und Dateien.
Site-Dateien: Als Site-Administrator sehen Sie alle Verzeichnisse und Dateien auf Systemebene. Anderenfalls sehen Sie nur Dateien aus dem öffentlich-Ordner auf Site-Ebene.
License information: You see these fields if the site administrator turned on license metadata. Additionally, if you are in an institution, your institution administrator may require you to provide a license.
Lizenzinformationen: Ihre Standardlizenz wird angezeigt. Ihre Voreinstellungen können Sie in den Accounteinstellungen festlegen. Sie können für jedes einzelne Artefakt einen andere Lizenz festlegen.
Lizenzgeber: Wenn Sie eine Datei verwenden, die von einer anderen Person stammt, können Sie hier den Namen des Urhebers hinterlegen.
Original URL: Wenn Sie eine Datei verwenden, die von einer anderen Person stammt, können Sie hier einen Link zur Internetseite von der die Datei stammt hinterlegen.
Upload file: You do not have to go back to your Files area in Create in order to upload a file. You can do so directly from this screen.
Ordnerpfad: Die sog. Brotkrumen-Navigation zeigt Ihnen in welchem Ordner Sie sich gerade befinden.
Click the Edit button to change any component of a folder or file, i.e. its name, description and tags. If you have a folder or file included in a page that you submitted for feedback, you will not be able to edit them.
Bemerkung
You can still select files that have been submitted in another portfolio page.
Click into the row that contains the file you wish to display in the block to select it or click the Select button . You only see HTML files.
Warnung
When you place group, institution, or site files into a page, beware that these files may not be available at some point any more when the person in charge deletes them.
Click Remove if you want to revert your selection.
Retractable: Choose whether you want to allow viewers to reduce the block to its heading on a page or see just the heading only automatically. The options are:
Nein: Der Block und dessen Inhalt wird immer angezeigt.
Yes: Allow viewers to reduce the block to just the heading by clicking the Retractable icon .
Automatically retract: Only the heading of the block is visible, and the viewer can click the Retracted icon to view its content.
Click the Save button to accept your changes, or click Cancel to leave the block’s content as it is. Remove is shown only when you place the block into the page for the first time.
You can also click the Close button in the top left-hand corner of the modal window to either remove a newly created block before it is being saved or to cancel any changes and leave the block’s content as it is.
Bemerkung
Sie können hier eine einzelne HTML-Datei in einer Ansicht anzeigen. Es ist nicht möglich, eine komplette Webseite aus verscheidenen HTML-Seiten anzuzeigen, da die Verlinkungen untereinander beim Upload nicht angepasst werden.