11.6. Institutionen
Administration menu → Institutions
You can use Mahara as multi-tenanted instance. That means that several different institutions can share one Mahara installation. All account holders from these different institutions can:
share portfolios with each other
give feedback on each other’s evidence and pages
in Gruppen über Institutionsgrenzen hinweg arbeiten
In Administration menu → Institutions → Settings you can set up as many institutions as you wish. Institution administrators can only administer their members and their institutions but not make any changes to site settings.
Institutions don’t need to be separate organisations. You can set up Mahara institutions for different parts of your organisation to use different themes, have different default settings, or authentication methods.
Bemerkung
Even if you use Mahara with one organisation only and do not want to distinguish different departments within your organisation, we recommend you set up at least one institution and not use ‚No institution‘. By setting up that institution, you will have two more roles available: institution staff and institution administrator.
You can create institution administrator accounts, which are less powerful than site administrator accounts. By having institution administrators, you can allow them to take care of account and group creation etc. without giving them full powers over the site preventing that too many people can make site changes.
11.6.1. Übersicht
Administration menu → Institutions → Settings
As site administrator, you see an overview of all institutions that exist on your Mahara instance. Institution administrators only see the institution(s) for which they are an administrator.
Bemerkung
Institution administrators who manage only one institution do not see this page and are taken immediately to the settings for their only institution.
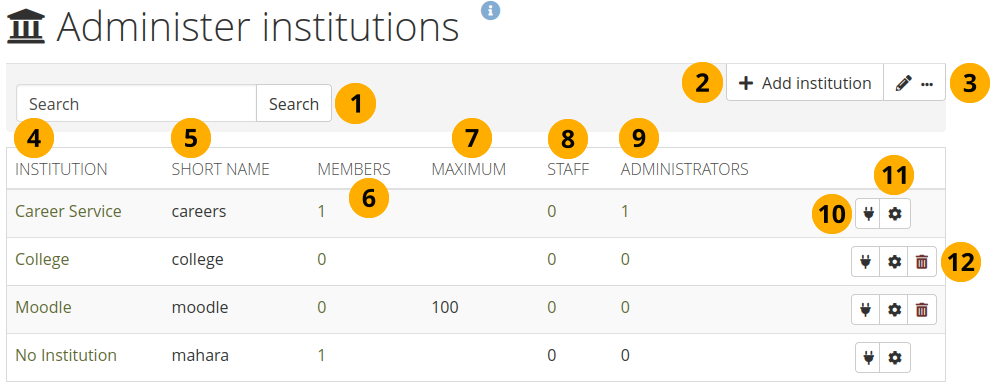
Übersicht für Institutionen
Suche: Suchen nach einer bestimmten Institution anhand ihres Namens und klicken Sie auf den Suchen-Button.
Klicken Sie auf den Institution hinzufügen-Button wenn Sie eine neue Institution anlegen wollen. Den Button sehen nur Site-Administratoren.
Click the Edit with three dots button to edit institution members, staff, and administrators.
Institution: Institutionen werden alphabetisch aufgelistet. Wenn Sie auf den Institutionsnamen klicken, kommen Sie zur Kontaktseite.
Short name: The institution’s short name. If you set up an institution manually, it converts that name into a lower case shortname. If you create institutions automatically, e.g. via web services or SAML, it is generated based on parameters set out by the automatic process.
Mitglieder: Anzahl registrierter Mitglieder der Institution.
Maximum: Maximum allowed members in this institution. If an institution has a maximum set, and it is reached, any potential new members will be rejected. The site and institution administrator receive a notification to take further steps.
Staff: Number of institution members with staff rights in this institution.
Administratoren: Anzahl der Institutionsmitglieder mit Administratorenrechten.
Click the Manage connections button to change web services connections for this institution.
Bemerkung
You only see this button if at least one institution has web services connections configured via the ‚Connection manager‘.
Click the Manage button to change institution settings.
Klicken Sie auf den Löschen-Button , um eine Institution zu löschen. Institutionen können nur gelöscht werden wenn sie keine Mitglieder enthalten.
Bemerkung
The institution ‚No institution‘ is the default ‚institution‘. It cannot be deleted as it is the standard Mahara site.
11.6.2. Eine Institution hinzufügen
Bemerkung
Nur Site-Administratoren können Institutionen hinzufügen. Wenn eine Institution angelegt wurde, können Institutionsadministratoren viele Einstellungen ändern.
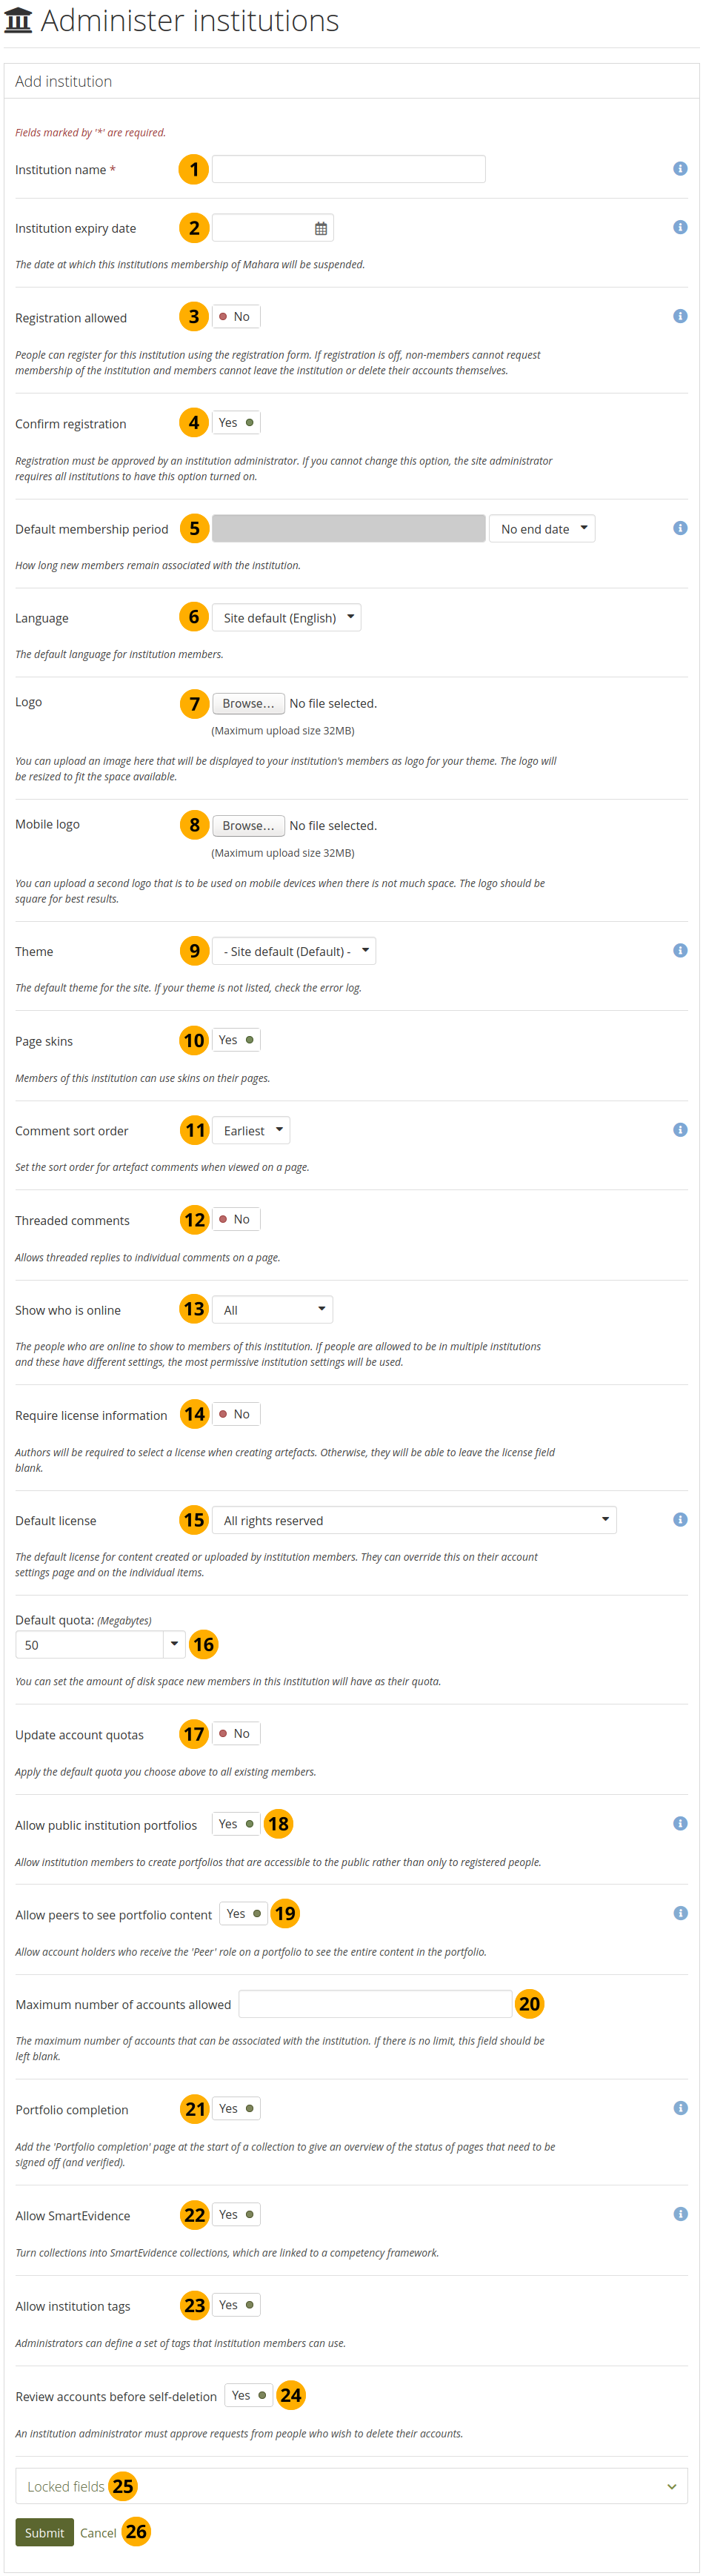
When you want to add an institution by clicking the Add institution button on Administration menu → Institutions → Settings, you need to provide some basic information for the new institution. You can change all settings later on.
Eine neue Institution hinzufügen
Institution name: This field is required. It is the name that everyone sees throughout the site to identify this institution.
Bemerkung
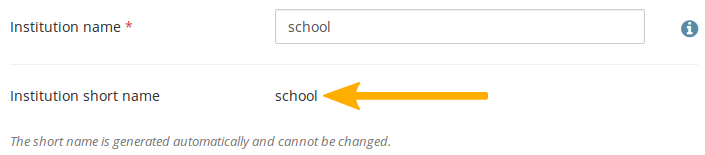
An internal ID for the institution is generated automatically. It is displayed on the institution’s settings page once the institution has been saved for the first time.
This short name can contain letters and numbers and must be at minimum one character long. This is helpful when institutions are created automatically based on an IdP setup.
Institution expiry date: Click into the field to select a date. If you leave the field empty, the institution does not have an expiry date.
Wenn Sie ein Ablaufdatum für die Institution festgelegt haben, kann an den Site Adminstrator und die Institutionsadministratoren vor Ablauf der Institution eine Nachricht versandt werden.
If the auto-suspend expired institutions option is set, then once the expiry date has been reached, this institution will be suspended automatically, and members of this institution will no longer be able to log in.
The warning time for institution expiry and the auto-suspend expired institutions options can be found in the institution settings under Administration menu → Configure site → Site options.
Registration allowed: Switch to ‚Yes‘ when you want to allow self-registration for people. As institution administrators, you will be asked to confirm that these people can join your institution. If you decline, their new account will be associated with ‚No institution‘ unless you have the Confirm registration option enabled. When you do not allow registration, nobody can register a new account, ask to join your institution or leave it without your permission.
Confirm registration: Switch to ‚Yes‘ if you want to control that no new accounts are created unless the administrator approves the registration. You receive a notification about pending registrations when a new person wants to register. If the site administrator requires all institutions to confirm registration, you cannot change this setting to ‚No‘.
Bemerkung
Switching this setting on is recommended for most sites that allow self-registration to prevent spammers from creating accounts and misusing the site.
When registration needs to be confirmed, people trying to register with an institution need to provide a reason.
Default membership period: You can set how long members will remain associated with this institution per default. Choose an option from the drop-down menu and then specify the number of days, weeks, months or years. After this length of time, the members will be removed from the institution. People will receive a notification before this time reminding them that they will be removed soon. However, that does not mean that they will lose their account. They will still have that and be associated with ‚No institution‘.
Language: Choose the language from the drop-down menu that you want the members in your institution to use by default.
Bemerkung
This is a default setting. Members in your institution can choose their own language in their account setting.
Logo: Sie können ein Bild als Logo hochladen. Dieses wird Ihren Mitgliedern an Stelle des Standard-Logos im Kopfbereich angezeigt werden.
Mobile logo: Upload a square version of your logo that is displayed on small devices.
Bemerkung
You can also upload a mobile logo to your theme if you prefer to add it there rather than upload it in the institution settings. The ‚Raw‘ theme has a mobile logo that is used in other themes as well unless you upload your own. Ensure that it is a square logo for best results.
Theme: Use the drop-down menu to choose the theme that you wish to use for this institution. All pages in that institution will receive that theme. When members from other institutions view portfolio pages that were created in this institution, they will see this institution’s theme on these pages. If Site default is selected, when a site administrator changes the site default theme, the theme for the members of this institution will change, too. You can install more themes in the theme folder on the server. Check out the community-contributed themes. If authors are allowed to have page themes, these pages are not affected by theme changes. Mahara also has a configurable theme which allows you to create a theme on the fly.
Page skins: Switch to ‚Yes‘ if you want your institution members to use page skins.
Bemerkung
This feature is only available when the server administrator enabled skins for the site.
Comment sort order: Decide on the sort order of comments on artefacts when they are displayed on a page. You can choose between the following:
Früheste: Chronologische Sortierfolge mit den ältesten Beiträgen zuerst.
Letzte: Chronologische Sortierfolge mit den jüngsten Beiträgen zuerst.
Threaded comments: Display comments on a page in a threaded manner so you can see, which comment is a reply to which previous comment.
Show who is online: If the site administrator allowed the ‚Show who is online‘ side block, you can decide which group of people you want to have displayed for this institution:
None: The side block is not displayed to institution members.
Institution only: Only institution members are displayed in the side block.
All: Everyone on the site are displayed in the side block. This option is only available if ‚Isolated institutions‘ is not turned on.
Require license information: Switch to ‚Yes‘ if your institution members need to choose a license for each artefact they upload or create. They can set a default license in their account settings. You only see this option if the site administrator turned on License metadata in the site settings.
Default license: You can choose a default license for your institution members‘ content. They can overwrite this default license in their account settings. You only see this option if the site administrator turned on License metadata in the site settings. If the site administrator allowed custom licenses, you can enter one using the drop-down menu option ‚Other license (enter URL)‘. This license can then also be used by your institution members.
Bemerkung
Wenn Sie sich nicht sicher sind, welche Standardlizenz für Ihre Institution am besten geeignet ist, fragen Sie den Rechtsanwalt Ihrer Institution oder einen Urheberrechtsspezialisten.
Default quota: You can set the amount of file quota new members registering with this institution shall have.
Update account quotas: Switch to ‚Yes‘ if you want to apply the default quota you choose above to all existing institution members.
Allow public institution portfolios: Switch to ‚Yes‘ if you want to allow members belonging to this institution to create portfolio pages and collections that are accessible to the public rather than only to registered people. If you allow public pages, members can also create secret URLs for their pages. Otherwise they cannot.
 Allow peers to see portfolio content: Per default, account holders who have the ‚Peer‘ role on a portfolio do not see the content on portfolio pages, allowing for a blind review. This setting can change that though for any portfolio by an account holder who is a member of this institution.
Siehe auch
Peers can give a peer assessment via the ‚Peer assessment‘ block.
Maximum number of accounts allowed: Specify the maximum number of accounts that can be created in this institution. If you leave this field blank, there is no limit to the number of accounts.
Bemerkung
When the maximum number of accounts has been reached and another person tries to register for the institution, the site administrator as well as the institution administrator for that institution receive a notification. That allows them to take further steps.
Portfolio completion: Allow portfolio authors to add the ‚Portfolio completion‘ progress page to the start of their collection.
Allow SmartEvidence: Activate SmartEvidence if you want your institution members to work with it.
Allow institution tags: If set to ‚Yes‘, you can set up tags for the members of your institution to use in their portfolios.
Bemerkung
When turned on, the new menu item Tags will appear in the institution sub menu.
Review accounts before self-deletion: If set to ‚Yes‘, an institution administrator needs to approve or deny the deletion of an account when the deletion is initiated by the account holder.
Bemerkung
This setting gives institutions in a formal learning setting the possibility to prevent accidental account deletion by people before portfolios are archived if required.
If the field is set to ‚Yes‘ and greyed out, the site administrator requires the confirmation for all institutions on the site.
Locked fields: Switch any value to ‚Yes‘ if you don’t want to allow changes to it by members. Disabled switches are for profile fields which are locked in the institution settings for ‚No institution‘. These profile fields are locked at the site level and cannot be unlocked for individual institutions.
Bemerkung
Locking profile fields such as first name, last name and display name can be beneficial for institutions that wish to always identify their members by their real names and not allow them to choose nicknames.
Click the Submit button to save your changes and create this institution, or click Cancel to abort the creation of this institution.
11.6.2.1. Institutionslogo ändern
You can upload a logo to any theme replacing the standard logo that comes with the theme. If you upload a file with large dimensions, the logo will be shrunk or upscaled to fit the available space. To achieve optimal results, upload a logo with a height of 90px to display well on Retina displays.
Ein Logo hochladen
Logo: Upload the logo that you want to use on your institution theme from your computer and click the Submit button at the bottom of the page.
Nachdem Sie Ihre Änderungen vorgenommen haben, ersetzt das neu hochgeladene Logo das vorherige im Header. In den Einstellungen wird angezeigt, was Sie hochgeladen haben.
Bemerkung
If you are a site administrator and not a member of the institution for which you change the logo, you cannot see the logo change unless you log in as an institution member.
Delete logo: If you want to revert back to the standard logo, switch to ‚Yes‘ and click the Submit button at the bottom of the page.
Mobile logo: Upload a square logo and click the Submit button at the bottom of the page. This logo is used for small devices when the regular logo would take up too much space on the screen.
Bemerkung
The logo must have square dimensions.
Nachdem Sie Ihre Änderungen vorgenommen haben, ersetzt das neu hochgeladene Logo das vorherige im Header. In den Einstellungen wird angezeigt, was Sie hochgeladen haben.
Delete mobile logo: If you want to delete this logo, switch to ‚Yes‘ and click the Submit button at the bottom of the page.
Bemerkung
There is a special logo that can be picked up by Facebook and other social media sites in order not to display a random image from the site. This logo must be placed into the theme folder. Mahara’s Raw theme has the Mahara logo, but it could be changed to a different one in another theme. For more information see the tracker item.
11.6.2.2. Konfigurierbares Theme verwenden
Wenn Sie keines der Standardthemes von Mahara oder eines der community-contributed themes verwenden wollen, können Sie entweder ein Theme von Grund auf selber erstellen oder ein konfigurierbares Theme in Verbindung mit dem Logo Upload verwenden.
If you do not upload a custom logo and use the Mahara logo with the configurable theme instead, it changes colour according to the theme background so it is always readable.
Bemerkung
The configurable theme is only a display theme. That means that members of the institution in which it is in use see the theme applied to the site and their pages. However, when members from another institution browse the portfolio pages of members from this institution, they do not see the configurable theme, but their own theme.
You can change the configurable theme on the institution settings page.

Colour options for the configurable theme
In order to change any of the colours, either provide the hexadecimal color code or choose the colour from the colour picker that becomes available as soon as you click in one of the colour fields.
Theme: Choose the “Configurable Theme” from the drop-down menu and the “Custom theme configuration” options become visible.
Header background: The colour of the header.
Text on header background: The colour of text in the header. It is also used as the navigation menu icon colour in the header.
Links: The link colour on pages and in the sidebar.
Headings: The heading colour for all headings except in the sidebar. This is currently not used.
Navigation background: The colour of the drop-down menu navigation.
Navigation text: The colour of the text / links in the navigation menu.
Reset colours: Switch to ‚Yes‘ if you want to go back to the original colours of the configurable theme.
Klicken Sie auf den Bestätigen-Button, um die Änderungen abzuspeichern.
Bemerkung
Wenn Sie als Mitglied der Institution nach dem Abspeichern vorgenommene Änderungen nicht direkt sehen, sollten Sie den Cache des Browsers löschen und die Seite neu laden.
Example of a configurable theme
Die Nummern auf der Seite beziehen sich auf die Optionen des konfigurierbaren Themes oben.
11.6.3. Die Site-Institution bearbeiten
Your Mahara site itself is listed as institution under Administration menu → Institutions → Settings. Per default, it has the name ‚No institution‘ and you can change certain settings that are applied to the site.
Bemerkung
Most settings for the site are made in Administration menu → Configure site → Site options.
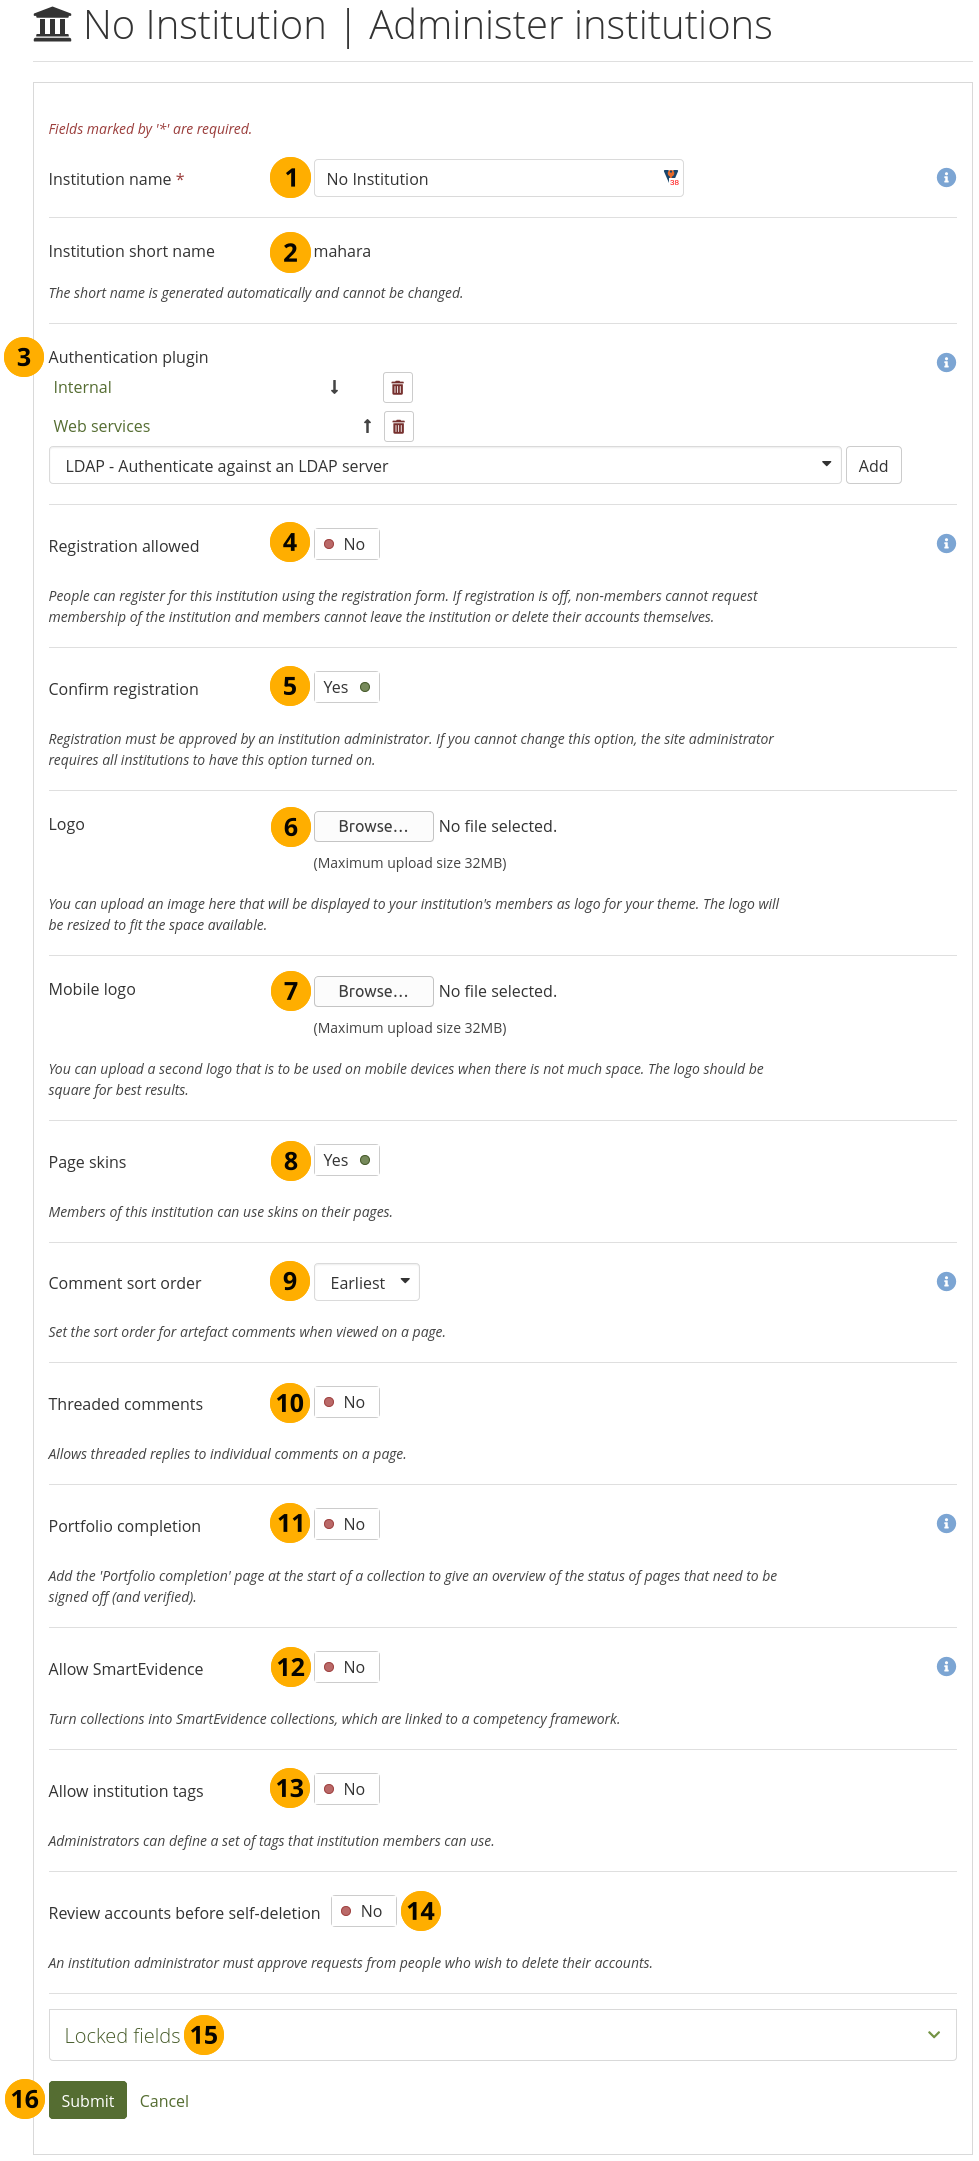
Edit the ‚No institution‘ site institution
Institution name: This field is required. It is the name that people see when registration is allowed for the site without having to register for a particular institution.
Institution short name: This name is generated automatically and set to ‚mahara‘.
Authentication plugin: You can decide which authentication methods you want to allow. See ‚Edit an institution‘ for more information.
Registration allowed: Switch this option to ‚Yes‘ if you want to allow people to register on your site without registering for a particular institution. If you switch this setting on but not the setting Confirm registration, new accounts do not need approval.
Bemerkung
Be careful disabling Confirm registration. Spammers can misuse your site and create accounts without your knowledge.
Confirm registration: Switch this option to ‚Yes‘ if you want to control that no new accounts are created unless the site administrator approves the registration. You receive a notification about pending registrations when a new person wants to register.
Bemerkung
If the site administrator decides that every manually created account, no matter the institution, needs confirmation, they will switch the ‚Confirm registration‘ setting to ‚Yes‘ in the ‚Site settings‘ in Administration menu → Configure site → Site options → Site settings.
Logo: Replace the standard site logo without having to place it in the theme folder on the server. Upload an image that will be displayed to everyone who is not in an institution and who is not logged into the site.
Mobile logo: Upload a square version of your logo that is displayed on small devices.
Page skins: Switch this option to ‚Yes‘ if you want people who are not in a particular institution to use page skins.
Bemerkung
This feature is only available when the server administrator enabled skins for the site.
Comment sort order: Decide on the sort order of comments on artefacts when they are displayed on a page. You can choose between the following:
Früheste: Chronologische Sortierfolge mit den ältesten Beiträgen zuerst.
Letzte: Chronologische Sortierfolge mit den jüngsten Beiträgen zuerst.
Threaded comments: Display comments on a page in a threaded manner so you can see, which comment is a reply to which previous comment.
Portfolio completion: Allow portfolio authors to add the ‚Portfolio completion‘ progress page to the start of their collection.
Allow SmartEvidence: Activate SmartEvidence if you want your institution members to work with it.
Allow institution tags: If set to ‚Yes‘, you can set up tags for the members of your institution to use in their portfolios.
Bemerkung
When turned on, the new menu item Tags will appear in the institution sub menu.
Review accounts before self-deletion: If set to ‚Yes‘, the site administrator needs to approve or deny the deletion of an account that is not in associated with an institution when the deletion is initiated by the account holder.
Locked fields: Switch any value to ‚Yes‘ if you don’t want account holders to make changes. Any field that you enable here is locked from editing in institutions.
Bemerkung
Locking profile fields such as first name, last name, and display name can be beneficial for institutions that wish to always identify their members by their real names and not allow members to choose nicknames.
Click the Submit button to save your changes, or click Cancel to discard your changes.
11.6.4. Eine Institution bearbeiten
Administration menu → Institutions → Settings → Click the Manage button next to an institution
Once you have created your institution, you can edit its settings, suspend, or delete the institution. You will have to choose at least one authentication method for this institution so that accounts can be created.
Bemerkung
Nur Site-Administrator/innen können Authentifizierungsmethoden für Institutionen hinzufügen, bearbeiten, löschen und sperren. Eine Institution kann erst gelöscht werden, wenn alle Mitglieder entfernt wurden.
You should set up at least one authentication method. Otherwise, nobody can log in to this institution. You can add multiple authentication methods to your institution to account for different members and how they are allowed to authenticate. That means for example for a university:
Lehrende und Studierende können sich mit ihrem Standard-Logindaten und Kennwort aus LDAP / Active Directory (LDAP authentication) oder Single Sign-on über SAML (SAML authentication) einloggen.
Sie können sich aber auch über Moodle einloggen. Dies kann als sekundäre Authentifizierung zu LDAP oder Single Sign on gesetzt werden (XML-RPC / MNet authentication).
Für Alumni können die MNet / LDAP Authentifizierungszugänge gegen interne Authentifizierung getauscht werden wenn sie ihr Studium abgeschlossen haben.
Externe Nutzer, die keinen Hochschulzugang bekommen sollen, können intern authentifiziert werden. Dafür benötigen sie dann an keiner anderen Stelle der Hochschul-IT einen Nutzerzugang.
All these then still log in to the same Mahara institution. Alternatively, you could also separate the accounts into their own institutions on your Mahara installation if that is more appropriate for your use case. This could mean for the above example:
Faculty and students log in and are automatically placed into the institution ‚University‘. They see the standard university theme.
Alumni are placed into the institution ‚Alumni‘ for easier account management as you could have the alumni coordinator manage these. Having them in a separate institution on Mahara would allow you to see who an alumni is. Additionally, they could receive a slightly different university theme that is geared towards alumni, and they can also receive different messages on their dashboard.
External assessors who are placed into the separate institution ‚Assessors‘ could be managed by an administrator who is the liaison for them without giving that administrator access to the account management of all other university members. They can receive the standard university theme, but receive different messages on their dashboard.
Bevor Sie IMAP, LDAP, SAML oder XML-RPC Authentifizierungsmethoden verwenden können, müssen dafür erforderliche Erweiterungen auf dem Server bereitgestelltwerden.
Plugins zur Authentifizierung in Institutionen
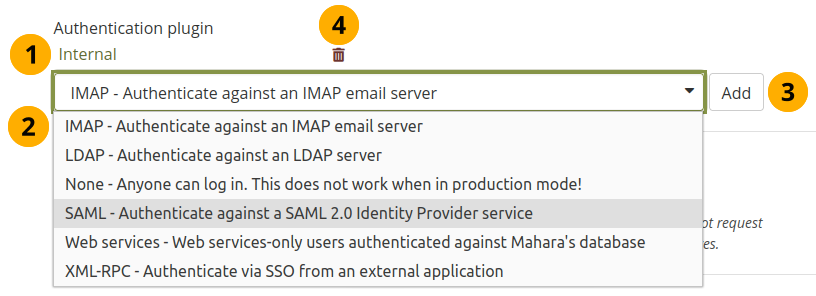
Once your institution is created, the settings include an additional option, Authentication plugin. You see all authentication methods that are already in use for this institution.
Bemerkung
Every institution receives the authentication method ‚Internal‘ automatically. Once another authentication method has been enabled, it can be removed if you do not wish anybody from that institution to have that authentication method.
Wählen Sie aus dem Drop-down-Menü eine der verfügbaren Methoden aus:
IMAP: Accounts are authenticated against an IMAP server. This is rarely used.
Internal: Accounts are created in Mahara. This is the default authentication method for a new institution.
LDAP: Accounts are authenticated against an LDAP server or Active Directory server.
None: Anyone can log in by picking a username and password.
Warnung
This should only be used for testing but not on a live site as you can’t control who can receive an account.
SAML: A SAML 2.0 Identity Provider Service is needed that has the accounts.
XML-RPC: Diese Authentifizierungsmethode wird verwandt, um MNet Mahara mit Moodle oder anderen Mahara-Systemen zu verbinden.
Klicken Sie auf den Hinzufügen-Button, um den Konfigurationsbereich für eine externe Authentifizierungsmethode zu sehen, bevor sie aktiviert wird.
Click the Delete icon to remove an authentication method from an institution. You can only do so when nobody is associated with that authentication method any more.
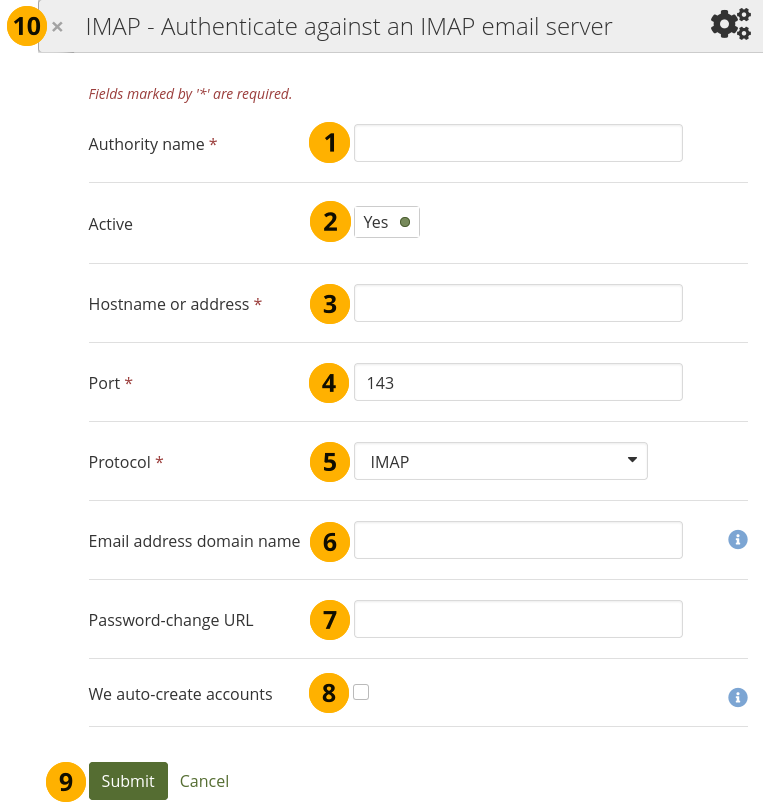
11.6.4.1. IMAP-Authentifizierung
You can use this authentication method to receive the login information for your accounts from your IMAP server.
IMAP Authentifizierung einrichten
Authority name: Enter a descriptive name to help you identify this authentication method. Preferably, choose a short name. This field is required.
Host-Name oder -Adresse: Tragen Sie den Hostnamen als URL ein. Pflichtfeld.
Port number: Specify the port number under which your IMAP server can be reached. The default is 143. This field is required.
Protocol: Select the protocol of your IAMP server by selecting it from the drop-down menu. This setting is required:
IMAP
IMAP/SSL
IMAP/SSL (selbstsigniertes Zertifikat)
IMAP/TLS
Email address domain name: Enter an email domain that shall be the only one you accept. This is useful in particular when you use a shared service like Gmail or Outlook.com.
Password-change URL: If your account holders can only change their password in one central space, provide the URL here.
We auto-create accounts: Select this option if people can provide their email address details and receive an account automatically.
Click the Submit button to enable this authentication method, or click Cancel to abort your changes.
Click the Close icon in the top left-hand corner of the modal window to close it without making any changes.
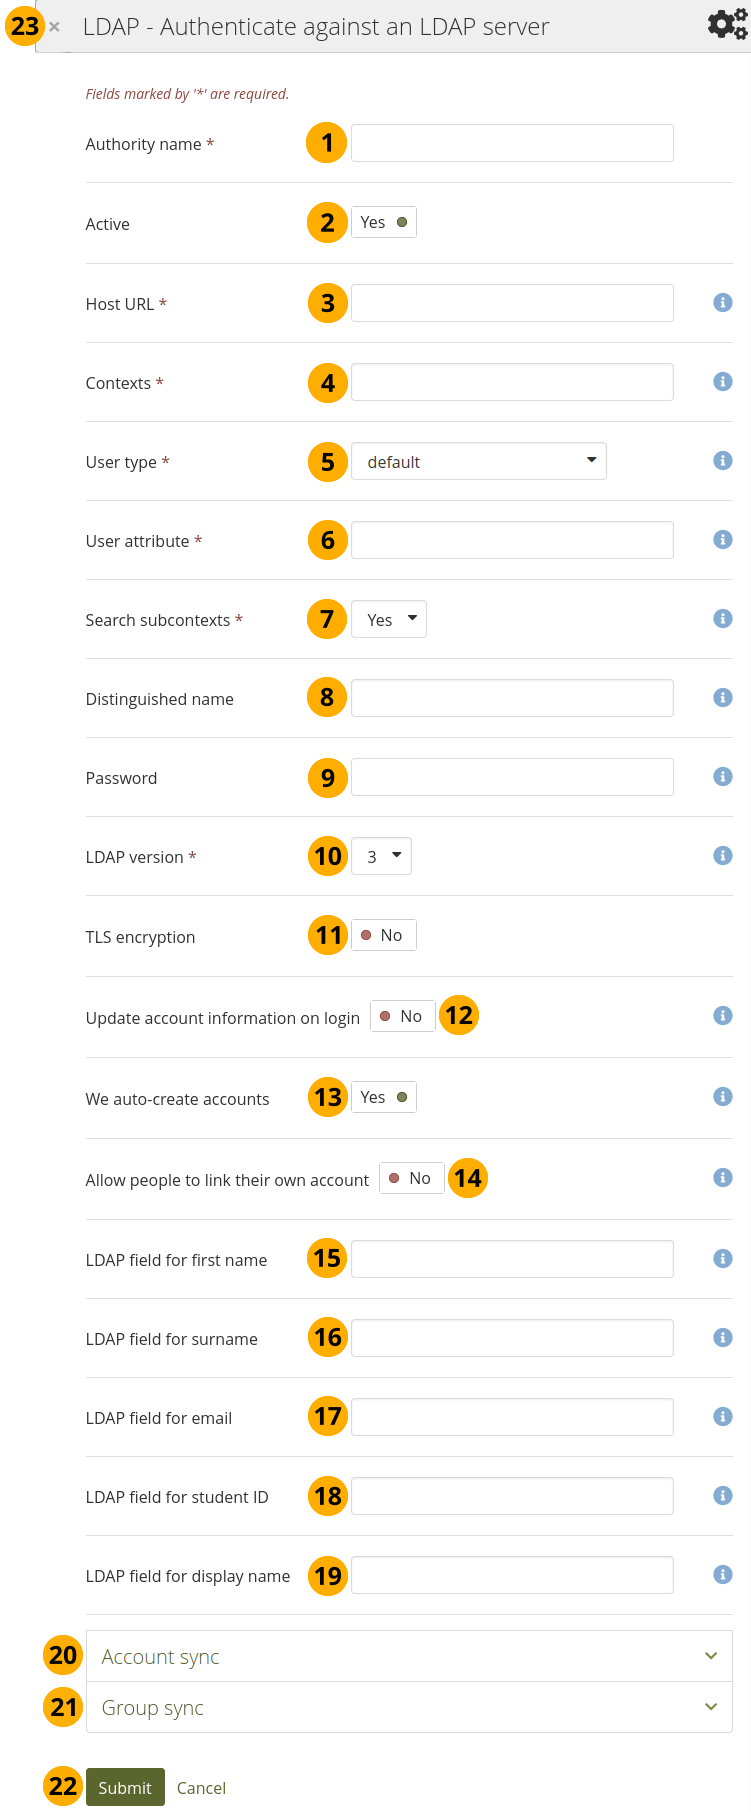
11.6.4.2. LDAP-Authentifizierung
Use this authentication method to authenticate against an LDAP / Active Directory server.
LDAP Authentifizierung einrichten
Authority name: Enter a descriptive name to help you identify this authentication method. Preferably, choose a short name. This field is required.
Active: Switch to ‚Yes‘ if you want to use this authentication method. If you switch to ‚No‘, you can disable it (temporarily) without deleting it.
Host URL: Specify hosts in URL form, e.g.
ldap://ldap.example.com. Separate multiple servers with ; for failover support. This field is required.Contexts: List the contexts where accounts are located. Separate different contexts with ;, e.g.
ou=users,o=org;ou=other,o=org. This field is required.User type: Select from the drop-down menu how accounts are stored in the LDAP directory. This field is required. You can choose between:
Novell Edirectory
posixAccount (rfc2307)
posixAccount (rfc2307bis)
sambaSamAccount (v. 3.0.7)
MS Active Directory
Standard
User attribute: Enter the attribute used to search for accounts. It is often
cn. This field is required.Search subcontexts: Select ‚Yes‘ if you want to search for the accounts also in subcontexts. This setting is required.
Distinguished name: If you want to use bind-user to search accounts, specify it here. It should look something like
cn=ldapuser,ou=public,o=org. Leave this blank for anonymous bind.Password: Enter the password for the ‚distinguished name‘.
LDAP-Version: Wählen Sie die verwandte LDAP-Version aus dem Drop-down-Menü ein. Pflichteintrag.
TLS encryption: Switch to ‚Yes‘ if you use this encryption mechanism.
Update account info on login: Switch to ‚Yes‘ if you want to have the first name, last name and email address updated with the corresponding LDAP values at each login. Enabling this option may prevent some MS ActiveDirectory sites / accounts from subsequent Mahara logins.
We auto-create accounts: Switch to ‚Yes‘ if you want Mahara to create accounts automatically when a person authenticates successfully but does not yet have an account.
Allow people to link their own account: Switch to ‚Yes‘ if you want to allow people who have an account on internal authentication method to link it to their LDAP credentials.
LDAP field for first name: Enter the name of the field in the LDAP record that contains the person’s first name.
LDAP field for surname: Enter the name of the field in the LDAP record that contains the person’s last name.
LDAP field for email: Enter the name of the field in the LDAP record that contains the person’s email address.
LDAP field for student ID: Enter the name of the field in the LDAP record that contains the person’s student ID.
LDAP field for display name: Enter the name of the field in the LDAP record that contains the person’s display name.
Account sync: Decide whether you wish to synchronize your accounts via a cron job and make additional settings.
Group sync: Decide whether you want to create groups automatically in Mahara based on your LDAP groups.
Click the Submit button to enable this authentication method or click Cancel to abort your changes.
Click the Close icon in the top left-hand corner of the modal window to close it without making any changes.
11.6.4.2.1. LDAP account sync
You can set up your LDAP authentication so that account creation can be automated. Account deletion should be considered carefully.
Configure the LDAP account sync
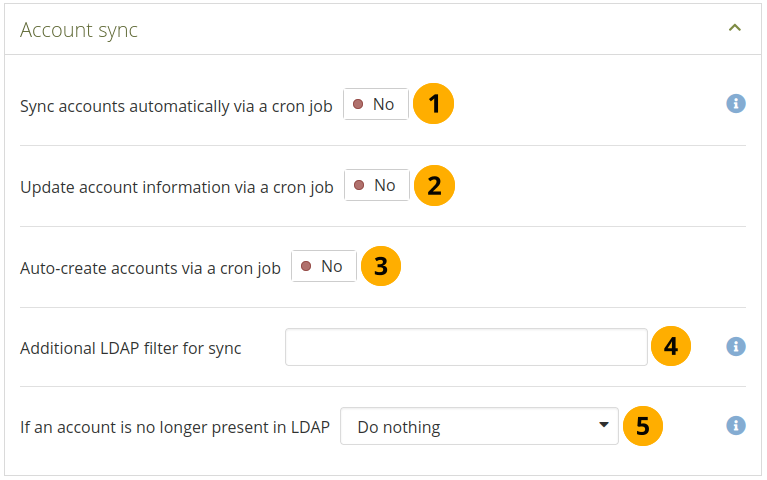
Sync accounts automatically via a cron job: Enable this setting to activate a task in the cron which will automatically create and/or update accounts based on records in the LDAP server.
Bemerkung
By default, this cron task runs once a day at midnight (server time). Edit the record in the ‚auth_cron‘ table or use the optional command-line script supplied at
htdocs/auth/ldap/cli/sync_users.phpif you want to schedule it to run at other times or with other settings.This setting will have no effect if the cron is not running. See the installation guide for instructions on how to set it up.
Update account information via a cron job: Switch to ‚Yes‘ if you to have account information updated via the cron if they changed in the LDAP record.
Auto-create accounts via a cron job: Switch to ‚Yes‘ if you want new accounts in your LDAP directory to get an account automatically.
Additional LDAP filter for sync: Provide an LDAP filter here, and the sync will only see accounts in LDAP who match that filter. Example:
Example: uid=user*.Warnung
Use this setting with caution if you have auto-suspend or auto-delete enabled, as doing so will cause all accounts in your institution which do not match the filter to be suspended or deleted.
If an account is no longer present in LDAP: Choose from the drop-down menu what you want to do if accounts are no longer in your LDAP directory:
Do nothing: People keep their account. This is the recommended setting.
Suspend account: The account will be suspended. The account holder will no longer be able to log in, and their content and pages will not be viewable. However, none of their data will be deleted, and the account can be un-suspended by the cron when their LDAP record reappears, or manually by an administrator. Alternatively, their authentication method could be changed to the Mahara internal.
Delete account and all content: The account will be deleted, along with all their content and pages.
Warnung
The automatic deletion of accounts is not recommended. The data is fully deleted from the server when an account is deleted. The account can only be restored from a backup. Some information such as friend relationships and group membership cannot be restored.
Click the Submit button to enable this authentication method, or click Cancel to abort your changes.
11.6.4.2.2. LDAP-Gruppensynchronisation
You can set up your LDAP authentication so that group creation can be automated. Group deletion should be considered carefully.
Den LDAP Gruppen-Sync aktivieren
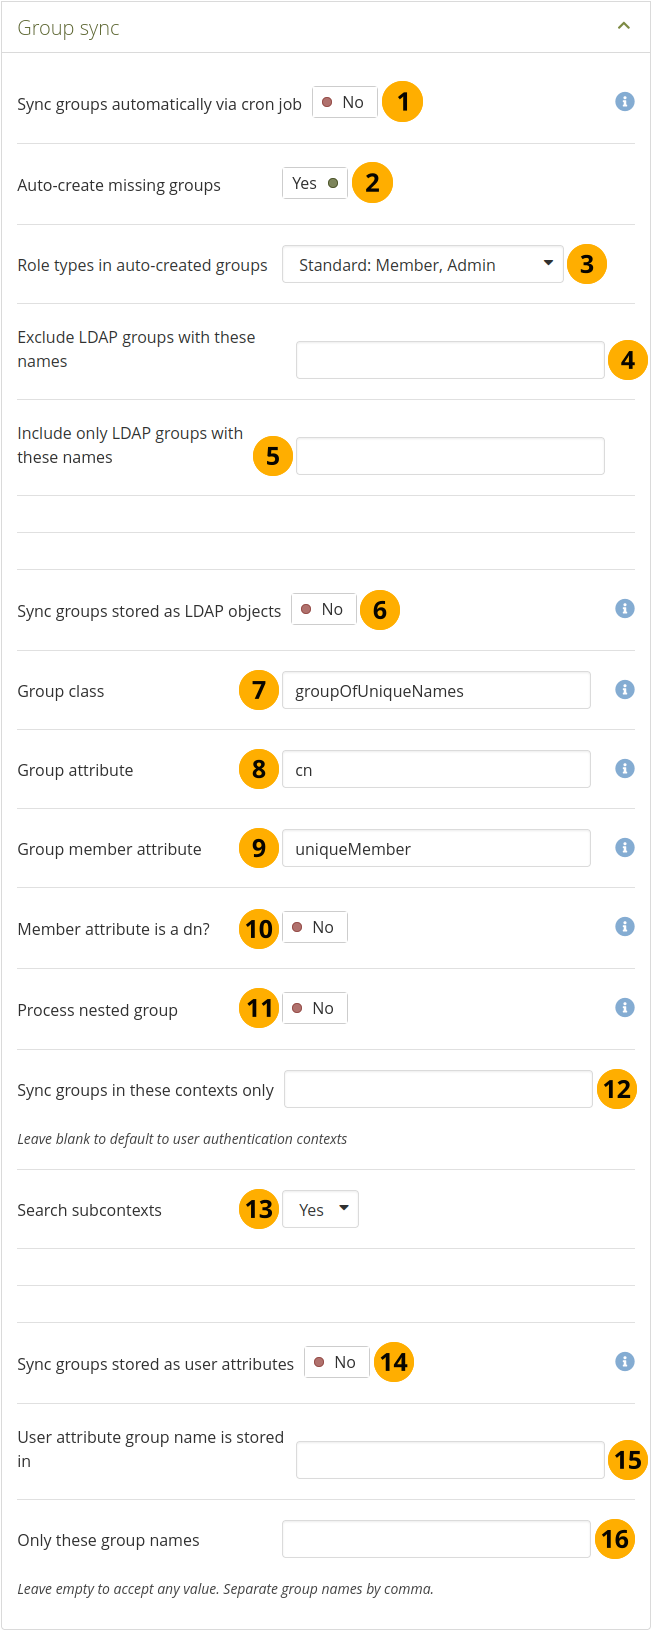
Gruppen automatisch über Cron synchronisieren: Mit der Aktivierung lösen Sie eine Synchronisierung der Gruppenzugehörigkeit aufgrund von LDAP Einträgen aus. Der Cron-Job erzeugt und/oder aktualisiert die Mitgliedschaft.
Bemerkung
By default, this cron task will execute once daily at midnight (server time). Edit the record in the ‚auth_cron‘ table or use the optional command-line scripts supplied in
htdocs/auth/ldap/cli/if you wish to schedule it to run at other times or with other settings.Note: You will also need to activate the ‚Sync groups stored as LDAP objects‘ and / or ‚Sync groups stored as user attributes‘ settings in order for groups to be synced.
Gruppenmitglieder können sowohl hinzugefügt wie auch entfernt werden. Wenn eine Gruppe nicht weiter im LDAP Datensatz gefunden wird, werden alle Mitglieder aus der Gruppe ausgetragen.
This setting will have no effect if the cron is not running. See the installation guide for instructions on how to set it up.
Auto-create missing groups: Switch to ‚Yes‘ if you want to have new groups in your LDAP directory created automatically in Mahara.
Role types in auto-created groups: Decide which roles members can have in auto-created groups.
Kurse: Mitglieder, Tutoren und Administratoren
Standard: Mitglieder und Administratoren
LDAP Gruppen mit diesen Namen ausschließen: Bei der automatischen Erstellung von Gruppen aus LDAP können Sie festlegen, dass Einträge mit definierten Bezeichnungen nicht als Gruppen in Mahara angelegt werden.
Include only LDAP groups with these names: If you want to restrict the creation / synchronisation of your groups to a specified few, list them here.
Sync groups stored as LDAP objects: Switch to ‚Yes‘ if your groups are stored as standalone records in LDAP. Example:
dn: cn=languagestudents,ou=groups,dc=mahara,dc=orgobjectClass: groupOfUniqueNamescn: languagestudentsuniqueMember: uid=user1,dc=mahara,dc=orguniqueMember: uid=user2,dc=mahara,dc=orguniqueMember: cn=frenchclass,ou=groups,dc=mahara,dc=orgGruppen-Klasse: Tragen Sie die LDAP objectclass ein, die für Gruppen erforderlich ist.
Gruppenattribut: Tragen Sie das LDAP-Attribut ein, das mit den Gruppenbezeichnungen abgeglichen wird. Der Name ist häufig ‚‘cn‘‘.
Gruppenmitgliedsattribut: Tragen Sie das LDAP Attribut ein in dem die Gruppenmitgliedschaft gespeichert ist. Es ist häufig ‚‘uniqueMember‘‘:
Member attribute is a dn? Switch to ‚Yes‘ if each entry in the ‚Group member attribute‘ field is a ‚distinguished name‘. Disable this setting if each entry in ‚Group member attribute‘ field is a username only.
Process nested group: Switch to ‚Yes‘ if your groups can contain other groups as members. If enabled, the sync process will recursively include the members of these nested groups into the parent group.
Bemerkung
Der Prozess wird beendet wenn er zirkuläre Referenzen entdeckt.
Gruppen nur in diesen Kontexten synchronisieren: Listen Sie die Kontexte auf in denen Gruppen abgelegt sind. Trennen Sie die einzelnen Einträge mit einem Semikolon „;“. Beispiel: :
ou=groups,o=org;ou=other,o=org.Bemerkung
If this field is left empty, the group sync cron will fall back to using the same list of contexts as the ‚Contexts‘ setting for where accounts are located.
Search subcontexts: Change to ‚Yes‘ if subcontexts should be included in the synchronisation.
Sync groups stored as user attributes: Switch to ‚Yes‘ if each LDAP account record has an attribute which indicates a group the account should be in. This setting will cause the LDAP sync cron to create a group for each unique value in the specified user attribute (or in those listed in the ‚Acceptable group names‘ field), and place each person in the appropriate group (or groups, if they have multiple values for the attribute).
Gruppenatribut für Nutzer ist gespeichert in: Tragen Sie das LDAP Attribut ein in dem der Name hinterlegt ist.
Only these group names: When creating groups based on user attributes, only create groups with these names. This will not affect groups created via the ‚Sync groups stored as LDAP objects‘ setting, if it is active.
Click the Submit button to enable this authentication method or click Cancel to abort your changes.
11.6.4.3. SAML Authentifizierung
11.6.4.3.1. Setup
Wählen Sie diese Authentifizierungsmethode für Ihre Institution wenn Sie einen SAML 2.0 Identiy Provider Service für Ihre Organisation verwenden, um sich mit einem Login bei mehreren Anwendungen einzuloggen.
The SAML plugin can be used to connect to ADFS as well. In order to do so, the signature algorithm needs to be set appropriately in the SAML plugin configuration.
In Mahara 20.04 a range of additional fields were made available to automate institution and account setup for organisations that use SAML as their IdP. This includes:
Automatic setup of institutions based on a ‚parent IdP‘.
Role mapping for administrator and staff accounts.
Role mapping for an account that is to be added to all groups either in the institution or on the site.
Siehe auch
If you need to diagnose problems with accounts, you can log the attributes that the IdP passes on.
SAML 2.0 Authentifizierung
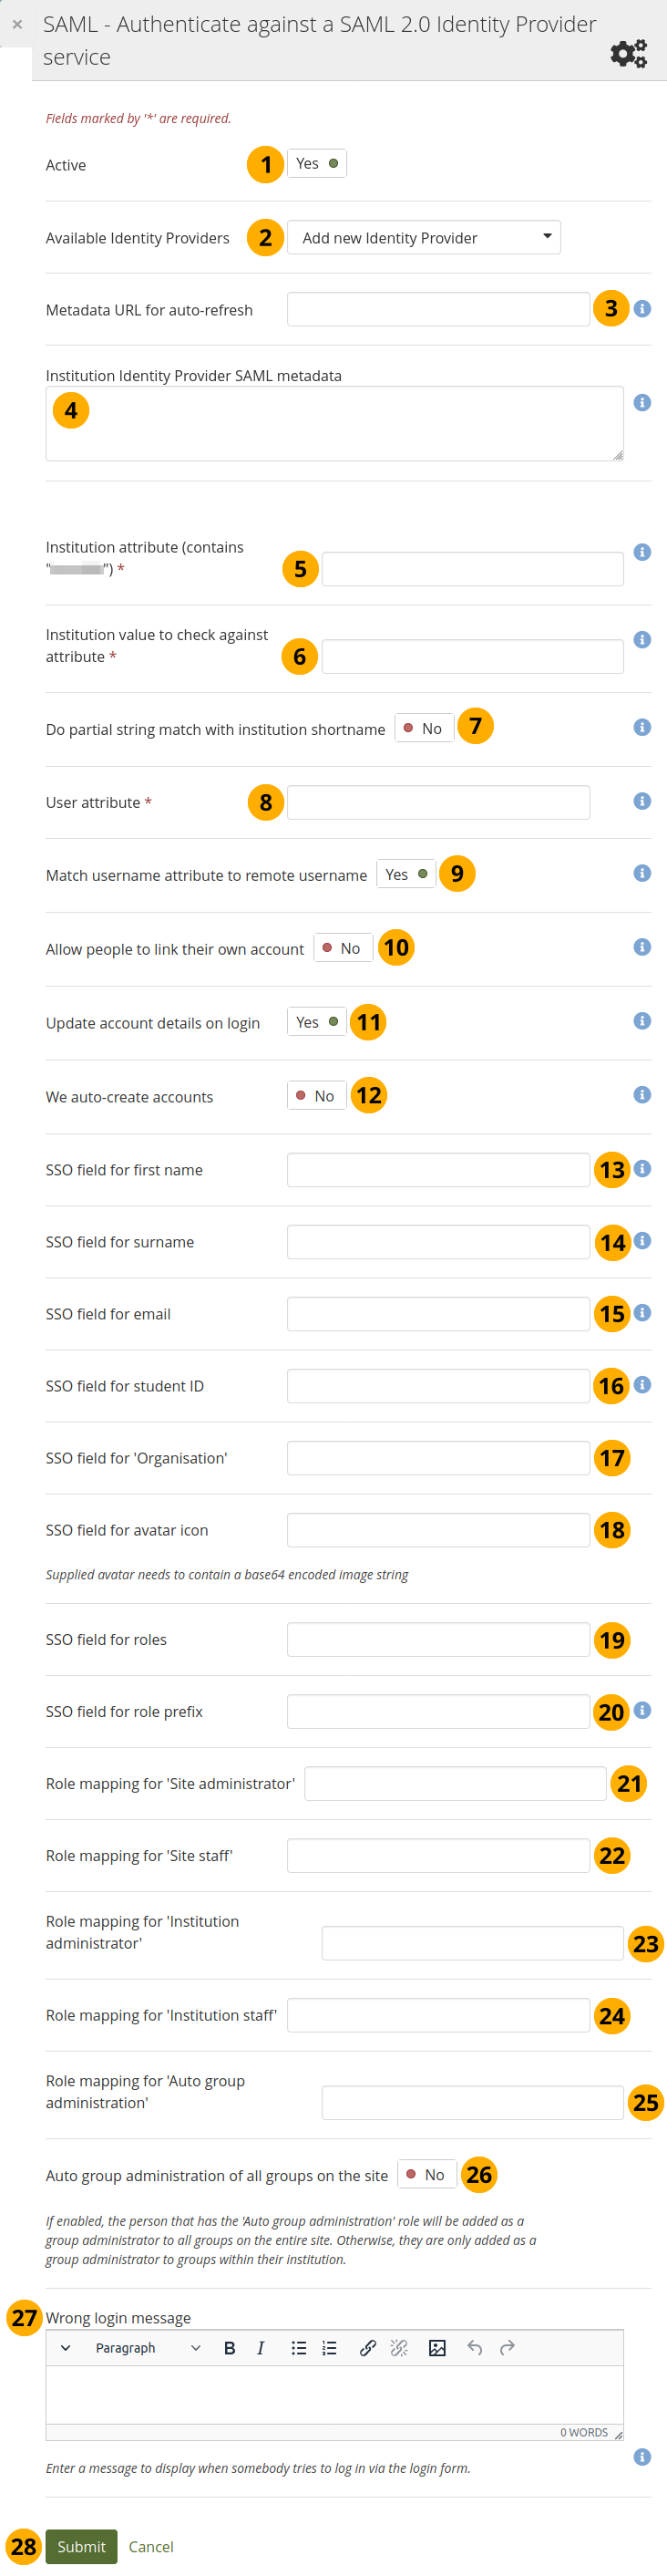
Active: Set the switch to ‚Yes‘ if you want to use the IdP.
Bemerkung
When you have an inactive IdP, it is not displayed on the page that lists all IdPs.
Available Identity Providers: If you add your first SAML IdP, you can only enter the details. Once you have an IdP set up, you see a drop-down menu, and you can choose from them if the metadata for the institution you are setting up uses the same IdP or set up a new IdP.
Bemerkung
When you have more than one SAML IdP set up on your site, people wanting to log in via SSO are taken to an overview page that lists all SSO providers.
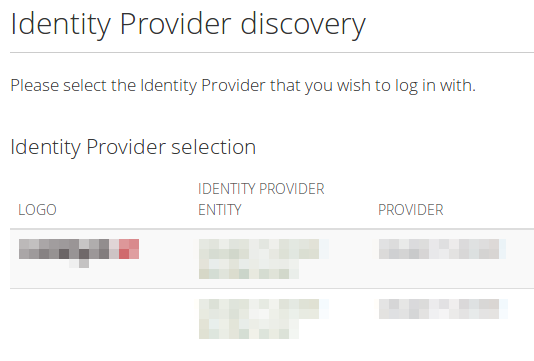
The available information to display is the logo of the service, its name, and the service provider. If you want to display your logo on the page, add the following just below the
<md:IDPSSODescriptor>line and replace ‚linktothelogo‘ with the actual location of the logo:<md:Extensions> <mdui:UIInfo xmlns:mdui="urn:oasis:names:tc:SAML:metadata:ui"> <mdui:Logo width="120" height="30" xml:lang="en">linktothelogo</mdui:Logo> </mdui:UIInfo> </md:Extensions>Metadata URL for auto-refresh: Instead of adding the metadata directly, you can provide the URL to the metadata, which needs to be in XML format, so that changes to it are pulled automatically via cron. You would not have to update the metadata yourself when it changes.
Institution Identity Provider SAML metadata: Enter the metadata from your IdP. Make sure that all information in the SAML plugin configuration is correct and that there are no server dependencies missing.
Bemerkung
This element requires the XML formatted metadata for the IdP that you want to connect to. If the same IdP has already been configured for another institution, then leave this blank.
If you entered metadata in this field and also provided a link to the metadata URL, the latter takes precedence.
If you provided the metadata URL for auto-refresh previously, you do not need to enter the current metadata into this field when you set up a new instance of that IdP connection. It will be fetched automatically.
Institution attribute (contains ‚…‘): Enter the attribute that will be passed from the Identity Provider (IdP) that shows which institution the account belongs to. This usually directly correlates to the LDAP attribute (the signin service of the IdP), e.g. eduPersonOrgDN. This field is required.
Institution value to check against attribute: Enter the value that will be checked against the institution attribute value as passed from the IdP. If the institution regex switch ‚Do partial string match with institution shortname‘ is set to ‚Yes‘, this value can be a regular expression that will be used to check against the institution attribute value. This field is required.
Do partial string match with institution shortname: Switch to ‚Yes‘ to treat the value in ‚Institution value to check against attribute‘ like a regular expression.
Nutzerattribut: Tragen Sie den Namen des Attributs für den Nutzernamen ein, den Sie vom IdP erhalten haben. Pflichtfeld.
Match username attribute to remote username: This switch is set to ‚Yes‘ by default and needs to stay on this setting. It matches the user attribute value to the remote username field assigned to a given account (not the internal Mahara username). Only if you have the experimental feature of ‚usersuniquebyusername‘ turned on can you set this switch to ‚No‘. We do not recommend this unless you are very experienced and have control over all applications in question.
Warnung
By default, SAML authentication instances have the ‚Match username attribute to remote username‘ setting enabled. If that setting were disabled, someone with control over any SAML identity provider could gain control over any account on that Mahara site by setting the username attribute accordingly. In other words, administrators of one institution could control members in other institutions. You would only be able to disable this setting if you set the ‚usersuniquebyusername‘ variable to ‚true‘ in config.php file. However, you should not do that on a Mahara instance to which multiple SAML providers connect and you are not in control of all usernames that are created.
Siehe auch
If you disable ‚Match username attribute to remote username‘, you get an error message which talks about the config setting for ‚usersuniquebyusername‘. Please refer to the experimental feature of the ‚usersuniquebyusername‘ variable for more information.
Allow people to link their own account: Switch to ‚Yes‘ if you want to allow people to link their own internal Mahara account to the authenticated SAML account. This depends on the ‚Match username attribute to remote username‘ option being enabled. If this setting is turned on when people try to log in via SSO and their username as well as the email for example match an internal username, they can link their accounts. That would allow them to log in either via the SSO login or via the regular login box into the same account and avoid account duplication.
Update account details on login: Switch to ‚Yes‘ to update the first name, last name, and email address with the corresponding IdP values passed through at each login.
We auto-create accounts: Switch to ‚Yes‘ to create accounts on Mahara automatically when a person authenticates successfully but does not yet have an account.
Bemerkung
You can turn this setting now also on for multi-tenanted sites that use SAML SSO in more than one institution.
SSO field for first name: Enter the name of the attribute passed by the IdP that contains the person’s first name.
SSO field for surname: Enter the name of the attribute passed by the IdP that contains the person’s last name.
SSO field for email: Enter the name of the attribute passed by the IdP that contains the person’s email address.
SSO field for student ID: Enter the name of the attribute passed by the IdP that contains the student ID.
SSO field for ‚Organisation‘: Enter the name of the attribute that denotes an organisation.
SSO field for avatar icon: If the IdP contains base64-encoded images for a profile picture, you can enter it here.
SSO field for roles: Enter the name of the attribute here that passes in role information.
SSO field for role prefix: If the IdP passes in role information for the person logging in, then you can set this ‚prefix‘ field so that only those roles starting with the prefix should be handled by Mahara. This way the IdP can have different roles for different Service Providers (SP). If the person does not have any roles relating to this prefix, they will not be allowed to log in.
Role mapping for ‚Site administrator‘: Enter the name of the role that is assigned to people in the IdP who shall have site administrator permissions.
Role mapping for ‚Site staff‘: Enter the name of the role that is assigned to people in the IdP who shall have site staff permissions.
Role mapping for ‚Institution administrator‘: Enter the name of the role that is assigned to people in the IdP who shall have institution administrator permissions.
Role mapping for ‚institution staff‘: Enter the name of the role that is assigned to people in the IdP who shall have institution staff permissions.
Bemerkung
At the moment, the institution administrator and institution staff roles are only updated on account creation unless the config variable ‚usersuniquebyusername‘ is used. The site administrator and site staff roles are updated on each login. There is a wishlist item to correct that behaviour for institution administrators and staff.
Role mapping for ‚Auto group administration‘: Enter the name of the role that is assigned to people in the IdP who shall be added to every group in this institution per default.
Bemerkung
The ‚auto group administrator‘ is added to all groups - new and existing - automatically. They are also subscribed to all forums and cannot unsubscribe.
When you set up the ‚parent‘ IdP in an institution, you have an additional setting: ‚Copy roles to all SAML authentication instances‘. That allows you to update the role mappings for all institutions based on this IdP in one go.
Auto group administration of all groups on the site: Set this to ‚Yes‘ if a role from a ‚parent‘ IdP shall be added to all groups on this site. This is useful if the site is very homogeneous for one organisation or for a group of organisations that is administered centrally. If set to ‚No‘, the person is only added to the groups of this particular institution.
Wrong login message: Display this message to people who try to log in via the standard login form instead of the SSO button when they are supposed to use it. This message should contain instructions on how they can gain access to Mahara through SSO.
Bemerkung
The message is displayed right above the login form in the sidebar. Therefore, do not make it too long.
Click the Submit button to enable this authentication method or click Cancel to abort your changes.
11.6.4.3.2. Using Keycloak with SAML
Keycloak is an open source identity and access management service that allows you to set up authentication to various applications.
The steps provided here for using Keycloak in Mahara were used by a community member to test the connection. If you have a different experience, please let us know, and we can expand this section.
Download the XML from
/auth/saml/sp/metadata.php.Create a client in Keycloak with the XML.
Create a client scope in Keycloak, add maps for institution, username, email, first name, last name, etc.
Bemerkung
Make sure ‚SAML Attribute Name‘ matches SSO field names in the Mahara institution SAML configugration.
Set ‚We auto-create accounts‘ to ‚Yes‘ in Mahara to create accounts on login.
Download the ‚Mod Auth Mellon files‘ from the installation tab of the client in Keycloak.
Copy the XML for the IdP to the Mahara ‚Institution Identity Provider SAML metadata‘ in the SAML authentication method.
Add the metadata URL, which is
<keycloak server>/auth/realms/<REALM>/protocol/saml/descriptor.
Siehe auch
There is more information on how to set up Keycloak with SAML on the internet. The blog post ‚Keycloak – Download SAML 2.0 IdP Metadata‘ was useful.
11.6.4.4. Web services
If you want to use web services with accounts in an institution, add the web services authentication.
You need the web services authentication method if you want to allow people to connect via LTI.
You cannot configure anything for the authentication plugin, but need to do that in the Web services area.
11.6.4.5. XML-RPC / MNet Authentifizierung
Siehe auch
MNet authentication is still provided in Mahara for existing instances. However, if you are setting up a new Mahara site, we recommend you connect it to your learning management system via LTI. The Mahara project team expands the functionality possibilities for LTI.
Use the XML-RPC authentication for connecting a Mahara instance to a Moodle or another Mahara installation for sharing login information. With Moodle 2 that does not only mean that you can log in to Mahara via Moodle, but also that you can transfer certain activities into your Mahara portfolio from Moodle.
Eine Moodle-Seite kann mit genau einem Mahara-System verbunden werden. Jede XML-RPC Authentifizierungsinstanz in Mahara benötigt ihre eigene individuelle wwwroot-URL-Adresse und eine Verbindung zu genau einer Mahara Institution.
Bemerkung
Sie müssen Netzwerk aktivieren, um diese Authentifizierung zu verwenden.
Die MNet Authentifizierung einrichten
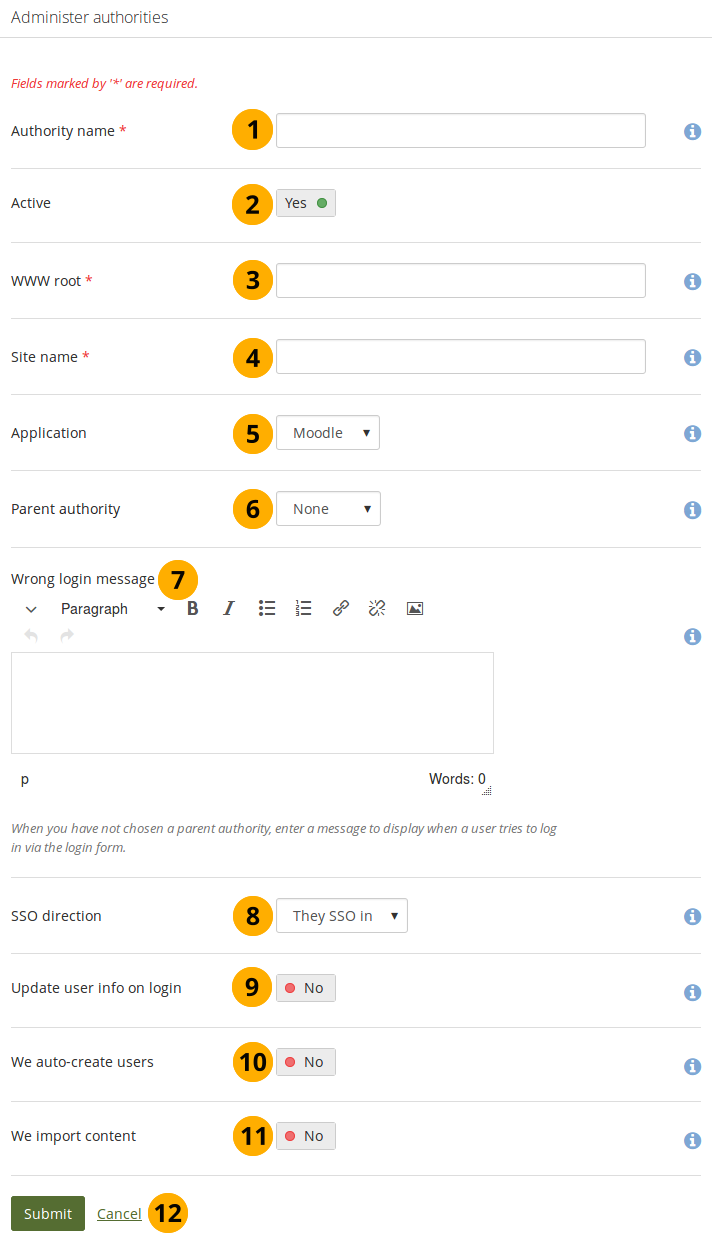
Authentifizierungsname: Geben Sie einen beschreibenden Namen ein, um den Server zu benennen. Bevorzugt ist ein kurzer Name. Pflichtfeld.
Active: Set the switch to ‚Yes‘ if you want to use this authentication method for the institution.
WWW root: Enter the web address of the root of the remote application, e.g.
https://example.com. This field is required. If your WWW root requires a specific port, enter the port number that the remote application is listening at. You probably will not need to add a port unless you are connecting to ahttpsservice or your remote application is running on a non-standard port.Site name: Enter the name to present to people to identify the remote site. If you enable SSO, they may click on this name to start a session at the remote site. This field is required.
Application: Choose the application on the remote side. You can choose between ‚Mahara‘ and ‚Moodle‘.
Parent authority: If you set a parent authority from the already existing authentication methods, people will be able to log in using that authority as well as MNet. For example, you could set up SAML authentication and have that be the parent of this MNet authority. That means that people will be able to log in by clicking the SSO login button using their SSO credentials as well as via MNet from their Moodle. You do not have to set a parent authority. If you do not, people using MNet will only be able to access Mahara via MNet, i.e. log in to Moodle or the other Mahara first.
Bemerkung
If you choose a Parent authority, ensure that all accounts are associated with this authentication method instead of the MNet one. Otherwise, they will not be able to log in via the parent authentication method. If the remote username for MNet and the other authentication method is already the same, you just need to change the authentication method. If they are not yet the same, you need to update the account details together with changing their authentication method.
Wrong login message: Enter a message to display when someone tries to log in via Mahara’s login form but is not allowed to if you have not set up a parent authority.
SSO-Richtung: Wählen Sie aus dem Drop-down-Menü die Richtung in der SSO funktionieren soll.
They SSO in: Enable this option to allow account holders from the remote site to roam to your Mahara site without having to enter their username and password. This is the most commonly used setting. The remote application is the source of the login information and where accounts are created initially. This is the default option.
We SSO out: Enable this option to allow your account holders to roam from Mahara to the remote site without having to enter their username and password there. Mahara is the source of the login information and where accounts are created initially. The following fields are replaced by They auto-create accounts if this option is selected.
Update account info on login: Set this switch to ‚Yes‘ to bring over personal data from the remote site upon each login and update your Mahara account record with any changes. The following fields, when filled in on Moodle, are filled in Mahara:
First name (always carried over)
Last name (always carried over)
Email address (always carried over)
Profile picture
Description (Introduction on Mahara)
City
Country
Language
HTML-Editoreinstellung
We auto-create accounts: Switch to ‚Yes‘ to create accounts on Mahara automatically when a person authenticates successfully but does not yet have an account.
We import content: Not all network-enabled applications support this, but if they do, e.g. Moodle, this will allow people of the remote site to import content to Mahara. It depends on the option ‚They SSO in‘ from ‚SSO direction‘ and it is sensible to also have ‚We auto-create accounts‘ set.
Click the Submit button to enable this authentication method or click Cancel to abort your changes.
If the connection to the remote site is successful, the public key of the remote site will be stored with the authentication method and rotated when needed. If there is a problem and the public key does not update, you can exchange it yourself with the correct one while you are troubleshooting the underlying problem.
Siehe auch
Refer to the comprehensive guide about setting up Mahoodle, the combination of Mahara and Moodle, for step-by-step instructions on how to set everything up on the Moodle side and on Mahara. The guide explains the steps for both Moodle 1.9 and Moodle 2.x.
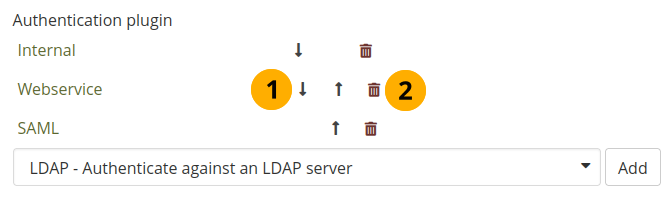
11.6.4.6. Reihenfolge der Authentifizierungsmethoden
Wenn Sie mehrere Authentifizierungsmethoden innerhalb einer Institution aktiviert haben, können Sie die Reihenfolge der Abfrage festlegen.
Reihenfolge der Authentifizierungsmethoden
Use the Down arrow button and the Up arrow to move a specific authentication method down or up in the list. Mahara looks for accounts of people in the order of the list.
Löschen Sie eine einzelne Authentifizierungsmethode durch Anklicken des Löschen-Buttons|delete|.
Bemerkung
You cannot delete an authentication method when there are still people who require it to log in. Before deleting an authentication method, you have to move the accounts to another authentication method.
11.6.4.7. Institution sperren
Ein Site-Administrator kann eine Institution jederzeit sperren.

Sperren und Institution
Click the Suspend institution button to make an institution (temporarily) unavailable to its members.
11.6.5. Statische Seite der Institution
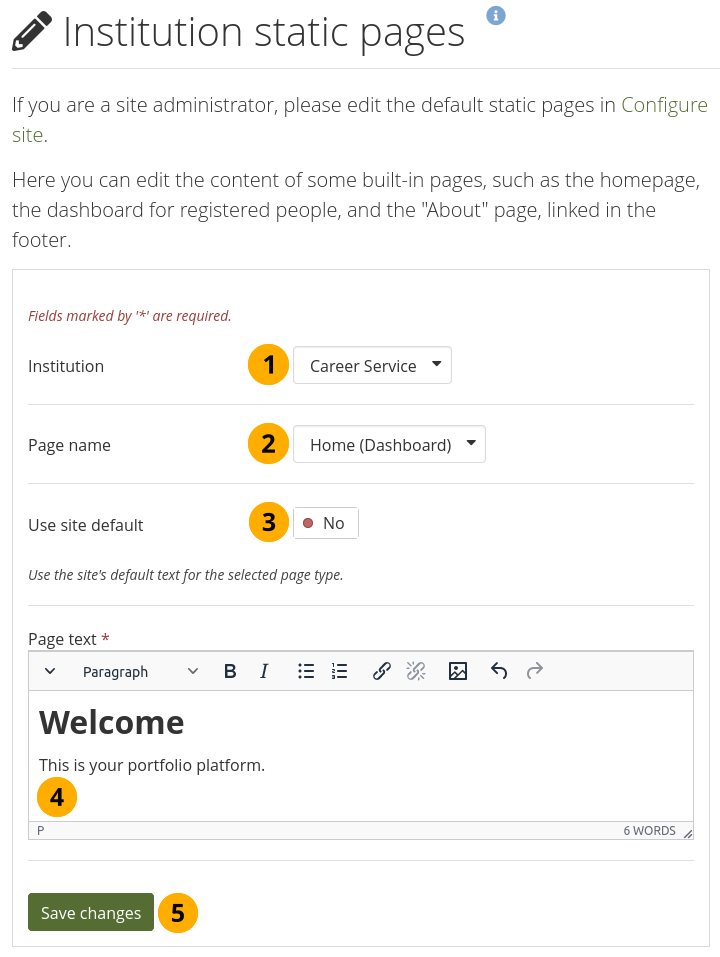
Administration menu → Institutions → Static pages
Institutionsadministratoren können den Inhalt von statischen Seiten, die ein Site-Administrator created erstellt hat, überschreiben. Dies sind folgende Seiten:
Impressum/Über
Startseite
Startseite vor Login
All pages come with default text that you can change. Every page must contain some text. You can use the visual editor to style your page.
Statische Seite der Institution bearbeiten
Institution: If you are a site administrator or an institution administrator of more than one institution, choose the institution for which you want to change the page content. If you administer only one institution, its name is displayed without the drop-down menu.
Site-Name: Wählen Sie vom Drop-down-Menü die Seite aus, die Sie bearbeiten möchten.
Use site default: Switch to ‚Yes‘ if you want to use the content that is displayed on the page for the entire site. Switch to ‚No‘ if you want to provide your own content.
Page text: Change the text in the editor window if you selected ‚No‘ for ‚Use site default‘. You cannot leave this field empty.
Klicken Sie auf den Änderungen speichern-Button.
11.6.6. Legal
Administration menu → Institutions → Legal
Every institution can have its own statement about terms and conditions and privacy in addition to the site’s statements. If the site administrator turned on ‚Strict privacy‘ in the institution settings, everyone needs to accept them before being able to use their account.
Warnung
The Mahara project cannot give legal advice. If you need legal advice, please consult your own lawyer to ensure that you comply with applicable laws.
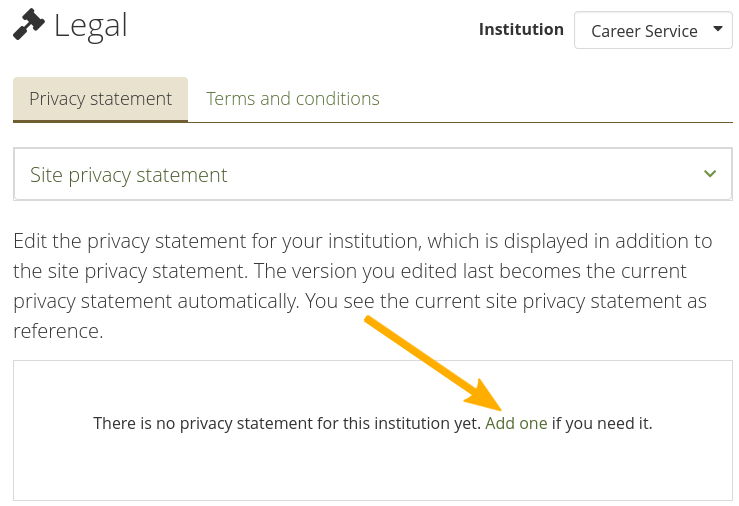
Legal statements overview page on the institution level without any statements
When an institution doesn’t have its own privacy statement or terms and conditions set up, the site statement is the default one that is used. Set up your own institution statement by clicking the ‚Add one‘ link.
Bemerkung
Institutions do not have to set up their own legal statements if the site statement is sufficient.
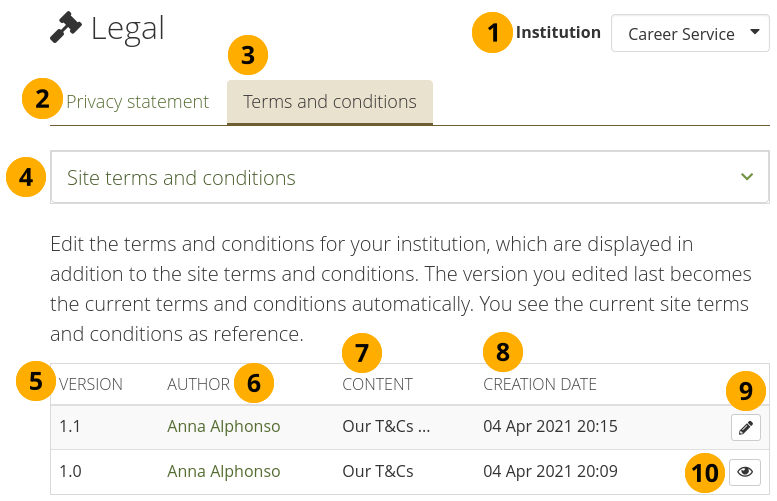
Legal statements overview page on the institution level
Institution: The institution for which you are viewing the statements is displayed.
Bemerkung
If you are an institution administrator, you only see your own institution. If you are a site administrator, you can select the institution for which you want to view the statement.
Click the ‚Privacy statement‘ tab to edit the current privacy statement for the institution and view old versions.
Click the ‚Terms and conditions‘ tab to edit the current terms and conditions for the institution and view old versions.
The site privacy statement or terms and conditions are provided as reference so you can decide whether your institution needs its own statements.
Version: Version number of the statement.
Bemerkung
Versions are listed in reverse chronological order.
Author: Person who edited the version.
Content: Beginning of the text of the statement.
Creation date: Date and time when the version was saved.
Click the Edit button when you want to make changes to the current version. It will be saved as a new version.
Click the View button to see the full text of an old version.
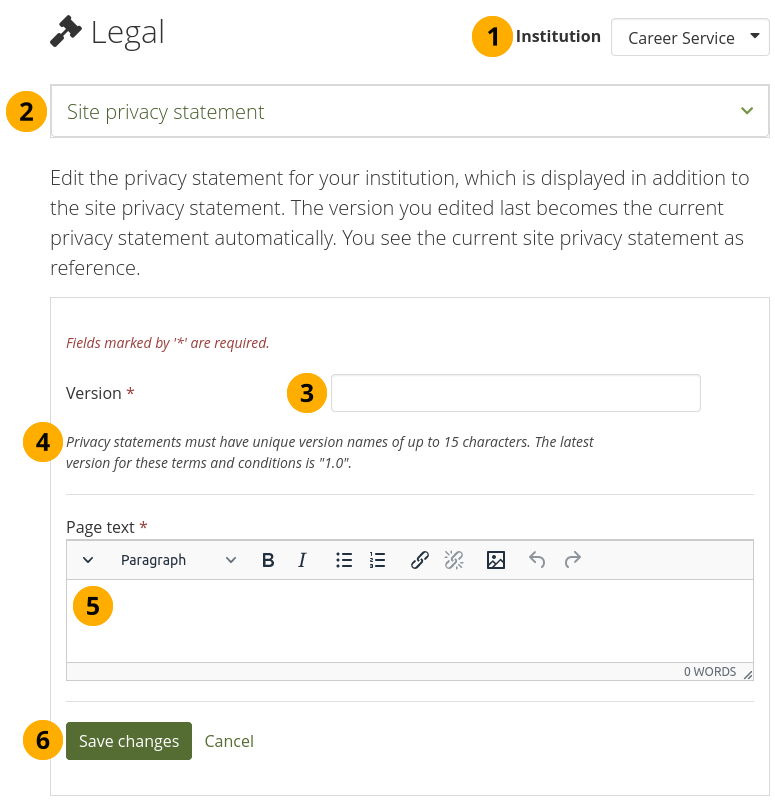
11.6.6.1. Datenschutzerklärung
Warnung
You cannot save a draft version of your changed privacy statement. As soon as you save the form, anybody logging in will be asked to accept the new privacy statement.
Edit the institution level privacy statement
Institution: The institution for which you are viewing the statements.
Bemerkung
If you are an institution administrator, you only see your own institution. If you are a site administrator, you can select the institution for which you want to view the statement.
Site privacy statement: View the site’s privacy statement so you don’t contradict it in your institution’s statement.
Version: Give your statement a new version number. It can be up to 15 characters long and must be different from any previous one.
The previous version number is stated for convenience.
Page text: Enter the text that should be displayed in the privacy statement.
Click the Save changes button to accept your changes, or click Cancel to abort your changes.
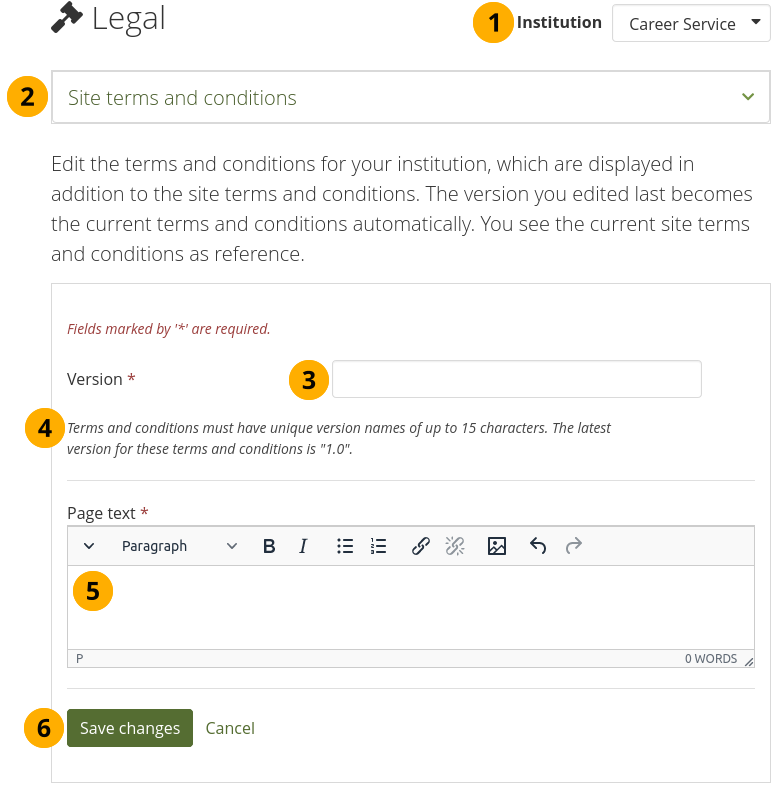
11.6.6.2. Nutzungsbedingungen
Warnung
You cannot save a draft version of your changed terms and conditions. As soon as you save the form, anybody logging in will be asked to accept the new terms and conditions.
Edit the institution level terms and conditions
Institution: The institution for which you are viewing the statements.
Bemerkung
If you are an institution administrator, you only see your own institution. If you are a site administrator, you can select the institution for which you want to view the statement.
Site terms and conditions: View the site’s terms and conditions so you don’t contradict it in your institution’s statement.
Version: Give your statement a new version number. It can be up to 15 characters long and must be different from any previous one.
The previous version number is stated for convenience.
Page text: Enter the text that should be displayed in the terms and conditions.
Click the Save changes button to accept your changes or click Cancel to abort your changes.
11.6.7. Mitglieder
Administration menu → Institutions → Members
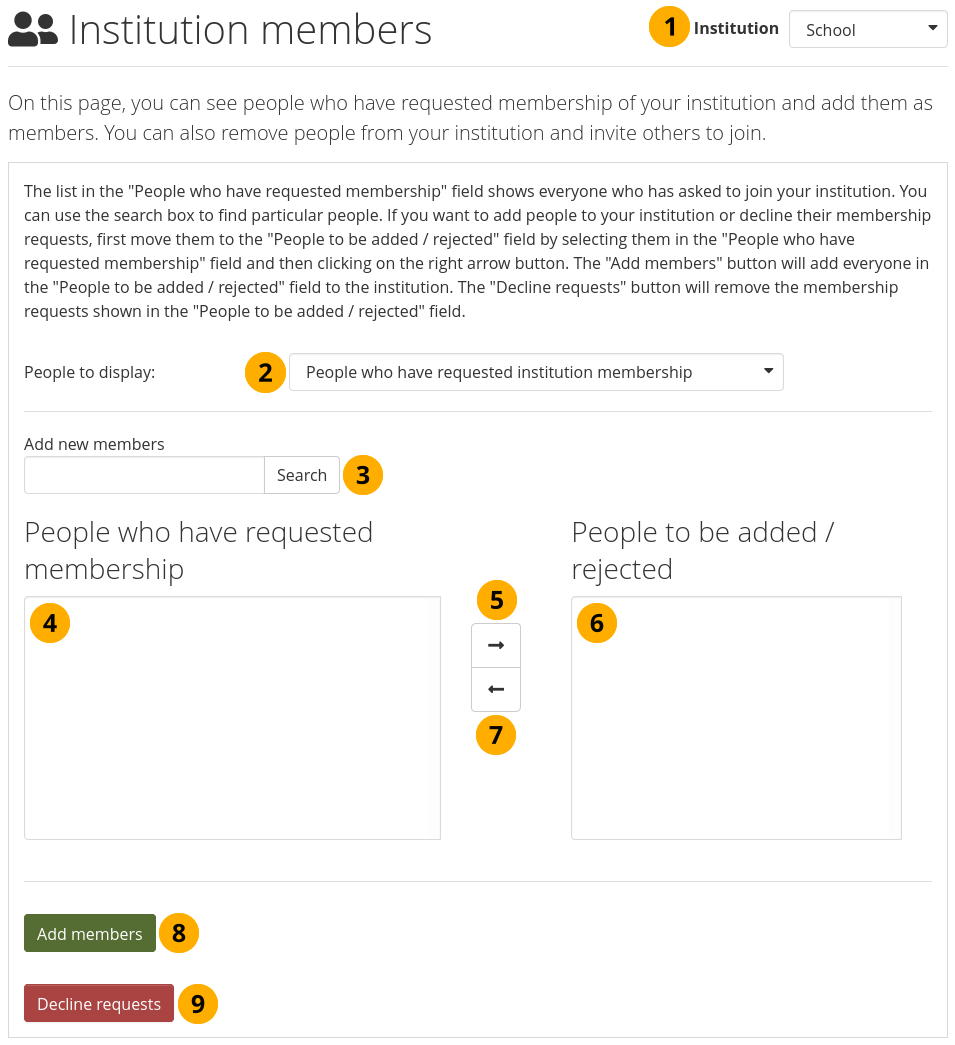
You can add and remove members from one institution in bulk. As site administrator, you can always add members to an institution. As institution administrator, you can only invite people to become members.
You can filter accounts to narrow the result list:
Personen, die eine Mitgliedschaft in der Institution beantragt haben
Personen, die eine Mitgliedschaft in der Institution nicht beantragt haben
Personen, die die Institution verlassen haben
Personen, die bereits Mitglied der Institution sind
Personen, die in die Institution eingeladen wurden
Bemerkung
Double-click a name and it will be moved to the other side. This goes for all functionalities that are similar to this one here.
11.6.7.1. Personen, die eine Mitgliedschaft in der Institution beantragt haben
If your institution allows self-registration, people who are not already members of your institution can request to join it.
Institution administrators receive notifications about membership requests. Site administrators only receive notifications about people wanting to join ‚No Institution‘.
Mitgliedsanfragen von Institutionen akzeptieren oder verwerfen.
Institution: Choose from the drop-down menu to which institution you wish to add people. If there is only one institution that you can administer, its name will be displayed without the drop-down menu.
People to display: Choose People who have requested institution membership.
Add new members: Search for people in the Search box if there are too many names listed.
People who have requested membership: Select the people you wish to add to the institution.
Add the people by clicking the Right-arrow button .
People to be added / rejected: If you put people into the box for ‚People to be added / rejected‘ by accident, you can remove them from that list by clicking on them.
Then click the Left-arrow button , and they are removed from the list.
Wenn Sie alle Mitglieder bearbeitet haben, klicken Sie auf den Mitglieder hinzufügen-Button.
Alternatively, if you wish to decline people’s membership, select them, and then send a general denial by clicking the Decline requests button.
11.6.7.2. Personen, die bisher keine Mitgliedschaft beantragt haben
An admin can also take the initiative and invite or add people to an institution.
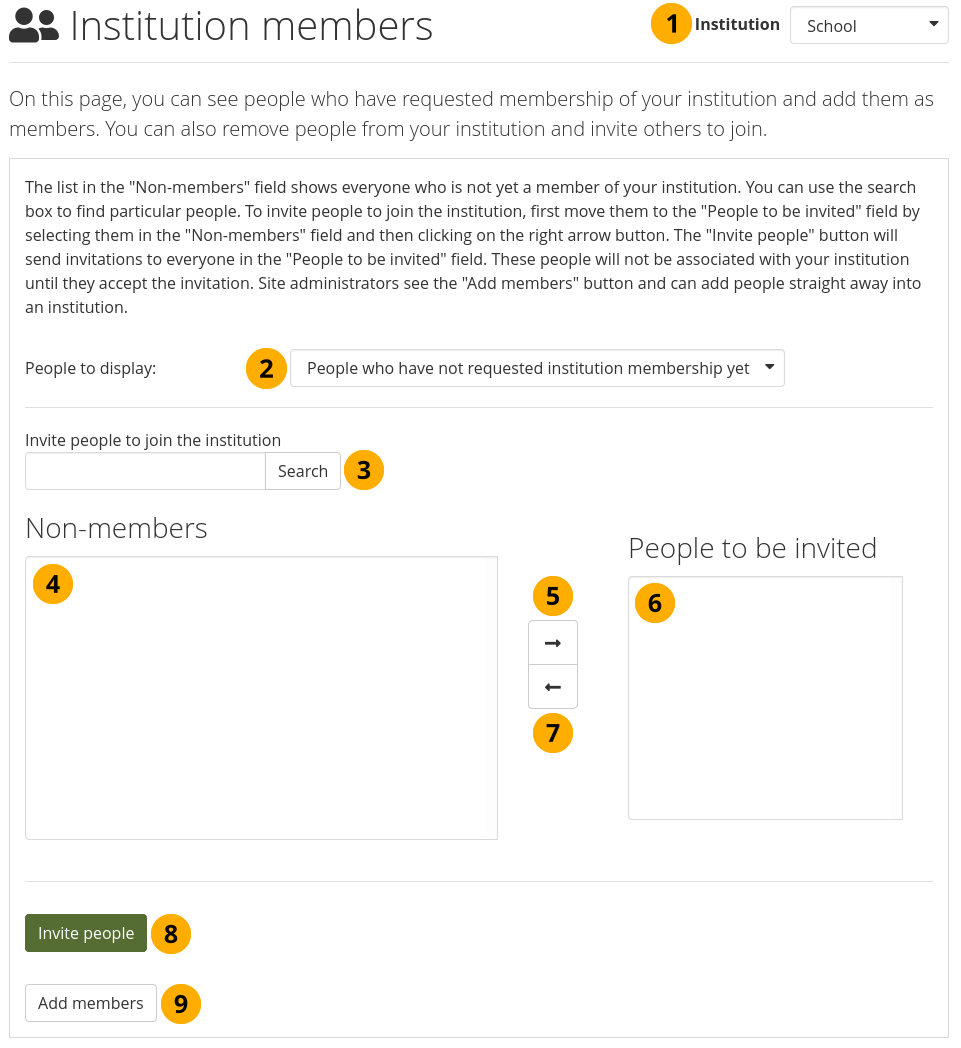
Invite or add people to become institution members
Institution: Choose from the drop-down menu to which institution you wish to invite or add people. If there is only one institution that you can administer, its name will be displayed without the drop-down menu.
People to display: Choose People who have not requested membership yet.
Invite people to join the institution: Search for people in the Search box if there are too many names listed.
Non-members: Select the people you wish to invite to the institution.
Add the people to the list People to be invited by clicking the Right-arrow button .
If you put a person into the box for ‚People to be invited‘ by accident, you can remove them from that list by clicking on them.
Then click the Left-arrow button , and they are removed from the list.
When you have all the members you wish to invite to the institution, click the Invite people button. The invitees receive a notification and can accept or decline the institution membership invitation.
Alternatively, if you are a site administrator, you can click the Add members button to add people to the institution without asking them first.
11.6.7.3. Personen, die die Institution verlassen haben
An administrator can filter people by the previous institution to which they were attached in order to find them more quickly.
Bemerkung
This is only of importance for a multi-tenanted Mahara instance with at least two institutions.
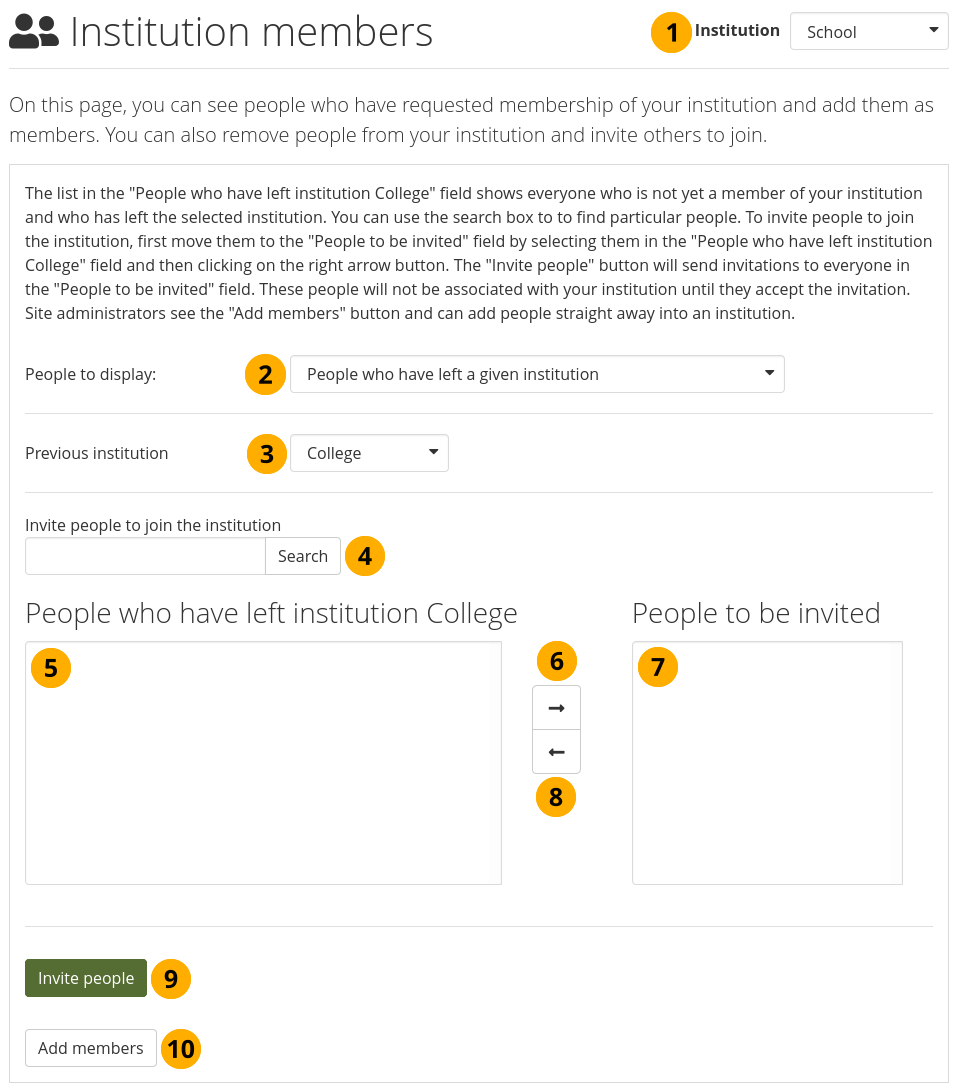
Invite or add people to become institution members when they had left an institution
Institution: Choose from the drop-down menu to which institution you wish to invite or add people. If there is only one institution that you can administer, its name will be displayed without the drop-down menu.
People to display: Choose People who have left a given institution.
Bemerkung
‚Left‘ is interpreted loosely, it also means when an administrator removed them from an institution.
Previous institution: Choose the institution from which you want to add people. They must have left it first to be listed here.
Invite people to join the institution: You can search for people in the Search box if there are too many names listed.
People who have left institution [name of the institution]: Select the people you wish to invite or add to the institution listed.
Add the people to the list People to be invited by clicking the Right-arrow button .
If you put a person into the box for ‚People to be invited‘ by accident, you can remove them from that list by clicking on them.
Then click the Left-arrow button , and they are removed from the list.
When you have all the people you wish to invite to this institution, click the Invite people button. The invitees receive a notification and can accept or decline the institution membership invitation.
Alternatively, if you are a site administrator, you can click the Add members button add people to the institution without asking them first.
Bemerkung
Mahara keeps track of the last institution of a person via an invisible tag.
11.6.7.4. Personen, die bereits Mitglied der Institution sind
You can remove members from an institution, e.g. if they are no longer students at a school or university, but should still have an account on Mahara or when they are just switching institutions on the same Mahara instance.
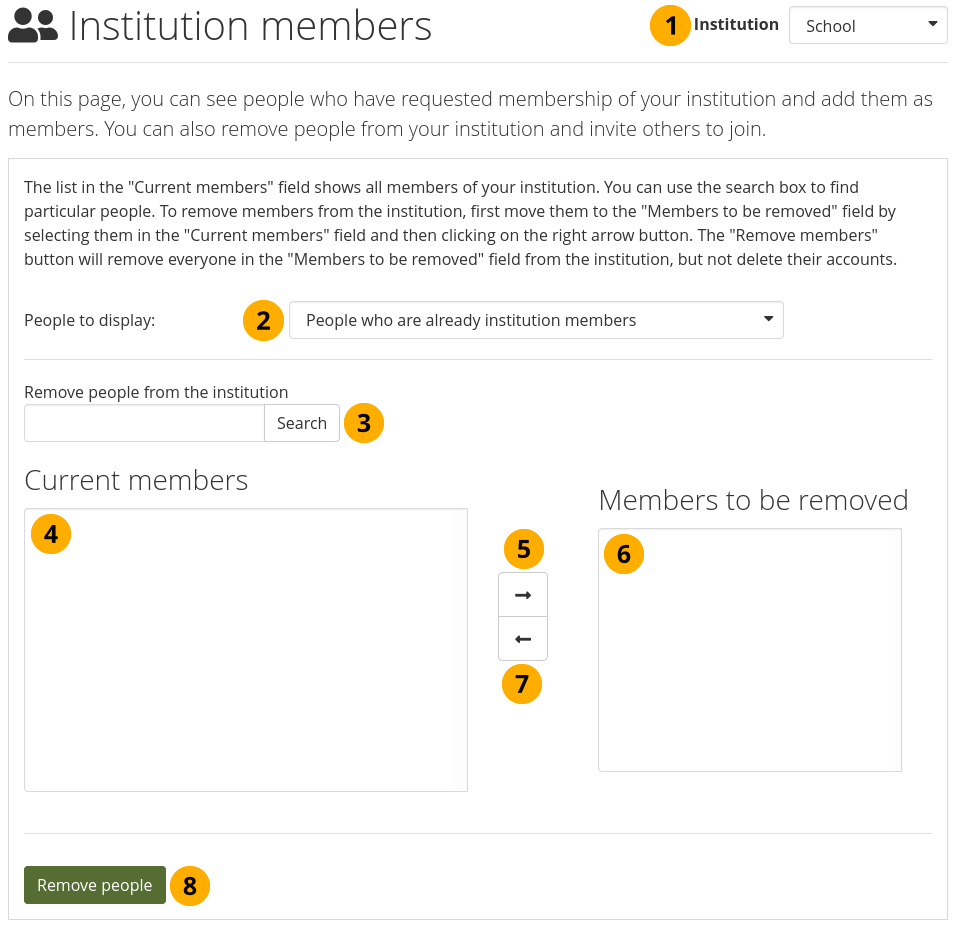
Remove members from an institution
Institution: Choose from the drop-down menu which institution’s members you wish to display. If there is only one institution that you can administer, its name will be displayed without the drop-down menu.
People to display: Choose People who are already institution members.
Remove people from the institution: You can search for members in the Search box if there are too many names listed.
Current members: Select the members you wish to remove from the institution.
Add them to the list Members to be removed by clicking the Right-arrow button .
If you put a person into the box for ‚Members to be removed‘ by accident, you can remove them from that list by clicking on them.
Then click the Left-arrow button , and they are removed from the list.
When you have all the members you wish to remove from your institution, click the Remove people button.
11.6.7.5. Personen, die in die Institution eingeladen wurden
An administrator can uninvite people from an institution.
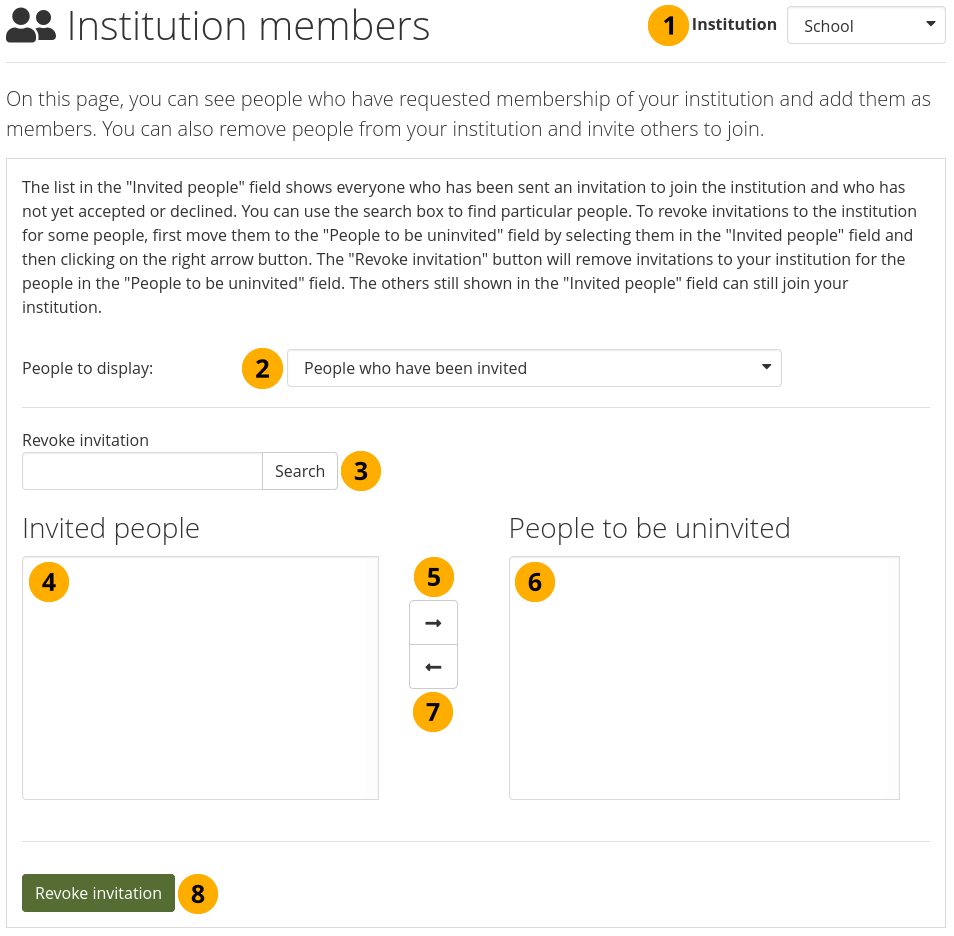
Uninvite people from joining your institution
Institution: Choose from the drop-down menu which institution’s invited people you wish to display. If there is only one institution that you can administer, its name will be displayed without the drop-down menu.
People to display: Choose People who have been invited.
Revoke invitations: You can search for people in the Search box if there are too many names listed.
Invited people: Select the people whose invitation to join your institution you want to revoke.
Add the people to the list People to be uninvited by clicking the Right-arrow button .
If you put a person into the box for ‚People to be uninvited‘ by accident, you can remove them from that list by clicking on them.
Then click the Left-arrow button , and they are removed from the list.
When you have all the people you wish to uninvite from the institution, click the Revoke invitations button.
11.6.8. Mitarbeiter/innen der Institution
Administration menu → Institutions → Staff
You can give institution members staff rights in an institution in which they are members. The staff role allows them to create course groups for example. This page allows you to do that in bulk for many members at once.
Siehe auch
You can also give staff rights on the person’s account settings page.
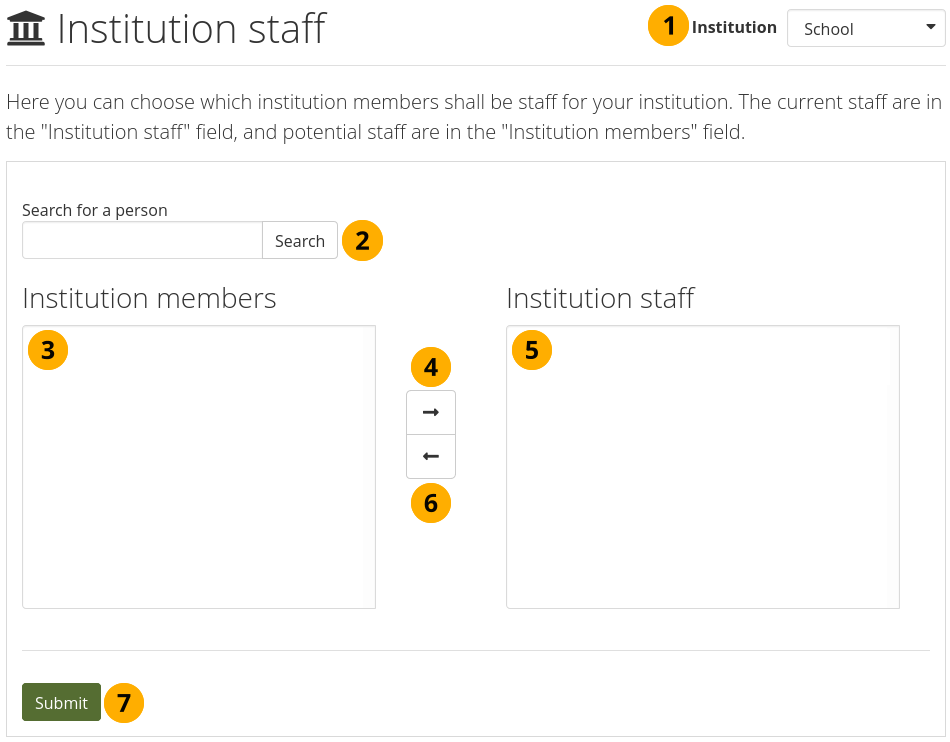
Give members institution staff rights.
Institution: Choose the institution from the drop-down menu for which want to give staff rights to members. If there is only one institution that you can administer, its name will be displayed without the drop-down menu.
Search for a person: You can search for people in the Search box if there are too many names listed.
Institutionsmitglieder: Wählen Sie die Mitglieder der Institution aus, denen Sie Mitarbeiter/innen-Rechte geben wollen.
Add the people to the list Institution staff by clicking the Right-arrow button .
If you put a person into the institution staff list by accident or want to remove existing staff members and return them to normal membership status, select them.
Then click the Left-arrow button , and they are removed from the list.
Wenn Sie alle Mitglieder hinzugefügt haben, klicken Sie auf den Bestätigen-Button.
11.6.9. Administrator/innen der Institution
Administration menu → Institutions → Administrators
You can give members administrator rights in an institution in which they are members. The administrator role will allow them to manage others in their own institution. This page allows you to do that in bulk for many people at once.
Siehe auch
You can also give admin rights on the person’s account settings page.
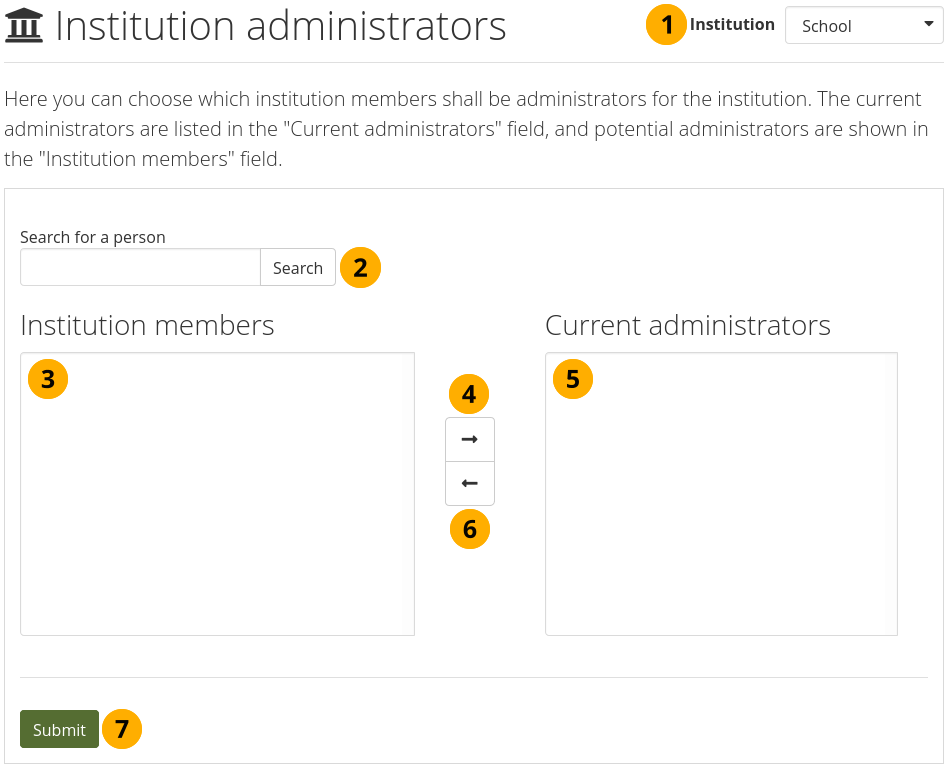
Give members institution admin rights.
Institution: Choose the institution from the drop-down menu for which want to give admin rights to members. If there is only one institution that you can administer, its name will be displayed without the drop-down menu.
Search for a person: You can search for people in the Search box if there are too many names listed.
Institution members: Select the institution members who shall get administrator rights.
Add the member to the list Current administrators by clicking on the Right-arrow button .
If you put a person into the institution administrator list by accident or want to remove existing administration members and return them to normal membership status, select them.
Then click on the Left-arrow button , and they are removed from the list.
When you have all the members you wish to have as administrators in the institution, click the Submit button.
11.6.10. Benachrichtigungen für Administrator/innen
Administration menu → Institutions → Admin notifications
Warnung
The administrator notifications are site administrator notifications, yet institution administrators are listed as well even though they do not receive these types of notifications. There is an open wishlist item to deal with this.
The Admin notifications page lists all people with institution and site administrator access on your site. It shows their selected notification preferences for all administrator notifications. There should be at least one administrator receiving each type of message generated.
Bemerkung
Institution administrators only see administrator notifications for their own institutions.
Administrator notifications are:
Kontaktieren Sie uns!
Anstößiger Inhalt
Wiederholter Virenupload
Virenkennung Freigabe
Objectionable content in forum
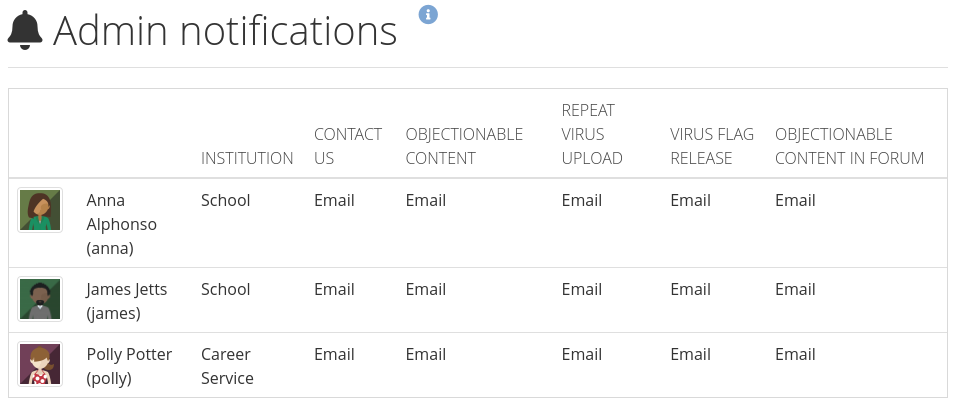
Overview of the administrator notification types
11.6.11. Profil-Vollständigkeit
Administration menu → Institutions → Profile completion
Profile completion lets you select content that members of an institution need in order to have a ‚completed‘ profile. The parameters for a completed profile can differ from one institution to another. In some cases you can also decide how many content items a person needs of a specific artefact type to complete their profile.
Siehe auch
The site administrator needs to enable the profile completion feature in the side block settings for institutions to be able to use it.
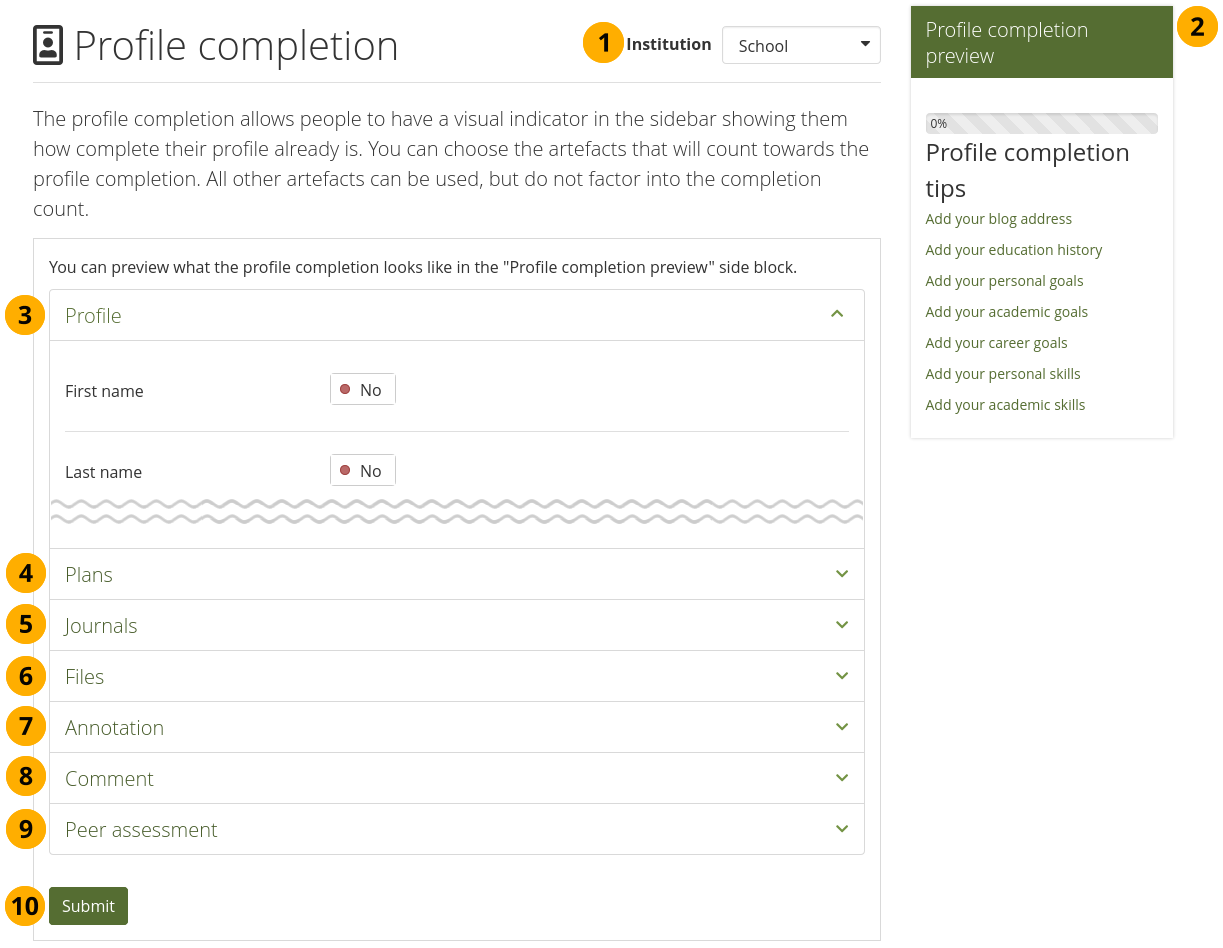
Profil-Vervollständigung für Institution aktivieren
Institution: If you administer more than one institution, select the one for which you want to set up the profile completion from the drop-down menu. If there is only one institution, its name will be displayed without the drop-down menu.
Profile completion preview: Once you clicked the Submit button, you will see a preview of the progress bar that is displayed to your institution members in the side block.
Profile: Set the switches to ‚Yes‘ for the items that you want your members to fill in from their profile. Select the number of groups a person should join or number of friends a member of your institution should make.
Résumé: Set the switches to ‚Yes‘ for the résumé items that a person should fill in to have a completed profile.
Plans: Select the number of plans and tasks a person should have from the drop-down menus.
Journals: Select whether a person needs to have a certain number of journal entries for a complete profile.
Files: In this section you can decide whether a person needs to upload a certain number of files. You can also specify the file type and decide how many items of each file type a person should upload for a complete profile.
Annotation: Select from the drop-down menu the number of comments a person should make on annotations to gain a completed profile.
Comment: Select from the drop-down menu the number of comments a person should make to gain a completed profile.
Klicken Sie auf den Bestätigen-Button, um Ihre Änderungen zu speichern.
11.6.12. Institution pages and collections
Administration menu → Institutions → Pages and collections
11.6.12.1. Create and manage institution portfolios
You can create pages and collections for your entire institution. Although you could always create portfolios under a regular account that others could copy into their own portfolio, the advantage of institution pages and collections is that new members in the institution can receive a copy upon joining the institution. All administrators for that institution and the site administrator have access to the institution portfolios, and can manage them collaboratively.
Creating and editing an institution portfolio is very similar to creating and editing a personal portfolio. However, not all blocks are available when editing an institution page due to the different context. Please refer to the overview of blocks for a list of all the blocks that you can use in an institution page.
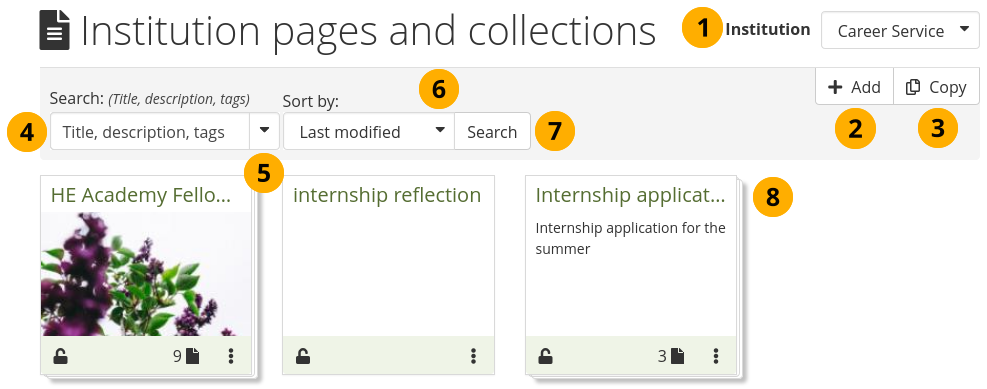
Manage institution pages and collections
Institution: If you administer more than one institution, select the one for which you want to create or edit pages. If there is only one institution, its name will be displayed without the drop-down menu.
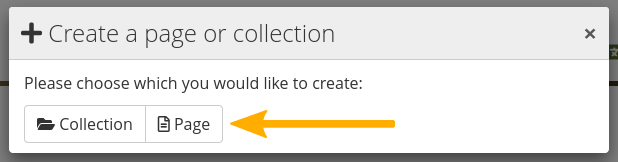
Click the Add button to start a new page or collection from scratch.
Bemerkung
A modal opens in which you can choose whether to create a page or collection.
Click the Copy button to choose an existing page or collection as basis.
Search: If you have many pages and collections on the institution level, type your search term into the search field.
Use the drop-down arrow to limit your search. The available options are:
Title, description, tags: Search for your search term in the title, descirption, and tags of your site portfolios.
Title, description: This is the default option. It searches in the title and description of your site portfolios.
Tags: Search only within the tags of your site portfolios.
Sort by: Decide on the sort order in which you wish to display your portfolios.
Alphabetical: Portfolios are displayed in alphabetical order.
Date created: List the portfolios in chronologically reverse order with the newest portfolios first.
Last modified: Display the portfolios in the order of their last modification with the most recent portfolios that have been changed first. This is the default display option.
Last viewed: Show the portfolios in the order in which they were viewed by you and others starting with the most recently viewed portfolios.
Most visited: Display the portfolios that have been visited most first in the list.
Most feedback: List the portfolios in descending order based on the amount of feedback they have received.
Bemerkung
The sort order that you choose does not change when you navigate away from the overview page or log out. When you change the sort order, that new setting will be used until you change it again.
Click the Search button to search your site portfolios based on your search term and / or sorting criteria.
Edit your institution pages and collections as usual.
Bemerkung
When somebody leaves comments on an institution page or artefact, the institution and site administrators receive a notification.
11.6.12.2. Create template portfolios efficiently
You often create institution portfolios as templates to roll them out to everyone in your institution. Alternatively, you could create rules to put templates into certain accounts at specific times. This option is currently only available through additional development work, but the foundations are available through the new template options.
When you create an institution collection, you can mark it as template.
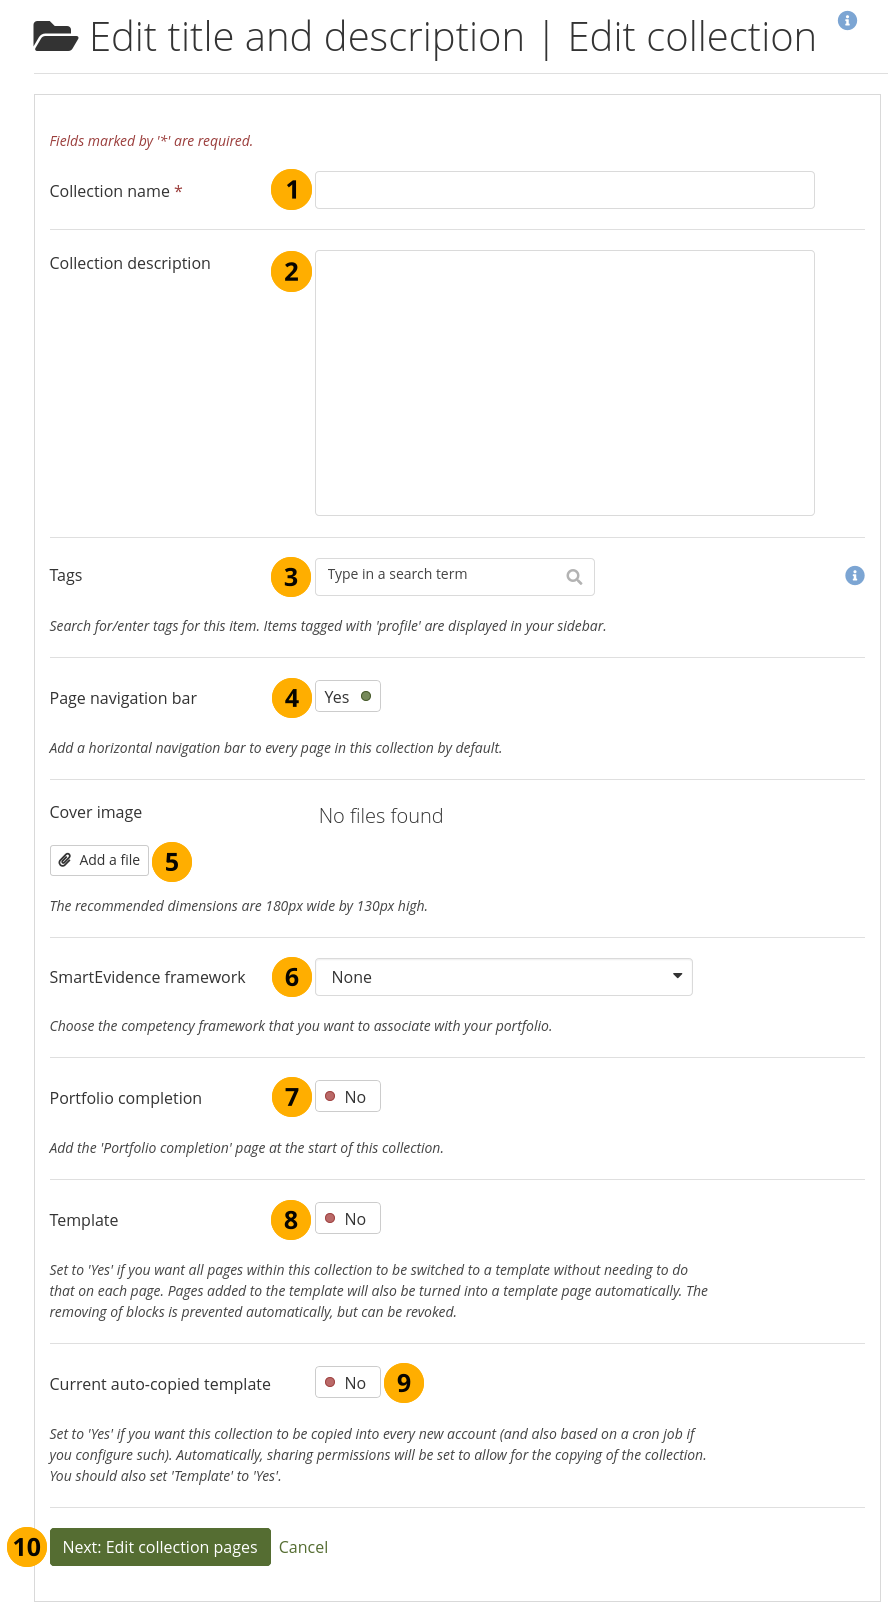
Create institution collection
Collection name: Give your collection a title. This field is required.
Collection description: Add a short description. It is displayed on the ‚Pages and collections‘ overview page and in other places where collection metadata is shown.
Tags: Add one or more tags to your collection to find it more easily.
Page navigation bar: Per default, each collection has a built-in navigation so you can easily move from one page to the next. You can remove it though if you like.
Bemerkung
If you use SmartEvidence or the portfolio completion option, you should keep the page navigation bar. If you don’t have it, you can’t easily return to those pages.
Cover image: Click the Add a file button to select a cover image for your collection. It is displayed on the ‚Pages and collections‘ overview page.
SmartEvidence framework: Select a framework if you want to create a competency portfolio. This option is only available if the institution allows the use of SmartEvidence.
Portfolio completion: You can add the portfolio completion page as first page in your collection if it is enabled on the institution level. It can be used as alternative to SmartEvidence or in conjunction with it.
- Template: If this collection is a template, you can mark it as such. Automatically, the properties of pages you add to the collection are changed:
All pages within the collection are turned into template pages, i.e. portfolio authors who copy the collection won’t be able to change the instructions, and the original template page is linked.
The switch ‚Prevent removing of blocks‘ is set to ‚Yes‘. However, it can be set to ‚No‘ by the portfolio authors for individual pages as needed if they do want to remove blocks.
- Current auto-copied template: You can turn a template into an auto-copied template for an institution. That means that the collection is automatically:
shared with the institution,
copying permissions are set to allow copying and to place a copy into new institution members‘ accounts.
Bemerkung
This option is a convenience for the time being. You can still share any other institution portfolio with the entire institution and set it to be copied into new accounts.
Only one portfolio in an institution can have the option Current auto-copied template activated. If the setting is switched to ‚No‘, the portfolio sharing permissions are removed automatically. You can still share it manually though by specifically selecting the sharing options.
This option may not seem to be so useful at the moment as you can still override its sharing options and also make other portfolios still available as templates. Where this option is useful is when you decide which portfolio is automatically copied into an account based on certain rules or account properties when you have a recertification portfolio where certain account holders need to receive a new portfolio every year. Currently, this is only possible through additional development work, but allows you to create complex sharing rules for portfolios that need to be used by large groups of people in an organisation.
Portfolios that are automatically copied into new accounts are created based on a cron job, which runs every minute, to prevent the system slowing down when lots of portfolios need to be created at once. Next: Edit collection pages: Add pages to your collection.
11.6.13. Institution journals
Administration menu → Institutions → Journals
You create institution journals like regular personal journals. Institution journals allow you to create a journal template and then copy that into personal accounts for example. They also allow you to create a news blog for your institution.
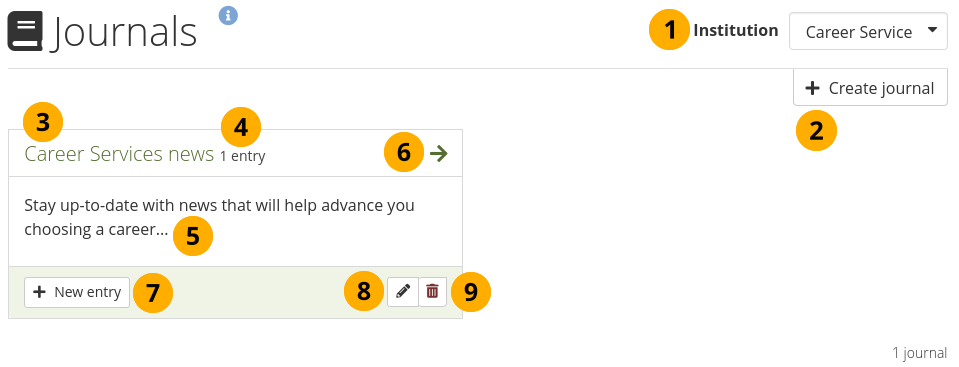
Institution journals
Institution: If you administer more than one institution, select the one for which you want to create or update a journal. If there is only one institution, its name will be displayed without the drop-down menu.
You can create multiple journals. Click the Create journal button to set up a new journal.
All your journals are listed on Administration menu → Institutions → Journals with their titles. The titles link through to the individual journals.
The number of entries in this particular journal
The description of the journal if it has one
Click the Arrow icon to be taken to the journal and see all journal entries.
Click the New entry button to create a new journal entry from this screen.
Click the Edit button to make changes to your journal title, description, or tags.
Click the Delete button to delete the journal and all its entries.
Warnung
When you click the Delete button, you receive a confirmation message whether you really want to delete the journal or not. If you used the journal or an entry of it in a page, Mahara lets you know so you can decide whether to delete the journal or not. Once you agree to delete the journal, your journal and all its content are removed permanently and cannot be retrieved again.
11.6.14. Institutionsansichten und -sammlungen freigeben
Administration menu → Institutions → Share
Sie sehen eine Übersicht aller Institutionsansichten und -sammlungen der gewählten Institution.
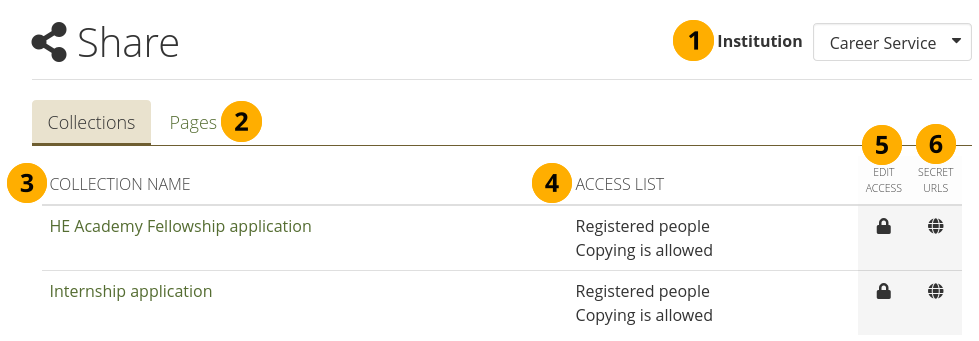
Institutionsansichten und -sammlungen freigeben
Institution: If you administer more than one institution, select the one for which you want to change sharing permissions for pages or collections. If there is only one institution, its name will be displayed without the drop-down menu.
Select whether you want to change permissions for a collection or a page.
Bemerkung
You can select more than one collection or page on the following screen and give them all the same permissions at once.
Collection / page name: All collections or pages for that institution are listed here.
Zugriffsliste: Zeigt die Zugriffsberechtigungen für Ansichten und Sammlungen.
Click the Edit access icon to change the permissions of who can view and copy a page or collection.
Click the Edit Secret URL icon to define a secret URL for a page or collection.
Das Freigeben einer Institutionsansicht oder Sammlung ähnelt dem Vorgang zum Freigeben einer Portfolioansicht oder - sammlung. Der einzige Unterschied besteht darin, dass Sie neuen Institutionsmitgliedern ermöglichen direkt eine Kopie bei der Aufnahme in die Institution zu erhalten.
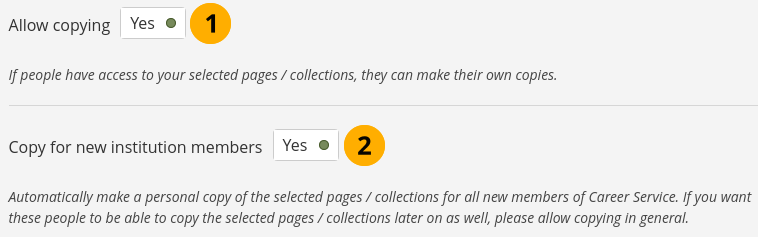
Einstellung für Kopien von Institutionsansichten für neue Institutionsmiglieder
When you clicked the Edit access icon on the Share page for institution pages and collections, click the Advanced options link and change the switch for Allow copying to ‚Yes‘. This now allows everyone who has access to the selected page(s) or collection(s) to copy them.
Copy for new members: Enable this option if all new members in your institution shall receive a copy of the selected page(s) or collection(s) into their portfolios when an account is created for them.
Bemerkung
If you enable this option without also enabling the option ‚Allow copying‘, your existing members will not be able to make a copy of the page(s) or collection(s) themselves if they need another one.
The institution portfolios are not copied into newly created accounts immediately, but they are placed into a queue. When the cron runs next, the queue is reduced. This cron job runs every minute. This method was chosen because there could be many copies placed into accounts, which would slow down the system. Hence, the cron job to do the copying in smaller chunks.Klicken Sie auf den Speichern-Button am Fuß der Seite, um die Änderungen zu speichern.
When site administrators create and share an institution page or collection, they can share it with the members of the institution in which they created the page or collection.
11.6.15. Dateien
Administration menu → Institutions → Files
Der Dateibereich einer Institution enthält alle Dateien, die von Administratoren als Institutionsdateien hochgeladen wurden. Der Upload von Dateien erfolgt wie unter persönlicher Dateibereich beschrieben.
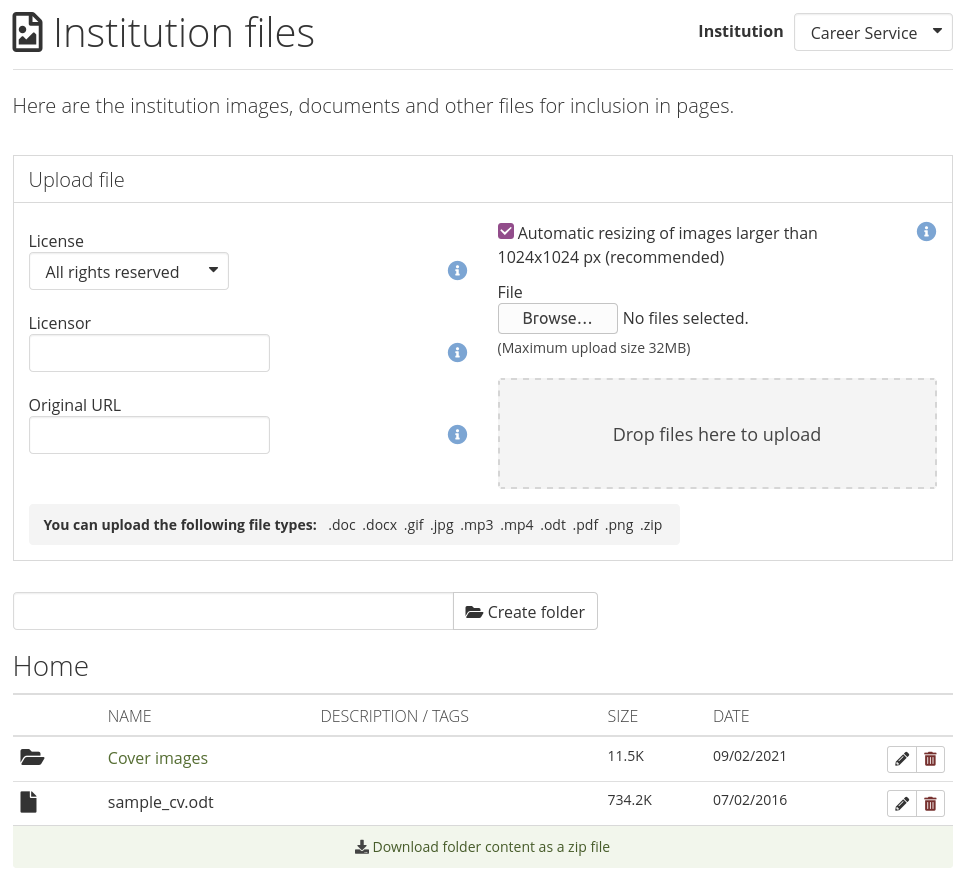
Dateibereich der Institution
11.6.16. Tags
Administration menu → Institutions → Tags
11.6.16.1. Manage institution tags
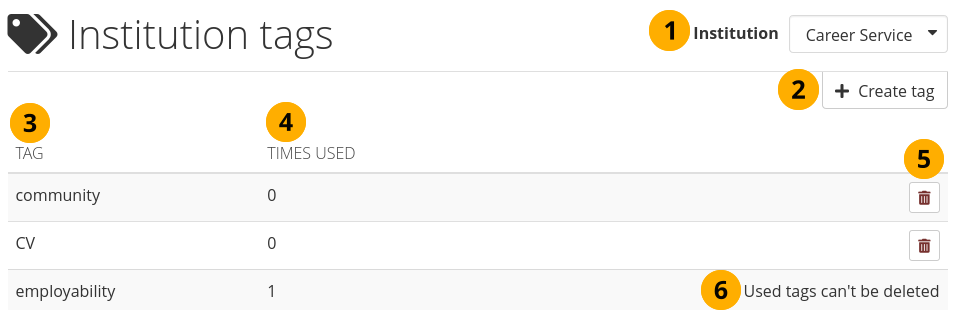
Manage institution tags
Institution: If you administer more than one institution, select the one for which you want to manage tags. If there is only one institution, its name will be displayed without the drop-down menu.
Click the Create tag button to set up a new tag.
Tag: Lists all the tags created in this institution.
Times used: Displays the number of times the tag has been used by institution members.
Click the Delete button to remove a tag.
If a tag is currently in use, you cannot delete it.
11.6.16.2. Create an institution tag
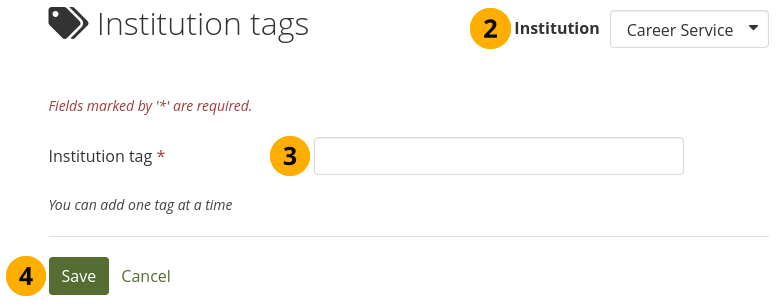
Create an institution tag
Click the Create tag button on the Tags page to set up a new tag.
Institution: If you administer more than one institution, make sure the institution in which you want to create the tag is displayed. If there is only one institution, its name will be displayed without the drop-down menu.
Institution tag: Enter a new institution tag. It can consist of multiple words.
Click the Save button to save this new tag, or click Cancel to abort the action.
11.6.16.3. Use an institution tag
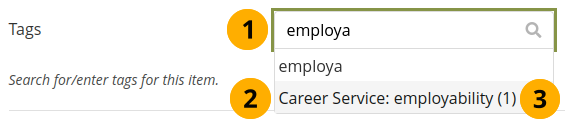
Use institution tags
You can use tags from the institution to which you belong anywhere you can enter tags.
Click into the tag search box and start typing a couple of letters of the tag you are looking for. The search narrows down to the potential tags
Institution tags are prefixed with the institution’s name.
You see the actual tag after the institution name including how many times you have used it.
11.6.17. Ausstehende Registrierungen
Administration menu → Institutions → Pending registrations
When you turn on Confirm registration for an institution in the institution settings, no account in this institution is created without the administrator knowing it. If a person is rejected, no account is created. If the option Confirm registration is not turned on, an account is created in the ‚No institution‘ institution but not in the actual institution.
Hier der Prozess der Selbstregistrierung mit aktiver Funktion Registrierungen bestätigen.
11.6.17.1. Selbstregistrierung für internen Account
When people try to self-register for your institution, they must provide certain details.
Bemerkung
Die Felder für E-Mail, Vor- und Nachname können in veränderter Reihenfolge erscheinen wenn die Einstellungen des erweiterten Spam-Schutzer aktiviert wurden.
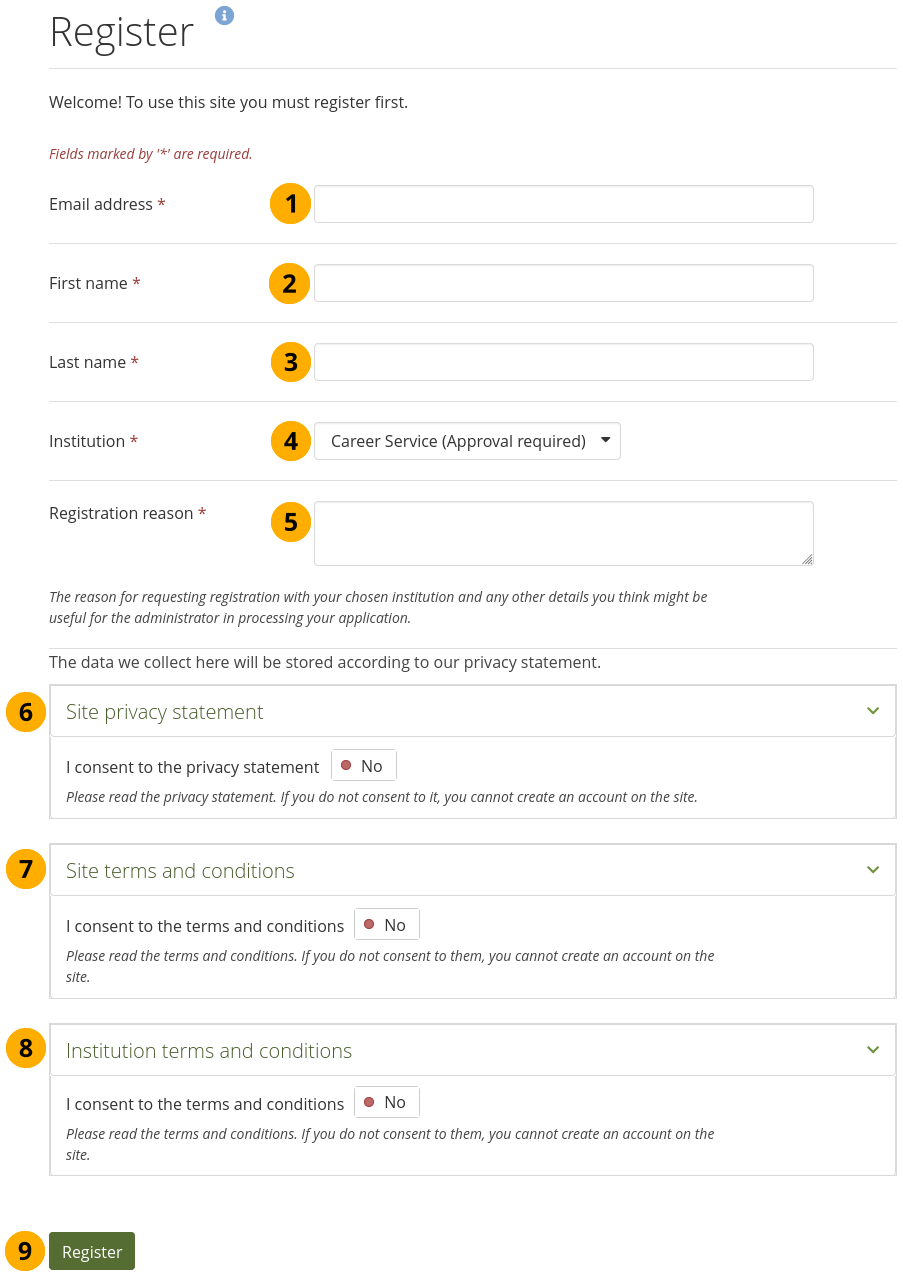
Self-registration for an institution
Vorname: Tragen Sie Ihren Vornamen ein.
Nachname: Geben Sie Ihren Nachnamen an.
E-Mailadresse: Tragen Sie Ihre E-Mailadresse ein.
Institution: Wählen Sie die Institution in der Sie sich registrieren wollen. Es wird Ihnen angezeigt wenn die gewählte Institution Ihre Registrierung vor der Freigabe bestätigen muss.
Registration reason: If administrator approval is required, you must provide a reason why you want to join the institution.
You may need to accept the site privacy statements if the site has ‚Strict privacy‘ turned on or requires that the ‚Registration agreement‘ is accepted.
You may need to accept the site terms and conditions for the site. If the institution you are registering for has additional terms and conditions to the general site ones, they will be in the institution terms and conditions.
You may need to review and accept the institution’s privacy statement and / or terms and conditions if there are separate ones to the site’s.
Klicken Sie auf den Registrieren-Button.
The administrators of that institution receive a notification about the pending registration. They then review pending registrations.
Bemerkung
If the institution doesn’t have any institution administrators, the site administrator will receive notifications about account registrations.
If your account is approved, you will receive an email that includes a link to confirm your email address. You must click that link within 24 hours. If you do not, you will have to start the registration process again from the beginning.
11.6.17.2. Ausstehende Registrierungen ansehen
As administrator, you can view pending registrations for your institutions on the Pending registrations page in Administration menu → Institutions → Pending registrations.

Auf Bestätigung wartende Registrierungen
Institution: If you administer more than one institution, select the one for which you want to review pending registrations. If there is only one institution, its name will be displayed without the drop-down menu.
Pending registration: You see a list of all registration requests. They include the names of the requesters and their email addresses.
Registrierungsgründe: Die Gründe für die Registrierung werden angezeigt.
Expires: The time by which an administrator needs to approve this registration.
Klicken Sie auf den Bestätigen-Button wenn Sie Registrierungsanfragen bestätigen wollen. Die Bestätigung muss auf der Folgeseite nochmals bestätigt werden. Die beantragende Person erhält nun eine E-Mail mit einem Link zum Abschließen des Registrierungsprozesses.
Klicken Sie auf den Ablehnen-Button wenn Sie die Registrierung zurückweisen wollen und kein Account in der Institution angelegt werden soll.
When you approve accounts, you can decide whether they should receive staff rights. For example, this helps to give all teachers at a school staff access rights upon their self-registration.
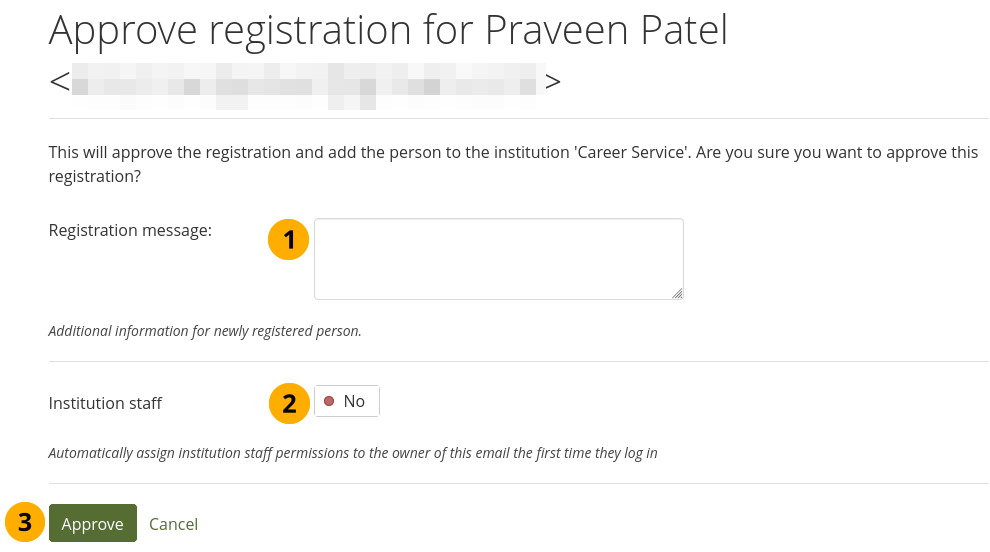
Approve a pending registration
Registration message: Send a message to the person whose account you are approving. This can be a welcome message or additional information to get them started.
Institution staff: Switch to ‚Yes‘ if the person shall have staff access rights.
Click the Approve button when you want to approve this registration request or click Cancel to abort the approval process.
You can see the time by which the registering person needs to complete the registration process.

Pending registration: Waiting on account registration completion
Expires: The date and time by which a self-registering person needs to complete the registration process.
Indicator stating that the self-registering person needs to complete the registration.
Wenn Sie eine Person zurückweisen, können Sie hierfür einen Grund angeben.
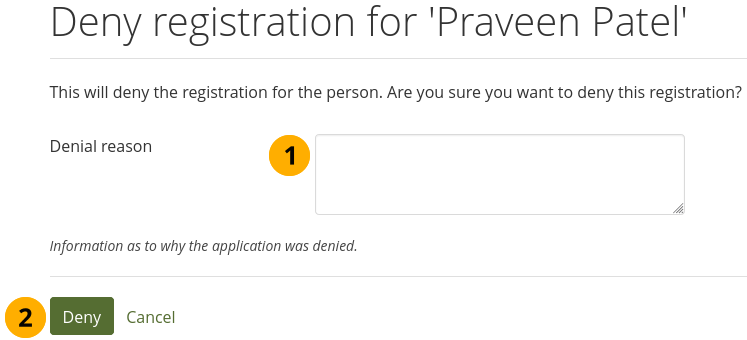
Reason for denying institution membership for a self-registering person
Ablehnungsgrund: Tragen Sie einen Grund für die Ablehnung der Registrierung an, damit die Person dies nachvollziehen kann.
Click the Deny button to send a notification to the person’s email address with the reason for the denial or click Cancel to abort the denial process.
11.6.17.3. Selbstregistrierung abschließen
When people are accepted as members in an institution via this process, they must still complete the registration process. This is necessary to provide information in all required fields besides a password and a username.
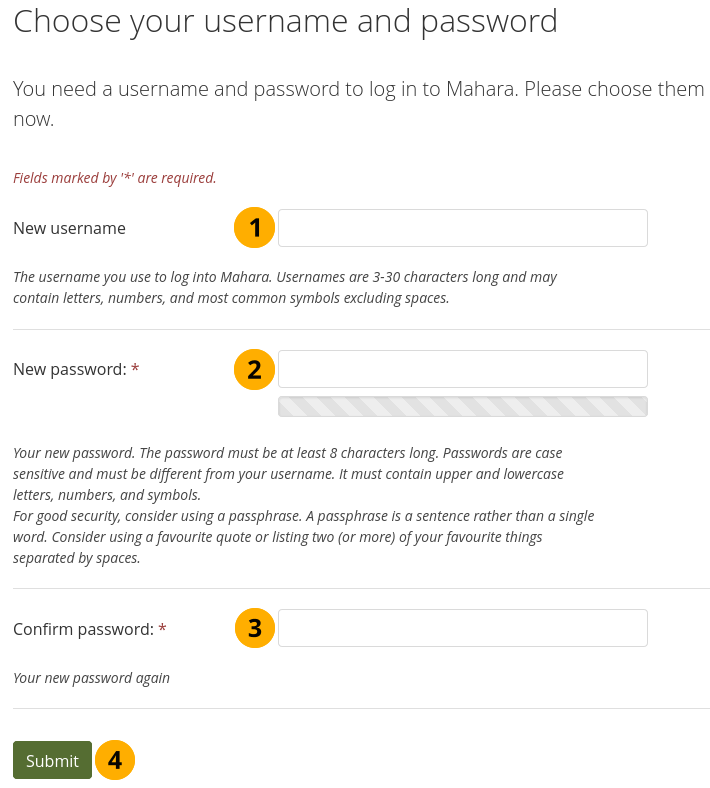
Selbst-Registrierung für Institution abschließen
Neuer Nutzername: Wählen Sie Ihren neuen Nutzernamen. Ein Vorschlag wird erstellt, Sie können sich aber einen eigenen wählen. Sollte der selbstgewählte Nutzername bereits von einem anderen Nutzer/in verwendet werden, erhalten Sie nach der Eingabe einen Hinweis.
Neues Passwort: Wählen Sie ein Passwort für Ihren Account. Pflichtfeld.
Passwort bestätigen: Tragen Sie das Passwort ein zweites Mal ein. Dieser Eintrag ist erforderlich.
Click the Submit button to complete your registration. You are taken to your Dashboard.
11.6.18. Pending deletions
Administration menu → Institutions → Pending deletions
When the site administrator required all institutions to review account deletions in the site configuration or an institution administrator required it for their institution in the institution settings, members cannot delete their accounts immediately. Instead, an administrator needs to approve or deny the request.
When a person requested that their account be deleted, the institution or site administrator receives a notification.
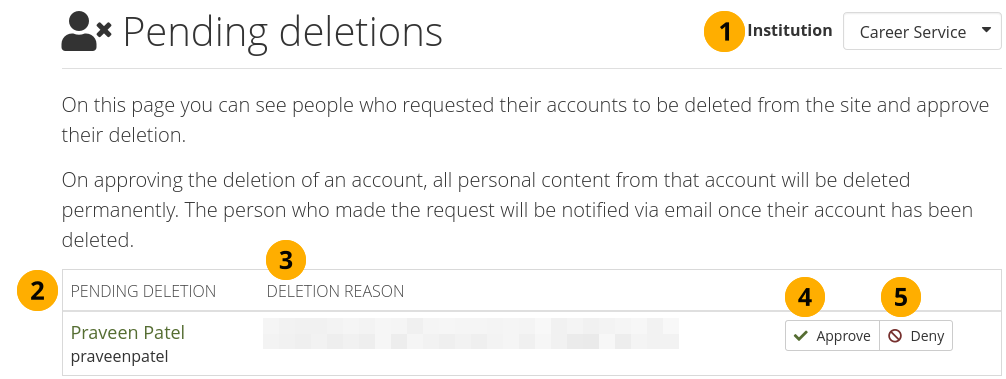
Pending account deletion page
Institution: If you administer more than one institution, select the one for which you want to review pending deletions. If there is only one institution, its name will be displayed without the drop-down menu.
Pending deletion: The name and username of the person who wants to delete their account is displayed. Their name is linked to their profile page.
Deletion reason: The reason for the deletion is shown.
Click the Approve button when you want to approve the account deletion. You will have to confirm this decision on the next page. The person will receive an email to their primary email address stored in Mahara when the deletion has been completed.
Warnung
Account deletion is permanent, and content cannot be retrieved once an account has been deleted. Once you approve the account deletion, it will happen immediately.
Click the Deny button if you do not want the account to be deleted right away. Provide a reason for your decision so that the person can get in touch with you to discuss your decision.