10.8. SmartEvidence
Administration → Extensions → SmartEvidence
Note
The SmartEvidence administration area is only accessible by site administrators.
The implementation of SmartEvidence is experimental. While the majority of the functionality works as intended there are a few areas that still need to be sorted out, .e.g. the export of the SmartEvidence map in both HTML and Leap2A.
SmartEvidence allows you to work with competency frameworks in Mahara and associate them automatically with an evidence map for a visualisation of the competencies already gained, in progress, and not yet started.
“Competencies” is used in a wide sense here. SmartEvidence can be used for multiple purposes including competency-based assessment, graduate attributes, skills accomplishment and many more. It can also be used for self-assessment purposes.
Note
The Annotations blocktype must be enabled on the site in order to use SmartEvidence.
10.8.1. Overview
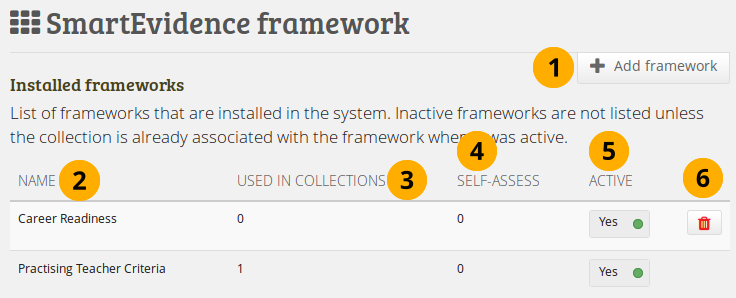
Overview of the installed SmartEvidence frameworks
Click the Add framework button to upload a new SmartEvidence framework.
Name: Displays the name of the framework.
Used in collections: Shows how many times the framework has been used.
Self-assess: Indicates whether the framework allows self-assessment or not.
Active:
Yes: Users can select the framework if they are allowed to use it.
No: Users, who have not already selected the framework for their collection cannot select it anymore. Those who already have it associated with a collection can continue using it. Switching a framework to be inactive is useful if a new version of the framework is issued and those who haven’t already started under the old framework should use the new one.
Click the Delete button if you want to remove a framework. You can only remove frameworks that are not in use.
Note
Mahara comes with two competency frameworks pre-installed to make testing easier. You can delete them if you do not want your users to work with them.
10.8.2. Download framework files
The easiest to get started with a SmartEvidence framework is to download an existing one. You can then make any number of changes.
See also
If you created your own SmartEvidence framework files that you want to share with the community, please send them to us for review and inclusion in the downloadable ones.
10.8.3. Create a framework file
You can use any text editor to create and edit your SmartEvidence framework files. If you have an edit that supports syntaxhighlighting for JSON files, you have an advantage as you can differentiate text that you can change from prompts that Mahara needs to interpret the file more easily.
You can also use a JSON editor, e.g. JSONedit and JSON Editor Online. These make it easy for you to edit the file because you can view it without much of the JSON syntax that is required.
Note
It is best to start your framework file with the help of one of the samples as you then know the structure and have all relevant elements in the file.
10.8.3.1. Start of the file
A framework file contains a number of parameters at the beginning that allow you to customise the framework to your needs.
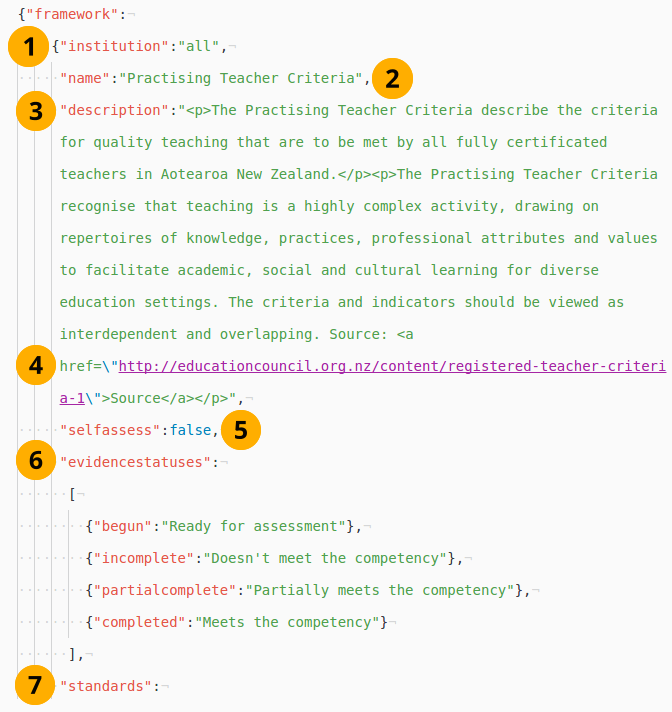
The start of a matrix file
institution: The shortname of the institution in which the framework should be used is entered here. If the framework is for all institutions, all is placed here.
Note
The institution shortname can be seen by hovering over the institution name on the Institution overview page and looking at the end of the URL. The last parameter is the institution shortname.
name: The title of the framework as it should be shown to the users.
description: The description of the framework is displayed on the SmartEvidence page in a collection. It can contain basic HTML code.
If the HTML code in the description field requires the use of quotation marks, these need to be escaped. Otherwise, they would be interpreted as commands. The escaping is done easily by placing a backslash right in front of the quotation mark:
\".selfassess: Determine whether users can self-assess their competencies or whether the competencies can only be assessed by somebody else. The following two values are allowed:
true: Users can self-assess.
false: Users cannot perform self-assessment.
evidencestatuses: Currently, there are four evidence statuses that can be used in an evidence map: begun, incomplete, partialcomplete, and completed. You can decide what words are used for these statuses in the framework that you set up. This allows you to easily set up frameworks in different languages for example.
standards: The rest of the document holds the standards and sub-standards.
Note
Be careful when changing a matrix file and make sure not to remove any commas, quotation marks, brackets, curly braces or any other marks in sections that you use. They are required for the correct interpretation of the file.
You can check if your file contains all necessary syntax by pasting it into the JSON Formatter and Validator for example. If there are any issues and JSON cannot interpret your file, the validator specifies the places where the errors occur so you can track them down more easily and fix.
10.8.3.2. Standards section
You can define the standards after the initial information. They provide the heading level on the SmartEvidence overview page.
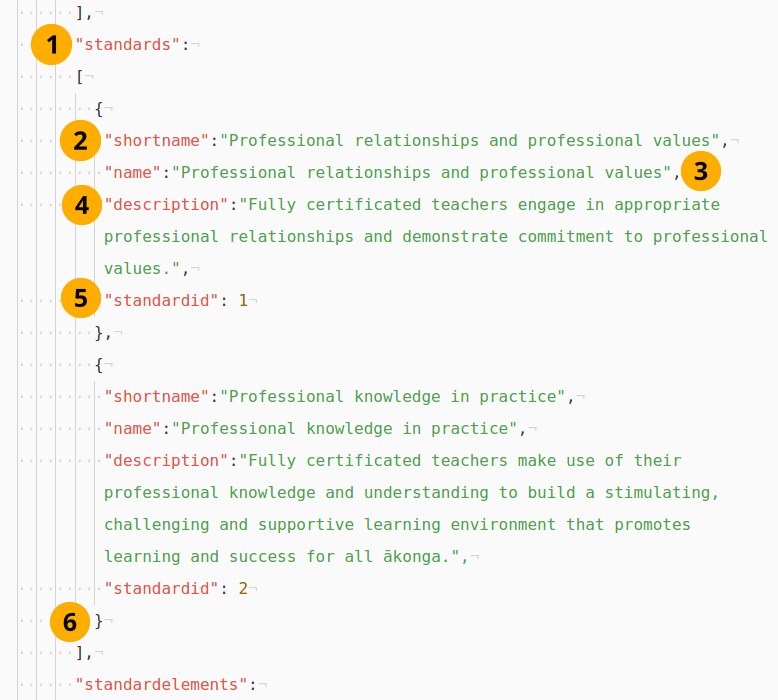
The standards in a matrix file
standards: Introduction of this section. You can define as many standards as you want. There is no limit.
shortname: Each standard needs a shortname, e.g. a number or a summary of the full title. The shortname is mandatory and a maximum of 100 characters long.
name: Title of the standard. It is mandatory and a maximum of 255 characters long.
description: The description is optional and is displayed when you hover over the name of the standard (touch-click on mobile).
standardid: Give each standard a natural number so they can be placed in the correct order and referred back to from the standard elements.
Do not place a comma after the closing curly brace of the last standard.
10.8.3.3. Standard elements section
Define all the standard elements, i.e. the individual sub-standards after the standards. They are the ones to which you can add evidence.
Note
Place all sub levels immediately after the higher level standard element so that the mapping is happening correctly.
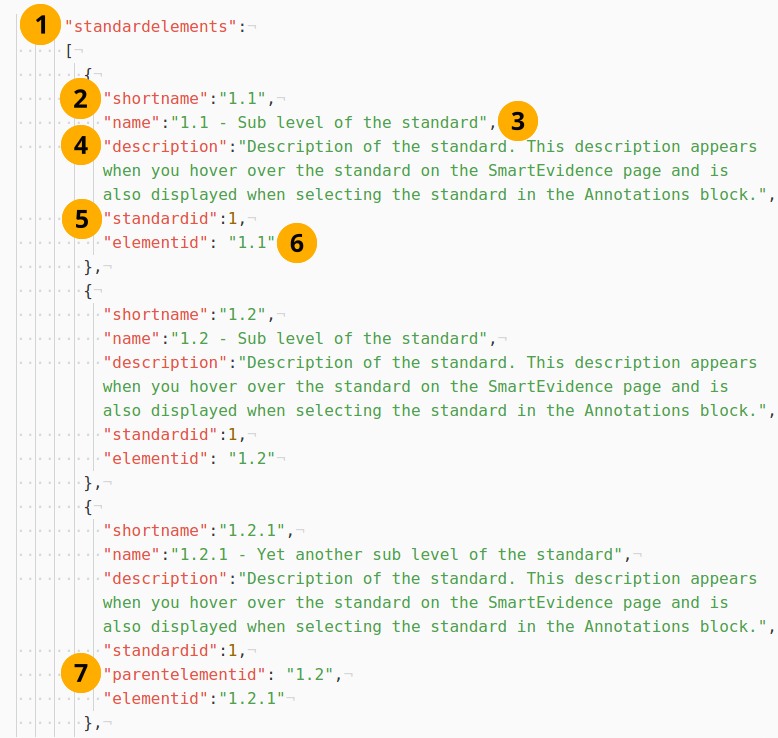
The standard elements in a matrix file
standardelements: Introduction of this section. There is no limit on how many standard elements you can define.
shortname: The shortname is displayed on the SmartEvidence overview page. It is mandatory and a maximum of 100 characters long.
name: Title of the standard element. It is mandatory and a maximum of 255 characters long.
description: The description is optional and is displayed when you hover over the name of the standard (touch-click on mobile).
standardid: Provide the ID of the standard to which you want to associate a particular standard element.
elementid: Give your standard element an ID so you can refer to it when you have another sub level. The ID needs to be placed between quotation marks.
parentelementid: Provide the elementid of the parent standard element if the standard element that you set up is on a level lower. The ID needs to be placed between quotation marks.
Note
When a standard element has a lower level, it cannot be associated with evidence itself, but only the standard elements on the lower level.
10.8.3.4. The end of the file
When you defined all your standards and standard elements, you can end the file.
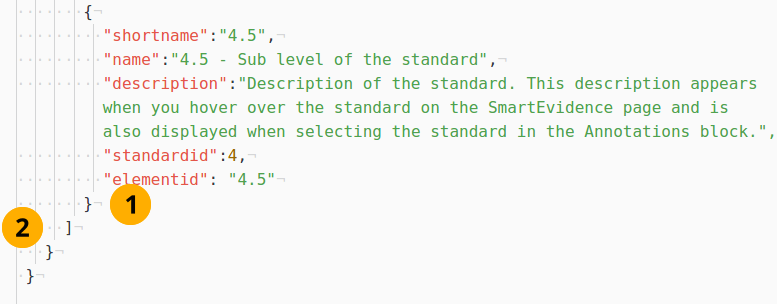
The end of a matrix file
Do not put a comma after the last curly brace of the last standard element.
Make sure to close all angular brackets and curly braces.
10.8.3.5. The result
Once you finished the file, you can upload it into Mahara and start using it.
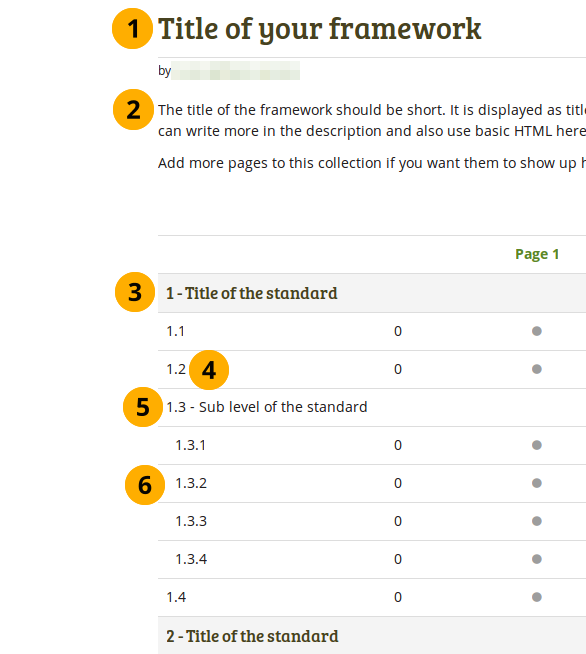
The finished result once uploaded
Title of the framework
Description of the framework
A standard. It cannot have evidence associated, only its lower levels.
A standard element.
A standard element with further lower level elements. It cannot have evidence associated, only its lower level.
A third level of elements.
Note
You can have more than 3 levels in your competency framework. The readability decreases though with many levels.
10.8.4. Add a framework
You can upload a SmartEvidence framework by clicking the Add framework button.
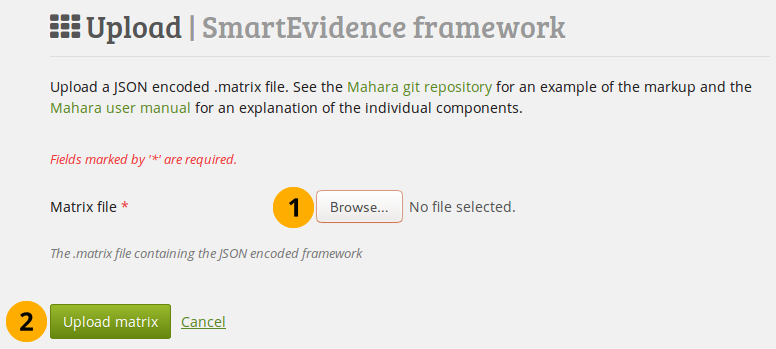
Upload a .matrix file that contains a competency framework
Click the Browse button to choose the matrix file that contains the framework that you want to use.
Click the Save button to upload the file.
10.8.5. Work with a framework
See also
You can find more information on how to use a SmartEvidence framework in the portfolio section.