6.2. Groups
Main menu → Engage → Groups
Groups can be used for collaboration amongst people as they offer the possibilities to:
discuss topics in forums
create and edit pages and collections together
share files
share pages
submit portfolios for assessment / feedback
Note
Groups can be created by everybody, staff, or administrators only. The site administrator decides that in Administration menu → Configure site → Site options → Group settings.
6.2.1. Overview page
This page gives you access to groups on the site.
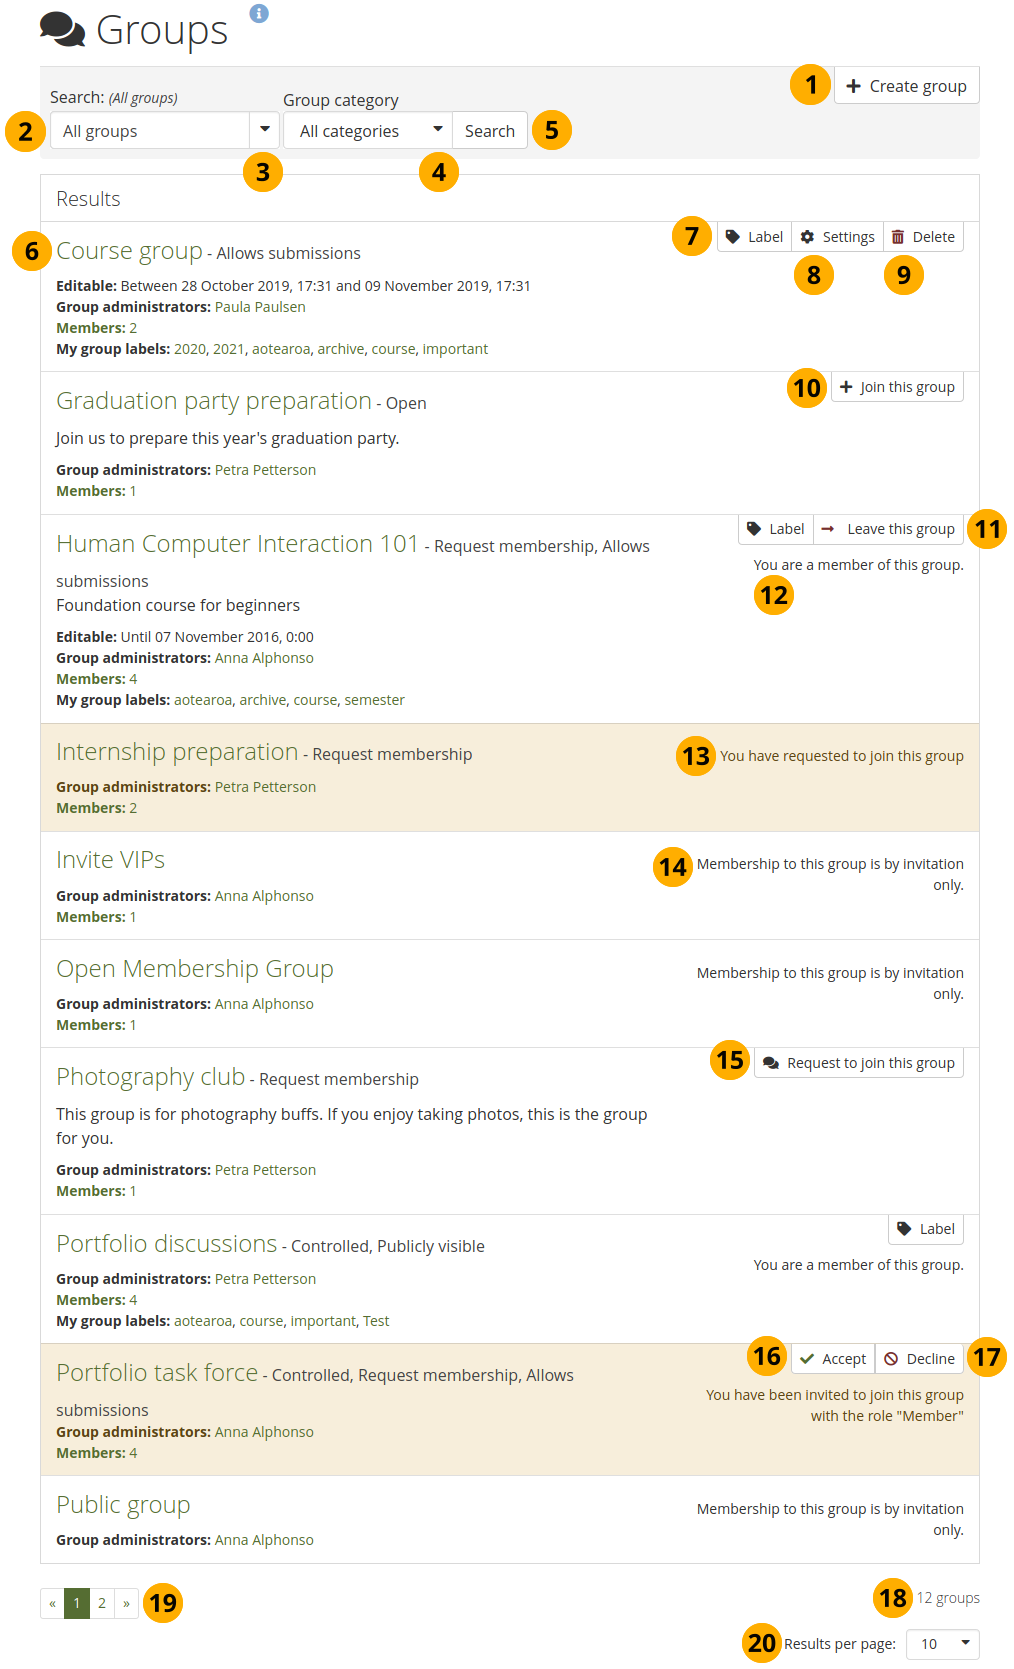
The Groups page lists all groups that you can see
Click the Create group button when you want to set up a new group. You only see this button if the site administrator allows you to create groups.
Search: Search for a certain group using a word or words from its title or description. Per default, you search in ‘All my groups’.
Note
Usually, you do not see forums, group pages and collections, and group files unless you are a member of a group. If a group is publicly available, you do see the forum discussions.
Use the drop-down menu to select a different search context. You can search within:
All my groups: This option displays all groups in which you are a member or to which you have been invited.
Groups I’m in: This is a list of all groups in which you are a member, no matter your role in the group.
Groups I own: Only the groups in which you are a group administrator are displayed.
Groups I’m invited to: Only groups to which you have been invited to are shown.
Groups I can join. Only groups in which you are not a member and that you can join are displayed. It does not show any groups that have controlled membership.
Groups I’m not in: This shows all groups in which you are currently not a member. It shows groups to which you have been invited but not yet accepted.
All groups: This is a list of all groups that you can see no matter whether you are a member in them or not.
Note
You cannot see hidden groups when you are not a member of them.
Group category: You can limit your search results to a certain group category if group categories exist.
Click the Search button to see the results.
All the groups to which you have access are listed with group title, administrator, description, group type, and number of members if the administrator discloses that information.
Click the Label button if you want to set a personal label for this group. That will allow you to filter all your groups according to your own criteria.
See also
See the section ‘Group label’ for more information.
Click the Settings button when you want to update the details for a group in which you are the administrator.
Click the Delete button only when you want to delete your group permanently. Group members receive a notification that the group has been deleted.
Warning
When you delete a group, all its content and contributions from group members are deleted permanently and cannot be retrieved again.
If you want to become a member of an open group, click the Join this group button, and you will be a member immediately.
If you are a member of a group, you can leave it at any time.
Note
The only exception is ‘Controlled membership’ groups. There, only a group administrator can remove you.
If you are a regular group member, your role is displayed.
If you requested to join a group, you can see that group highlighted.
Some groups can only be joined by invitation.
If you want to join a group that needs the approval of the group administrator, click the Request to join this group button next to the group. The administrator will receive a notification and decide about admitting you to the group.
Click the Accept button to join a group to which you have been invited.
Click the Decline button to decline membership in a group to which you have been invited.
The number of groups that meet the filter criteria.
Use the paginator to see more groups.
Results per page: Change the number of results you want to see on a single page via the drop-down menu.
6.2.2. Personal group labels
You can label groups in which you are a member. That allows you to filter your groups by these labels and control what groups are displayed in the sidebar and in your My groups block on the profile page if you use that.
Note
The labels are your personal labels and only visible to you.
6.2.2.1. Label a group
You can give labels to your groups on the Groups overview page.
Label a group
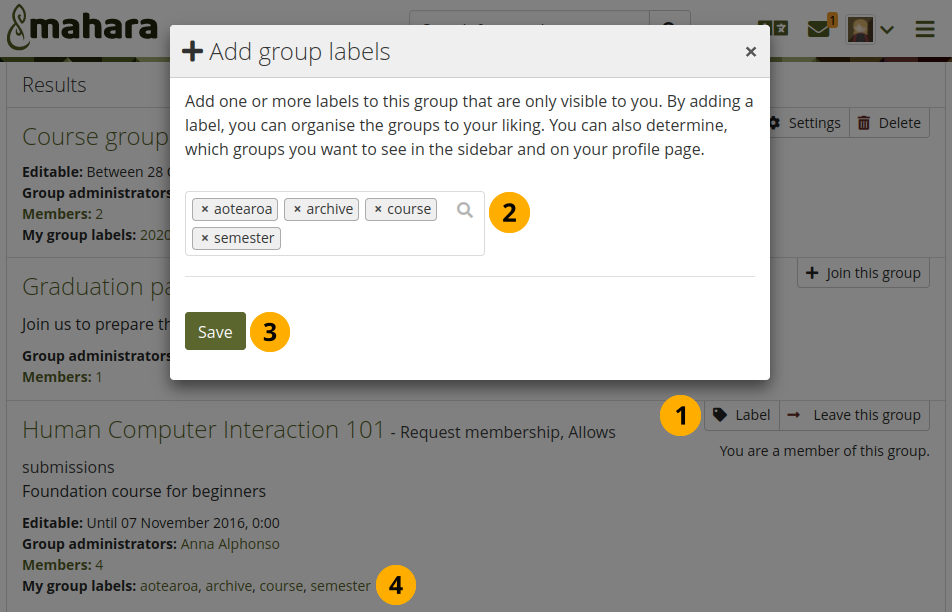
Click the Label button and the ‘Add group labels’ modal opens.
Start typing a label name and a search is conducted immediately so you can see any labels that you may already have with the name to select it for consistency. Once you selected a label, you can remove it at a later stage.
Note
You can give your group as many labels as you like.
Click the Save button to confirm your changes.
My group labels: Your labels appear in the search result list. Click a label to filter your groups that have that label.
6.2.2.2. Filter for labelled groups on the Groups page
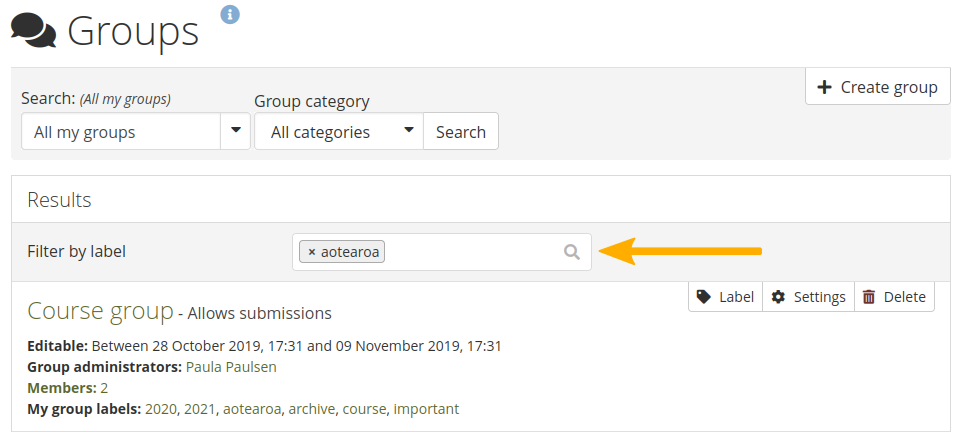
You label your groups on the Groups overview page and can filter by those labels there as well.
Filter groups by labels
When you click a label on the Groups page, and you are in one of the following search contexts,
All my groups
Groups I’m in
Groups I own
then your result list will be filtered for groups with that label. You can add and remove more labels form the filter.
The search for the labels that is performed is a Boolean OR. That means, all groups are displayed that have at least one of the filter labels.
6.2.2.3. Filter for labelled groups in the sidebar
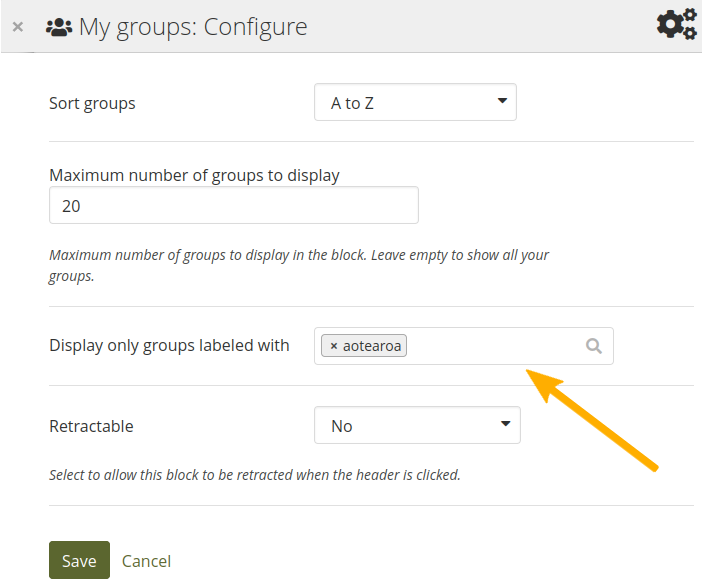
If you only want to see a subset of your groups in the sidebar, e.g. only of the current semester or your most frequently used groups, then you decide that in your account preferences.

Display groups filtered by label in the sidebar
In the ‘General account options’ area in your account preferences, select the label(s) in the option Display only groups labelled with.
That way, an otherwise long list of groups is shortened by the ones that you need regularly.
6.2.2.4. Filter for labelled groups on your profile page
You can decide which groups you want to display on your profile page if you work with the block My groups.
Display groups filtered by label on your profile page
When you configure the ‘My groups’ block on your profile page, you can select the label(s) associated with the groups that you wish to display.