4.2.5. External content
With the help of the external content blocks, you can include RSS feeds, external media or GoogleApps documents etc. into a page.
4.2.5.1. External feed
Embed an external RSS or ATOM feed, e.g. to display an external blog.
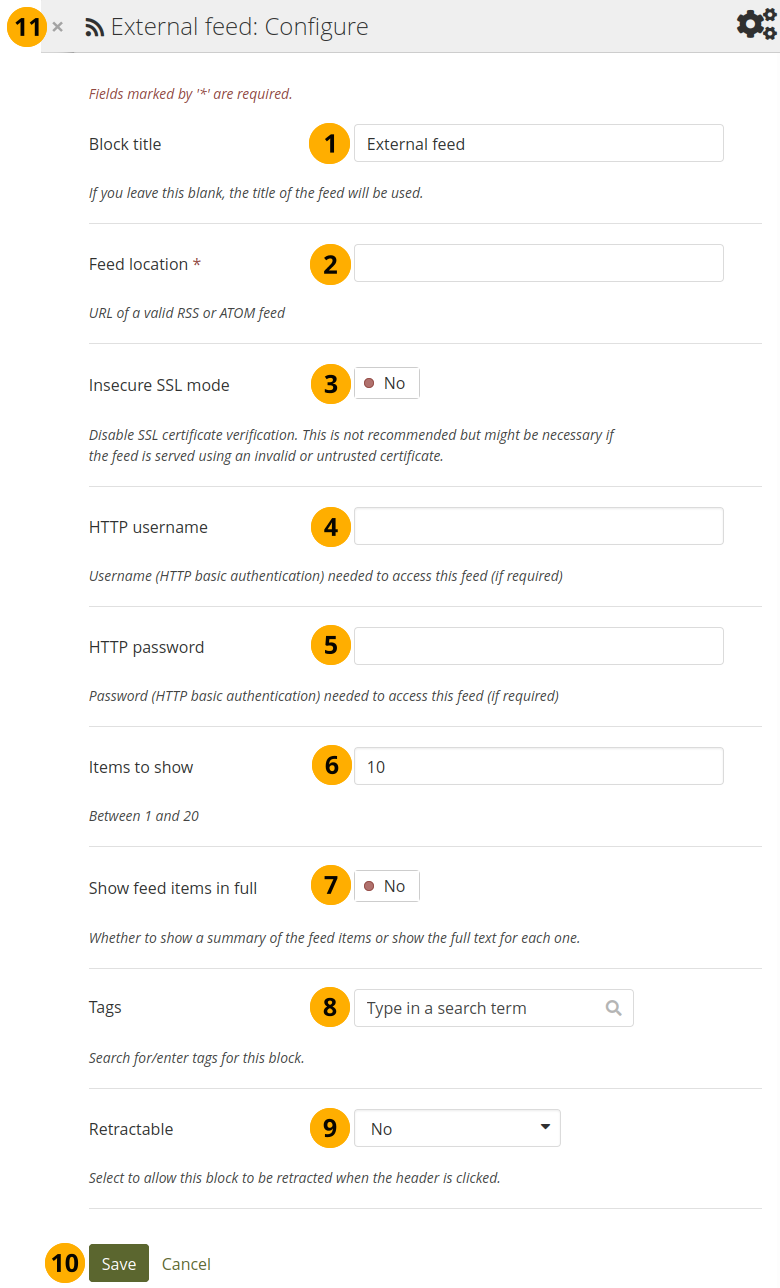
Configure the external feed block
Block title: If you leave the title blank, the title of the feed will be used.
Feed location: Put the entire feed URL from a valid RSS or ATOM feed in here. If the feed is not displayed, try to view it in a regular feed reader to make sure that the URL is correct. You must provide a feed URL here.
Note
Unfortunately, Firefox and Chrome do not display the RSS feed icon for a page immediately near the address bar any more. In Firefox you will have to go to View → Toolbars → Customize and then drag the RSS icon to your toolbar. It lights up orange / white when a feed is available.
If you use Chrome, you will have to install the RSS Subscription Extension.
Insecure SSL mode: Switch this option to ‘Yes’ if you wish to enable the insecure SSL mode. This mode allows you to override certificate errors generated by a feed.
HTTP username: Provide a username if you wish to access a feed that requires authentication. This is the username to access the feed and not your portfolio system.
HTTP password: Provide a password to access a feed that requires authentication. This is the password to access the feed and not your portfolio system.
Items to show: Decide how many of the latest items in the feed you wish to display. You can choose up to 20.
Show feed items in full: Switch this option to ‘Yes’ if you want to see the entire feed content and not only the heading of a blog post.
Tags: Enter tags for this block to find this content more easily. The tags are displayed as part of the page tags.
Retractable: Choose whether you want to allow viewers to reduce the block to its heading on a page or see just the heading only automatically. The options are:
No: The block and its content is displayed at all times.
Yes: Allow viewers to reduce the block to just the heading by clicking the Retractable icon .
Automatically retract: Only the heading of the block is visible, and the viewer can click the Retracted icon to view its content.
Click the Save button to accept your changes, or click Cancel to leave the block’s content as it is. Remove is shown only when you place the block into the page for the first time.
You can also click the Close button in the top left-hand corner of the modal window to either remove a newly created block before it is being saved or to cancel any changes and leave the block’s content as it is.
Note
If your feed is not updated automatically, please ask your site administrator to check the cron settings.
If you click an entry in the RSS feed, it will open in a new window.
4.2.5.2. External media
With this block you can embed content from a wide variety of third-party sites. The sites that are allowed are listed below the text area in the configuration screen. You see only their favicons, but when you hover over an icon with your mouse, you see the site’s name as well.
See also
Mahara comes with a number of sites that are allowed per default. These are listed on the page. Your site administrator can add additional iframe sources.
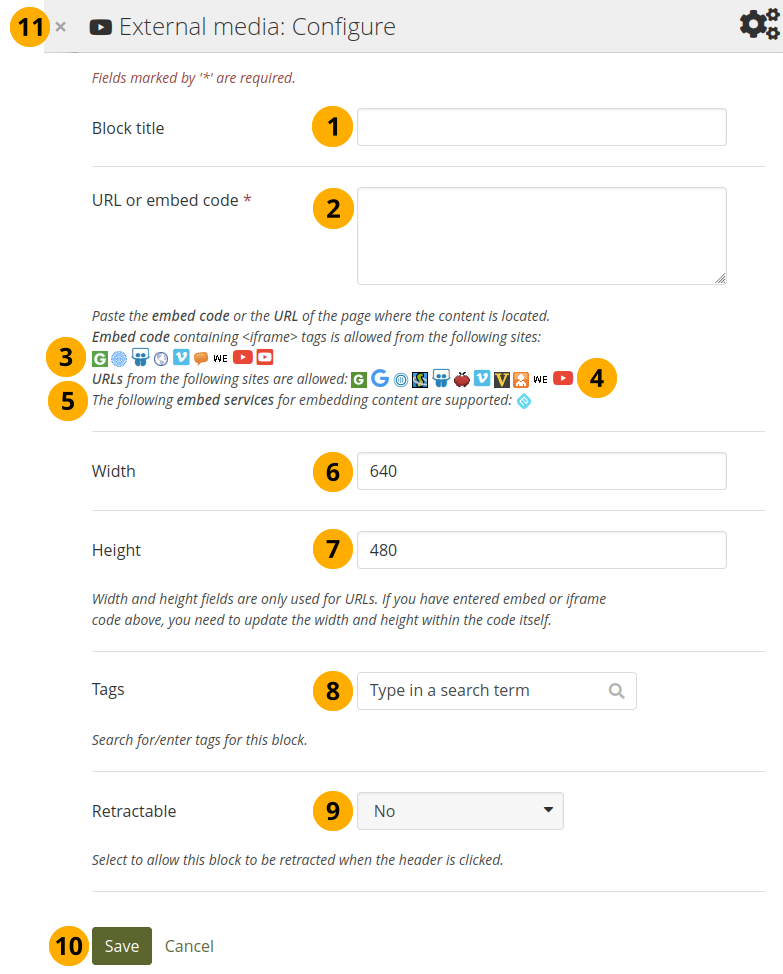
Configure the external media block
Block title: Choose a title for your embedded content.
URL or embed code: Paste the URL or the embed code of a page where the content is located.
Embed code: Content from the sites listed in this section can be embedded using the <iframe> embed code. Any new site that the site administrator allows will be added in alphabetical order. The default sites are:
URLs: Content from the sites listed in this section can be embedded by copying the page URLs where the content can be found. The default sites are:
You can also paste an Embedly embed code and display your content that way.
Width: Choose the width (in pixels) that the content should take up on the page. This only goes for the content for which you provided the URL.
Note
If you use the embed code, you need to provide the correct width and height directly in the embed code and can ignore this setting here.
Height: Choose the height (in pixels) that the content should take up on the page. This only goes for the content for which you provided the URL.
Note
If you use the embed code, you need to provide the correct width and height directly in the embed code and can ignore this setting here.
Tags: Enter tags for this block to find this content more easily. The tags are displayed as part of the page tags.
Retractable: Choose whether you want to allow viewers to reduce the block to its heading on a page or see just the heading only automatically. The options are:
No: The block and its content is displayed at all times.
Yes: Allow viewers to reduce the block to just the heading by clicking the Retractable icon .
Automatically retract: Only the heading of the block is visible, and the viewer can click the Retracted icon to view its content.
Click the Save button to accept your changes, or click Cancel to leave the block’s content as it is. Remove is shown only when you place the block into the page for the first time.
You can also click the Close button in the top left-hand corner of the modal window to either remove a newly created block before it is being saved or to cancel any changes and leave the block’s content as it is.
Note
You can use the same iframe embed code around Mahara in notes, text and journal entries as well.
See also
Watch the video Saving a video from iPad to MyPortfolio if you want to see how you can embed a YouTube video into your Mahara portfolio using an iPad. You can use a similar work flow for adding YouTube videos also via Android or on your computer. ‘MyPortfolio’ is the name of a Mahara instance in New Zealand for schools.
4.2.5.3. Google Apps
Embed any of the following content available via Google (Apps):
books
calendars
documents, spreadsheets, presentations
maps
You can only display the content, but not immediately edit documents, spreadsheets or presentations. You will have to be logged in to your Google (Apps) account to do so. You can use this block with a regular, personal Google account or if you have a Google Apps account via an institution, e.g. your school or university.
Note
If certain documents are restricted to a Google Apps domain or to specific people, a login screen is displayed.
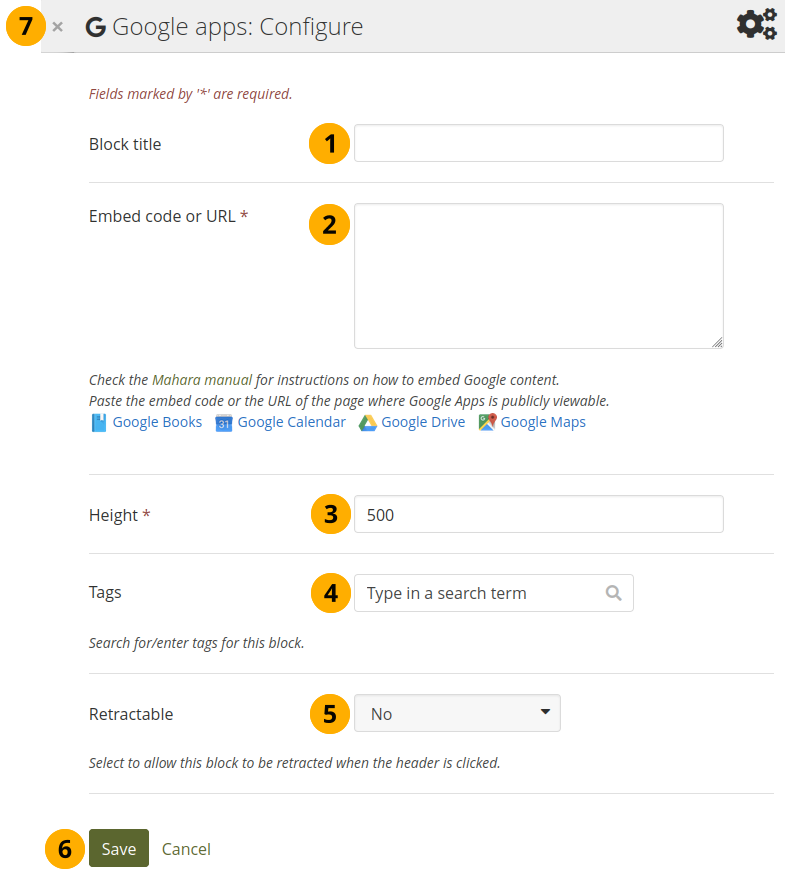
Configure the Google Apps block
Block title: Choose a title for your embedded content.
Embed code or URL: Depending on what kind of content you wish to display, you either provide the embed code or the URL. Click the Help button for more information on how to embed each Google component.
Height: Choose the height for the embedded content. The width is adjusted to the column width of the block automatically.
Tags: Enter tags for this block to find this content more easily. The tags are displayed as part of the page tags.
Retractable: Choose whether you want to allow viewers to reduce the block to its heading on a page or see just the heading only automatically. The options are:
No: The block and its content is displayed at all times.
Yes: Allow viewers to reduce the block to just the heading by clicking the Retractable icon .
Automatically retract: Only the heading of the block is visible, and the viewer can click the Retracted icon to view its content.
Click the Save button to accept your changes, or click Cancel to leave the block’s content as it is. Remove is shown only when you place the block into the page for the first time.
You can also click the Close button in the top left-hand corner of the modal window to either remove a newly created block before it is being saved or to cancel any changes and leave the block’s content as it is.
Google document
Open the document.
Click File in the menu bar and then Publish to the Web.
Click the Start publishing button.
Copy the document link or embed code.
Paste the link or embed code into the Embed code or URL box in the Google Apps block.
Google spreadsheet
Open the spreadsheet.
Click File in the menu bar and then Publish to the Web.
Click the Start publishing button.
Read through the other options and decide on them.
Copy the link for the option Web page or the embed code for the option HTML to embed in a page.
Paste the link or embed code into the Embed code or URL box in the Google Apps block.
Google presentation
Open the presentation.
Click File in the menu bar and then Publish to the Web.
Click the Start publishing button.
Copy the link or embed code.
Paste the link or embed code into the Embed code or URL box in the Google Apps block.
Google Drive folder
Select the folder that you want to share.
Click the Link icon. A shareable link is created.
Copy the link.
Paste the link into the Embed code or URL box in the Google Apps block.
Google Calendar
Open Google Calendar.
Click on the little triangle next to the calendar that you wish to embed.
Click on Calendar settings.
On the Calendar details tab scroll down to Embed This Calendar.
Customize the calendar appearance and then copy the embed code.
Paste the embed code into the Embed code or URL box in the Google Apps block.
Google Maps
Open Google Maps.
Click the My Places button.
Click on the name of the map that you wish to embed.
Click on the Link icon to the left of the map.
Customize the appearance of the map and copy the embed code.
Paste the embed code into the Embed code or URL box in the Google Apps block.
Note
Use steps 2 and 3 only if you wish to embed one of your Google maps. If you wish to embed any Google map, you can skip these steps.
Google Books
Open Google Books.
Find the book that you wish to embed.
Click on the book title.
Click on the Link icon above the book.
Copy the embed code of the book.
Paste the embed code into the Embed code or URL box in the Google Apps block.
Note
The link icon only appears if you are allowed to embed this book.
4.2.5.4. Badges
Open Badges are an answer for showing recognition of skills and competencies online with the help of an open framework.
4.2.5.4.1. Configure the block
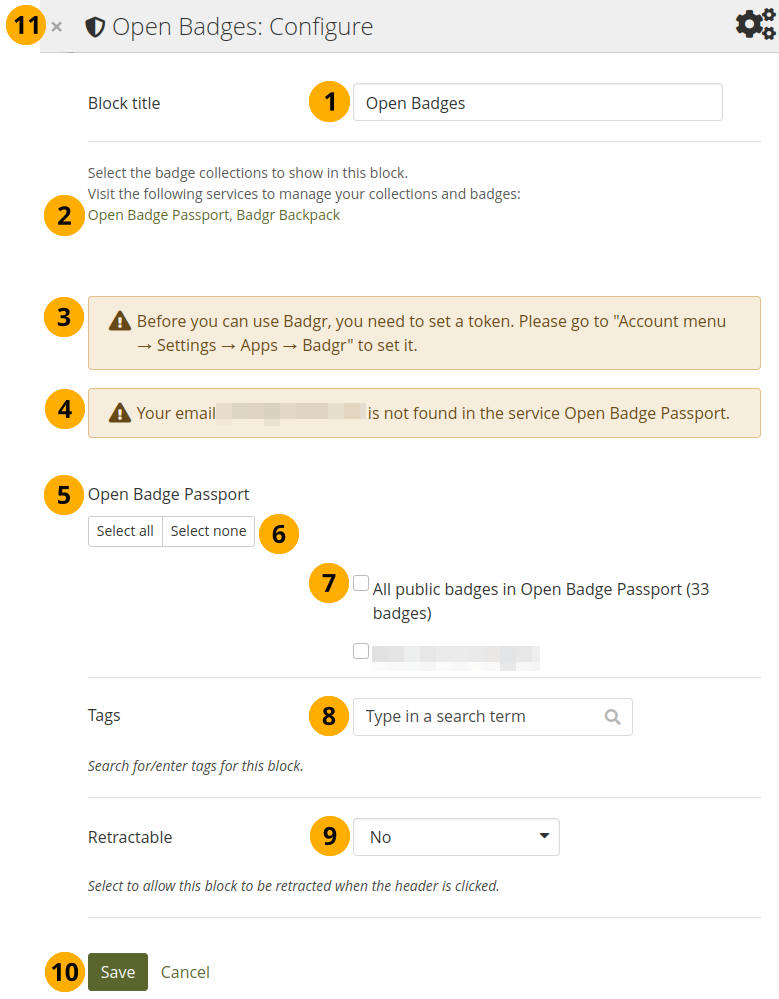
Configure the Open Badges block
Block title: Choose a title for your block.
If you do not see all your public badge collections, click the links to verify that you have made all badges publicly available that you want to see.
Note
The Mozilla Backpack was deprecated as the service does not exist any more. Badges from that Backpack cannot be displayed any more. If you are on an upgraded site and used to display Open Badges through the Mozilla Backpack, they are not displayed any more.
If you had a Mozilla Backpack, you would have received an email with all your badges latest in 2019. It is best to import them either to Badgr or the Open Badge Passport (or both) to keep using them. Once you moved your badges, you can re-add them here in the block.
If your site administrator allowed the use of Badgr, but you have not yet set a token, you are alerted to rectify that in the connected app settings.
Mahara checks the backpacks for all email addresses that are associated with your account. If it can’t find any badges to display for a particular address, it will show a notice.
Open Badge Passport: All public badge collections from your Open Badge Passport are displayed.
See also
If you have other ‘backpacks’ that contain badges, the site administrator would need to allow them in the config.php.
Use the Select all or Select none buttons to select all badge collections or to revert your selection.
You can also select individual badge collections if you prefer by ticking their checkboxes.
Tags: Enter tags for this block to find this content more easily. The tags are displayed as part of the page tags.
Retractable: Choose whether you want to allow viewers to reduce the block to its heading on a page or see just the heading only automatically. The options are:
No: The block and its content is displayed at all times.
Yes: Allow viewers to reduce the block to just the heading by clicking the Retractable icon .
Automatically retract: Only the heading of the block is visible, and the viewer can click the Retracted icon to view its content.
Click the Save button to accept your changes, or click Cancel to leave the block’s content as it is. Remove is shown only when you place the block into the page for the first time.
You can also click the Close button in the top left-hand corner of the modal window to either remove a newly created block before it is being saved or to cancel any changes and leave the block’s content as it is.
Note
Since your badges need to be fetched from an external service, it may take a little bit until they are displayed on the page.
4.2.5.5. Course completion
The Course completion block requires that you have a web services connection established to a learning management system (LMS) that supports course completions. Follow the steps provided in the Plugin administration for the blocktype ‘courseinfo’.
This functionality was developed with Moodle and Totara in mind.
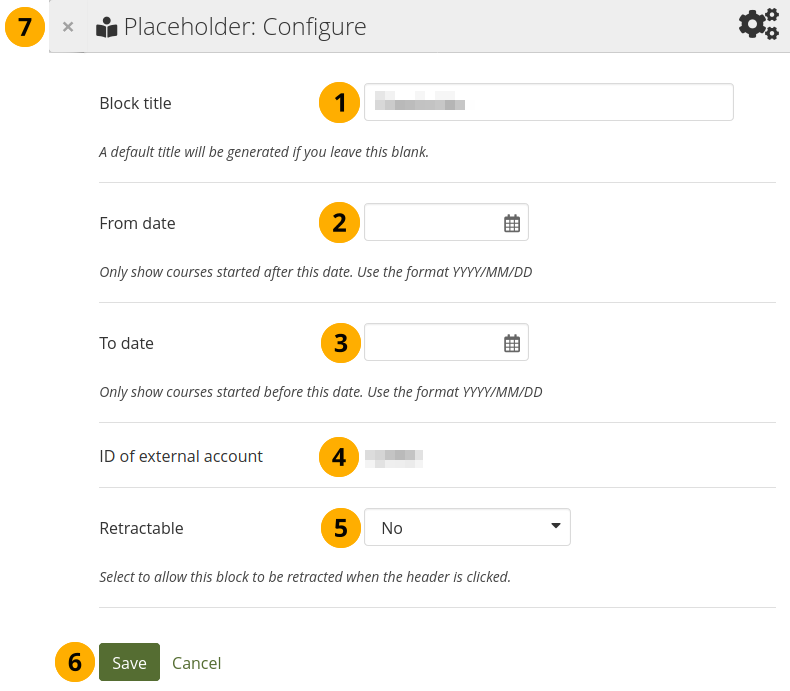
Configure the Course completion block
Block title: Choose a title for your block.
From date: Select the start date from which you want to display completion data.
To date: Select the end date up to which you want to display completion data.
ID of external account: The ID that the portfolio author has in the LMS to confirm that the correct records are displayed.
Retractable: Choose whether you want to allow viewers to reduce the block to its heading on a page or see just the heading only automatically. The options are:
No: The block and its content is displayed at all times.
Yes: Allow viewers to reduce the block to just the heading by clicking the Retractable icon .
Automatically retract: Only the heading of the block is visible, and the viewer can click the Retracted icon to view its content.
Click the Save button to accept your changes, or click Cancel to leave the block’s content as it is. Remove is shown only when you place the block into the page for the first time.
You can also click the Close button in the top left-hand corner of the modal window to either remove a newly created block before it is being saved or to cancel any changes and leave the block’s content as it is.
When the block is placed on a page, it will look like the following screenshot.
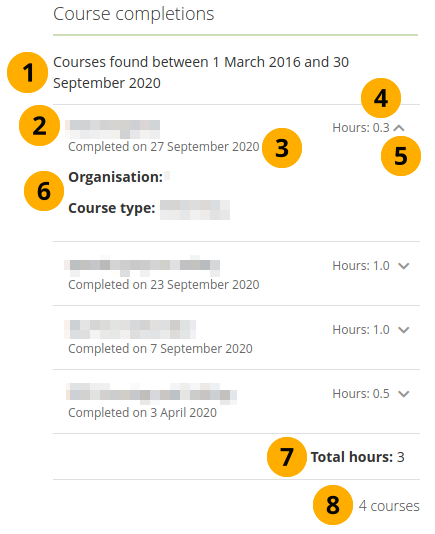
Display of the Course completion block in a page
The time frame for which the course completion data is gathered.
The title of the course.
The date when the course was completed.
The number of hours associated with the course.
Click the Down arrow icon to show more information. Use the Up arrow icon to hide the additional information.
For example, you can display the organisation and the course type in the additional information, depending on how the web services are configured.
Total hours: The total number of hours over the reporting time frame.
The number of courses that are included in this report.