4.11. Notes
Main menu → Create → Notes
Notes are bits and pieces of text that you can re-use from one portfolio page in another without having to copy the entire page.
4.11.1. View your notes
Though you cannot create notes directly from this page, you can edit your notes. Their content will be changed wherever that note is used.

Notes viewed on the notes overview page
Note title: This column contains the titles of the notes where they appear for the first time. When you click the title, you see the content of the note.
Block title: This column shows the title of the note blocks so that you can find the requisite note, esp. when you changed the title considerably.
The Contained in column lists all the pages in which this note is used. It is matched up with the Titled column.
Attachments : This column displays the number of attachments you have per note.
Click the Edit button to make changes to the note. Beware that any changes you make here are made to all instances of the note.
Click the Delete button to permanently delete the note. This action cannot be undone and all instances of the note are deleted from portfolio pages.
When you submitted a portfolio page that contains notes, you cannot change the note’s content or delete it until the page is released again.
You see the number of notes you have in total.
4.11.2. Edit your notes
You can edit your notes to make changes to them.
Warning
When you make changes to a note from this page, all instances of this note on any portfolio page will be affected.
Edit a note
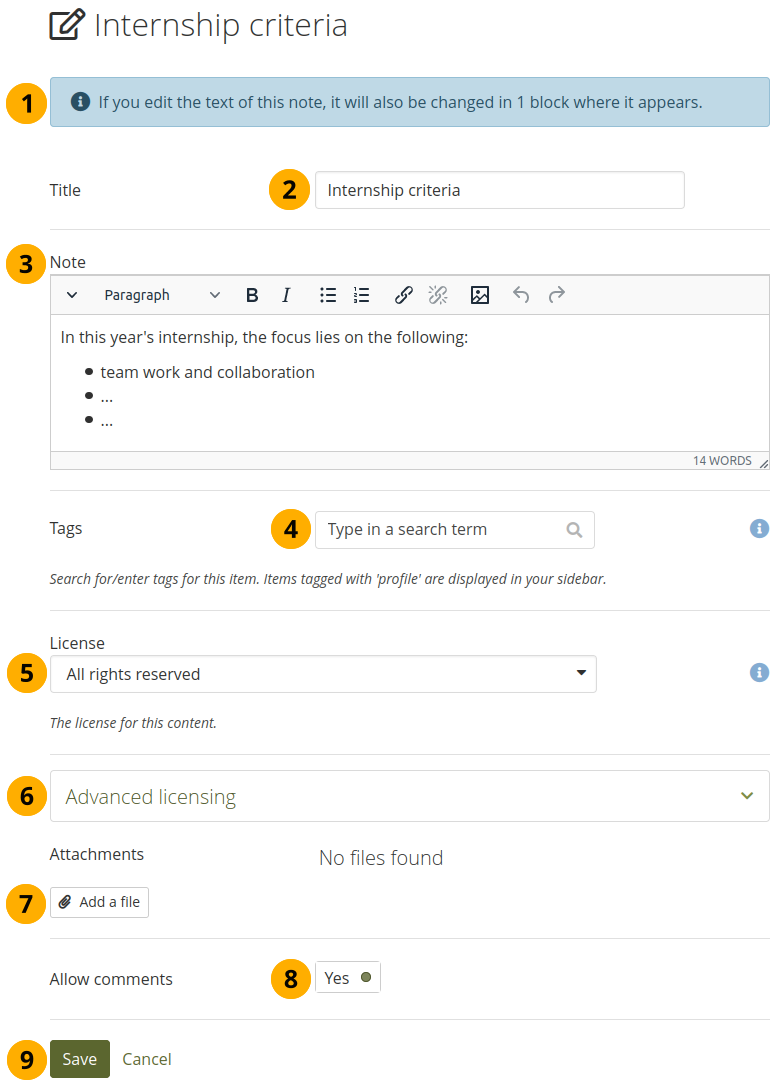
An alert appears at the top of the page if you opened a note that is contained in more than one page. If you edit this note, it will be changed in all locations where this note appears.
Note
If you do not wish the note to be changed everywhere it appears, go to the page where the note should stay as it is, go into the block configuration and click the ‘Make a copy’ link above the text editor.
Title: The title of your existing note is displayed.
Note: The content of your note is displayed. If you make changes here, they will be applied to all instances where the note appears.
Tags: Enter tags to find your notes more easily at a later stage. You can choose from your existing tags by starting to type a letter and then selecting the tag you want to use. You can also type a new tag, and it is added to your list of tags.
See also
You can find more information on how to use the tag selector in the ‘Tags’ section.
License: You see this field if the site administrator turned on license metadata. Choose the license for this note. You can set your default license in your account settings.
Advanced licensing: You see this option if the site administrator turned on license metadata. If you click it, you see two additional license fields, ‘Licensor’ and ‘Original URL’, that you can fill in if this in not your own note or if you had published it elsewhere before.
Attachments: Attach files to a note as additional evidence for the text you are writing.
See also
When you edit your note, you can attach files or remove files as you would do on the File(s) to download block.
Allow comments: Set the switch to ‘Yes’ if you want to allow others to leave comments on your note.
Click the Save button to keep your changes or click the Cancel button to abort your changes.