11.10. Web services
Administration menu → Web services
Note
Web services are only accessible by site administrators.
Web services allow you to connect your Mahara site with other applications that have web services / APIs as well. It might require some configuration or the development of specific web services functions to accomplish the integration you are looking for. The Mahara web services are a framework that makes it possible to develop additional APIs without having to do a great deal more than defining a function that exposes the required functionality, and the associated interface definition.
In order to use web services, your site must use a SSL certificate. When your site is not in production mode, you can test web services without SSL.
11.10.1. Configuration
Administration menu → Web services → Configuration
On this page you set up various web services rules and enable or disable them.
11.10.1.1. Enable web service functionality
You can enable web services globally and then configure protocols individually to suit your needs. Once a protocol is enabled, it can be used for all functions, accounts, and tokens.
Switch web services and individual protocols on and off
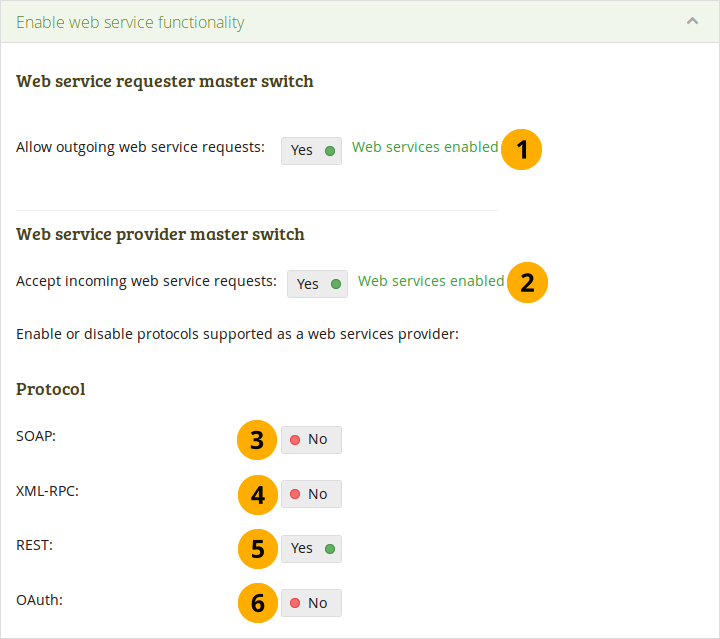
Allow outgoing web service requests: If set to ‘Yes’, web services are available to be used on your site for outgoing calls.
Accept incoming web service requests: If set to ‘Yes’, web services are available to be used on your site for incoming calls, for example via Mahara Mobile.
SOAP: Allow this protocol if you want to be able to use the Simple Object Access Protocol.
XML-RPC: Set this to ‘Yes’ if you want to make remote procedure calls to XML content. This protocol is used by MNet.
Note
As long as MNet is supported in Mahara, you can use that to configure your connection to Moodle.
REST: Allow the REpresentational State Transfer protocol by switching this setting to ‘Yes’. The REST interface also supports JSON authentication.
OAuth: If you want to use the OAuth (Open Authentication) protocol, switch this setting to ‘Yes’.
Note
If you disable web services, any activated individual protocols under “Protocol” are turned off and would need to be enabled manually again when you switch web services on again.
11.10.1.2. Networking certificates
In this section, the public key of your Mahara certicate that is created on Administration menu → Configure site → Networking is displayed for convenience.
11.10.1.3. Manage service groups
Service groups are the units of allocation of access to an account (authentication) or user tokens. They are a collection of functions. Mahara already comes with a series of service groups and functions that you can configure. More service groups can be added.
Overview of the available service groups and their basic settings
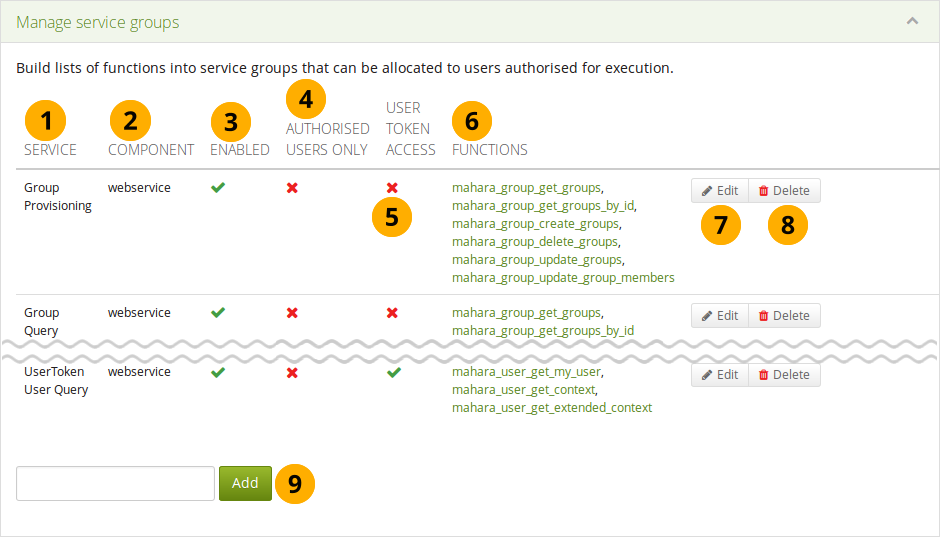
Service: The service group under which a number of related functions are grouped that you can enable or disable.
Component: The area through which a service group is available. It is generally ‘webservice’.
Enabled: If a service group is enabled, you see the Enabled icon . If it is not enabled, you see the Disabled icon .
Authorised users only: If the service group can be used by people who log in with a username and password, you see the Enabled icon . If it is not possible to use it as such a user, you see the Disabled icon .
User token access: You see the Enabled icon if access to the functions of this group requires a user token. If access via a user token is not allowed, you see the Disabled icon .
Functions: This is a list of functions that are associated with the service group.
Note
Clicking on one of the functions takes you to the web services documentation for this function. More information about the web service function is available there including a description of the functions API, input and output parameters, and error handling.
Click the Edit button to make changes to the service group as described below.
Click the Delete button to completely remove the service group.
Note
In many cases you may not want to delete the web service group entirely as you would need to re-create it and associate functions with it if you required it at a later stage. Disabling the group would often be sufficient.
If you want to create a new service group, add it in this field and click the Add button. You can then see your new group in the list of service groups and configure it by clicking the Edit button next to it.
When you selected the service group you want to edit, you see the following screen.
Edit the settings of a service group
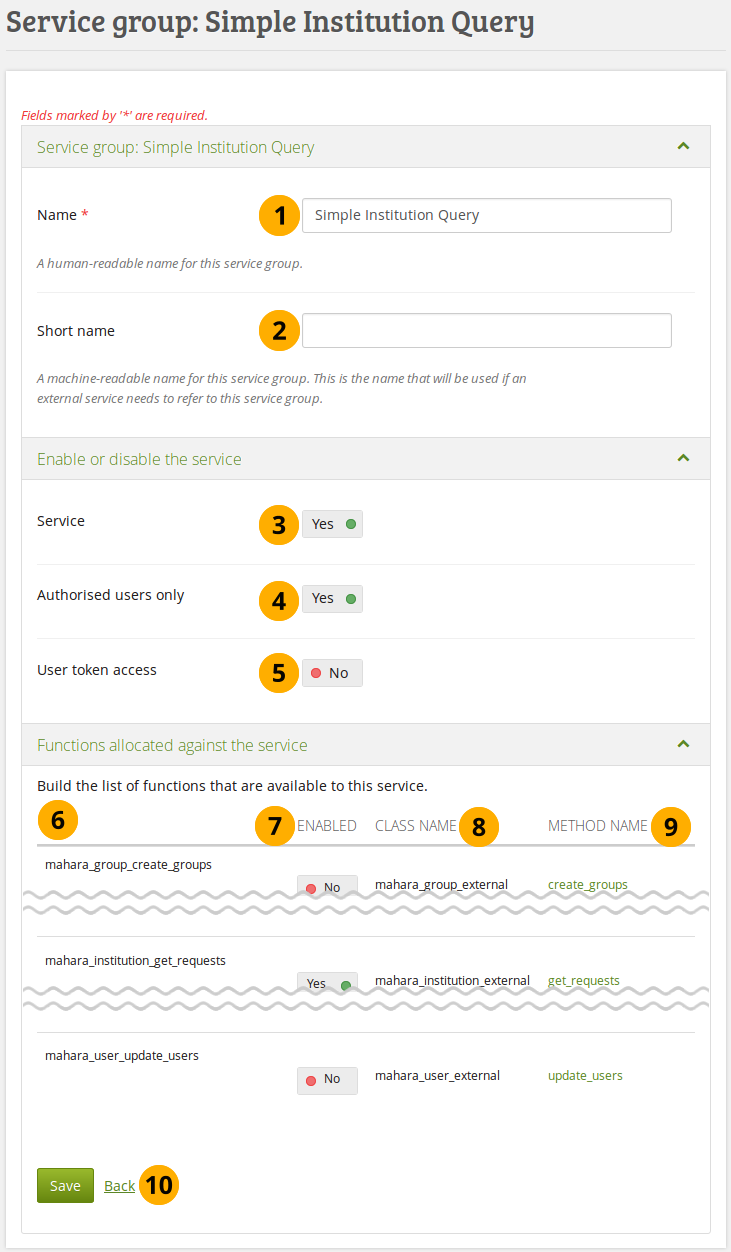
Name: Name of the service group
Short name: This is a short name for the service that is required by applications that connect to Mahara in order to refer to this service.
Service: Set this switch to ‘Yes’ if you want to use this service group. You can tweak the individual functions below.
Authorised users only: Set this switch to ‘Yes’ if only people with a username and password should be affected by this service group.
User token access: Set this switch to ‘Yes’ if you want users to have individual tokens in order to access certain functionalities.
Note
The user token access gives the enitre Mahara userbase the possibility to make use of the API. Therfore generally, it should be restricted to service groups that give access to user-focused functions like mahara_user_get_my_user for the current user’s own details.
The name of the function.
Enabled: This setting enables or disables the use of this function.
Class name: The name of the class that is part of the function.
Method name: The name of the method that is being called. The link takes you to the web services documentation for that method.
Click the Save button when you are finished making your changes, or click Back if you want to cancel the changes.
11.10.1.4. Manage service access tokens
You can generate access tokens for individual accounts and associate service groups to which that account shall have access.
Overview of the access tokens
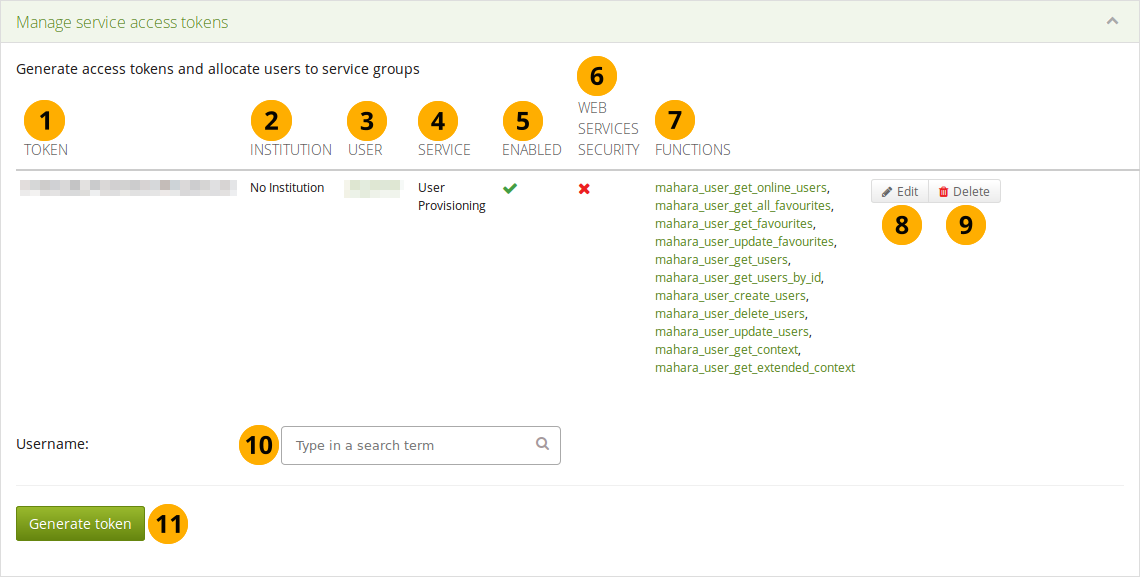
Token: The token that was generated for a particular account.
Institution: Lists the institution to which the account belongs.
User: The username is displayed and linked to the user’s settings page in the administration.
Service: The service group for which the token was generated.
Enabled: If this service group is enabled, you see the Enabled icon . If it is not enabled, you see the Disabled icon .
Web services security: If web services security is enabled, you see the Enabled icon . Otherwise, you see the Disabled icon .
Functions: This is a list of all the functions that the token has access to for the selected service.
Click the Edit button to make changes to the settings.
Click the Delete button to remove the token.
Username: Type a username for whom you wish to add a token. You can either start typing the name or the username of a person registered on your site. You will receive suggestions for names as you type.
Click the Generate token button for a new access token to be created for that account. You are taken to a screen where you can associate a service group to this token (see below). You can only enter one username.
When you create a token, you need to provide some additional information.
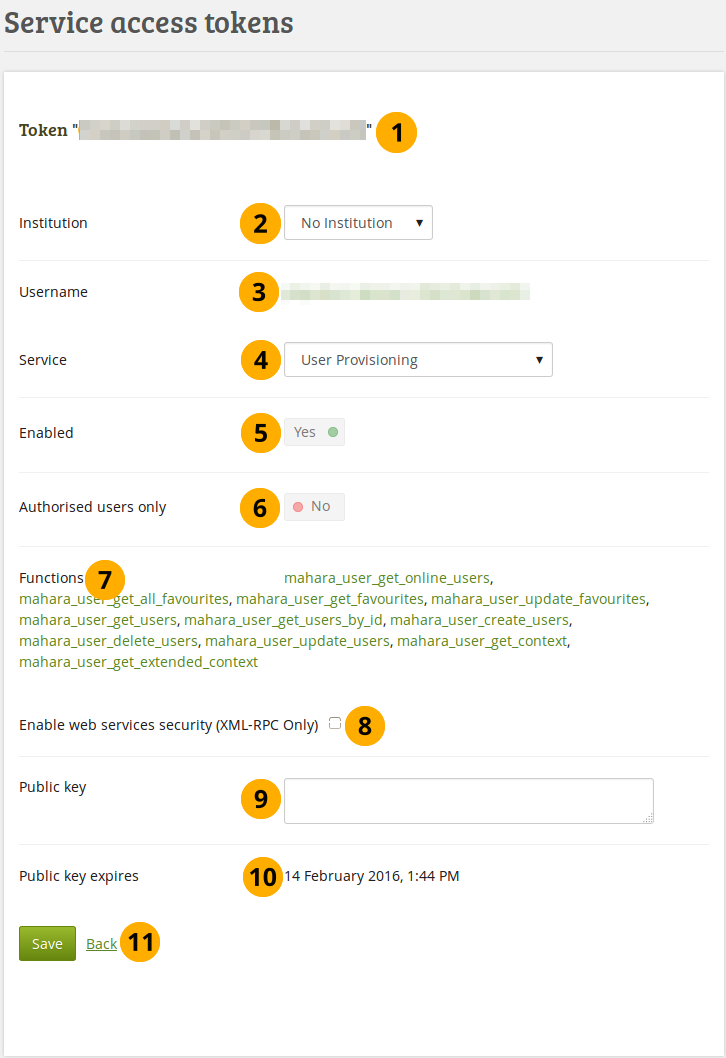
Configure a service access token
Verify that you are editing the correct token.
Institution: Select the institution to which the account belongs.
Username: Verify that you have the correct username for which you want to set up a token. The username is linked to the person’s settings page in the administration.
Service: Choose the service group from the drop-down list for which you want to enable the token. Only services that allow token access can be chosen.
Enabled: The token is automatically enabled when the service group is enabled.
Note
If you want to disable a service group, please do so in the section Manage service groups.
Authorised users only: This switch is not used in this context because here you create a token. That’s why it is disabled.
Functions: A list of functions that the token has access to.
Note
When you change the service, the list of functions is not automatically updated. You only see the updated list when you save the page.
Enable web services security (XML-RPC only): This feature is only available for XML-RPC based authentication.
Public key: Enter the public key for added web service security (only for XML-RPC based authentication).
Public key expires: Date on which the public key that you entered expires. The date is only updated once you save the form.
Click the Save button when you are finished making your changes, or click Back if you want to cancel the changes.
11.10.1.5. Manage service users
If you do not wish to use a token for your users, but give them access to functions via their usernames, you should choose this option. Users must:
only be configured once.
have the ‘webservice’ authentication method in an institution in which they are a member.
Note
Accounts with the authentication method ‘webservice’ can only access Mahara via web services and cannot use the standard login form.
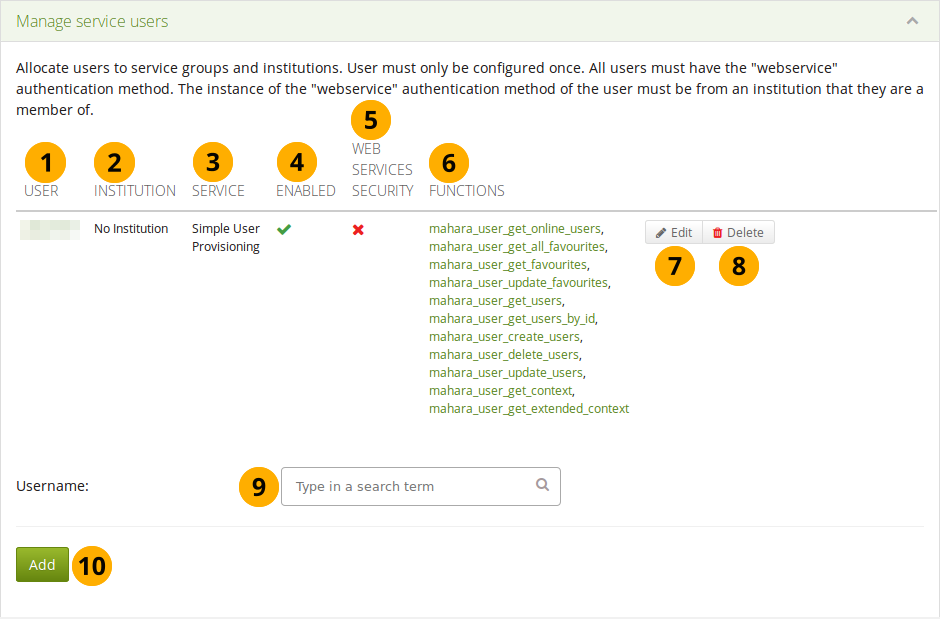
Manage service users overview section
User: The username is displayed of the user for whom you configured a service group. It is linked to the user’s account settings page in the administration.
Institution: Lists the institution to which the account belongs.
Service: The service group that is associated with the account.
Enabled: If this service group is enabled, you see the Enabled icon . If it is not enabled, you see the Disabled icon .
Web services security: If web services security is enabled, you see the Enabled icon . Otherwise, you see the Disabled icon .
Functions: This is a list of all the functions that the user has access to for the selected service.
Click the Edit button to make changes to the settings.
Click the Delete button to remove the account from the access to the associated service group.
Username: Type a username for whom you wish to manage the services. You can either start typing the name or the username of a person registered on your site. You will receive suggestions for names as you type. The account must have web services as authentication method.
Click the Generate token button for a new access token to be created for that account. You are taken to a screen where you can associate a service group to this token (see below). You can only enter one username.
When you add an account, you need to provide some additional information.
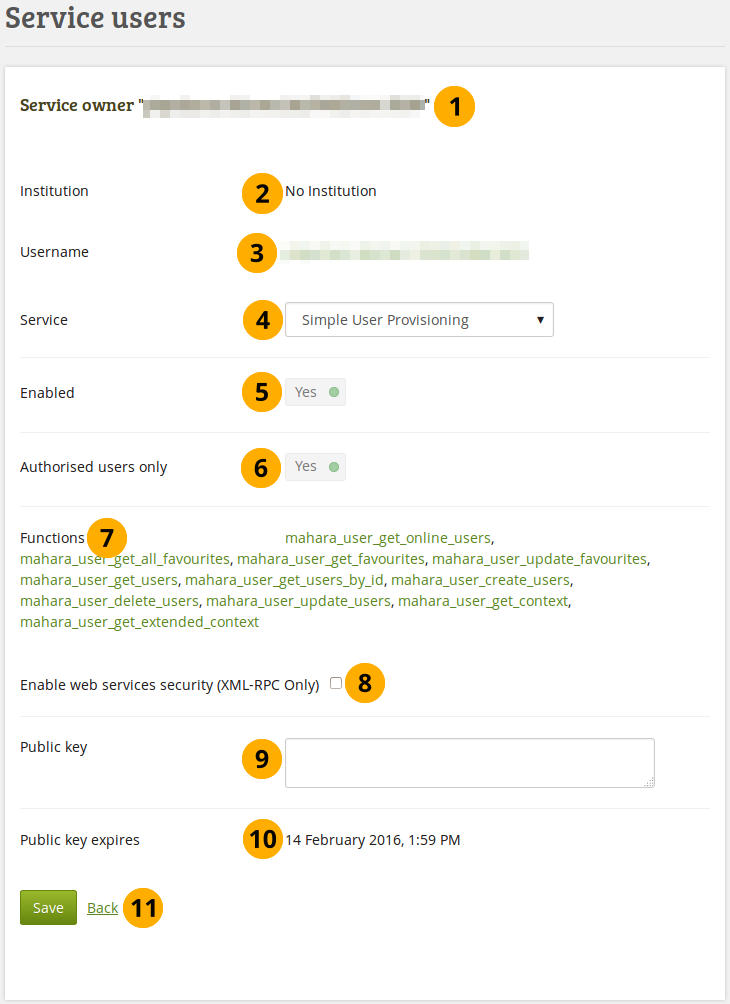
Associate a user with a specific service group
Service owner: The username is displayed. It must match the username below.
Institution: Verify that the institution associated with the account is correct. If it is not, you can change the institution on the account settings page.
Username: Verify that you have the correct username for which you want to set up a token.
Service: Choose the service group from the drop-down menu to which you want to give the person access. Only services that allow access via a username can be chosen.
Enabled: The settings are automatically enabled when the service group is enabled.
Note
If you want to disable a service group, please do so in the section Manage service groups.
Authorised users only: This switch is set to ‘Yes’ automatically when the service group is configured to allow access via a username.
Functions: A list of functions that the account has access to.
Note
When you change the service, the list of functions is not automatically updated. You only see the updated list when you save the page.
Enable web services security (XML-RPC only): This feature is only available for XML-RPC based authentication.
Public key: Enter the public key for added web service security (only for XML-RPC based authentication).
Public key expires: Date on which the public key that you entered expires. The date is only updated once you save the form.
Click the Save button when you are finished making your changes, or click Back if you want to cancel the changes.
11.10.2. Application connections
Administration menu → Web services → Application connections
This is an overview page of all the connections that you have allowed either via personal user tokens or OAuth access tokens.
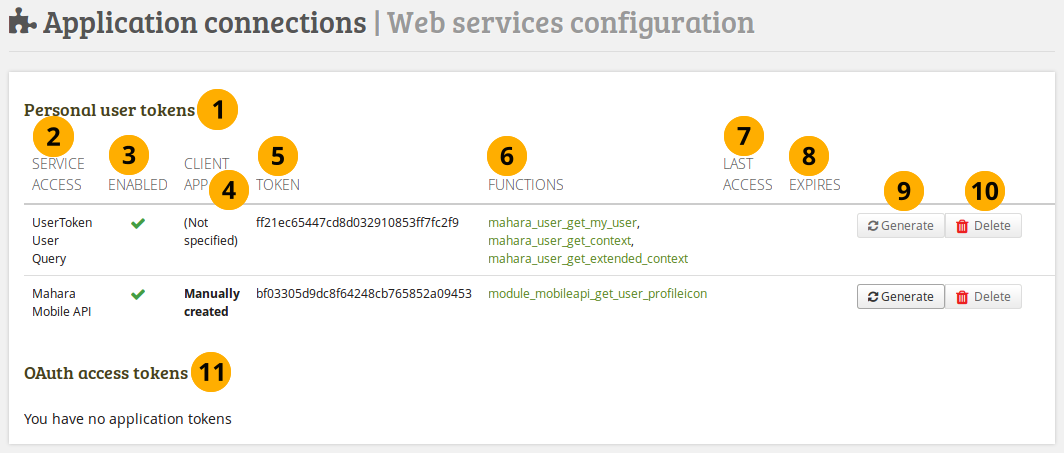
Overview of the application connections
The section Personal user tokens displays all the tokens that you have generated for individuals and whether they have been accessed or not amongst others.
Service access: This column displays the service group for which you created a token.
Enabled: If the service group is enabled, you see the Enabled icon . If it is not enabled, you see the Disabled icon .
Client app: Display how the access token was generated.
Token: The token is displayed here.
Functions: The functions that are part of the service group are listed and linked. The links go to the web services documentation for the function that you selected.
Last access: List the date and time of the last use of the token.
Expires: Show the expiry date of the token.
Click the Generate button to generate a new random token.
Click the Delete button to delete the token. The user group and functions are still available. You can then click the Generate button to create a new token.
Note
The Delete button is only available when a token was generated.
In the OAuth access tokens section you see any tokens generated to be used with OAuth.
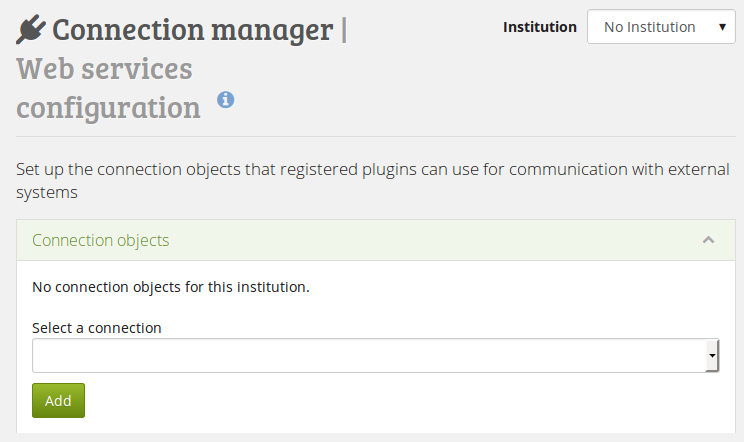
11.10.3. Connection manager
Administration menu → Web services → Connection manager
The connection manager facilitates the use of web services by making the setup of connections easier.
For more information, see the wiki (original idea) and the feature request item.
Overview for the connection manager
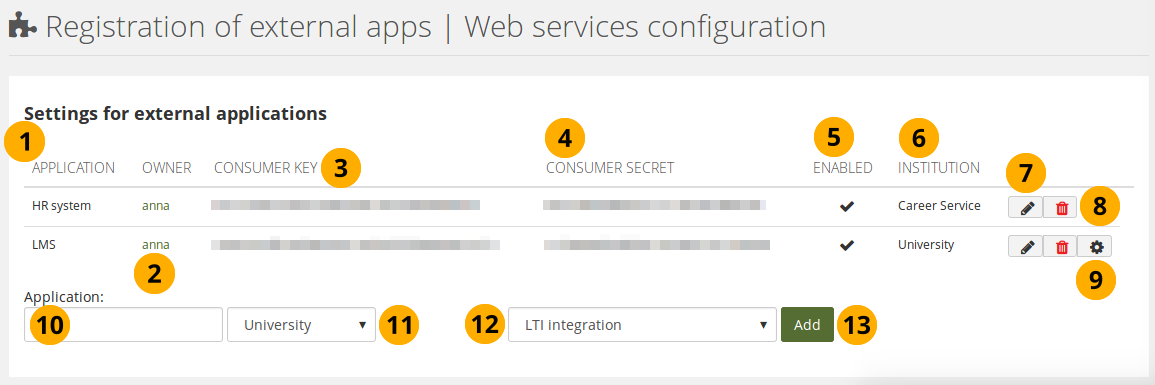
11.10.4. Registration of external apps
Administration menu → Web services → External apps
You can use this page to register external applications that are connected via OAuth. An example is LTI (Learning Tools Interoperability). You can enable external tools for institutions and specific service definitions, for which a consumer key and secret will be generated automatically.
Register an external application
Application: Lists the applications that are connected via OAuth.
Owner: The person who has set up the OAuth service.
Consumer key: The consumer key for the OAuth service.
Consumer secret: The consumer secret for the OAuth service.
Enabled: If the application is enabled, you see the Enabled icon . If it is not enabled, you see the Disabled icon .
Institution: The institution for which the external app has been set up.
Click the Edit button to make changes to the settings.
Click the Delete button to remove the application so it cannot connect any more to Mahara via OAuth.
Click the Manage button to decide on more settings where available.
Application: Give your application that you want to add a name.
Choose which institution shall have access to your chosen application via OAuth.
Choose the service group that you want to associate with this application.
Click the Add button to create the OAuth authentication for the seleced service. You are taken to a screen where you can configure your application (see below).
You can see details about the connection that you are setting up by clicking the Edit button .
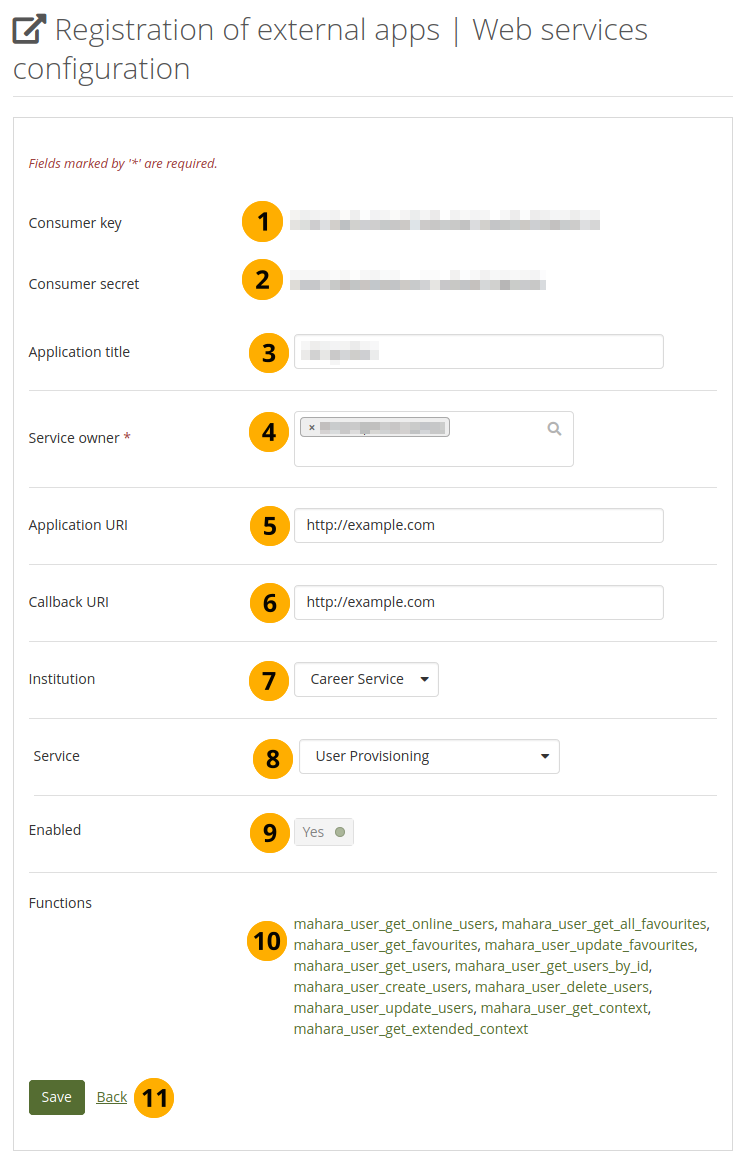
Configure an OAuth service
Consumer key: The consumer key for the external service.
Consumer secret: The consumer secret for the external service.
Application title: You can change the title for the application.
Service owner: Person who has set up the external service. You can change the owner of the service so that it is not all tied to a site administrator. This is handy when you want to set up a specific account that handles all web services calls.
Application URI: URI of the application. If it is not needed, it is ignored.
Note
If you set up LTI and no other authentication method for your account holders to log in directly into Mahara, you can enter the URL to your LTI activity here so they are being redirected correctly for the login when they receive a notification.
Callback URI: The callback URI for the application. If it is not needed, it is ignored.
Institution: Select the institution for which you want to set up the external service.
Service: Select the service group that you want to set up.
Enabled: The application is automatically enabled when OAuth is enabled.
Functions: A list of functions that the application has access to.
Note
When you change the service, the list of functions is not updated automatically. You only see the updated list when you save the page.
Click the Save button when you are finished making your changes, or click Back if you want to cancel the changes.
11.10.5. Web services logs
Administration menu → Web services → Web services logs
You can view the logs from the web services and narrow you search so you only see the relevant information.
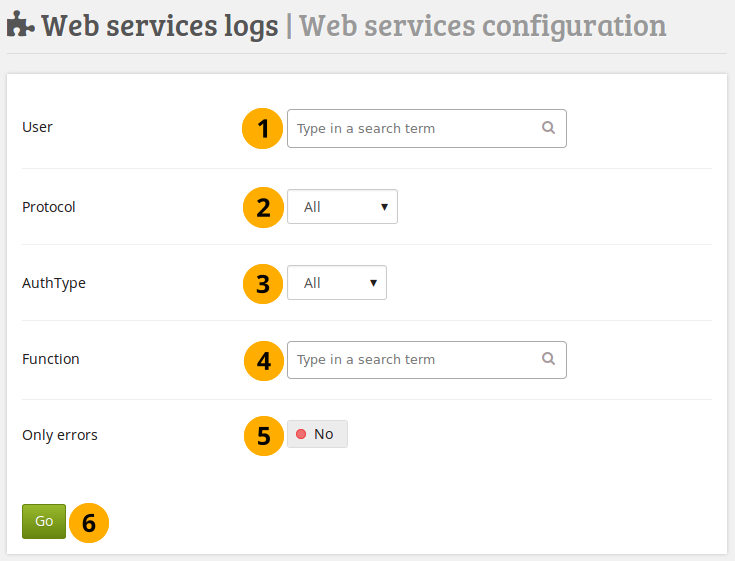
Search the web services logs
User: Type the username of the person for whom you want to see the logs. You can only enter one username. You can either start typing the name or the username of a person registered on your site. You will receive suggestions for names as you type.
Protocol: Select the web services protocol that is associated with the account. You can only see the protocols that are enabled.
Auth type: Choose the type of authentication that you selected for the account. The options are:
All: Display the logs for any authentication type.
Token: Only display logs when the account has a user token.
User: Display the logs when the account uses the username for the web service.
OAuth: Select this option if you only want to see logs when the person logs in via OAuth.
Function: Search for the function that you are interested in.
Only errors: Switch to ‘Yes’ if you only want to see log information that contains an error.
Click the Go button to start your search.
If there are any results for your search, you will see them in the Results area.
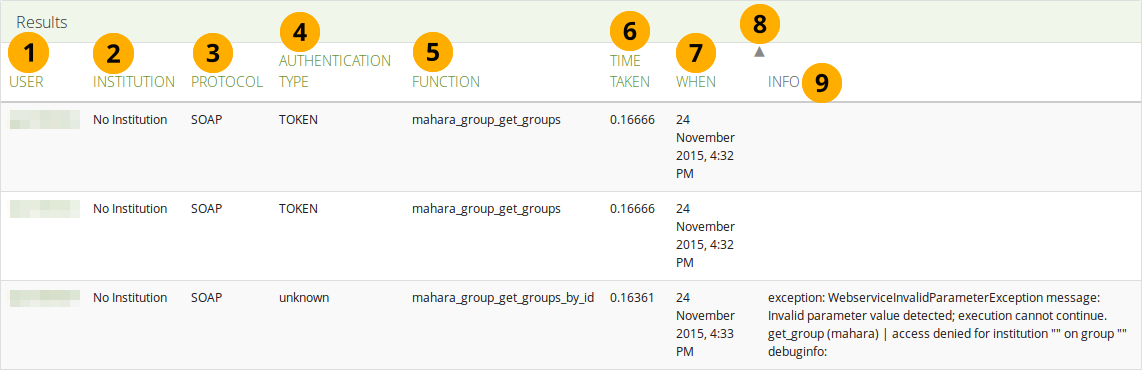
Results for the search of the web services logs
User: Display the username of the account for which there is a log entry.
Institution: Display the name of the institution to which the account belongs.
Protocol: Show the protocol that is associated with the account for the chosen context.
Authentication type: Show the authentication type that is associated with the account.
Function: Display the function for which there is a log entry.
Time taken: The time it took to fetch the log entry.
When: Display the date that the log entry was produced.
You can change the sort order for any column by clicking its column title.
Info: Error messages are displayed here.
11.10.6. Web services test client
Administration menu → Web services → Web services test client
The test client gives you the opportunity to test your settings. Please beware that the functions are executed on the system and not a separate test instance.
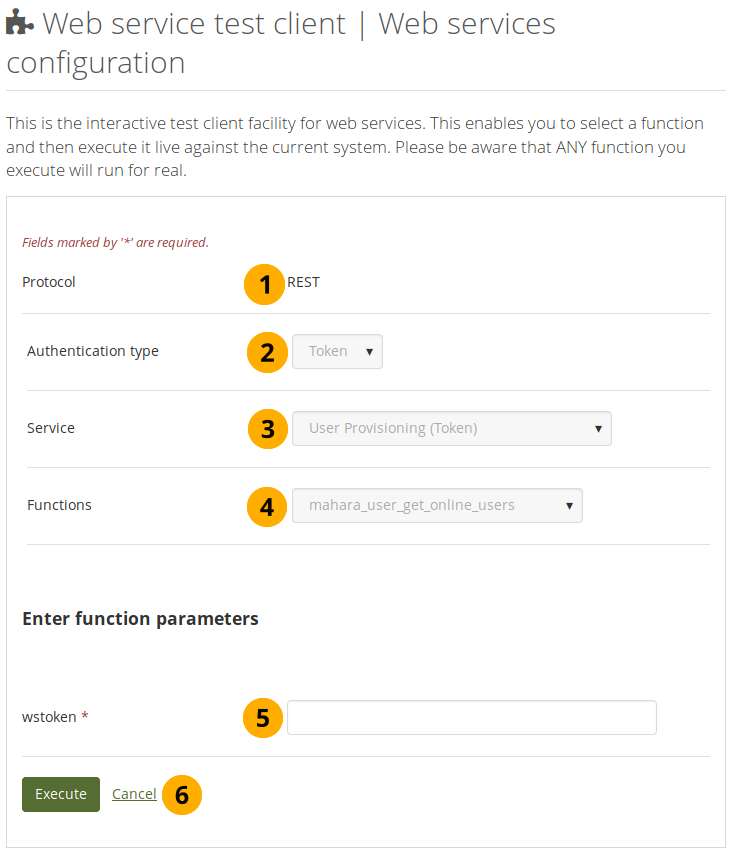
Web services test client
Note
When you start the configuration, you only see the protocol and the authentication type if you only have one protocol selected. The other fields are revealed once you made a decision on what to test.
Protocol: You only see the web services protocols that are currently enabled. If you see more than one, select the one that you want to test.
Authentication type: Select the authentication type that you would like to include in your test. Click the Next button to see the following option.
Service: Choose the service group that you want to test. Click the Next button to see the following option.
Functions: Select the function that you want to include in your test. Click the Next button to see the following option.
wstoken: Enter the web services token for the account that you want to test.
Note
If you selected ‘User’ for the authentication type, you’ll also see a field wspassword that you can fill in.
Click the Execute button if you want to run the test, or click Cancel if you want to abort the test.
Once the test has run, the results of the test are displayed on the screen.