13.2.  Setup of LTI Advantage in Mahara
The recording showcases the three main functionalities that are achieved via LTI Advantage when connecting to Brightspace:
Authentication
Setup of groups based on courses and enrolment information
Portfolio submission
13.2.1. Enable LTI Advantage
Administration menu → Extensions → Plugin administration → ltiadvantage
In order to use LTI, complete the setup in Mahara as well as in the LMS that you want to connect.
Mahara supports LTI 1.1 and experimentally LTI (1.3) Advantage.
Note
LTI Advantage is an experimental feature and has not yet been tested with LMS other than Brightspace.
You enable LTI Advantage for your site by activating the plugin ‘ltiadvantage’ in the Plugin administration.
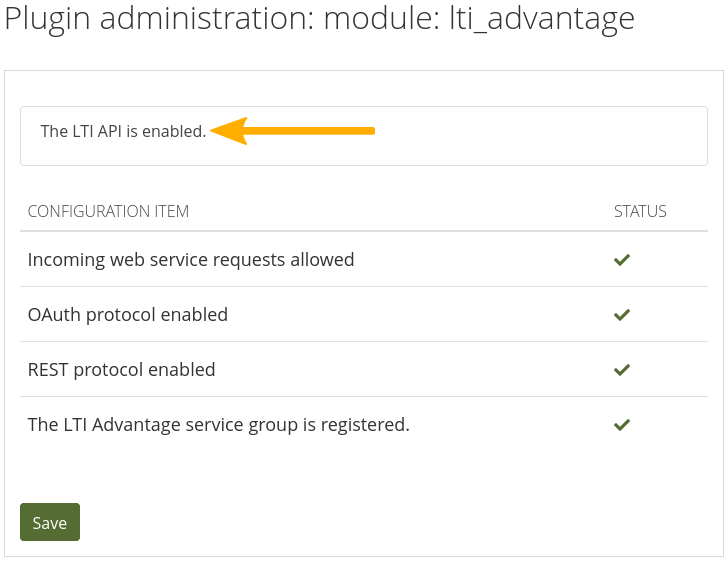
The LTI plugin is enabled
The LTI plugin is enabled when there are no warning signs on the plugin page and the text at the top reads ‘The LTI API is enabled’.
Note
It is best to enable LTI Advantage using this method rather than enabling individual web services manually to ensure that all dependencies are set up correctly.
13.2.2. Enable LTI Advantage for an institution
You can enable LTI Advantage for an institution as site administrator. Institution administrators cannot set up LTI for their own institution.
Enable LTI Advantage for an institution
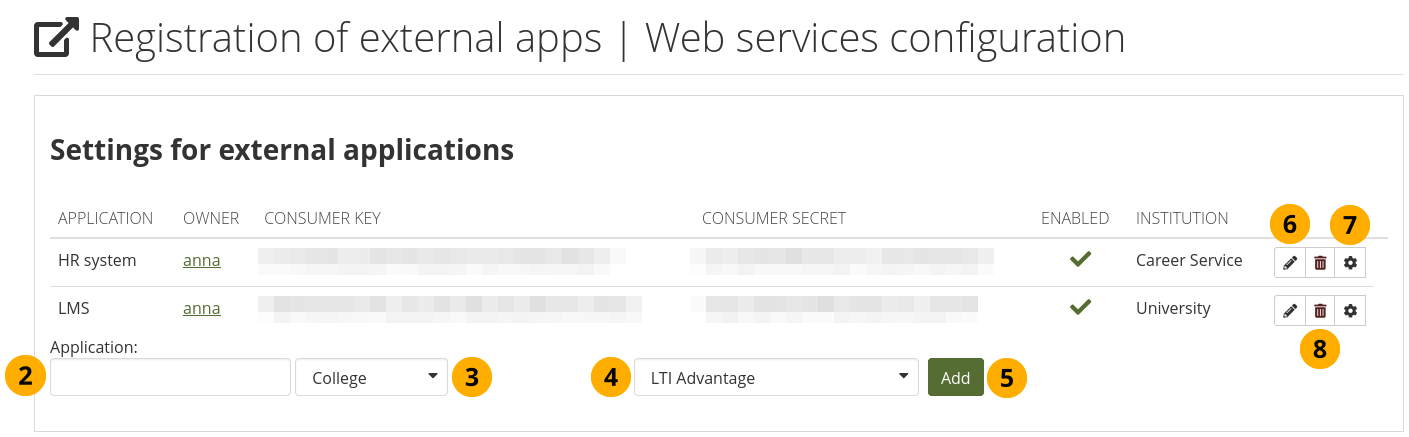
Go to Administration menu → Web services → External apps.
Application: Give your application that you want to connect a name. This is an identifier that only you need to understand.
Choose the institution in which you want to set up the application.
Select ‘LTI Advantage’ from the drop-down menu.
Click the Add button to set up LTI Advantage for the institution.
Note
If your institution does not already have the ‘Web services’ authentication method, it will be added automatically.
While a consumer key and consumer secret are created, the LMS requires other parameters that you can see when you edit this app.
Click the Edit button to make changes to the web services configuration.
Click the Manage button to make changes to the authentication part of this app.
Click the Delete button to remove this app.
See also
You can connect a second authentication method to LTI to allow account holders to log in via Mahara and via the LMS.
13.2.3. Edit the LTI Advantage connection
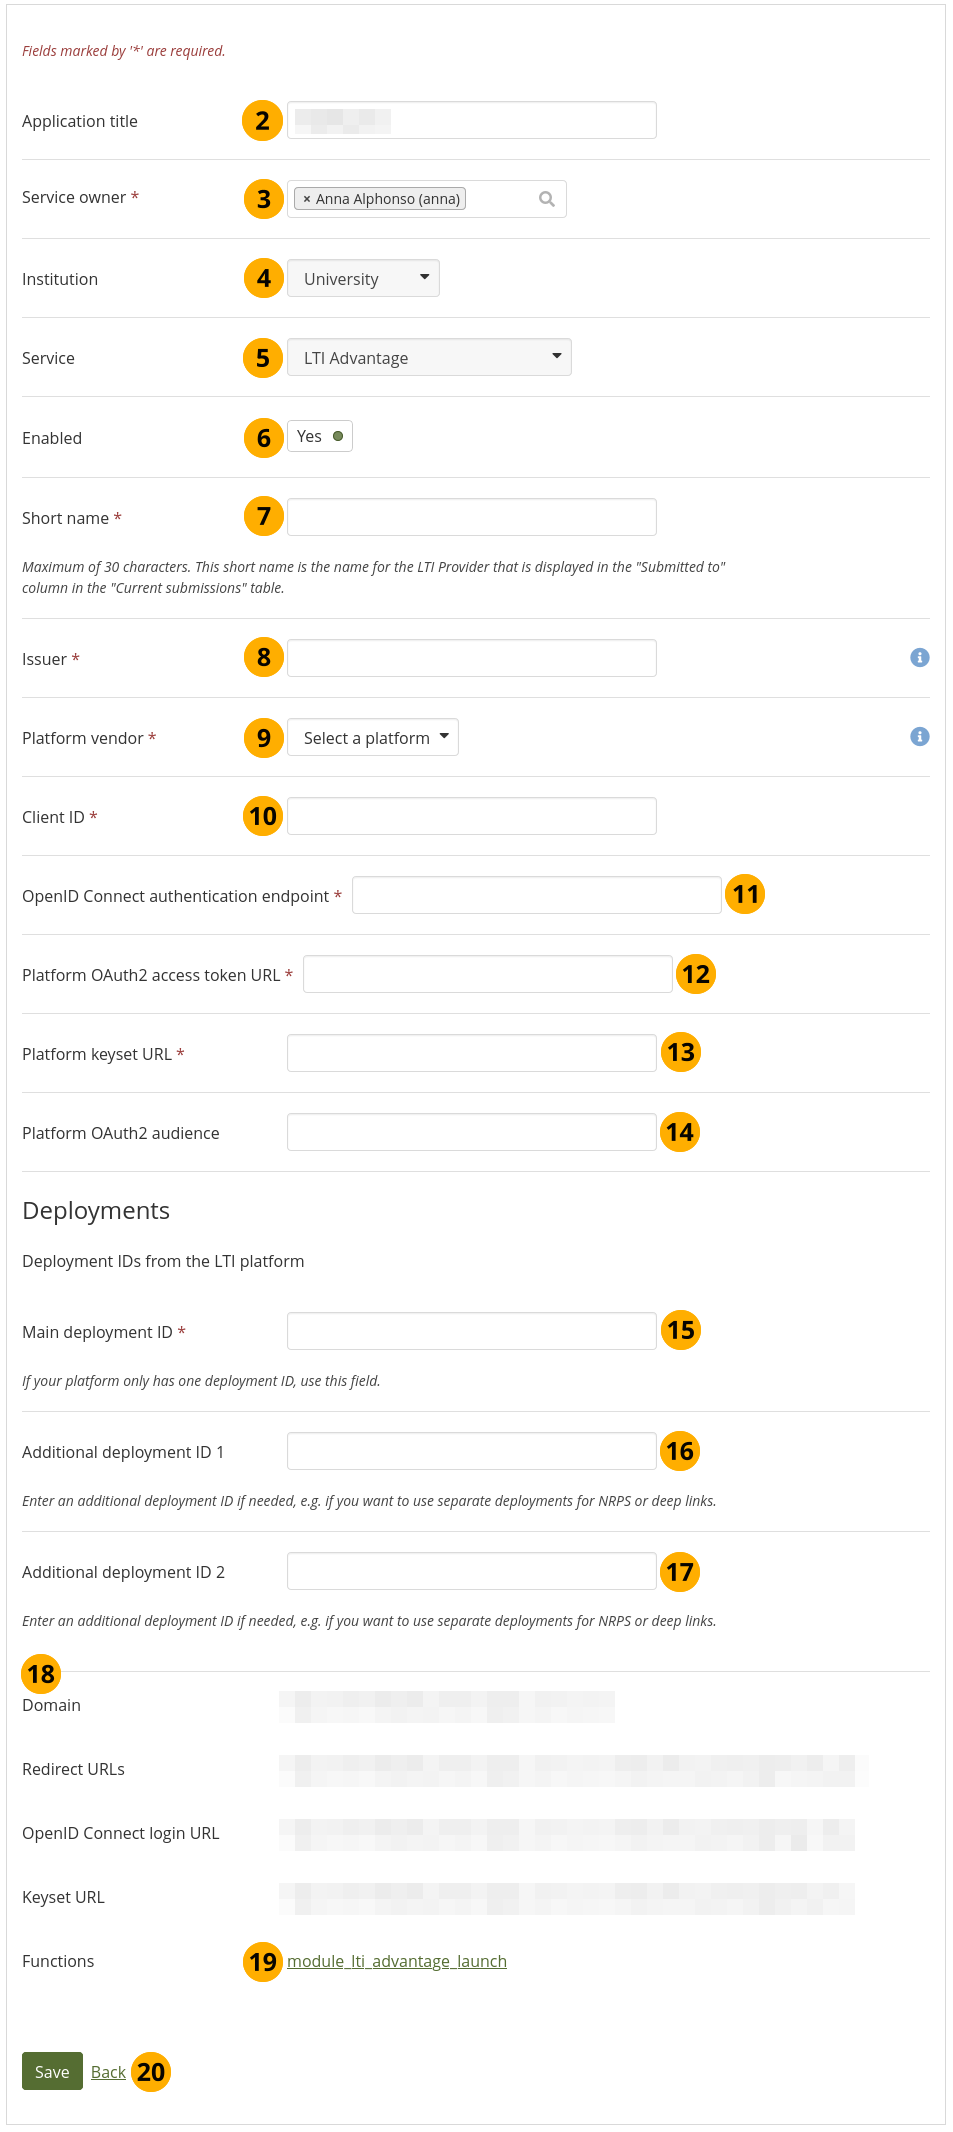
In contrast to LTI 1.1, the consumer key and consumer secret are not used for LTI Advantage. Other parameters are important though and you also provide details from the LMS to configure the connection.
Note
LTI Advantage is an experimental feature and has not yet been tested with LMS other than Brightspace.
Edit the LTI Advantage in Mahara
Click the Edit button on the ‘External apps’ overview page for the LTI Advantage connection that you want to configure.
Application title: You can change how you want to refer to this application to easily distinguish it from others.
Service owner: Select the account that is the owner. Per default, it is the person who added the app. However, it is good practice to change this to another account, e.g. one that was specifically set up for web services connections so that the administrator is not logged out whenever the web service is triggered. This field is required.
Note
The account selected must have at minimum institution administrator permissions. If you are on a multi-tenanted site, make sure to give the account only institution administrator permissions as it should be in the institution and not a general account.
Institution: Verify that the correct institution is selected. You cannot change this value. If it is incorrect, delete the app and set up a new one.
Service: Verify that the correct app / web service is selected. You cannot change this value. If it is incorrect, delete the app and set up a new one.
Enabled: Keep the app on ‘Yes’ if you want people to log in via LTI Advantage. When you set up a new app, it is automatically enabled.
Short name: This short name is the name for the LTI Provider that is displayed in the ‘Submitted to’ column in the ‘Current submissions’ table in Administration menu → Groups → Current submissions. This field is required.
Issuer: This value is the content of the
issfield in a request from the LTI platform. For Brightspace, this is the URL of your Brightspace instance. This field is required.Platform vendor: Select your platform vendor or select ‘Other’ if it is not listed and enter the value provided by your platform. This field is required.
Client ID: Add the value given to you by your LMS. This field is required.
See also
Refer to the Brightspace setup for information on where to look for the LMS specific values.
OpenID Connect authentication endpoint: Add the value given to you by your LMS. This field is required.
Platform OAuth2 access token URL: Add the value given to you by your LMS. This field is required.
Platform keyset URL: Add the value given to you by your LMS. This field is required.
Platform OAuth2 audience: Add the value given to you by your LMS.
Main deployment ID: Add the main deployment ID for your platform. If you can have multiple deployment IDs, use the one for authentication purposes here. This field is required.
Additional deployment ID 1: Some platforms can have more than one deployment ID to differentiate between the different LTI Advantage services. Use them at your discretion.
Note
In Brightspace you can have three different general deployment IDs:
Basic authentication
Names and Role Provisioning Service (NRPS)
Deep link
It is recommended that you set these up so you have more control over what happens when a link in the LMS is clicked.
Additional deployment ID 2: You can add a third deployment ID if required.
Mahara values needed for the setup in the LMS: These are the values that are required to finish the setup in the LMS.
Functions: The functions involved in this web services call are listed. You can click a function to see the web services documentation for it in Mahara.
Click the Save button to keep your changes. Then click Back to return to the overview page.