8.1. Accountinstellingen
User menu → Settings
The account settings of a user can be accessed via the Settings page in the User menu in the top right of a page.
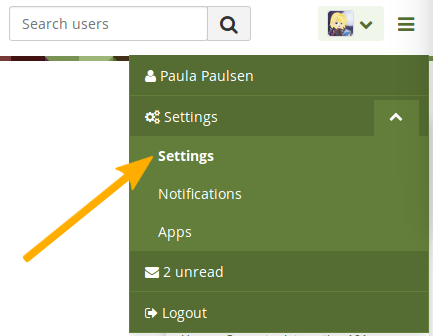
Acces the Settings page
8.1.1. Nieuw wachtwoord
Je kunt je Mahara wachtwoord wijzigen op de Instellingen-pagina
Notitie
If you do not see this section on your Settings page, you cannot change your password. Your login and password are managed elsewhere. This is the case if your institution has set up single sign-on for example. If you want to change your password in such a case but don’t know where, please contact your institution administrators. They will be able to tell you where you can change your password.
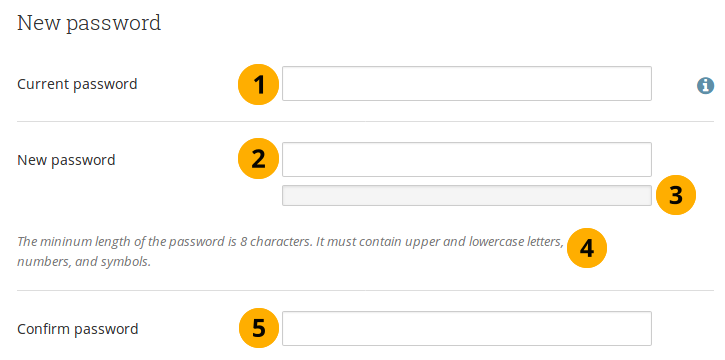
Change your password
Huidig wachtwoord: geef je huidig wachtwoord.
Nieuw wachtwoord: geef je nieuw gekozen wachtwoord.
The password strength indicator shows how strong your password is in relation to the password policy.
The minimum requirements for the password are mentioned in the help text.
Bevestig wachtwoord: geef je nieuw wachtwoord opnieuw in om er zeker van te zijn dat het juist gespeld is.
Als je wil kun je meer wijzigingen maken op deze pagina.
Klik op de Bewaren-knop onderaan de pagina.
Je wachtwoord moet uit minstens zes tekens bestaan. Wachtwoorden zijn hoofdlettergevoelig en moeten verschillend zijn van je gebruikersnaam.
8.1.2. Wijzig gebruikersnaam
You need a username to log in to Mahara. If your account is not managed by single-sign on or another authentication method, you see this box with your current username in it. You can change your username at any time.
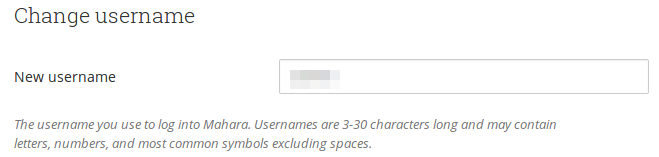
Change your username
Notitie
Gebruikersnamen zijn 3-30 tekens lang en kunnen letters, cijfers en de meeste gewone symbolen bevatten, maar geen spaties.
8.1.3. Wijzig profiel URL
Notitie
Je kunt het “Wijzig profiel-URL”-gedeelte van je account instellingenpagina enkel zien als de site beheerder mooie URL’s ingeschakeld heeft en jouw het recht gegeven heeft je profiel-URL te wijzigen.
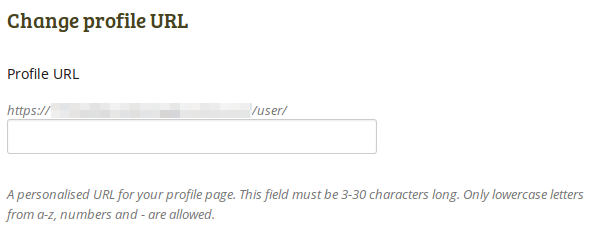
Wijzig profiel URL
Als je deze optie ziet, kun je een identificatie voor je profielpagina kiezen. Standaard wordt je gebruikersnaam gekozen, maar als je dat wil wijzigen en de site beheerder heeft dat toegestaan, dan moet je identificatie 3-30 tekens lang zijn. Je kunt enkel kleine letters gebruiken van a-z, cijfers en een liggend streepje.
Your profile page is then accessible via the URL https://url-to-your-mahara-site/user/your-chosen-name. For example: https://mahara-university.org/user/paula.
Waarschuwing
Though you can change the URL to your profile page or any other portfolio page at any point, you shouldn’t do that because people who already know the URL to your page will not be able to access it anymore after you have changed it.
The original, internal Mahara URL, e.g. https://mahara-university.org/user/view.php?id=123 will still work.
8.1.4. Algemene instellingen account
The general account options are visible to all users no matter whether you can change your username and password or not. However, some options are only available if the site administrator turned them on.

View and change your general account options
Friends control: Choose whether other users may add you to their friends list. If you are added to a friends list, the owner of that list is added to yours as well. When you remove someone from your friends list, you are also removed from their list automatically. Your settings options are:
Niemand mag me als vriend toevoegen: andere gebruikers zien de optie om jouw als vriend toe te voegen niet.
Nieuwe vrienden moeten mijn goedkeuring krijgen: voor iemand jouw kan toevoegen als vriend aan hun vriendenlijst, moet je hen eerst goedkeuren.
Nieuwe vrienden worden automatisch goedgekeurd: je aanvaardt alle vriendschapsverzoeken automatisch.
HTML editor: An HTML editor is available for use in some sections of the site. This is known as a ‘What you see is what you get’ (WYSIWYG) editor. It allows you to apply formatting to your text like in a word processor. If the editor is turned off, you can only enter plain text without any formatting like making text bold or colorising your text. If you do not have this option, the site administrator may have disabled it.
Default license: If the site administrator enabled License metadata in the general site settings, you can select your default license for your content that you create or upload. The default setting is “All rights reserved”, which means that you reserve all copyright.
If your institution administrator requires you to specify a license, you must set a license other than “None selected”.
You can choose any license from the drop-down menu that suits most of your content best. If you upload an artefact by another person that was published under a different license, you can choose that particular license on the artefact’s settings. If the site administrator allowed custom licenses, you can enter one using the drop-down menu option “Other license (enter URL)”.
Notitie
If you are not sure which default license to choose, please check with your organisation as it may require you to use a specific license. You can also consult a copyright lawyer (at cost).
If you are a member of multiple institutions and choose “Use institution default”, you will not be able to select the institution whose license you want to make the default one. One will be chosen by the system randomly.
Disable email: Use this setting to stop the site from sending you emails. It is advised that you generally regulate what is sent via email and what is not in the notifications.
Waarschuwing
If you disable your email address, you cannot reset your password as that requires the sending of an email. You will have to contact an administrator and have your password reset.
Messages from other users: Use this setting to choose who you wish to receive messages from. Use the notifications area to decide how you will receive these messages. Your options are:
Niemand mag me berichten sturen: andere gebruikers mogen je geen berichten sturen.
Mijn vrienden mogen me berichten sturen: enkel gebruikers op je vriendenlijst kunnen je via het systeem contacteren en je een bericht sturen.
Iedereen mag me berichten sturen: elke gebruiker van het systeem, of ze nu vriend zijn of niet, kan je contacteren.
Notitie
These restrictions do not apply to users with ‘administrator’ or ‘staff’ access.
Taal: als jouw Mahara in meerdere talen wordt aangboden, dan zul je deze optie zien en kan je kiezen in welke taal je wil navigeren door de site. De menu-items en de contextgevoelige hulp verschijnen in je gekozen taal. De inhoud van portfolio’s of groepen zal echter niet automatisch naar die taal omschakelen.
Thema:
If you belong to multiple institutions, you can choose the institution theme with which you wish to browse the site and see all your portfolios in (unless you chose a page theme or skin). Other users will see your pages in their own theme as this setting is not for choosing page themes.
If the site administrator allowed it, you can choose any theme that is available to you as your browse theme.
Toon controle om kolommen toe te voegen en te verwijderen tijdens het bewerken van een pagina: je kunt de Toevoegen en Verwijderen-knoppen op het bewerkscherm voor pagina’s om het aantal kolommen vlug te wijzigen toevoegen of verwijderen. Zie bewerk opmaak.
Multiple journals: By default, you have one journal. If you set this switch to “Yes”, you will be able to create more journals. Once you have created a second journal, you cannot switch this setting back to “No”.
Notitie
Als je Moodle gebruikt om gegevens te exporteren naar Mahara, dan moet je meerdere logboeken inschakelen omdat inhoud die via Leap2A doorgestuurd wordt, dikwijls in een nieuw logboek geplaatst wordt.
Maximum tags in cloud: Decide how many tags you wish to display in your personal tag cloud in the sidebar in Pages and collections and Files.
Maximum number of groups to display: Decide how many groups you wish to display in your sidebar. If you do not enter any value, no group will be displayed.
Sort groups: Decide in which sort order your groups should be displayed in your sidebar:
Most recently joined: Groups are displayed in chronologically reverse order to show the groups that you joined recently first.
Earliest joined: This option displays your groups in the order in which you joined them.
A to Z: Alphabetically from A to Z. This is the default option.
Hide real name: You see this option if the site administrator allows users to hide their real name. If you switch this to “Yes”, others can only search for you using your display name.
Dashboard information: Choose this option if you want to display the quick links on your dashboard.
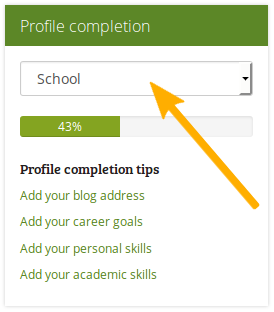
Profile completion progress bar: Switch this setting to “Yes” if you want to display the progress bar set up by your institution and tips on how to complete your profile.
Notitie
You only see this option if the administrator of your institution set up the profile completion.
If you are a member of multiple institutions, you can switch between the individual institutions in order to view the respective sidebar.
Resize large images on upload: If you enable this option, all large images will be resized to the maximum dimensions per default. You can disable this setting for the upload of individual images. You only see this option if the site administrator allowed it.
Device detection: If you enable this option and browse the site via a smartphone or tablet, you will only see functionality that can be handled comfortably on a mobile device. If you do not enable this option, you will see the site as it is on a mobile device. On small devices, the menu will change to a mobile-friendly one though. You only see this option if the site administrator allowed it.
Klik op de Bewaren-knop al je klaar bent met je wijzigingen.
8.1.5. Verwijder account
You can delete your own account by clicking the Delete account button on the top of the Settings page.
Notitie
Every account can be deleted. It is up to the administrators to decide whether a review is required before the content of a user account can be deleted fully.

Delete your account and your entire content
Waarschuwing
Wees er zeker van dat je je account wil verwijderen. Je artefacts en pagina’s kunnen niet hersteld worden als je je account verwijdert. Alles zal weg zijn. Je kunt van al je zaken een backup maken (behalve groepsinhoud) door je portfolio te exporteren.
 If no account deletion review is required, you must provide your current password as a security measure before you can delete your account.
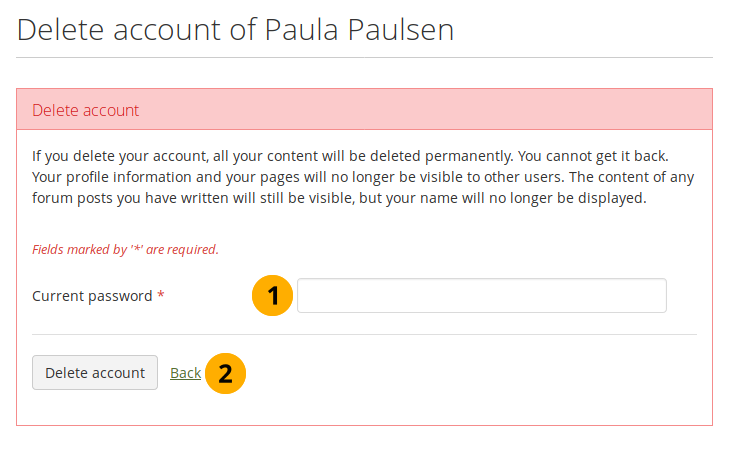
Provide your password to delete your account
Current password: Enter your password to approve the deletion of your account.
Click the Delete account button to complete the deletion.
If the site or the institution administrator decided that a review is required before you can delete your account, you will need to provide a reason for wanting to delete your account.
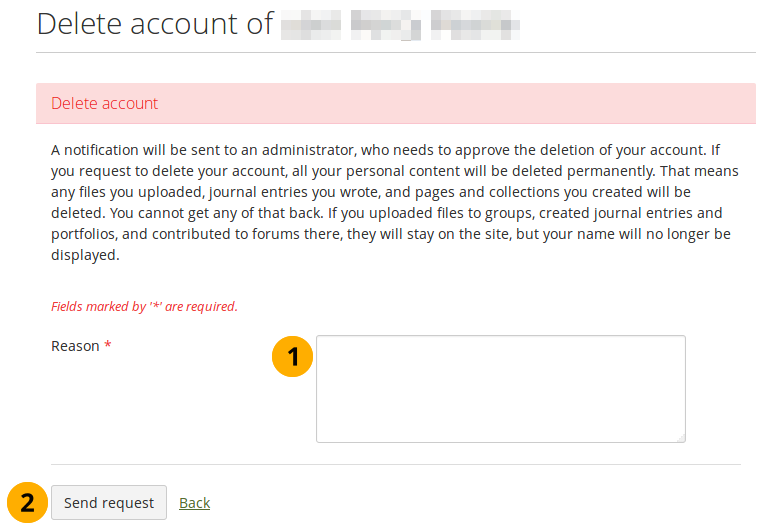
Reasons for deleting your account
Enter the reason for deleting your account.
Click the Send request button to request that your account be deleted.
The site administrator or institution administrator if you are a member in an institution receives a notification about your request and can approve or deny it.
On your account settings page, you can cancel or resend your account deletion request.

Cancel or resend your account deletion request
Click the “Cancel request” button if you want to keep your account.
Click the “Resend deletion notification” button if your administrator hasn’t deleted your account yet and hasn’t been in touch with any questions.
The date is displayed when you requested that your account be deleted.