11.3. Beheer site
Administration menu → Configure site
Notitie
Configureer site is enkel toegankelijk voor site-beheerder.
In Configureer site kun je:
algemene instellingen voor ja Mahara site maken
site pagina’s bewerken
bepalen of bepaalde menu-items getoond worden
netwerking toestaan met Moodle of een andere Mahara
maken en delen van site-pagina’s en collecties
uploaden van site-bestanden
11.3.1. Site opties
Administration menu → Configure site → Site options
in Site opties kun je globale opties kiezen die als standaard gelden voor de hele site.
Notitie
Een of meerdere velden kunnen uitgeschakeld zijn als ze overschreven zijn door een instelling in config.php.
Als je klaar bent met het bewerken van één of meerdere instellingen, klik dan op site-opties updaten onderaan de pagina.
11.3.1.1. Site instellingen
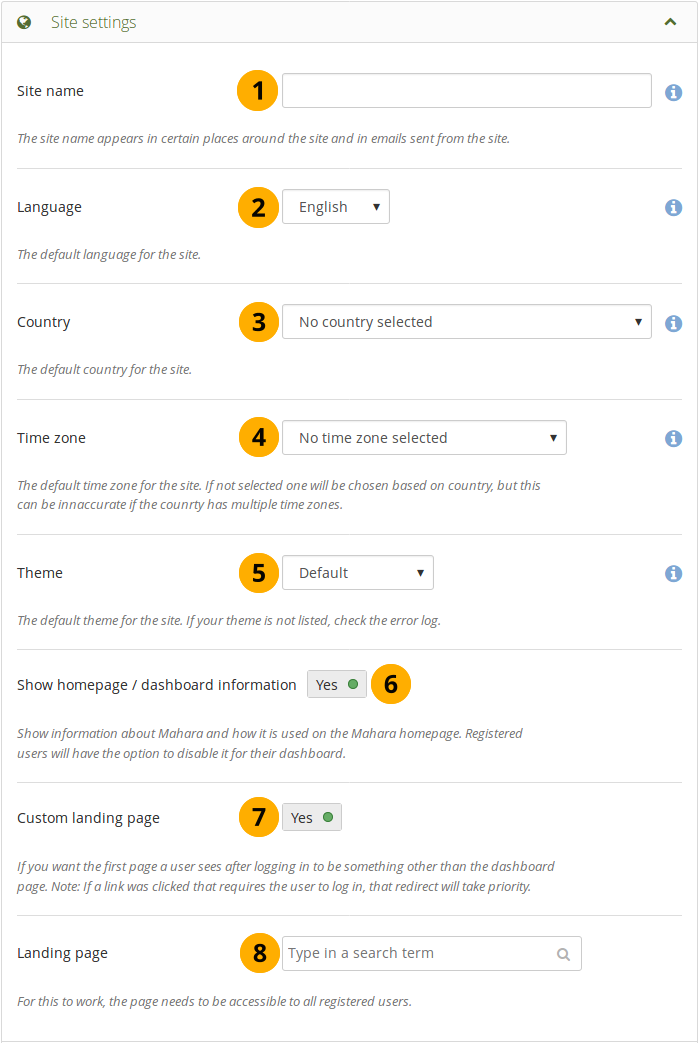
Site instellingen
Site-naam: Kies een naam voor je Mahara site. Die verschijnt op verschillende plaatsen op de site, bijvoorbeeld in de titelbalk van je browser en in e-mails die de site stuurt. Daarom mag die niet te lang zijn.
Taal: Bepaal de standaardtaal voor je site. Als je meerdere taalpakketten geïnstalleerd hebt, dan zie je een rolmenu. Anders wordt de standaardtaal, Engels, getoond.
Notitie
You can install more language packs. More information about the language packs is on the wiki.
Land: Het geselecteerde land is de standaard voor landselecties in Mahara, vb in in contact informatie.
Time zone: Select the time zone in which you want to have time stamps displayed around the site. If you do not select one, one will be chosen according to the country if you entered one. This may not be accurate if a country has more than one time zone.
Theme: Mahara comes with a number of themes that you can use. Choose one from the drop-down menu to make it the default theme for your site. If you have institutions set up, they can choose their own theme. You can search for community-contributed themes on the Mahara wiki.
Show homepage / dashboard information: If set to “Yes”, information about Mahara and how it is used is displayed on the homepage for logged-out and on the Dashboard for registered users. Registered users can disable this for their own dashboard. See also Quick links.
Custom landing page: Switch this setting to “Yes” if you want people to arrive at a different page than the dashboard after having logged in. The select menu where you can choose the appropriate page becomes visible.
Notitie
If a person clicks a link that is different from the homepage and requires a login, they will be redirected to the proper page rather than being taken to the custom landing page.
Landing page: Start typing a letter that appears in the title of the page that you want to choose.
Notitie
Only group, institution, and site pages that are available to all registered users are displayed. That includes group homepages as well as group discussion forums when they are visible to all registered users.
If a page is deleted or access removed, the site administrator receives an email notification so they can fix the problem. In the meantime, everybody is redirected to the dashboard page again.
11.3.1.2. User settings
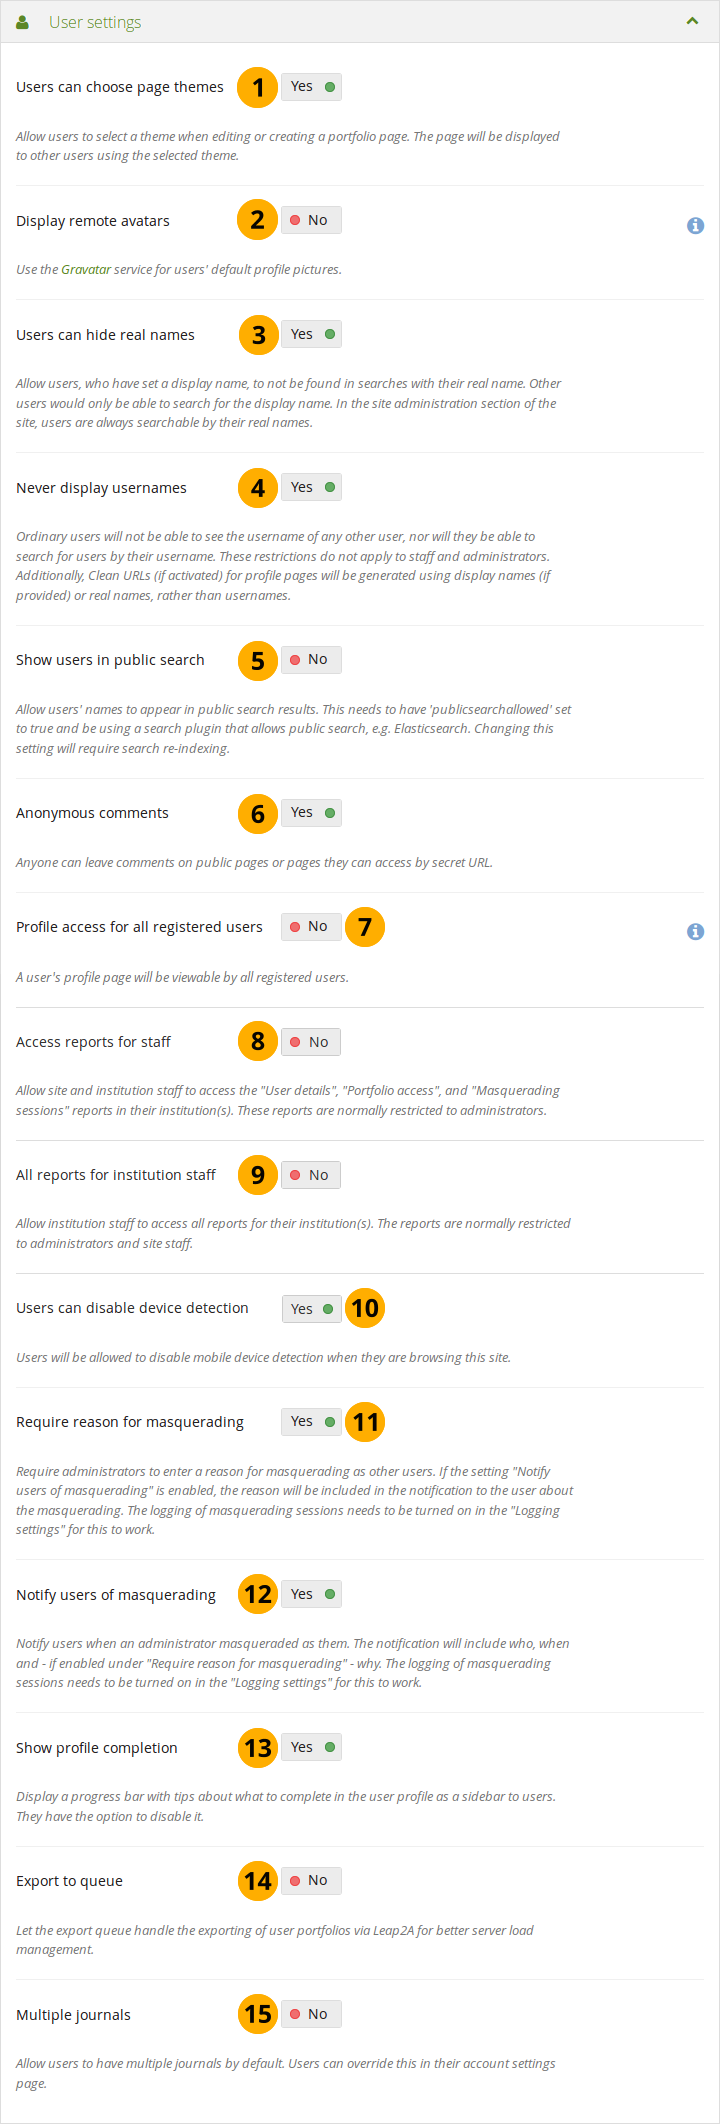
User settings
Users can choose page themes: If this setting is enabled, users can select a theme for their portfolio page. The page is displayed with this theme to other users. Thus, the institution or site theme can be overwritten.
Display remote avatars: If allowed, users’ default profile pictures will be their Gravatar pictures (remote avatar). Users will need an account with Gravatar for this to work.
Notitie
If you use your own avatar server to provide profile pictures for your users, you can use that instead of Gravatar for the default profile pictures. In order to do so, you need to add the remote avatar base URL to your config.php.
Users can hide real names: If allowed, users who have set a display name may choose to be searchable only by their display name and will not be found in searches by their real name. In the administration section of the site, users are always searchable by their real names. An administrator (site and institution) always sees the display name, first and last name and username.
Never display usernames: If set to “Yes”, ordinary users cannot search for others using their username in “Search users” on the dashboard or via “People”. They will also not be able to see the username of any other user. These restrictions do not apply to staff and administrators. Additionally, Clean URLs (if activated) for profile pages will be generated using display names (if provided) or real names, rather than usernames.
Show users in public search: If allowed, usernames can appear in public search results. In addition, this feature needs to have the value
$cfg->publicsearchallowed = true;set in your config.php file and requires a search plugin that allows public search, e.g. Elasticsearch.Notitie
When you change this setting, you need to re-index the search index for the change to take effect.
Anonymous comments: If allowed, logged-out users / users without a login can leave comments on public pages or pages they can access via a secret URL.
Profile access for all registered users: If this option is set to “No”, profile pages are initially viewable by all registered users, but the owner is allowed to restrict access to their institution only if they wish. Enable this option if you want to make sure all users can see each others’ profile pages. Profiles of institution members will always be visible to other members of the same institution.
Access reports for staff: If set to “Yes”, site and institution staff will have access to user reports. The following reports are available to them:
Masquerading sessions (if logging of these is turned on)
Portfolio access
User details
All reports for institution staff: If set to “Yes”, institution staff will have access to all reports in their institutions. This is normally restricted to administrators and site staff.
Users can disable device detection: If allowed, users can disable mobile device detection in their account settings. This allows them to be more flexible in what they can view and do on a mobile device such as a smartphone or tablet.
Require reason for masquerading: If set to “Yes”, administrators will be required to enter a reason for masquerading as other users. This will be logged, and if the setting “Notify users of masquerading” is enabled, included in the notification to the user about the masquerading. This setting needs logging to be turned on.
Notify users of masquerading: If set to “Yes”, users will be notified when an administrator masqueraded as them. The notification will include who, when and - if enabled under “Require reason for masquerading” - why. This setting needs logging to be turned on.
Show profile completion: If set to “Yes”, a progress bar with tips about what to complete in the user profile will be displayed in the sidebar to users. They can disable it in their account settings.
Zie ook
Administrators can configure the items that count towards profile completion in Administration menu → Institutions → Profile completion.
Export to queue: If allowed, the export queue will handle the exporting of user portfolios via Leap2A for better server load management.
Notitie
This feature is still experimental. Turning this feature on will export individual portfolios in Main menu → Manage → Export via the export queue. That means that the export is made when there are enough system resources available. The user exporting a portfolio will receive an email when the export is ready for download.
Multiple journals: If allowed, all users will have multiple journals per default. They can still change that setting in their personal account settings.
11.3.1.3. Search settings
Mahara comes with a search plugin that allows you to search for users and pages. If you install another search plugin, you will be able to select which one to use for your site.
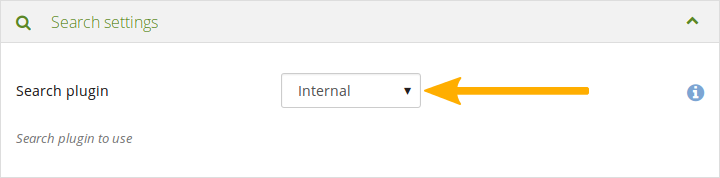
Search settings
Zie ook
You can configure the internal search plugin in the administration of the search plugin.
Elasicsearch is another search plugin that is supported by Mahara out of the box. The search server will need to be installed separately though. Elasticsearch is useful for fulltext search and is required for advanced reporting.
Notitie
You need to choose the Elasticsearch plugin if you turn on “Event log reporting”.
11.3.1.4. Group settings
Mahara cannot only be used for individual work but also to work collaboratively in groups. Some settings are available in that area.
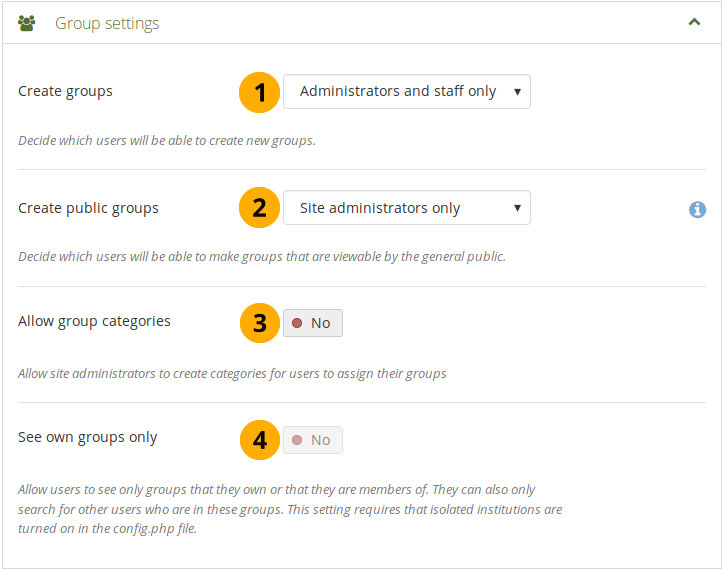
Group settings
Create groups: You decide whether administrators, administrators and staff or everyone can create groups. The default setting is the most permissive “everyone” because Mahara is user-centered and gives the individual users a great deal of control over what they want to do. If you choose to limit the group creation to administrators (and staff), these need to be contacted to set up groups. There is no internal group request system.
Create public groups: Choose whether everyone or only administrators can create public groups. These are groups for which you do not need to be a member of the group or even have a login for Mahara to view the group homepage, discussion forums (and member listing if the group administrator allowed that).
Allow group categories: If allowed, site administrators can create categories for users to assign to their groups. These categories can be used to filter groups in Groups.
Zie ook
Group categories are managed by site administrators in the groups area of the administration.
 See own groups only: This setting becomes active when the site is set to “Isolated institutions”. This setting makes it possible for people to only see other people who are in the same groups. They cannot see other groups in the search results.
11.3.1.5. Institution settings
You can use Mahara with multiple institutions and separate them for administrative purposes, e.g. user management and permissions, and to give them a different theme.
Institution settings
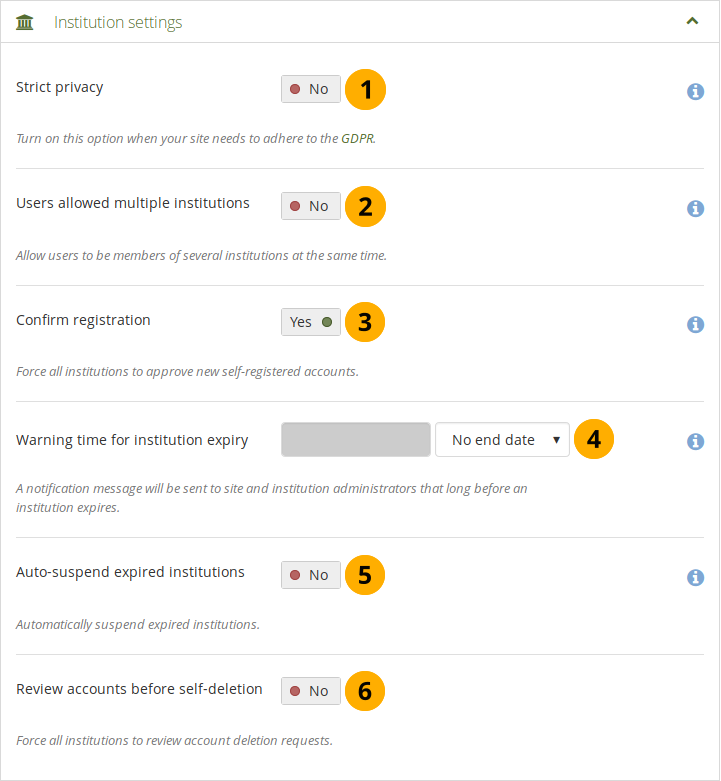
Strict privacy: You may want to require all your users to accept the terms and conditions and privacy statement on your site. Switch this setting to “Yes” if you want to have more control over the acceptance. You cannot allow multiple institutions if you want to use this setting for the time being.
Notitie
The strict privacy feature was created to help institution comply with the GDPR in the European Union. However, institutions that do not need to adhere to it may find it useful as well.
Turning this setting on will require everyone on the site to accept the terms and conditions and privacy statement(s) the first time they log in as well as whenever they change.
Users allowed multiple institutions: If allowed, users can be members of several institutions at the same time. Thus, a user who belongs to two or more institutions only needs one account. You cannot allow multiple institutions when “Strict privacy” is turned on and when
the site has isolated institutions.Notitie
While this is a convenient setting for people who need to be institution administrators in multiple institutions and cannot receive site administrator permissions, it is recommended that users can only belong to one institution.
Confirm registration: If set to “Yes”, administrators cannot make the Confirm registration setting optional when configuring an institution. This prevents institution administrators from disabling this setting when it is required site-wide to not allow user accounts to be created without administrator approval.
Notitie
When registration needs to be confirmed, people trying to register with an institution need to provide a reason.
Warning time for institution expiry: If set, a notification will be sent to site and institution administrators this amount of time before an institution is due to expire and be suspended. This time may be specified in days, weeks, months, years or “No end date”. If the latter option is chosen, institutions will not expire by default.
Auto-suspend expired institutions: If set to “Yes”, this option will allow Mahara to automatically suspend an institution that has expired automatically. This means that users of that institution will not be able to log in until the institution has been unsuspended.
Review accounts before self-deletion: If set to “Yes”, every institution is forced to approve or deny the deletion of accounts if users attempt to delete their account. If set to “No”, it is up to each institution to activate this setting.
Notitie
This setting gives institutions in a formal learning setting the possibility to prevent accidental account deletion by people before portfolios are archived if required.
11.3.1.6. Account settings
Account settings
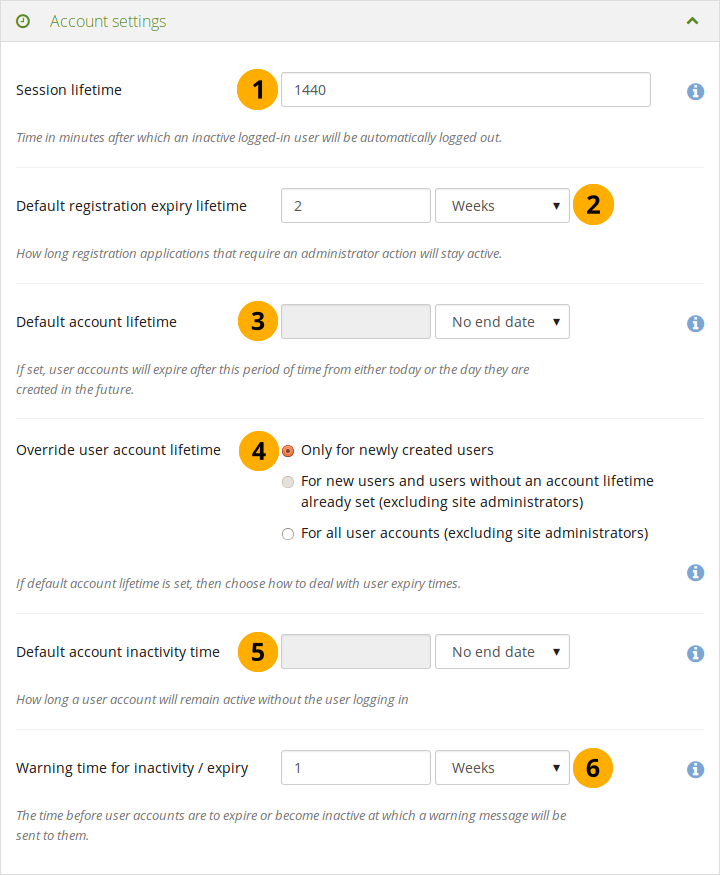
Session lifetime: For security reasons, after a specified period of inactivity, a user will be logged off the site automatically. This field specifies this time in minutes. The default value is 1440 minutes (24 hours).
Default registration expiry lifetime: As site administrator you can decide when pending registrations that require approval expire. This time may be specified in days, weeks, months, years or “No end date”. If the latter option is chosen, pending registrations will not expire by default. The default value is 2 weeks.
Default account lifetime: If set, user accounts will expire after this amount of time from when they were created. When a user account is expired, the user cannot log in. This time may be specified in days, weeks, months, years or “No end date”. If the latter option is chosen, accounts will not expire by default.
Override user account lifetime: Choose for which accounts a change in the default account lifetime shall take effect:
Only for newly created users
For new users and users without an account lifetime already set (excluding site administrators)
For all user accounts (excluding site administrators)
Notitie
Site administrators are always excluded from a change in the account lifetime as they should always have access to the system.
Default account inactivity time: If set, users who do not log in for this amount of time will be considered “inactive” and will not be able to log in anymore. This time may be specified in days, weeks, months, years or “No end date”. If the latter option is chosen, users are not set to “inactive” by default.
Warning time for inactivity / expiry: If set, a warning message will be sent to users this amount of time before their accounts are due to expire or become inactive. This time may be specified in days, weeks, months, years or “No end date”. If the latter is chosen, users do not receive a warning before their account expires or they are flagged as having an inactive account.
11.3.1.7. Security settings
Security settings
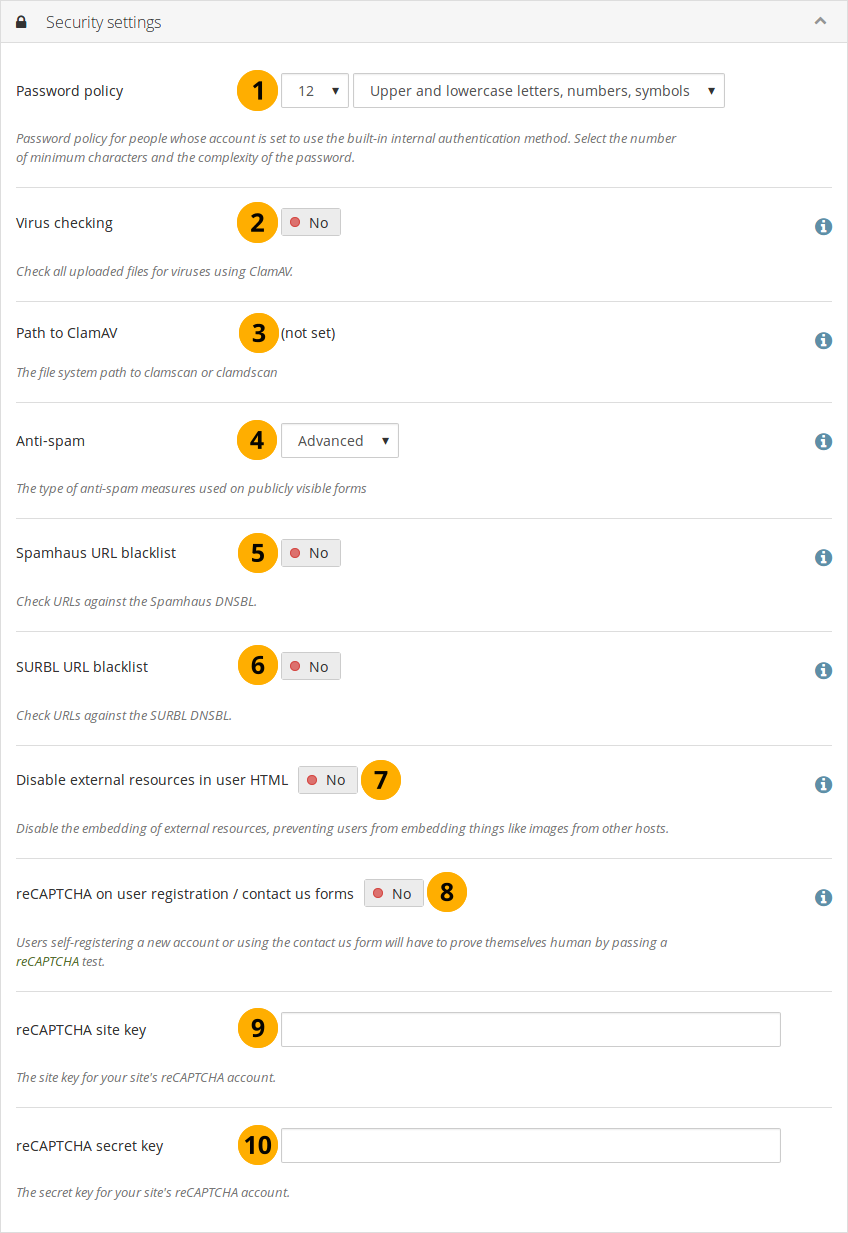
Password policy: Select the minimum requirements for passwords by people who use internal authentication. The password policy does not affect accounts using external authentication such as SSO or LDAP for example. You need to select a minimum password length and also the make-up of the password. The options are:
Upper and lowercase letters
Upper and lowercase letters, numbers
Upper and lowercase letters, numbers, symbols
Notitie
Along with the password policy, a password strength indicator is available on fields where a new password needs to be entered in order to show how good the new password is.
Virus checking: If you want all files that are uploaded by users to be run through the ClamAV virus scanner, you should turn the virus checking option on. You have to have ClamAV installed on your server.
Path to ClamAV: For security reasons, the path to ClamAV on your server needs to be provided in the config file. You see the path here if you provided that config value.
Anti-spam: There are three levels of anti-spam protection available for publicly visible forms such as the contact and registration forms. A form submission is never silently rejected. Rather, an error message is displayed asking the user to try again if the submission is classified as spam. The three choices are:
None: No anti-spam checks are performed on form submissions.
Simple: Some basic checks are performed. Form submissions with email addresses that are not well-formed or that have an excessive number of URLs are rejected.
Advanced: Performs additional checks to determine whether email addresses are real or contain URLs that are blacklisted. This requires an Internet connection.
Spamhaus URL blacklist: If set to “Yes”, URLs will be checked against the Spamhaus DNSBL. The Spamhaus Project provides a URL blacklist that is free for non-commercial, low-traffic use. A professional use datafeed service is also available but not supported in Mahara. Please read the Spamhaus DNSBL usage terms before enabling this option.
SURBL URL blacklist: If set to “Yes”, URLs will be checked against the SURBL DNSBL. SURBL provides a URL blacklist that is free for organizations with fewer than 1000 users. A professional use datafeed service is also available, but not supported in Mahara. Please read the SURBL usage terms before enabling this option.
Disable external resources in user HTML: Turning this option on will prevent users from embedding external resources such as images from remote sites into their forum posts and other HTML content. YouTube videos and other media can also not be embedded. It is however a good thing to do from a security standpoint since it does neutralise a few clever phishing attacks. See the HTML Purifier documentation for more details.
reCAPTCHA on user registration / contact us forms: If set to “Yes”, people who register themselves on the site and who use the “Contact us” form when not logged in are required to fill in the reCAPTCHA form. This is for spam protection.
reCAPTCHA site key: Enter the site key for your site’s reCAPTCHA account.
reCAPTCHA secret key: Enter the secret key for your site’s reCAPTCHA account.
11.3.1.8. Proxy settings
Proxy settings
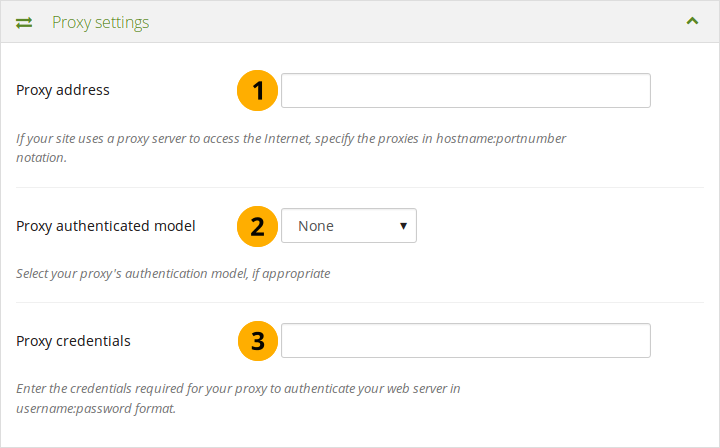
Proxy address: If your site uses a proxy server to access the Internet, specify the proxy in
hostname:portnumbernotation.Proxy authentication model: Select your proxy’s authentication model (none or basic [NCSA]), if appropriate.
Proxy credentials: Enter the credentials required for your proxy to authenticate your web server in
username:passwordformat.
11.3.1.9. Email settings
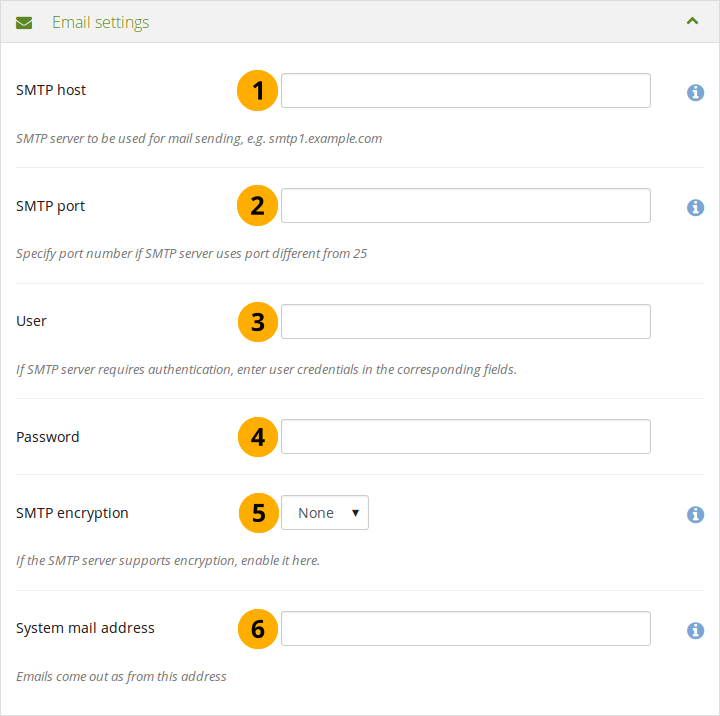
Email settings
SMTP host: If you want to force Mahara to use a specific SMTP server instead of the system one, enter its hostname here, e.g.
smtp.example.com. It is possible to specify more than one host by separating them with semicolons, e.g.smtp1.example.com;smtp2.example.com, but keep in mind that all other settings, e.g. authentication credentials and port numbers, will apply to all listed servers. It is not possible to specify different credentials for each server in this list. This feature is useful when SMTP host authentication is not required or you list different frontends for the same mail server in which case other settings will work.SMTP port: If your SMTP server uses a port number different from 25, you may specify it here. When encryption is enabled, the default ports are 465 for SSL and 587 for TLS. You only need to specify a port number if it is different from these. Check the correct settings with your mail service provider.
User: If your SMTP server requires authentication, enter the username here.
Password: If your SMTP server requires authentication, enter the password here.
SMTP encryption: If your SMTP server supports encryption, enable it here.
System mail address: This email address is the address that emails are sent from Mahara.
11.3.1.10. Notification settings
You can set the default options for new users to receive notifications. Users can override these settings on their own User menu → Settings → Notifications page.
The options you have are:
Email: Sends an email to your primary email address once the notification was created. In some cases, the cron needs to run first in order for the notification to be sent.
Email digest: Sends one email per day for all the notifications that you set to “Email digest”.
Notitie
If you select either of the email options, notifications will still arrive in the user’s inbox, but they will be marked as read automatically.
Inbox: All notifications are only sent to your system inbox that you can reach in the top right corner next to the “Logout” button.
None: If you use this option, you will not get a notification for the selected notification type. Use this setting wisely as you may miss important notifications.
Notitie
You cannot set “System messages” and “Messages from other users” to “None”.
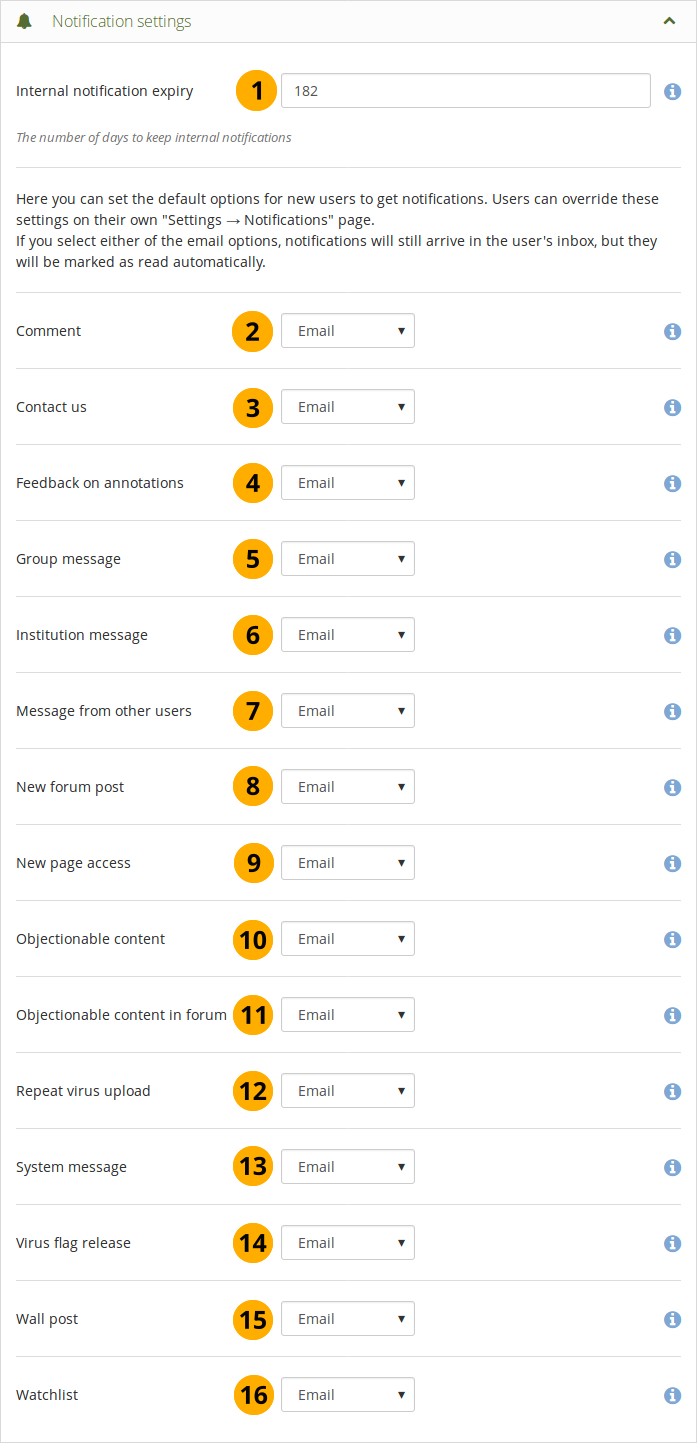
Notification settings
Internal notification expiry: The number of days until certain notifications in the inbox are deleted. The default value is 182 days. The notifications in question are:
Page access notifications
Watchlist notifications
Institution messages
Contact us: Only site administrators see this notification type. These are messages sent via the “Contact us” form that can be accessed in the footer of the site if the site administrators decided to display this link.
Feedback: These are notifications about any comments received on pages, artefacts or journal posts.
Feedback on annotations: These notifications are triggered when feedback is left on an annotation.
Group message: The system generates these notifications automatically, e.g. when a user requests to join a group.
Institution message: These notifications are generated by the system automatically, e.g. institution confirmation message, institution removal message, institution request sent to administrator.
Message from other users: Messages that are sent by other users.
New forum post: These notifications are sent to a user when new forum posts happened in the forums or forum topics that the user is subscribed to.
New page access: This type of notification is sent to you when you, you as a friend or one of your groups has been given access to a page. You do not receive notifications about pages accessible to all registered users and the public.
Objectionable content: Only administrators see this notification type. These notifications contain complaints by users about content that an administrator should take a look at because it does not comply with the terms and conditions set out for the site. This setting is for pages and artefacts that contain objectionable content.
Objectionable content in forum: Only administrators see this notification type. These notifications contain complaints by users about content that an administrator should take a look at because it does not comply with the terms and conditions set out for the site. This setting is for forum topics and posts that contain objectionable content.
Repeat virus upload: Only site administrators see this notification type. This notification informs site administrators about users who repeatedly upload virus-infected files. Virus checking must be turned on.
System message: This type of notification is generated automatically by the system or sent automatically by one of the site administrators, e.g. account confirmation message.
Virus flag release: Only site administrators see this notification type. This notification lets site administrators know when files were released by the virus scanner. Virus checking must be turned on.
Wall post: This type of notification is sent to you when somebody else leaves a public or private message on your wall.
Watchlist: Notifications of updates to pages or artefacts that you put onto your watchlist are generated automatically and sent in intervals.
11.3.1.11. General settings
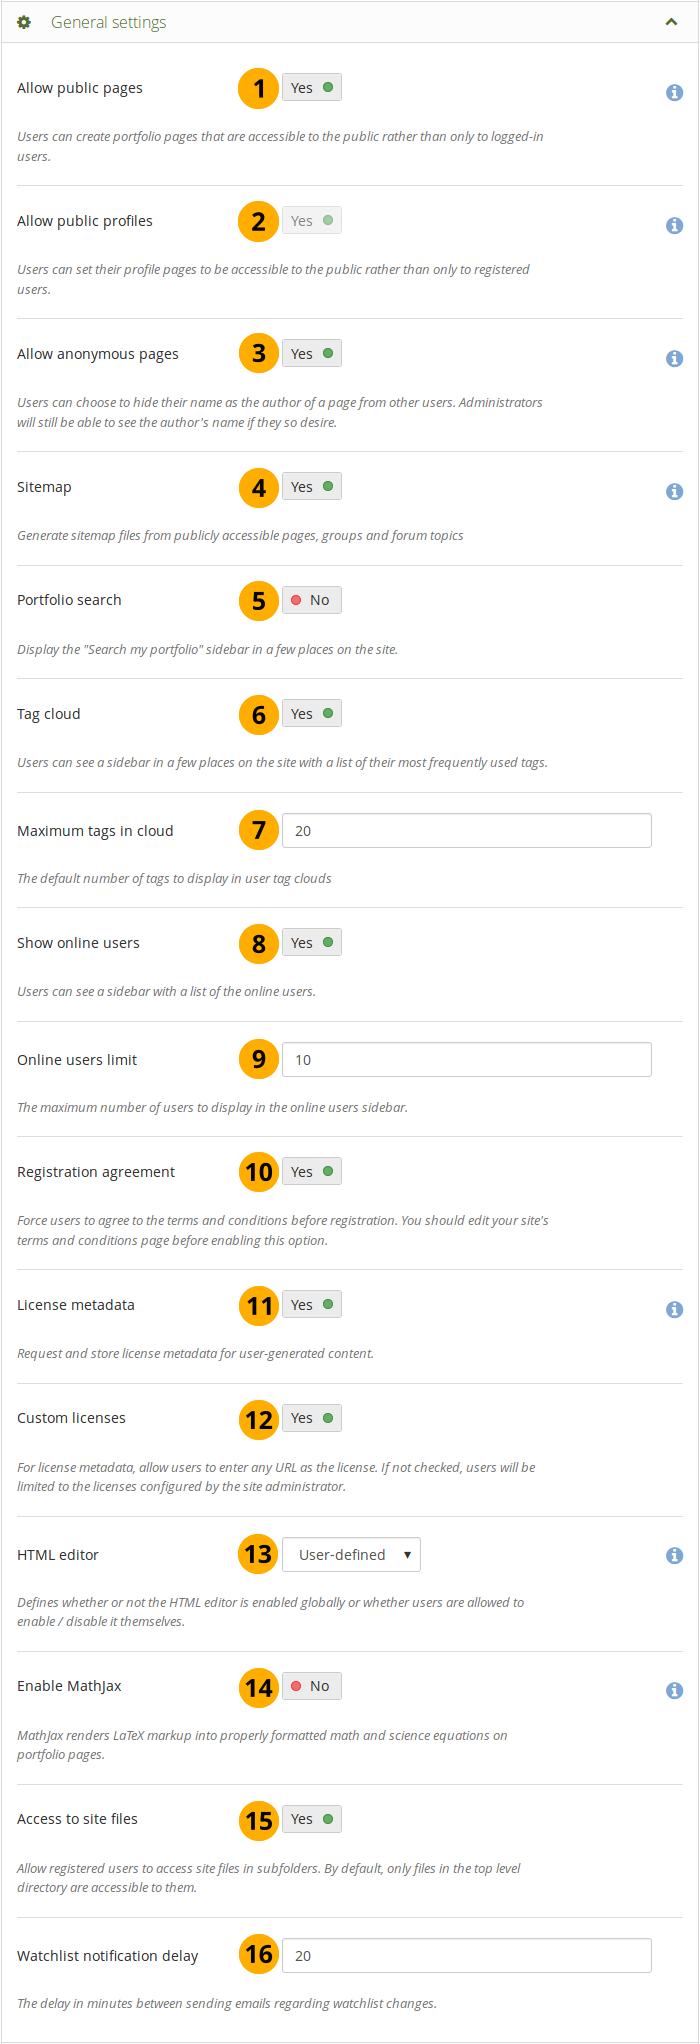
General settings
Allow public pages: If set to “Yes”, users can create portfolio pages that are accessible to the public rather than only to registered users.
Allow public profiles: If allowed, users can set their profile pages to be accessible to the public rather than only to registered users. However, only registered users can use interactive features such as the wall.
Notitie
If the option “Allow public pages” is chosen, “Allow public profiles” is automatically selected.
Allow anonymous pages: If set to “Yes”, users can hide their name as the author of a page from other users. Administrators and staff can still view authorship information by clicking on the “Author’s name hidden” link that will reveal the real name.
Notitie
The name is also anonymized in blocks that are on the page and would normally display the author’s name.
Sitemap: If set to “Yes”, sitemap files from publicly accessible pages, groups and forum topics are generated that can be sent to another service.
Portfolio search: If allowed, the “Search my portfolio” side block is displayed in the Pages and collections and Files sections of the site. However, it has not been working for most users for a long time.
Tag cloud: If set to “Yes”, users see a side block in the Pages and collections and Files sections of the site with a list of their most frequently used tags. The number of tags displayed is defined by the option “Maximum tags in cloud”.
Maximum tags in cloud: Enter the default number of tags to display in user tag clouds. Users can change this number in their account settings.
Show online users: If set to “Yes”, users see a side block with a list of the users who have been logged-in in the last 10 minutes (cf. the dashboard). Institution administrators can limit the users displayed in this block to institution members in the institution settings.
Online users limit: Enter the maximum number of users to display in the Online users side block.
Registration agreement: If set to “Yes”, you force users to agree to the “Terms and Conditions” before registration. You should edit your site’s “Terms and Conditions” page before enabling this option. You can do so under Static pages.
License metadata: If allowed, users can choose under which license they want to make their content available. They can set a default license in their account settings and then decide for each artefact individually as well. An institution administrator can set the default license in the institution settings.
Custom licenses: If allowed, users can enter any URL as license for their content. If not checked, users will be limited to the licenses configured by the site administrator.
HTML editor: Choose whether the HTML editor is used by default or not. If set to User-defined, users will be allowed to choose whether to use the HTML editor in their personal settings or not. Otherwise the specified setting will be used site-wide.
Enable MathJax: If set to “Yes”, mathematics and science equations can be displayed nicely in Mahara pages. For more information on how to configure MathJax, see the Help icon next to the option.
Access to site files: If allowed, registered users will have access to site files in subfolders of the folder “public”. By default, only files directly in the folder “public” are accessible to them.
Watchlist notification delay: Decide how many minutes after editing a page, a watchlist notification is sent. The default value is “20” for 20 minutes.
Notitie
In the past, a watchlist notification about a change was sent whenever a block was edited on a page. Since that caused a lot of notifications to be sent, a delay has been put in place to accumulate a number of changes so that it can be assumed more that a page and not only an item on the page has changed.
11.3.1.12. Logging settings
Mahara logs a number of events. These can now be collected in the database as well. The primary reason for logging events in the database is the logging of administrators masquerading as users for enhanced audits of these actions.
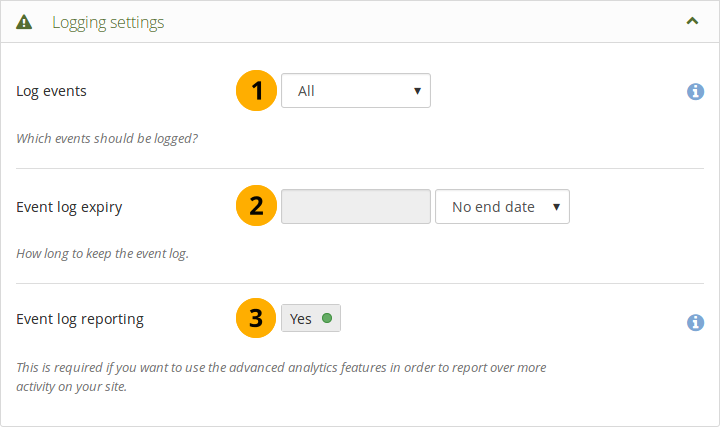
Logging settings
Log events: Decide which events you wish to log in the database. Events are generated every time the user does something significant on the site, such as editing a page. This log is kept in the
event_logtable in the database.None: Nothing is logged in the database.
Masquerading: Only masquerading sessions are logged. This setting needs to be turned on if you wish to report on administrator masquerading of users.
All: All events that can be logged in the database are logged.
Event log expiry: Decide for how long you wish to keep your database log. If you selected to log all events, the table can grow quite quickly especially on an active site. This time may be specified in days, weeks, months, years or “No end date”. If the latter option is chosen, the event log is not deleted by default.
Event log reporting: If set to “Yes”, you can report over a number of activities on the site in the “Reports” section that require events to be logged.
The table event_log contains the data that can be logged:
usr: user ID of the person whose account is shown on screen
realusr: user ID of the administrator who masquerades
event: action being carried out, e.g. beginning of a masqueradin session, saving of an artefact, deleting of a page or artefact, update user information, placing a block onto a page
data: additional information about the action, e.g. the ID of a block that is updated
time: time when the action was carried out
11.3.2. Static pages
Administration menu → Configure site → Static pages
Here you can edit the content of some pages around the site and the pages linked to in the footer:
About
Home (Dashboard)
Logged-out home
Zie ook
Institutions can change the content of these pages on their static institution pages to their liking and do not have to go with the content from the entire site.
The terms and conditions and privacy statement pages can be found in the Legal section.
All pages come with default text that you can change entirely. Every page must contain some text. You can use the visual editor to style your page.
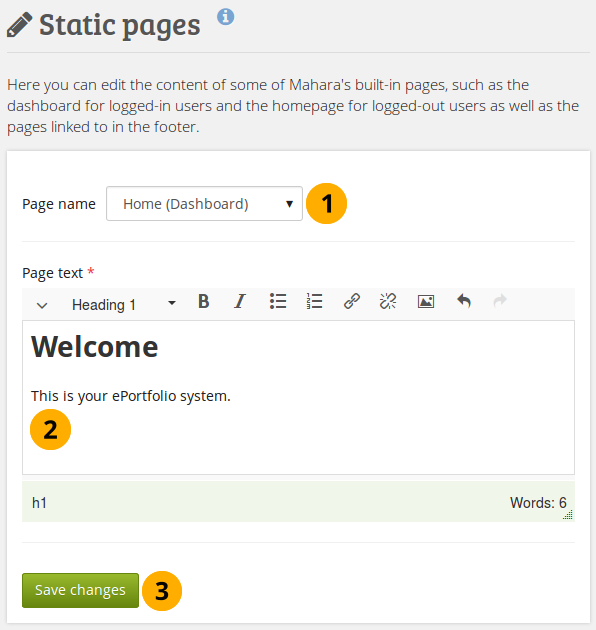
Edit static pages
Page name: Choose the page you want to edit from the drop-down menu.
Page text: Change the text in the editor window. You cannot leave this field empty.
Click the Save changes button.
Notitie
If your site has added custom pages to the menu where you have a number of additional informational pages, you can edit their content from the Static pages screen. In order to do so, a server administrator needs to make changes on the backend.
11.3.3. Legal
Administration menu → Configure site → Legal
Notitie
The terms and conditions and privacy statement pages moved from the Static pages to the Legal section. That way, old versions can be tracked more easily.
Every site can have a statement about terms and conditions and privacy. If you turned on “Strict privacy” in the institution settings, everyone needs to accept them before being able to use their account.
Waarschuwing
The Mahara project cannot give legal advice. If you need legal advice, please consult your own lawyer to ensure that you comply with applicable laws.
Legal statements overview page
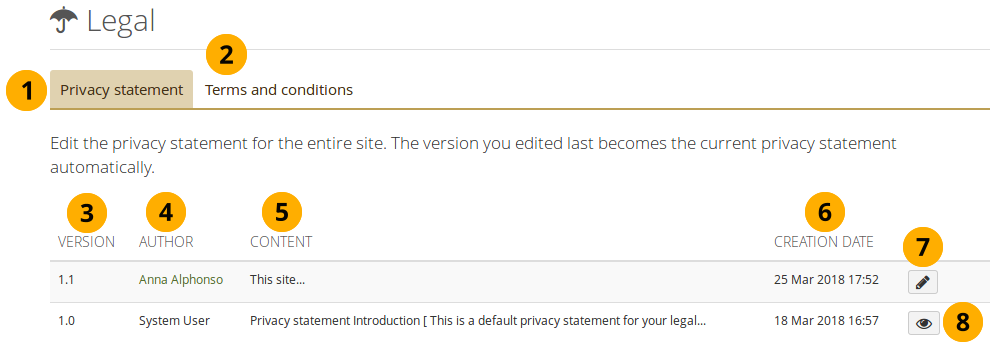
Click the “Privacy statement” tab to edit the current privacy statement for the site and view old versions.
Click the “Terms and conditions” tab to edit the current terms and conditions for the site and view old versions.
Version: Version number of the statement.
Notitie
Versions are listed in reverse chronological order.
Author: Person who edited the version.
Content: Beginning of the text of the statement.
Creation date: Date and time when the version was saved.
Click the Edit button when you want to make changes to the current version. It will be saved as a new version.
Click the View button to see the full text of an old version.
Notitie
Institutions can set up their own privacy statement and terms and conditions that are displayed to their members in addition to the site’s legal terms.
11.3.3.1. Privacy statement
Waarschuwing
You cannot save a draft version of your changed privacy statement. As soon as you save the form, anybody logging in will be asked to accept the new privacy statement.

Edit the site level privacy statement
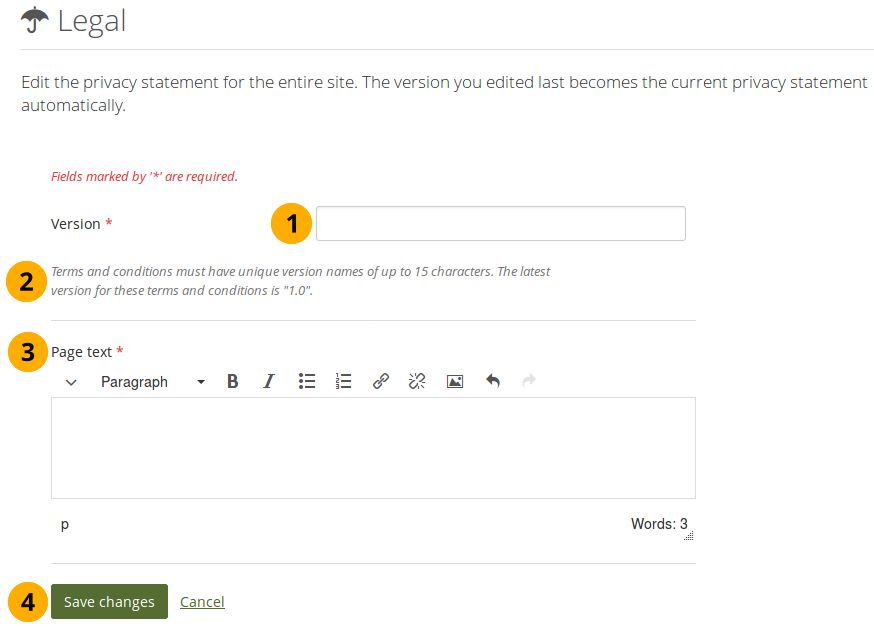
Version: Give your statement a new version number. It can be up to 15 characters long and must be different from any previous one.
The previous version number is stated for convenience.
Page text: Enter the text that should be displayed in the privacy statement.
Click the Save changes button to accept your changes or click Cancel to abort your changes.
11.3.3.2. Terms and conditions
Waarschuwing
You cannot save a draft version of your changed terms and conditions. As soon as you save the form, anybody logging in will be asked to accept the new terms and conditions.
Edit the site level terms and conditions
Version: Give your statement a new version number. It can be up to 15 characters long and must be different from any previous one.
The previous version number is stated for convenience.
Page text: Enter the text that should be displayed in the terms and conditions.
Click the Save changes button to accept your changes or click Cancel to abort your changes.
11.3.4. Menus
Administration menu → Configure site → Menus
There are two menus in Mahara:
Links and resources
Footer
11.3.4.1. Links and resources
The Links and resources menu appears to all users on most pages in the side bar. You can decide which links or files are available to everybody - also those without a login - and which ones only logged-in users shall see.
Add external links to the Links and resources menu
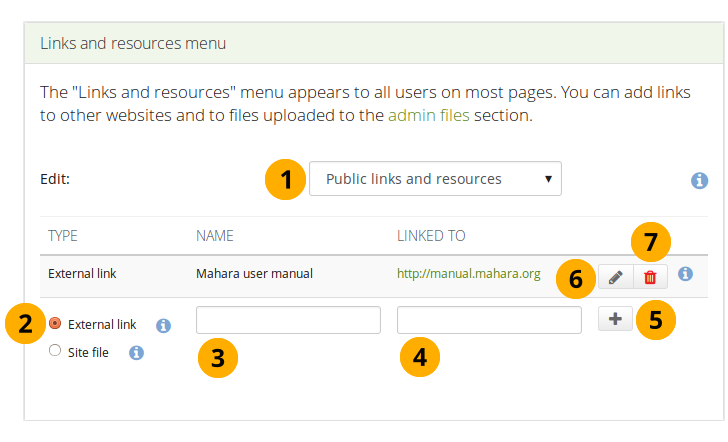
Choose which Links and resources menu you want to edit: the public or the logged-in users one.
Choose the type External link.
Give your link a name that will appear in the menu.
Provide the full URL to the link including
http://orhttps://.Click the Add button .
Click the Edit button to make changes to the existing link.
Click the Delete button to delete the link.
You can also link to files that you have uploaded to the site files area.
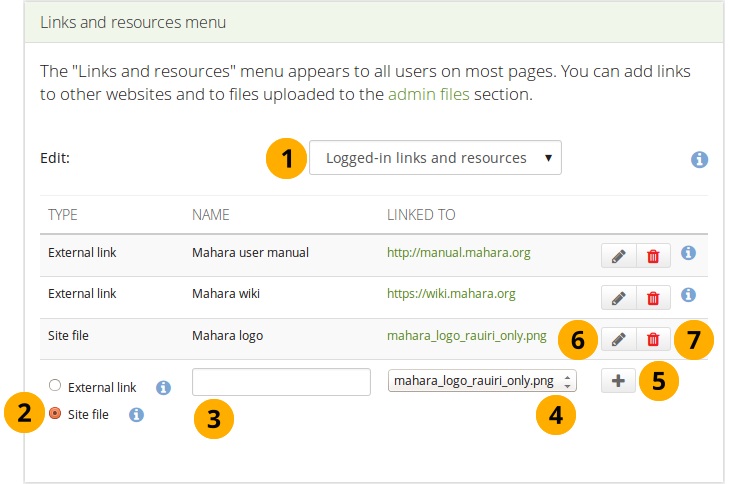
Add a site file to the Links and resources menu
Choose which Links and resources menu you want to edit: the public or the logged-in users one.
Choose the type Site file.
Give your site file a name that will appear in the menu.
Choose the file you want to display from the drop-down menu.
Click the Add button .
You can make changes to the name or choose a different file when you click the Edit button .
You can remove the file from the menu by clicking the Delete button . This will only delete the reference to the file in the menu but not the file itself.
Notitie
If you wish to display your links and resources in a specific order, map that order out before you add the links and files because you cannot change the order afterwards.
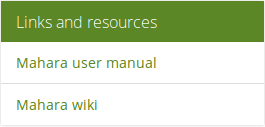
Links and resources menu result
11.3.4.2. Footer menu
You have control over which links are displayed in the footer on each page.
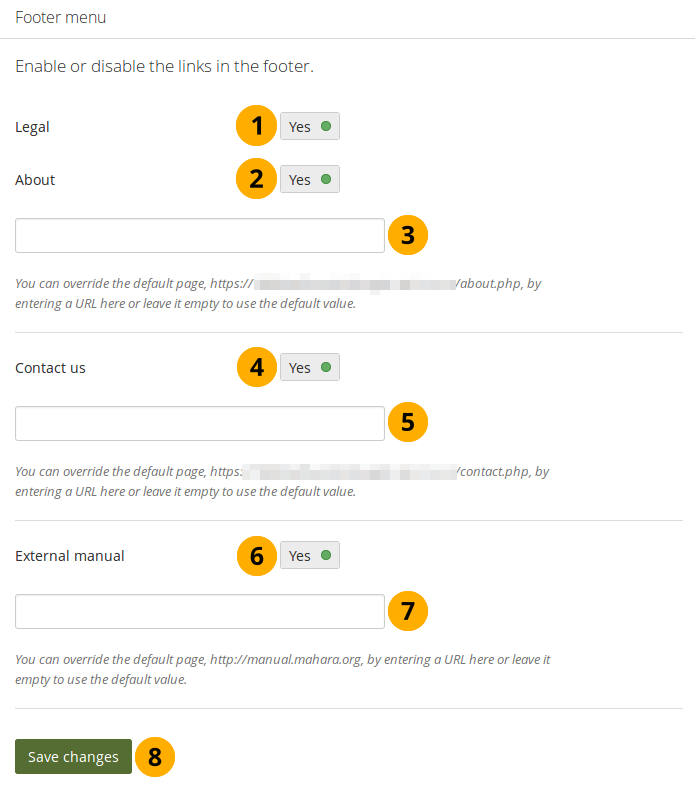
Footer menu
Legal: Set the switch to “Yes” if you wish to display a link to the terms and conditions and privacy statement for the site in the footer of every page.
Notitie
You cannot link to external pages to accommodate stricter privacy regulations more easily. If you want to link to an external page, you can place the link in the text area of the terms and conditions or privacy statement.
About: Choose “Yes” to display the link to the “About” page in the footer.
Notitie
You can change the text in Static pages if you don’t already have an existing text to link to.
If you have an existing page, you can provide the link here.
Contact us: Set the switch to “Yes” if you want to display a link to a contact form in the footer.
If you have a contact page, you can provide the link to overwrite the Mahara one.
External manual: If you want to display a help link to the manual in the footer of a page, switch this option to “Yes”. It will take you to the relevant page in the Mahara manual of the version of Mahara that you are using.
If you have your own copy of the Mahara manual, you can provide the link here.
Click the Save changes button to save your choices.
11.3.5. Networking
Administration menu → Configure site → Networking
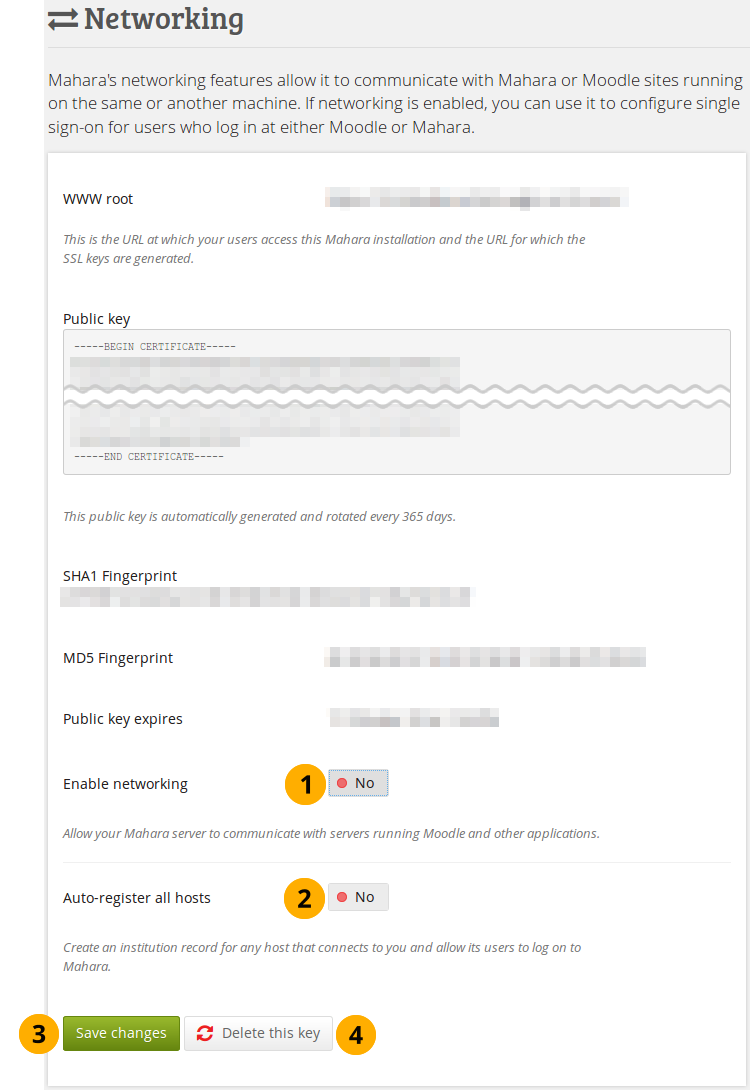
Mahara’s networking feature allows it to communicate with other Mahara or Moodle sites. If networking is enabled, you can use it to configure single sign-on (SSO) for users who log in at either Moodle or Mahara or allow users from another Mahara instance to access yours.
You can connect Mahara and Moodle to save certain content you created in Moodle through the portfolio feature.
Networking overview
In order to use networking site-wide with any institution, you need to:
Enable networking: Choose “Yes” if you wish to connect one or more Mahara or Moodle sites to your Mahara instance.
Auto-register all hosts: If you choose “Yes”, an institution is created for any host that connects allowing these users to log in to your Mahara site. We recommend you leave the default “No” because that gives you more control over which Moodle or Mahara instances can connect.
Click the Save changes button.
Click the Delete this key button if you want to generate a new key for your Mahara site, e.g. when you copied the database from another site or the other instance doesn’t recognize it properly.
Depending on which site you wish to connect, you may need to provide some of the other information on the page, in particular the WWW root and the public key.
Zie ook
You can consult the comprehensive guide for setting up a Mahoodle when connecting Mahara and Moodle.
You set up MNet for an institution when you edit the authentication method XML-RPC.
11.3.6. Licenses
Administration menu → Configure site → Licenses
The site administrator can allow users to add license metadata to their artefacts in the general site settings. Additionally, an institution administrator can require institution members to choose a license for any of their artefacts in the institution settings.
11.3.6.1. List of licenses
Licenses that are available to all users of the site are defined on the Licenses page. Mahara comes with a number of pre-defined licenses, but the site administrator can add many more or delete any of the existing ones.
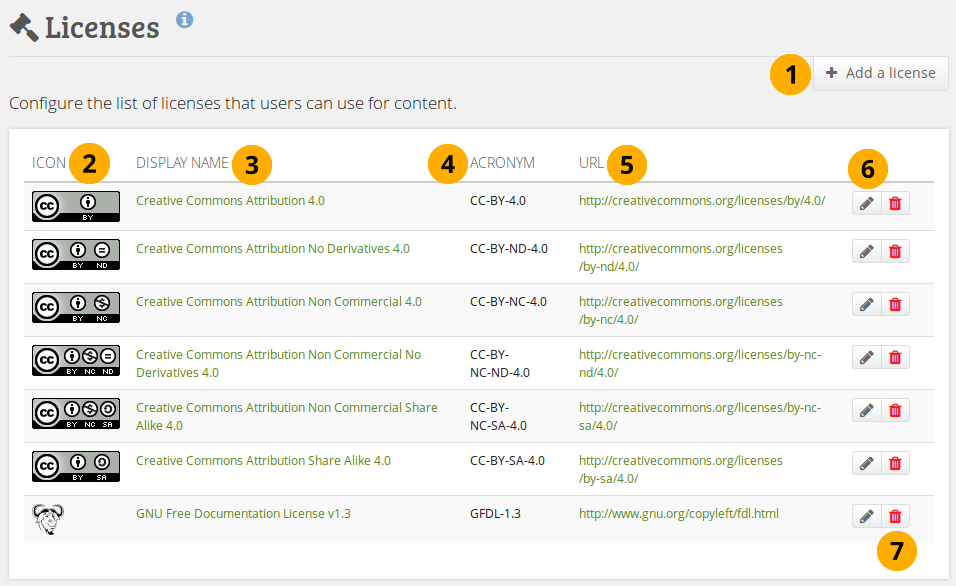
Available licenses on the site
Click the Add a license button to add an additional license that users can choose from.
Icon: Every license can have an icon / license logo that is displayed on the details page of an artefact.
Display name: The name that is displayed for each license around the site, e.g. in the drop-down menu where a user can select a license and on the details page of an artefact.
Acronym: The short name by which the license is also known. This acronym is also displayed to the user on the details page of an artefact.
URL: The Internet address where the license text can be found. When a license is displayed on the details page of an artefact, it is linked to this URL.
Notitie
It is important for users to be able to click on a link to the license because that allows them to learn about the license conditions and what they can do with the artefact or not.
Click the Edit button to change properties of a license. You can change the display name, acronym and the license icon, but not its URL. If you want to change the latter, you will need to create a new license.
Click the Delete button to remove a license from the system.
11.3.6.2. Add a license
As site administrator you can add as many licenses as you wish. Go to Administration menu → Configure site → Licenses and click the Add a license button.
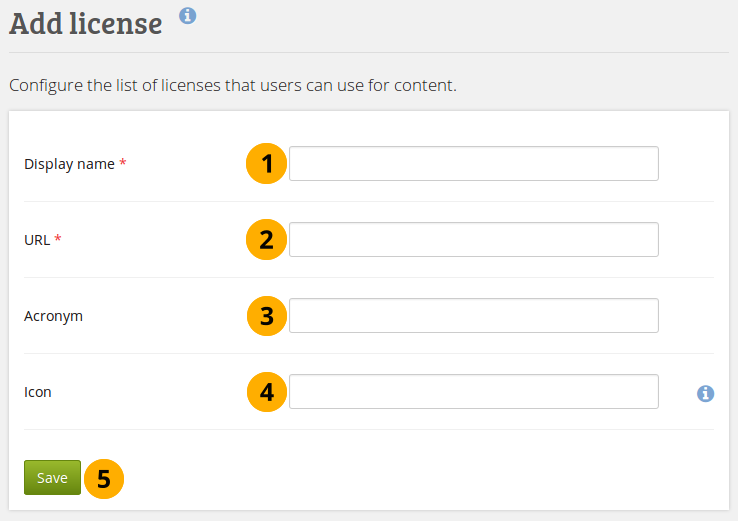
Add a new license to the site
Display name: Choose a name for your license that will be displayed around the site, e.g. on the details page of an artefact and in the drop-down menu in which users and institution administrators choose their defaul license. This field is required.
URL: The Internet address where the license text can be found. When a license is displayed on the details page of an artefact, it is linked to this URL. This field is required.
Acronym: If the license you want to add also has a commonly known acronym, you can enter it.
Icon: If the license you add has a logo that you want to display next to the icense, e.g. on the details page of an artefact, you can link it here.
This can be a http://… or https://… URL to an image elsewhere on your site or anywhere on the Internet.
Notitie
The protocol you use should match the protocol of your Mahara site to prevent browser warnings.
It can also be a license:… URL to specify license icons from the Mahara theme. For example, the URL
license:gfdl.pngwould refer to the filestatic/images/license/gfdl.pngin the theme.
Click the Save button to add the license to the site.
11.3.6.3. Edit a license
As site administrator you can change the properties of any license. Go to Administration menu → Configure site → Licenses and click the Edit button next to a license that you want to change. You can change all license properties but the URL.

Edit a license on the site
Display name: Change the name of the license that is displayed around the site.
Acronym: Change the acronoym of the license.
Icon: Change the icon that is associated with the license and displayed along with the license’s name around the site.
This can be a http://… or https://… URL to an image elsewhere on your site or anywhere on the Internet.
Notitie
The protocol you use should match the protocol of your Mahara site to prevent browser warnings.
It can also be a license:… URL to specify license icons from the Mahara theme. For example, the URL
license:gfdl.pngwould refer to the filestatic/images/license/gfdl.pngin the theme.
Click the Save button to keep your changes to the license.
Notitie
You cannot change the URL of the license. If you have a mistake in the URL, you will need to delete the license entirely and add it correctly.
11.3.7. Site pages and collections
Administration menu → Configure site → Pages and collections
You can create site pages with informational content to share with other users or you can create templates which users can copy into their own accounts. You can also change the default content and layout of the pages for the dashboard, profile, group homepage, and regular page.
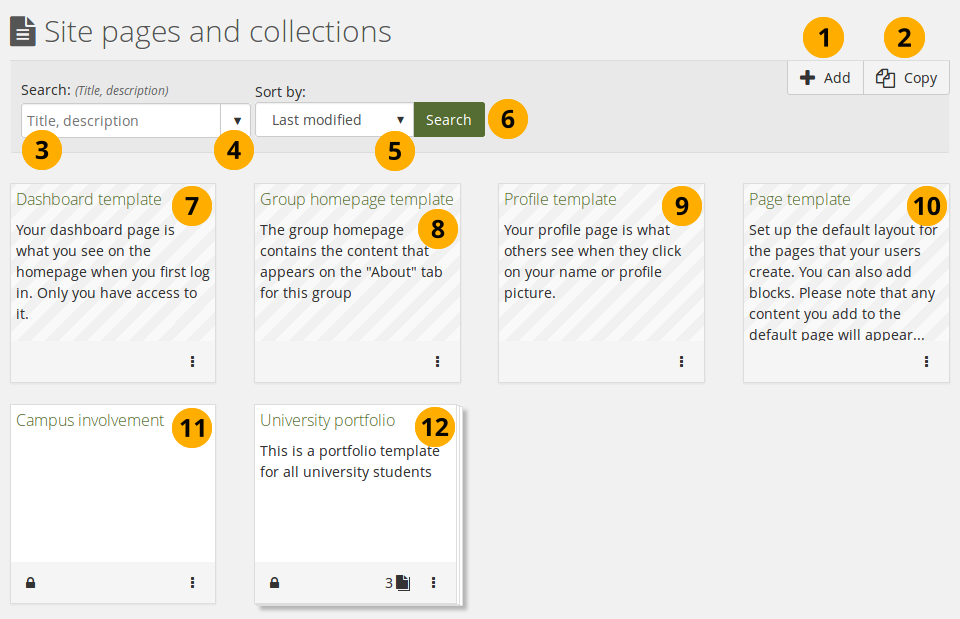
Site pages and collections
Adding and editing site pages and collections is very similar to creating and editing a portfolio page or collection. However, not all blocks are available when editing a site page in the page editor due to the different context. Please refer to the overview of blocks for a list of all the blocks that you can use in a site page.
Click the Add button to start a new page or collection from scratch.
Notitie
A modal opens in which you can choose whether to create a page or collection.
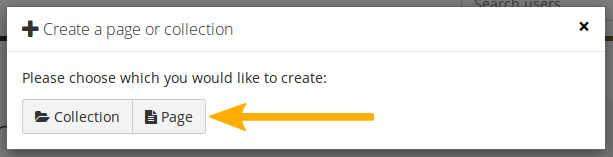
Click the Copy button to choose an existing page or collection as basis.
Search: Type your search term into the search field.
Use the drop-down arrow to limit your search. The available options are:
Title, description, tags: Search for your search term in the title, descirption, and tags of your site portfolios.
Title, description: This is the default option. It searches in the title and description of your site portfolios.
Tags: Search only within the tags of your site portfolios.
Sort by: Decide on the sort order in which you wish to display your portfolios.
Alphabetical: Portfolios are displayed in alphabetical order.
Date created: List the portfolios in chronologically reverse order with the newest portfolios first.
Last modified: Display the portfolios in the order of their last modification with the most recent portfolios that have been changed first. This is the default display option.
Last viewed: Show the portfolios in the order in which they were viewed by you and others starting with the most recently viewed portfolios.
Most visited: Display the portfolios that have been visited most first in the list.
Most feedback: List the portfolios in descending order based on the amount of feedback they have received.
Notitie
The sort order that you choose does not change when you navigate away from the overview page or log out. When you change the sort order, that new setting will be used until you change it again.
Click the Search button to search your site portfolios based on your search term and / or sorting criteria.
Dashboard template: You can edit the dashboard template. The dashboard doesn’t change for existing users. However, new users will get the changed dashboard.
Group homepage template: Change the layout and the blocks that are displayed on all group homepages. This only affects groups created after the changes.
Profile template: Make changes to the layout and the blocks that users see on their profile page per default. Your changes only affect new users.
Notitie
You cannot delete the dashboard, group homepage, profile and page templates.
Page template: Change the default portfolio page. The changes only affect any pages that are created after you made the change.
Notitie
Changing this page template is useful if you want to have all new pages use a specific layout instead of the built-in three-column layout. You could also place a block onto the template that any new page should have.
Users still have the possibility to change any settings once they create their page. You are not locking them into a specific way.
Once you are done creating your site portfolios, you can share them with others.
Notitie
When somebody leaves feedback on a site page or artefact, the site administrators receive a notification.
11.3.8. Site journals
Administration menu → Configure site → Journals
You create site journals like regular user journals.
Site journals
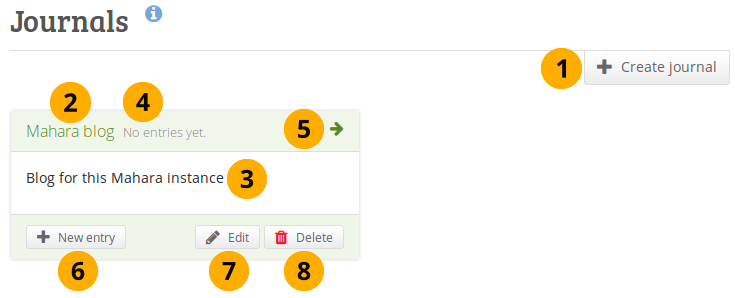
You can create multiple journals. Click the Create journal button to set up a new journal.
All your journals are listed on Administration menu → Configure site → Journals with their titles. The titles link through to the individual journals.
You can see the description of the journal.
You see how many entries you have in each journal.
Click the Arrow icon to be taken to the journal and see all journal entries.
Click the New entry button to create a new journal entry directly from this screen.
Click the Edit button to make changes to your journal title, description or tags.
Click the Delete button to delete the journal and all its entries.
Waarschuwing
When you click the Delete button, you receive a confirmation message whether you really want to delete the journal or not. If you used the journal or an entry of it in a page, Mahara lets you know so you can decide whether to delete the journal or not. Once you agree to delete the journal, your journal and all its content are removed permanently.
11.3.9. Share
Administration menu → Configure site → Share
You share site pages and site collections like any other pages and collections.
Zie ook
Refer to the share options for regular portfolio pages and collections for further information.
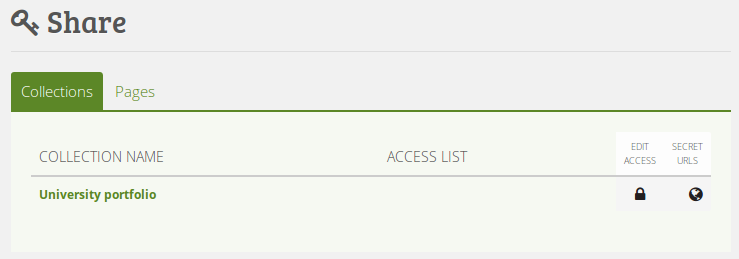
Share site pages and collections
When you want to allow copying, you have a few more options available than on regular pages or collections.
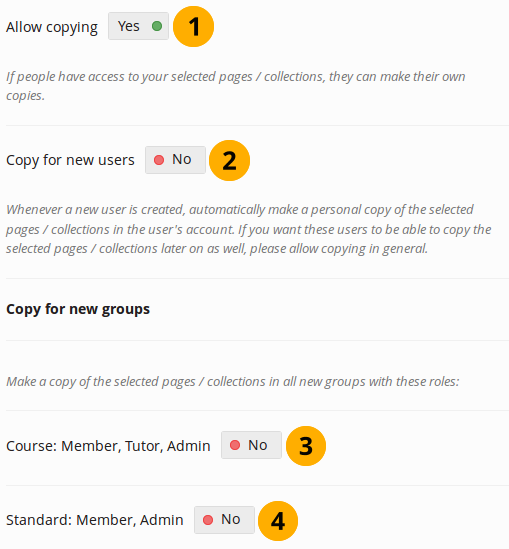
Copying site pages and collections
Allow copying: Switch this option to “Yes” if you want to allow the people who have access to the page or collection to copy it.
Copy for new users: Enable this option if all new users on the site - and not just in one institution - shall receive a copy of the selected page(s) or collection(s) into their portfolios when an account is created for them.
Notitie
If you enable this option without also enabling the option “Allow copying”, your users will not be able to make a copy of the page(s) or collection(s) themselves if they need another one.
Course: Switch this option to “Yes” if all course groups shall receive a copy of the selected page(s) or collection(s).
Standard: Switch this option to “Yes” if all standard groups shall receive a copy of the selected page(s) or collection(s).
11.3.10. Site skins
Administration menu → Configure site → Site skins
Waarschuwing
Skins is a feature that can be applied on top of themes for pages. While you can change a lot of style elements, changing all of them is not advised depending on the theme that is underlying your page.
This feature is only available when the server administrator enabled skins for the site.
You can create skins that will be available to all users of your site.
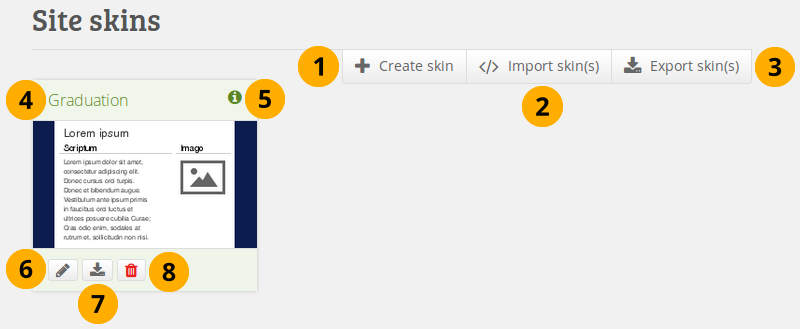
Site skins
Click the Create skin button to design a new skin.
Click the Import skin(s) button to import skins that others have shared online.
Click the Export skin(s) button to export all site skins.
The title of the skin.
Click the Info button to see more details for the skin, e.g. who created it when.
Click the Edit button to make changes to this skin.
Click the Export button to export only this one skin.
Click the Delete button to remove this skin.
Zie ook
The process of creating and editing a site skin is very similar to creating and editing skins in your portfolio.
11.3.11. Fonts
Administration menu → Configure site → Fonts
You can install additional fonts to be used with page skins. Currently, you cannot use these fonts anywhere else.
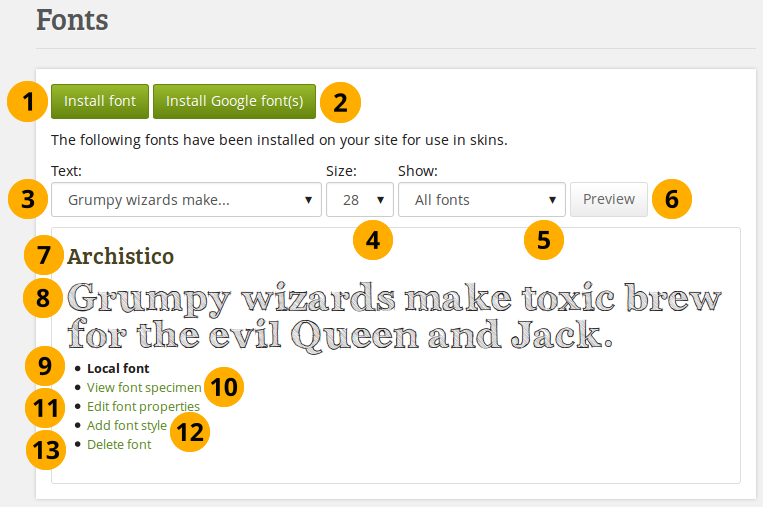
Fonts overview page
Click the Install font button to install a font from your computer.
Click the Install Google font(s) button to install fonts you discovered through Google fonts.
Text: Decide in which preview text the installed fonts should be displayed on this overview page. The default text is “Grumpy wizards…”:
Latin alphabet (ASCII only)
Latin alphabet (ISO/IEC 8859-1)
Latin alphabet (ISO/IEC 8859-2)
Cyrillic alphabet (ISO/IEC 8859-5)
Greek alphabet (ISO/IEC 8859-7)
Numbers and fractions
Punctuation
Lorem ipsum dolor sit amet, consectetur adipiscing elit.
Grumpy wizards make toxic brew for the evil Queen and Jack.
The quick brown fox jumps over the lazy dog.
Notitie
Not all fonts have the full character set implemented. In particular, the Cyrillic and Greek alphabets may be missing and also some numbers, fractions and pucntuation symbols.
The three last sentences show most / all of the letters in the English alphabet.
Size: Decide on the size of the letters in which the installed fonts should be displayed on this overview page. The default size is 28.
Show: Decide which fonts you want to see on this overview page:
All fonts
Local fonts
Google web fonts
Click the Preview button to change which fonts are displayed depending on the criteria you selected.
The title of the font is shown.
See what your font looks like according to your preview settings.
You see whether it is a Google font or a local font that you uploaded.
Click View font specimen to see details about this font.
Click Edit font properties on a local font to change some font settings.
Click Add font style to add more styles for a local font.
Click Delete font to delete this font.
11.3.11.1. Install a local font
You can install a font that you find online as long as you have the permission to do so. Please always read the license of a font before uploading it to ensure that you are allowed to do so.
Zie ook
There are a lot of websites for finding fonts. One of them where you can use, share and remix them is the Open Font Library.
Click the Install font button on the Fonts overview page.
Zie ook
If you want to upload a font you found on Google fonts, please follow the Google fonts installation instructions.
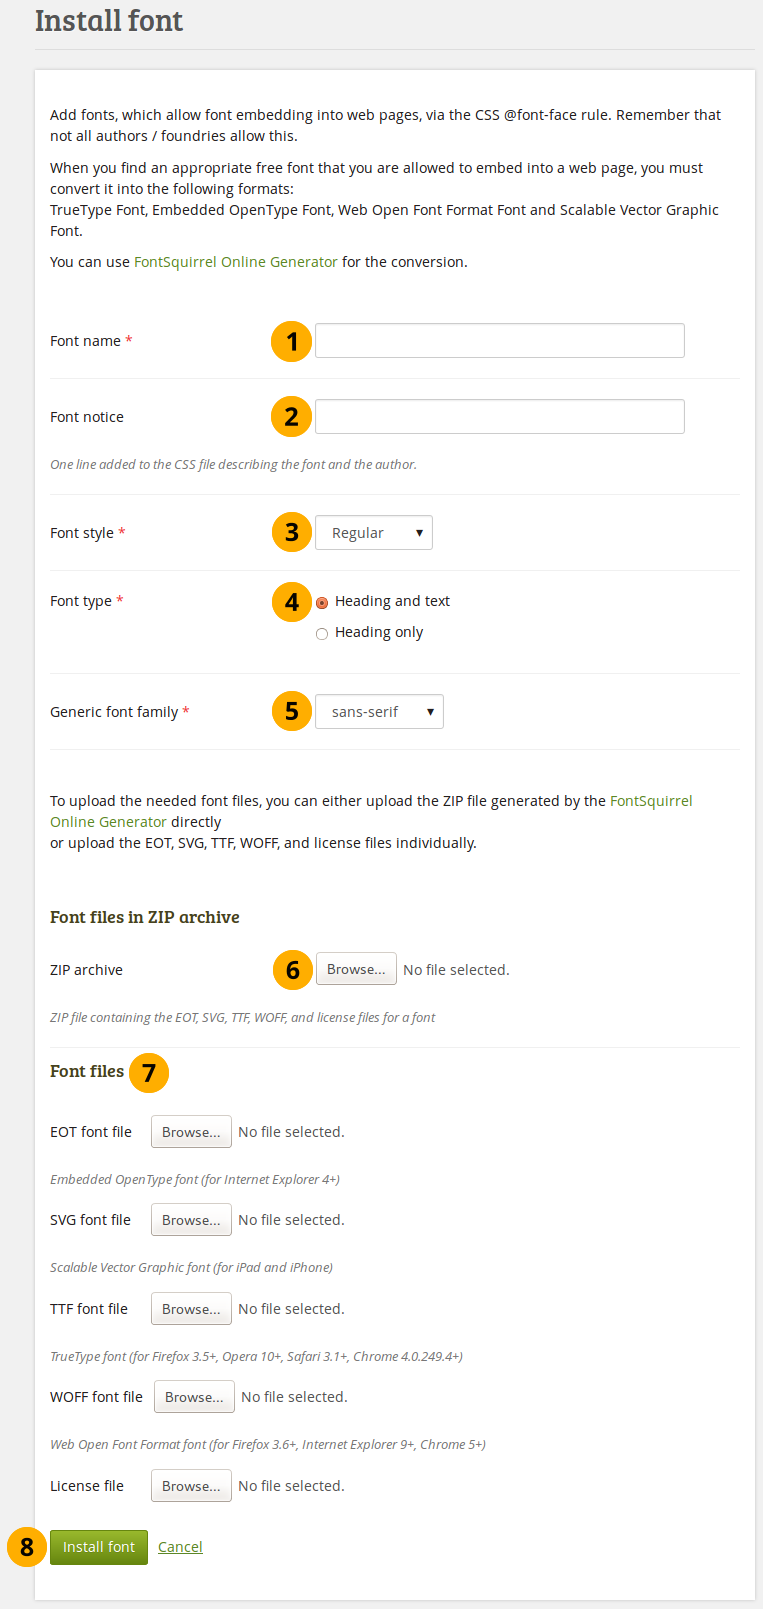
Install a font
Font name: Provide the name of the font. this field is required.
Font notice: Provide information about the font, e.g. license, and the font creator.
Font style: State what styles the font has available that you upload. If the styles come in separate font files, you need to upload all of them separately:
Regular
Bold
Italics
Bold italics
Font type: Decide where in a page skin the font can be used:
Headings and text
Headings only
Generic font family: To what generic font family does this font belong? Choose from:
serif: Letters and symbols have a small line attached to the end of a stroke to guide the eye from one letter to the next. An example is the font “Times New Roman”.
sans-serif: Letters and symbols do not have the guiding line. An example is the font “Arial”.
monospace: All letters have the same space.
cursive: Handwriting fonts.
fantasy: Fonts that are very ornamented.
ZIP archive: You can upload all font files in one go using a zip archive instead of having to upload them separately. You need to include all required font files.
Font files: You need to upload your font in all these font files in order to ensure that it can be displayed in different browsers and on different devices. Click the Browse button next to each font file type to upload that specific font file.
EOT font file: Embedded OpenType font (for Internet Explorer 4+)
SVG font file: Scalable Vector Graphic font (for iPad and iPhone)
TTF font file: TrueType font (for Firefox 3.5+, Opera 10+, Safari 3.1+, Chrome 4.0.249.4+)
WOFF font file: Web Open Font Format font (for Firefox 3.6+, Internet Explorer 9+, Chrome 5+)
License file: Upload the font license file
Zie ook
You can use the FontSquirrel Webfont Generator to convert your fonts into the required formats.
Click the Install font button to finish installing this font or click Cancel to abort your action.
11.3.11.2. Edit a local font
You can make certain changes to a local font and also install additional font styles.
Click Edit font properties on the Fonts overview page to make changes to a number of settings of a local font.
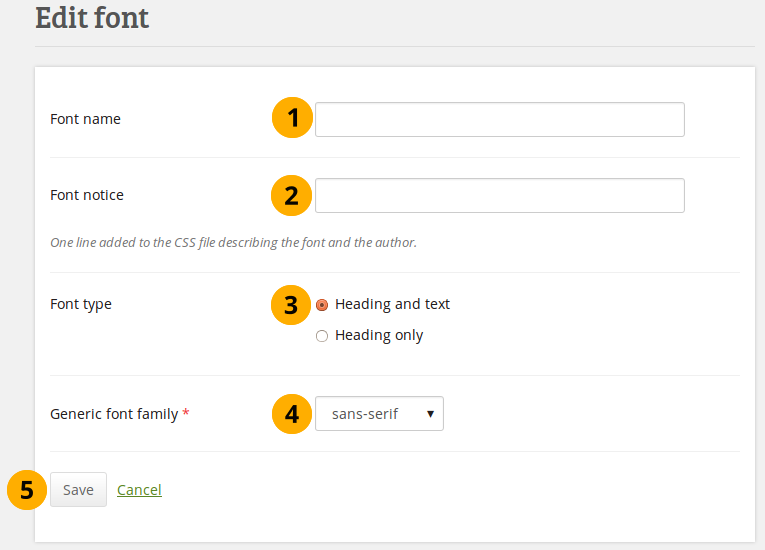
Edit font properties of a local font
Font name: Edit the font name.
Font notice: Make changes to the license information and the creator of the font.
Font type: Choose whether the font can be used for headings only or also for regular text.
Generic font family: Change the font family to which this font belongs.
Click the Save button to accept your changes or click Cancel to abort your action.
Click the Add font style button to upload additional font styles for your font. If your font comes with a number of different styles in separate files, you need to upload them separately.

Add an additional font style to a specific font
Font name: The name of your font for which you are uploading an additional font style is displayed.
Font style: Choose the font style that you are uploading.
Font files: Upload all required font files.
Click the Save button to accept your changes or click Cancel to abort your action.
11.3.11.3. Install Google font(s)
Click the Install Google font(s) button to see the instructions and the font upload area for Google fonts.
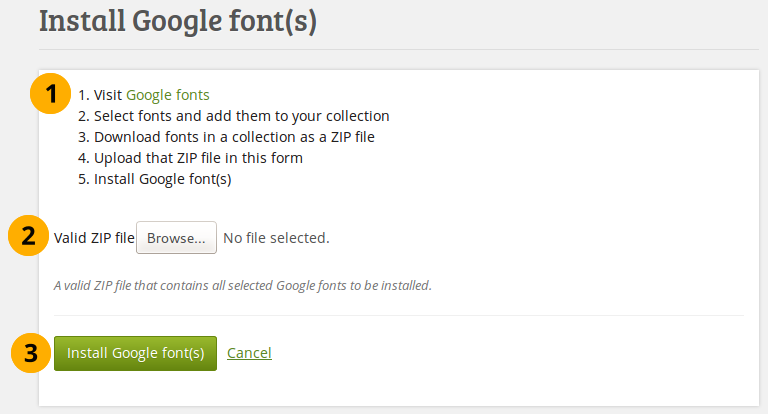
Install Google font(s)
Follow the instructions for finding and downloading Google fonts.
Visit the Google fonts website.
Select the fonts that you wish to make available for all users to choose for skins and add them to your collection on Google.
Download all fonts as a ZIP file.
Valid ZIP file: Click the Browse button to upload the ZIP file that you downloaded from Google.
Click the Install Google font(s) button to add these fonts to your fonts on Mahara or click Cancel to abort your action.
11.3.12. Files
Administration menu → Configure site → Files
Here you can upload files that you can include in the links and resources menu or in site pages. You can add files that are in the home directory to the menu with resources for logged-in users. Files that you save in the public folder can be used in the menu for users who are not logged-in. Additionally, users can put them into their own portfolio pages as files to download.
Zie ook
The process of uploading and managing files is very similar to files in your personal files area.
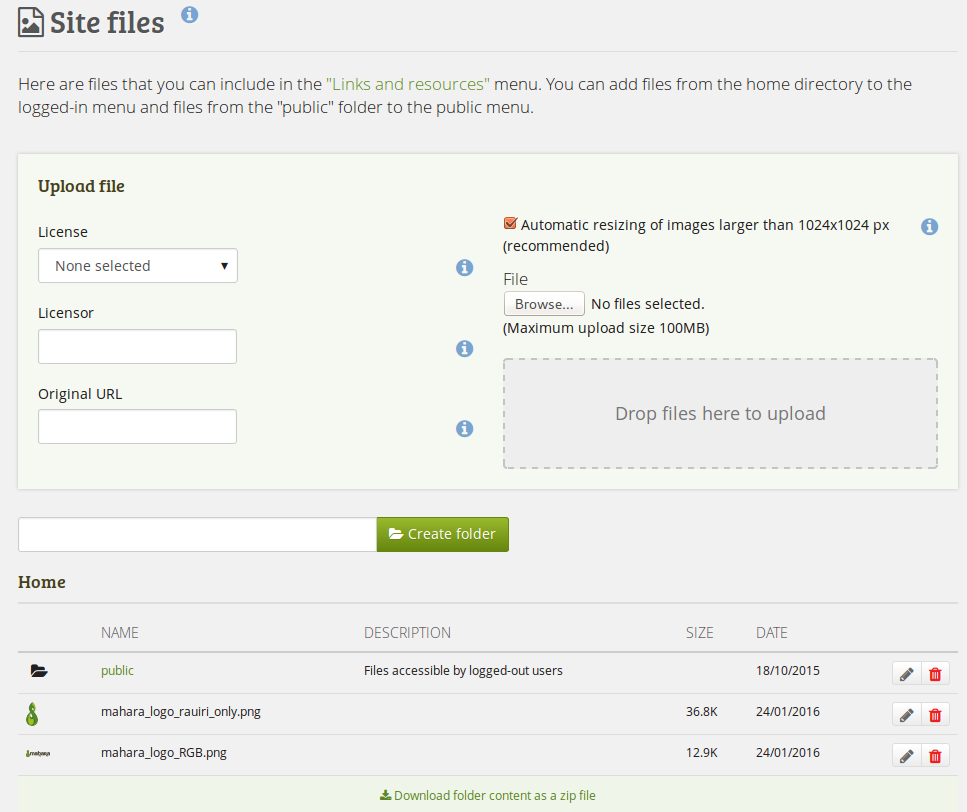
Site files
11.3.13. Cookie Consent
Administration menu → Configure site → Cookie Consent
The “Cookie Law”, Directive 2009/136/EC of the European Parliament and of the Council, defines the requirements for consenting to the keeping of cookies across the European Union. Before your site can store or retrieve information from an electronic device, the user of your site must give informed consent for you to do so.
Zie ook
Read the full text of the directive.
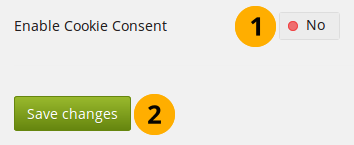
Enable Cookie Consent
Enable Cookie Consent: Switch this setting to “Yes” if you want to enable the Cookie Consent feature.
Click the Save changes button.
Notitie
Cookie Consent does not have its own configuration. Site administrators need to provide relevant information on the Privacy page.
When Cookie Consent is enabled, your users see the following banner at the bottom of their screen.
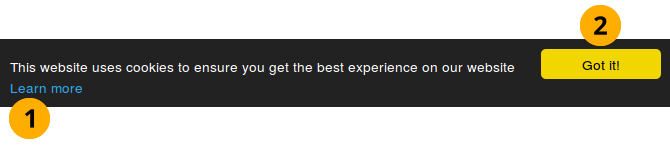
Cookie Consent banner
Click the “Learn more” link to be taken to the Privacy page of your site. There, more information about the collection of data via cookies is available.
Click the Got it button to acknowledge the use of cookies. You only need to do this once in a browser.