6.3. General
The artefacts in this tab are of a general nature or do not fit into any other category and can be used around the site.
When you create a page in a group, you do not have the plans block available as you cannot create plans in groups. Additionally, you can choose the following blocks when you edit the group homepage:
6.3.1.  Annotation

Add a block to your page which lets you add an annotation for your page.
Note
This feature is an initial implementation of a feature for the SmartEvidence functionality. You can learn more about SmartEvidence from the presentation “SmartEvidence: Why did it come about, and what is it?”.
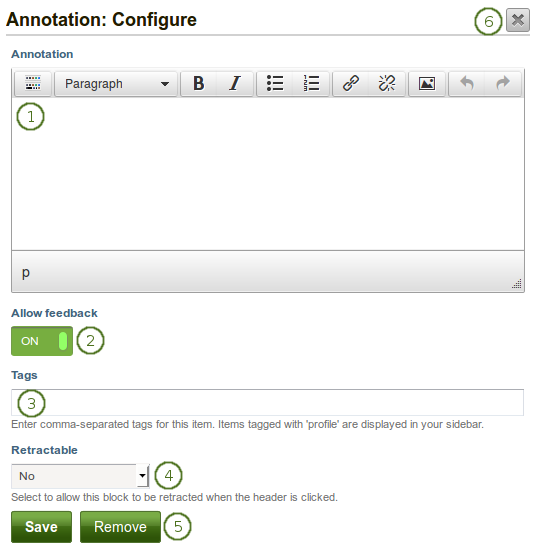
Configure the Annotation block
- Annotation: Write your annotation for your portfolio page. It will help to situate the evidence that you put together on the page, establish the context and tie things together.
- Allow feedback: When you allow feedback on your annotation, others can leave feedback as usual. However, as soon as the first feedback has been added, you will not be able to make changes to your annotation text anymore. That is to ensure that the feedback still relates back to the annotation.
- Tags: Enter tags to find your annotation more easily at a later stage. Separate your tags with commas. If you already have tags, you can click on the link Show my tags and select the ones that you think will fit for this collection as well. They will be entered into the text field for you.
- Retractable: Choose whether you want to allow users to reduce the block to its heading on a page or see just the heading only automatically. The options are:
- No: The block and its content is displayed at all times.
- Yes: Allow users to reduce the block to just the heading by clicking the Retractable icon
 .
. - Automatically retract: Only the heading of the block is visible, and the user can click the Retracted icon
 to view its content.
- Click the Save button to accept your changes, or click the Cancel button to leave the block’s content as it is. The Remove button is shown only when you place the block into the page for the first time.
- You can also click the Close button
 in the top right-hand corner to either remove a newly created block before it is being saved or to cancel any changes and leave the block’s content as it is.
6.3.2. Creative Commons license

Add a block to your page which lets users know under which Creative Commons license your page is published.
Configure the Creative Commons license block
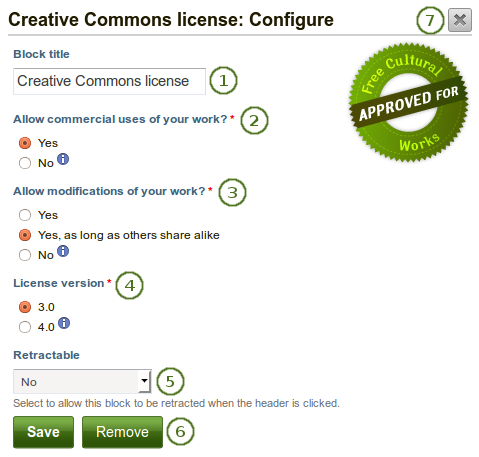
Block title: Choose a title for your block.
Allow commercial uses of your work? Decide whether users can re-use your work for commercial purposes.
Allow modifications of your work? Decide whether others can remix your work and create something new and if so under which conditions.
License version: Select under which Creative Commons license you wish to publish your work. You can choose between
- Creative Commons 3.0
- Creative Commons 4.0
See also
Check out what is new in Creative Commons 4.0, and why you may want to choose that license.
Retractable: Choose whether you want to allow users to reduce the block to its heading on a page or see just the heading only automatically. The options are:
- No: The block and its content is displayed at all times.
- Yes: Allow users to reduce the block to just the heading by clicking the Retractable icon .
- Automatically retract: Only the heading of the block is visible, and the user can click the Retracted icon to view its content.
Click the Save button to accept your changes, or click the Cancel button to leave the block’s content as it is. The Remove button is shown only when you place the block into the page for the first time.
You can also click the Close button
in the top right-hand corner to either remove a newly created block before it is being saved or to cancel any changes and leave the block’s content as it is.
See also
For more information about the licenses and their terms, visit the Creative Commons website.
6.3.3. Feedback

Note
This functionality is only available when the site administrator installed the blocktype plugin “Comment”. It is installed by default in a new Mahara installation, but when a site is upgraded, the site administrator needs to install it manually in the Extensions.
You can move the feedback section from the bottom of a page elsewhere onto your page to integrate it better with your page content. Please note the following:
- There is no configuration possible for this block.
- You only see feedback / comments when you display a page, but not in the edit mode.
- If there is a lot of feedback on a page, it will be paginated so that it fits into the size of the block.
- You can only place 1 feedback block onto a page as it contains the entire page feedback.
- Feedback for individual artefacts is still placed at the bottom of the artefact details pages because you cannot put a block onto these pages.
- You can move the block like any other block on your page. If you delete the block, the feedback is displayed at the bottom of the page again.
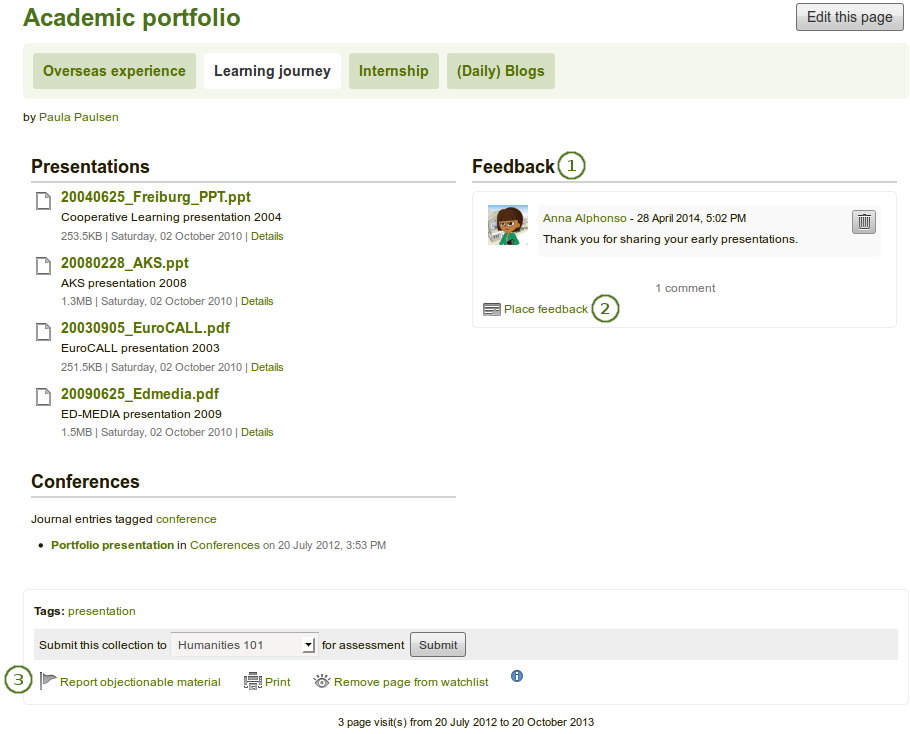
What the feedback block looks like on a page
- The block has the heading “Feedback” unless your Mahara installation uses a different word.
- When you click the Place feedback link, a pop-up is displayed in which you can enter your feedback with all the functionality as at the bottom of the page.
- There is no feedback link or display of feedback at the bottom of a page when you put a feedback block onto your page.
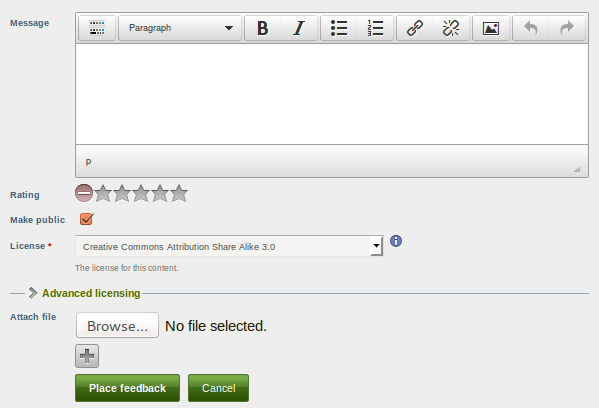
Pop-up window for placing feedback when it is in a block
When you place feedback in a block, you do so in a pop-up window.
6.3.4. Group info

This block is a default block on the group homepage. There is no configuration possible.
Note
This block can only be used on a group homepage.
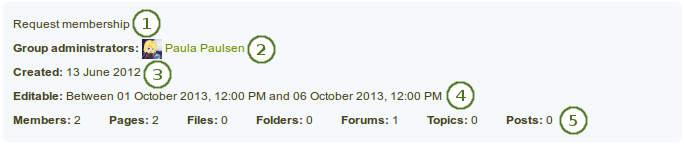
Items in the group info block
The block contains information about:
- group characteristics
- group administrator
- group creation date
- dates between which regular group members can participate in group activities
- group statistics
- number of group members
- number of pages created in the group
- number of files uploaded to the group
- number of folders created in the group
- number of forums created in the group
- number of forum topics created in the group
- number of posts in forum topics in the group
6.3.5. Group members

This block is a default block on the group homepage. You can display member profile pictures and their names.
Note
This block can only be used on a group homepage.
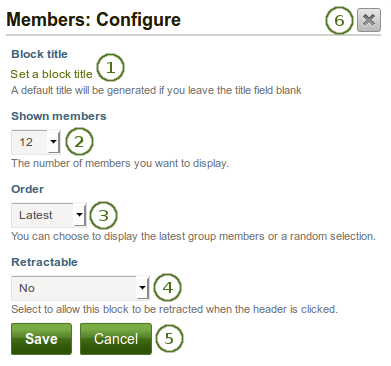
Configure the Group members block
- Block title: The automatic title for this block is “Members”. You can set another one if you wish.
- Shown members: Choose how many members (between 1 and 100) are shown on the group homepage. All others are accessible via the Members tab in the group. The default number of members displayed is 12.
- Order: Choose the order in which members are displayed. Options are
- latest: display members according to their group joining date in reverse chronological order
- random: let Mahara decide which members to display
- Retractable: Choose whether you want to allow users to reduce the block to its heading on a page or see just the heading only automatically. The options are:
- No: The block and its content is displayed at all times.
- Yes: Allow users to reduce the block to just the heading by clicking the Retractable icon .
- Automatically retract: Only the heading of the block is visible, and the user can click the Retracted icon to view its content.
- Click the Save button to accept your changes, or click the Cancel button to leave the block’s content as it is. The Remove button is shown only when you place the block into the page for the first time.
- You can also click the Close button in the top right-hand corner to either remove a newly created block before it is being saved or to cancel any changes and leave the block’s content as it is.
6.3.6. Group pages

This block is a default block on the group homepage. You can display pages created in and / or shared with the group in this block.
Note
This block can only be used on a group homepage.
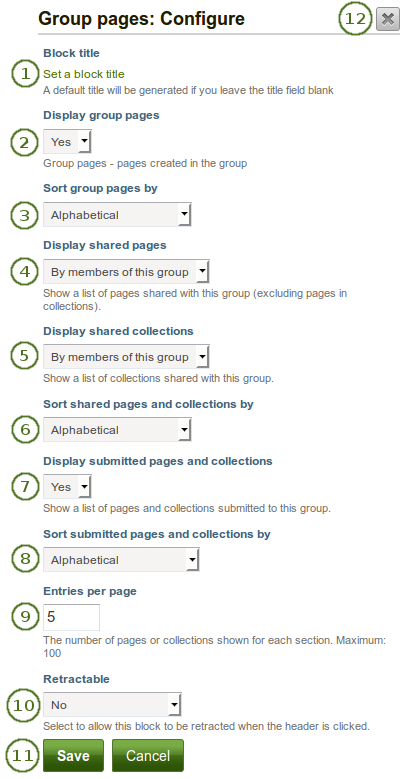
Configure the Group pages block
Block title: The automatic title for this block is “Group pages”. You can set another one if you wish.
Display group pages: Decide whether to display pages that were created in the group. “Yes” is the default option.
- Sort group pages by: Choose in which order to display pages created in the group. “Alphabetical” is the default option, but you can also display them based on when they were last modified.
Display shared pages: Decide whether to display pages that users shared with the group. The options are:
None: No shared pages are displayed.
- By members of this group: Display only pages that have been shared by members of the group.
Note
This option is particularly well-suited for groups that are used for class purposes. That way, students can share their pages or collections with the group for a long time, but the administrator can choose to display only pages of group members but not those that are not members anymore. The pages of non-group members are still accessible via the Shared with me functionality.
By anybody: Display all pages that have been shared with the group.
Display shared collections: Decide whether to display collections that users shared with the group. The options are:
- None: No shared collections are displayed.
- By members of this group: Display only collections that have been shared by members of the group.
- By anybody: Display all collections that have been shared with the group.
- Sort shared pages and collections by: Choose in which order to display pages and collections shared with the group. “Alphabetical” is the default option, but you can also display them based on when they were last modified.
Display submitted pages and collections: Decide whether to display pages and collections that group members submitted to the group. There is no distinction made between pages and collections. “Yes” is the default option.
- Sort submitted pages and collections by: Choose in which order to display pages and collections submitted to the group. “Alphabetical” is the default option, but you can also display them based on when they were last modified.
Entries per page: Choose the maximum number of pages or collections you wish to see on the group homepage for the above before a paginator is displayed. You can display a maximum of 100 items per category.
Retractable: Decide whether you want to allow users to reduce the block to its heading on a page. The options are:
- No: This is the default option. The block and all its content is displayed.
- Yes: The block can be retracted. The user can click the Retractable icon to just show the heading.
- Automatically retract: Choose this option if you want to show only the block’s heading when a user views the page. The user can click the Retracted icon to view the entire block.
Click the Save button to accept your changes, or click the Cancel button to leave the block’s content as it is. The Remove button is shown only when you place the block into the page for the first time.
You can also click the Close button
in the top right-hand corner to either remove a newly created block before it is being saved or to cancel any changes and leave the block’s content as it is.
Note
A page is considered as updated when the content of at least one block is updated, including the adding of a new Mahara journal entry into the journal block.
6.3.7. Inbox

The Inbox block displays the latest messages that you have received.
Note
This block can only be used on your dashboard.
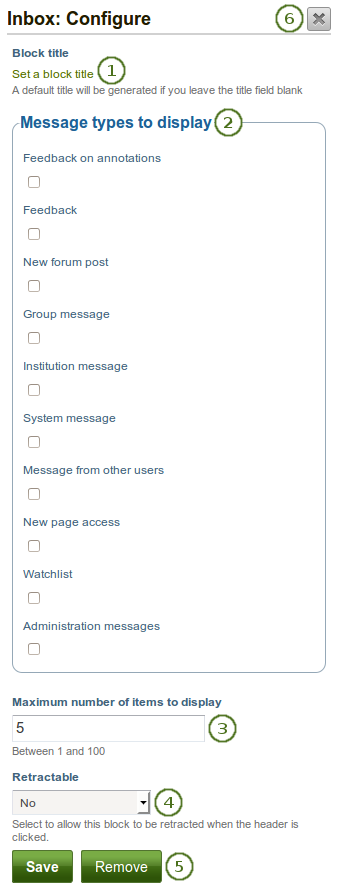
Configure the Inbox block
- Block title: The automatic title for this block is “Inbox”. You can set another one if you wish.
- Message types to display: Place a check mark for each message type that you want to display in this block.
- Maximum number of items to display: Decide how many messages shall be shown on your dashboard. You can choose between 1 and 100.
- Retractable: Choose whether you want to allow users to reduce the block to its heading on a page or see just the heading only automatically. The options are:
- No: The block and its content is displayed at all times.
- Yes: Allow users to reduce the block to just the heading by clicking the Retractable icon .
- Automatically retract: Only the heading of the block is visible, and the user can click the Retracted icon to view its content.
- Click the Save button to accept your changes, or click the Cancel button to leave the block’s content as it is. The Remove button is shown only when you place the block into the page for the first time.
- You can also click the Close button in the top right-hand corner to either remove a newly created block before it is being saved or to cancel any changes and leave the block’s content as it is.
When you display messages from other users on your dashboard through the Inbox block, you can see quickly which messages you have not read. They are marked in bold and have a closed envelope. Messages you have read are indicated by an open envelope.
Unread messages have a closed envelope and are displayed in bold whereas read messages have an open envelope
6.3.8. Latest pages

The Latest pages block displays the latest pages to which you have access across Mahara.
Note
This block can only be used on your dashboard.
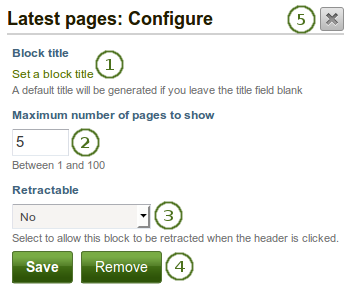
Configure the Latest pages block
- Block title: The automatic title for this block is “Latest pages”. You can set another one if you wish.
- Maximum number of pages to show: Decide how many pages shall be shown on your dashboard. You can choose between 1 and 100.
- Retractable: Choose whether you want to allow users to reduce the block to its heading on a page or see just the heading only automatically. The options are:
- No: The block and its content is displayed at all times.
- Yes: Allow users to reduce the block to just the heading by clicking the Retractable icon .
- Automatically retract: Only the heading of the block is visible, and the user can click the Retracted icon to view its content.
- Click the Save button to accept your changes, or click the Cancel button to leave the block’s content as it is. The Remove button is shown only when you place the block into the page for the first time.
- You can also click the Close button in the top right-hand corner to either remove a newly created block before it is being saved or to cancel any changes and leave the block’s content as it is.
6.3.9. Navigation

Add a navigation block to display links to pages in a collection.
Note
You must create at least one collection in order to use this block.
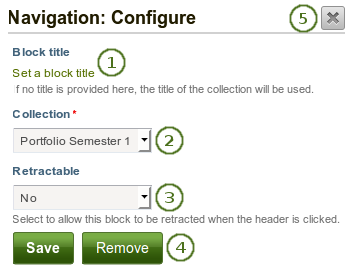
Configure the Navigation block
- Block title: The title of the collection is chosen automatically unless you provide a different one.
- Collection: Choose the collection from the drop-down menu for which you wish to display links in the block.
- Retractable: Choose whether you want to allow users to reduce the block to its heading on a page or see just the heading only automatically. The options are:
- No: The block and its content is displayed at all times.
- Yes: Allow users to reduce the block to just the heading by clicking the Retractable icon .
- Automatically retract: Only the heading of the block is visible, and the user can click the Retracted icon to view its content.
- Click the Save button to accept your changes, or click the Cancel button to leave the block’s content as it is. The Remove button is shown only when you place the block into the page for the first time.
- You can also click the Close button in the top right-hand corner to either remove a newly created block before it is being saved or to cancel any changes and leave the block’s content as it is.
6.3.10. Note

Add a note to your page. This feature is used when you do not want to keep the text in a journal, but still want to be able to re-use the text on other pages.
6.3.10.1. Add a new note

Configure the Note block
- Block title: Provide a title for your note.
- Block content: Write your text. You can include formatting, external images etc.
- Alternatively, you can also use text from another note that you have already written.
- License: You see this drop-down menu if the site administrator turned on license metadata. Additionally, if you are in an institution, your institution administrator may require you to provide a license. Your default license is displayed. You can set your default license in your account settings. You may choose a different license for each individual artefact.
- Advanced licensing: If you can / must enter license information, you can also provide information about the original licensor and a URL where the original can be found.
- Allow comments: Switch this setting on if you wish to allow comments / feedback on your note. This option is on by default.
- Tags: Enter tags to find your note more easily at a later stage. Separate your tags with commas. If you already have tags, you can click on the link Show my tags and select the ones that you think will fit for this collection as well. They will be entered into the text field for you.
- Attachments: Attach files to a note as additional evidence for the text you are writing.
- Click the Add a file button if you wish to add one or more files to a note.
- Retractable: Choose whether you want to allow users to reduce the block to its heading on a page or see just the heading only automatically. The options are:
- No: The block and its content is displayed at all times.
- Yes: Allow users to reduce the block to just the heading by clicking the Retractable icon .
- Automatically retract: Only the heading of the block is visible, and the user can click the Retracted icon to view its content.
- Click the Save button to accept your changes, or click the Cancel button to leave the block’s content as it is. The Remove button is shown only when you place the block into the page for the first time.
- You can also click the Close button in the top right-hand corner to either remove a newly created block before it is being saved or to cancel any changes and leave the block’s content as it is.
Note
We recommend you do not include images that you have uploaded to Mahara in a note via the link to the image. It cannot be guaranteed that they are displayed for other users if they do not have access to the image via another portfolio page. All access in Mahara is granted to pages and through them to the artefact blocks. An image in a note is not recognized as artefact and can therefore not receive its proper permissions.
6.3.11. Add an image into a note
Note
In Mahara 15.04 the way of including images into text was changed. Please refer to the section “Insert an image into text” for more information.
6.3.11.1. Attach a file to a note
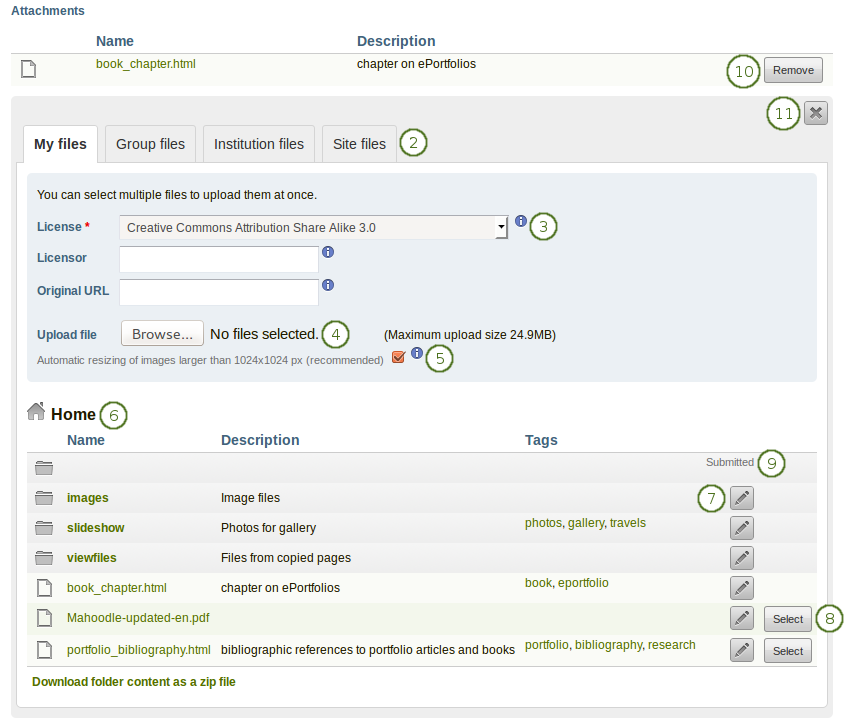
Attach a file to a Note block
Click the Add a file button if you wish to add one or more files to a note.
Files area: Choose from which files area you would like to select a file:
- My files: You see all the folders and files that you have created.
- Group files: You see all the folders and files that you are allowed to publish.
- Institution files: If you are an institution administrator, you will see institution folders and files.
- Site files: If you are a site administrator, you will see all site folders and files. Otherwise, you can only see the ones that are in the folder public in the Site files.
License information: You see these fields if the site administrator turned on license metadata. Additionally, if you are in an institution, your institution administrator may require you to provide a license.
- License: Your default license is displayed. You can set your default license in your account settings. You may choose a different license for each individual artefact.
- Licensor: If you are uploading a file that somebody else created, you can attribute the work to them here and provide their name for example.
- Original URL: If you are uploading somebody else’s file, provide a link to the original Internet address so that others can go there and view the original file.
Upload file: You do not have to go back to your Files area in Content in order to upload a file. You can do so directly from this screen.
If the site administrator turned on the image resizing option, you can decide whether you want to have your images resized if they are larger than the specified dimensions. This option is recommended to save space in your portfolio.
Folder path: The breadcrumbs show in which folder you are currently.
You can still edit any component of the file, i.e. its file name, description and tags by clicking the Edit button.
Choose the file or files you wish to display by clicking the Select button.
Warning
When you place group, institution or site files into a page, beware that these files may not be available at some point anymore when the person in charge deletes them.
You can also still select files (within folders) that have been submitted in another portfolio page.
Click the Remove button to not display a specific file in this block anymore.
Click the Close button
to hide the file selector.
6.3.11.2. Re-use text from an existing note
You can re-use text from other note from one page in another without having to copy the page first.
Warning
If you do not make a copy of the note content in the block configuration and change it, the text is changed in all other instances where this note is used.
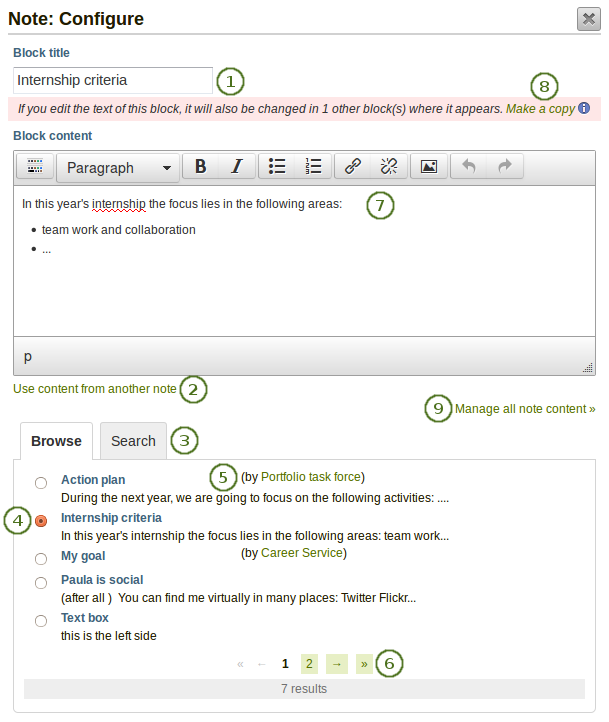
Configure the Note block by copying text
Block title: Provide a title for your note. You should only enter it after you selected the note to re-use as the title of the original note will overwrite anything you had put in before.
Click the link Use content from another note to view all notes to which you have access. These can be:
- your own notes
- notes from group pages that you can copy
- notes from institution or site pages to which you have access
Click Browse or Search to find the note that you want to re-use.
All notes are listed with their title and the first line. Click the radio button next to the note that you want to use again.
If a note does not belong to you but for example to a group, you see the author next to the note’s title.
Use the paginator to move between your notes if more than 5 are displayed.
The content of the note that you have selected is displayed in the Block content box. Now you can make changes.
Warning
The text will be changed in all other instances where this note appears.
If you wish to make changes to the note, but do not want to change it everywhere else, click the Make a copy link above the Block content in the red box. The text is then retained, but it is treated like a new note and the original note is not changed.
Click the Manage all note content link to be taken to your personal Notes to make changes there instead of in an existing note from this popup window here.
All other functionality that you see on the screen is the same as for adding a new note.
6.3.12. Plans

Display one of your plans in a block.
Note
You must create at least one plan in order to use this block.
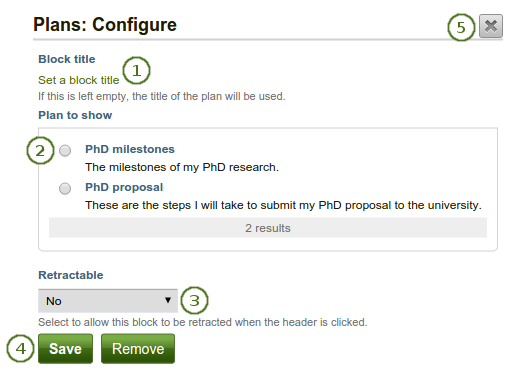
Configure the Plans block
- Block title: The title of the plan is chosen automatically unless you provide a different one.
- Plan to show: Choose the plan which you want to display in your page.
- Retractable: Choose whether you want to allow users to reduce the block to its heading on a page or see just the heading only automatically. The options are:
- No: The block and its content is displayed at all times.
- Yes: Allow users to reduce the block to just the heading by clicking the Retractable icon .
- Automatically retract: Only the heading of the block is visible, and the user can click the Retracted icon to view its content.
- Click the Save button to accept your changes, or click the Cancel button to leave the block’s content as it is. The Remove button is shown only when you place the block into the page for the first time.
- You can also click the Close button in the top right-hand corner to either remove a newly created block before it is being saved or to cancel any changes and leave the block’s content as it is.
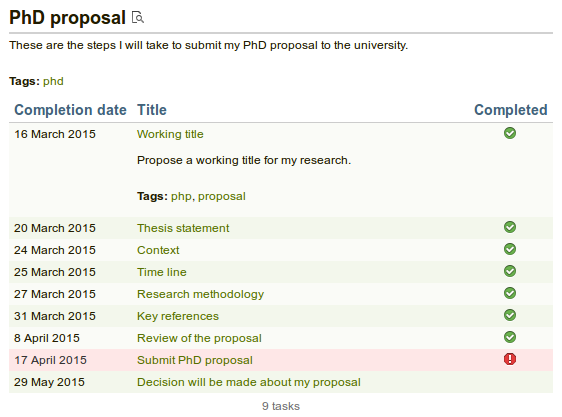
Result of an embedded plan in a portfolio page. By clicking on the linked titles, you can show the descriptions of the individual tasks.
6.3.13. Recent forum posts

Display a specified number of recent forum posts from one group on a page.
Note
You must be a member of at least one group in order to use this block.
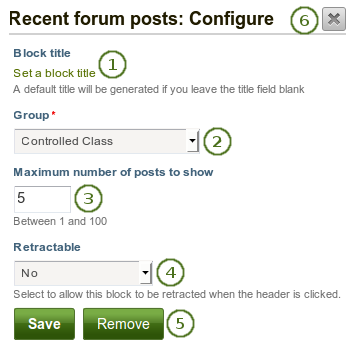
Configure the Recent forum posts block
- Block title: The title of the block is generated automatically unless you provide a different one. The default title is “Recent forum posts”.
- Group: Choose the group whose forum posts you wish to display.
- Maximum number of posts to show: Decide how many of the latest forum posts you wish to show. The default value is 5. You can show up to 100 posts.
- Retractable: Choose whether you want to allow users to reduce the block to its heading on a page or see just the heading only automatically. The options are:
- No: The block and its content is displayed at all times.
- Yes: Allow users to reduce the block to just the heading by clicking the Retractable icon .
- Automatically retract: Only the heading of the block is visible, and the user can click the Retracted icon to view its content.
- Click the Save button to accept your changes, or click the Cancel button to leave the block’s content as it is. The Remove button is shown only when you place the block into the page for the first time.
- You can also click the Close button in the top right-hand corner to either remove a newly created block before it is being saved or to cancel any changes and leave the block’s content as it is.
6.3.14. Text

Add text to your page. This feature is used when you want to put a snippet of text onto a page that does not have to be re-used.
Note
In a default Mahara instance, this block is available in the content chooser at the top together with the Image block. It does not appear in the section General as well.
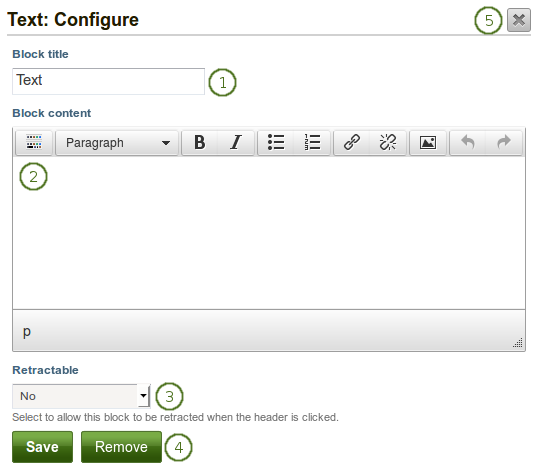
Configure the Text block
- Block title: Provide a title for your text.
- Block content: Write your text. You can include formatting, external images etc.
- Retractable: Choose whether you want to allow users to reduce the block to its heading on a page or see just the heading only automatically. The options are:
- No: The block and its content is displayed at all times.
- Yes: Allow users to reduce the block to just the heading by clicking the Retractable icon .
- Automatically retract: Only the heading of the block is visible, and the user can click the Retracted icon to view its content.
- Click the Save button to accept your changes, or click the Cancel button to leave the block’s content as it is. The Remove button is shown only when you place the block into the page for the first time.
- You can also click the Close button in the top right-hand corner to either remove a newly created block before it is being saved or to cancel any changes and leave the block’s content as it is.
Note
In Mahara 15.04 the way of including images into text was changed. Please refer to the section “Insert an image into text” for more information.
6.3.15. Watched pages

The Watched pages block displays the pages that are on your watchlist.
Note
This block can only be used on your dashboard.
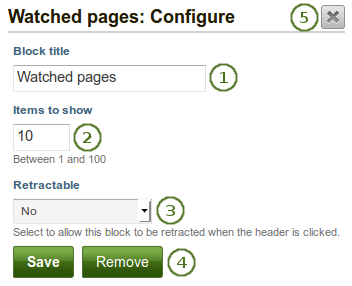
Configure the Watched pages block
- Block title: The automatic title for this block is “Watched pages”. You can set another one if you wish.
- Items to show: Decide how many pages shall be shown on your dashboard. You can choose between 1 and 100.
- Retractable: Choose whether you want to allow users to reduce the block to its heading on a page or see just the heading only automatically. The options are:
- No: The block and its content is displayed at all times.
- Yes: Allow users to reduce the block to just the heading by clicking the Retractable icon .
- Automatically retract: Only the heading of the block is visible, and the user can click the Retracted icon to view its content.
- Click the Save button to accept your changes, or click the Cancel button to leave the block’s content as it is. The Remove button is shown only when you place the block into the page for the first time.
- You can also click the Close button in the top right-hand corner to either remove a newly created block before it is being saved or to cancel any changes and leave the block’s content as it is.