6.4. Innerhalb einer Gruppe
Bemerkung
Es hängt von Ihrer Rolle in der Gruppe ab, ob Sie auf bestimmte Funktionen Zugriff haben oder nicht und ob Sie Einstellungen ändern können. Daher kann die Darstellung auf den Screenshots von den Einstellungen in Ihrem System abweichen.
6.4.1. Gruppenstartseite
Main menu → Engage → Groups → [Name of the group] → About
Die Gruppenstartseite ist der zentrale Ausgangspunkt einer Gruppe. Sie erhalten einen schnellen Überblick über die Gruppe und erreichen von hier aus alle Inhalte der Gruppe. Einige Elemente werden in der Grundeinstellung bereits vorgeschlagen. Es können jedoch individuelle Einstellungen beim Anlegen einer Gruppe vorgenommen werden.
6.4.1.1. Gruppenhomepages als reguläre Gruppenmitglieder anzeigen
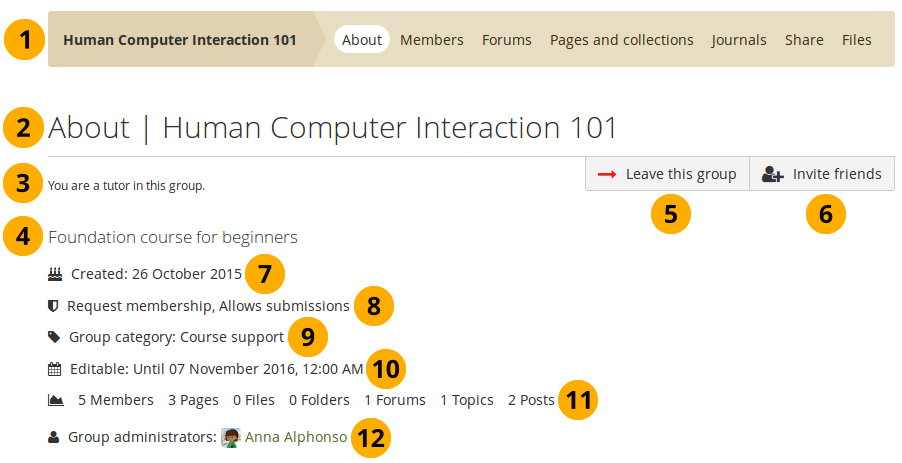
Gruppenhomepages als reguläre Gruppenmitglieder anzeigen
Group name and navigation items within the group. You see all the areas that you have access to in the group. If you are not allowed to edit pages, you will not see the „Share“ tab, for example.
Group area that you are in and group name.
As member in the group, you see your status.
Group description.
Click the Leave this group button to leave the group.
Bemerkung
You only see the button when the group is not a controlled membership group.
Wenn der Gruppenadministrator die Empfehlung für Kontakte erlaubt hat, sehen Sie den Button. Wenn die Einladung für Kontakte erlaubt wurden, finden Sie den entsprechenden Button.
Erstellt: Erstellungsdatum der Gruppe.
Important group attributes, e.g. open or request group, possibility of having submissions etc.
Group category: Category to which this group belongs; great for filtering groups on Groups.
Bemerkung
This feature is only available if the site administrator allowed group categories.
Bearbeitbar: Wenn der Gruppenadministrator einen Zeitraum für die Bearbeitung des Inhalts durch Gruppenmitglieder festgelegt hat, wird er hier angezeigt. Wurde kein Zeitraum festgelegt, wird nichts angezeigt.
Statistiken über die Anzahl der Gruppenmitglieder, Ansichten, Dateien, Verzeichnisse, Foren, Forenthemen und -beiträge.
Gruppenadministrator/innen: Klicken Sie auf die Namen, um die Profile anzusehen.
The group administrator can add additional blocks to the group homepage besides the Group info block. The default blocks are generally:
6.4.1.2. Die Gruppenhomepage als Gruppenadministrator ansehen
Wenn Sie ein/e Gruppenadministrator/in sind, können Sie weitere Blöcke zur Gruppenstartseite hinzufügen. Rufen Sie Blöcke im Ansichten-Kontext für eine Liste auf.
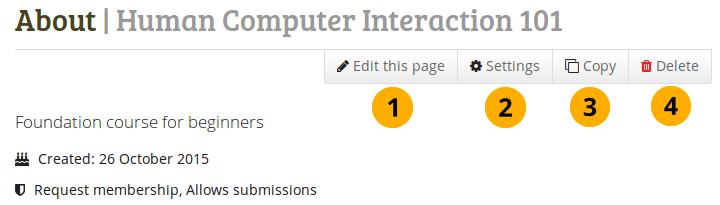
Die Gruppenhomepage als Gruppenadministrator ansehen
Click the Edit this page button if you want to make changes to the group homepage.
Click the Settings button if you want to make changes to the group settings.
Click the Copy button to duplicate the group. The group’s files, journals, pages, collections and group settings are copied. Group membership and forums are not copied.
Bemerkung
You only see the button if you are allowed to create a group. The site administrator decides that in Administration menu → Configure site → Site options → Group settings.
Klicken Sie auf den Gruppe löschen Button, wenn Sie diese Gruppe permanent löschen wollen. Mitglieder der Gruppe erhalten dann eine Benachrichtigung über die Löschung.
Warnung
Wenn Sie einmal eine Gruppe gelöscht haben, können Sie dessen Inhalte nicht mehr wiederherstellen. Foren oder Gruppenseiten können nicht exportiert werden. Wenn Sie einige Gruppenseiten gerne behalten würden, müssen Sie diese in Ihr eigenes Portfolio kopieren (oder in eine andere Gruppe). Seiten die nicht mit der Gruppe geteilt wurden, werden nicht gelöscht.
If you have portfolios submitted to a group, they will be released once the group is deleted and can be edited again.
6.4.2. Mitglieder
Main menu → Engage → Groups → [Name of the group] → Members
6.4.2.1. Mitgliederseite

Gruppenmitgliederseite ansehen, wie sie von einem Gruppenadministrator gesehen wird.
Auf der Gruppenmitgliederseite kann ein Gruppenadministrator:
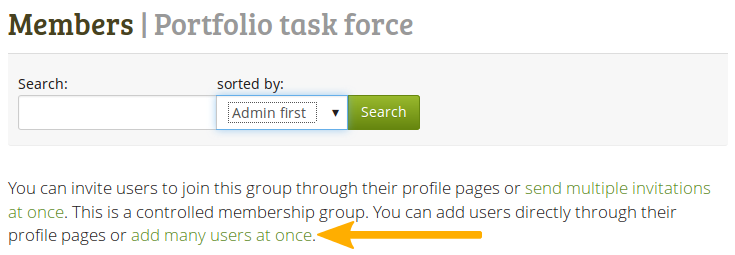
Search: Search for group members by entering their name.
Sorted by: Sort group members by selecting one of the following options:
Admin first: Display administrators first.
Bemerkung
Dies bedeutet, dass Nutzer nach ihrer Stellung angezeigt werden: Zuerst werden Administratoren angezeigt, dann Tutoren und zuletzt die Mitglieder.
Name A to Z: Sort everyone alphabetically from A to Z.
Name Z to A: Sort everyone alphabetically from Z to A.
First joined: Sort everyone chronologically starting with those who joined first.
Last joined: Sort everyone in reverse chronological order.
Click the Search button to perform your search.
Invite multiple users to the group at once.
Bemerkung
If you are in a controlled membership group, you can add multiple users in bulk and don’t have to wait until they accepted you invitation.
Grundinformationen über Gruppenmitglieder anzeigen:
ihren Namen
ihre Rolle
ihre Einführung im Profil
den Eintrittstermin in die Gruppe
Die Rolle eines Nutzers ändern.
Entfernen Sie einen Nutzer von einer Gruppe durch Anklicken des Aus Gruppe entfernen-Buttons.
Legen Sie fest wie viele Mitglieder auf einer Seite angezeigt werden sollen.
Bemerkung
Als reguläres Gruppenmitglied können Sie andere Nutzer nicht zur Gruppe einladen oder hinzufügen. Sie können auch nicht andere Rollen vergeben oder Nutzer aus der Gruppe ausschließen.
6.4.2.2. Change the role of a member
A group administrator can always change the role of an existing member. Depending on the group’s setting, there are up to three different roles possible:
Member
Tutor
Administrator
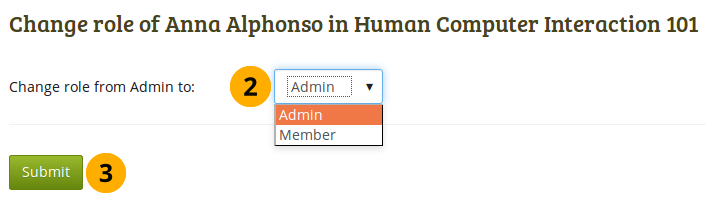
Change the role of a group member
On the Members page of the group, click the link Change role.
Choose the new role from the drop-down menu that the member shall have instead of their old role.
Click the Submit button to make the change.
6.4.2.3. Invite a new member
A group administrator can always invite any user to a group from the Members area of the group by clicking the link send multiple invitations at once. If the group administrator allowed users to invite friends, they can do so via the Invite friends button on the group homepage.
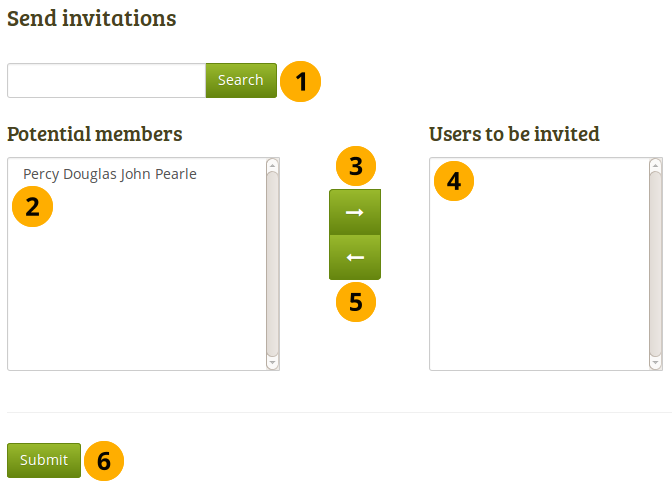
Laden Sie andere Nutzer zu einer Gruppe ein
Search: You can search for users in the search box if there are too many names listed. Then select the users you want to invite.
Mögliche Mitglieder: Wählen Sie die Nutzer/innen, die Sie in die Gruppe einladen wollen.
Als Gruppenadministrator sehen Sie alle Nutzer der Site.
Als reguläres Gruppenmitglied sehen Sie nur Ihre Kontakte.
Fügen Sie die Nutzer zur Liste Einzuladende Nutzer durch Anklicken des Pfeil nach rechts-Button hinzu.
Wenn Sie eine Person versehentlich in die Liste der eingeladenen Personen eingefügt haben, können Sie sie durch Anklicken des Namens wieder entfernen.
Klicken Sie auf den Pfeil nach links-Button , um sie von der Liste zu entfernen.
Wenn Sie alle Nutzer, die Sie einladen wollen, ausgewählt haben, klicken Sie auf den Absenden-Button.
Die eingeladenen Nutzer/innen erhalten eine Benachrichtigung. Die Gruppe wird bei diesen in der Übersicht Meine Gruppen angezeigt wo sie die Einladung annehmen oder abweisen können.
Bemerkung
Sie können einen Namen zweifach anklicken , um ihn von einer zur anderen Seite zu setzen.
6.4.2.4. Recommend a group to a friend
Falls der Gruppenadministrator die Empfehlung von Mitgliedschaften in der Gruppe erlaubt, unter erstellen und bearbeiten einer Gruppe, so können Mitglieder der Gruppe ihre Kontakte einladen. Sie klicken dazu auf den Button Kontakten empfehlen in der Gruppenseite.
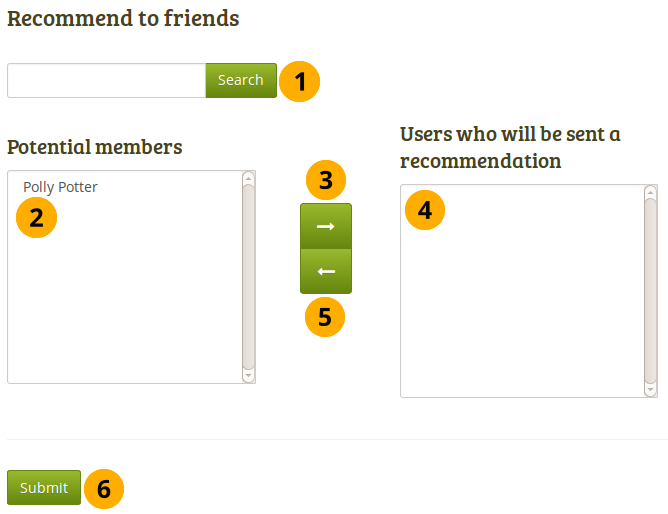
Empfehlen Sie Ihren Freunden eine Gruppe
Search: You can search for your friends in the search box if there are too many names listed.
Mögliche Mitglieder: Wählen Sie die Kontakte aus, denen Sie eine Empfehlung für diese Gruppe zusenden wollen.
Fügen Sie Nutzer zur Liste Nutzer, denen einen Einladung zugesandt wird durch Anklicken des Pfeil nach rechts-Buttons .
Wenn Sie eine/n Nutzer/in versehentlich hinzugefügt haben, können Sie sie durch Anklicken des Namens wieder entfernen.
Klicken Sie auf den Pfeil nach links-Button und er wird wieder von der Liste entfernt.
Wenn Sie alle Nutzer/innen, denen Sie eine Empfehlung zusenden wollen, ausgewählt haben, klicken Sie auf den Absenden-Button.
The users will receive a notification and can then decide to request membership for the group.
Bemerkung
Sie können einen Namen zweifach anklicken , um ihn von einer zur anderen Seite zu setzen.
6.4.3. Foren
Main menu → Engage → Groups → [Name of the group] → Forums
The forums are visible to all group members. If you create a public group, anybody online will be able to see the forum discussions. However, they would need to log in to participate. Forums in public groups receive an RSS feed to enable users to subscribe to the discussion forum, e.g. the mahara.org community forums.
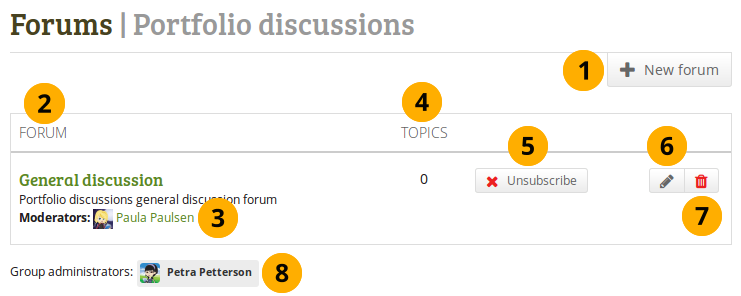
Übersicht der Gruppenforen
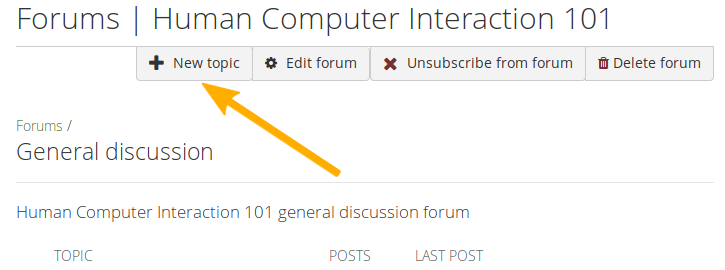
If you have appropriate rights, you can create a new forum by clicking the New forum button.
Forum: Name und kurze Beschreibung des Forums
Moderatoren: Die Forenmoderatoren anzeigen (wenn eingestellt).
Themen: Anzahl der Forenthemen in jedem Forum.
Wenn Sie Benachrichtigungen für jeden neuen Foreneintrag erhalten wollen, können Sie sich über den Einschreiben-Button als Abonnent eintragen. Wenn Sie aus dem Forum bereits Benachrichtigungen erhalten, können Sie sich über den Austragen-Button wieder aus der Liste entfernen.
Als Gruppenadministrator sehen Sie den Bearbeiten-Button , um Änderungen an den Foreneinstellungen vorzunehmen.
If you are a group administrator, you see the Delete button for deleting the forum and all of its topics.
Gruppenadministratoren: Die Gruppenadministratoren anzeigen
6.4.3.1. Ein neues Forum anlegen
Gruppenadministrator/innen können Foren in Gruppen anlegen.
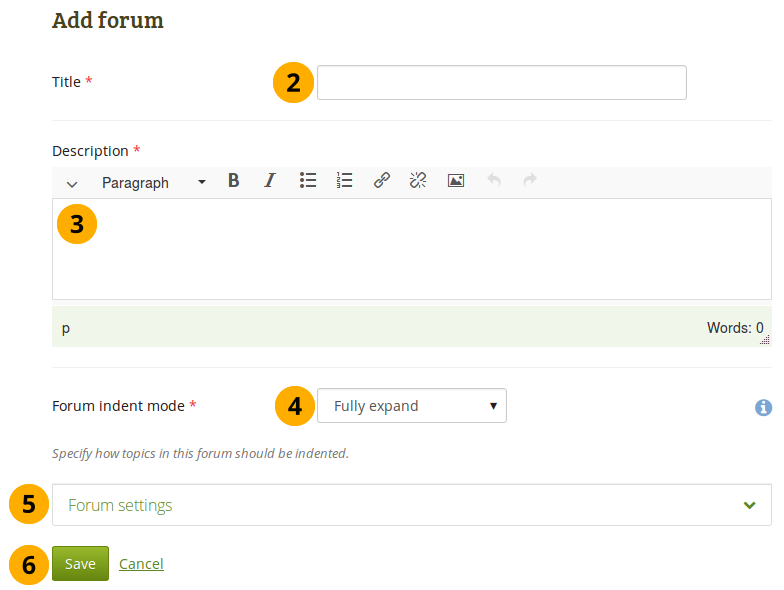
Fügen Sie ein Forum einer Gruppe zu
Klicken Sie auf den Neues Forum-Button, um ein neues Forum anzulegen.
Titel: Geben Sie dem Forum einen Titel.
Description: Write a brief description of your forum. This makes it easier for users to decide whether they want to look at its content or not.
Forenmodus: Legen Sie fest wie die Themen in dem Forum dargestellt (eingerückt) werden sollen.
Ganz aufklappen: Antworten werden leicht eingerückt. Damit wird schnell klar wer wem geantwortet hat. Die Zahl der Einrückungsebenen ist nicht begrenzt.
Expand to maximum: Indentation to indicate the replies to an individual post specifying the maximum level of indentation (pops up once this option is chosen). All replies beyond the chosen level are not indented further.
No indents: There is no indentation of replies to individual posts. The forum structure is flat and posts are listed one after the other without any indication of which one was replied to.
Forum settings: Choose advanced settings for your forum.
Click the Save button to add your forum or click Cancel to abort creating the forum.
In the Forum settings, the administrator can decide on additional settings for a forum.
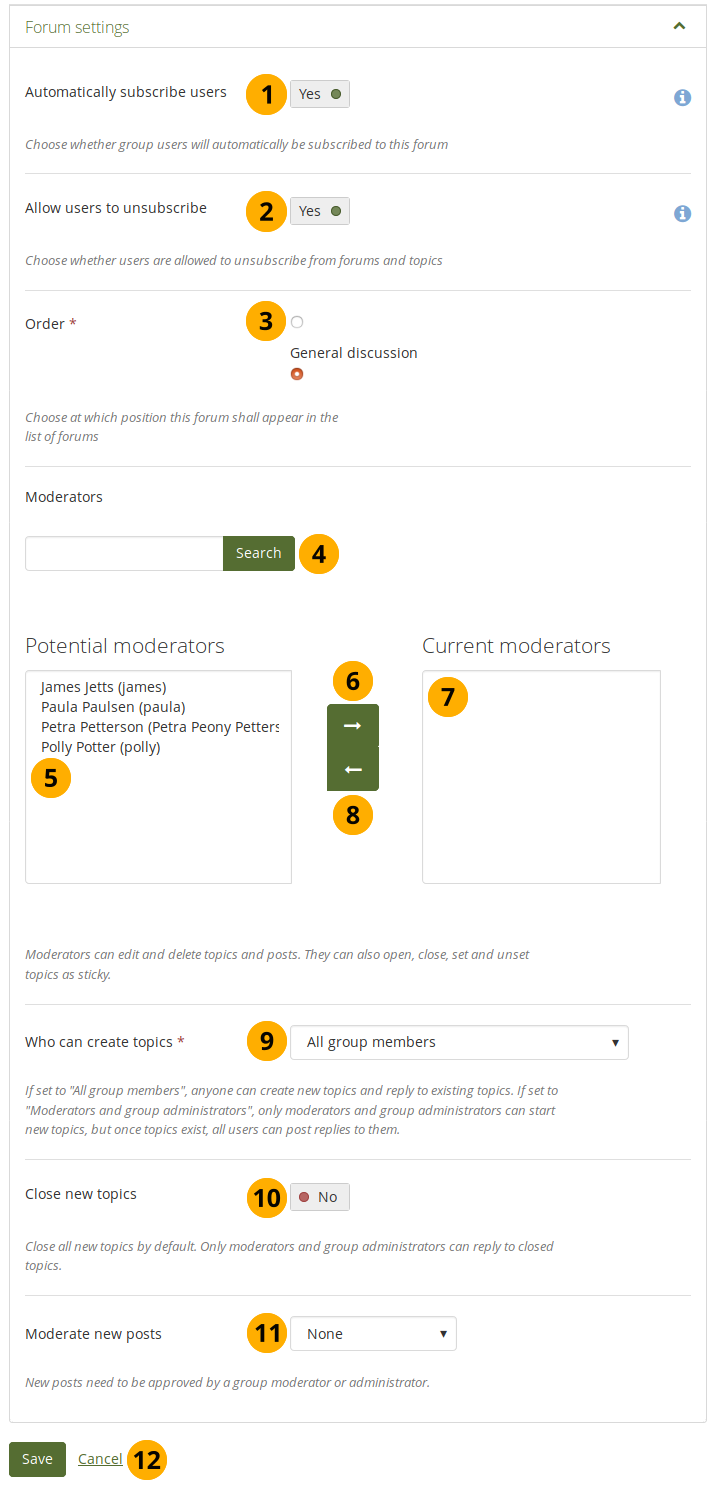
Wählen Sie weitere Einstellungen im Forum
Automatically subscribe users: Choose whether group members will be subscribed to this forum automatically. When subscribed, members will receive notifications when new posts and replies are made in the forum.
Allow users to unsubscribe: This option is only available to staff and institution and site administrators. You can decide whether group members are allowed to unsubscribe from forum notifications. The default option is „Yes“. Staff and administrators can select not to allow unsubscribing to ensure that group members receive important notifications. If the settings for the forum change, group members will be re-subscribed if they had previously unsubscribed from the forum.
Order: A default position for your forum is chosen upon its creation - after the last existing forum. You may position it elsewhere in the list of forums. Click the radio button above or below a certain forum to position it before or after it.
Moderators: Choose one or more moderators for your forum. They can edit and delete topics and posts as well as open, close, set and unset topics as sticky. Thus, they can perform some administrative functions without having to receive full group administrator rights. Enter the name of a group member in the search box if there are too many names listed and click the Search button to search for them. They are listed under Potential moderators.
Potential moderators: Select the member(s) who should become a forum moderator.
Add the users to the list Current moderators by clicking the right-arrow button .
If you put a person into the box by accident, you can remove them from that list by clicking on them.
Then click the left-arrow button , and they are removed.
Bemerkung
Alternatively, you can double-click the name of a person and they are moved to the other side.
Who can create topics: Decide who in your group is allowed to create topics within that forum. If set to „All group members“, any group member can create new topics and reply to existing topics. If set to „Moderators and group administrators“, only moderators and group administrators can start new topics, but once topics exist, all group members can post replies to them.
Close new topics: If switched to „Yes“, all new topics in this forum will be closed by default. Only moderators and group administrators can reply to closed topics. This is a setting that may be useful for a forum that is solely used for announcements.
Moderate new posts: Decide whether forum posts should be moderated, i.e. not made available to the group unless a group administrator or moderate has reviewed them. The options are:
None: No moderation. All forum posts are available directly.
Posts: Only original forum posts are moderated. Replies do not undergo moderation.
Replies: Only replies are moderated. Original posts are not put into a moderation queue.
Posts and replies: Both original posts and replies are moderated.
Click the Save button to save the settings for the forum or click Cancel to retain the previous settings.
6.4.3.2. Ein Forenthema hinzufügen
Wenn Sie die Berechtigung zum Anlegen neuer Forenthemen besitzen, sehen Sie den Button Neues Thema.
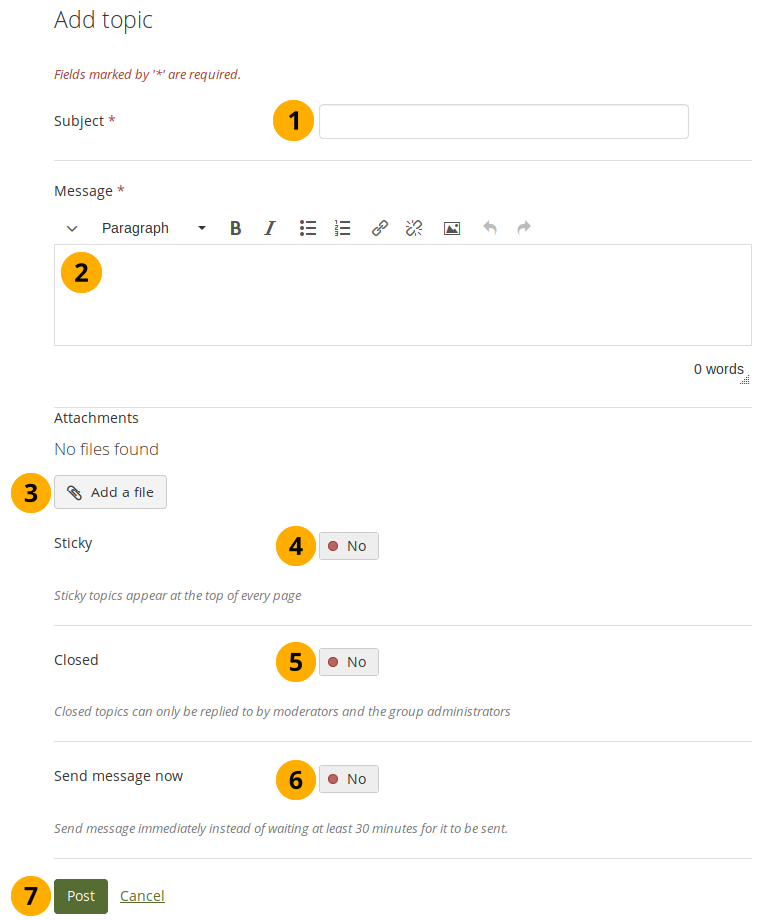
Fügen Sie ein neues Thema zu einem Forum hinzu
Bemerkung
Administrator/innen können jederzeit Änderungen an den Foreneinstellungen vornehmen. Dazu stehen die Buttons Forum bearbeiten und Forum löschen zur Verfügung.
Fügen Sie ein neues Forumsthema hinzu
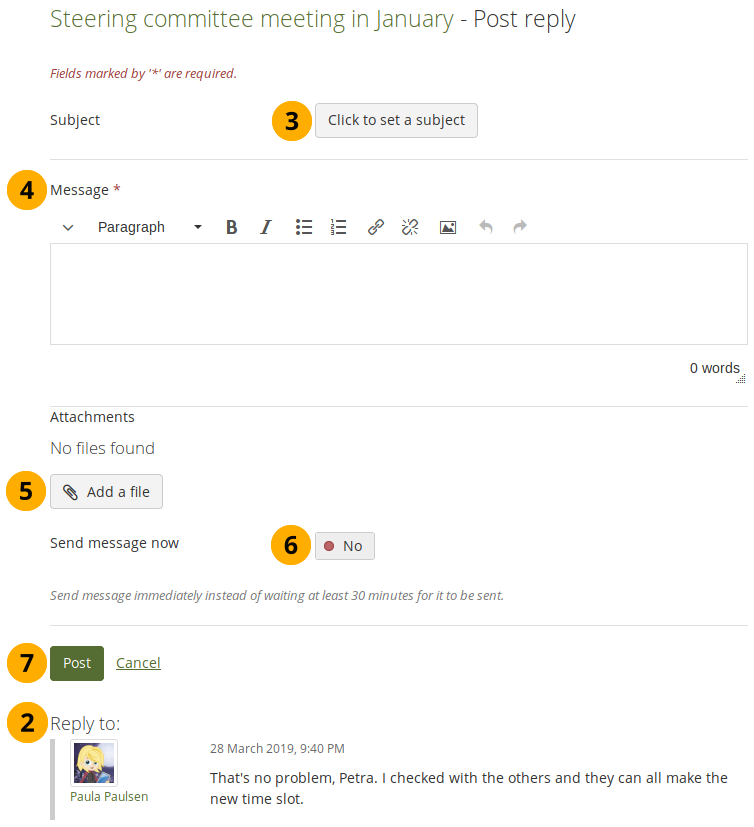
Betreff: Tragen Sie eine gut verständliche Beschreibung des Diskussionsgegenstandes für dieses Forum ein. Pflichtfeld.
Mitteilung: Tragen Sie hier Ihren Beitrag ein. Pflichtfeld.
Click the Add a file button to attach one or more files to your forum post. You can select from your personal files, group, institution, and site files as well as upload files. Depending on the group settings, you may only be able to upload files to your personal files area.
Sticky: Moderator and administrator-only setting to keep the topic at the top of the list of forum topics in the current forum.
Closed: Moderator and administrator-only setting to prevent others from responding to this post. Moderators and administrators can still post replies.
Send message now: If switched to „Yes“, the notification about your forum post is sent immediately instead of waiting for the forum post delay time to pass. You can still edit your message normally.
Klicken Sie auf den Beitrag absenden-Button, um den Diskussionsbeitrag zu veröffentlichen oder wählen Sie Abbrechen.
Bemerkung
When you write your forum topic, i.e. your first post, and any other subsequent post, you have formatting options available in the visual editor (when it is enabled). It also allows you to insert images into your post. Images you upload to your own Files area are displayed in forum posts for other people to see.
In some groups you may be able to upload files into the group. You could link it then in your forum post but must be aware that any group member could delete the image.
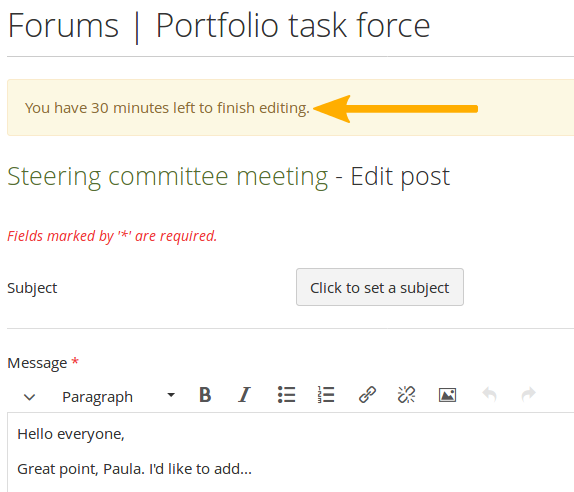
Nachdem Sie Ihren Forenbeitrag erstellt haben, wird er in der Liste der Forenthemen angezeigt. Alle anderen können ihn umgehend sehen. Administrator/innen und Moderator/innen können ihn jederzeit bearbeiten oder löschen. Reguläre Mitglieder können ihre eigenen Beiträge für eine begrenzte Zeit bearbeiten oder wieder löschen. Diese wird von der Site-Administration unter Forenbeitragsbearbeitungsdauer festgelegt.
Einträge in einem Thema im Forum
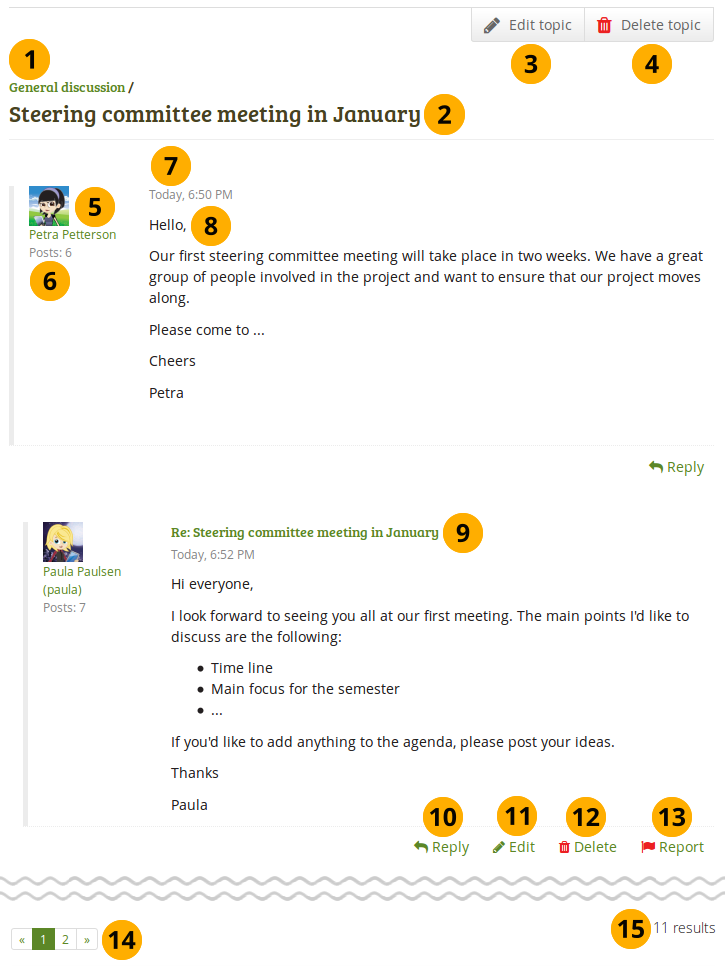
Der Titel des Forums.
Der Titel des Forenthemas
Die Person, die ein Forenthema begonnen hat und der Gruppenadministrator haben das Recht, den anfänglichen Beitrag zu überarbeiten. Dazu nutzen Sie den Thema bearbeiten-Button.
Group administrators and forum moderators can also click the Delete topic button to delete a forum topic.
Das Profilbild und der Name des Verfassers des Beitrags. Der Name ist mit der Profilseite verlinkt.
Die Anzahl der Beiträge dieses Nutzers in allen Gruppen.
Datum und Uhrzeit des Forenbeitrags
Der Beitrag selber
The titles of subsequent posts are clickable and give you the permanent link to this post. That allows you to jump to this post directly and view it at the top of the page.
Click the Reply link Reply to comment on the post.
If you are the author of a forum post, you see the Edit link Edit and can make changes to your post until the forum post delay has been reached. Group administrators and forum moderators can always edit and delete any forum post besides replying to it.
Click the Report link Report to report the post as containing objectionable content.
If you are a group administrator or forum moderator, you can delete a forum post by clicking the Delete link Delete.
Wenn Ihr Forenthema mehr als 10 Beiträge enthält, erfolgt eine Verteilung auf Unterseiten. Zehn Beiträge sind auf jeder Seite sichtbar. Klicken Sie auf die Seitenzählung, um weitere Beiträge zu lesen.
You see the total number of forum posts in this topic.
Bemerkung
Wenn Sie einen Beitrag verändern oder löschen wird keine Benachrichtigung versandt. Wenn andere davon erfahren sollen, erstellen Sie einen neuen Beitrag in dem Forum.
6.4.3.4. Einen Beitrag, ein Thema oder ein Forum löschen
A moderator or administrator can always edit a single forum post, a topic or an entire forum by clicking the Edit button. Only group administrators can delete a forum. Moderators can only delete forum posts and topics.
Warnung
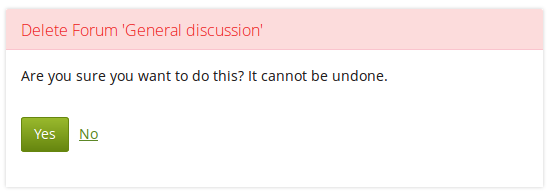
Wenn ein Forenbeitrag, ein Forenthema oder ein Forum gelöscht wurde, kann dieser Vorgang nicht rückgängig gemacht werden. Der Inhalt ist verloren.
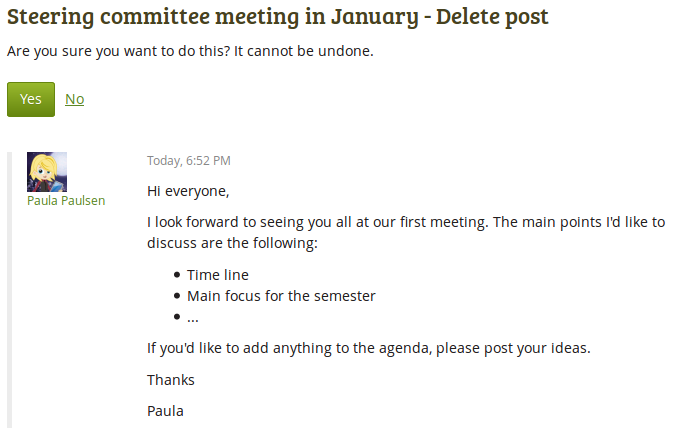
Delete a forum post
Before a forum post is deleted, moderators and administrators can see it again to ensure that they delete the correct post.
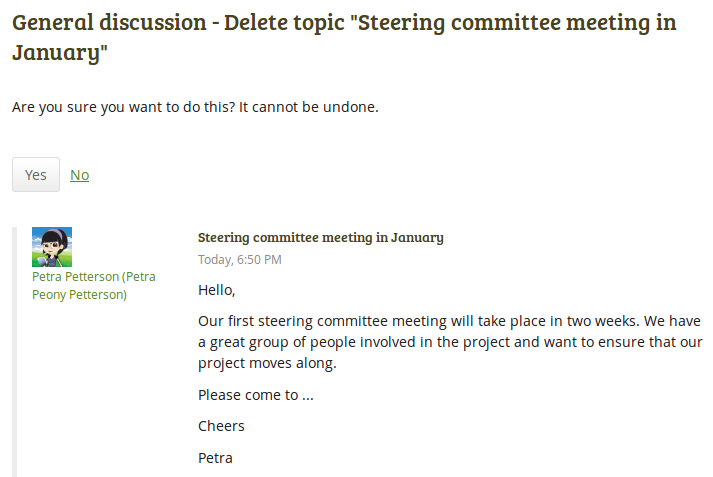
Delete a forum topic
Forum moderators and group administrators can delete an entire forum topic. Once they click the Delete button , the topic itself, but no replies, is displayed so they can double-check that they are deleting the right topic.
Delete an entire forum
Only group administrators can delete an entire forum.
6.4.3.5. Verwaltung für mehrere Forenaktivitäten
Gruppen- und Forenadministrator/innen können mehrere Aktionen auf einmal für Foren einer Gruppe ausführen.

Forumsfunktionen zur Mehrfachbearbietung für Administratoren und Moderatoren
Click the Edit forum button to make changes to the forum itself. This option is only available to group administrators.
Click the Delete forum button to delete the forum and all of its content permanently. This option is only available to group administrators.
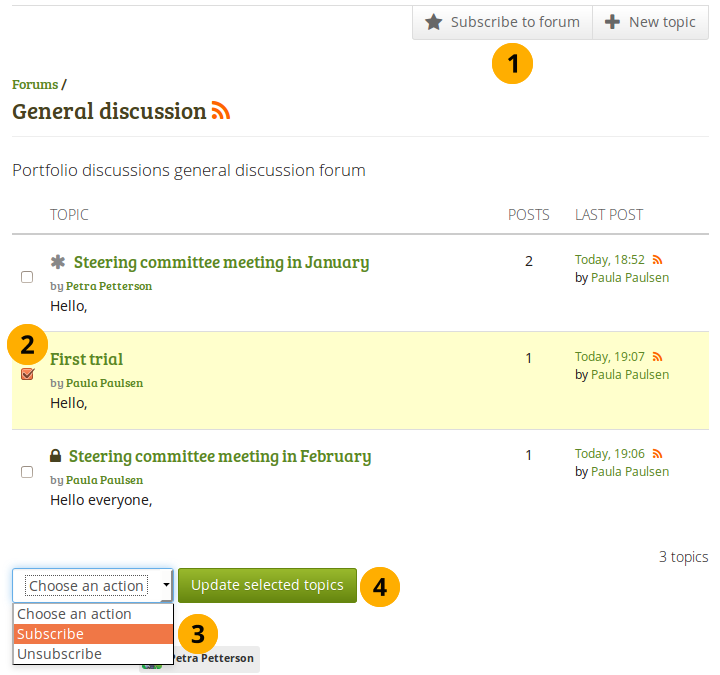
Sticky topics, marked with an Asterisk , are displayed at the top of the list of forum topics, no matter how old they are.
Wählen Sie Themen mit denen Sie die gleiche Aktion ausführen wollen.
Closed topics are marked with a Padlock . Only group administrators and forum moderators can post in them.
Im Drop-down-Menu finden Sie die ausführbaren Aktionen.
Festgeklebt: Diese Forenthema werden in der Liste der Themen oben angezeigt.
Loslösen: Das Thema wird wieder in der chronologischen Reihenfolge der Diskussionsthemen angezeigt.
Schliessen: Nur Gruppenadministratoren und Forumsmoderatoren können zu diesem Thema Beiträge verfassen.
Offen: Jeder kann zu diesem Thema Beiträge verfassen.
Move to: Move selected topics to another forum.
Bemerkung
If you are not subscribed to or unsubscribed from an entire forum, you find two more options in the drop-down menu to subscribe to and unsubscribe from individual forum topics.
Klicken Sie auf den Button Ausgewählte Elemente aktualisieren, um die Änderungen zu speichern.
6.4.3.6. Abonnieren Sie einzelne Themen im Forum
You can subscribe to individual forum topics if you do not wish to get updates for all forum topics. In order to subscribe to individual forum topics, follow the next steps.
Bemerkung
Die Möglichkeit einzelne Themen eines Forums zu abonnieren oder deren Abonnement abzubestellen ist in Community-Gruppen gut geeignet in denen sehr viele Themen in einem Forum diskutiert werden. Sie könenn dann gezielt die Themen abonnieren, die für Sie von Interesse sind.
Abonnieren Sie einzelne Themen im Forum
Prüfen Sie zunächst, ob Sie nicht für das gesamte Forum bereits abonniert sind. Falls Sie es nicht sind, sehen Sie den Button Forum abonnieren Klicken Sie andernfalls auf den Button Forum abbestellen. Sonst können Sie die folgenden Schritte nicht ausführen.
Bemerkung
If you see the Unsubscribe from forum button, you are subscribed to all forum topics.
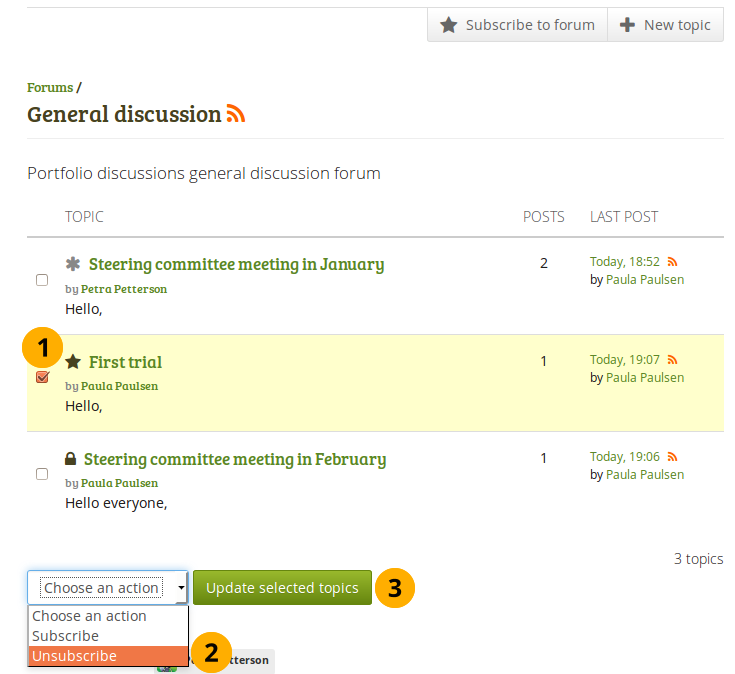
Tick the check box in front of the individual forum topic(s) to which you wish to subscribe.
Wählen Sie die Option Abonnieren aus dem Aktion wählen-Dropdown-Menu.
Klicken Sie auf den Button Ausgewählte Elemente aktualisieren, um die Änderungen zu speichern.
Die Forenthemen in die Sie nunmehr eingeschrieben sind erhalten das Eingeschrieben-Sternchen .
6.4.3.7. Bestellen Sie einzelne Themen im Forum ab
To complete the next steps, you will have to be subscribed to at least one forum topic. You can identify the subscribed topics easily because they have the Subscribed star icon next to their topic titles.
Bestellen Sie einzelne Themen im Forum ab
Wählen Sie den/die Forenthemen, aus denen Sie sich austragen wollen.
Wählen Sie die Optionen Austragen aus dem Dropdown-Menü Aktion wählen.
Klicken Sie auf den Gewählte Elemente aktualisieren-Button zum Speichern der Änderungen. Sie sind danach bei den gewählten Themen nicht mehr in der Abonnentenliste eingetragen.
6.4.3.8. View objectionable content on forum topics and posts
Gruppenmitglieder können Forenthemen und einzelne Foreneinträge als unangemessen melden. Wenn Sie ein ganzes Forum als unangemessen melden wollen, dann müssen Sie den ersten Eintrag in diesem Forum melden.
Report a forum post as objectionable
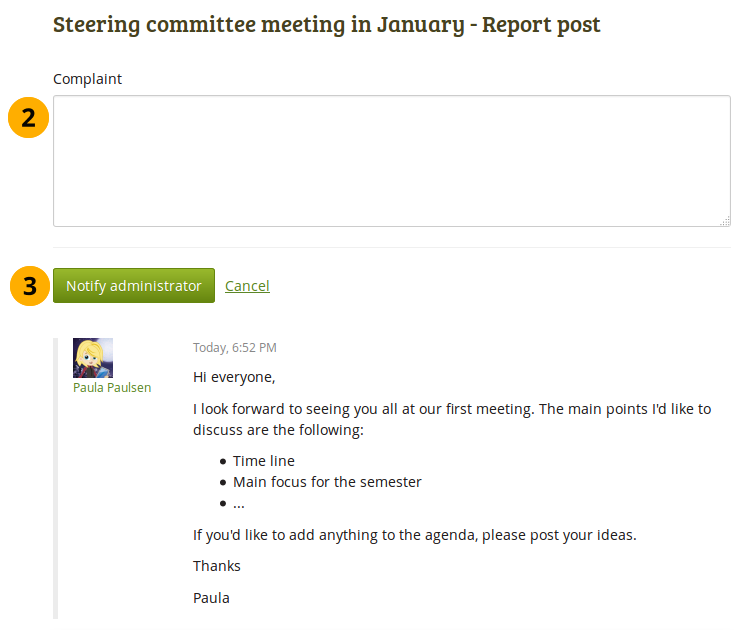
Click the Report link Report to report objectionable content on a forum post or topic. You see the post that you are reporting on the page.
Briefly write why you think the forum post does not comply with the terms and conditions of the site.
Click the Notify administrator button to send your report.
Group administrators, forum moderators, and site administrators receive a notification and can review the report.
Die Person, die den Inhalt eines Eintrags oder Themas im Forum als unangemessen meldet, sieht dies folgendermaßen:
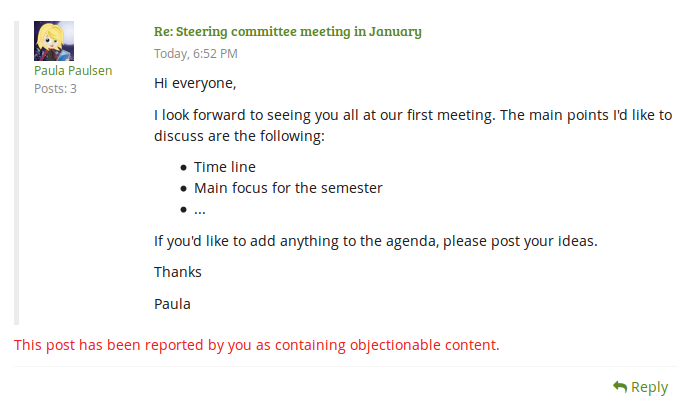
Was die Person sieht, die unangemessenen Inhalt gemeldet hat
Bemerkung
Andere normale Nutzer sehen nicht, dass ein Eintrag oder ein Thema im Forum als unangemessen gemeldet wurde.
Wenn sich ein Administrator oder ein Forum Moderator in einem Forum befindet, welches ein als unangemessen gemeldetes Thema oder Eintrag enthält, dann sehen diese das betreffende Thema hervorgehoben.
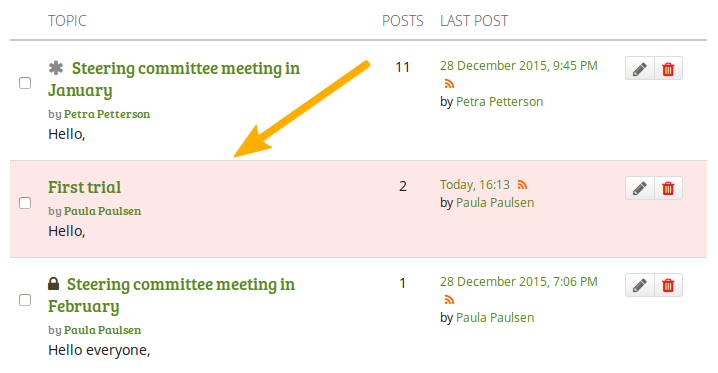
Ein Forumsthema das unangemessen Inhalt beinhaltet, wird in der Liste der Forenthemen rot hinterlegt.
Ein Administrator oder Forumsmoderator kann mehr Datails über ein betreffendes Thema oder einen Eintrag einsehen.
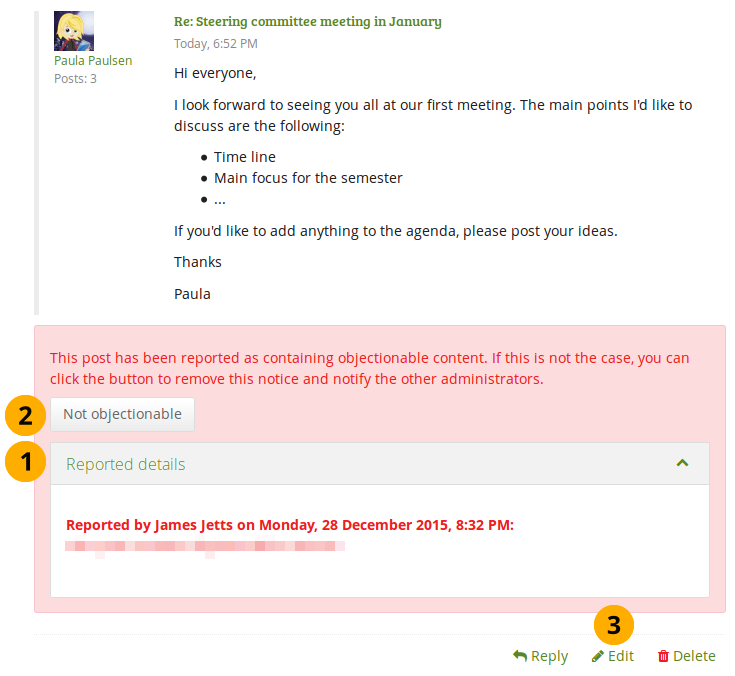
Ein Eintrag im Forum, der unangemessenen Inhalt enthält, wird hervorgehoben und beinhaltet zusätzliche Informationen
Click the Reported details drop-down to see the explanation why somebody reported this post as objectionable.
Klicken Sie auf den Nicht unangemessen Button, wenn Sie denken, dass dieser Eintrag keinen unangemessenen Inhalt aufweist. Den Gruppenadministratoren, den Forum Moderatoren und den Site Administratoren wird dann eine Benachrichtigung gesendet.
You can also edit the forum post if you want to remove part of it to make it nonobjectionable.
6.4.4. Pages and collections
Main menu → Engage → Groups → [Name of the group] → Pages and collections
Members of a group have access to certain portfolios. These can be:
pages and collections that are created in the group
pages and collections that are shared with the group
The latter are portfolios that users make accessible to the group from their personal portfolios by sharing them with the group. Members of the group cannot edit these portfolios.
Depending on the group settings, either only administrators (and tutors if it is a controlled group) or also regular group members can create and edit group portfolios.
Warnung
Everybody who can edit a group page can add or delete blocks on that page. There is no version tracking that shows who has edited what. Users should trust each other when collaborating on portfolios. Otherwise, it may be better if they only shared pages with a group.
6.4.4.1. Gruppenstartseite
Die Gruppenstartseite kann nur von Gruppenadministrator/innen bearbeitet werden. Sie enthält einige voreingestellte Blöcke. Sie können weitere Blöcke hinzufügen. Der Überblick über Blöcke zeigt Ihnen alle Blöcke, die Sie für eine Gruppenstartseite verwenden können.
6.4.4.2. Regular group pages and collections
Creating, editing and sharing a group portfolio is very similar to creating, editing and sharing a personal portfolio.
Not all blocks are available when editing a group page though due to the different context. Please refer to the overview of blocks for a list of all the blocks that you can use in a group page.
Wenn Sie einen Kommentar zu einer Gruppenansicht verfassen, können nur Gruppenadministratoren (und in kontrollierten Gruppen Tutoren) dieses Feedback wieder löschen.
Siehe auch
For submitting a portfolio to a group to receive instructor feedback, please refer to the feedback section.
Similarly to group homepages and personal portfolio pages, group portfolios can also have human-readable URLs if the site administrator activated clean URLs.
When you create or edit a group page, you can decide whether only the administrator shall have the right to edit the page with the Locked setting. With this setting you can allow the general editing of pages in the group, but still be able to lock down certain pages as administrator.
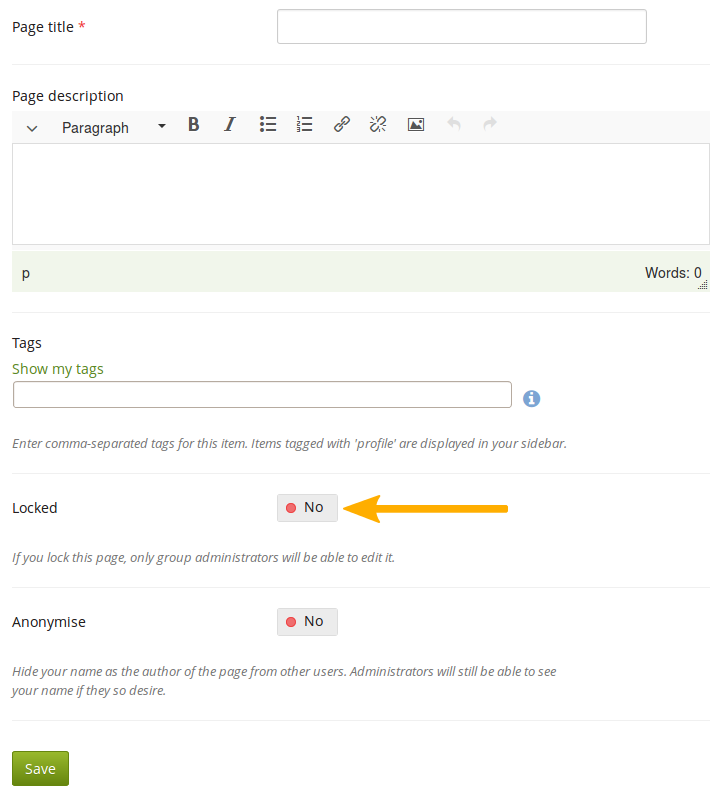
Sperren Sie eine Gruppenansicht für das alleinige Bearbeiten durch Administratoren.
When a group page is created, group members (except the page creator) receive a notification unless the group administrator switched the setting Shared page notifications to „No“ in the group settings.
6.4.5. Journals
Main menu → Engage → Groups → [Name of the group] → Journals
You create group journals like regular user journals.
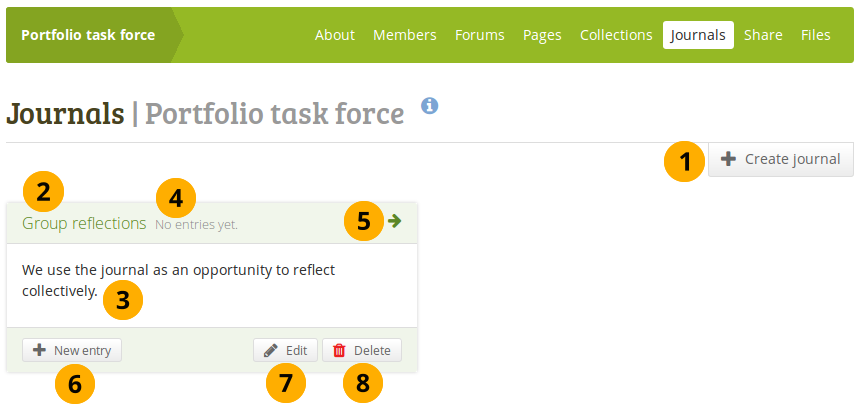
Group journals
You can create multiple journals. Click the Create journal button to set up a new journal.
Bemerkung
You can only create a journal if you have editing permissions in the group. If you can create and edit pages, you can add to journals.
All your journals are listed on Group → Name of the group → Journals with their titles. The titles link through to the individual journals.
You can see the description of the journal.
You see how many entries you have in each journal.
Click the Arrow icon to be taken to the journal and see all journal entries.
Click the New entry button to create a new journal entry directly from this screen.
Click the Edit button to make changes to your journal title, description or tags.
Click the Delete button to delete the journal and all its entries.
Warnung
When you click the Delete button, you receive a confirmation message whether you really want to delete the journal or not. If you used the journal or an entry of it in a page, Mahara lets you know so you can decide whether to delete the journal or not. Once you agree to delete the journal, your journal and all its content are removed permanently.
6.4.6. Freigeben
Main menu → Engage → Groups → [Name of the group] → Share
Wenn Sie Ansichten und Sammlungen in einer Gruppe bearbeiten dürfen, sehen Sie den Freigeben-Tab.
Siehe auch
The sharing of pages and collections works like in your personal porfolio. The group in which the page or collection was created is added automatically to the access permissions.
You can copy a group portfolio into the accounts of existing group members by setting the Copy for existing group members switch in the Advanced options. This is a good way to share templates with a wider group of people efficiently.
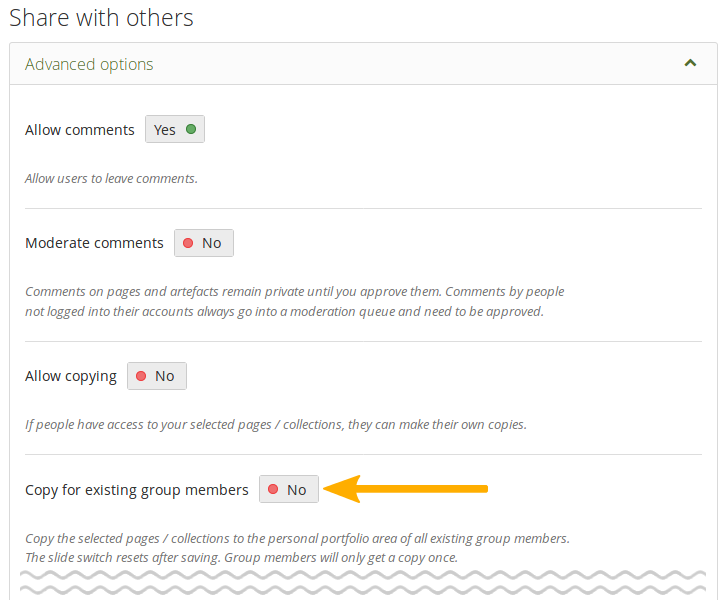
Copy a group portfolio automatically
Bemerkung
Only regular group members receive the copy of the portfolio. Group administrators and tutors do not get a copy.
The portfolio is copied only once. If changes are made to a page, they are not pushed to the copied page automatically. Also, when new members are added to the group and the template pushed automatically into their accounts, members who had already received the template will not get another copy.
6.4.7. Dateien
Main menu → Engage → Groups → [Name of the group] → Files
Der Datei-Bereich in einer Gruppe enthält alle Dateien, die von dazu berechtigten Gruppenmitgliedern hochgeladen wurden. Der Uploadprozess erfolgt in gleicher Weise wie bei den persönlichen Dateien.
Der Siteadministrator kann eine ein Gruppendateiablagequota festlegen um das Hochladen von Dateien zu begrenzen. Das Gruppenquota wird in der Dateiablage an der Seite angezeigt.
In contrast to the files in your personal files area, there are a couple of additional settings:
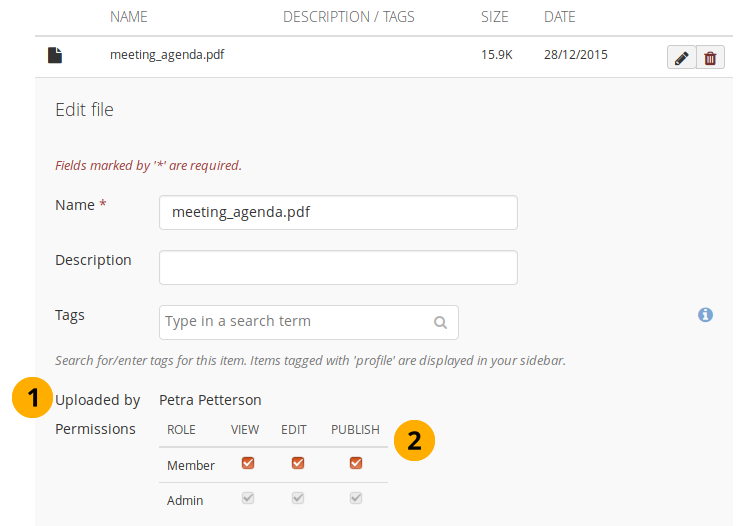
Berechtigungen für eine Gruppendatei einrichten
Uploaded by: You see the name of the person who uploaded a file to the group. That information is also displayed when you view the details page of the file in a portfolio.
Permissions: When you have the permission to upload a file, you can also determine additional permissions of who can view the file and edit its metadata. An administrator has all rights, but you can restrict them to regular group members or tutors.
Anzeigen: die Datei im Gruppendateibereich sehen und in Ansichten integrieren.
Bearbeiten: Sie können Dateinamen, Beschreibung, Schlagwörter und Berechtigungen bearbeiten.
Veröffentlichen: Gruppendateien in persönliche Portfolioansichten integrieren.
Bemerkung
The group owner and the group member uploading a file retain access to the file even if other group members are not able to use it.
6.4.8.  Plans
Main menu → Engage → Groups → [Name of the group] → Plans
You can set up a plan from scratch in a group or copy a template plan from your personal plans area.
You can set up two different types of plans:
Plans that can be completed in the group by group members. These are normal plans.
Assignment plans that learners complete in their personal portfolio area.
Bemerkung
If you want to set up an assignment plan, you need to set the „Create and edit“ permissions in the Group settings to „Everyone except ordinary members“ or „Group administrators“.
If you want to set a start and completion date automatically for each plan task, enter the editability dates in the Group settings.
6.4.8.1. Set up a plan
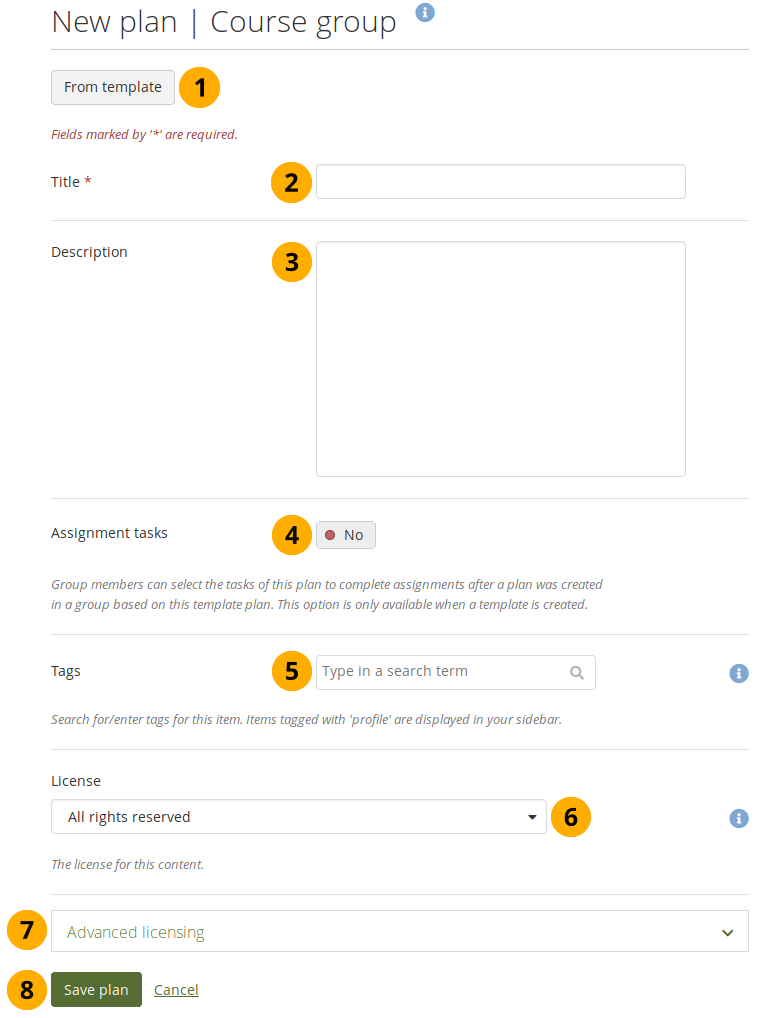
Set up a plan in a group
After having clicked the New plan button on the Plans overview page in a group…
Click the From template button if you want to copy one of the template plans from your personal area as new group plan. If you do, all tasks will be set up automatically and task pages as well as assignment portfolios copied into the group. You can still make any number of changes.
Bemerkung
When you select to create a plan from a template, a modal window opens where you can choose your template.
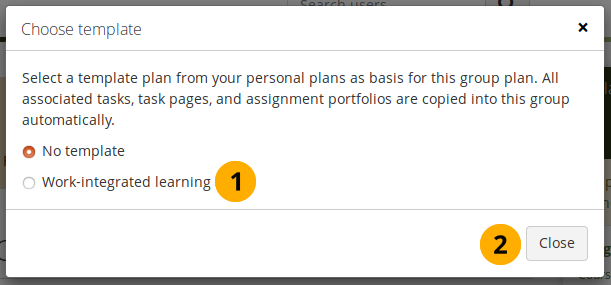
Select the plan template you want to use.
If you want to leave without selecting a template, click the Close button.
Title: Give your plan a title. This field is mandatory.
Description: Give your plan a description. It is visible when you select a plan for inclusion into a portfolio page and on the portfolio page itself.
Assignment tasks: Say „Yes“ for this option if you want learners to be able to choose certain plan tasks as activities and copy them into a plan in their personal portfolio area.
Tags: Add tags to your plan for easier searching later on.
License: You see this field if the site administrator turned on license metadata. Choose the license for the plan. You can set your default license in your account settings.
Advanced licensing: You see this option if the site administrator turned on license metadata. If you click it, you see two additional license fields, „Licensor“ and „Original URL“, that you can fill in if this in not your own plan.
Bemerkung
At the moment, you cannot display that license information on a portfolio page, but it is stored for future use when the functionality is expanded. You can view the license information on the artefact’s detail page though.
Click the Save plan button to keep your new plan. Click Cancel if you want to abort creating your plan or making changes to an existing plan.
6.4.8.2. View a plan
Bemerkung
If the plan is an assignment plan, it doesn’t show a column for the completion status.
Group administrators and tutors can edit assignment plans, but they cannot complete them.
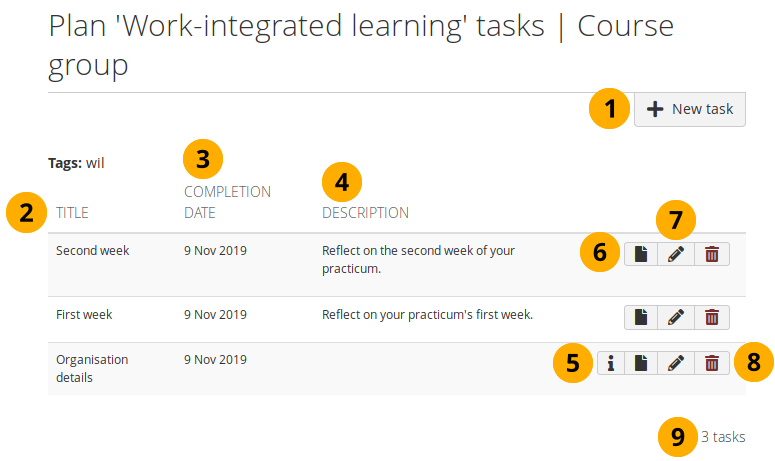
View plan tasks
Click the New task button to add a task to the plan.
Title: Shows the title of the task.
Completion date: The date when this task needs to be done.
Bemerkung
The start date and reminder time frame are not displayed.
Description: Additional information about the task.
Click the Task preview button next to a task to view the task page that is associated with this task if there is any.
Click the Open portfolio button next to a task to view the assignment portfolio that is associated with the task.
Click the Edit button to make changes to the task.
Click the Delete button to remove the task from this plan.
Bemerkung
Deleting the task does not delete the page in the group portfolio area.
The number of tasks in the plan is shown.
6.4.8.3. View an assignment plan as ordinary group member
Bemerkung
If the plan is an assignment plan, it doesn’t show a column for the completion status.
Ordinary group members can complete assignment plans, but they cannot edit them.
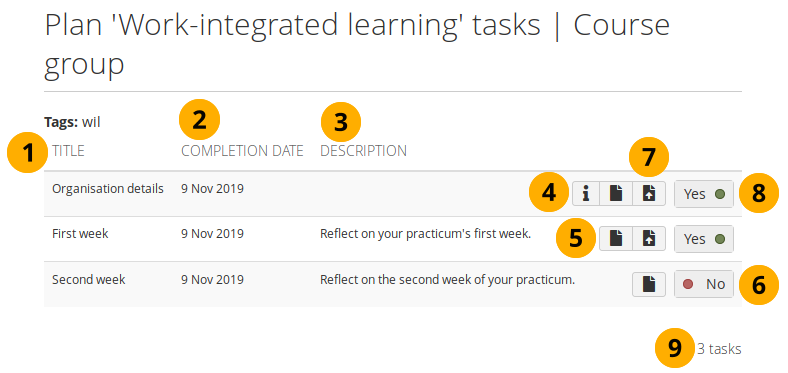
View plan tasks
Title: Shows the title of the task.
Completion date: The date when this task needs to be done.
Bemerkung
The start date and reminder time frame are not displayed.
Description: Additional information about the task.
Click the Task preview button next to a task to view the task page that is associated with this task if there is any.
Click the Open portfolio button next to a task to view the assignment portfolio that is associated with this task.
Click the No switch to add this task to your personal plan. It will turn into a Yes switch.
Bemerkung
When you click the switch, the assignment portfolio that is associated with the task (if there is any) is copied into your personal portfolio area.
The task page stays in the group, and you can access it by clicking the Task preview button in the plan in your personal area or here in the group plan area.
Click the Submit for assessment button to submit the assignment portfolio to the group.
Bemerkung
This button only becomes available when a task had been selected.
If you decide not to complete a task after all, you can click the Yes switch and turn it into No. The task is removed from your personal plan. If you have not yet edited the associated assignment portfolio, it will be deleted from your personal portfolio area.
The number of tasks in the group plan is shown.
Bemerkung
When you view the tasks in your personal plans area via Main menu → Create → Plans → [Name of the plan], you only see that tasks that you activated.
6.4.9. Bericht
Main menu → Engage → Groups → [Name of the group] → Report
Als Gruppenadministrator kommen Sie auf den Beteiligungsbericht in den Gruppeneinstellungen wechseln. Der Bericht versorgt Sie mit Informationen darüber wer in welcher Ansicht kommentiert hat, die in der Gruppe erstellt oder für diese freigegeben wurde.
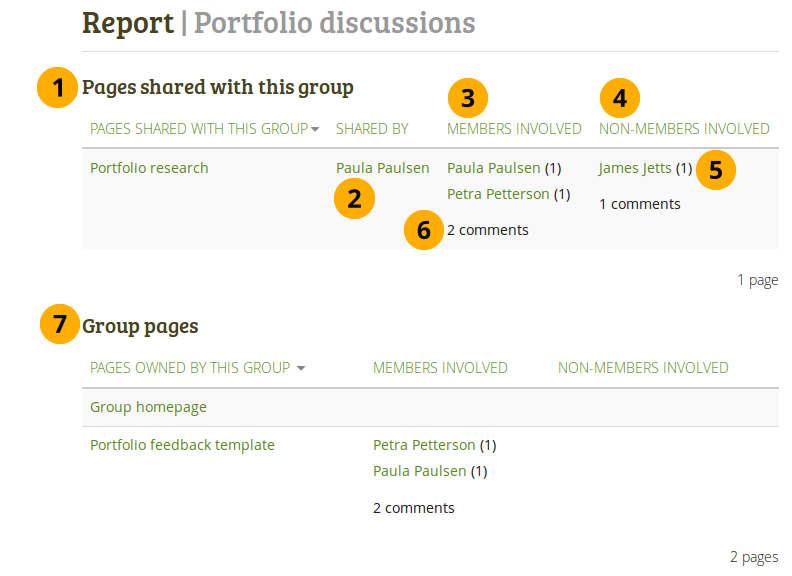
Teilnahmebericht für eine Gruppe
Ansichten, die für die Gruppe freigegeben wurden: Liste aller Ansichten, die für diese Gruppe freigegeben wurden.
Freigegeben durch: Zeigt den Autor einer Ansicht
Mitwirkende Mitglieder: Zeigt die Gruppenmitglieder, die auf den Ansichten öffentlich kommentiert haben.
Einbezogene Nicht-Mitglieder: Zeigt Nutzer, die in öffentlichen Ansichten kommentiert haben aber kein Gruppenmitglied sind.
Für jede Person, die zu einer Ansicht kommentiert hat, ist eine Zahl angegeben mit der Anzahl der Kommentare in diese Ansicht.
The total count for the comments by members and non-members separately is displayed.
Ansichten dieser Gruppe: Liste aller Ansichten, die von dieser Gruppe erstellt wurden.
Bemerkung
Sie können den Inhalt jeder Spalte sortieren lassen. Die Spalte die die Sortierfolge bestimmt wird mit einem aufwärts- oder abwärtsweisenden Dreieck gekennzeichnet.