11.5. Gruppen
Administration menu → Groups
Im Gruppen-Menü der Administration können Site Administratoren:
Add administrators to groups
Delete groups
Gruppenkategorien verwalten
Mehrere Gruppen auf einmal hinzufügen oder aktualisieren
Die Gruppenmitgliedschaft für mehrere Nutzer/innen aktivieren und aktualisieren
Im Gruppen-Menü der Administration können Institutions-Administratoren:
Mehrere Gruppen auf einmal hinzufügen oder aktualisieren
Die Gruppenmitgliedschaft für mehrere Nutzer/innen aktivieren und aktualisieren
11.5.1. Gruppen verwalten
Administration menu → Groups → Administer groups
Bemerkung
Gruppen verwalten ist nur für Site-Administratoren möglich.
Sie sehen eine Übersicht aller Gruppen der Site.
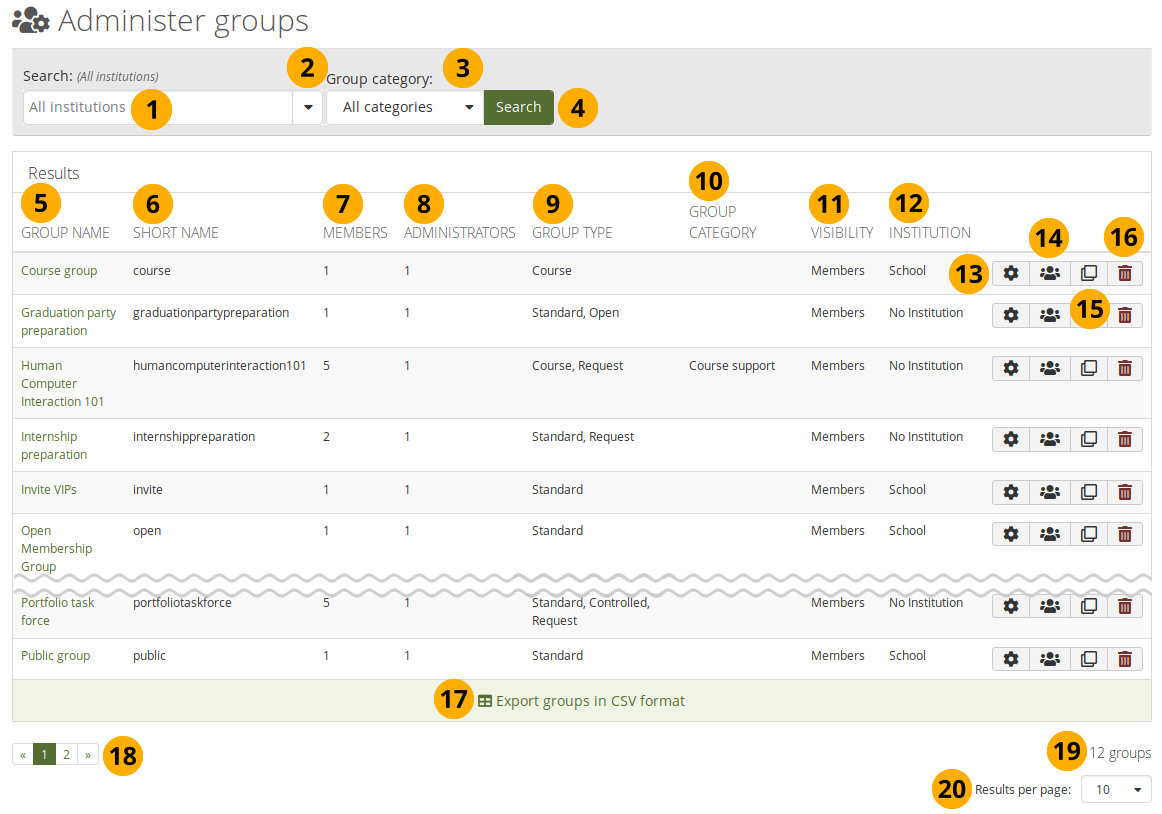
Gruppen verwalten
Search: Enter your search term, i.e. a part of the group name. The default text in the field shows you in which institution context you perform your search.
Use the drop-down arrow to choose a single institution in which to search for your group if there are multiple institutions set up on your site.
Select a group category to narrow down your search further if group categories are set up on your site.
Click the Search button to start your search.
Gruppennamen: Die Tabelle sortiert die Einträge alphabetisch nach dem Gruppennamen. Die Namen der Gruppen sind direkt mit den Startseiten der Gruppen verlinkt.
Short name: The group’s short name is displayed. Every group has a short name and can be managed via a CSV file in bulk.
Mitglieder: Anzahl der Gruppenmitglieder in jeder Gruppe.
Administratoren: Anzahl der Gruppenadministratoren pro Gruppe.
Group type: Overview of whether and how people can join this group.
Standard: Group consists of members and administrators.
Course: Group consists of members, tutors and administrators.
Open: Anybody can join the group without administrator approval.
Request: People can request to join the group. The administrator receives a notification.
Controlled: Group members cannot leave the group. Only the administrator can remove them. This is best suited for course groups.
Gruppenkategorien: Anzeige der Gruppenkategorie, die mit dieser Gruppe verknüpft ist.
Sichtbarkeit: Übersicht wer Zugriff auf diese Gruppe hat - Mitglieder oder öffentlich.
Institution: Show the institution to which the group belongs.
Klicken Sie auf den Verwalten-Button , um das Gruppendateikontingent zu ändern oder um Gruppenadministratoren hinzuzufügen oder zu entfernen.
Click the Export group membership in CSV format button to receive a CSV file with information about all members. You can use that file to make changes to the group membership and upload it again.
Click the Copy button to duplicate a group. The group’s files, journals, pages, collections and group settings are copied. Group membership and forums are not copied.
Klicken Sie auf den Löschen-Button, um eine Gruppe zu löschen.
Warnung
When you delete a group, all its content - forum posts, files and pages - will be deleted permanently and cannot be restored. Group members receive a notification about the deletion of the group.
Export groups in CSV format: Click this link to generate a CSV file with which you can change group settings in bulk.
Bemerkung
All groups shown on the page are exported rather than all groups so you can target which groups to export.
You can access groups from the search result list that are not displayed via the paginator.
The number of search results is displayed.
Results per page: Use the drop-down menu to change how many groups to display.
11.5.1.1. Gruppendateikontingent
Sie können ein Standarddateikontingent für Gruppen unter Plugins festlegen. Damit wird das Dateivolumen für jede Gruppe begrenzt. Hier können Sie das Dateikontingent für einzelne Gruppen anpassen.
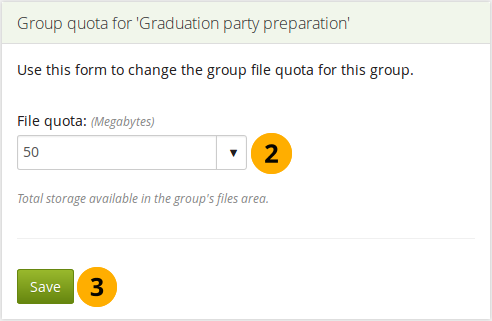
Gruppen-Dateivolumen ändern
Click the Manage button next to a group on the Administer groups page.
Dateikontingent: Ändern Sie das Dateikontingent extra für diese Gruppe.
Klicken Sie auf den Speichern-Button, um die Änderungen abzuspeichern
11.5.1.2. Hinzufügen oder Entfernen von Administrator/innen
Fügen Sie Administratoren zu einer Gruppe hinzu oder entfernen Sie sie durch Anklicken des Bearbeiten-Buttons neben der Gruppenbezeichnung auf der Seite Gruppen verwalten.
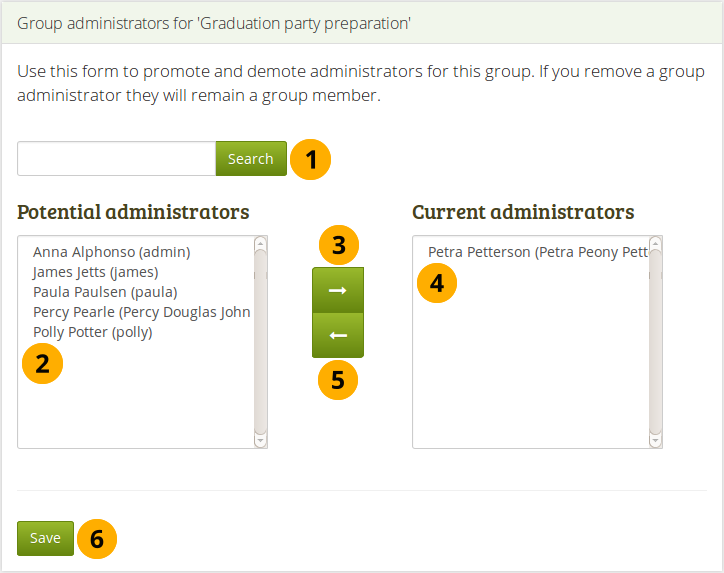
Gruppen-Administratoren hinzufügen oder entfernen
Search: If you have too many people on your site and you cannot see the ones you want, you can search for them here.
Potential administrators: Select the group members you wish to make group administrators. You can select multiple people at once using
CtrlandShiftclick.Klicken Sie auf den Rechtspfeil-Button , um die links ausgewählten Nutzer der rechten Übersicht (derzeitige Administratoren zuzuweisen.
Current administrators: If you want to remove an existing or accidentally added group administrator, you can remove them from the list on the right-hand side by clicking on their name.
Then click the left-arrow button , and the person is removed from the list.
When you have chosen all members you wish to make group administrators, click the Save button.
Bemerkung
Sie können einen Nutzer auch zweimalig anklicken, um ihn von einer Seite auf die andere zu schieben.
11.5.2. Gruppenkategorien
Administration menu → Groups → Group categories
Bemerkung
Gruppenkategorien sind nur für Site-Administratoren verfügbar.
Group categories help you filter your groups more easily on the My groups and Find groups pages. A group administrator can always assign one group category to a group if categories are enabled.
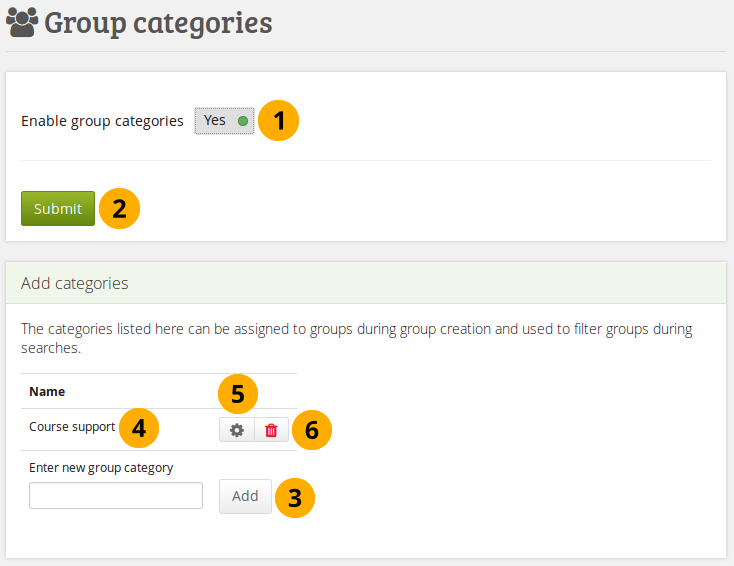
Gruppenkategorien verwalten
Enable group categories: Switch to ‚Yes‘ to enable group categories for the entire site.
Klicken Sie den Bestätigen-Button, um die Auswahl zu bestätigen.
Erstellen Sie eine neue Gruppenkategorie durch Eingabe des Namens und Anklicken des Hinzufügen-Buttons.
Name: Bestehende Gruppenkategorien werden aufgelistet.
Bearbeiten Sie eine Gruppenkategorie durch Anklicken des Bearbeiten-Buttons, ändern Sie den Namen und klicken Sie auf den Aktualisieren-Button. Mit Abbrechen brechen Sie den Vorgang ab.
Klicken Sie auf den Löschen-Button , um die Gruppenkategorie endgültig zu löschen.
Bemerkung
Group categories are not hierarchical and are available to everybody on the site. Everyone who can create groups can assign a group category when the feature has been enabled.
11.5.3.  Default group settings
Administration menu → Groups → Default group settings
Bemerkung
Default group settings is only accessible by site administrators.
You decide the default settings with which each new group is created. Group administrators can change these settings. The settings here do not affect existing groups.
Certain settings are only available to staff, institution administrators, or site administrators. They are not visible to group administrators who cannot set these settings and are ignored for such groups.
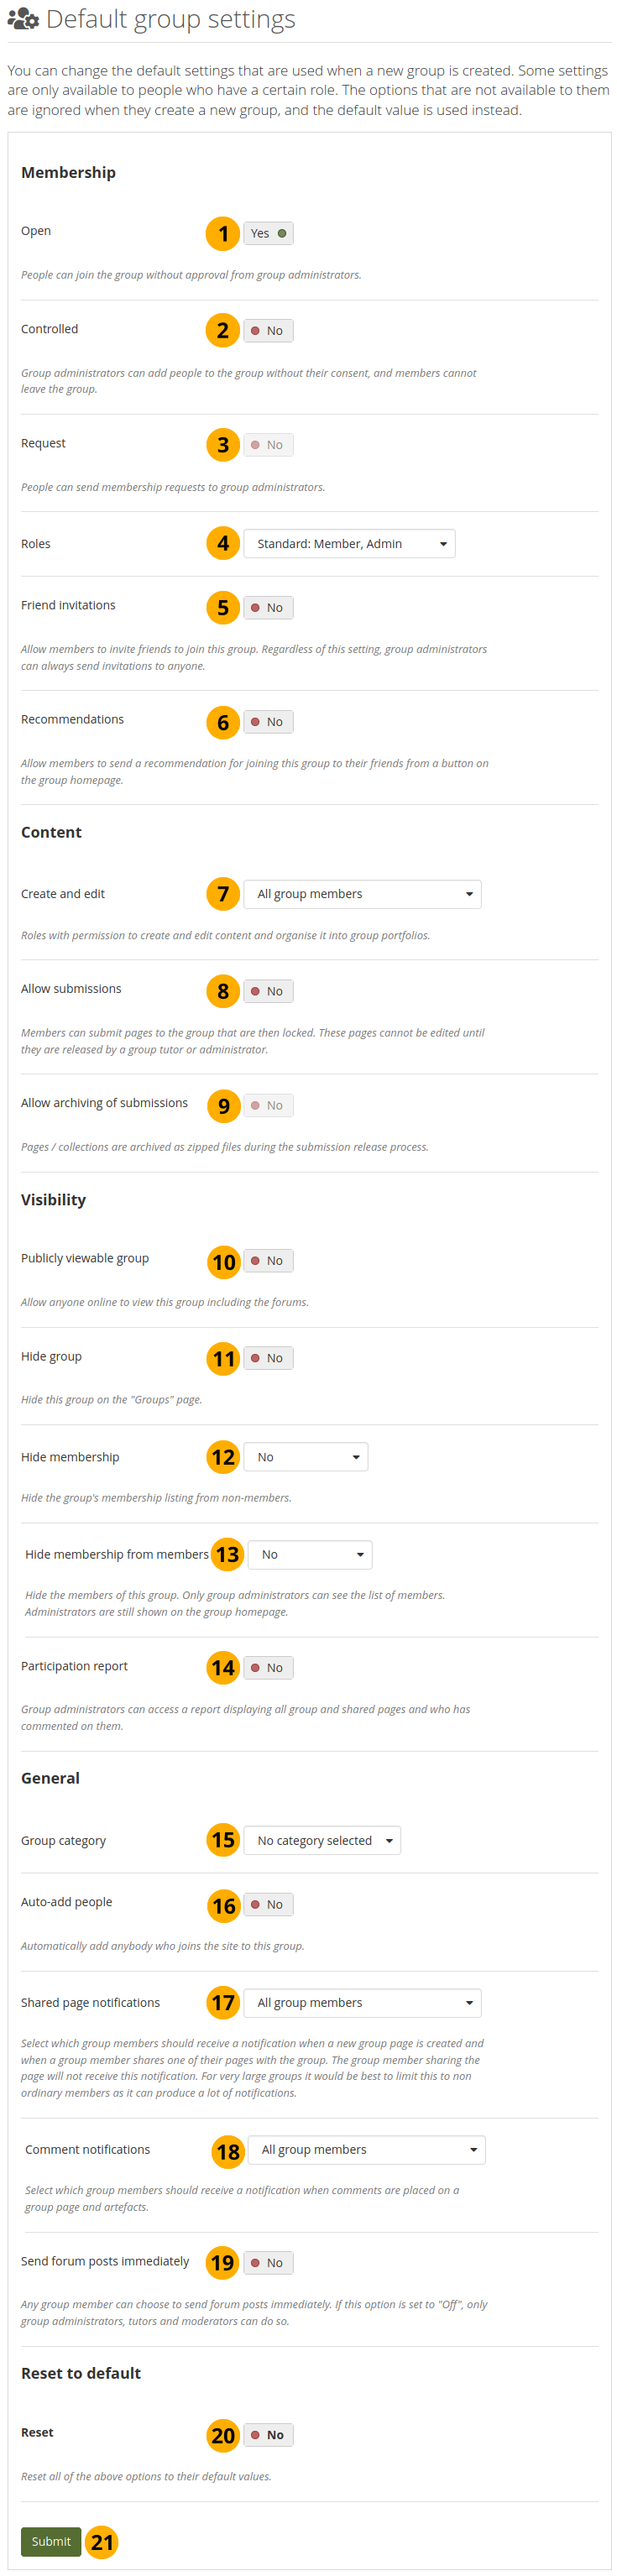
Decide on the default settings for new groups
Open: Switch this option to ‚Yes‘ if you want to create an open membership group. This allows people to join the group without approval from group administrators.
Controlled: Create a controlled group if you wish to add people who cannot leave the group. This is a useful setting for course groups where you do not want members to leave.
Request: Set this option to ‚Yes‘ if you wish to create a request membership group. People will have to send a membership request that requires group administrator approval.
Bemerkung
Open and request membership groups are mutually exclusive.
Roles: Choose whether you have only members and administrators or also tutors. The latter can provide feedback and release pages when page submissions are allowed, but they cannot change group settings.
Friend invitations: Switch to ‚Yes‘ if you want to allow group members to invite friends to join the group. Regardless of this setting, group administrators can always send invitations to anyone. If the friends accept, they will be added automatically to the group.
Recommendations: Set this option to ‚Yes‘ if you want to allow group members to send their friends a recommendation for joining this group from a button on the group homepage. If a request membership group has been recommended and the friends are interested in it, they would still need the approval of the group administrator to join.
Bemerkung
Friend invitations and recommendations are mutually exclusive options.
Create and edit: Decide who shall be able to create and edit content in the group:
All group members
Everyone except ordinary members, i.e. group administrators and tutors depending on the group type
Group administrators only
Allow submissions: Use this option to allow group members to submit pages or collections for feedback or assessment. These pages and collections as well as a number of content items in them are locked until released by a group administrator or tutor.
Allow archiving of submissions: Use this option when you want to archive pages or collections that have been submitted to this group. The archive will be made on the server. Administrators can download the archived submissions and vital information about them.
Bemerkung
The archive is made at the point of the release of a portfolio.
Publicly viewable group: Set this option to ‚Yes‘ if everybody shall have access to content of this group. You only see this setting if the site administrator allowed you to have it. Anybody online can see the group homepage and the discussion forum(s). Depending on the membership visibility, they may also see group members. Only members of the group can see the group’s pages, unless they have been made public, and the files area.
Hide group: Switch this option to ‚Yes‘ if you do not want to list this group on the Groups page.
Hide membership: You can hide members of the group from non-members. Decide whether to hide:
nobody
all group members (except administrators)
group tutors only
Hide membership from members: Decide whether to hide the group members to people in the group. Only group administrators can see the members listed. Administrators are still shown on the group homepage. You can hide:
nobody
all group members (except administrators)
group tutors only
Bemerkung
If people have the My groups block on their profile page, their group memberships are still listed there. The hiding of the membership and / or group only refers to the Groups page.
Participation report: Switch this option to ‚Yes‘ if group administrators shall view a report displaying all group portfolios and those that have been shared with the group and see who commented on them.
Group category: Choose a category if you want to associate the groups with one, allowing you to filter groups on the Groups page more easily. This setting is only available if the site administrator turned it on.
Auto-add people: When you switch this setting to ‚Yes‘, new account holders to the site are added to groups automatically.
Bemerkung
Be careful with this setting because it means that everybody joins all the groups created when a site administrator sets up a group.
Shared page notifications: Select from the drop-down menu who shall be notified when new group portfolios are created and when group members share their portfolios with the group. The options in the drop-down menu are:
All group members
Everyone except ordinary members, i.e. group administrators and tutors depending on the group type
Group administrators only
Comment notifications: Select from the drop-down menu who shall be notified when feedback is placed on a page or artefacts.
All group members
Everyone except ordinary members, i.e. group administrators and tutors depending on the group type
Group administrators only
Send forum posts immediately: If allowed, any group member can send a forum post immediately, without needing to wait for the forum post delay time. If not allowed, then only group administrators, tutors, and moderators can do so.
Reset: Switch to ‚Yes‘ if you wish to reset all changes you made to the default settings.
Click the Submit button to save the changes.
11.5.4. Archivierte Einreichungen
Administration menu → Groups → Archived submissions
Wenn Gruppenadministratoren oder Tutoren Portfolios in Gruppen verwalten, die archiviert werden können, können die Einreichungen hier leicht downgeloadet werden. Sie werden auf dem Server an einem zentralen Ort abgelegt. Mit Serverzugriff können sie auch dort direkt heruntergeladen werden.
Siehe auch
This feature requires that cron runs.
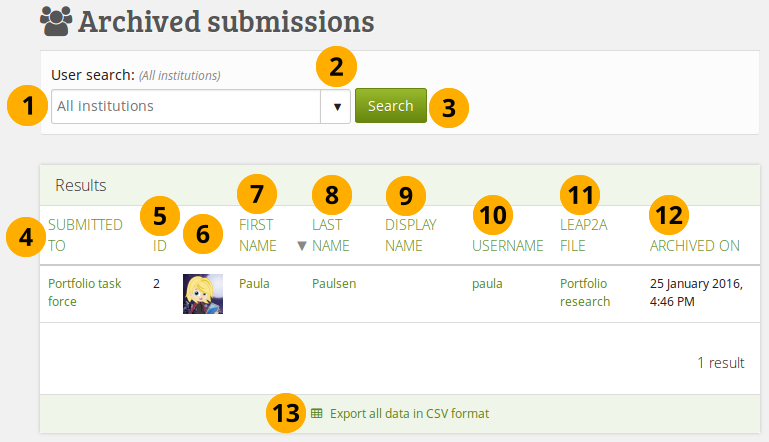
Archivierte Einreichungen durchsehen
Search: Enter your search term. The default text in the field shows you in which institution context you perform your search. Type the name, display name, username or email address or any partial thereof you wish to search for in the search field. If you turned on the exact search, you need to provide the correct name or email address and not a partial one.
Use the drop-down arrow to choose a single institution in which to search for your group member.
Click the Search button to start your search.
Eingereicht in: Die Spalte zeigt die Gruppe in der eine Ansicht oder Sammlung eingereicht wurde. Sie können auf den Gruppennamen klicken, um sie direkt aufzurufen. Wenn die Gruppe gelöscht wurde, ist die Einreichung weiter verfügbar, der Gruppenname wird dann jedoch nicht mehr verlinkt. Statt dessen wird das Löschdatum angezeigt.
ID: Die ID der Archivdatei auf dem Server für ein einfaches Wiederfinden der Datei beim Download der Daten als CSV-Datei.
The profile picture of the person is displayed.
First name: Displays the first name of the person. This is the default column for sorting results.
Bemerkung
Die anderen Bezeichnungen im Kopf der Spalte sind Links und ermöglichen die Tabelle anders zu sortieren.
Last name: Displays the last name of the person.
Display name: Shows the display name of the person.
Username: Clicking on the username, you are taken to the person’s administration settings page instead of their profile page as you would with the other names.
Leap2A-Datei: Kurzbeschreibung was in der Datei archiviert wurde.
Archiviert am: Datum und Uhrzeit zu der die Archivierung erfolgte.
Klicken Sie auf den Export aller Daten im CSV-Format-Link zum Download der archivierten Einreichungen. Die CSV-Datei enthält folgende Informationen:
Benutzername
Vorname
Nachname
Anzeigename
E-Mail Adresse
Namen der Gruppe in der die Einreichung erfolgte
KENNUNG
Titel des eingereichten Portfolios
Pfad auf Platte zum Speichern des Archivs
Bemerkung
All submissions are stored in the ‚submission‘ folder in your Mahara data directory on the server. Then, each account has a subdirectory and therein are all submissions of this account holder.
Dateiname
Zeit der Erstellung des Archivs
11.5.5. Neue Gruppen mittels CSV hinzufügen und aktualisieren
Administration menu → Groups → Add groups by CSV
Bemerkung
Site- und Institutionsadministratoren können Gruppen über eine CSV-Datei hinzufügen und aktualisieren.
Sie können mehrere Gruppen auf einmal erstellen indem Sie sie mit einer CSV-Datei mit den wichtigsten Informationen hochladen.
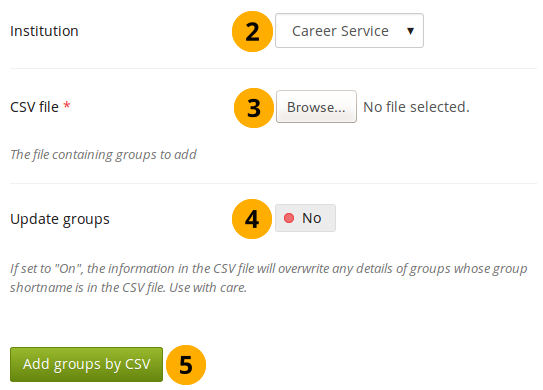
Neue Gruppen mittels CSV hinzufügen und aktualisieren
Erstellen Sie eine CSV-Datei. Sie muss zumindest folgende Felder enthalten:
shortname,displayname,roles.Bemerkung
Mahara also accepts CSV files that have a semicolon as separator instead of a comma.
Institution: Wählen Sie die Institution in der Sie die Gruppen erstellen wollen. Dies ist nur für interne Verwaltungsfunktionen, damit keine unbeabsichtigte Überschreibung erfolgt.
CSV-Datei: Wählen Sie die CSV-Datei von Ihrem Computer, die die Gruppen enthält.
Update groups: Switch to ‚Yes‘ if you are updating already existing groups.
Bemerkung
If you do not have your CSV file anymore, you can download it from the Administer groups screen, make the necessary changes and upload it.
Klicken Sie auf den Gruppen per CSV hinzufügen-Button, um die Änderungen vorzunehmen.
Bemerkung
For fields that require a Yes / No value, you need to put a numeric value into the CSV file:
0 = No
1 = Yes
Dies ist eine vollständige Liste der Felder, die Sie festlegen können:
allowarchives: Decide whether you want to allow portfolios that have been submitted to the group to be archived automatically.
Bemerkung
Die Option erfordert die Aktivierung der Option Ansichten einreichen.
category: Add a group to an existing group category. Put the title of the group category in this field.
Bemerkung
A site administrator can add group categories at Administration menu → Groups → Group categories → Add categories.
controlled: Group administrators can add people to the group without their consent, and members cannot leave the group.
description: Brief description about the purpose of this group.
displayname: The group name that appears around the site.
editroles: You can choose which roles will be allowed to create and edit content owned by the group. If your group contains only members and administrators, then ‚Group administrators‘ and ‚Everyone except members‘ are identical. These edit permissions will also be used by default for new group files. Permissions can be changed on individual files in the group files area.
Alle: jede/r in der Gruppe
Nichtmitglieder: jeder außer Mitgliedern in einer Gruppe mit Tutoren und Administratoren
Admin: nur Gruppenadministratoren
hidden: Choose to not list this group on the Find groups page.
hidemembers: Choose to hide group members from non-members.
hidemembersfrommembers: Choose to hide group members from everybody but the group administrator.
invitefriends: Choose to allow group members to invite their friends to the group.
open: Allow people to join the group without approval from the group administrator.
public: Allow people who are not logged in to view this group including the forums.
quota: Define the group file quota.
request: Allow people to send membership requests to group administrators.
roles: Choose to have a course or standard group. The roles in these group types are:
Kurs: Mitglied, Tutor, Administrator
Standard: Mitglied, Administrator
shortname: This is the name used to identify this group in the database. It is also used to identify the group when you add or update its members by CSV.
Bemerkung
The group shortname needs to be lowercase.
submitpages: Choose to allow the submission of pages and collections to this group. If you create a course group, this setting is automatically chosen.
suggestfriends: Allow group members to send their friends a recommendation to join this group.
usersautoadded: Choose to have all new account holders on the site added to the group automatically.
viewnotify: Choose who shall receive a notification when a new group page is created or a group member shares a portfolio. The options are:
0 = None
1 = All group members
2 = Everyone except ordinary members
3 = Group administrators

Beispiel-CSV-Datei für einen Gruppenupload
Wenn Sie Ihre CSV-Datei in einem Texteditor (nicht in einer Tabellenkalkulation) öffnen, sollte es so wie in diesem Beispiel aussehen:
"shortname","displayname","roles","usersautoadded","public","hidemembersfrommembers""public","Public group","standard",0,1,1"course","Course group","course",1,0,011.5.6. Aktualisiere Gruppenmitglieder mit CSV
Administration menu → Groups → Update group members by CSV
Bemerkung
Site- und Institutions-Administratoren können Gruppenmitglieder via CSV-Datei hinzufügen und aktualiseren.
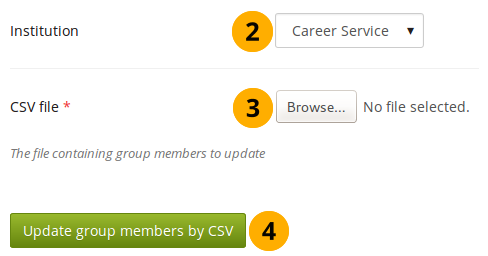
Aktualisiere Gruppenmitglieder mit CSV
Create a CSV file that contains the following fields:
shortname,username,rolein the first row. The short name is the group short name that you used to set up the group. Add the people that should become members of these groups. You can check their usernames on the People search page.Bemerkung
Wenn Sie viele Gruppen haben und vielleicht den Überblick verlieren, erzeugen Sie pro Gruppe eine CSV-Datei.
You can export the current group membership from the Administer groups screen and remove the fields that you do not need for the upload. The extra fields were added to give more context.
Institution: Wählen Sie die Institution in der die Gruppen erstellt werden sollen.
Bemerkung
You can only update group membership by CSV of people who belong to the institution in which you created the groups by CSV. All others must be added manually.
CSV-Datei: Wählen Sie die CSV-Datei auf Ihrem Computer, die die Gruppenmitglieder und ihre Zuordnung zu Gruppen enthält.
Klicken Sie auf den Gruppenmitglieder per CSV aktualisieren Button, um Mitglieder den ausgewählten Gruppen hinzuzufügen oder sie wieder zu entfernen.
Warnung
If you manually added people to a group whose members you want to update via CSV file, they will be removed from that group when you update the group membership and do not have them listed in the CSV file. Thus, be careful once you have added group members manually.
Es muß immer zumindest ein Administrator in der Gruppe verbleiben.
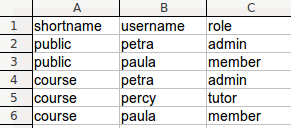
Beispiel-CSV-Datei für eine Aktualisierung der Gruppenmitgliedschaft
Wenn Sie Ihre CSV-Datei in einem Texteditor (nicht in einer Tabellenkalkulation) öffnen, sollte es so wie in diesem Beispiel aussehen:
"shortname","username","role""public","petra","admin""public","paula","member""course","petra","admin""course","percy","tutor""course","paula","member"Bemerkung
Mahara also accepts CSV files that have a semicolon as separator instead of a comma.