11.3. Site-Konfiguration
Administration menu → Configure site
Bemerkung
Konfiguration steht nur Site-Administratoren zur Verfügung.
In der Systemkonfiguration können Sie:
allgemeingültige Parameter für Ihr Mahara-System setzen
Ansichten der Site bearbeiten
die Darstellung bestimmter Menüwerte festlegen
ermöglicht die Verbindung von Moodle und Mahara
erstellen und freigeben von Ansichten und Sammlungen
Site-Dateien hochladen
11.3.1. Siteoptionen
Administration menu → Configure site → Site options
Siehe auch
The order of the site options and their categorisation changed in Mahara 20.04.
Unter Site-Optionen werden globale Festlegungen für die gesamte Site vorgenommen.
Bemerkung
Einzelne Felder können deaktiviert sein wenn Sie durch Einstellungen in der Datei config.php überschrieben werden.
Wenn Sie Ihre Einstellungen auf einer Seite vorgenommen haben, klicken Sie zum Speichern auf den Aktualisieren/Speichern-Button unten auf der Seite.
11.3.1.1. Site-Einstellungen
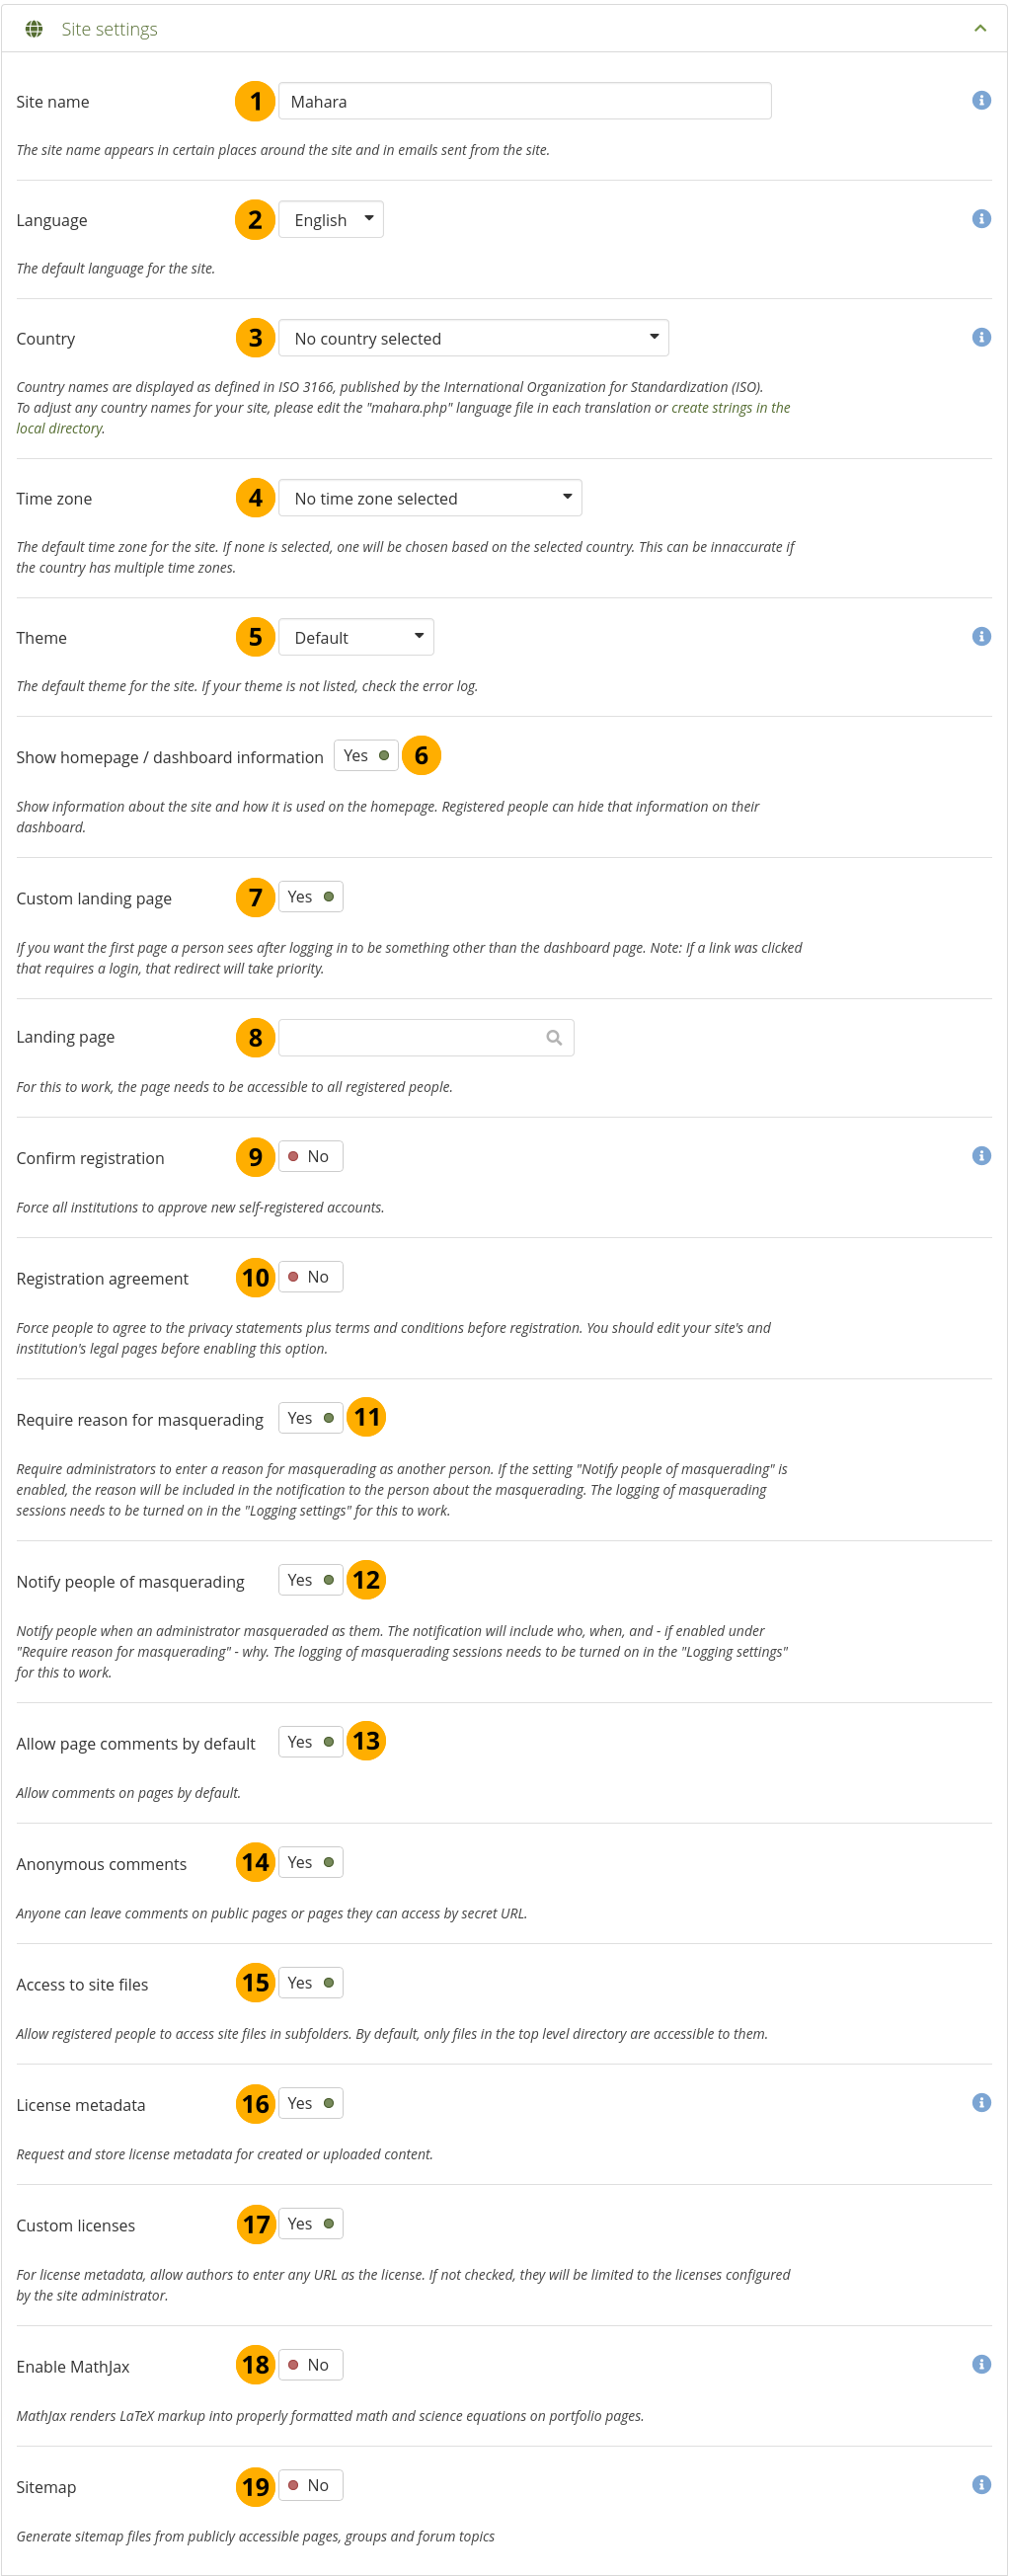
Site-Einstellungen
Site-Name: Wählen Sie einen Titel für die Mahara-Instanz. Es erscheint an festgelegten Stellen auf der Site, z.B. im Seitentitel, den der Browser anzeigt und in E-Mails, die von Mahara versandt werden. Daher sollte der Begriff nicht zu lang gewählt werden.
Sprache: Legen Sie die primäre Sprache für Ihr System fest. Wenn Sie mehrere Sprachpakete installiert haben, finden Sie hier ein Auswahlmenü. Andernfalls wird als Standard-Sprache Englisch genutzt.
Bemerkung
You can install more language packs. More information about the language packs is on the wiki.
Land: Die Vorauswahl wird für jeden Nutzeraccount als voreingestellter Wert genutzt, z.B. in den Kontaktinformationen.
Time zone: Select the time zone in which you want to have time stamps displayed around the site. If you do not select one, one will be chosen according to the country if you entered one. This may not be accurate if a country has more than one time zone.
Theme: Mahara bietet Ihnen mehrere Themes zur Auswahl an. Wählen Sie ein Theme aus dem Drop-down-Menu und legen Sie es damit als Standard fest. Wenn Sie Institutionen anlegen, legen Sie auch fest, ob diese ihr eigenes Theme auswählen können. Weitere von der Community erstellte ` Themes <https://wiki.mahara.org/index.php/Themes/Contributed_themes>`_ finden Sieim Mahara-Wiki.
Show homepage / dashboard information: If set to ‚Yes‘, information about Mahara and how it is used is displayed on the homepage for logged-out and on the Dashboard for registered people. Account holders can disable this for their own dashboard. See also Quick links.
Custom landing page: Switch this setting to ‚Yes‘ if you want people to arrive at a different page than the dashboard after having logged in. The select menu where you can choose the appropriate page becomes visible.
Bemerkung
If a person clicks a link that is different from the homepage and requires a login, they will be redirected to the proper page rather than being taken to the custom landing page.
Landing page: Start typing a letter that appears in the title of the page that you want to choose.
Bemerkung
Only group, institution, and site pages that are available to all registered people are displayed, including group homepages as well as group discussion forums when they are visible to all registered people.
If a page is deleted or access removed, the site administrator receives an email notification so they can fix the problem. In the meantime, everybody is redirected to the dashboard page again.
Confirm registration: If set to ‚Yes‘, administrators cannot make the Confirm registration setting optional when configuring an institution. This prevents institution administrators from disabling this setting when it is required site-wide to not allow accounts to be created without administrator approval.
Bemerkung
When registration needs to be confirmed, people trying to register with an institution need to provide a reason.
Registration agreement: If set to ‚Yes‘, you force people to agree to the ‚Terms and Conditions‘ before registration. You should edit your site’s ‚Terms and Conditions‘ page before enabling this option. You can do so under Static pages.
Require reason for masquerading: If set to ‚Yes‘, administrators will be required to enter a reason for masquerading as another person. This will be logged, and if the setting ‚Notify people of masquerading‘ is enabled, included in the notification to the account holder about the masquerading. This setting needs logging to be turned on.
Notify people of masquerading: If set to ‚Yes‘, account holders will be notified when an administrator masqueraded as them. The notification will include who, when and - if enabled under ‚Require reason for masquerading‘ - why. This setting needs logging to be turned on.
Allow comments by default: By default, comments are allowed on pages. You can set this to ‚No‘ though if you want to require an explicit action from the portfolio author to allow comments on their portfolio as they need to allow comments in the ‚Advanced options‘ when sharing their portfolio.
Anonymous comments: If allowed, logged-out people and people_overview without a login can leave comments on public pages or pages they can access via a secret URL.
Access to site files: If allowed, registered people will have access to site files in subfolders of the folder ‚public‘. By default, only files directly in the folder ‚public‘ are accessible to them.
License metadata: If allowed, people can choose under which license they want to make their content available. They can set a default license in their account settings and then decide for each artefact individually as well. An institution administrator can set the default license in the institution settings.
Custom licenses: If allowed, authors can enter any URL as license for their content. If not checked, they will be limited to the licenses configured by the site administrator.
Enable MathJax: If set to ‚Yes‘, mathematics and science equations can be displayed nicely in Mahara pages. For more information on how to configure MathJax, see the Help icon next to the option.
Sitemap: If set to ‚Yes‘, sitemap files from publicly accessible pages, groups and forum topics are generated that can be sent to another service.
11.3.1.2. Einstellungen für Institutionen
You can use Mahara with multiple institutions and separate them for administrative purposes, e.g. account management and permissions, and to give them a different theme.
Einstellungen für Institutionen
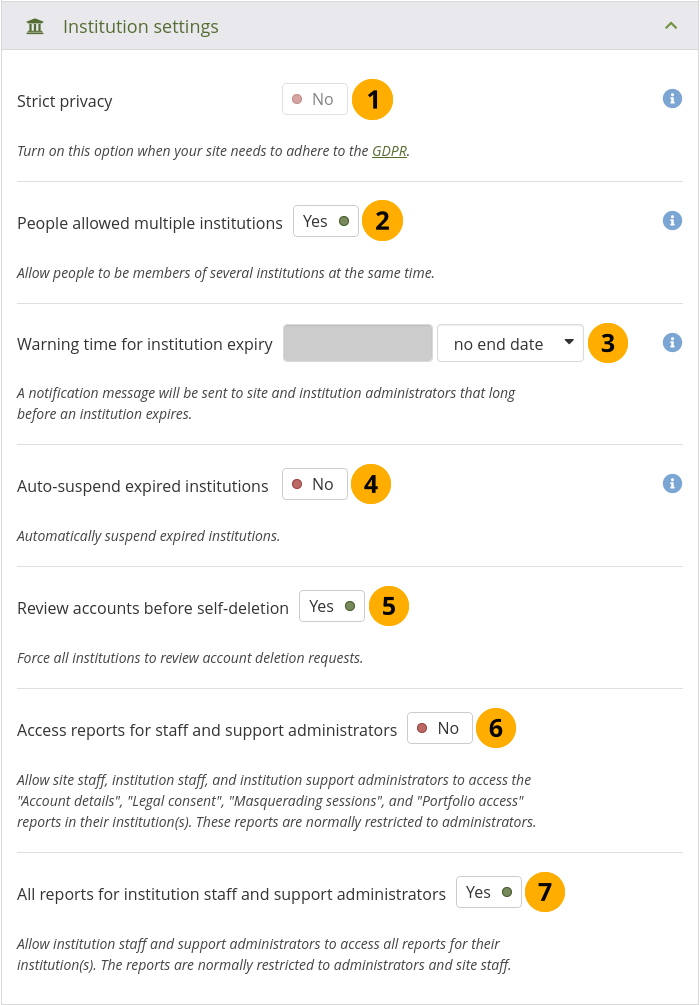
Strict privacy: You may want to require all your account holders to accept the terms and conditions and privacy statement on your site. Switch this setting to ‚Yes‘ if you want to have more control over the acceptance. You cannot allow multiple institutions if you want to use this setting for the time being.
Bemerkung
The strict privacy feature was created to help institution comply with the GDPR in the European Union. However, institutions that do not need to adhere to it may find it useful as well.
Turning this setting on will require everyone on the site to accept the terms and conditions and privacy statement(s) the first time they log in as well as whenever they change.
People allowed multiple institutions: If allowed, account holders can be members of several institutions at the same time. Thus, a person who belongs to two or more institutions only needs one account. You cannot allow multiple institutions when ‚Strict privacy‘ is turned on and when the site has isolated institutions.
Bemerkung
While this is a convenient setting for people who need to be institution administrators in multiple institutions and cannot receive site administrator permissions, it is recommended that account holders can only belong to one institution.
Warning time for institution expiry: If set, a notification will be sent to site and institution administrators this amount of time before an institution is due to expire and be suspended. This time may be specified in days, weeks, months, years or ‚No end date‘. If the latter option is chosen, institutions will not expire by default.
Auto-suspend expired institutions: If set to ‚Yes‘, this option will allow Mahara to automatically suspend an institution that has expired automatically. This means that members of that institution will not be able to log in until the institution has been unsuspended.
Review accounts before self-deletion: If set to ‚Yes‘, every institution is forced to approve or deny the deletion of accounts if people attempt to delete their account. If set to ‚No‘, it is up to each institution to activate this setting.
Bemerkung
This setting gives institutions in a formal learning setting the possibility to prevent accidental account deletion by people before portfolios are archived if required.
Access reports for staff and support administrators: If set to ‚Yes‘, site and institution staff and institution support administrators will have access to people reports. The following reports are available to them:
Account details
Legal consent
Masquerading sessions (if logging of these is turned on)
Portfolio access
All reports for institution staff and support administrators: If set to ‚Yes‘, institution staff and support administrators will have access to all reports in their institutions. This is normally restricted to site and institution administrators and site staff.
11.3.1.3. Accounteinstellungen
Accounteinstellungen
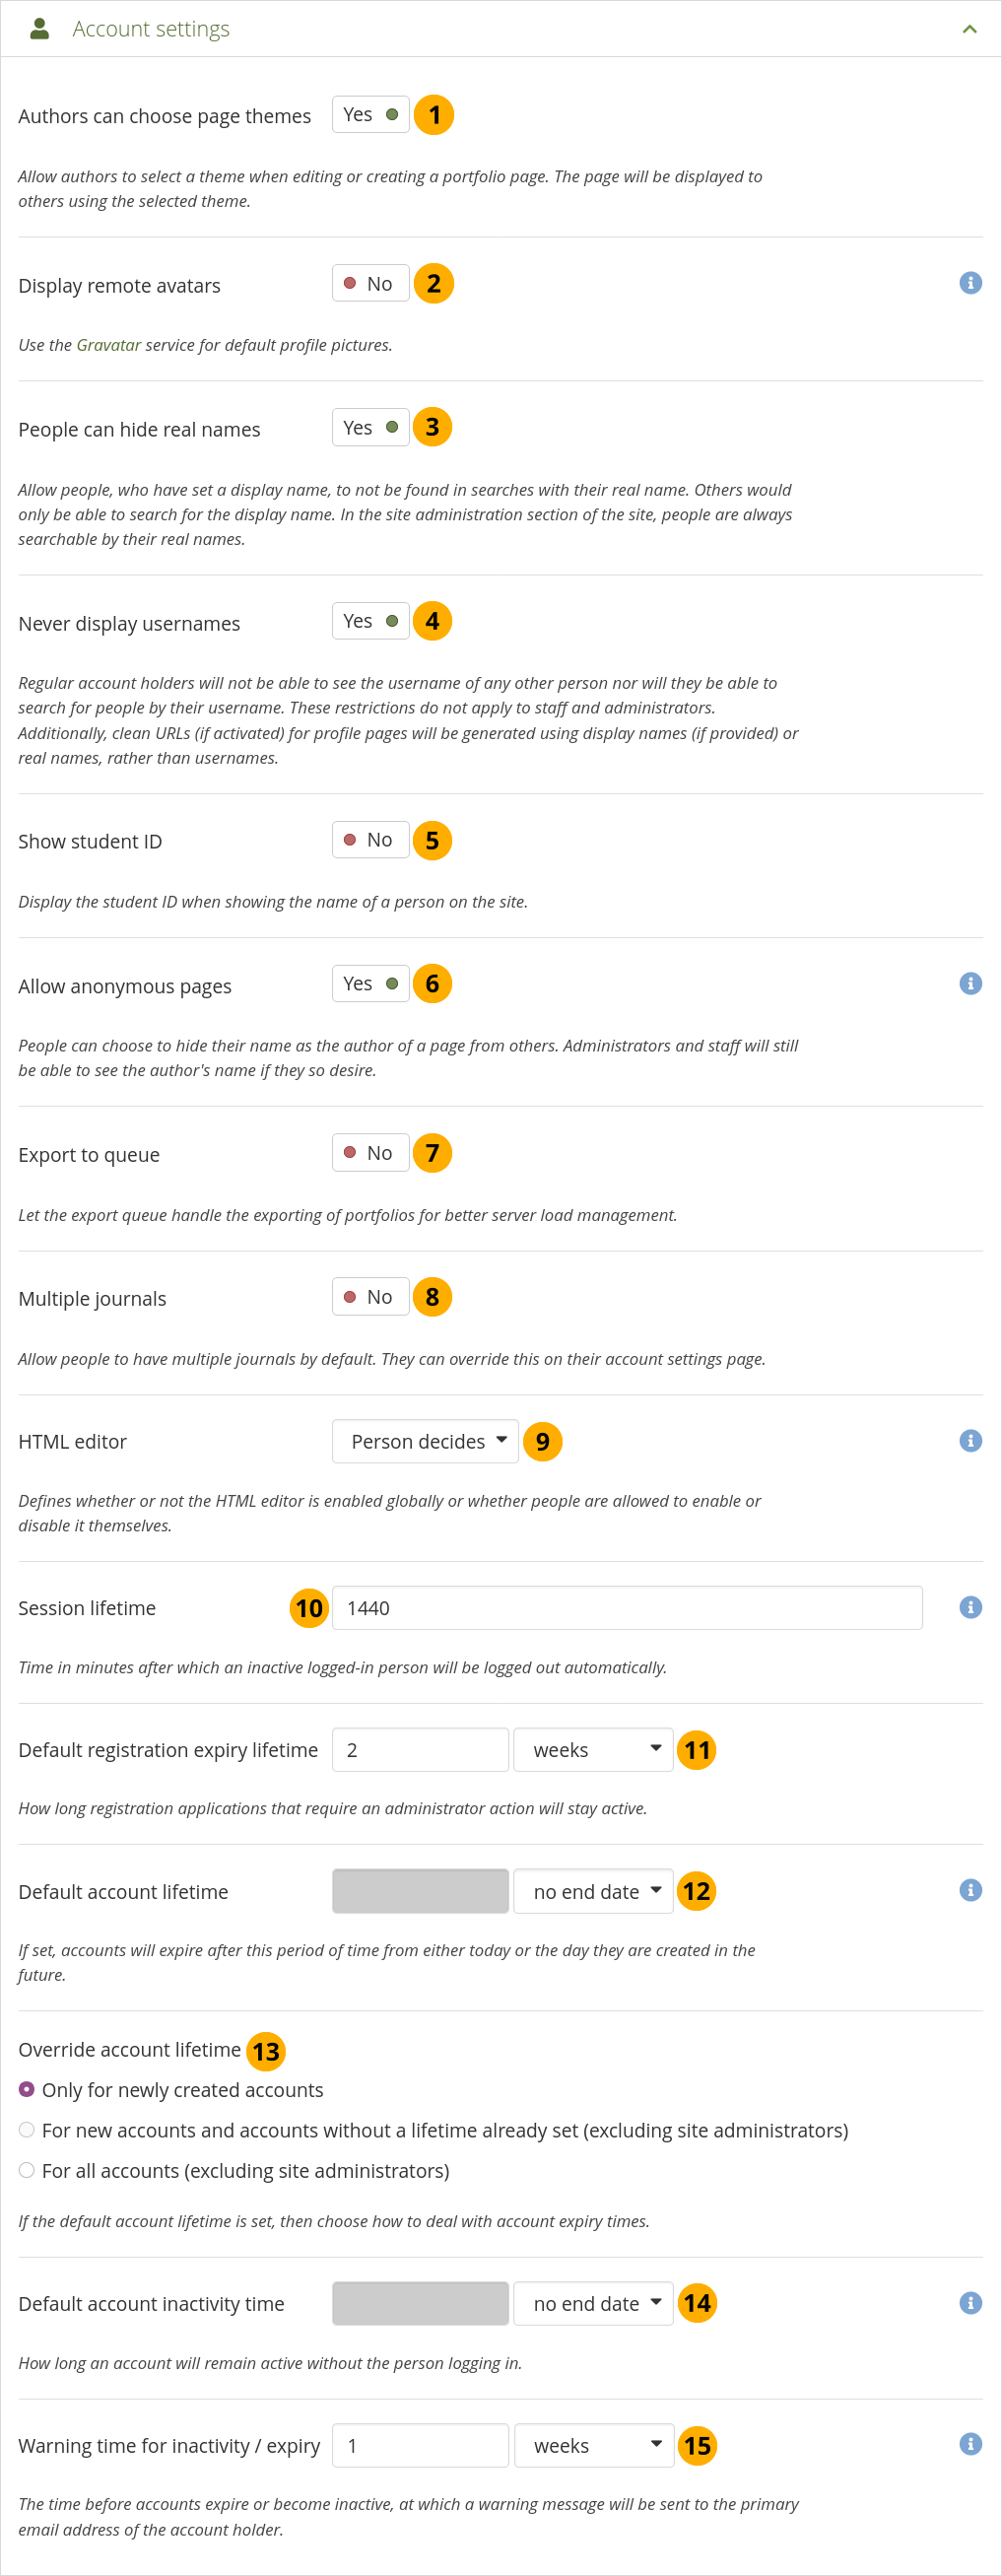
Authors can choose page themes: If this setting is enabled, authors can select a theme for their portfolio page. The page is displayed with this theme to other people. Thus, the institution or site theme can be overwritten.
Display remote avatars: If allowed, account holders‘ default profile pictures will be their Gravatar pictures (remote avatar). They will need an account with Gravatar for this to work.
Bemerkung
If you use your own avatar server to provide profile pictures for your account holders, you can use that instead of Gravatar for the default profile pictures. In order to do so, you need to add the remote avatar base URL to your config.php.
People can hide real names: If allowed, people who have set a display name may choose to be searchable only by their display name and will not be found in searches by their real name. In the administration section of the site, people are always searchable by their real names. An administrator (site and institution) always sees the display name, first and last name and username.
Never display usernames: If set to ‚Yes‘, ordinary account holders cannot search for others using their username in ‚Search for people‘ on the dashboard or via ‚People‘. They will also not be able to see the username of any other person on the site. These restrictions do not apply to staff and administrators. Additionally, Clean URLs (if activated) for profile pages will be generated using display names (if provided) or real names, rather than usernames.
Show student ID: Display the student ID when the name of a person is displayed on the site. This can help, when knowing the student ID or another registration number is important to know by anybody using the site.
Allow anonymous pages: If set to ‚Yes‘, account holders can hide their name as the author of a page from others. Administrators and staff can still view authorship information by clicking on the ‚Author’s name hidden‘ link that will reveal the real name.
Bemerkung
The name is also anonymised in blocks that are on the page and would normally display the author’s name.
Export to queue: If allowed, the export queue will handle the exporting of personal portfolios for better server load management. The person exporting a portfolio will receive an email when the export is ready for download.
Multiple journals: If allowed, all account holders will have multiple journals per default. They can still change that setting in their personal account settings.
HTML editor: Choose whether the HTML editor is used by default or not. If set to Person-defined, account holders will be allowed to choose whether to use the HTML editor in their personal settings or not. Otherwise the specified setting will be used site-wide.
Session lifetime: For security reasons, after a specified period of inactivity, a person will be logged off the site automatically. This field specifies this time in minutes. The default value is 1440 minutes (24 hours).
Bemerkung
The maximum session lifetime is hard-coded as 30 days. Even if you put in a longer time, it will not last past 30 days.
Default registration expiry lifetime: As site administrator you can decide when pending registrations that require approval expire. This time may be specified in days, weeks, months, years or ‚No end date‘. If the latter option is chosen, pending registrations will not expire by default. The default value is 2 weeks.
Default account lifetime: If set, accounts will expire after this amount of time from when they were created. When an account is expired, the account holder cannot log in. This time may be specified in days, weeks, months, years or ‚No end date‘. If the latter option is chosen, accounts will not expire by default.
Override account lifetime: Choose for which accounts a change in the default account lifetime shall take effect:
Only for newly created accounts
For new accounts and accounts without an account lifetime already set (excluding site administrators)
For all accounts (excluding site administrators)
Bemerkung
Site Administratoren sind immer von einer Änderung der Gültigkeitsdauer ausgenommen, da sie jederzeit Zugriff auf das System haben müssen.
Default account inactivity time: If set, people who do not log in for this amount of time will be considered ‚inactive‘ and will not be able to log in any more. This time may be specified in days, weeks, months, years or ‚No end date‘. If the latter option is chosen, people are not set to ‚inactive‘ by default.
Warning time for inactivity / expiry: If set, a warning message will be sent to people this amount of time before their accounts are due to expire or become inactive. This time may be specified in days, weeks, months, years or ‚No end date‘. If the latter is chosen, people do not receive a warning before their account expires or they are flagged as having an inactive account.
11.3.1.4. Access settings
Access settings
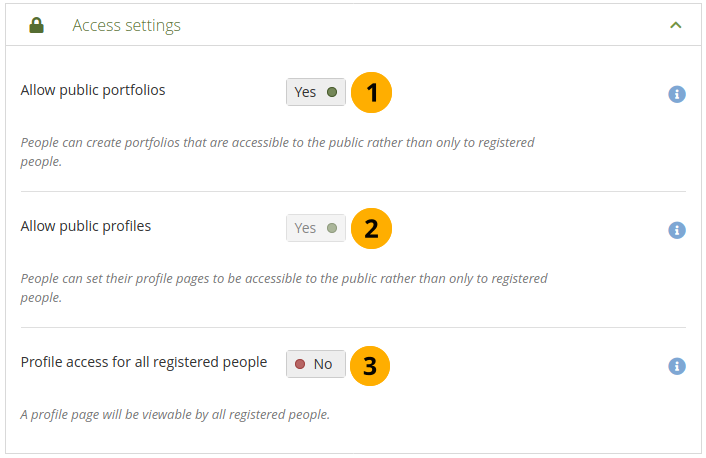
Allow public portfolios: If set to ‚Yes‘, authors can create portfolios that are accessible to the public rather than only to registered people.
Allow public profiles: If allowed, people can set their profile pages to be accessible to the public rather than only to registered people. However, only registered people can use interactive features such as the wall.
Bemerkung
If the option ‚Allow public portfolios‘ is chosen, ‚Allow public profiles‘ is automatically selected.
Profile access for all registered people: If this option is set to ‚No‘, profile pages are initially viewable by all registered people, but the owner is allowed to restrict access to their institution only if they wish. Enable this option if you want to make sure everyone with an account on the site can see each others‘ profile pages. Profiles of institution members will always be visible to other members of the same institution.
11.3.1.5. Benachrichtigungseinstellungen
You can set the default options for new account holders to receive notifications. They can override these settings on their own Account menu → Settings → Notifications page.
Ihre Optionen sind:
E-Mail: Erstellt eine E-Mail an Ihren primären E-Mail-Account wenn die Benachrichtigung erstellt wurde. Der Versand erfolgt in manchen Fällen erst nachdem der Cron (zeitgesteuert) ausgeführt wurde. Die E-Mail kann also zeitlich versetzt versandt werden.
Email digest: Sends one email per day for all the notifications that you set to ‚Email digest‘.
Bemerkung
If you select either of the email options, notifications will still arrive in the person’s inbox, but they will be marked as read automatically.
Inbox: All notifications are only sent to your system inbox that you can reach in the top right corner next to the ‚Logout‘ button.
Keine: Sie erhalten bei einer Benachrichtigung keinen Hinweis. Seien Sie mit dieser Option vorsichtig, da Sie sonst schnell wichtige Informationen übersehen können.
Bemerkung
You cannot set ‚System messages‘ and ‚Messages from other people‘ to ‚None‘.
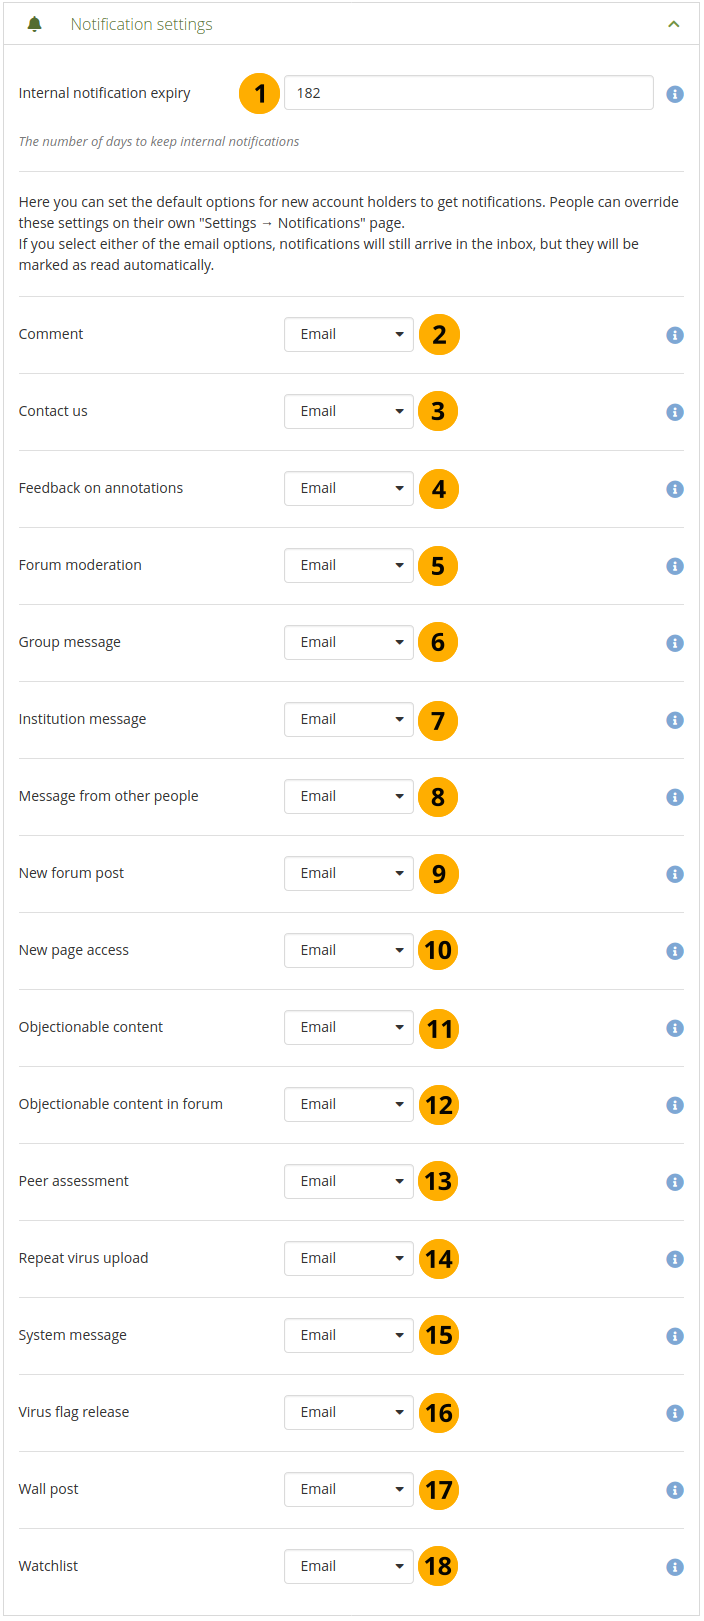
Benachrichtigungseinstellungen
Internal notification expiry: The number of days until certain notifications in the inbox are deleted. The default value is 182 days. The notifications in question are:
Page access notifications
Watchlist notifications
Institution messages
Comment: These are notifications about any comments received on pages, artefacts or journal posts.
Contact us: Site administrators or institution administrators see this notification type. These are messages sent via the ‚Contact us‘ form that can be accessed in the footer of the site if the site administrator decided to display this link.
Bemerkung
Institution administrators only receive these notifications if an institution member who is logged in sends a notification. In all other cases the site administrators will receive them.
Feedback on annotations: These notifications are triggered when feedback is left on an annotation.
Forum moderation: When a forum is moderated, the moderator receives notifications about posts that require a review before others can see them.
Group message: The system generates these notifications automatically, e.g. when a person requests to join a group.
Institution message: These notifications are generated by the system automatically, e.g. institution confirmation message, institution removal message, institution request sent to administrator.
Message from other people: Messages that are sent by other people who have an account on the platform.
New forum post: These notifications are sent to a group member when new forum posts happened in the forums or forum topics to which they are subscribed.
New page access: This type of notification is sent to you when you, you as a friend or one of your groups has been given access to a page. You do not receive notifications about pages accessible to all registered people and the public.
Objectionable content: Only administrators see this notification type. These notifications contain complaints by people about content that an administrator should take a look at because it does not comply with the terms and conditions set out for the site. This setting is for pages and artefacts that contain objectionable content.
Objectionable content in forum: Only administrators see this notification type. These notifications contain complaints by people about content that an administrator should take a look at because it does not comply with the terms and conditions set out for the site. This setting is for forum topics and posts that contain objectionable content.
Peer assessment: Notification when a new peer assessment has been made on a page.
Repeat virus upload: Only site administrators see this notification type. This notification informs site administrators about people who repeatedly upload virus-infected files. Virus checking must be turned on.
System message: This type of notification is generated automatically by the system or sent automatically by one of the site administrators, e.g. account confirmation message.
Virus flag release: Only site administrators see this notification type. This notification lets site administrators know when files were released by the virus scanner. Virus checking must be turned on.
Wall post: This type of notification is sent to you when somebody else leaves a public or private message on your wall.
Watchlist: Notifications of updates to pages or artefacts that you put onto your watchlist are generated automatically and sent in intervals.
11.3.1.6. Gruppeneinstellungen
Mahara kann nicht nur für individuelle Portfolioarbeit genutzt werden. Es ist zusätzlich möglich, in Gruppen zu arbeiten. Einige dafür wichtige Einstellungen finden Sie in diesem Abschnitt.
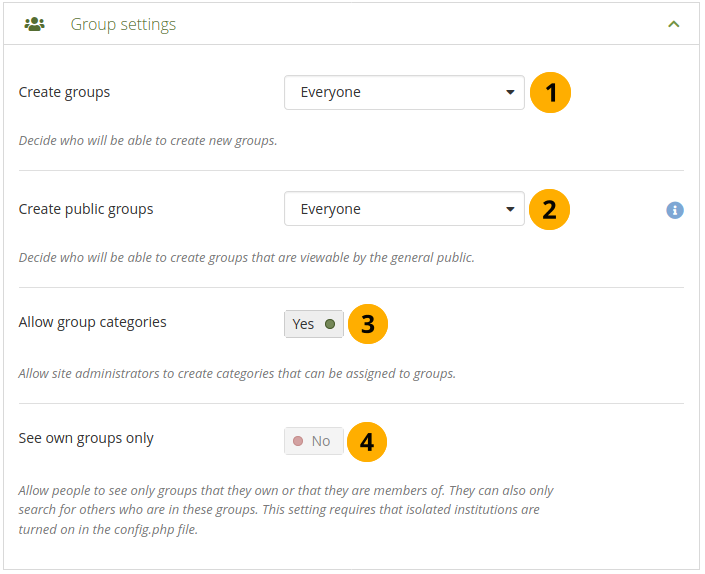
Gruppeneinstellungen
Create groups: You decide whether administrators, administrators and staff or everyone can create groups. The default setting is the most permissive ‚everyone‘ because Mahara is learner-centred and gives individuals a great deal of control over what they want to do. If you choose to limit the group creation to administrators (and staff), these need to be contacted to set up groups. There is no internal group request system.
Öffentliche Gruppen erstellen: Legen Sie fest, ob jeder oder nur Administratoren öffentliche Gruppen anlegen können. Für solche Gruppen ist keine Gruppenmitgliedschaft oder ein Login erforderlich, um die Startseite oder Diskussionsforen zu sehen. Administratoren können auch die Öffentlichkeit für die Mitgliederliste festlegen.
Allow group categories: If allowed, site administrators can create categories that can be assigned to groups. These categories can be used to filter groups in Groups.
Siehe auch
Group categories are managed by site administrators in the groups area of the administration.
See own groups only: This setting becomes active when the site is set to ‚Isolated institutions‘. This setting makes it possible for people to only see other people who are in the same groups. They cannot see other groups in the search results.
11.3.1.7. Side block settings
The settings in this section control the side blocks that are displayed on many pages.

Side block settings
Tag cloud: If set to ‚Yes‘, portfolio authors see a side block in the Portfolios and Files sections of the site with a list of their most frequently used tags. The number of tags displayed is defined by the option ‚Maximum tags in cloud‘.
Maximum tags in cloud: Enter the default number of tags to display in personal tag clouds. Account holders can change this number in their account settings.
Show who is online: If set to ‚Yes‘, account holders see a side block with a list of the people who have been logged-in in the last 10 minutes (cf. the dashboard). Institution administrators can limit the people displayed in this block to institution members in the institution settings.
Limit for ‚People online‘: Enter the maximum number of people to display in the Show who is online side block.
Show profile completion: If set to ‚Yes‘, a progress bar with tips about what to complete in the personal profile will be displayed in a side block. Account holders can disable it in their account settings.
Siehe auch
Administrators can configure the items that count towards profile completion in Administration menu → Institutions → Profile completion.
Portfolio search: If allowed, the ‚Search my portfolio‘ side block is displayed in the Portfolios and Files sections of the site. However, it has not been working for most people for a long time.
11.3.1.8. Sucheinstellungen
Sucheinstellungen
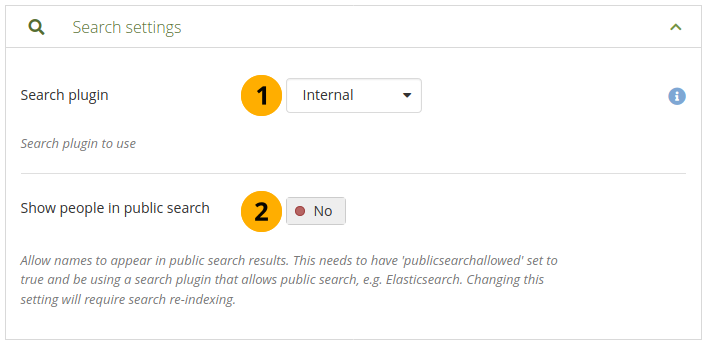
Search plugin: Mahara comes with a search plugin that allows you to search for people. If you install another search plugin, e.g. Elasticsearch, you will be able to select which one to use for your site.
Siehe auch
Sie können das interne Such-Plugin im Bereich Verwaltung des Such-Plugins konfigurieren.
Elasicsearch is another search plugin that is supported by Mahara out of the box. The search server will need to be installed separately though. Elasticsearch is useful for fulltext search and is required for advanced reporting. Mahara supports Elasticsearch 5/6 and Elasticsearch 7.
Bemerkung
You need to choose one of the Elasticsearch plugins if you turn on ‚Event log reporting‘.
Show people in public search: If allowed, usernames can appear in public search results. In addition, this feature needs to have the value
$cfg->publicsearchallowed = true;set in your config.php file and requires a search plugin that allows public search, e.g. Elasticsearch.Bemerkung
Wenn Sie diese Einstellung ändern, muss der Such-Index neu aufgebaut werden.
11.3.1.9. Sicherheitseinstellungen

Sicherheitseinstellungen
Password policy: Select the minimum requirements for passwords by people who use internal authentication. The password policy does not affect accounts using external authentication such as SSO or LDAP for example. You need to select a minimum password length and also the make-up of the password. The options are:
Upper and lowercase letters
Upper and lowercase letters, numbers
Upper and lowercase letters, numbers, symbols
Bemerkung
Along with the password policy, a password strength indicator is available on fields where a new password needs to be entered in order to show how good the new password is.
Virus checking: If you want all files that are uploaded by people to be run through the ClamAV virus scanner, you should turn the virus checking option on. You have to have ClamAV installed on your server.
Path to ClamAV: For security reasons, the path to ClamAV on your server needs to be provided in the config file. You see the path here if you provided that config value.
Anti-spam: There are three levels of anti-spam protection available for publicly visible forms such as the contact and registration forms. A form submission is never silently rejected. Rather, an error message is displayed asking the person to try again if the submission is classified as spam. The three choices are:
Keine: Für das Formular werden keine Anti-Spam-Warnungen ausgegeben.
Einfach: Es erfolgt eine einfache Prüfung, ob die E-Mail-Adresse richtig strukturiert ist oder sehr viele URL Adressen im Text auftauchen.
Erweitert: überprüft, ob die E-Mail-Adresse existiert und ob sie auf einer Sperrliste (Blacklist) eingetragen ist. Dazu ist ein Internetzugang erforderlich.
Spamhaus URL deny list: If set to ‚Yes‘, URLs will be checked against the Spamhaus DNSBL. The Spamhaus Project provides a URL blacklist that is free for non-commercial, low-traffic use. A professional use data feed service is also available but not supported in Mahara. Please read the Spamhaus DNSBL usage terms before enabling this option.
SURBL URL deny list: If set to ‚Yes‘, URLs will be checked against the SURBL DNSBL. SURBL provides a URL deny list that is free for organizations with fewer than 1,000 people. A professional use datafeed service is also available, but not supported in Mahara. Please read the SURBL usage terms before enabling this option.
Disable external resources in HTML: Turning this option on will prevent authors from embedding external resources such as images from remote sites into their forum posts and other HTML content. YouTube videos and other media can also not be embedded. It is however a good thing to do from a security standpoint since it does neutralise a few clever phishing attacks. See the HTML Purifier documentation for more details.
reCAPTCHA on account registration / contact us forms: If set to ‚Yes‘, people who register themselves on the site and who use the ‚Contact us‘ form when not logged in are required to fill in the reCAPTCHA form. This is for spam protection.
reCAPTCHA Site Key: Geben Sie den Site Key für Ihren reCAPTCHA Account ein.
reCAPTCHA Secret Key: Geben Sie den Secret Key für Ihren reCAPTCHA Account ein.
HSTS override: If your web server already sets the HTTP Strict Transport Security (HSTS) header, then deactivate it here for Mahara. That prevents it from being set twice and causing an error when you check your site for the proper configuration, e.g. via an SSL check tool.
11.3.1.10. Proxy Einstellungen
Proxy Einstellungen
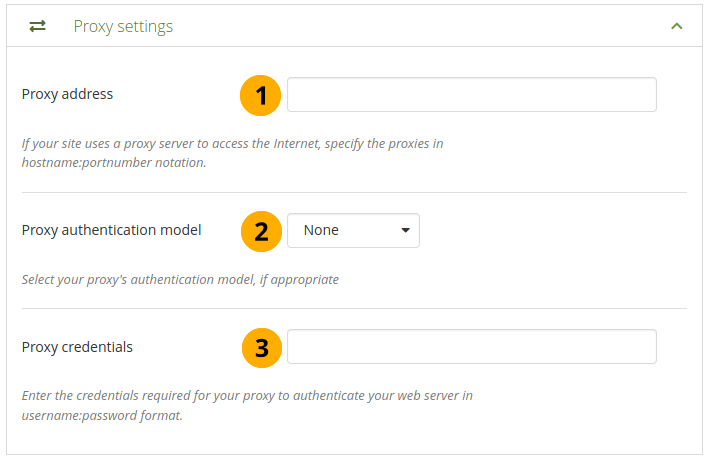
Proxy address: If your site uses a proxy server to access the Internet, specify the proxy in
hostname:portnumbernotation.Proxy-Authentifizierung: Wählen Sie bei Bedarf Ihr Proxy-Authentifizierungsmodell (keins oder Basis [NCSA]) ein.
Proxy-Bestätigungen: Geben Sie hier die Zugangsdaten im Format ‚‘username:password‘‘ für die Authentifizierung des Webservers beim Proxy ein.
11.3.1.11. E-Mail Einstellungen
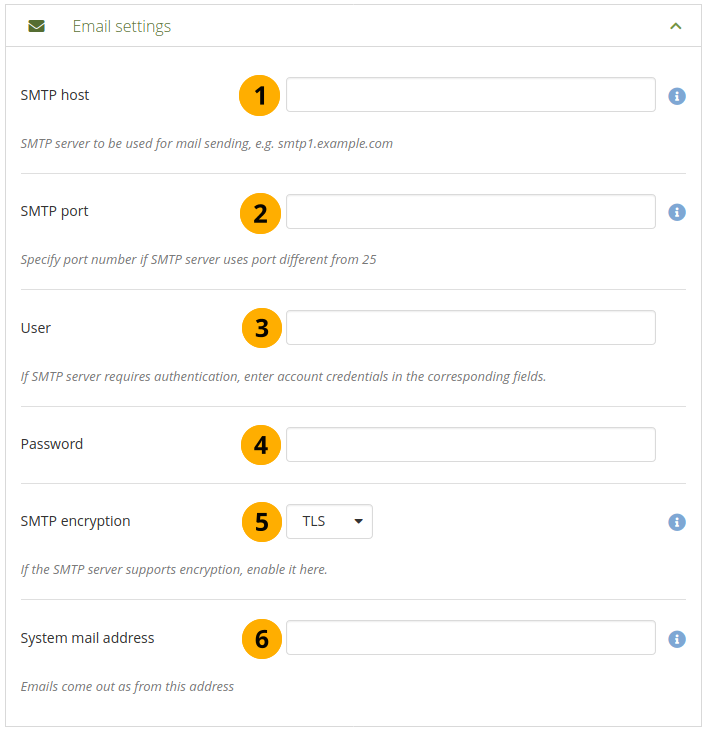
E-Mail Einstellungen
SMTP-Host: Wenn Sie statt des Mahara internen SMTP Servers einen anderen verwenden wollen, so tragen Sie den Host-Namen hier ein, z.B. ‚smtp.example.com‘. Es ist möglich, mehrere Einträge vorzunehmen und mit Kommas zu trennen (‚smtp1.example.com,smtp2.example.com‘). Alle weiteren Einträge müssen dann jedoch für alle Hosts gelten und können nicht ‚aufgesplittet‘ werden. Es können also nicht verschiedene Zugangsdaten und Ports für mehrere Hosts eingetragen werden. Die Funktion kann sinnvoll genutzt werden, wenn eine SMTP Host Authentifizierung nicht erforderlich ist oder verschiedene Frontends für den gleichen Server hinterlegt werden.
SMTP-Port: Falls Ihr SMTP-Server einen anderen Port als 25 verwendet, können Sie diesen hier eintragen. Bei Verschlüsselung lauten die Standardports 465 für SSL und 587 für TLS. Portnummern müssen nur eingetragen werden, falls sie von diesen Standardwerten abweichen. Überprüfen Sie ggfs. die richtigen Einträge mit Ihrem Mail-Server-Provider.
User: If your SMTP server requires authentication, enter the username here.
Password: If your SMTP server requires authentication, enter the password here.
SMTP-Verschlüsselung: Falls Ihr SMTP-Server Verschlüsselung unterstützt, aktivieren Sie die Option.
System-E-Mail-Adresse: E-Mail-Adresse, die Mahara zum Versand von Benachrichtigungen als Absender verwendet.
11.3.1.12. Log-Einstellungen
Mahara logs a number of events. These can now be collected in the database as well. The primary reason for logging events in the database is the logging of administrators masquerading as account holder for enhanced audits of these actions.
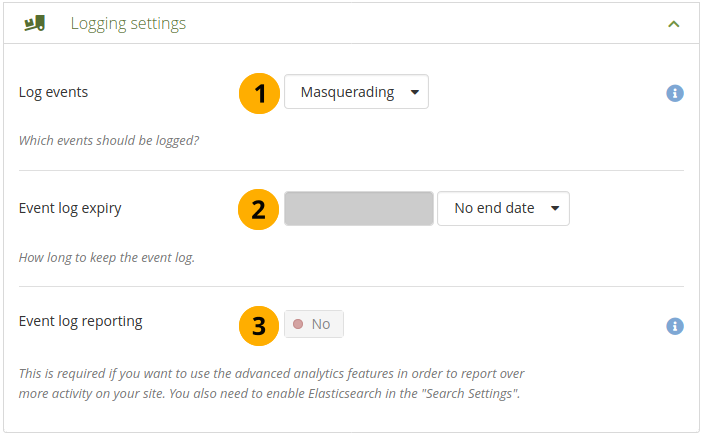
Log-Einstellungen
Log events: Decide which events you wish to log in the database. Events are generated every time a person does something significant on the site, such as editing a page. This log is kept in the
event_logtable in the database.Keine: In der Datenbank wird nichts gespeichert.
Masquerading: Only masquerading sessions are logged. This setting needs to be turned on if you wish to report on administrator masquerading of account holders.
Alle: Alle Ereignisse, die geloggt werden können, werden gespeichert.
Event log expiry: Decide for how long you wish to keep your database log. If you selected to log all events, the table can grow quite quickly especially on an active site. This time may be specified in days, weeks, months, years or ‚No end date‘. If the latter option is chosen, the event log is not deleted by default.
Event log reporting: If set to ‚Yes‘, you can report over a number of activities on the site in the ‚Reports‘ section that require events to be logged.
The table event_log contains the data that can be logged:
usr: ID of the person whose account is shown on screen
realusr: ID of the administrator who masquerades
event: action being carried out, e.g. beginning of a masquerading session, saving of an artefact, deleting of a page or artefact, update account information, placing a block onto a page
data: zusätzliche Informationen über die Aktion, z.B. ID des aktualisierten Blocks
time: Zeitpunkt, an dem die Aktion ausgeführt wurde
11.3.2. Statische Seiten
Administration menu → Configure site → Static pages
Bearbeiten Sie den Inhalt einiger allgemeiner Seiten und der Inhalte, die in der Fußzeile durch Links aufgerufen werden:
Impressum/Über
Startseite
Seite nach Abmeldung
Siehe auch
Institutions can change the content of these pages on their static institution pages to their liking and do not have to go with the content from the entire site.
The terms and conditions and privacy statement pages can be found in the Legal section.
Alle Seiten verfügen bereits über einen Standardtext, den Sie auf Ihre Bedürfnisse anpassen oder gegen einen eigenen Text austauschen können. Die Seiten sind fest verlinkt und sollten daher mit den für Sie sinnvollen Inhalten gefüllt werden. Zur Gestaltung steht Ihnen der Editor zur Verfügung.
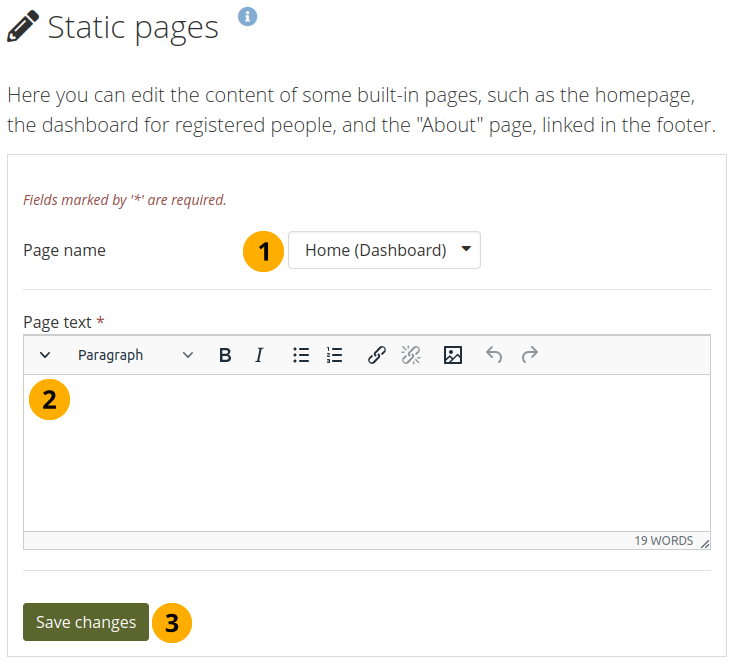
Statische Seiten bearbeiten
Site-Name: Wählen Sie vom Drop-down-Menü die Seite aus, die Sie bearbeiten möchten.
Einführung: Bearbeiten Sie den Text im Texteditor. Das Feld kann nicht leer bleiben.
Klicken Sie auf den Änderungen speichern-Button.
Bemerkung
If your site has added custom pages to the menu where you have a number of additional informational pages, you can edit their content from the Static pages screen. In order to do so, a server administrator needs to make changes on the backend.
11.3.3. Legal
Administration menu → Configure site → Legal
Bemerkung
The terms and conditions and privacy statement pages moved from the Static pages to the Legal section. That way, old versions can be tracked.
Every site can have a statement about terms and conditions and privacy. If you turned on ‚Strict privacy‘ in the institution settings, everyone needs to accept them before being able to use their account.
Warnung
The Mahara project cannot give legal advice. If you need legal advice, please consult your own lawyer to ensure that you comply with applicable laws.
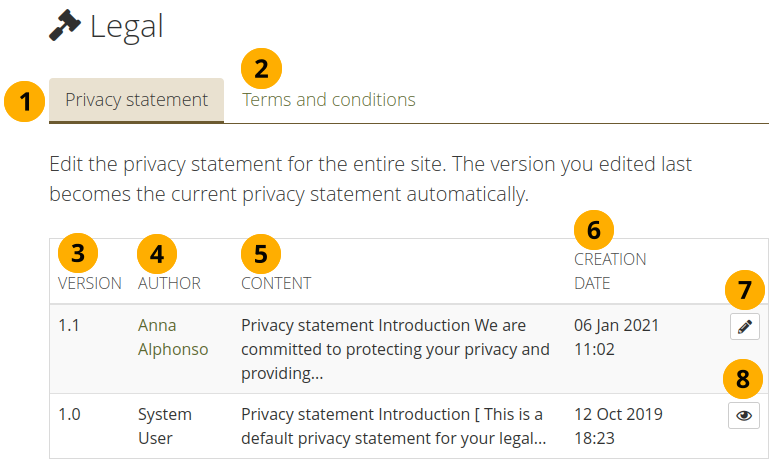
Legal statements overview page
Click the ‚Privacy statement‘ tab to edit the current privacy statement for the site and view old versions.
Click the ‚Terms and conditions‘ tab to edit the current terms and conditions for the site and view old versions.
Version: Version number of the statement.
Bemerkung
Versions are listed in reverse chronological order.
Author: Person who edited the version.
Content: Beginning of the text of the statement.
Creation date: Date and time when the version was saved.
Click the Edit button when you want to make changes to the current version. It will be saved as a new version.
Click the View button to see the full text of an old version.
Bemerkung
Institutions can set up their own privacy statement and terms and conditions that are displayed to their members in addition to the site’s legal terms.
11.3.3.1. Datenschutzerklärung
Warnung
You cannot save a draft version of your changed privacy statement. As soon as you save the form, anybody logging in will be asked to accept the new privacy statement.
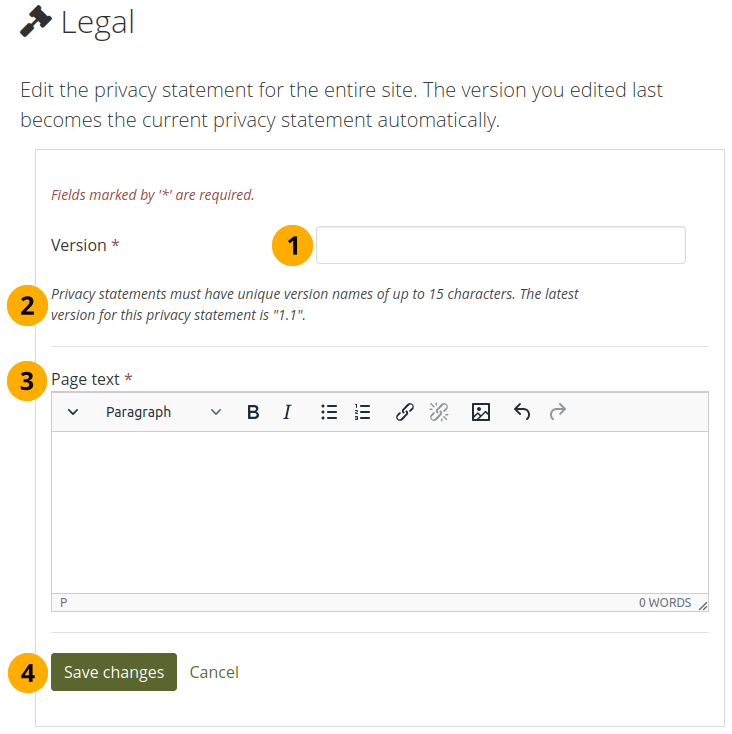
Edit the site level privacy statement
Version: Give your statement a new version number. It can be up to 15 characters long and must be different from any previous one.
The previous version number is stated for convenience.
Page text: Enter the text that should be displayed in the privacy statement.
Click the Save changes button to accept your changes or click Cancel to abort your changes.
11.3.3.2. Nutzungsbedingungen
Warnung
You cannot save a draft version of your changed terms and conditions. As soon as you save the form, anybody logging in will be asked to accept the new terms and conditions.
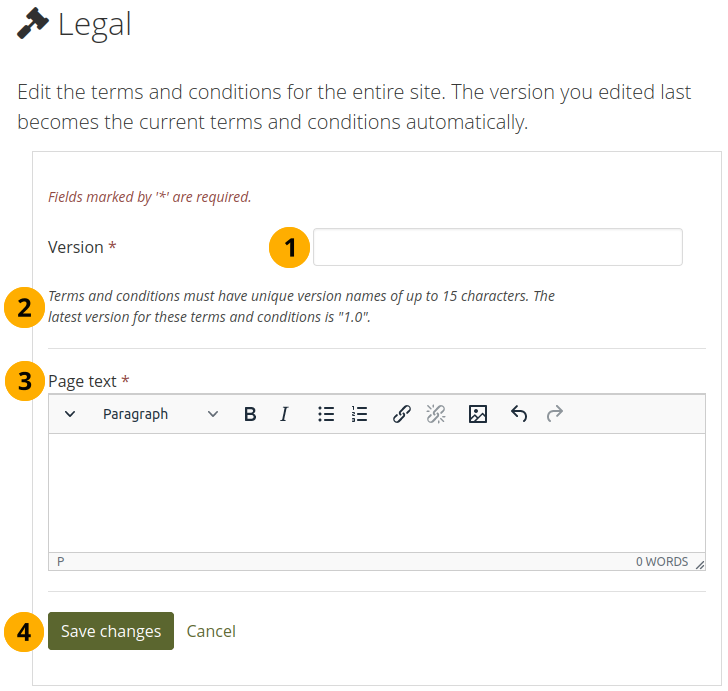
Edit the site level terms and conditions
Version: Give your statement a new version number. It can be up to 15 characters long and must be different from any previous one.
The previous version number is stated for convenience.
Page text: Enter the text that should be displayed in the terms and conditions.
Click the Save changes button to accept your changes or click Cancel to abort your changes.
11.3.4. Menüs
Administration menu → Configure site → Menus
Sie finden hier zwei Menüs in Mahara:
Links und Ressourcen
Fußzeile
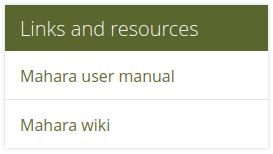
11.3.4.1. Links und Ressourcen
The Links and resources menu appears to everyone on most pages in the side bar. You can decide which links or files are available to everybody - also those without a login - and which ones only logged-in people shall see.
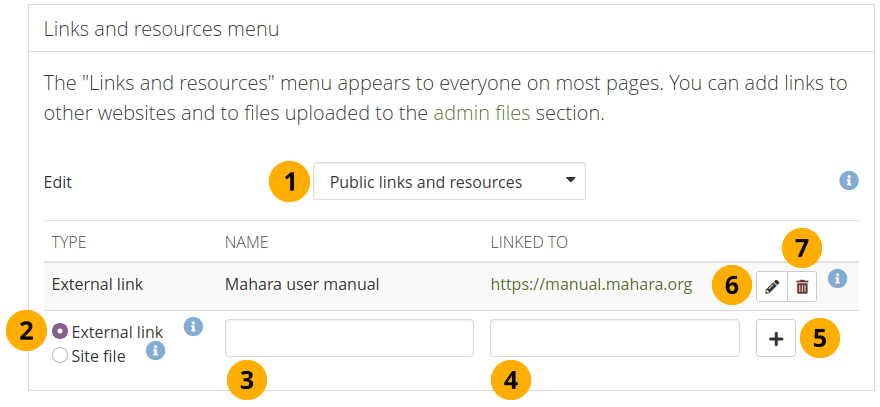
Externen Link zum Links- und Ressourcenmenu hinzufügen
Choose which Links and resources menu you want to edit: the public or the logged-in people one.
Den Typ externer Link auswählen.
Geben Sie dem Link eine Bezeichnung, die im Menü angezeigt wird.
Geben Sie die vollständige URL einschließlich ‚http://‘ oder ‚https://‘ ein.
Click the Add button .
Click the Edit button to make changes to the existing link.
Click the Delete button to delete the link.
Sie können auch auf Dateien verlinken, die Sie im Dateibereich hinterlegt haben.
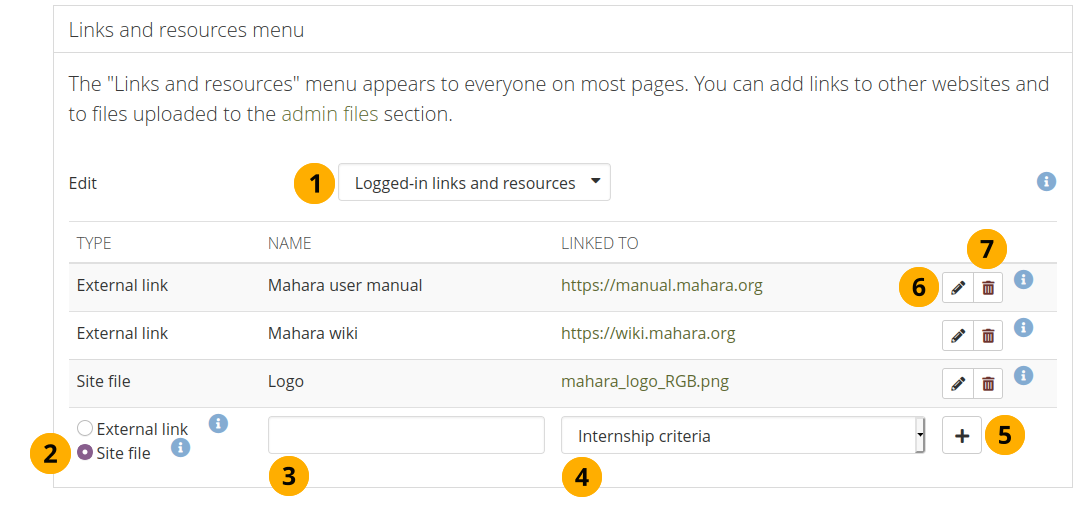
Site-Datei zum Links- und Ressourcenmenu hinzufügen
Choose which Links and resources menu you want to edit: the public or the logged-in people one.
Wählen Sie den Typ Site-Dateien.
Geben Sie der Datei einen Namen, der im Menü angezeigt werden soll.
Wählen Sie die gewünschte Datei aus dem Drop-down-Menü aus.
Click the Add button .
You can make changes to the name or choose a different file when you click the Edit button .
You can remove the file from the menu by clicking the Delete button . This will only delete the reference to the file in the menu but not the file itself.
Bemerkung
Wenn Sie die Links und Ressourcen in einer speziellen Reihenfolge anzeigen wollen, legen Sie diese von Beginn an fest, da die Reihenfolge später nicht mehr geändert werden kann.
Links- und Ressourcenmenu fertiggestellt
11.3.4.2. Fußzeilenmenü
Sie legen fest, welche Links in der Fußzeile jeder Seite angezeigt werden.

Fußzeilenmenü
Legal: Set the switch to ‚Yes‘ if you wish to display a link to the terms and conditions and privacy statement for the site in the footer of every page.
Bemerkung
You cannot link to external pages. If you want to link to an external page, place the link in the text area of the terms and conditions or privacy statement.
About: Choose ‚Yes‘ to display the link to the ‚About‘ page in the footer.
Bemerkung
You can change the text in Static pages if you don’t already have an existing text to link to.
If you have an existing page, you can provide the link here.
Contact us: Set the switch to ‚Yes‘ if you want to display a link to a contact form in the footer. Site administrators or institution administrators receive these notifications.
Bemerkung
Institution administrators only receive these notifications if an institution member who is logged in sends a notification. In all other cases the site administrators will receive them.
If you have a contact page, you can provide the link to overwrite the Mahara one.
External manual: If you want to display a help link to the manual in the footer of a page, switch this option to ‚Yes‘. It will take you to the relevant page in the Mahara manual of the version of Mahara that you are using.
If you have your own copy of the Mahara manual, you can provide the link here.
Click the Save changes button to save your choices.
11.3.5. Netzwerk
Administration menu → Configure site → Networking
Mahara’s networking feature allows it to communicate with other Mahara or Moodle sites. If networking is enabled, you can use it to configure single sign-on (SSO) for account holders who log in at either Moodle or Mahara or allow people from another Mahara instance to access yours.
You can connect Mahara and Moodle to save certain content you created in Moodle through the portfolio feature.
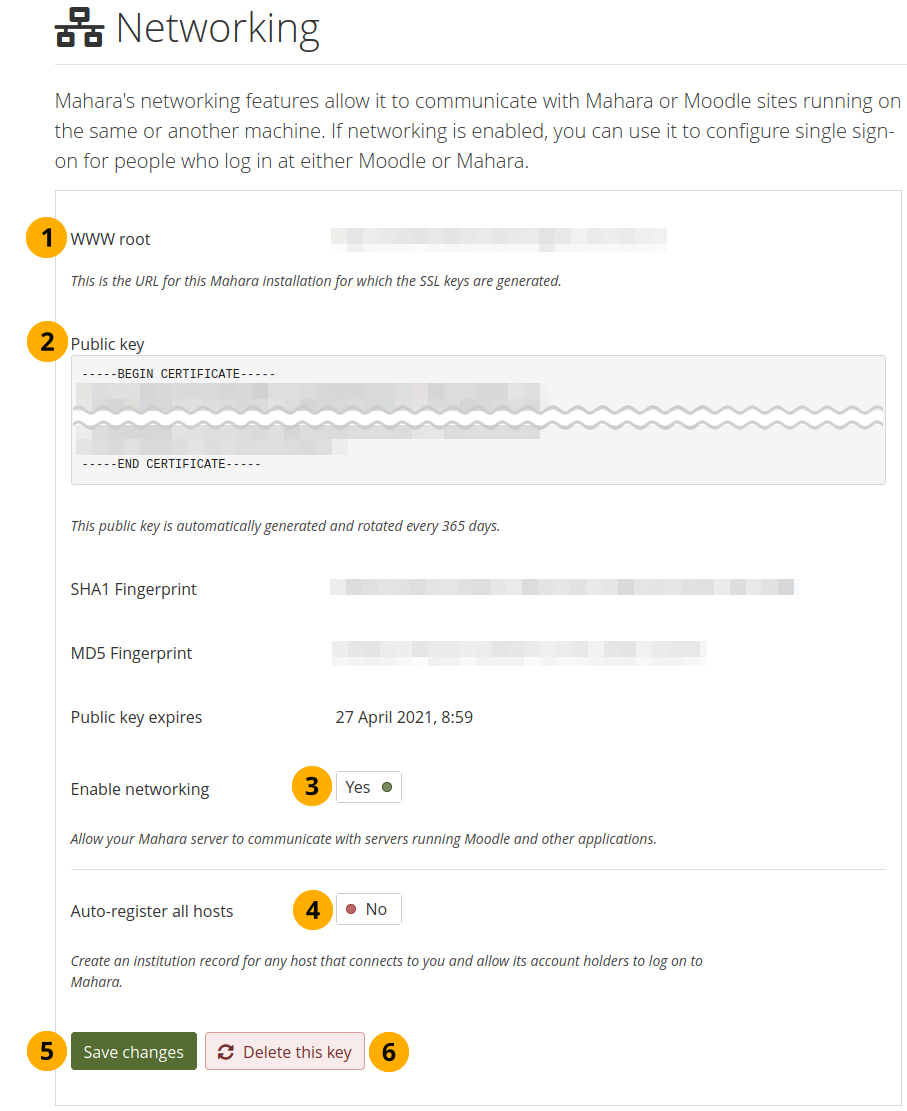
Netzwerk-Übersicht
Um die Netzwerkfunktion für alle Institutionen zu nutzen, müssen Sie:
WWW root: The URL of your Mahara installation and the the URL for which the SSL certificate is generated.
Public key: The key is generated automatically.
Enable networking: Choose ‚Yes‘ if you wish to connect one or more Mahara or Moodle sites to your Mahara instance.
Auto-register all hosts: If you choose ‚Yes‘, an institution is created for any host that connects allowing their account holders to log in to your Mahara site. We recommend you leave the default ‚No‘ because that gives you more control over which Moodle or Mahara instances can connect.
Klicken Sie auf den Änderungen speichern-Button.
Click the Delete this key button if you want to generate a new key for your Mahara site, e.g. when you copied the database from another site or the other instance doesn’t recognize it properly.
Je nachdem mit welcher Seite Sie eine Verbindung herstellen wollen, müssen Sie einige der Informationen dieser Seite eintragen, insbesondere WWWroot und den öffentlichen Schlüssel.
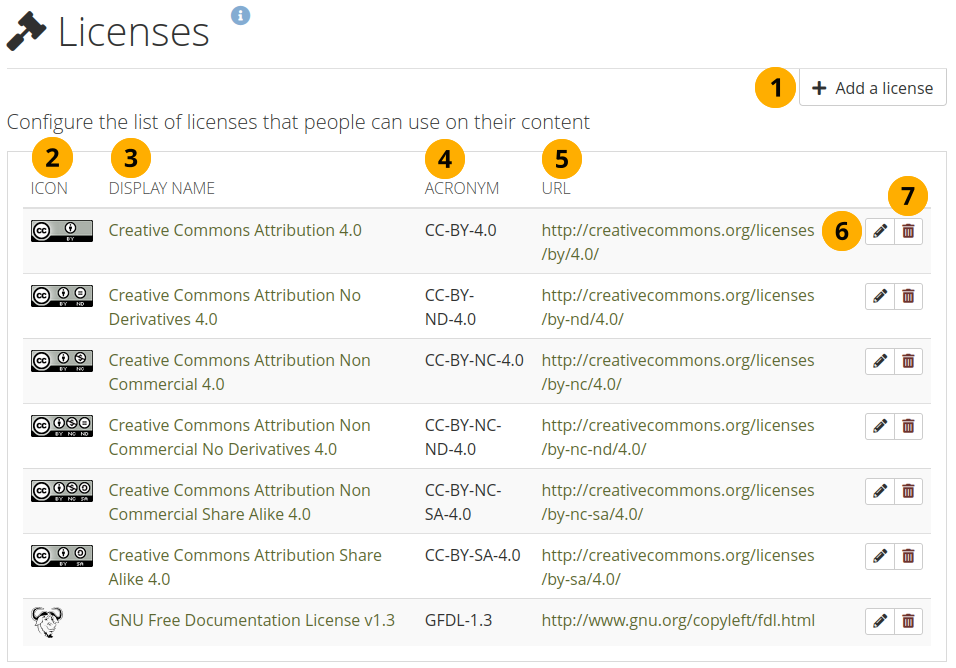
11.3.6. Lizenzen
Administration menu → Configure site → Licenses
The site administrator can allow authors to add license metadata to their artefacts in the site settings. Additionally, an institution administrator can require institution members to choose a license for any of their artefacts in the institution settings.
11.3.6.1. Liste der Lizenzen
Licenses that are available to everyone of the site are defined on the Licenses page. Mahara comes with a number of pre-defined licenses, but the site administrator can add many more or delete any of the existing ones.
Verfügbare Lizenzen der Site
Click the Add a license button to add an additional license that people can choose from.
Icon: Jede Lizenz kann ein Icon /ein Lizenzlogo erhalten, das auf der Detailseite eines Artefakts angezeigt wird.
Display name: The name that is displayed for each license around the site, e.g. in the drop-down menu where an author can select a license and on the details page of an artefact.
Acronym: The short name by which the license is also known. This acronym is also displayed to the author on the details page of an artefact.
URL: Internetseite auf der der Lizenztext gefunden wird. Der Link zur URL wird auf der Detailseite des Artefakts mit der Lizenzinformation genutzt.
Bemerkung
It is important for authors to be able to click on a link to the license because that allows them to learn about the license conditions and what they can do with the artefact or not.
Klicken Sie auf den Bearbeiten-Button , um die Lizenzinformationen zu ändern. Sie können den angezeigten Namen, das Akronym und das Lizenz-Icon ändern, nicht jedoch die URL. Wenn Sie dies später ändern wollen, müssen Sie eine neue Lizenz erstellen.
Klicken Sie auf den Löschen-Button, um eine Lizenz vom System zu entfernen.
11.3.6.2. Eine Lizenz hinzufügen
As site administrator you can add as many licenses as you wish. Go to Administration menu → Configure site → Licenses and click the Add a license button.

Neue Lizenz zur Site hinzufügen
Display name: Choose a name for your license that will be displayed around the site, e.g. on the details page of an artefact and in the drop-down menu in which people and institution administrators choose their default license. This field is required.
URL: Die Internetadresse unter der der Lizenztext gefunden werden kann. Wenn eine Lizenz auf einer Detailseite eines Artefakt angeziegt wird, wird sie mit dieser Webseite verlinkt. Das Feld ist erforderlich.
Akronym: Wenn für die Lizenz auch ein Akronym existiert unter dem die Lizenz ebenfalls bekannt ist, können Sie es hier eingeben.
Icon: Wenn es zur Lizenz auch ein Icon/Logo gibt, das mit angezeigt werden soll, können Sie es hier verlinken.
Dies kann eine http://… oder https://… URL-Adresse zu einem Bild irgendwo auf der Maharaseite oder im Internet sein.
Bemerkung
The protocol you use should match the protocol of your Mahara site to prevent browser warnings.
Sie können auch URLs für Lizenzen verwenden, die vom Mahara Theme genutzt werden. Zum Beispiel die URL
license:gfdl.pngführt zur Dateistatic/images/license/gfdl.pngim Theme.
Klicken Sie auf den Speichern-Button, um eine Lizenz hinzufügen.
11.3.6.3. Eine Lizenz bearbeiten
As site administrator you can change the properties of any license. Go to Administration menu → Configure site → Licenses and click the Edit button next to a license that you want to change. You can change all license properties but the URL.

Lizenz auf Site-Ebene bearbeiten
Angezeigter Name: Ändern Sie den Namen mit der die Lizenz auf der Seite angezeigt wird.
Akronym: Ändern Sie das Akronym der Lizenz.
Icon: Ändern Sie das Icon, das mit der Lizenz verbunden wird. Es wird im Zusammenhang mit der Lizenz auf der Seite angezeigt.
Dies kann eine http://… oder https://… URL-Adresse zu einem Bild irgendwo auf der Maharaseite oder im Internet sein.
Bemerkung
The protocol you use should match the protocol of your Mahara site to prevent browser warnings.
Sie können auch URLs für Lizenzen verwenden, die vom Mahara Theme genutzt werden. Zum Beispiel die URL
license:gfdl.pngführt zur Dateistatic/images/license/gfdl.pngim Theme.
Klicken Sie auf den Speichern-Button, um die Änderungen zur Lizenz zu sichern.
Bemerkung
Sie können die URL der Lizenz nicht ändern. Wenn Sie einen Fehler in der URL entdeckt haben, können Sie die Lizenz insgesamt ändern und eine neue anlegen.
11.3.7. Site portfolios
 Administration menu → Configure site → Portfolios
11.3.7.1. Create and manage site portfolios
You can create site pages with informational content to share with others or you can create templates which portfolio authors can copy into their own accounts. You can also change the default content and layout of the pages for the dashboard, profile, group homepage, and regular page.
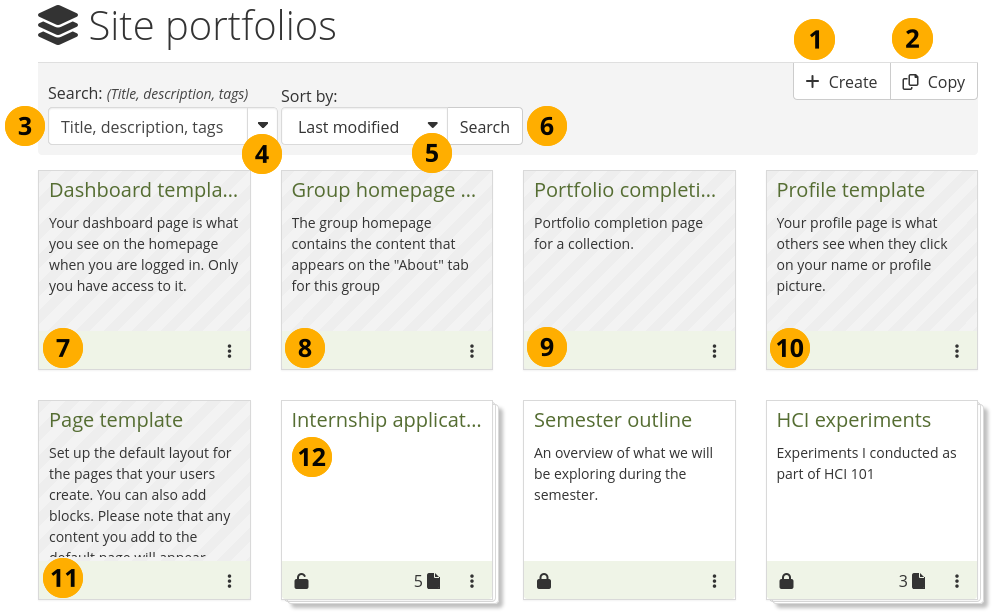
Site portfolios
Adding and editing site pages and collections is very similar to creating and editing a portfolio page or collection. However, not all blocks are available when editing a site page due to the different context. Please refer to the overview of blocks for a list of all the blocks that you can use in a site page.
Click the Create button to start a new page or collection from scratch.
Bemerkung
A modal opens in which you can choose whether to create a page or collection.
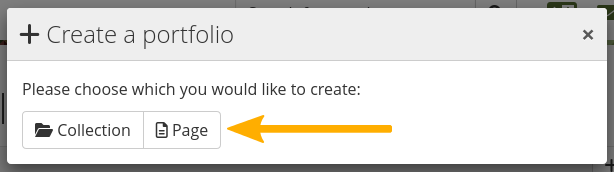
Click the Copy button to choose an existing page or collection as basis.
Search: Type your search term into the search field.
Use the drop-down arrow to limit your search. The available options are:
Title, description, tags: Search for your search term in the title, descirption, and tags of your site portfolios.
Title, description: This is the default option. It searches in the title and description of your site portfolios.
Tags: Search only within the tags of your site portfolios.
Sort by: Decide on the sort order in which you wish to display your portfolios.
Alphabetical: Portfolios are displayed in alphabetical order.
Date created: List the portfolios in chronologically reverse order with the newest portfolios first.
Last modified: Display the portfolios in the order of their last modification with the most recent portfolios that have been changed first. This is the default display option.
Last viewed: Show the portfolios in the order in which they were viewed by you and others starting with the most recently viewed portfolios.
Most visited: Display the portfolios that have been visited most first in the list.
Most feedback: List the portfolios in descending order based on the amount of feedback they have received.
Bemerkung
The sort order that you choose does not change when you navigate away from the overview page or log out. When you change the sort order, that new setting will be used until you change it again.
Click the Search button to search your site portfolios based on your search term and / or sorting criteria.
Dashboard template: You can edit the dashboard template. The dashboard doesn’t change for existing account holders. However, new ones will get the changed dashboard.
Group homepage template: Change the layout and the blocks that are displayed on all group homepages. This only affects groups created after the changes.
Portfolio completion template: Change the layout and the blocks that are displayed on all portfolio completion pages. This only affects those pages created after the changes.
Profile template: Make changes to the layout and the blocks that people see on their profile page per default. Your changes only affect new account holders.
Bemerkung
You cannot delete the dashboard, group homepage, profile and page templates.
Page template: Change the default portfolio page. The changes only affect any pages that are created after you made the change.
Bemerkung
Changing this page template is useful if you want to have all new pages use a specific layout instead of the built-in three-column layout. You could also place a block onto the template that any new page should have.
Authors still have the possibility to change any settings once they create their page. You are not locking them into a specific way.
You can create pages and collections.
Once you are done creating your site portfolios, you can share them with others.
Bemerkung
Wenn jemand ein Feedback auf einer Site-Ansicht oder zu einem Artfefakt hinterlässt erhält der Site-Admin eine Benachrichtigung.
11.3.7.2. Create template portfolios efficiently
You often create site portfolios as templates to roll them out to everyone on your site. Alternatively, you could create rules to put templates into certain accounts at specific times. This option is currently only available through additional development work, but the foundations are available through the new template options.
When you create a site collection, you can mark it as template.
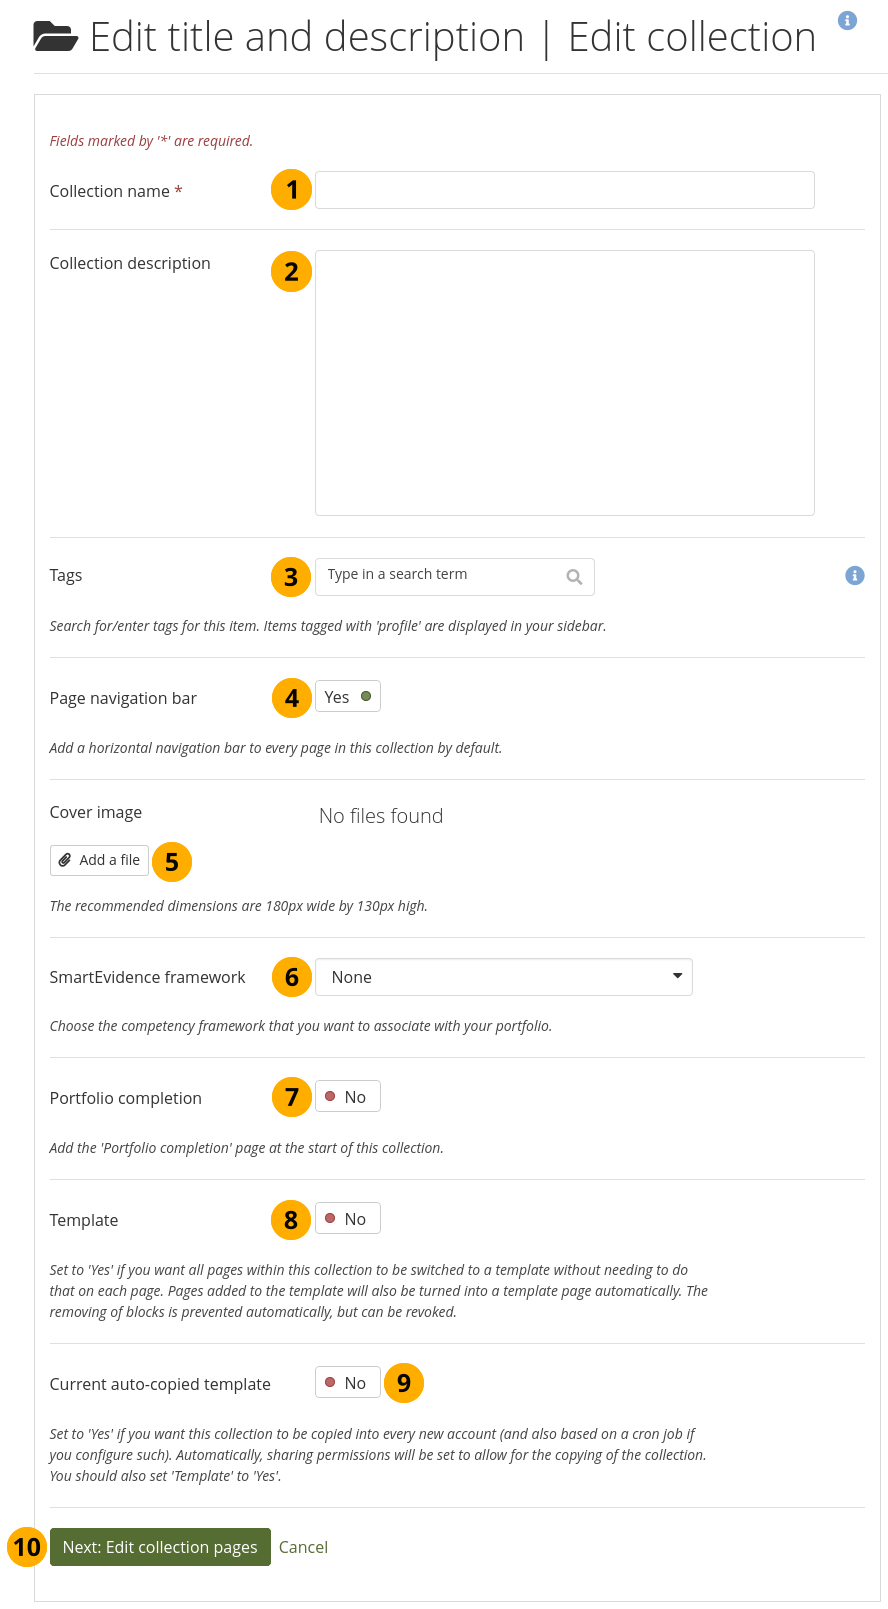
Create site collection
Collection name: Give your collection a title. This field is required.
Collection description: Add a short description. It is displayed on the ‚Portfolios‘ overview page and in other places where collection metadata is shown.
Tags: Add one or more tags to your collection to find it more easily.
Page navigation bar: Per default, each collection has a built-in navigation so you can easily move from one page to the next. You can remove it though if you like.
Bemerkung
If you use SmartEvidence or the portfolio completion option, you should keep the page navigation bar. If you don’t have it, you can’t easily return to those pages.
Cover image: Click the Add a file button to select a cover image for your collection. It is displayed on the ‚Portfolios‘ overview page.
SmartEvidence framework: Select a framework if you want to create a competency portfolio. This option is only available if the site allows the use of SmartEvidence.
Portfolio completion: You can add the portfolio completion page as first page in your collection if it is enabled on the site level. It can be used as alternative to SmartEvidence or in conjunction with it.
Template: If this collection is a template, you can mark it as such. Automatically, the properties of pages you add to the collection are changed:
All pages within the collection are turned into template pages, i.e. portfolio authors who copy the collection won’t be able to change the instructions, and the original template page is linked.
The switch ‚Prevent removing of blocks‘ is set to ‚Yes‘. However, it can be set to ‚No‘ by the portfolio authors for individual pages as needed if they do want to remove blocks.
Current auto-copied template: You can turn a template into an auto-copied template for an institution. That means that the collection is automatically:
shared with the institution ‚No institution‘, which is the site level,
copying permissions are set to allow copying and to place a copy into new accounts that are added to ‚No institution‘ rather than an actual institution on the site.
Bemerkung
This option is a convenience for the time being. You can still share any other institution portfolio with the entire institution and set it to be copied into new accounts.
Only one portfolio in an institution can have the option Current auto-copied template activated. If the setting is switched to ‚No‘, the portfolio sharing permissions are removed automatically. You can still share it manually though by specifically selecting the sharing options.
This option may not seem to be so useful at the moment as you can still override its sharing options and also make other portfolios still available as templates. Where this option is useful is when you decide which portfolio is automatically copied into an account based on certain rules or account properties when you have a recertification portfolio where certain account holders need to receive a new portfolio every year. Currently, this is only possible through additional development work, but allows you to create complex sharing rules for portfolios that need to be used by large groups of people in an organisation.
Portfolios that are automatically copied into new accounts are created based on a cron job, which runs every minute, to prevent the system slowing down when lots of portfolios need to be created at once.
Next: Edit collection pages: Add pages to your collection.
11.3.8. Site journals
Administration menu → Configure site → Journals
You create site journals like regular personal journals.
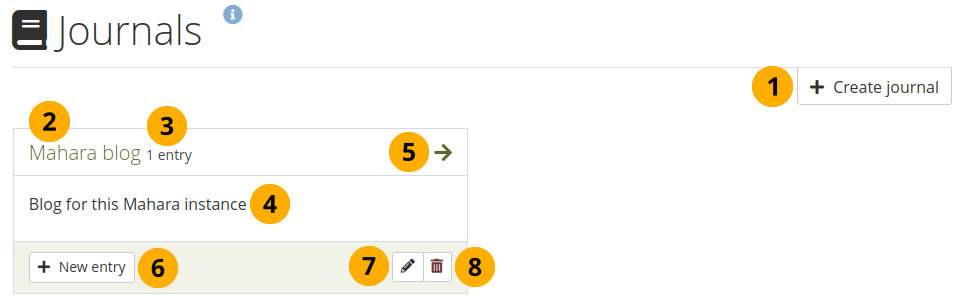
Site journals
You can create multiple journals. Click the Create journal button to set up a new journal.
All your journals are listed on Administration menu → Configure site → Journals with their titles. The titles link through to the individual journals.
You see how many entries you have in each journal.
You can see the description of the journal.
Click the Arrow icon to be taken to the journal and see all journal entries.
Click the New entry button to create a new journal entry directly from this screen.
Click the Edit button to make changes to your journal title, description or tags.
Click the Delete button to delete the journal and all its entries.
Warnung
When you click the Delete button, you receive a confirmation message whether you really want to delete the journal or not. If you used the journal or an entry of it in a page, Mahara lets you know so you can decide whether to delete the journal or not. Once you agree to delete the journal, your journal and all its content are removed permanently.
11.3.9. Freigeben
Administration menu → Configure site → Share
Site-Ansichten und -Sammlungen werden wie alle anderen Ansichten und Sammlungen freigegeben.
Siehe auch
Refer to the share options for regular portfolios for further information.
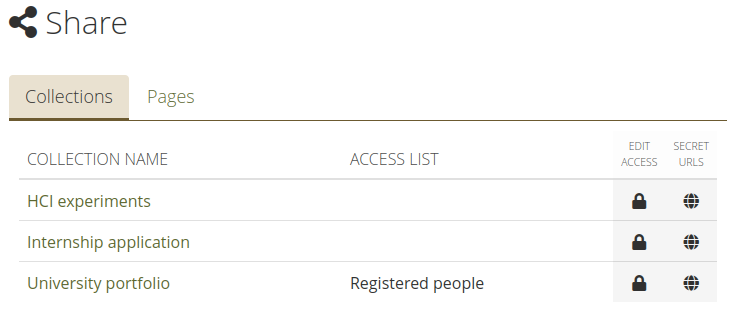
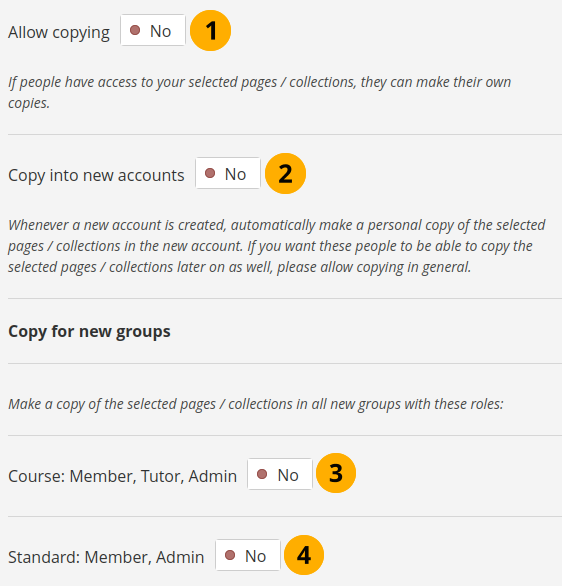
Share site portfolios
Wenn Sie das Kopieren zulassen, haben Sie erweiterte Funktionen im Vergleich zu Ansichten und Sammlungen an anderen Stellen zur Verfügung.
Copying site portfolios
Allow copying: Switch this option to ‚Yes‘ if you want to allow the people who have access to the page or collection to copy it.
Copy into new accounts: Enable this option if all new account holders on the site - and not just in one institution - shall receive a copy of the selected page(s) or collection(s) into their portfolios when an account is created for them.
Bemerkung
If you enable this option without also enabling the option ‚Allow copying‘, your account holders will not be able to make a copy of the page(s) or collection(s) themselves if they need another one.
Course: Switch this option to ‚Yes‘ if all course groups shall receive a copy of the selected page(s) or collection(s).
Standard: Switch this option to ‚Yes‘ if all standard groups shall receive a copy of the selected page(s) or collection(s).
11.3.10. Site-Oberflächen
Administration menu → Configure site → Site skins
Warnung
Skins sind eine Funktion mit der die vorhandene grafische Darstellung angepasst werden. Je nachdem welches Theme als Grundlage dient können unterschiedlich viele Elemente angepasst werden.
This feature is only available when the server administrator enabled skins for the site.
You can create skins that will be available to everyone on your site.
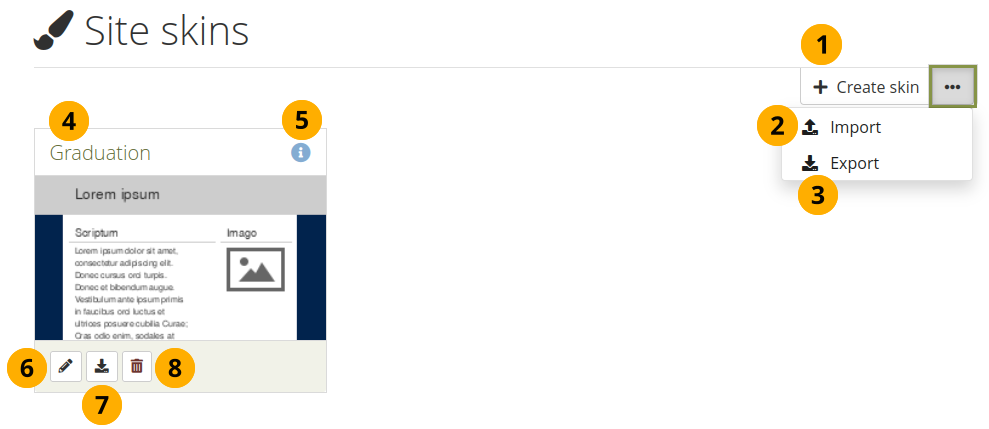
Site-Oberflächen
Klicken Sie auf den Oberfläche erstellen-Button, um eine neue Oberfläche zu erstellen.
Klicken Sie auf den Oberfläche(n) importieren-Button, um Oberflächen zu importieren, die andere Nutzer online zur Verfügung gestellt haben.
Klicken Sie auf den Oberfläche(n) exportieren-Button, um alle Site-Oberflächen zu exportieren.
The title of the skin.
Click the Info button to see more details for the skin, e.g. who created it when.
Klicken Sie auf den Bearbeiten-Button , um Änderungen an der Oberfläche vorzunehmen.
Klicken Sie auf den Export-Button , um nur eine einzelne Oberfläche zu exportieren.
Klicken Sie auf den Löschen-Button um diese Oberfläche zu entfernen.
Siehe auch
The process of creating and editing a site skin is very similar to creating and editing skins in your portfolio.
11.3.11. Schriftarten
Administration menu → Configure site → Fonts
Sie können zusätzliche Schriftarten für die Nutzung in Ansichts-Oberflächen installieren. Derzeit können sie an anderen Stellen noch nicht genutzt werden.
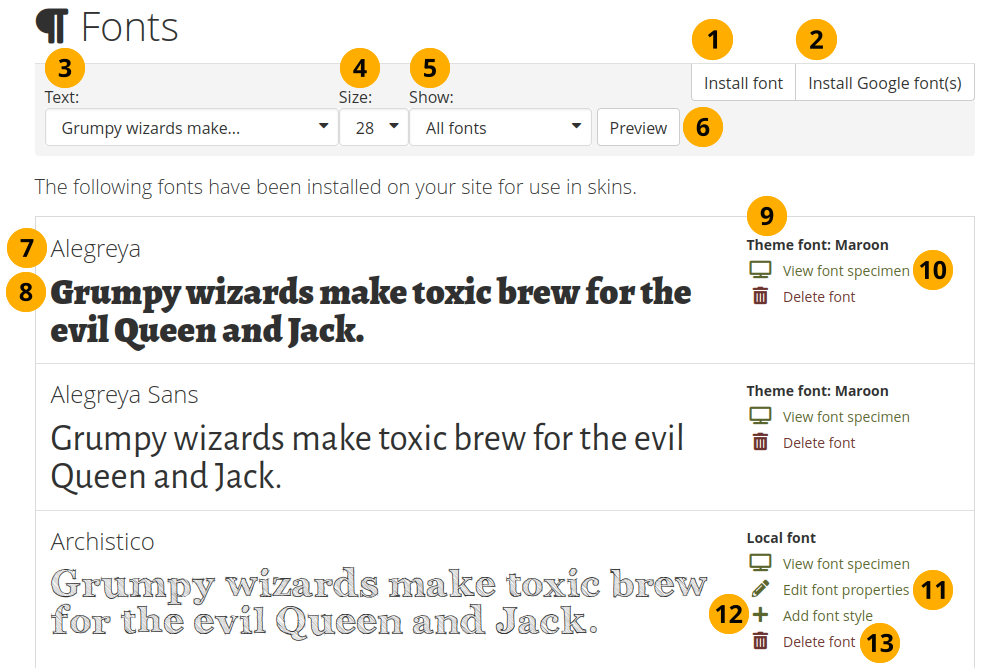
Fontübersichtsseite
Klicken Sie auf den Schriftart installieren-Button, um Schriften von Ihrem Computer zu installieren.
Click the Install Google font(s) button to install fonts you discovered through Google fonts.
Text: Decide in which preview text the installed fonts should be displayed on this overview page. The default text is ‚Grumpy wizards…‘:
Lateinisches Alphabet (nur ASCII)
Lateinisches Alphabet (ISO/IEC 8859-1)
Lateinisches Alphabet (ISO/IEC 8859-2)
Cyrillisches Alphabet (ISO/IEC 8859-5)
Griechisches Alphabet (ISO/IEC 8859-7)
Zahlen und Brüche
Satzzeichen
Lorem ipsum dolor sit amet, consectetur adipiscing elit.
Grumpy wizards make toxic brew for the evil Queen and Jack.
The quick brown fox jumps over the lazy dog.
Bemerkung
Not all fonts have the full character set implemented. In particular, the Cyrillic and Greek alphabets may be missing and also some numbers, fractions and punctuation symbols.
Die letzten drei Sätze enthalten die meisten /alle Buchstaben im englischen Alphabet.
Größe: Legt fest in welcher Größe die installierten Schriften auf der Übersichtsseite dargestellt werden. Standardwert ist 28 pt.
Anzeigen: Legt fest welche Schriftarten auf der Übersichtsseite angezeigt werden:
Alle Schriften
Lokale Schriften
Google-Web-Schrift
Theme fonts
Klicken Sie auf den Vorschau-Button, um anzuzeigen welche Schriften je nach Vorauswahlkriterien gezeigt werden.
Der Titel der Schriftart wird angezeigt.
Sie sehen wie Ihre Schriftart mit Ihren Voreinstellungen aussieht.
You see whether it is a local font that you uploaded, a Google font, or a theme font.
Bemerkung
The theme fonts are the fonts used in the Mahara themes. That way it is possible to create a skin with just a header background but leaving all text elements consistent with the underlying theme.
Click View font specimen to see details about this font.
Click Edit font properties on a local font to change some font settings. You do not have this option for theme or Google fonts.
Click Add font style to add more styles for a local font. You do not have this option for theme or Google fonts.
Click Delete font to delete this font.
Bemerkung
When you delete a theme font, the font is still available in the theme itself. However, people can no longer use it in a skin.
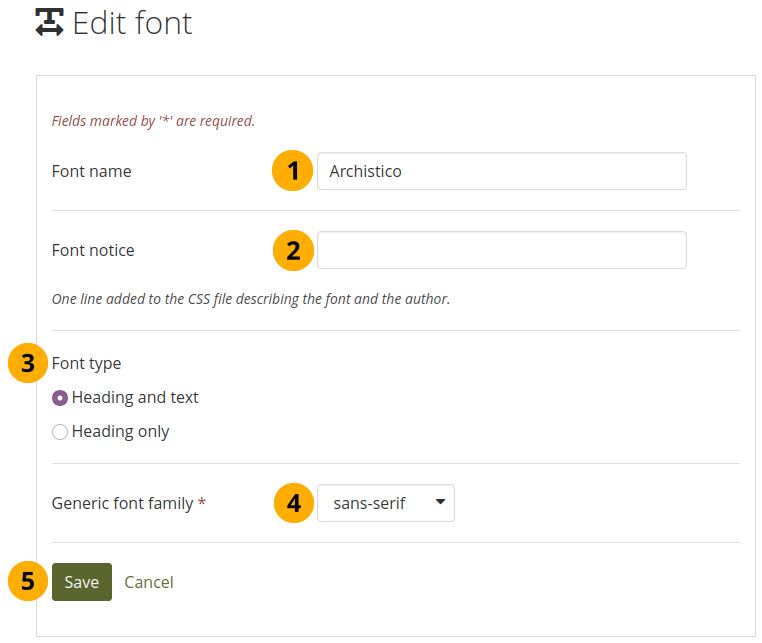
11.3.11.1. Eine lokale Schrift installieren
Sie können einen Schrifttyp installieren, den Sie online finden sofern Sie dazu die Nutzungsrechte erhalten haben. Lesen Sie in jedem Fall die Lizenz für die Schriftart, bevor Sie diese hochladen.
Siehe auch
There are a lot of websites for finding fonts. One of them where you can use, share and remix them is the Open Font Library.
Klicken Sie auf den Schriftart installieren-Button auf der Schriften-Übersichtsseite.
Siehe auch
If you want to upload a font you found on Google fonts, please follow the Google fonts installation instructions.
Font installieren
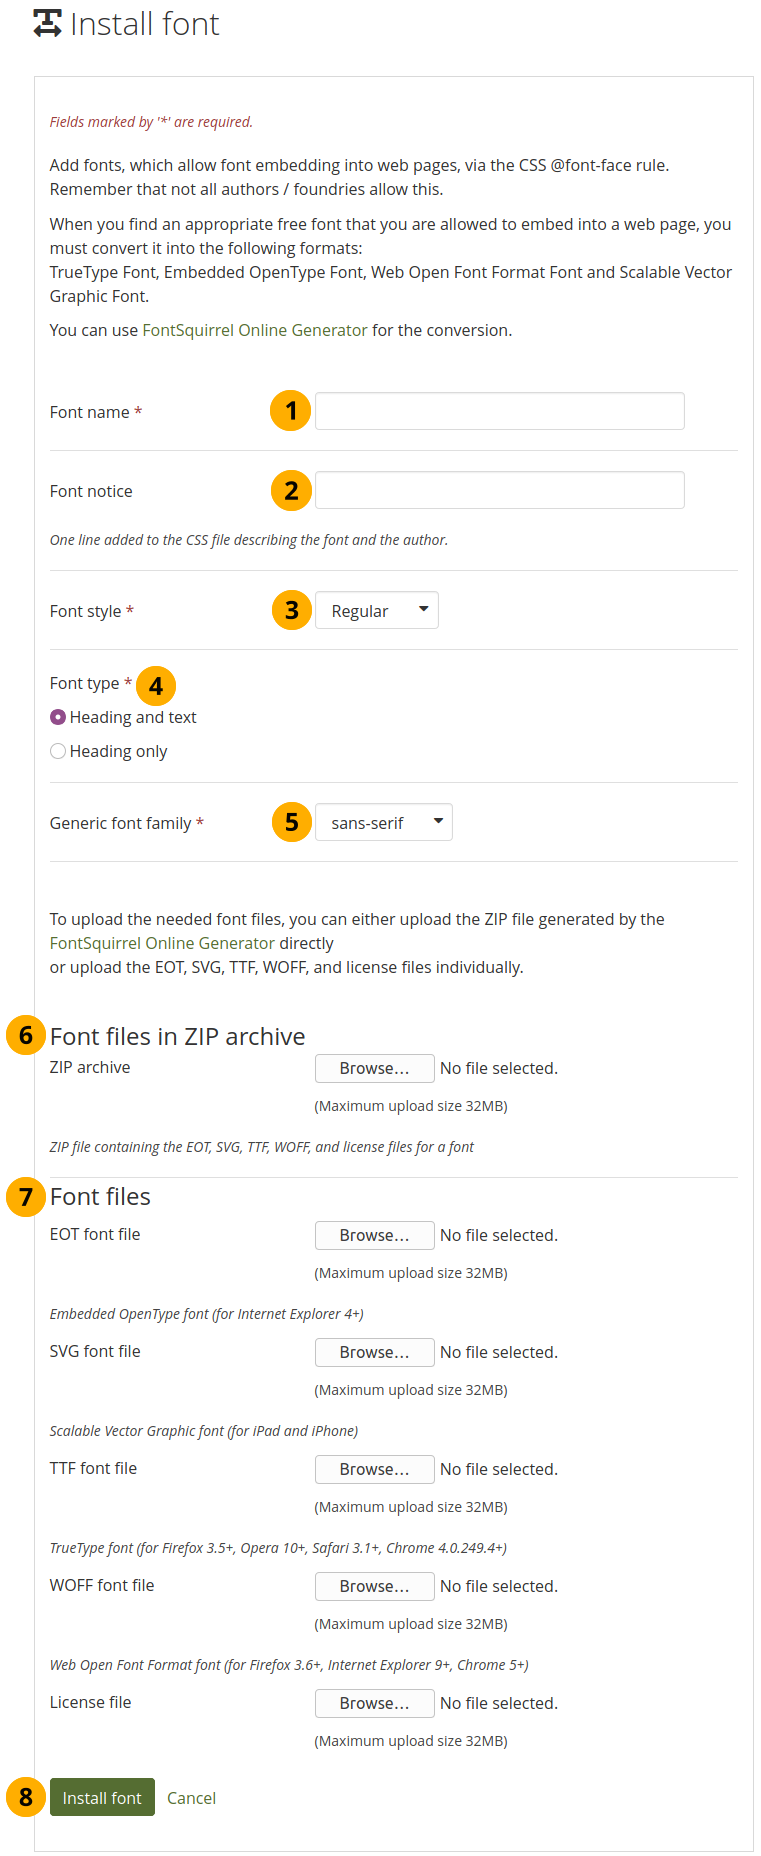
Font name: Provide the name of the font. this field is required.
Schriftart Hinweis: Hinterlegen Sie Informationen zur Schriftart, z.B: Lizenz und Urheber.
Schriftstil: Geben Sie an, welche Stile für die hochgeladene Schriftart verfügbar sind. Wenn die Stile in separaten Schriftdateien vorliegen, müssen Sie sie alle separat hochladen:
Regulär
Fett
Kursiv
Fett kursiv
Schrifttyp: Legen Sie fest wo in der Site-Oberfläche die Schrift genutzt werden darf:
Überschriften und Text
Nur Überschriften
Allgemeine Schriftfamilie: Zu welcher Schriftfamilie gehört die Schrift? Wählen Sie:
serif: Letters and symbols have a small line attached to the end of a stroke to guide the eye from one letter to the next. An example is the font ‚Times New Roman‘.
sans-serif: Letters and symbols do not have the guiding line. An example is the font ‚Arial‘.
Monospace: Alle Zeichen haben die gleiche Breite. Ein Beispiel ist die ‚Schreibmaschinen‘-Schrift „Courier“.
Kursiv: Handschriften-Schrift. Leicht schräg gestellt.
Fantasy: Schriften mit ornamentalem Charakter.
ZIP archive: You can upload all font files in one go using a zip archive instead of having to upload them separately. You need to include all required font files.
Schriftartdateien: Sie müssen für Ihre Schrift alle Schriftdateien hochladen, damit die verschiedenenBrowser und Endgeräte die Schrift korrekt anzeigen können. Klicken Sie auf den Durchsuchen-Button neben dem Schriftarttyp und laden Sie die entsprechende Datei hoch.
EOT Schriftdatei: Embedded OpenType Schrift (für Internet Explorer 4+)
SVG Schriftdatei: Scalable Vector Graphic Schrift (für iPad and iPhone)
TTF Schriftdatei: TrueType Schrift (für Firefox 3.5+, Opera 10+, Safari 3.1+, Chrome 4.0.249.4+)
WOFF Schriftdatei: Web Open Font Format Schrift (für Firefox 3.6+, Internet Explorer 9+, Chrome 5+)
Lizenzdatei: Laden Sie die Lizenzdatei hoch
Siehe auch
You can use the FontSquirrel Webfont Generator to convert your fonts into the required formats.
Click the Install font button to finish installing this font or click Cancel to abort your action.
11.3.11.2. Lokale Schrift anpassen
Sie können einzelne Änderungen an der lokalen Schrift vornehmen und zusätzliche Schriftartstile hochladen.
Click Edit font properties on the Fonts overview page to make changes to a number of settings of a local font.
Font Eigenschaften für lokalen Font editieren
Schriftname: Bearbeiten Sie den Schriftnamen.
Schrifthinweis: Nehmen Sie Änderungen an den Hinweisen zur Lizenz oder zum Urheber vor.
Schriftarttyp: Wählen Sie, ob die Schrift für Überschriften und Text genutzt werden kann.
Allgemeine Schriftartfamilie: Ändern Sie die Zuordnung der Schrift zu einer Schriftfamilie.
Click the Save button to accept your changes or click Cancel to abort your action.
11.3.11.3. Add font style
Click the Add font style button to upload additional font styles for your local font. If your font comes with a number of different styles in separate files, you need to upload them separately.
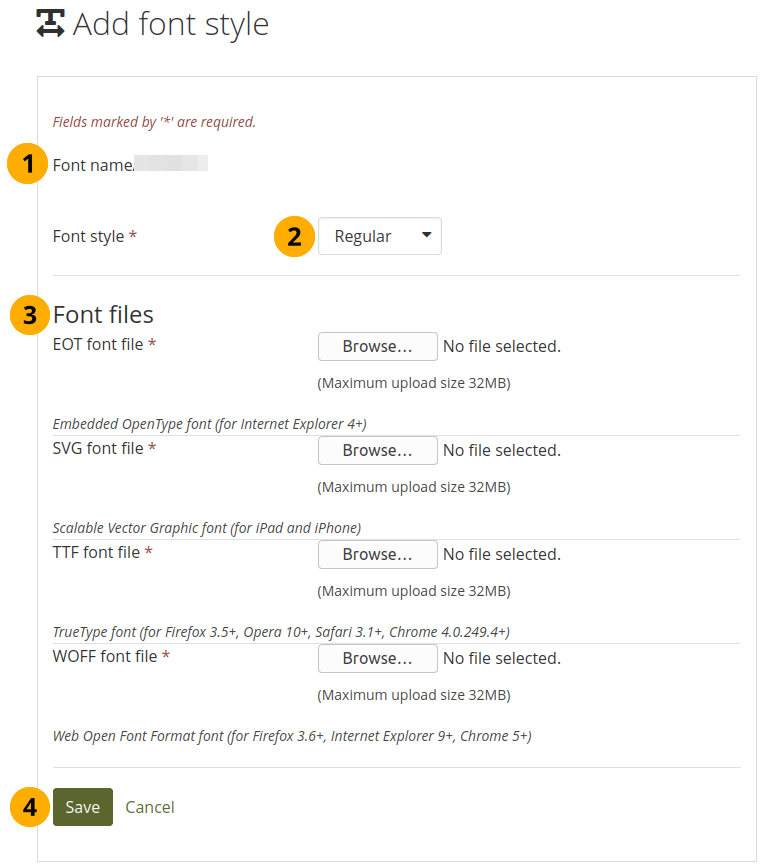
Zusätzlichen Font-Style zu einem lokalen Font hinzufügen
Schriftname: Der Name der Schrift für die ein zusätzlicher Stil hochgeladen wird wird angezeigt.
Schriftstil: Wählen Sie den Schriftstil, den Sie hochladen.
Schriftdateien: Laden Sie alle erforderlichen Schriftdateien hoch.
Click the Save button to accept your changes or click Cancel to abort your action.
11.3.11.4. Google Schrift(en) installieren
Klicken Sie auf den Google Schrift(en) hochladen-Button für weitere Hinweise auf dem Dateiuploadbereich von Google.
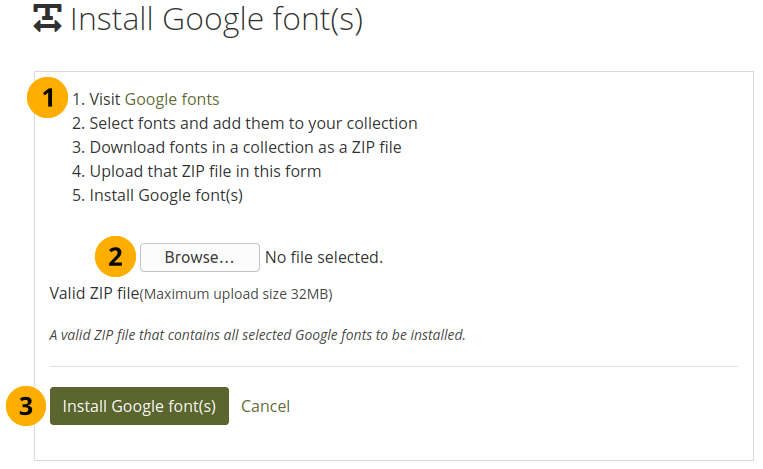
Google Schrift(en) installieren
Folgenden Sie den Hinweisen zum Finden und Downloaden von Google-Schriften.
Bemerkung
The instructions here are not the same as on the site because Google does not allow the downloading of font files any more. Mahara will be updated with the new instructions in Mahara 21.04.
Visit :Google webfonts helper.
Select the font for which you are looking.
Select the character sets you require.
Select the styles you want to have available.
Download the resulting ZIP file in step 4 on the page.
Upload that ZIP file in this form.
Gültige ZIP-Datei: Klicken Sie auf den Durchsuchen-Button, um die von Google heruntergeladene ZIP-Datei in Mahara hochzuladen.
Click the Install Google font(s) button to add these fonts to your fonts on Mahara or click Cancel to abort your action.
11.3.12. Dateien
Administration menu → Configure site → Files
Here you can upload files that you can include in the links and resources menu or in site pages. You can add files that are in the home directory to the menu with resources for logged-in people. Files that you save in the public folder can be selected in the menu for people who are not logged-in. Additionally, everyone can put them into their own portfolio pages as files to download.
Siehe auch
The process of uploading and managing files is very similar to files in your personal files area.
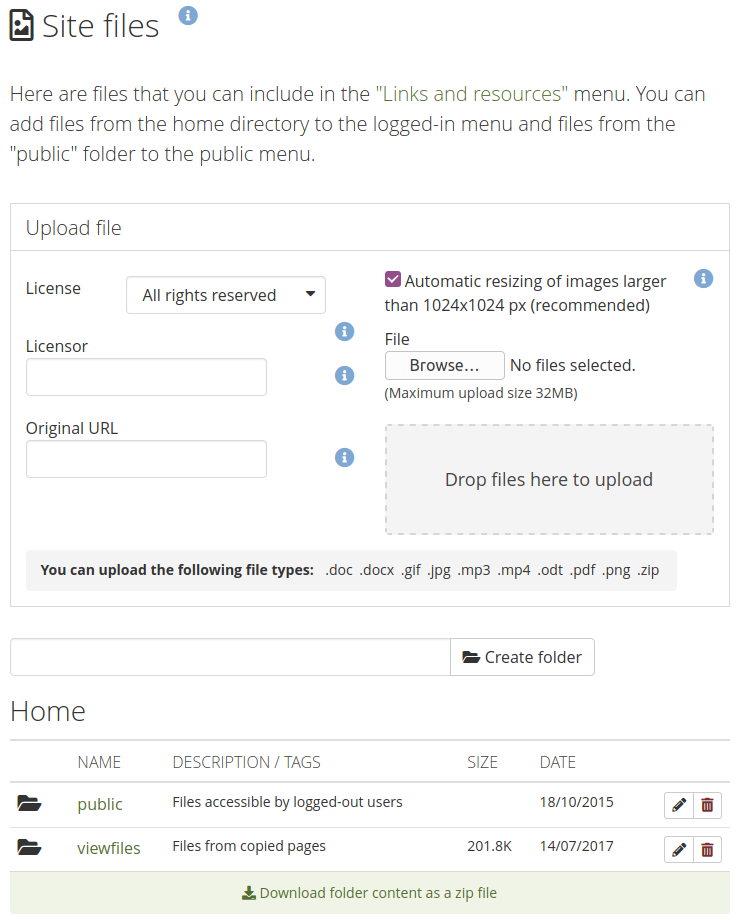
Site-Dateien
11.3.13. Cookie-Bestätigung
Administration menu → Configure site → Cookie Consent
The ‚Cookie Law‘, Directive 2009/136/EC of the European Parliament and of the Council, defines the requirements for consenting to the keeping of cookies across the European Union. Before your site can store or retrieve information from an electronic device, the visitors of your site must give informed consent for you to do so.
Siehe auch
Read the full text of the directive.

Enable Cookie Consent
Enable Cookie Consent: Switch this setting to ‚Yes‘ if you want to enable the Cookie Consent feature.
Klicken Sie auf den Änderungen speichern-Button.
Bemerkung
Cookie Consent does not have its own configuration. Site administrators need to provide relevant information on the Privacy page.
When Cookie Consent is enabled, your visitors see the following banner at the bottom of their screen.
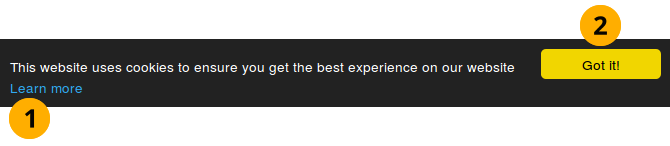
Cookie Consent banner
Click the ‚Learn more‘ link to be taken to the Privacy page of your site. There, more information about the collection of data via cookies is available.
Click the Got it button to acknowledge the use of cookies. You only need to do this once in a browser.