3.4. Journal
Content → Journal
The Journal is a tool with which you can record your thoughts and experiences online. By adding your journal or individual posts of it to a page you can allow other users to place feedback and comments on it. Thus, you can create a dialogue with your audience.
Per default, every user has one journal available. You can also have multiple journals.
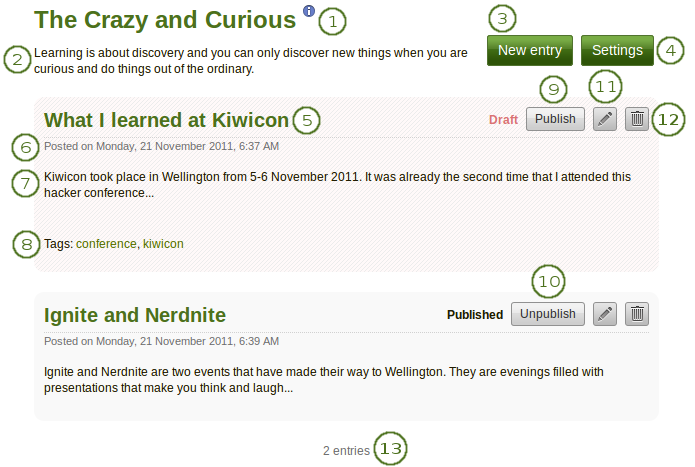
Overview of a journal with journal entries
- Journal title
- Journal description (optional)
- Click the New entry button to create a new entry in this journal.
- Click the Settings button to change certain journal settings (see below).
- Title of the journal entry
- Creation date of the journal entry
- Beginning of the journal entry
 Tags associated with the journal entry
- If a journal entry is labeled Draft, only you can view it. You can then click the Publish button to publish this entry to your journal for others to see when it is included in a page.
Note
When you publish a journal, you do not automatically make it available to others or make it public on the internet. The journal or journal entry still needs to be put into a page that is then shared with others in order for them to see it.
- If a journal entry is labeled Published, you can click the Unpublish button to revert it back to draft status.
- Click the Edit button
 to make changes to your journal entry.
 - Click the Delete button
 to delete your journal entry.
 - Number of entries in your journal
3.4.1. Change your journal settings
You can change the title of your default journal (and all others if you have enabled multiple journals) and add a description as well as tags.
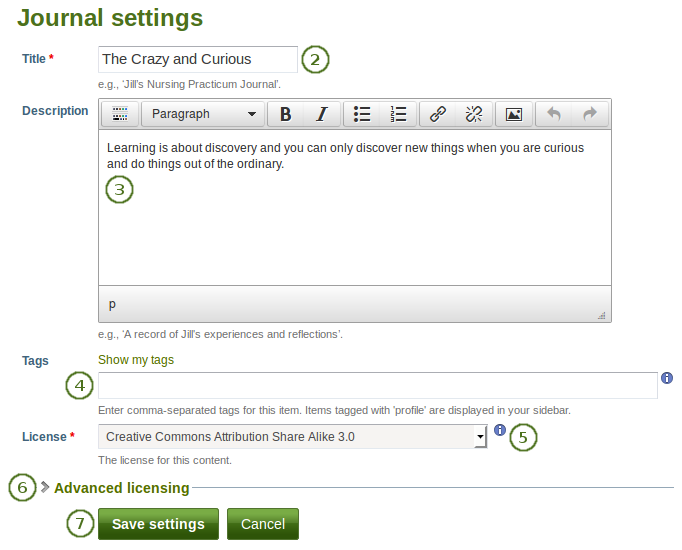
Journal settings
- Click on the Settings button of your journal.
- Title: Change the title of your journal. This is a mandatory field.
- Description: Add a description for your journal. You can format it as you wish.
- Tags: Add tags to your journal for easier searching later on. Separate each tag with a comma. You may also choose tags from the ones that you have created previously by clicking on Show my tags and then clicking on the tags you want to use.
- License: You see this field if the site administrator turned on license metadata. Choose the license for the journal. You can set your default license in your account settings.
- Advanced licensing: You see this option if the site administrator turned on license metadata. If you click it, you see two additional license fields, “Licensor” and “Original URL”, that you can fill in if this in not your own journal.
- Click the Save settings button to save your changes or the Cancel button to abort your changes.
3.4.2. Add a journal entry
All journal entries you make are private to you until you put them into a page. Thus, the publishing of a journal / journal entry is a three-step process:
- You write your entry and save it.
- In a page, you choose one of the journal blocks that suits your purpose best.
- You give those who shall see that page access to it.
Post your journal entry by following the steps below.
Journal entry
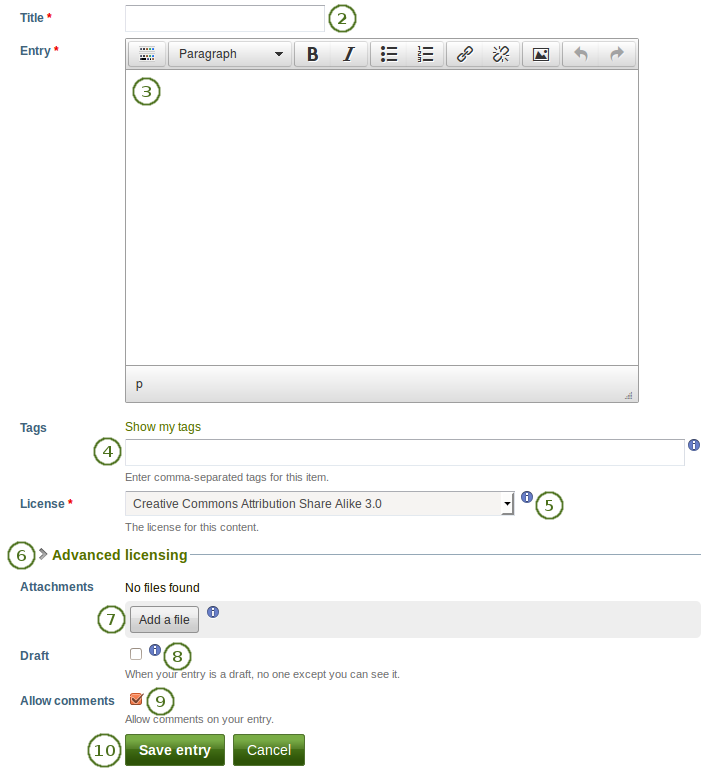
- In your journal, click on New entry.
- Title: Provide a title for your journal entry that expresses what you are writing about. This field is mandatory.
- Entry: You must also write some text, add pictures etc. The visual editor helps you format your journal entry. This field is mandatory.
- Tags: Add tags to your journal for easier searching later on. Separate each tag with a comma. You may also choose tags from the ones that you have created previously by clicking on Show my tags and then clicking on the tags you want to use.
- License: You see this field if the site administrator turned on license metadata. Choose the license for the journal entry. You can set your default license in your account settings.
- Advanced licensing: You see this option if the site administrator turned on license metadata. If you click it, you see two additional license fields, “Licensor” and “Original URL”, that you can fill in if this in not your own journal entry.
- Attachments: Add an attachment or more to your journal entry, e.g. PDF files associated with it or images. You can add files either from your files area or upload new ones directly onto your journal entry.
- Draft: Mark your entry as draft if you have not finished it yet. This is especially helpful if you have published your journal in a page, but do not want anybody to read this particular entry (yet). It is always visible to you, but not others.
- Allow comments: Check this box if you want to receive comments on the journal entry.
- Click the Save button to save your entry or the Cancel button to abort your changes.
3.4.3. Add a file as attachment to a journal entry
When you attach files directly to a journal entry, others can see them whenever they have access to the journal entry.
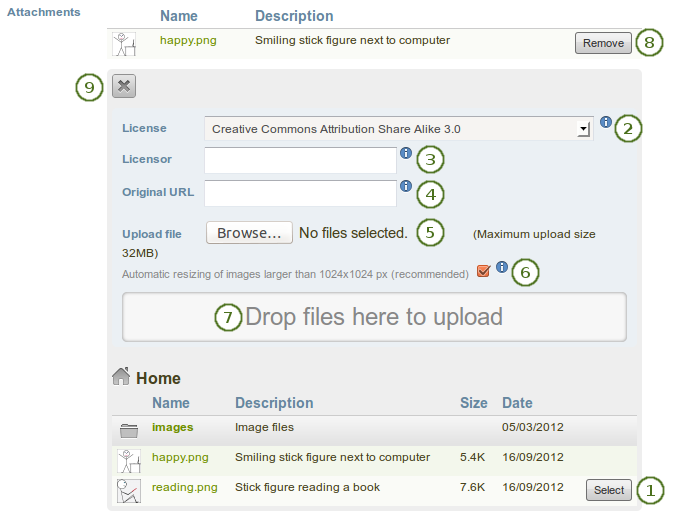
Attachments for journal entries
Click the Add a file button and then the Select button to select the file(s) from your Files area that you wish to attach.
Alternatively, you can upload additional files directly.
License: You see this field if the site administrator turned on license metadata. Choose the license for the artefact that you are uploading. You can set your default license in your account settings.
Licensor: You see this field if the site administrator turned on license metadata. If you are uploading a file that somebody else created, you can attribut the work to them here and provide their name for example.
Original URL: You see this field if the site administrator turned on license metadata. If you are uploading somebody else’s file, provide a link to the original Internet address so that others can go there and view the original file.
Click the Browse button to select a file from your computer to upload.
If you wish, you can have your uploaded images resized automatically if they are larger than the recommended size. You can only see this option if the site administrator made the image resizing option available.
Instead of clicking the Browse button to upload files, you can drag and drop files from your computer directly onto the “drop zone”. You must still observe the maximum file size upload for each file and the maximum total file size cannot be exceeded either.
Note
This functionality is not available in all browsers. Generally, users of Chrome 7+, Firefox 4+, Internet Explorer 10+, Opera 12+ (Windows only) and Safari 6+ can use drag and drop.
If you attached a file that you do not wish to attach anymore, you can click on the Remove button to take it off your list of attachments.
Once you are done, you can click the Close button.
3.4.4. Add an image to a journal entry
You can add images to your journal entry in two ways:
- Link to the image that is available elsewhere online.
- Use an image that you have on Mahara.
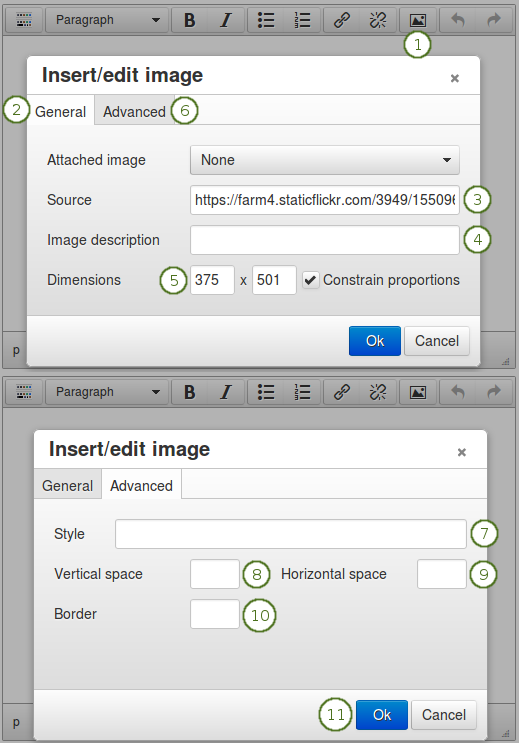
3.4.4.1. Link to an image online
Images that are freely accessible online are easy to add to a journal entry. However, make sure that you have the permission to use this image in your portfolio.
Link an external image in a journal post
Go to the visual editor and click on the Image button
 .
.Make sure you are on the General tab.
Source: Paste or type the image URL into this field. It must start with http:// or https://.
Image description: Provide a brief description for your image. This will be the “alt” text that is displayed to screen reader users.
Dimensions: Change the size of your image. If the image is recognised correctly, you have the image’s dimensions (in pixels) displayed directly. The first value is the width of the image and the second one is the height.
Note
When you want to change the dimensions, make sure the checkbox “Constrain proportions” is ticked. Then you only need to change one value and the second one is changed accordingly.
Click the Advanced tab if you wish to make additional settings.
Style: Add CSS style information if you want to make specific changes beyond the basic settings.
Vertical space: Add more space (in pixels) above and below the image.
Horizontal space: Add more space (in pixels) to the left and righ of the image.
Border: Add a simple black border to your image if you wish to do so.
Click the OK button. Alternatively, click the Cancel button if you want to abort inserting the image.
If you are not happy with how the image looks in your journal entry, select it (it will get little square handles) and click on the Image button again to make adjustments.
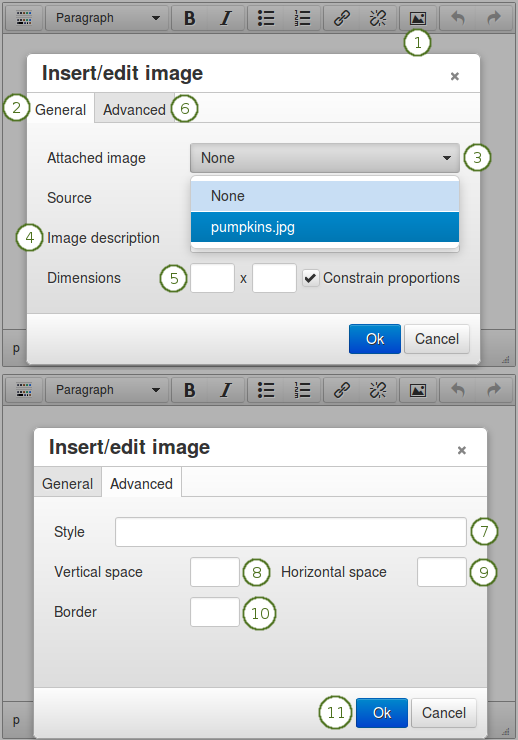
3.4.4.2. Add an image from Mahara
Link an image from your Files area in a journal post
Go to the visual editor and click on the Image button
.Make sure you are on the General tab.
Attached image: Select the image that you wish to display. You must have had it attached to the journal entry in order to see it here.
Image description: Provide a brief description for your image. This will be the “alt” text that is displayed to screen reader users.
Dimensions: Change the size of your image. If the image is recognised correctly, you have the image’s dimensions (in pixels) displayed directly. The first value is the width of the image and the second one is the height.
Note
When you want to change the dimensions, make sure the checkbox “Constrain proportions” is ticked. Then you only need to change one value and the second one is changed accordingly.
Click the Advanced tab if you wish to make additional settings.
Style: Add CSS style information if you want to make specific changes beyond the basic settings.
Vertical space: Add more space (in pixels) above and below the image.
Horizontal space: Add more space (in pixels) to the left and righ of the image.
Border: Add a simple black border to your image if you wish to do so.
Click the OK button. Alternatively, click the Cancel button if you want to abort inserting the image.
If you are not happy with the alignment or the dimensions of the image in your journal entry, select it and click on the Image button again to make adjustments.
3.4.5. Work with multiple journals
Content → Journals
If you wish to use more journals, e.g. to put your writing into categories for making all posts from one category available in a page without having to select each journal entry, you can go to your Settings and tick the checkbox Multiple journals.
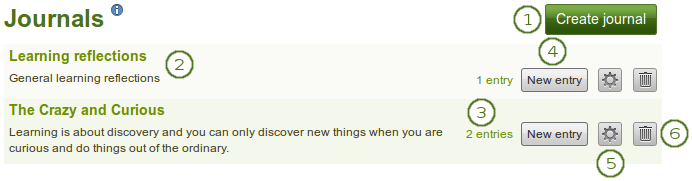
Multiple journals enabled
- Once you can create multiple journals, click the Create journal button to set up a new journal.
- All your journals are listed on Content → Journals with their titles and descriptions. The titles link through to the individual journals.
- You see how many entries you have in each journal.
- Click the New entry button to create a new journal entry directly from this screen.
- Click the Settings button
 to make changes to your journal title, description or tags.
 - Click the Delete button to delete the journal and all its entries.
Warning
When you click the Delete button, you receive a confirmation message whether you really want to delete the journal or not. If you used the journal or an entry of it in a page, Mahara lets you know so you can decide whether to delete the journal or not. Once you agree to delete the journal, your journal and all its content are removed permanently.