1. Introduction
Welcome to the Mahara user manual. This user manual is designed to provide documentation for people who use Mahara on a day-to-day basis. It covers the functionalities of Mahara to provide you with information about what you see on the screen.
Without further ado, let’s begin!
1.1. What is Mahara?
If you’re wondering what Mahara or an ePortfolio is, why you might want one and what it can do for you, then read on – you’re about to find out.
At the simplest level, Mahara is two things: an ePortfolio and a social networking system combined. An ePortfolio is a system in which students can record “evidence of lifelong learning” – such as essays, artwork or other such things they produce that can be stored digitally. Such things are known as artefacts in Mahara. Social networking systems need little introduction – think Bebo, Facebook or MySpace. Basically, they give a way for people to interact with their friends and create their own online communities.
But Mahara is much more than just a place to store files. Mahara also includes blogging, a résumé builder, and Moodle integration.
1.2. The Mahara framework
With Mahara, you control which items and what information within your portfolio other users see. Such items and information are termed artefacts. To facilitate this access control, all artefacts you wish to show to other users need to be arranged into one area. In Mahara this compilation of selected artefacts is called a ‘page’. You can have as many pages as you like, each with a different number of artefacts, intended purpose and audience. Your audience, or the people you wish to give access to your page, can be added as individuals or as a member of a group. It can even be made publicly available.
For example you could create:
- a page for your friends and family that includes holiday photos and a personal journal
- a page for your tutor, which includes assessments and your reflective learning journal
- a page to showcase your best pieces of work and your résumé for potential employers
- …
A single page or a collection of pages can make up your portfolio. Unless artefacts are placed in a page, they are not visible to anybody but you. You can use files that you uploaded or journal entries you wrote in as many pages as you wish. You only need one copy of your artefact.
Imagine you collected all your artefacts in a shoe box. Whenever you have a new artefact, you add it to the shoe box. When you are ready to create your portfolio, you take a look at the artefacts in your shoe box and choose those that you want to make available on a portfolio page. You can arrange the artefacts on that page to your liking.
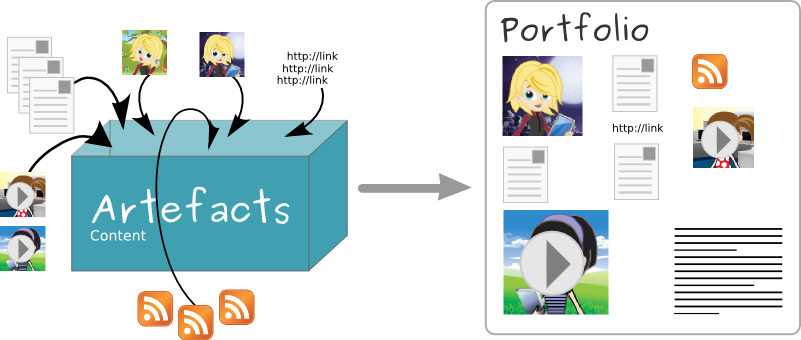
Portfolio work with Mahara
The diagram below of example artefacts, pages and groups illustrates how content in Mahara can be shared and reused in different contexts and for different audiences.
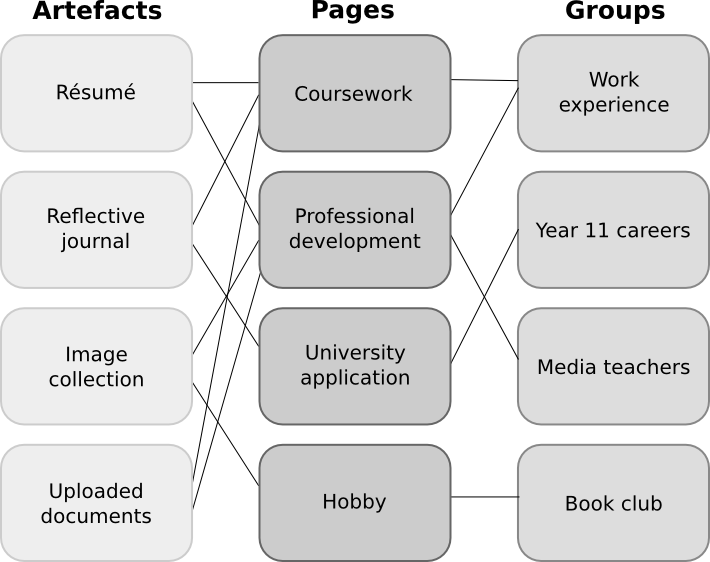
Mahara framework
1.3. How does Mahara fit in to the e-learning landscape?
If you think of LMSs such as Moodle, Sakai and Blackboard as the formal, structured side of e-learning, then Mahara is the social, reflective side. An LMS and an ePortfolio complement one another in an online learning environment.
In particular, while Mahara’s APIs are open to all, Mahara can integrate with Moodle natively to provide a streamlined user experience. Since Moodle 2.0 this is not only limited to SSO via MNet, but students are able to export assignments, blogs and much more straight into Mahara to use as artefacts – which can then, of course, be placed into pages.
1.4. What if Mahara does not support a feature I want?
Mahara has been designed from the ground up to be an open, pluggable system. Creating new artefacts, authenticating against a custom system and much more can be implemented simply through writing a plugin that uses the appropriate core API. What this means is that it is free and easy for you to customise almost anything about Mahara to suit your needs – and paid support is available through a network of Mahara Partners should you require it.
1.5. Other things to do
Now you have a basic idea of what Mahara is, you could:
- Read the list of features that Mahara comes with.
- Explore the demo or download Mahara for yourself to play with.
- Sign up to the mahara.org community and begin asking questions and contributing in the forums.
- Continue reading this user guide.
1.6. Where can I get ideas of how to use Mahara?
The Mahara 1.4 Cookbook by Ellen Marie Murphy was published in September 2011. It has over 50 ideas of how to use Mahara in different settings. The book can be purchased in PDF and paper formats.
The Mahara E-Portfolios: Beginner’s Guide by Derrin Kent and Richard Hand is the updated edition of the Mahara 1.2 E-Portfolios: Beginner’s Guide and a great reference for step-by-step instructions on how to create a portfolio and perform other tasks.
You may also wish to check what other books or papers have been published on Mahara or what users talk about in conference presentations.
1.7. Getting help
- Contextual help is available throughout Mahara. Watch out for the Help icon
 . Click on it to find out more about the action you are about to perform.
 - You can also ask questions in the forums.
1.8. Mahara and accessibility
Mahara aims to be usable by as many individuals as possible, including those with disabilities or special needs. Creating accessible web content is a requirement in many countries. In order to provide international guidelines, the Web Content Accessibility Guidelines (WCAG) were created. There are three conformance levels under the WCAG 2.0, the latest edition of the guidelines: A, AA, and AAA. Each level requires conformance with previous levels and includes its own specific guidelines for how websites should be made accessible.
With version 1.9, Mahara has reached level AA for user-facing areas of the system. The administration of Mahara is predominantly on level AA as well. Only a few things need to be corrected.
If you come across accessibility issues, please file a report in our bug tracker and tag the item “accessibility”.
If you are a screen reader user, you can use the following access keys to navigate the main menu items in Mahara:
Regular user interface:
- d:Dashboard
- c: Content
- p: Portfolio
- g: Groups
- a: Administration
Administrator interface:
- a: Admin home
- c: Configure site
- u: Users
- g: Groups
- i: Institutions
- e: Extensions
- h: Return to site