5.3. Set up a group
You can create a number of different groups depending on your role on Mahara.
All user roles
- Open membership: Any user of the site can become a member simply by visiting your group page and clicking the Join button.
- Request membership Any user can request to join your group. However, as owner you can choose to accept or decline this request. The requesting member will be notified of your decision automatically.
- Invite only: Only users that you explicitely invite may join your group. They can accept or decline your invitation.
Staff and administrators
Standard controlled membership
- You can add users directly to your group.
- The members cannot leave this group.
Course controlled membership
- You can add users directly to your group.
- The members cannot leave this group.
- You can assign tutors to the group. They can only add new members.
- Group members can submit portfolio pages for feedback / assessment. These pages are locked until released by an admin or tutor.
Course request membership
- Any user can request to join your group. However, as owner you can choose to accept or decline this request.
- The members can leave this group.
- You can assign tutors to the group. They can only add new members.
- Group members can submit portfolio pages for feedback / assessment. These pages are locked until released by an admin or tutor.
- This group is designed to be used for a course-based group where the membership is defined by an external system (such as an institution’s enrolment system) and you wish to replicate that membership in the group. However, you can also set up this group manually.
Note
The site administrator can limit the creation of groups to users with staff and / or administrator rights. If you cannot create a group, you will most likely not have the appropriate permission and will have to contact your site administrator, e.g. via the Contact us form to enquire about the process of having a group set up.
5.3.1. Create a group as a user, staff or institution admin
If you are allowed to create a group, you see the Create Group button on the My Groups overview page.
Create a group as a user
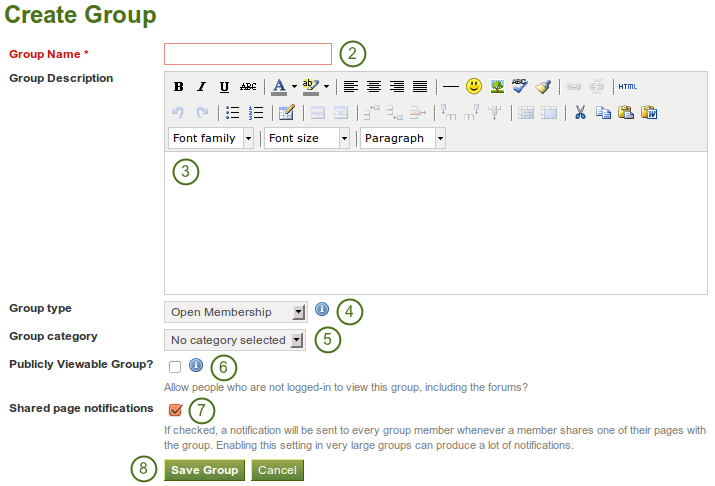
- Click the Create Group button on Groups -> My Groups.
- Group name: Provide a name for your group. You must fill in this field.
- Group description: Briefly describe what your group is about.
- Group type: Choose a type for your group. For descriptions of the types and what user role can create which group type, see above.
- Group category: Choose a category if you want to associate your group to one, allowing you to filter groups on the My Groups and Find Groups page. This setting is only available if the site administrator turned it on.
- Publicly viewable group? Choose this option if anybody shall have access to this group. You only see this setting if the site administrator allowed you to have it. Anybody can see the group homepage, the members and the discussion forum. Only members of the groups can see the group’s pages, unless they have been made public, and the files area.
- Shared page notification: This check box has a check mark per default. Whenever somebody shares a page with the group, all group members get an email. You may want to uncheck this setting in very large groups where lots of pages get shared but members do not have to be notified.
- Click the Save Group button to finish creating your group, or click the Cancel button to abort the group creation process.
Note
The group name that you choose does not have to be unique. Other groups can have the same name. In order to distinguish them more easily, you can add a group description.
5.3.2. Create a group as a site admin
When you have site admin rights, you have an additional setting when you create a group: You can choose to add new users to a group automatically. That way, any new user who creates an account after the group is created becomes a member of this group.
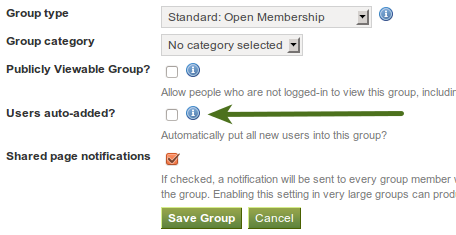
Add users to a group automatically.
Note
This is a great setting when you want to set up a community group which all users should join in order to participate in forum discussions etc. On mahara.org this is used to make every user a member of the “Community” group in which discussions around Mahara take place.
All other group settings still apply.
5.3.3. Edit general group settings
You can start out editing a group’s settings from three places by clicking on the Edit button:
- My Groups overview page
- Find Groups page
- The group homepage
You are then taken to the same screen as if you were creating a group and make the necessary changes.
Warning
You can change the group type to a different one. Please be careful if you do so especially from a controlled course group. If users have submitted portfolio pages to that group, they remain locked eve when you change the group type.