3.3. Files
Content → Files
The Files area is a repository, i.e. a document storage for folders and files, that you can use within your portfolio. Both folders and files are considered artefacts and as such can be added to a page. You may create any number of folders or sub folders. To view which sub folders and files sit within a folder, click on the folder name. Use the Home link to return to the top level folder directory.
You can arrange files and folders by dragging and dropping the icon in front of the file / folder name onto another folder icon. A suitably named and organised filing structure will help you with the long term organisation and retrieval of your artefacts. If you want to move a file or folder out of a sub folder, move it onto the  parent folder icon
  .
.
You will find that some folders are automatically created by the system such as viewfiles. This folder includes files from imported pages. As with any other file, you can move them out of this folder and store them in a different folder.
Note
You can move files and folders to your heart’s content without having to re-link them in the pages where you use them. Also renaming them will not have a negative impact on links.
3.3.1. Upload a file
Before you upload a file, make sure that you are allowed to do so. For any artefacts that you publish in your portfolio, you must have the sufficient rights. That means:
- the artefact is your own or
- you are allowed to reproduce and distribute it → it does not violate any copyright legislation and
- the artefact also adheres to the Terms and Conditions of the Mahara site you are using
It can be that you have to agree to an upload agreement before you can upload any files to your files area. The site administrator decides about that in Site Administration → Extensions → Plugin Administration → Plugin type: artefact: file.
You can select a file from your computer to upload by clicking on the Browse button. Make sure that the file is not larger than the allowed upload size.
When the file was uploaded successfully, it appears in your file list. You can edit it by clicking on the Edit button to:
- change its file name (but leave the file extension)
- add a description which will help you to identify the file easily
- add tags which you can use to search your portfolio content
- allow comments directly on the artefact
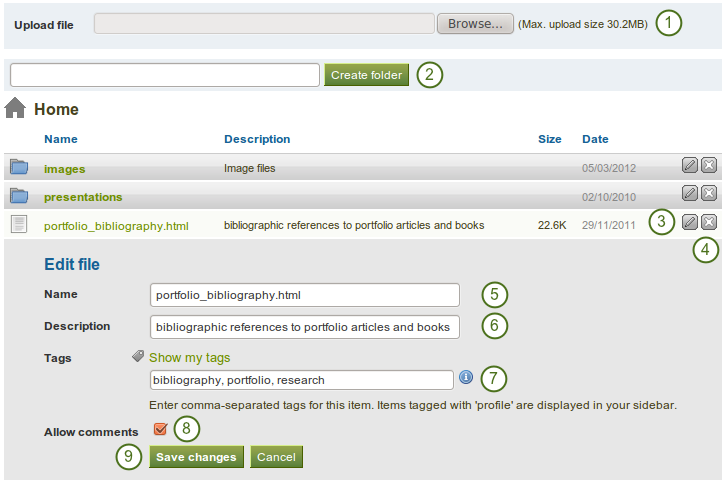
Upload and edit a file
- Upload a file.
- Type the folder name and click the Create folder button.
- Click the Edit button
 to edit folder or file properties (continue with Step 5).
 - Click the Delete button
 to delete a file or folder.
 - Name: Change the name of the file. It is not necessary to keep the file extension as Mahara stores it internally. However, it can be good to leave it in case somebody has problems opening the file as no default programme is associated after downloading the file.
- Description: Give the file a description to find it again more easily.
- Tags: Give the file one or more tags. You can choose from your existing tags if you wish by clicking on the Show my tags link and then selecting the tags. Separate your tags with commas.
- Allow comments: Decide if users should be allowed to comment directly on the file.
- Click the Save changes button to keep your changes or click the Cancel button to abort the action.
Note
You can move your file to a folder by clicking on the icon before the file’s name and then dragging and dropping it onto a folder icon.
3.3.2. Upload multiple files
You can upload multiple files at once in two different ways:
- You can upload multiple files when you are browsing for them. Hold down the Ctrl key (or Command key on a Mac) and click on all the files that you wish to upload at once.
- You can also place all files into a compressed file, a .zip file, and upload that to Mahara. This method allows you to upload multiple files from different folders on your computer at once. You can create a zip file from any number of files that you have selected in your document management program by making a right mouse click and selecting Compress… (or something similar).
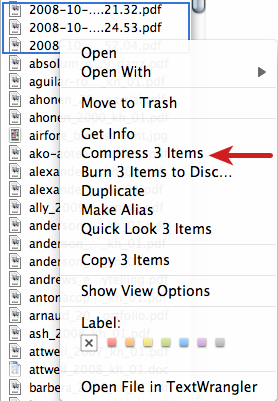
Zip files in the Finder under MacOSX
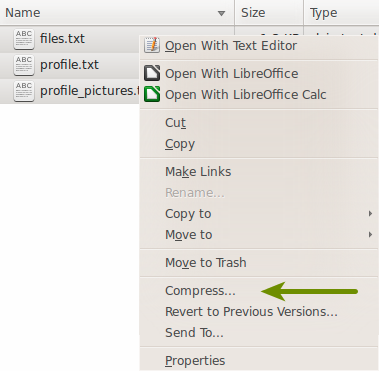
Zip files in Ubuntu’s Nautilus
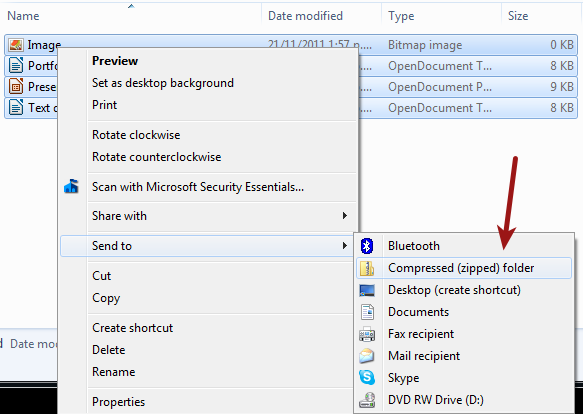
Zip files in Windows Explorer
Once you have uploaded your zip file to Mahara, you can unzip it there. Click on the Unzip button  next to the Edit button . Please follow the on-screen instructions.
3.3.3. Create a folder
Type the name of the folder into the text field and click the Create folder button. You can edit the properties of the folder by clicking on the Edit button . You can:
- change its name
- add a description which will help you to identify the folder easily
- add tags which you can use to search your portfolio content
- allow comments (this setting can be overwritten for the artefact on a page)
3.3.4. Delete a file or folder
You can delete a file or an entire folder and its content by clicking on the Delete button at the end of the line of the file or folder.
If you use a file in a journal entry and / or on a page, you are warned before deleting the file so that you don’t delete it by accident.
3.3.5. File quota
The site administrator of your Mahara site decides how much space you can have to store files. This can vary across institutions. You can check your file quota in the sidebar in your ‘Files’ area.
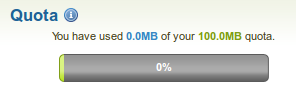
File quota