7.3. Notifications
You can view the messages you receive in your account and that you have sent in your Notifications area which you access from the top-right corner between Settings and Logout.
Access your Notifications area
7.3.1. Inbox
Your Inbox holds all the messages that you receive in Mahara and whose notification type you have not set to “None”.
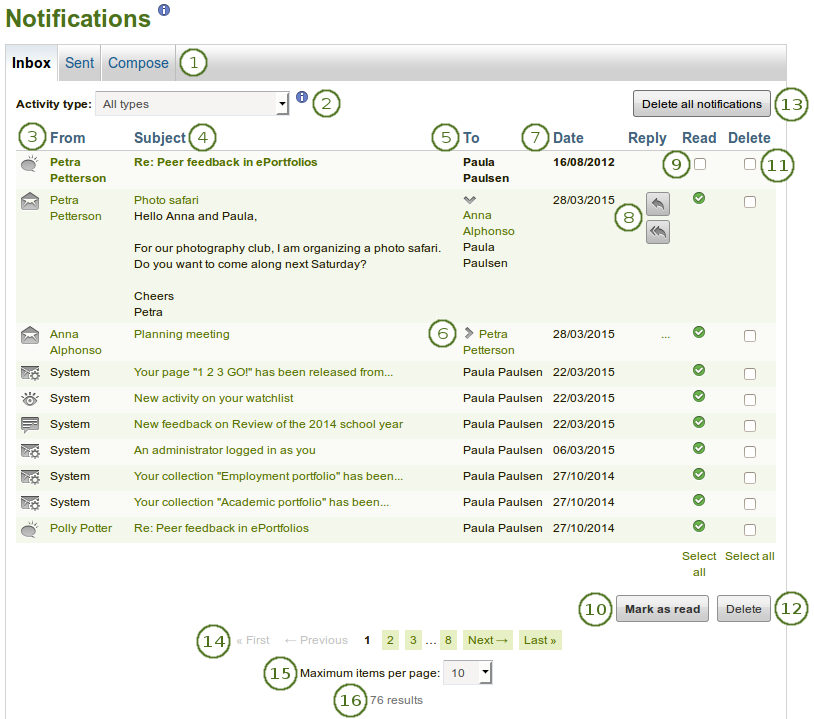
Your inbox
You have easy access to your sent messages by clicking the Sent tab.
 You can also write a message to one or more users by clicking the Compose tab.
Activity type: You can filter your notifications according to an activity type to see only a subset of all your notifications.
From: The user who sent the message.
Subject: The subject of the notification is linked so that you can click on it and read the text of the notification.
To: The user(s) who received the message.
Click the Expand icon
 to see all the recipients of the message. You can click their individual names to be taken to their profile page.
Date: The date when the notification was sent.
When you have unread notifications, these are displayed first so you can attend to them directly and do not have to find them further down in your inbox.- Reply: When you click anywhere into the message or the three dots “…” in the Reply column, you see buttons that allow you to reply to a message from another user. Click the Reply button
 to send a message to the sender, or click the Reply all button
  to send a message to the sender and all recipients of the notification.
 Read: Select one or more notifications on that page that you want to mark as read by ticking individual checkboxes or using the Select all link at the bottom of the column. Notifications that are sent to your email are marked as read automatically, and you cannot select them.
Click the Mark as read button to mark the previously selected notifications as read. The icon for messages from other users changes into an open envelope when you have read those messages.
Delete: Select one or more notifications on that page that you want to delete by ticking the checkboxes or using the Select all link at the bottom of the column.
Click the Delete button to permanently delete the notifications that you had selected for deletion.
Click the Delete all notifications button if you want to delete all notifications at once. If you selected a specific activity type, only the notifications matching this type will be deleted.
Warning
Once notifications are deleted, you cannot retrieve them again.
Navigate through the list of your messages with the help of the Paginator.
Maximum items per page: You can select how many notifications you want to see per page by choosing a different number from the drop-down menu.
You can see how many notifications you have in total.
7.3.2. Sent
Your Sent message area holds all the messages that you sent in Mahara.
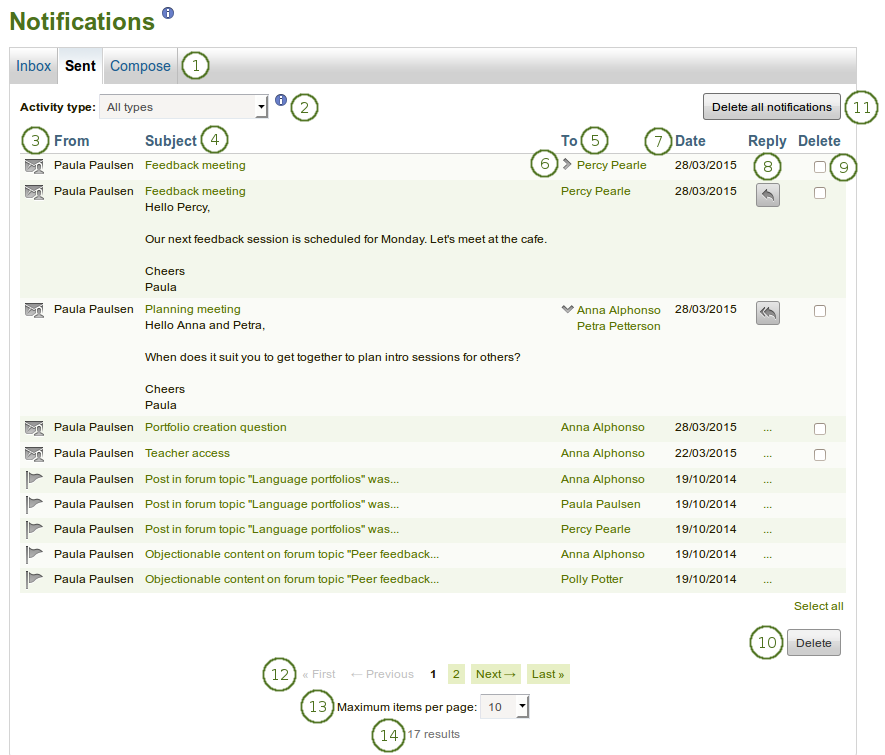
Your sent messages
You have easy access to your inbox by clicking the Inbox tab.
You can also write a message to one or more users by clicking the Compose tab.Activity type: You can filter your notifications according to an activity type to see only a subset of all your notifications.
From: The user who sent the message. In general, your name is displayed here as this is your Sent messages area.
Subject: The subject of the notification is linked so that you can click on it and read the text of the notification.
To: The user(s) who received the message.
Click the Expand icon
to see all the recipients of the message.Date: The date when the notification was sent.
- Reply: When you click anywhere into the message or the three dots “…” in the Reply column, you see buttons that allow you to reply to a message from another user. Click the Reply button to send a message to the recipient, or click the Reply all button to send a message to all recipients of the original notification.
Delete: Select one or more notifications on that page that you want to delete by ticking the checkboxes or using the Select all link at the bottom of the column.
Note
You can only delete some notifications.
Those that you cannot delete, do not have a checkbox available.Click the Delete button to permanently delete the notifications that you had selected for deletion.
Click the Delete all notifications button if you want to delete all notifications that you can delete at once. If you selected a specific activity type, only the notifications matching this type will be deleted.
Warning
Once notifications are deleted, you cannot retrieve them again.
Navigate through the list of your messages with the help of the Paginator.
Maximum items per page: You can select how many notifications you want to see per page by choosing a different number from the drop-down menu.
You can see how many notifications you have in total.
7.3.3. Send a message
You can send a message to multiple people in Mahara. When you clicked the Send message button on a person’s profile page or on the page “Find friends” or “My friends”, you can add more people to whom to send the message.
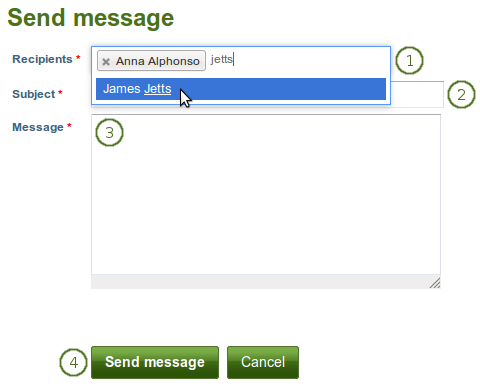
Send a message
Recipients: The person whom you selected to send the message to is added automatically to the recipient list. You can add more by starting typing and then selecting their name when they come up. You must enter at least one user to send a message to.
Note
It depends on the search settings of the site when you start seeing results for the names that you type. If the option “Exact user searches” is selected for the internal search plugin, then you need to type at least the entire first name for name options to be displayed. If the “Exact user searches” option is not selected, results start showing up as soon as you type the first letter.
Subject: Decide on the subject of the notification like in an email. You must enter a subject.
Message: Write your message. This field is required.
Click the Send message button to send the message to the people in the recipients’ list, or click the Cancel button to abort your action.
You can view all the messages that you sent in your “Sent” area in the Notifications.