11.8. Extensions
Administration menu → Extensions
Note
Extensions is only accessible by site administrators.
Extensions in Mahara serve to provide certain functionality in the system. Extensions can be installed at any point and can also be hidden.
11.8.1. Plugin administration
Administration menu → Extensions → Plugin administration
The Plugin administration lists all the plugins that are currently installed on your Mahara instance and provides a link to the plugin configuration settings where available.
Plugins in Mahara are always installed and can be accessed if users know the URLs and would otherwise have access. Rather than enabling and disabling the functionality, plugins are hidden or made visible by clicking on the Hide or Show buttons beside the plugins. When hiding an artefact type plugin, Mahara stops the display of the blocks related to it as well.
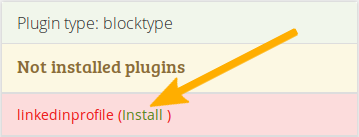
Warning when a plugin is not yet installed
If you added a plugin to your site’s codebase or if a new plugin was added to Mahara since the last upgrade that you performed, you will need to install it. A plugin that is not yet fully installed is marked with a warning and listed first in its section. Click the Install link to start the installation process.
In order to delete a plugin completely, you must delete the code and all database tables that pertain to the plugin. Additionally, you need to delete it from a number of system tables, e.g. “artefact”, “artefact_config”, “artefact_cron”, etc. As an example, view the information on how to uninstall the My Learning plugin.
Note
Core Mahara functionality can be made unavailable to users by hiding it. This may be useful if you connect Mahara to another system that already provides this functionality or if you do not wish your users to use that functionality. However, the decision about hiding a functionality should be considered thoroughly as it may also mean that users may not be able to have as many artefacts available to them as they could have.
In the following, only the plugins that have additional settings are discussed.
11.8.1.1.  Blocktype
You can decide in which order the block types are listed in the block configuration when you put a block onto a page.
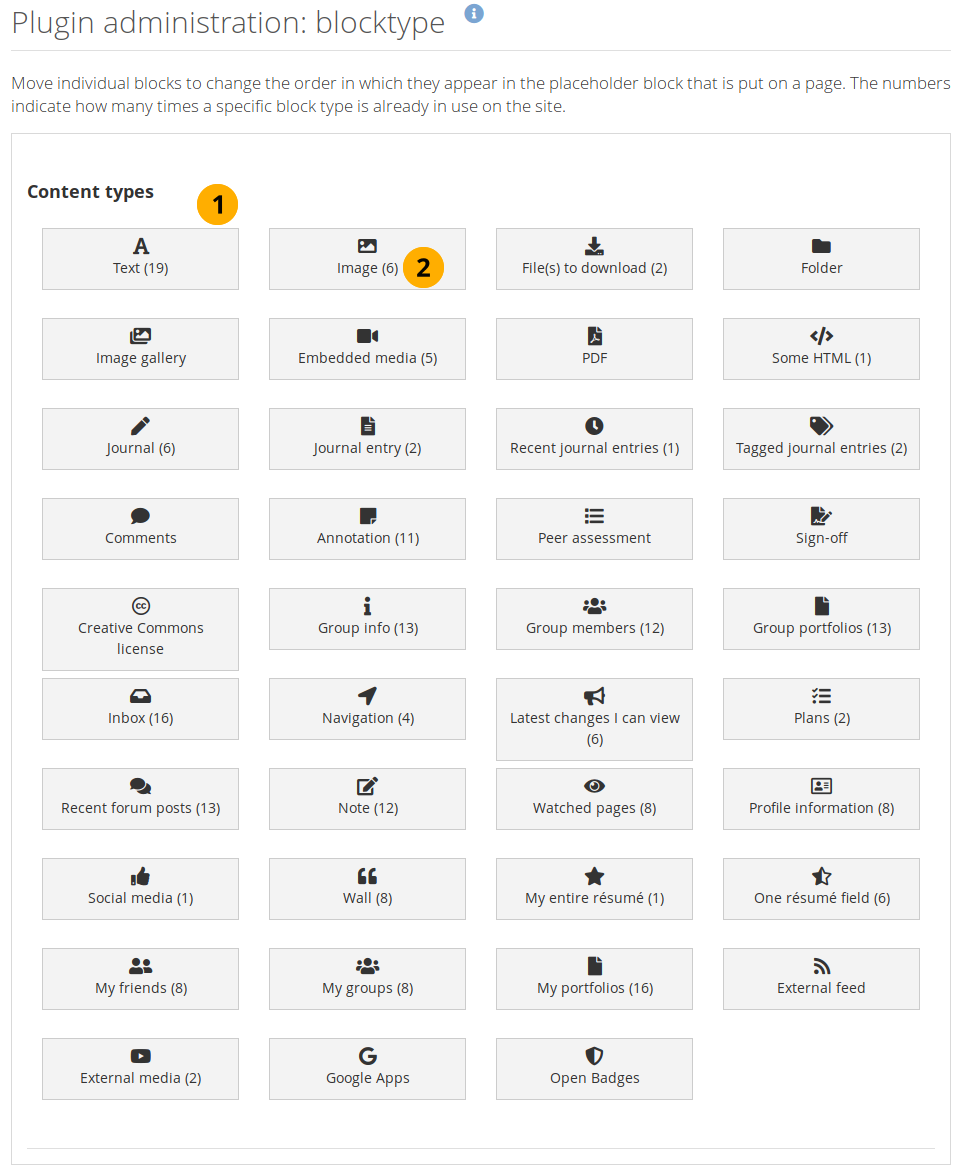
Order the block types for display in the placeholder block configuration
All block types that are available in Mahara are listed. You may not put all onto every page as their usage depends on the page context. Drag and drop the blocks to change their order.
Note
Typically, the first four blocks are displayed in the placeholder block configuration by default. Other blocks are accessible by clicking the Show more button.
This allows you to give quick access to the four most widely used blocks. Alternatively, you could pull blocks higher up that are underused.
The number indicates how many times this block has been used on the site.
Note
Some blocks are automatically placed on all profile and dashboard pages or group homepages.
11.8.1.2. Blocktype: File / folder
You can decide the default sort order for files displayed in a Folder block and whether viewers of portfolio pages that contain a Folder block should be able to download the contents of the folder as zip file in one go.
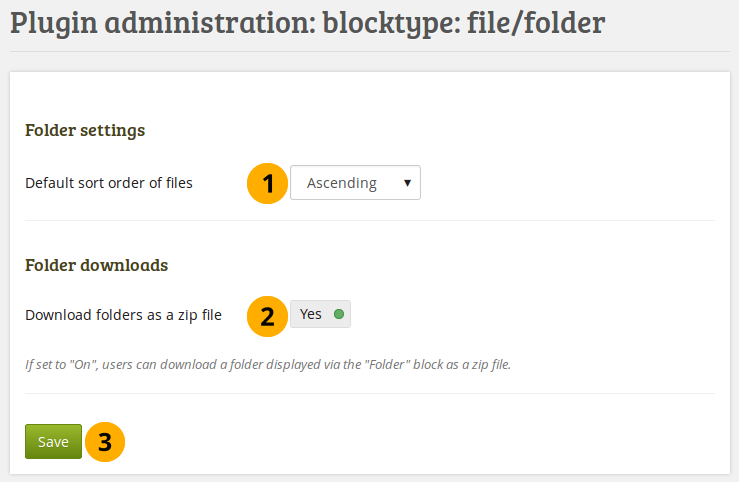
Configure the Folder block
Default sort order of files: Decide whether the default sort order for displaying files in a Folder block should be alphabetically ascending or descending.
Note
Page authors can change the sort order for each block.
Download folders as zip files: Switching this option to “Yes”, you can download the contents of a folder displayed in a Folder block as zip file. Thus, it is very easy for a viewer to grab all files at once and download them to their computer.
See also
Site administrators decide in the Artefact type: File settings for how long the zip file is kept on the server.
11.8.1.3. Blocktype: File / gallery
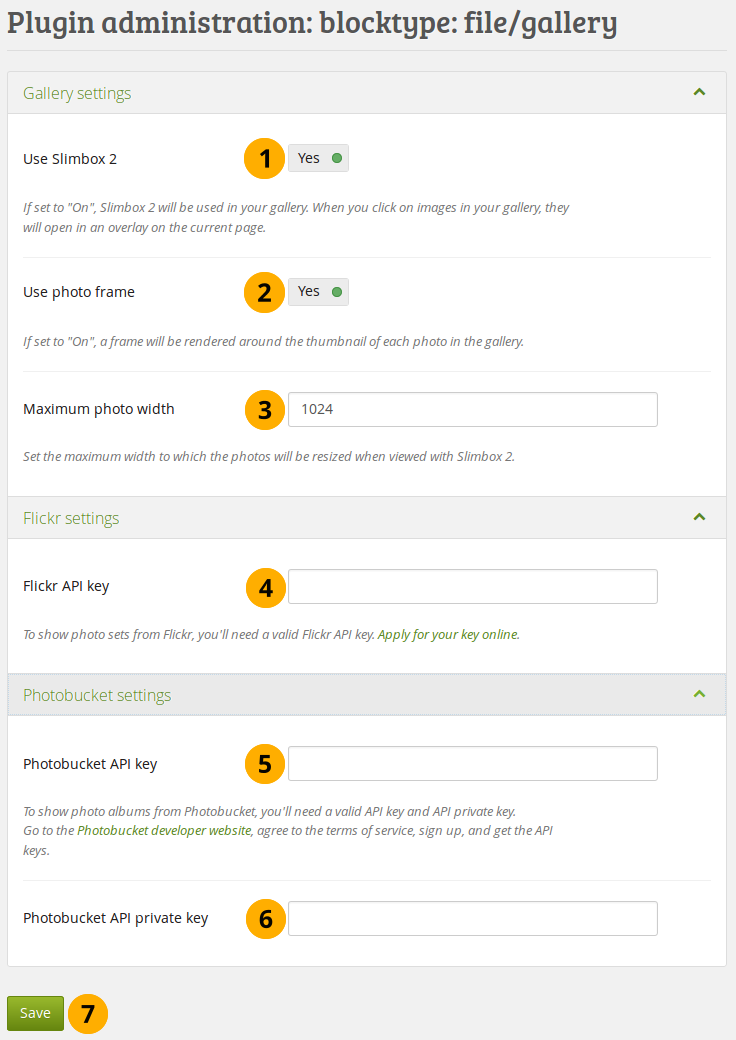
You can provide additional image gallery settings and also allow your users to make Flickr and Photobucket image galleries available. The settings you make on this page will be the default settings for all users.
Configure the Image gallery block
Use Slimbox2: Switch this option to “Yes” if you want to enlarge images from your image gallery on the page in an overlay instead of opening them in a new window.
Use photo frame: Turn this option on if you want to put a frame around the thumbnail of each photo in photo galleries.
Maximum photo width: Set the maximum width (in pixel) to which the photos will be resized when viewed with Slimbox2.
Flickr API key: If you want to allow users to display photos from Flickr, you need a valid Flickr API key. You can apply for the key at Flickr.
Photobucket API key: If you want to allow users to display photos from Photobucket, you need a valid API and private API key. You can get them from the developer page of Photobucket.
Photobucket API private key: Provide the private API key from Photobucket that you will have received.
Click the Save button to keep your changes.
11.8.1.4. Blocktype: File / internalmedia
Configure which file types users can embed into the Embedded media block. If you disable a file type that has already been used in a block, it will not be rendered any more.
Mahara comes with Video.js, a media player that can play a number of media files and does not require Flash (though it does have a Flash fallback option). Other video file types can be enabled, but users must have the appropriate software installed on their computers and the respective plugins enabled in their browsers to play them.
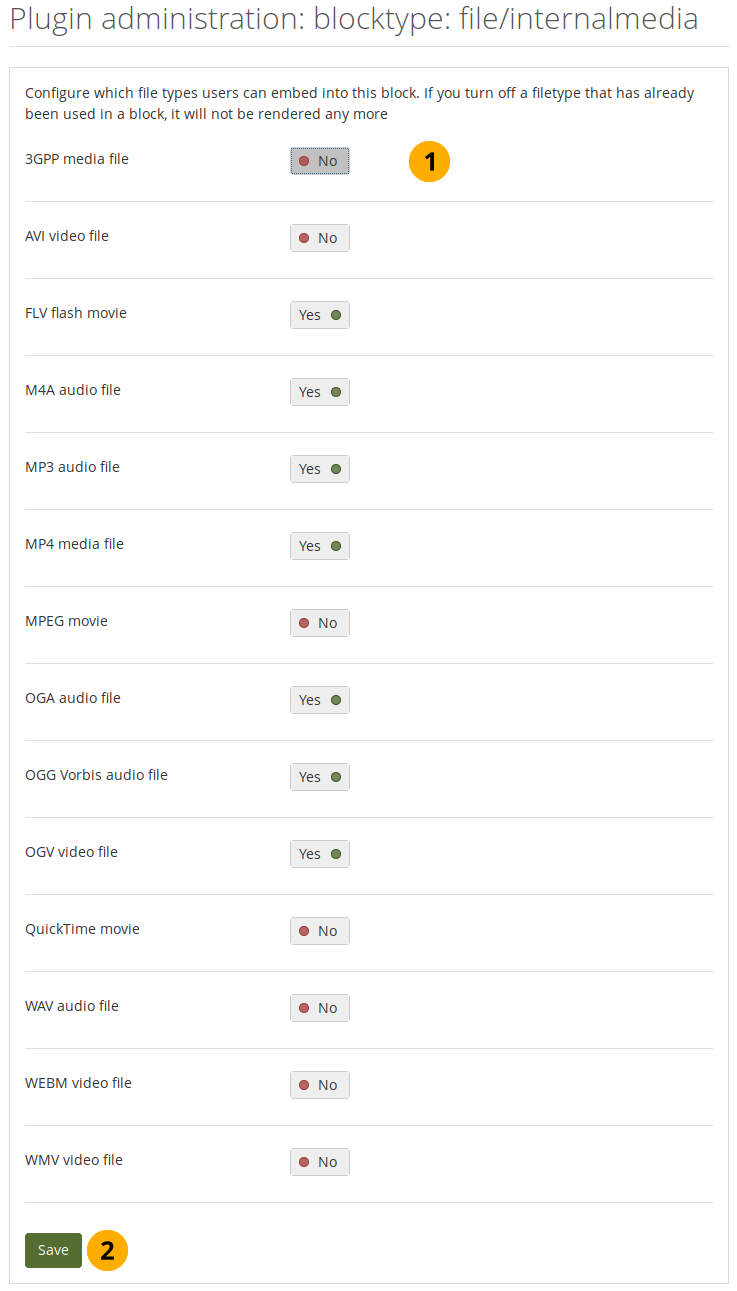
Configure the Embedded media block
Turn on the file types that you wish your users to be able to show on their portfolio pages.
Click the Save button to keep your changes.
Note
If you allow the embedding of file types that cannot be played by Video.js, some users may not have the necessary software installed for displaying these file types.
Here’s an overview of the video and audio file formats that can be played by Video.js and which browsers can view them. Only because Video.js supports them does not mean that all browsers can play them. They still need to support a specific file format themselves. Listed are only the browsers that Mahara supports. For updates to browser support, check the site “Can I use…”.
iOS devices may not always display MP4 files as the devices may only recognize the MPEG4 “Baseline” profile rather than the “High” profile. You can read the Apple specifications and convert a video if needed using Handbrake. Newer iOS devices (from the iPhone 5S on) should play “High” profile videos.
File format |
Chrome |
Chrome for Android |
Firefox |
Internet Explorer / Edge |
Opera |
Safari (incl. iOS) |
|---|---|---|---|---|---|---|
3GPP media file |
||||||
FLV Flash movie (requires Flash) |
||||||
|
||||||
MP3 audio |
||||||
MP4 video (H.264) |
||||||
MPEG movie |
||||||
OGA audio |
||||||
OGG Vorbis audio file |
||||||
OGV video |
||||||
|
(Edge) |
|||||
WEBM video file |
Note
While you can upload any file fromat from any computer or Android device, you are not able to upload audio files from an iOS device. You can only upload .mov video files. These require a browser plugin to be played and are not served via Video.js.
AVI and WMV files can only be played on computers running Windows unless you have a browser plugin installed on another operating system.
11.8.1.5. Blocktype: Text
You can convert Note blocktypes to Text blocktypes across the entire instance.
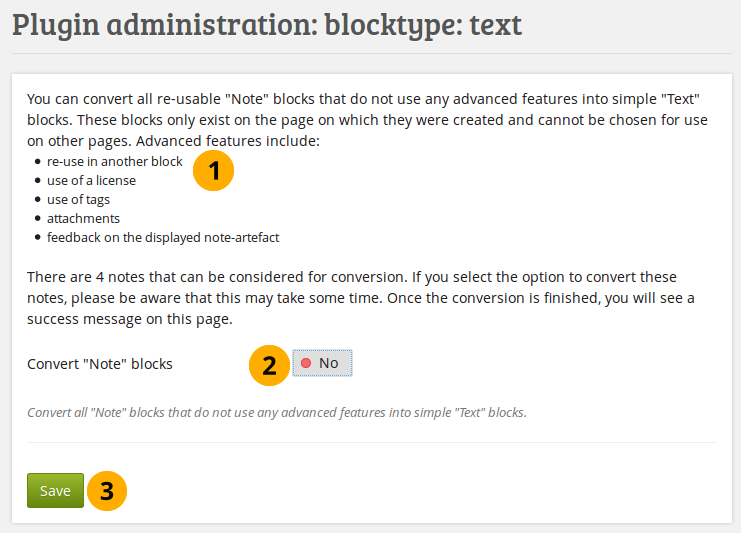
Configure text settings
Mahara calculates how many notes can be converted. Notes with the following characteristics are included in the conversion process. Notes that:
have not been re-used in another block;
do not have a license attached;
do not use tags;
do not have any attachments;
have not received any comments.
Turn on the option Convert “Note” blocks to convert all notes.
Click the Save button to start the conversion process. This may take some time depending on how many notes are to be converted.
See also
If you have a large site, the conversion of notes to text may take a very long time. It can be beneficial to use the command-line script.
11.8.1.6. Blocktype: Wall
You can limit the number of characters that are allowed for wall posts in this configuration setting. Existing posts will not be changed.
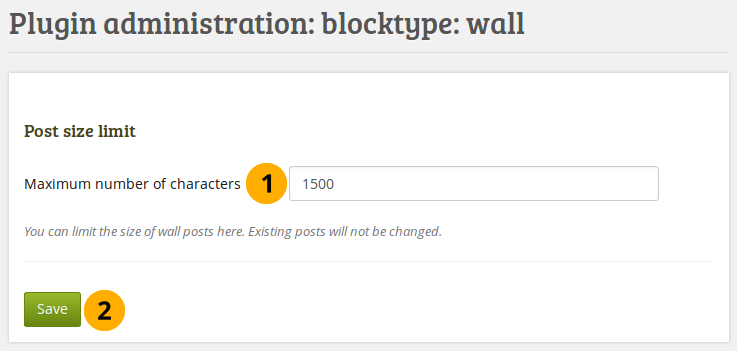
Configure wall settings
Choose the maximum number of characters for your wall posts.
Click the Save button to keep your changes.
11.8.1.7. Artefact type: Comments
Turn comment ratings on to enable ratings in the comment section on artefacts and pages. You can change the look of the comment ratings as well as the scale.
Note
Ratings cannot be on their own. They require either a comment or a file attachment.

Enable comment ratings
Enable comment ratings: Switch to “Yes” to enable comment ratings.
Icon to use to display ratings: Use the drop-down menu to select the icon that you want to use for your ratings. You can choose between:
Star
Heart
Thumbs up
Tick
Number of rating choices: Choose the scale that users will see when rating comments.
Note
If you change the number of rating choices, the ratings themselves will not be recalculated to fit that new scale.
Colour: Use the colour picker to select the colour for your icon or enter the hexadecimal color code.
Generated example: See a preview of what your comment ratings will look like.
Click the Save button to keep your changes.
11.8.1.8. Artefact type: File
You can configure a variety of options for uploading files:
Default user quota
Default group quota
Upload agreement
Resize images on upload
Profile picture size
Comments
Folder downloads
11.8.1.8.1. Default user quota
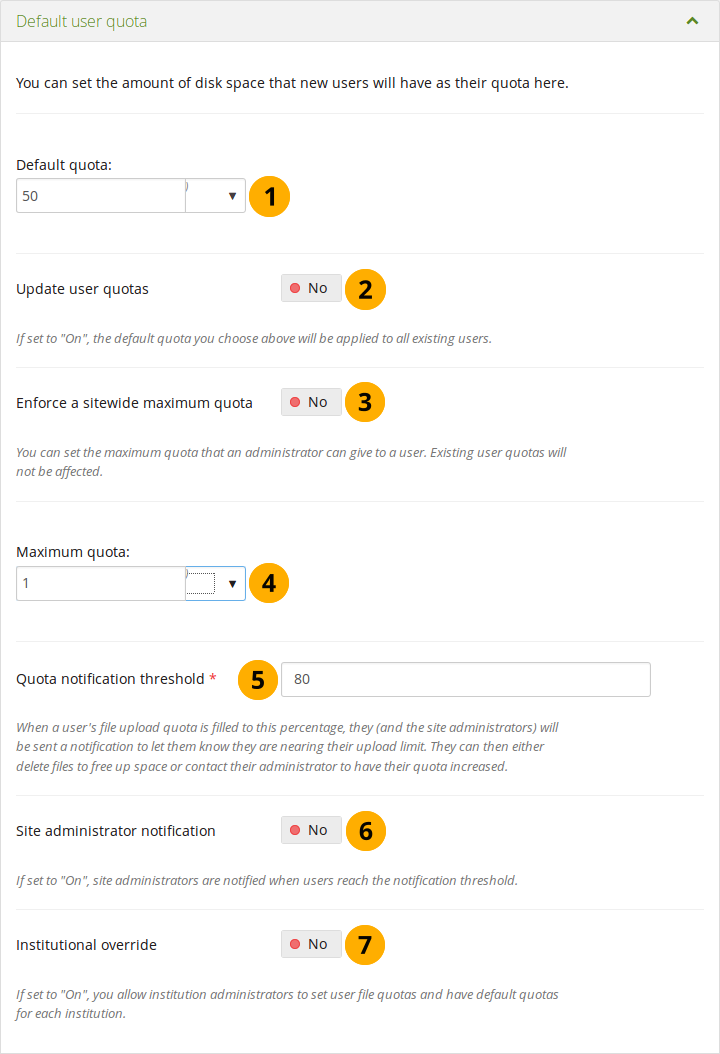
Configure the default user quota
Default quota: You can set the amount of disk space that new users will have as their quota. Existing user quotas will not be changed.
Update user quotas: Switch this option to “Yes” if you want to update the file quota for existing users with the value under Default quota. Only then will they be updated.
Enforce a site-wide maximum quota: Switch to “Yes” if you do not wish an administrator to go beyond the allowed maximum quota.
Maximum quota: You can set the maximum quota that an administrator can give to a user. Existing user quotas will not be affected.
Quota notification threshold: You can set a percentage for when a user receives a notification about reaching the upload limit for files. They can then decide to delete files to free up space or contact the site or institution administrator to check if they can receive more space.
Site administrator notification: Switch to “Yes” if the site administrator shall receive the quota notification emails for individual users to take action.
Institutional override: Switch this option to “Yes” if you want to allow institution administrators to set user file quotas and have default quotas for each institution.
Click the Save button at the bottom of the page when you are finished making your changes or continue to the next section on this page.
11.8.1.8.2. Default group quota
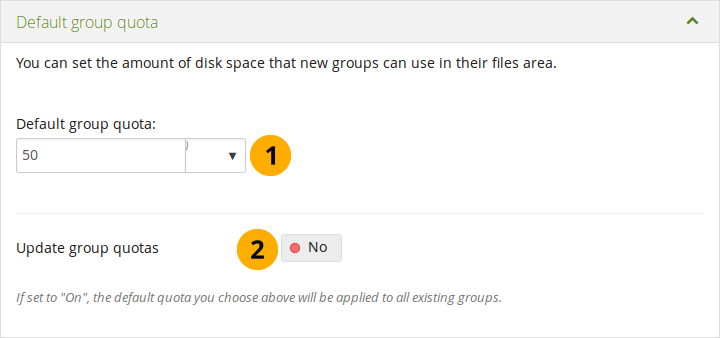
Configure the default group quota
Default group quota: You can set the amount of disk space that each group will have as its quota. Existing groups will not be affected.
Update group quotas: Switch to “Yes” if you want to update the file quota for existing groups with the value under Default quota. Only then will they be updated.
Click the Save button at the bottom of the page when you are finished making your changes or continue to the next section on this page.
11.8.1.8.3. Upload agreement
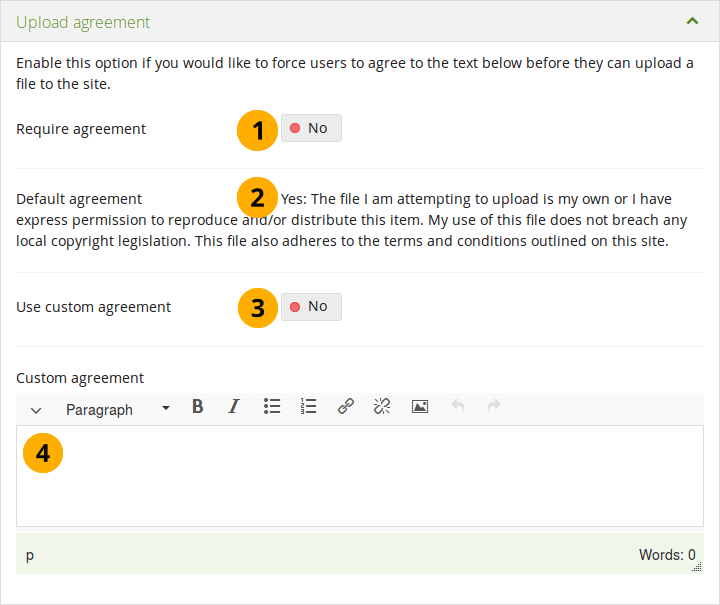
Configure the upload agreement
Require agreement: Switch to “Yes” if you want to force users to agree to certain terms before they can upload a file to the site. They must accept this agreement before they are able to choose a file from their computer to upload to Mahara.
Default agreement: This is the default agreement that will be displayed if you selected the option Require agreement and if you don’t want to use your own custom agreement.
Use custom agreement: If you want to write your own upload agreement, switch this option to “Yes” in addition to Require agreement.
Custom agreement: If you want to use a custom upload agreement, write it here.
Click the Save button at the bottom of the page when you are finished making your changes or continue to the next section on this page.
11.8.1.8.4. Resize images on upload
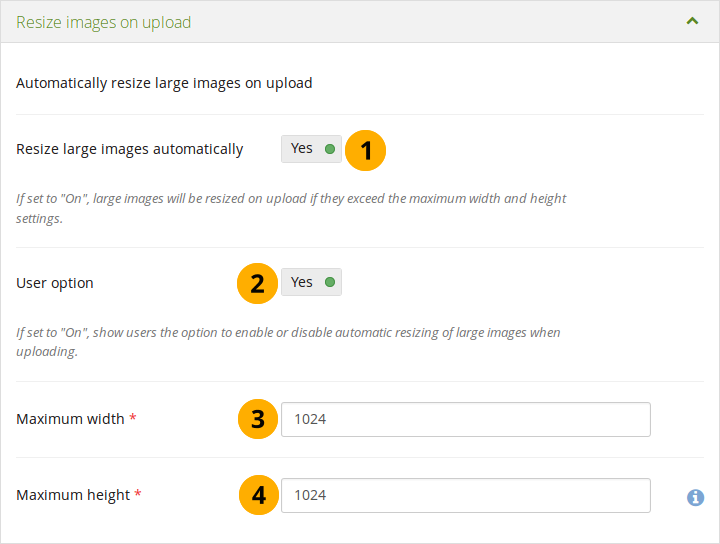
Configure the image resizing options
Resize large images automatically: Switch this option to “Yes” to resize any image that is uploaded to the maximum width and height settings.
User option: Switch to “Yes” if you wan to display users the option to resize images automatically in their account settings.
Maximum width: Choose the maximum width (in pixels) to which images will be resized upon uploading.
Maximum height: Choose the maximum height (in pixels) to which images will be resized upon uploading.
Click the Save button at the bottom of the page when you are finished making your changes or continue to the next section on this page.
11.8.1.8.5. Profile picture size
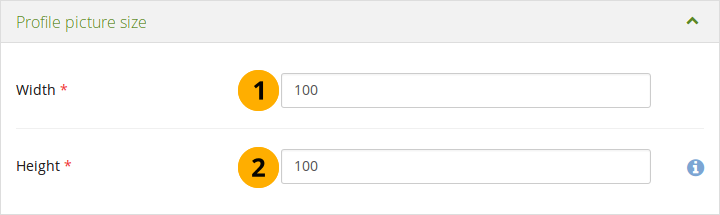
Configure the size of the profile pictures
Width: Choose the maximum width (in pixels) of the profile pictures for users.
Height: Choose the maximum height (in pixels) of the profile pictures for users.
Click the Save button at the bottom of the page when you are finished making your changes or continue to the next section on this page.
Note
All images uploaded to the profile pictures area will be resized to these dimensions if they are larger.
11.8.1.8.7. Folder downloads
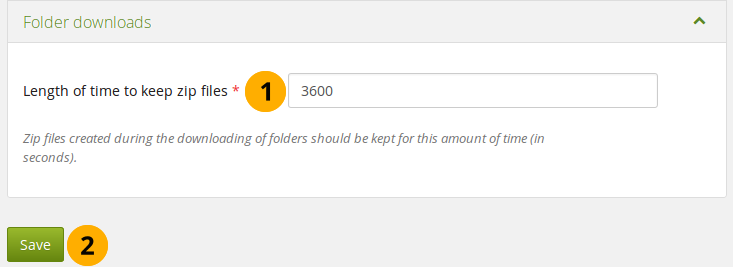
Configure the folder download settings
Length of time to keep zip files: Choose the amount of time for how long you want to keep the zip files on the server that are created during the folder download process. The default time frame is 3,600 seconds (1 hour).
Click the Save button when you are finished making your changes.
11.8.1.9. Artefact type: Profile
For profile information you can decide which fields a user must provide when a user account is created manually or via CSV file. These fields are marked mandatory fields.
The profile fields marked searchable fields are available for all logged-in users to search on.
Decide which profile fields you want to display in Administration menu → Users → User search.
See also
You can add custom profile fields more easily via an addition to a local file in the Mahara code base.
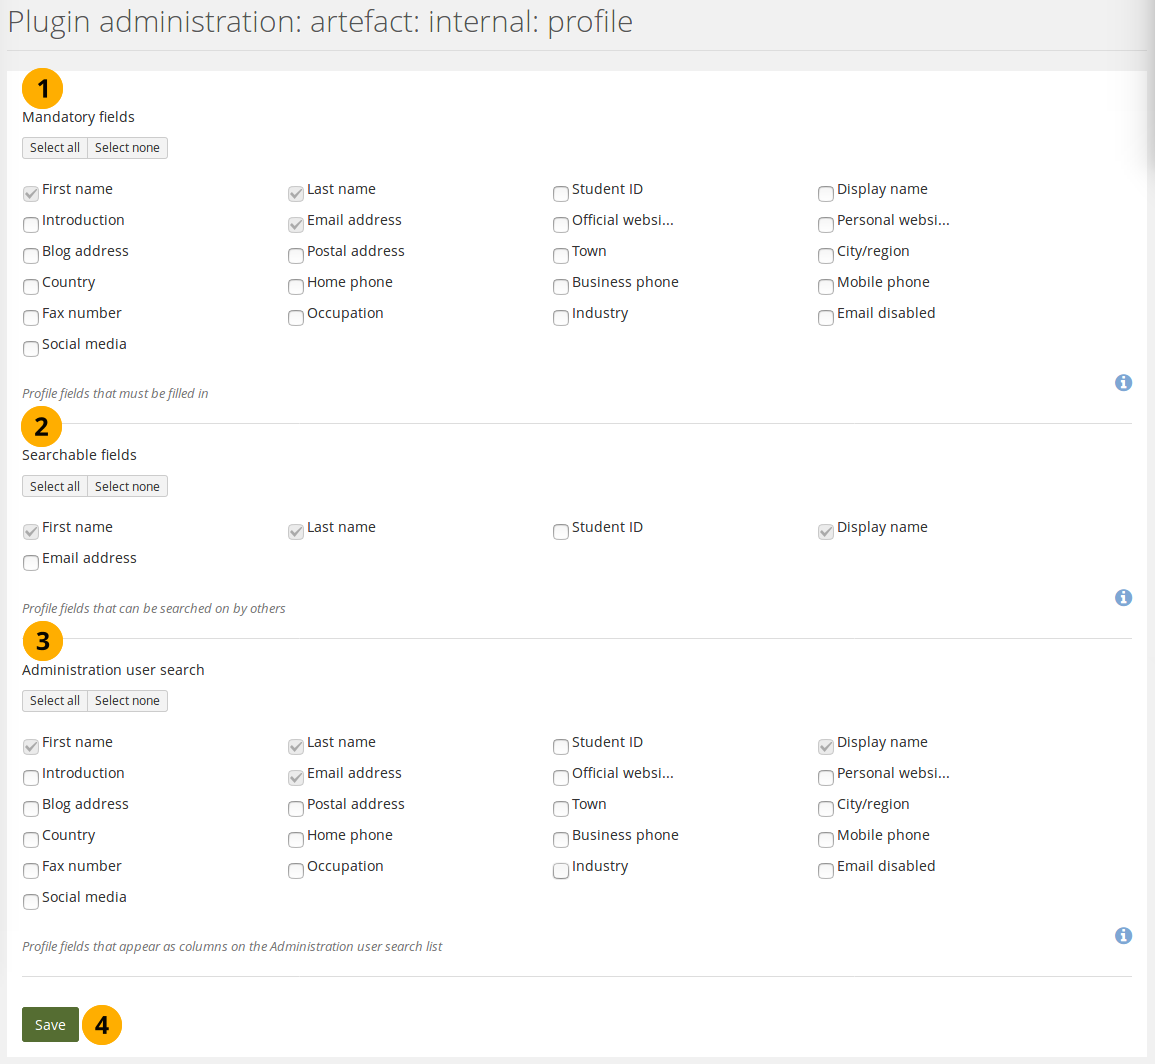
Choose mandatory and searchable profile fields
Mandatory fields: Select the fields that you wish all users to fill in. Certain fields cannot be deselected.
Searchable fields: Select the fields that can be searched on by others. Certain fields cannot be deselected.
Administration user search: Select the fields that you want to display in the User search table. The fields you select here are not exported to the CSV file though.
Note
Use the Select all and Select none buttons to select all profile fields at once or to clear your selection respectively.
Click the Save button to accept your changes.
11.8.1.10. Authentication: SAML
If you wish to use SAML authentication anywhere on your site, you can find all necessary information on your site’s metadata and certificate here.
Note
SimpleSAMLphp is a managed dependency that is included in Mahara, which makes the installation of SAML-based authentication methods easier.
You may need to install a few more dependencies manually. Please follow the on-screen instructions if that were the case.
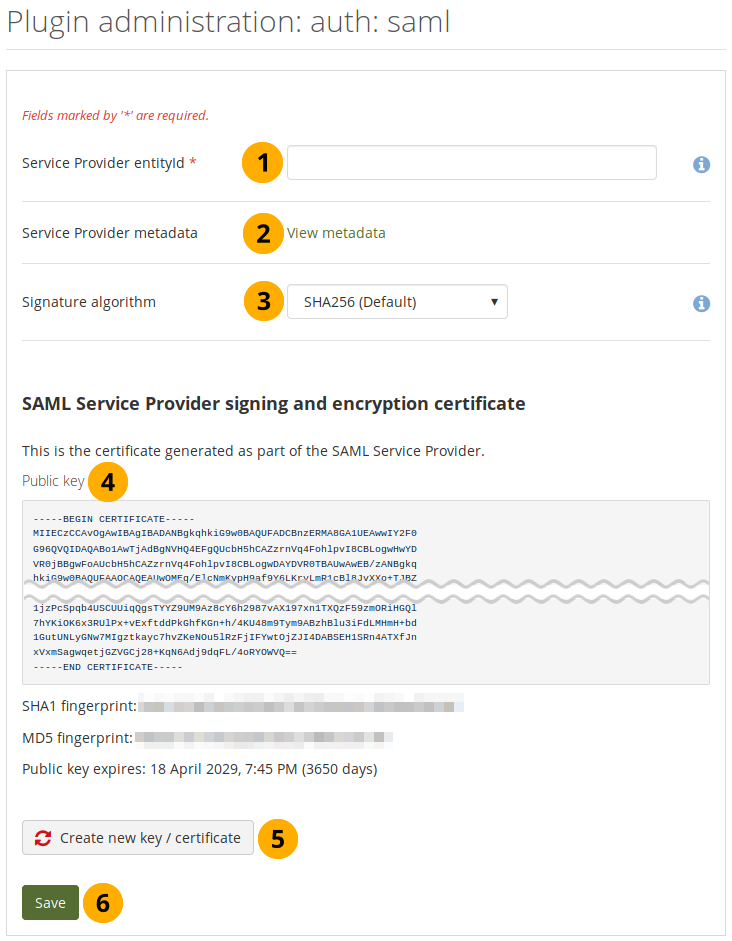
Prepare your site for SAML authentication
Service Provider entityId: This is the unique ID that identifies your Mahara instance to the Identity Provider, e.g. example.org/mahara. It is filled in automatically with the wwwroot of your instance. If it is incorrect, you can change it here.
Service Provider metadata: The metadata link takes you to the page with your SAML metadata that you would need to give to the Identity Provider.
Signature algorithm: This is the algorithm that will be used to sign SAML requests. This makes it possible to use the SAML authentication with ADFS (Active Directory Federation Services). The following options are available:
SHA256 (Default)
SHA384
SHA512
Legacy SHA1 (Dangerous)
Warning
The SHA1 algorithm is only provided for backwards compatibility. Unless you absolutely must use it, it is recommended to avoid it and use at least SHA256 instead.
Public key: The public key is generated and rotated automatically. Typically, you would not need to copy it from here since you copy the entire metadata. It is displayed for verification purposes.
Click the Create new key / certificate button if you want to force the creation of a new public key.
Click the Save button to make your changes.
When you create a new key, the old certificate can still be used for an interim period of time until you delete it. This allows for a transition period until all IdPs use the new certificate.
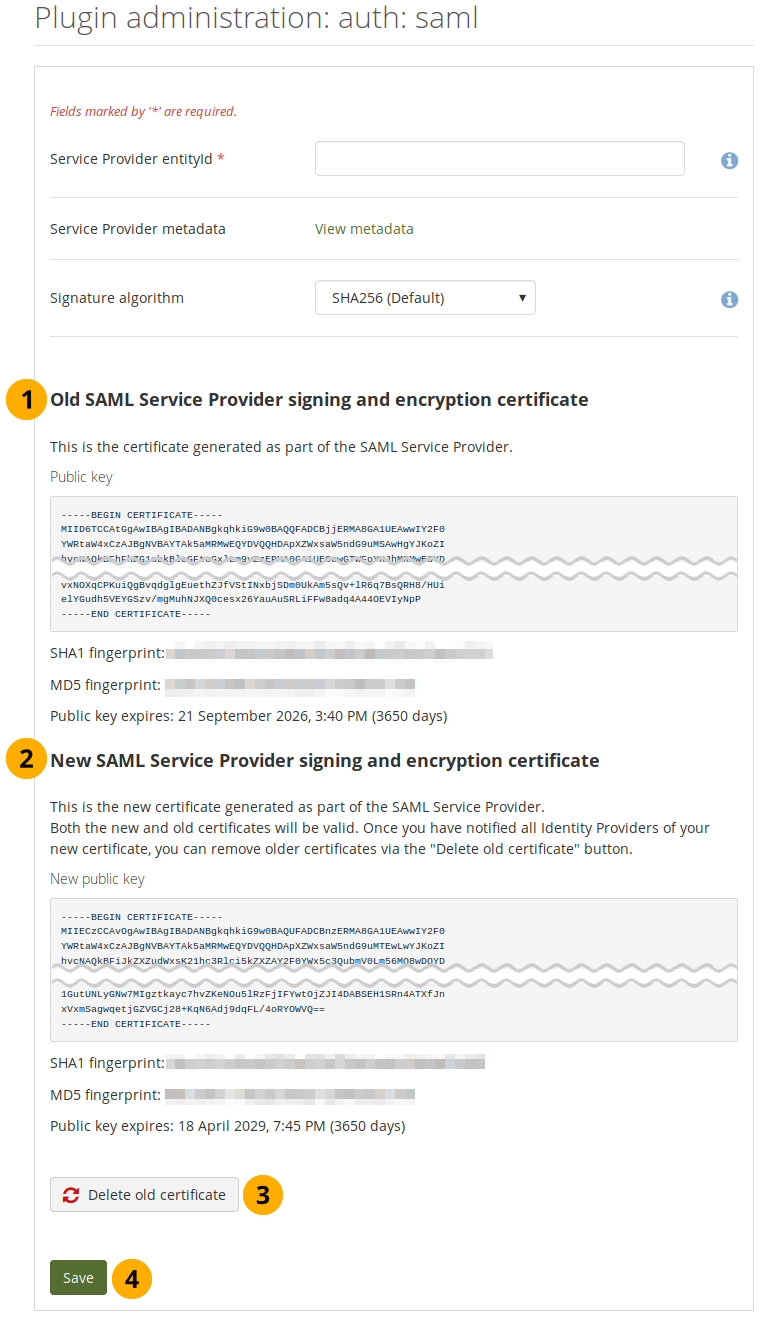
Rotate the SAML public key
Old SAML Service Provider signing and encryption certificate: The old certificate details are displayed and can be used until the certificate expires.
New SAML Service Provider signing and encryption certificate: The new certificate details are displayed and can be used immediately.
Click the Delete old certificate button to remove the old certificate when you are certain that no IdP is using it anymore.
Click the Save button to make your changes.
You can view all Identity Providers that are set up on Mahara and delete them if needed.

List all IdPs set up on the site
Identity Provider entity: Title of the Identity Provider’s authentication.
Provider: Name of the Identity Provider.
Institutions: Institution or institutions that use this IdP. The link takes you to the institution’s contacts page.
Delete IdP: Click the Delete button to remove the IdP that should not be used anymore on the site. You see the button only for IdPs that are not used in any institution.
11.8.1.11. Search: Elasticsearch
The regular Mahara search is limited to finding users and in certain places titles, descriptions and tags of pages or collections. However, Mahara can be extended to use allow for fulltext search capabilities. The Mahara core project team chose to use Elasticsearch. This is a powerful and extensible fulltext search engine. It does require a Java server, e.g. Tomcat, to run and thus may not be available for small instances of Mahara.
Note
If you are upgrading from a version of Mahara prior to Mahara 17.10 and you already had Elasticsearch in use, please take a look at the upgrade instructions.
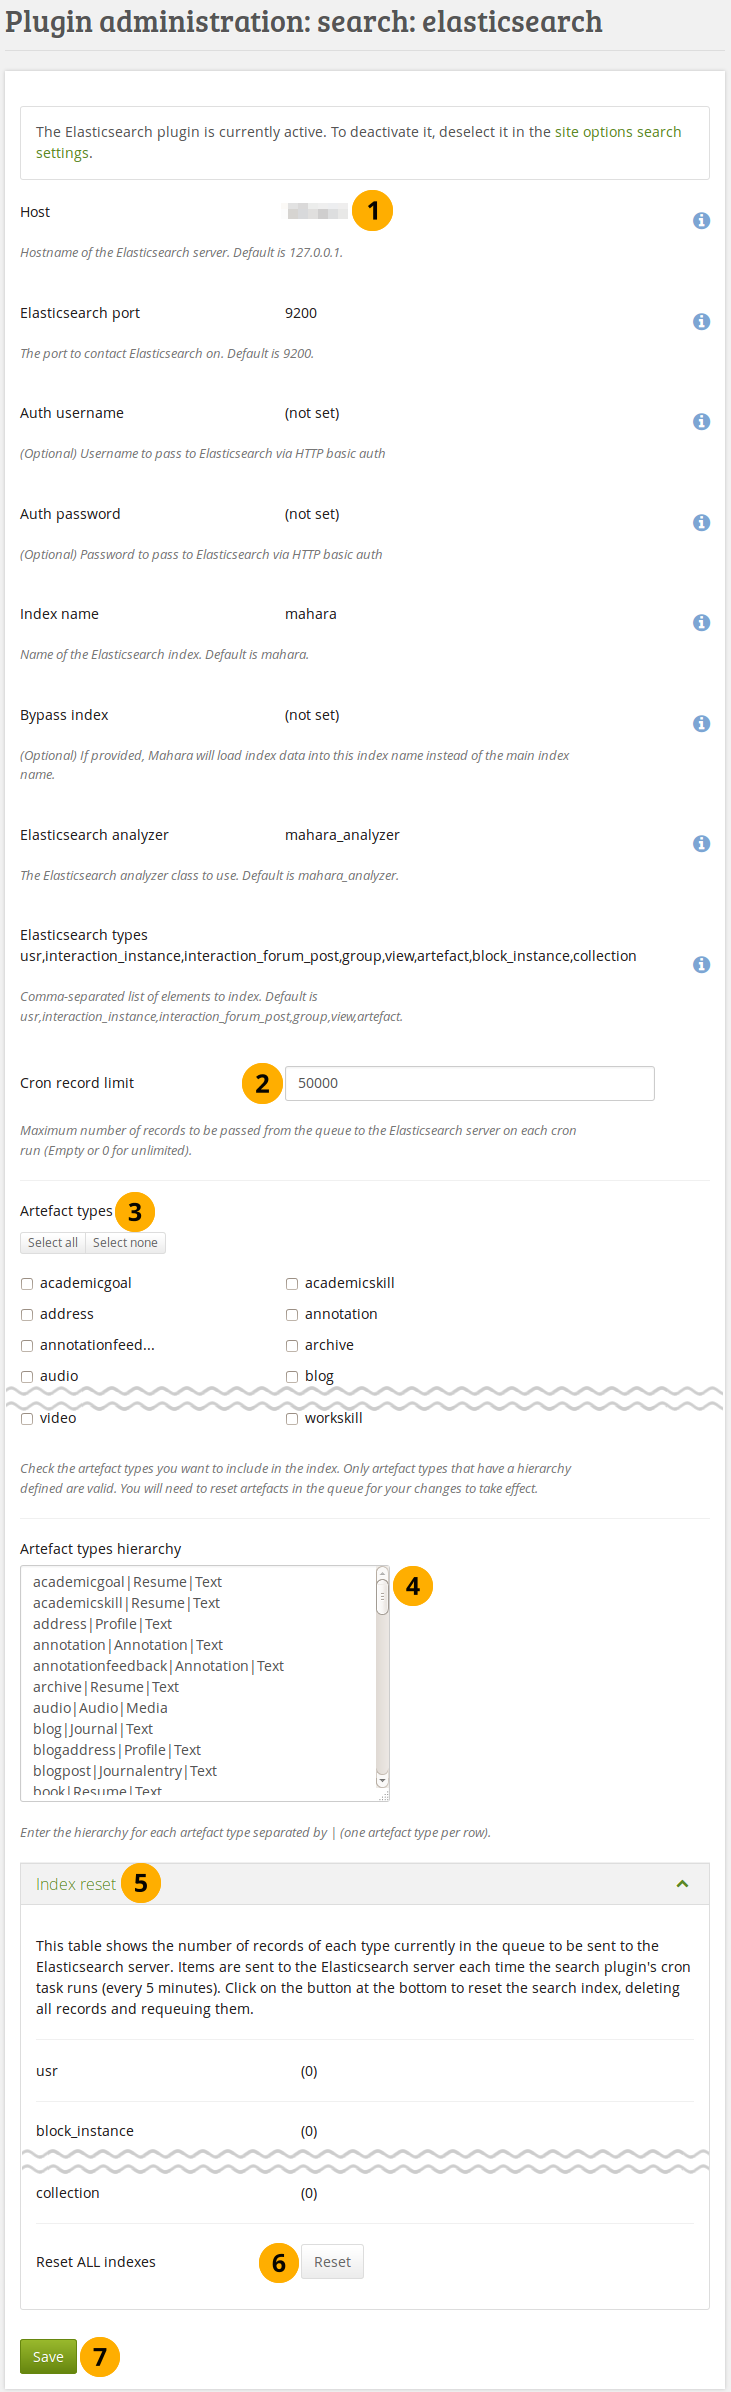
Configure the Elasticsearch plugin
Most of the Elasticsearch configuration needs to be done on the server level. Here you only see the settings, but cannot change them directly.
Cron record limit: Decide on the maximum number of records to be passed from the queue to the Elasticsearch server on each cron run. An empty field or
0means that there is no limit.Artefact types: Check the artefact types that you want to include in the search index. Only artefact types that have a hierarchy defined below are valid. You will need to reset artefacts in the queue below for your changes to take effect.
Artefact types hierarchy: Enter the hierarchy for each artefact type separated by
|(a pipe). Place each artefact type on a row by itself.Index reset: View the number of records of each type currently in the queue to be sent to the Elasticsearch server. Items are sent to the Elasticsearch server each time the search plugin’s cron task runs (every 5 minutes).
Click the Reset button to clear the search index and thus deleting all records and requeuing them.
Click the Save button to accept your changes.
See also
You can find more information about Elasticsearch in Mahara on the wiki. There are also some developer notes to get you started.
11.8.1.12. Search: Internal search
If your site has a lot of users and uses a PostgreSQL database, user searches will be faster with exact user searching enabled. The setting will still work with MySQL databases, but it is unlikely that it increases search performance significantly.
The advantage of the exact user search is that if you have 20 users with the first name “Percy” but different last names, you may find the user you are looking for more quickly because you can search for “Percy Pearle” and the result list will not show “Percy Pearl”, “Percy Sutter”, “Percy Townsend” etc.
However, partial matches on profile fields will not return results, so if for example you have a user called “Percy”, then typing “Perc” into the search box will not find that user anymore.
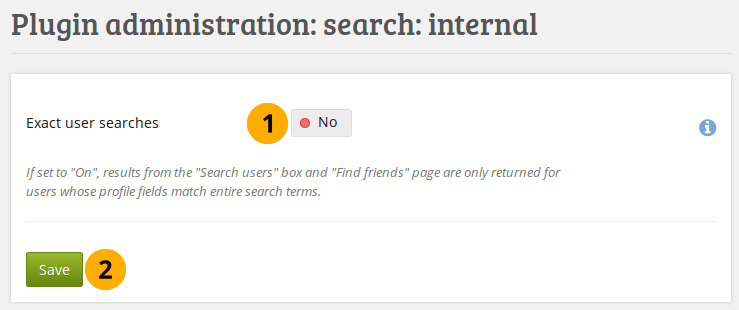
Configure the internal search plugin
Exact user searches: Switch this option to “Yes” if you want to enable exact user searches.
Click the Save button to keep your changes.
11.8.1.13. Interaction: Forum
The post delay setting determines the time (in minutes) that users have for editing their forum posts before they are mailed out. Once a forum post has been mailed and further edits are made, the date, time and editor are mentioned in the post.
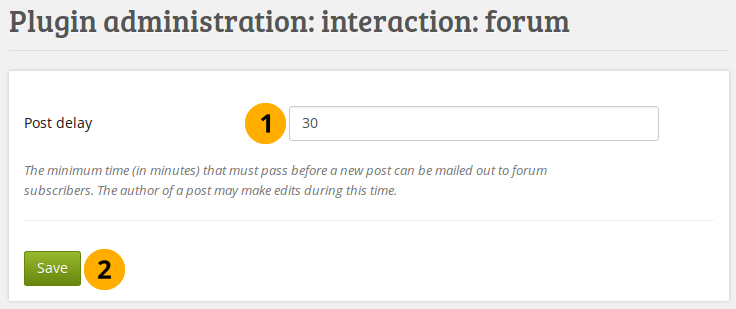
Set the edit time before the forum post is finalised
Post delay: Set the time in minutes before a post is finalised and further edits are marked as such.
Click the Save button to keep your changes.
11.8.1.14. Module: LTI
You can activate the LTI API in order to use the LTI integration.

Configure the LTI plugin
The message lets you know whether the LTI functionality is enabled or not.
Configuration item: List of the configuration items for LTI.
Status: Displays which configuration items are ready to be used and which ones are not.
Auto-configure LTI: Switch to Yes if you want all settings to be made automatically.
Note
Once the auto-configuration was successful, you do not see this option anymore. You can bring it back by making a change in the Web services section manually.
Click the Save button to save your changes.
11.8.1.15. Module: Mobile API
You can activate the mobile API in order to use “Mahara Mobile”, the new Mahara app.
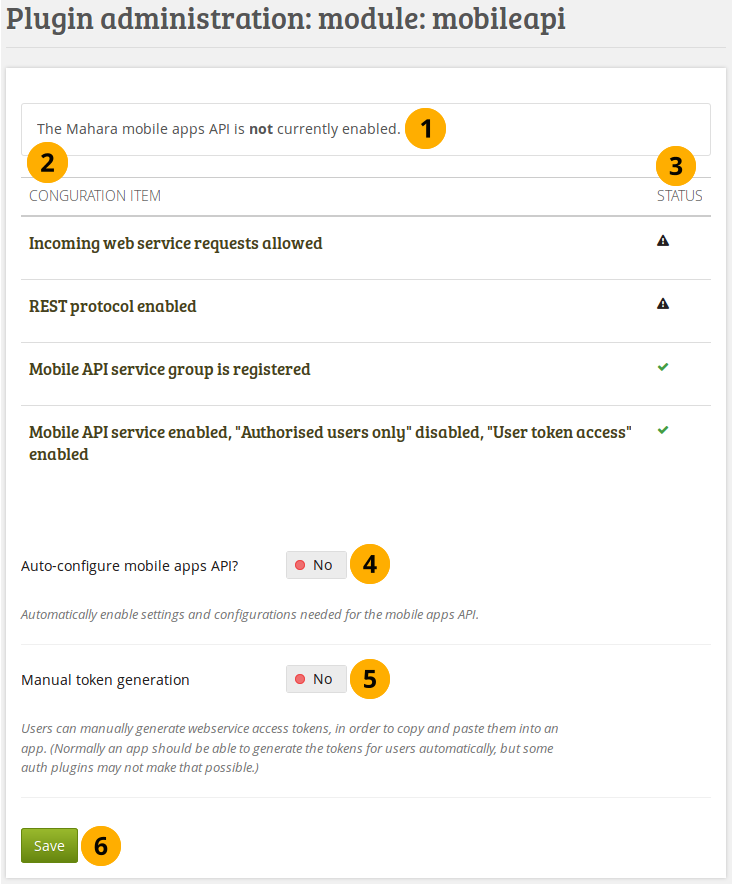
Configure the mobile API
The message lets you know whether the mobile apps API is enabled or not.
Configuration item: List of the configuration items for the mobile apps API.
Status: Displays which configuration items are ready to be used and which ones are not.
Auto-configure mobile apps API? Switch to Yes if you want all settings to be made automatically.
Note
Once the auto-configuration was successful, you do not see this option anymore. You can bring it back by making a change in the Web services section manually.
Manual token generation: Switch to Yes if you want to allow your users to create the initial app token manually. This is only needed if the authentication method does not support the token generation. This is the case with MNet for example.
Click the Save button to save your changes.
11.8.2. HTML filters
Administration menu → Extensions → HTML filters
Mahara uses HTML Purifier to filter out malicious code that could threaten the security of the system. If you have code, e.g. iFrames or JavaScript that you wish to use and that otherwise gets filtered out, you will have to write a filter to circumvent that. Filters should always be specific to their purpose and not give ‘carte blanche’ to ensure security as much as possible.
Mahara already comes with a number of installed filters. Others can be uploaded and then installed. If you have created a new set of HTML filters, you can install them by unzipping the files into the folder /htdocs/lib/htmlpurifiercustom and then click the Install button.
Custom filters for iFrames that allow the embedding of media content such as YouTube and WikiEducator allow users to grab the URL of the page on which the media is displayed instead of having to find the actual embed code.
Note
You do not necessarily require bespoke filters for media that you wish to embed via <iframe> embed code. If you are happy to use the original embed code, you can add it to the list of allowed iframe sources.
If you wish to be able to paste the URL instead (like for a YouTube video), then you would need a bespoke filter.
11.8.3. Allowed iframe sources
Administration menu → Extensions → Allowed iframe sources
This feature allows you as site administrator to specify the base URLs for media that you want your users to be able to embed. These iframes are then considered safe and will not be stripped out of a Text or Note block, the External media block or a journal entry where you can use them. You do not have to write bespoke filters for using these iframe sources.
The administrator interface allows you to add and manage these sources easily. Mahara already comes with a number of built-in iframe sources that you can take as examples.
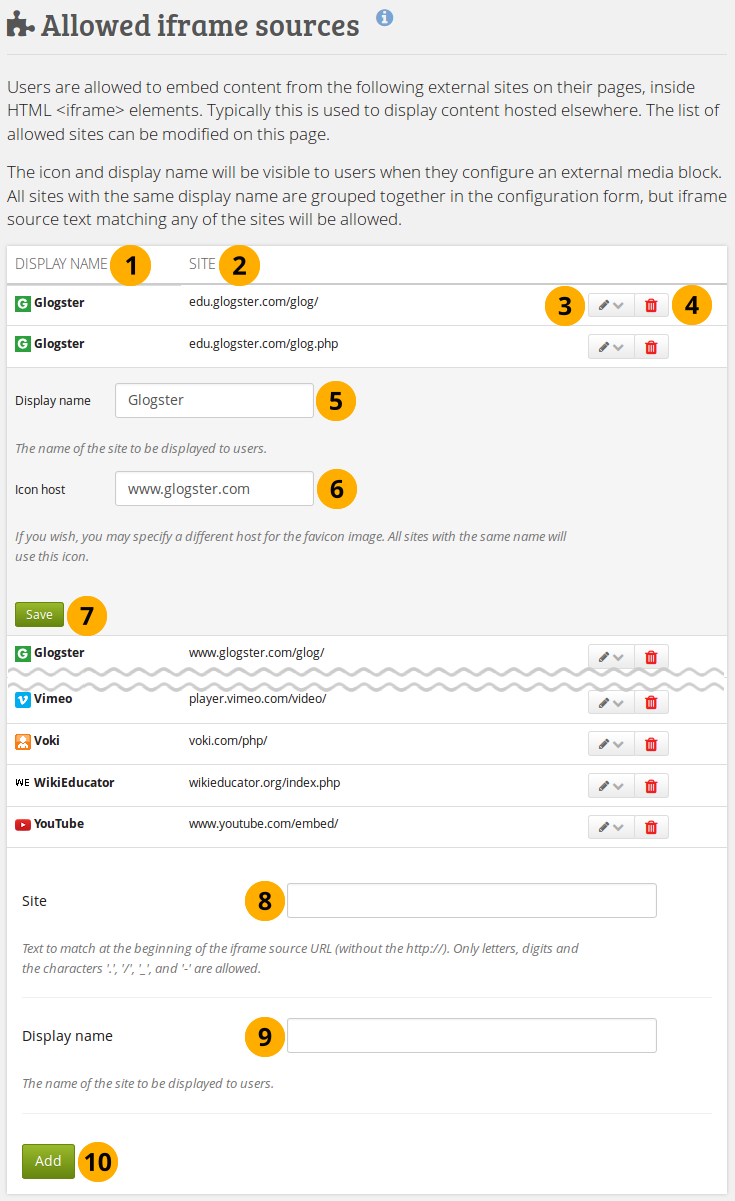
Add and edit allowed iframe sources
Display name: What the user will see in the external media block.
Site: The base URL of the iframe code.
Click the Edit button
to update the display name of an existing iframe source or the favicon source.Click the Delete button to remove an existing iframe source.
Display name: Change the display name of an existing iframe source here after having clicked the Edit button
.Icon host: Choose the base URL where the favicon can be found for the site that you are updating in case it is not fetched automatically.
Click the Save button to keep your changes for this site.
Site: Add a new iframe source by entering its base URL here. Please make sure to leave out the
https://. Only letters, digits and. / - _are allowed.Display name: Choose a display name for your iframe source. Typically, this is the name of the site that hosts the external content.
Click the Add button to place your new site into the list of allowed iframe sources. If the favicon does not display, edit your site and specify the icon host as per Step 6.
Note
Some sites can be reached via a variety of URLs, e.g. GoogleApps, Glogster. You need to provide all possible base URLs to ensure that the iframes are displayed. If you give the individual sites of one provider the same name, it will only show up once in the list of iframe sources in the external media block and not clutter the space unnecessarily.
See also
Community members started to collect iframe sources that they are using on their sites to share which URLs would need to be provided to get the iframes to work. You can check out the list on the wiki and also add your own iframe sources there.
11.8.4. Clean URLs
Administration menu → Extensions → Clean URLs
You can configure your site to use human-readable URLs for user profiles, groups and (group) portfolio pages. For example:
profile page: https://mahara.example.com/user/bob
portfolio page: https://mahara.example.com/user/bob/bobs-portfolio-page
group homepage: https://mahara.example.com/group/bobs-group
group portfolio page: https://mahara.example.com/group/bobs-group/an-interesting-group-page
This option allows you to create more memorable URLs.
See also
Please follow the configuration instructions on the wiki for enabling this feature on your site. You need access to the server to do so.
In the administration area you can generate clean URLs for existing users, groups and pages. This is handy when you upgraded from an earlier version of Mahara or want to reset all custom URLs.
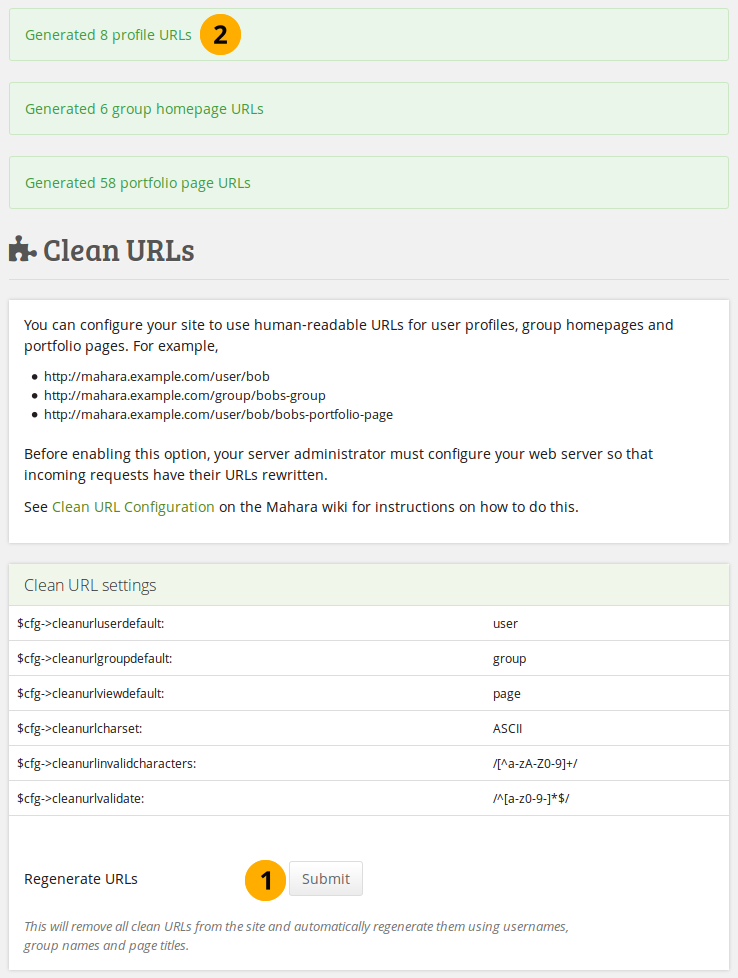
Regenerate clean URLs for existing users in bulk
Click the Submit button to regenerate clean URLs. Please beware that all existing clean URLs are lost.
You see the results of the action at the top of the screen.
Warning
If you generate clean URLs for all users from here, those who have already changed their URLs will lose their changes and links will be broken. We recommend you use this feature only when upgrading your Mahara site or when things have gone wrong with the clean URL generation.
11.8.5. SmartEvidence
For SmartEvidence, please refer to the separate section on it.
11.8.6. Web services
For web services, please see the separate section.
11.8.1.8.6. Comments
Configure the default comment settings for different file types
Click the Select All button to mark all file types.
Click the Select none button to clear your selections of the checkboxes.
Default comment permission: Choose the artefact types which shall have comments enabled per default. Users can override these settings for individual artefacts in the files area. You can enable comments for:
archive, i.e. compressed file
audio file
file
folder
image
profile picture
video file
Click the Save button at the bottom of the page when you are finished making your changes or continue to the next section on this page.