6.4. Inside a group
Note
It depends on your role in the group whether you can access / change certain functionalities that you see in the screenshots and that are described in the text.
6.4.1. Group homepage
Main menu → Engage → Groups → [Name of the group] → About
The group homepage is the central space for a group. There you can get a quick overview of the group and reach all the places that you wish to take a look at in a group. You see a few things per default on the group homepage. The items displayed on the group homepage do not only depend on the default settings but also the options chosen when the group was created.
6.4.1.1. View group homepage as regular group member
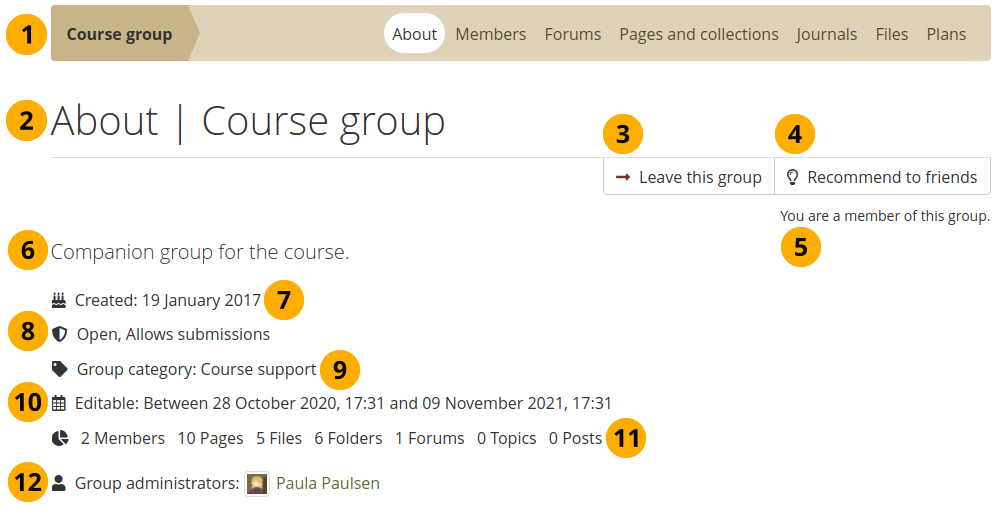
View group homepage as regular group member
Group name and navigation items within the group. You see all the areas that you have access to in the group. If you are not allowed to edit pages, you will not see the Share tab, for example.
Group area that you are in and group name.
Click the Leave this group button to leave the group.
Note
You only see the button when the group is not a controlled membership group.
If the group administrator allowed group members to recommend the group to friends, you see the Recommend to friends button. If the group administrator allowed group members to invite friends, you see the Invite friends button.
As member in the group, you see your status.
Group description.
Created: Creation date of the group.
Important group attributes, e.g. open or request group, possibility of having submissions etc.
Group category: Category to which this group belongs; great for filtering groups on Groups.
Note
This feature is only available if the site administrator allowed group categories.
Editable: If the group administrator defined a time frame within which group content is only editable for group members, it is displayed here. If the group administrator did not set a start and / or end date, this setting will not be shown.
Statistics on the number of group members, pages, files, folders, forums, forum topics and posts.
Group administrators: Click on their names to view their profile pages.
The group administrator can add additional blocks to the group homepage besides the Group info block. The default blocks are generally:
6.4.1.2. View group homepage as group administrator
If you are a group administrator, you can put other blocks on the group homepage. Check the blocks in pages context for a list of them.

View group homepage as group administrator
Click the Edit this page button if you want to make changes to the group homepage.
Click the Settings button if you want to make changes to the group settings.
Click the Copy button to duplicate the group. The group’s files, journals, pages, collections and group settings are copied. Group membership and forums are not copied.
Note
You only see the button if you are allowed to create a group. The site administrator decides that in Administration menu → Configure site → Site options → Group settings.
Click the Delete group button if you want to permanently delete the group. Group members will receive a notification about the deletion.
Warning
Once you deleted a group, you cannot retrieve its content any more. You cannot export forums or group pages. If you wish to keep group pages, you will need to copy them into your own portfolio (or another group). Pages that have been shared with the group are not deleted.
If you have portfolios submitted to a group, they will be released once the group is deleted and can be edited again.
6.4.2. Members
Main menu → Engage → Groups → [Name of the group] → Members
6.4.2.1. Members page
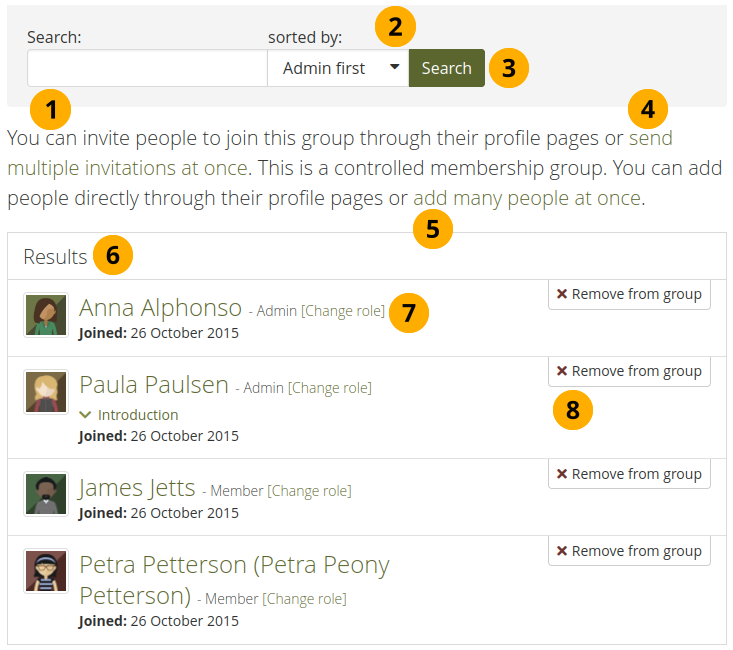
Group members page as seen by a group administrator
On the group members page, a group administrator can:
Search: Search for group members by entering their name.
Sorted by: Sort group members by selecting one of the following options:
Admin first: Display administrators first.
Note
This means that group members are displayed according to their roles: First are administrators, then tutors, and members come last.
Name A to Z: Sort everyone alphabetically from A to Z.
Name Z to A: Sort everyone alphabetically from Z to A.
First joined: Sort everyone chronologically starting with those who joined first.
Last joined: Sort everyone in reverse chronological order.
Click the Search button to perform your search.
Invite multiple people to the group at once.
If you are in a controlled membership group, you can add multiple people in bulk and don’t have to wait until they accepted you invitation.
View basic information about group members:
their name
their role
their profile introduction text
their group joining date
Change the role of a group member.
Remove a member from the group by clicking the Remove from group button.
Note
If you are a regular group member, you are not able to invite or add people from the members page, and you cannot change the role or remove a member from the group.
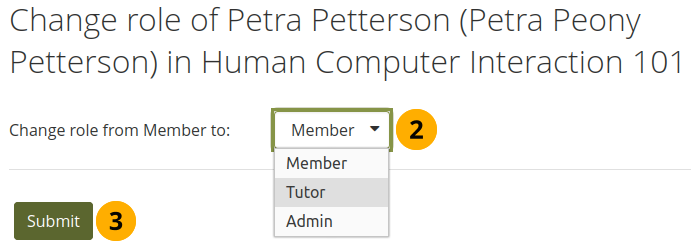
6.4.2.2. Change the role of a member
A group administrator can always change the role of an existing member. Depending on the group’s setting, there are up to three different roles possible:
Member
Tutor
Administrator
Change the role of a group member
On the Members page of the group, click the link Change role.
Choose the new role from the drop-down menu that the member shall have instead of their old role.
Click the Submit button to make the change.
6.4.2.3. Invite a new member
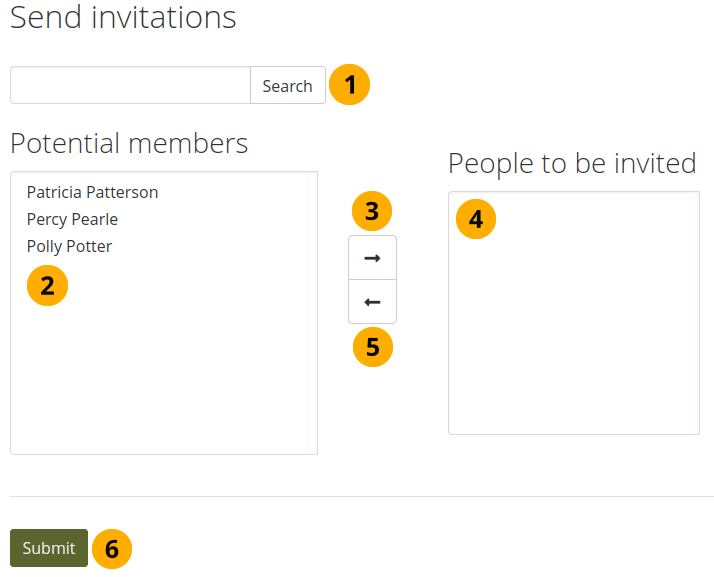
A group administrator can always invite anybody to a group from the Members area of the group by clicking the link send multiple invitations at once. If the group administrator allowed group members to invite friends, they can do so via the Invite friends button on the group homepage.
Invite other people to a group
Search: You can search for people in the search box if there are too many names listed. Then select the ones you want to invite.
Potential members: Select the people you want to invite to the group.
If you are a group administrator, you see all account holders on the site.
If you are a regular group member, you only see your friends.
Add the people to the list People to be invited by clicking the right-arrow button .
If you put a person into the box for people to be invited by accident, you can remove them from that list by clicking on them.
Then click on the left-arrow button , and they are removed from the list.
When you have all the people you wish to invite to this group, click the Submit button.
The invited people will receive a notification. The group will also be listed on the person’s Groups page where they can accept or decline group membership.
Note
You can also double-click a name to move it from one side to the other.
6.4.2.4. Recommend a group to a friend
If the group administrator allowed membership recommendations when creating or editing a group, group members can recommend the group to their friends by clicking the Recommend to friends button on the group homepage.
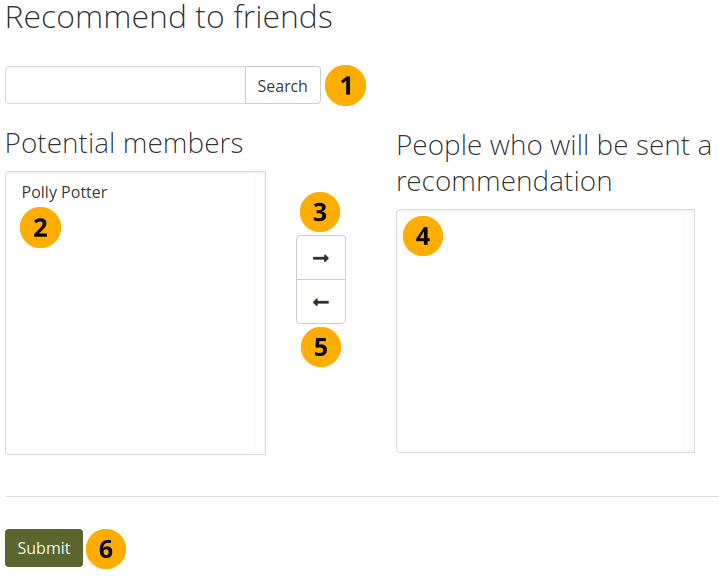
Recommend a group to friends
Search: You can search for your friends in the search box if there are too many names listed.
Potential members: Select the friends to whom you want to recommend this group.
Add the people to the list People who will be sent a recommendation by clicking the right-arrow button .
If you put a person into the box for recommendations by accident, you can remove them from that list by clicking on them.
Then click the left-arrow button , and they are removed from the list.
When you have all the people to whom you want to send a recommendation, click the Submit button.
The people will receive a notification and can then decide to request membership for the group.
Note
You can also double-click a name to move it from one side to the other.
6.4.3. Forums
Main menu → Engage → Groups → [Name of the group] → Forums
The forums are visible to all group members. If you create a public group, anybody online will be able to see the forum discussions. However, they would need to log in to participate. Forums in public groups receive an RSS feed to enable people to subscribe to the discussion forum, e.g. the mahara.org community forums.
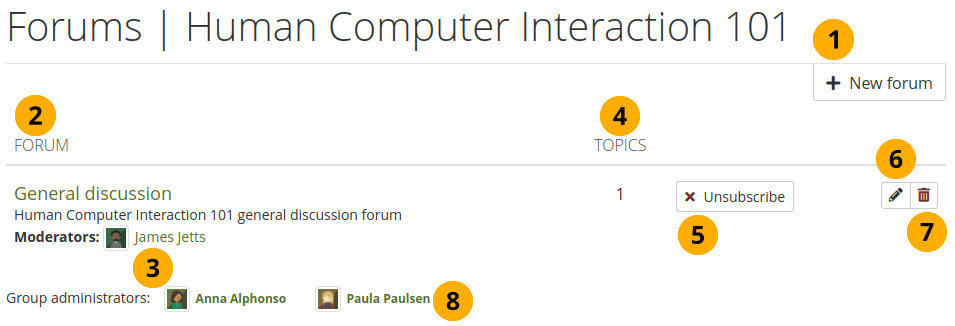
Group forum overview page
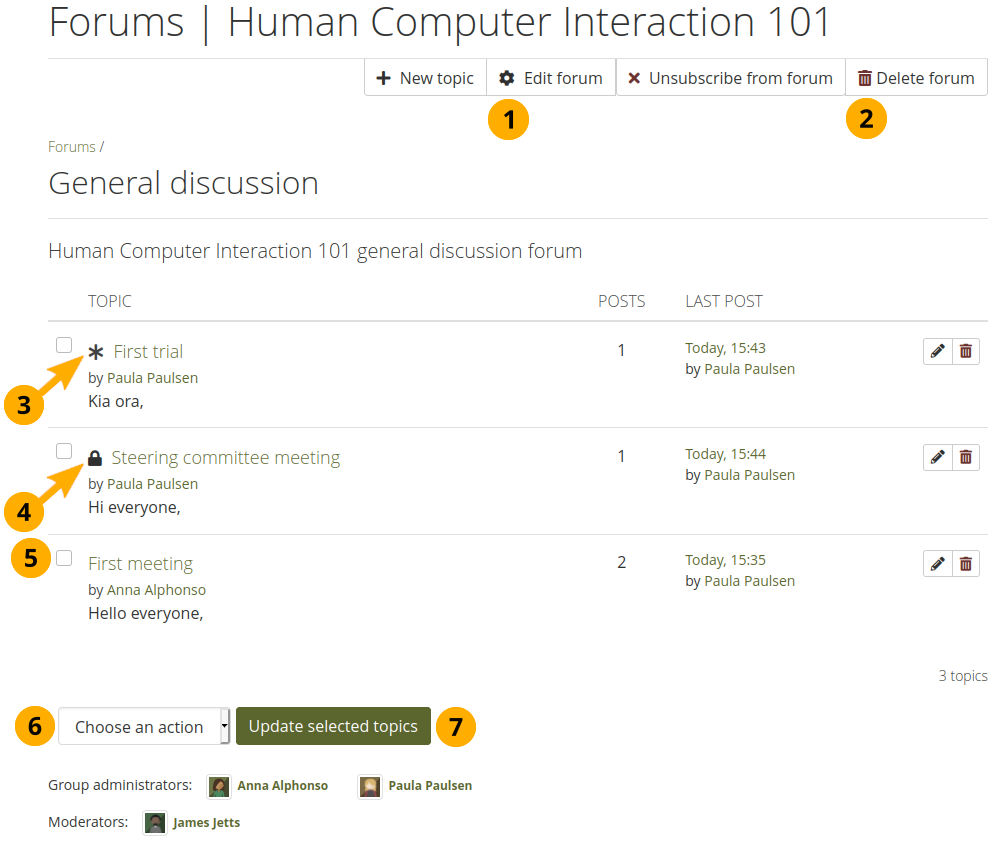
If you have appropriate rights, you can create a new forum by clicking the New forum button.
Forum: Name and brief description of the forum.
Moderators: View the forum moderators (if appointed).
Topics: Number of forum topics in each forum.
If you want to receive notifications about new forum posts, you can subscribe to a forum via the Subscribe button. If you already receive notifications, you will see the Unsubscribe button to have the option to not receive updates any more.
If you are a group administrator, you see the Edit button for making changes to the forum settings.
If you are a group administrator, you see the Delete button for deleting the forum and all of its topics.
Group administrators: View the group administrators.
6.4.3.1. Set up a new forum
A group administrator can set up forums in a group.
Add a forum to a group
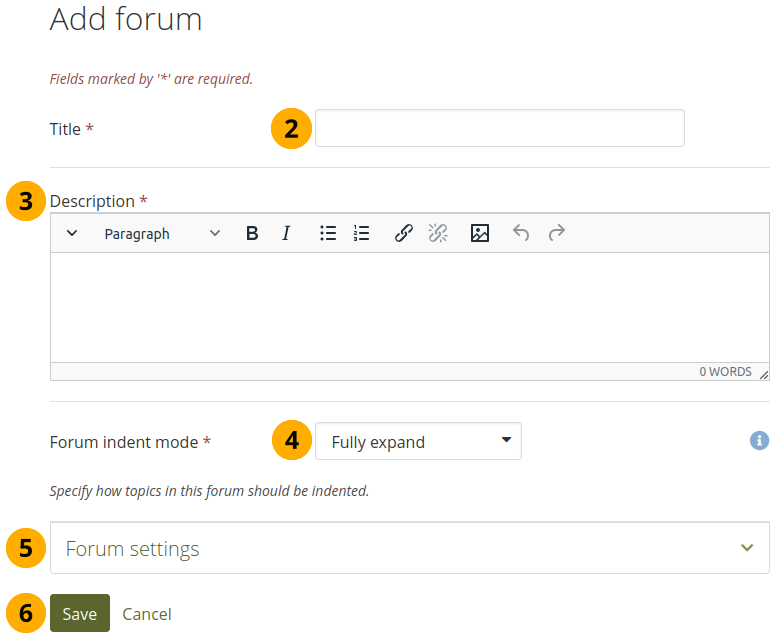
Click the New forum button to set up a new forum.
Title: Give your new forum a title.
Description: Write a brief description of your forum. This makes it easier for group members to decide whether they want to look at its content or not.
Forum indent mode: Specify how the topics in this forum should be indented.
Fully expand: Indentation is used to indicate the replies to individual posts. There is no limit to the level of indentation.
Expand to maximum: Indentation to indicate the replies to an individual post specifying the maximum level of indentation (pops up once this option is chosen). All replies beyond the chosen level are not indented further.
No indents: There is no indentation of replies to individual posts. The forum structure is flat and posts are listed one after the other without any indication of which one was replied to.
Forum settings: Choose advanced settings for your forum.
Click the Save button to add your forum or click Cancel to abort creating the forum.
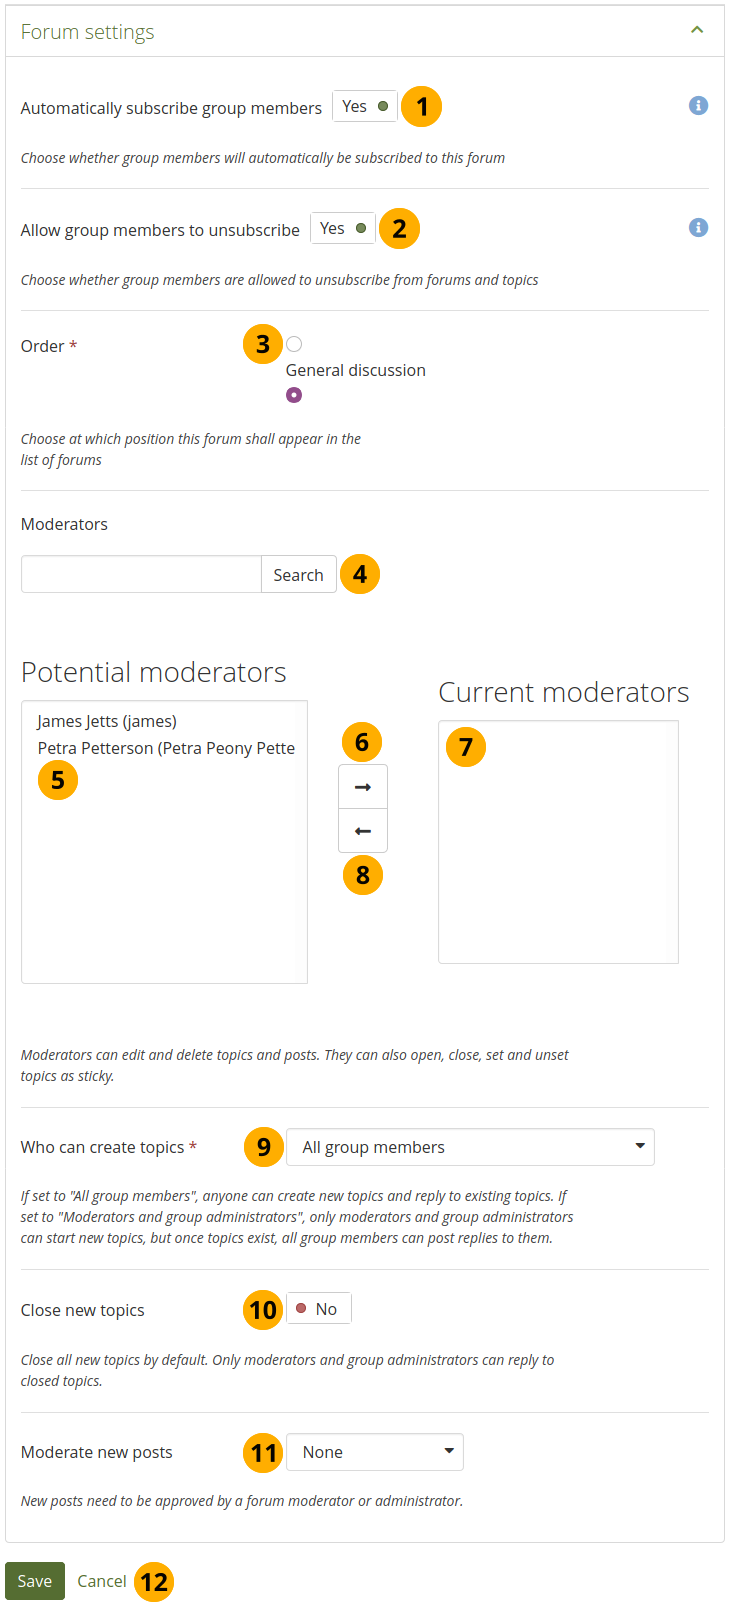
In the Forum settings, the administrator can decide on additional settings for a forum.
Choose further settings in the forum
Automatically subscribe group members: Choose whether group members will be subscribed to this forum automatically. When subscribed, members will receive notifications when new posts and replies are made in the forum.
Allow group members to unsubscribe: This option is only available to staff and institution and site administrators. You can decide whether group members are allowed to unsubscribe from forum notifications. The default option is ‘Yes’. Staff and administrators can select not to allow unsubscribing to ensure that group members receive important notifications. If the settings for the forum change, group members will be re-subscribed if they had previously unsubscribed from the forum.
Order: A default position for your forum is chosen upon its creation - after the last existing forum. You may position it elsewhere in the list of forums. Click the radio button above or below a certain forum to position it before or after it.
Moderators: Choose one or more moderators for your forum. They can edit and delete topics and posts as well as open, close, set and unset topics as sticky. Thus, they can perform some administrative functions without having to receive full group administrator rights. Enter the name of a group member in the search box if there are too many names listed and click the Search button to search for them. They are listed under Potential moderators.
Potential moderators: Select the member(s) who should become a forum moderator.
Add the group member(s) to the list Current moderators by clicking the right-arrow button .
If you put a person into the box by accident, you can remove them from that list by clicking on them.
Then click the left-arrow button , and they are removed.
Note
Alternatively, you can double-click the name of a person and they are moved to the other side.
Who can create topics: Decide who in your group is allowed to create topics within that forum. If set to ‘All group members’, any group member can create new topics and reply to existing topics. If set to ‘Moderators and group administrators’, only moderators and group administrators can start new topics, but once topics exist, all group members can post replies to them.
Close new topics: If switched to ‘Yes’, all new topics in this forum will be closed by default. Only moderators and group administrators can reply to closed topics. This is a setting that may be useful for a forum that is solely used for announcements.
Moderate new posts: Decide whether forum posts should be moderated, i.e. not made available to the group unless a group administrator or moderate has reviewed them. The options are:
None: No moderation. All forum posts are available directly.
Posts: Only original forum posts are moderated. Replies do not undergo moderation.
Replies: Only replies are moderated. Original posts are not put into a moderation queue.
Posts and replies: Both original posts and replies are moderated.
Click the Save button to save the settings for the forum or click Cancel to retain the previous settings.
6.4.3.2. Add a forum topic
When you have the right to add a forum topic, you see the New topic button when you click on a forum.
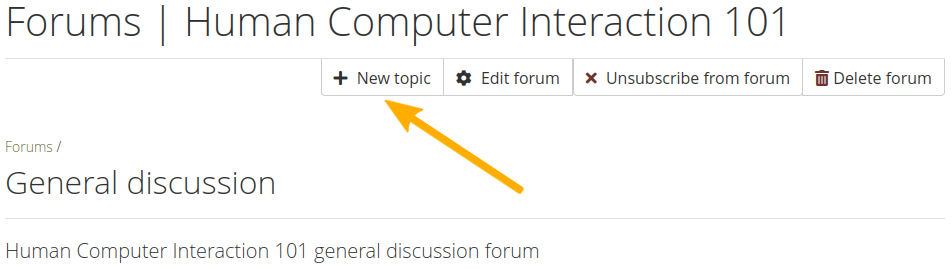
Add a new topic to a forum
Note
An administrator also always has the buttons Edit forum and Delete forum available to make changes to the forum set up.
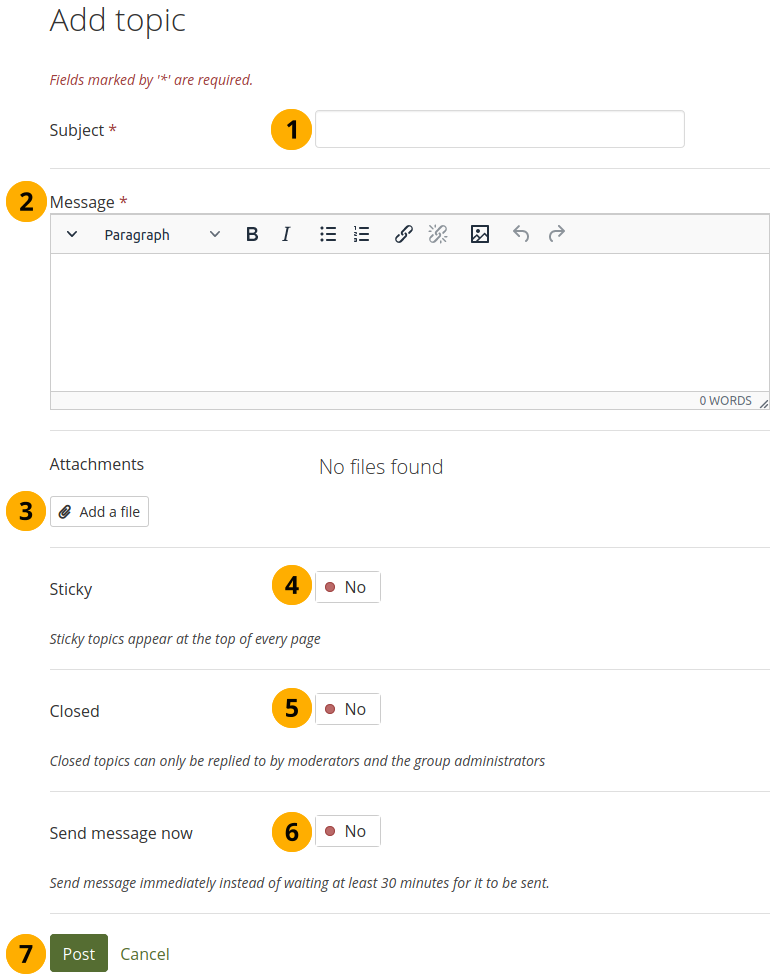
Add a new forum topic
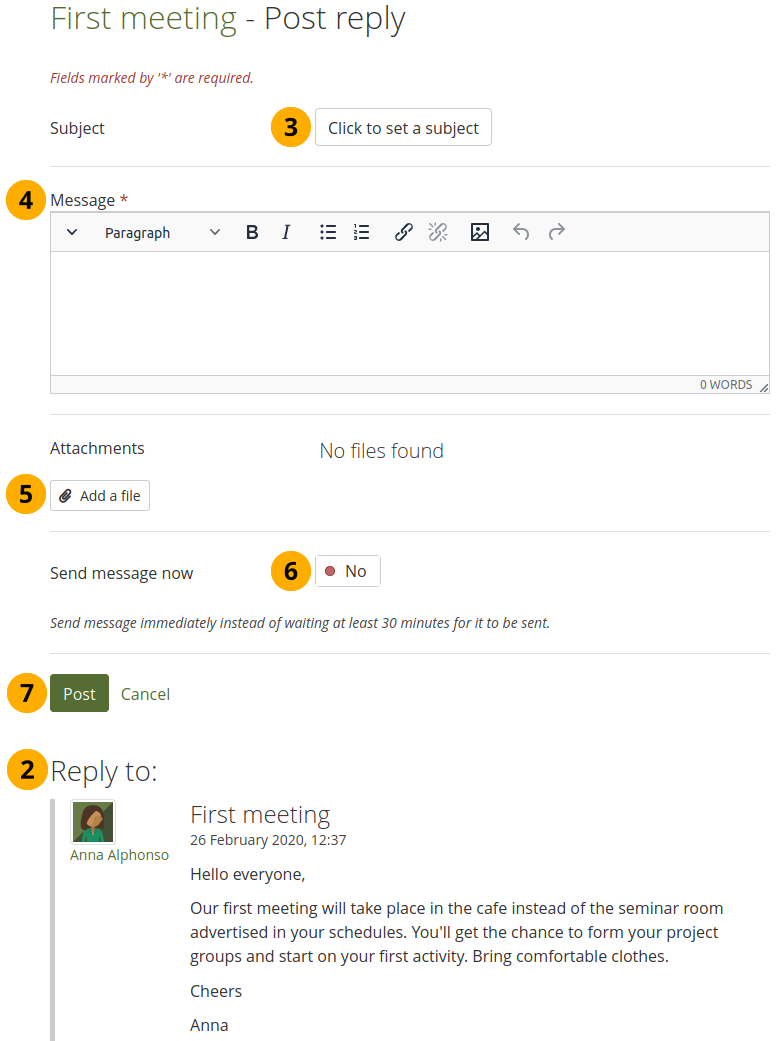
Subject: Type a concise description of what you wish to discuss in this forum thread. This field is mandatory.
Message: Elaborate on the topic. This field is mandatory.
Click the Add a file button to attach one or more files to your forum post. You can select from your personal files, group, institution, and site files as well as upload files. Depending on the group settings, you may only be able to upload files to your personal files area.
Sticky: Moderator and administrator-only setting to keep the topic at the top of the list of forum topics in the current forum.
Closed: Moderator and administrator-only setting to prevent others from responding to this post. Moderators and administrators can still post replies.
Send message now: If switched to ‘Yes’, the notification about your forum post is sent immediately instead of waiting for the forum post delay time to pass. You can still edit your message normally.
Click the Post button to send off your discussion topic, or click Cancel to abort your action.
Note
When you write your forum topic, i.e. your first post, and any other subsequent post, you have formatting options available in the visual editor (when it is enabled). It also allows you to insert images into your post. Images you upload to your own Files area are displayed in forum posts for other people to see.
In some groups you may be able to upload files into the group. You could link it then in your forum post but must be aware that any group member could delete the image.
Once you have finished writing your forum topic, it is displayed in the list of forum topics. Others can see it immediately. The administrator and moderator of the forum can edit or delete a topic at any time. Regular members can edit their topics up to a certain number of minutes after writing the post. The site administrator defines that time in the forum post delay.
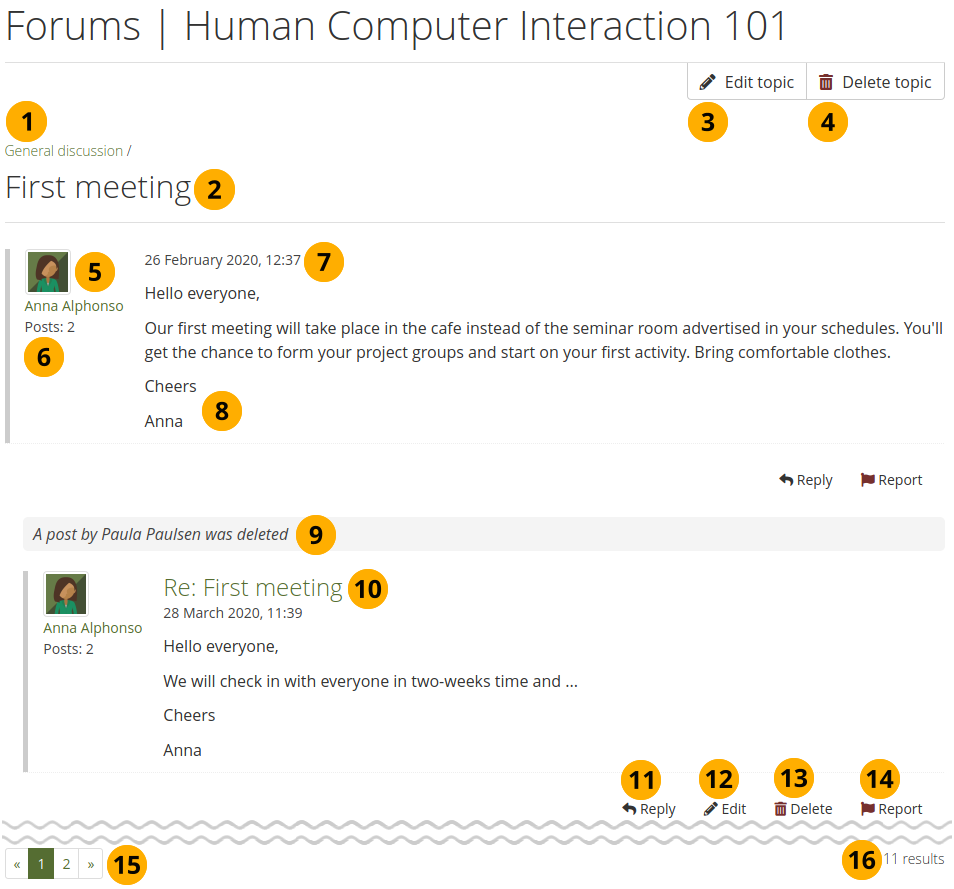
Posts in a forum topic
The title of the forum.
The title of the forum topic.
The person starting the forum topic and the group administrator as well as forum moderator have the Edit topic button to make changes to the initial post.
Group administrators and forum moderators can also click the Delete topic button to delete a forum topic.
The profile picture and name of the person who wrote the post. The name is linked to the profile page.
The number of posts of this person in all groups.
The date and time of the forum post.
The post itself.
If a post was deleted, a brief message is left to that effect so that subsequent posts that may seem out of context are situated.
The titles of subsequent posts are clickable and give you the permanent link to this post. That allows you to jump to this post directly and view it at the top of the page.
Click the Reply link Reply to comment on the post.
If you are the author of a forum post, you see the Edit link Edit and can make changes to your post until the forum post delay has been reached. Group administrators and forum moderators can always edit and delete any forum post besides replying to it.
Click the Report link Report to report the post as containing objectionable content.
If you are a group administrator or forum moderator, you can delete a forum post by clicking the Delete link Delete.
If your forum topic has more than 10 posts, the posts are paginated and 10 posts per page are shown. You can jump to other posts in the topic by clicking on a page number.
You see the total number of forum posts in this topic.
Note
There are no notifications sent when you edit or delete a forum post. If you wish others to know about your changes, you should write a new post instead of editing an existing one.

6.4.3.4. Delete a post, topic or forum
A moderator or administrator can always edit a single forum post, a topic or an entire forum by clicking the Edit button. Only group administrators can delete a forum. Moderators can only delete forum posts and topics.
Warning
Once a forum post, topic or forum is deleted, this action cannot be reversed and the content is gone forever.
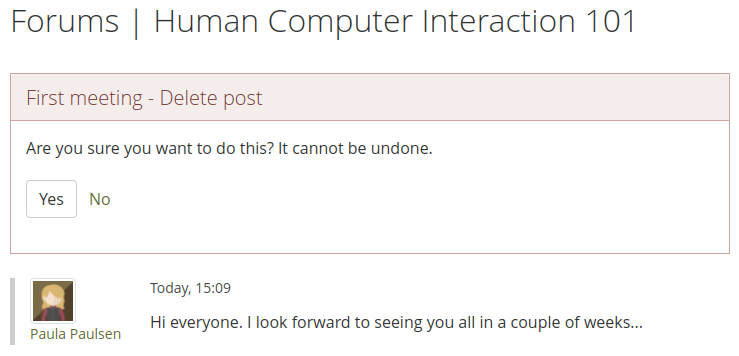
Delete a forum post
Before a forum post is deleted, moderators and administrators can see it again to ensure that they delete the correct post.
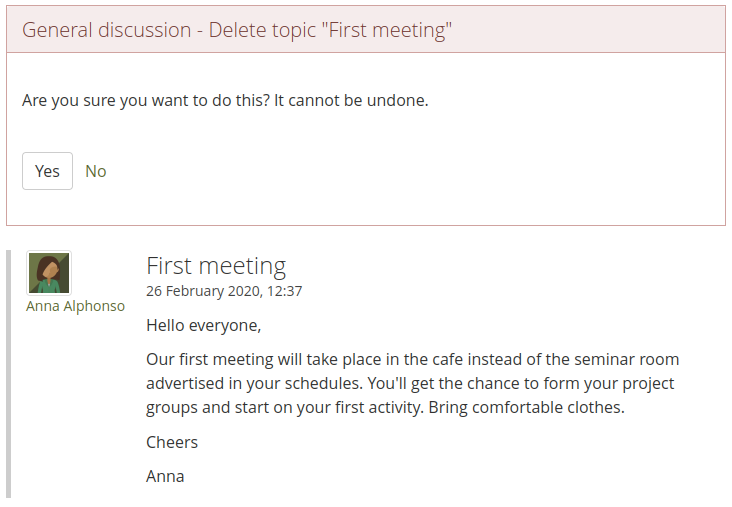
Delete a forum topic
Forum moderators and group administrators can delete an entire forum topic. Once they click the Delete button , the topic itself, but no replies, is displayed so they can double-check that they are deleting the right topic.
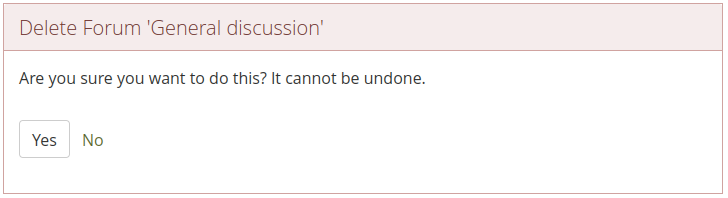
Delete an entire forum
Only group administrators can delete an entire forum.
6.4.3.5. Administrative forum bulk actions
Group administrators and forum moderators can perform bulk actions on forums in a group.
Forum bulk actions for administrators and moderators
Click the Edit forum button to make changes to the forum itself. This option is only available to group administrators.
Click the Delete forum button to delete the forum and all of its content permanently. This option is only available to group administrators.
Sticky topics, marked with an Asterisk , are displayed at the top of the list of forum topics, no matter how old they are.
Closed topics are marked with a Padlock . Only group administrators and forum moderators can post in them.
Select the topics for which you want to perform the same action.
Choose the action that you wish to perform from the drop-down menu. You can set all selected topics to
Sticky: They will sit at the beginning of all other forum topics.
Unsticky: They will be placed into the correct chronological order of their last post.
Close: Only the group administrator and forum moderator can add posts to these topics.
Open: Everyone can post to these topics again.
Move to: Move selected topics to another forum.
Note
If you are not subscribed to or unsubscribed from an entire forum, you find two more options in the drop-down menu to subscribe to and unsubscribe from individual forum topics.
Click the Update selected topics button to save your changes.
6.4.3.6. Subscribe to individual forum topics
You can subscribe to individual forum topics if you do not wish to get updates for all forum topics. In order to subscribe to individual forum topics, follow the next steps.
Note
The possibility to subscribe to and unsubscribe from individual forum topics is useful in community groups for example, where there are a lot of discussions in one forum, but you are only interested in a select few.
Subscribe to individual forum topics
Make sure that you are not subscribed to the entire forum. You should see the Subscribe to forum button. Click the Unsubscribe from forum button if necessary. Otherwise, you will not be able to complete the following steps.
Note
If you see the Unsubscribe from forum button, you are subscribed to all forum topics.
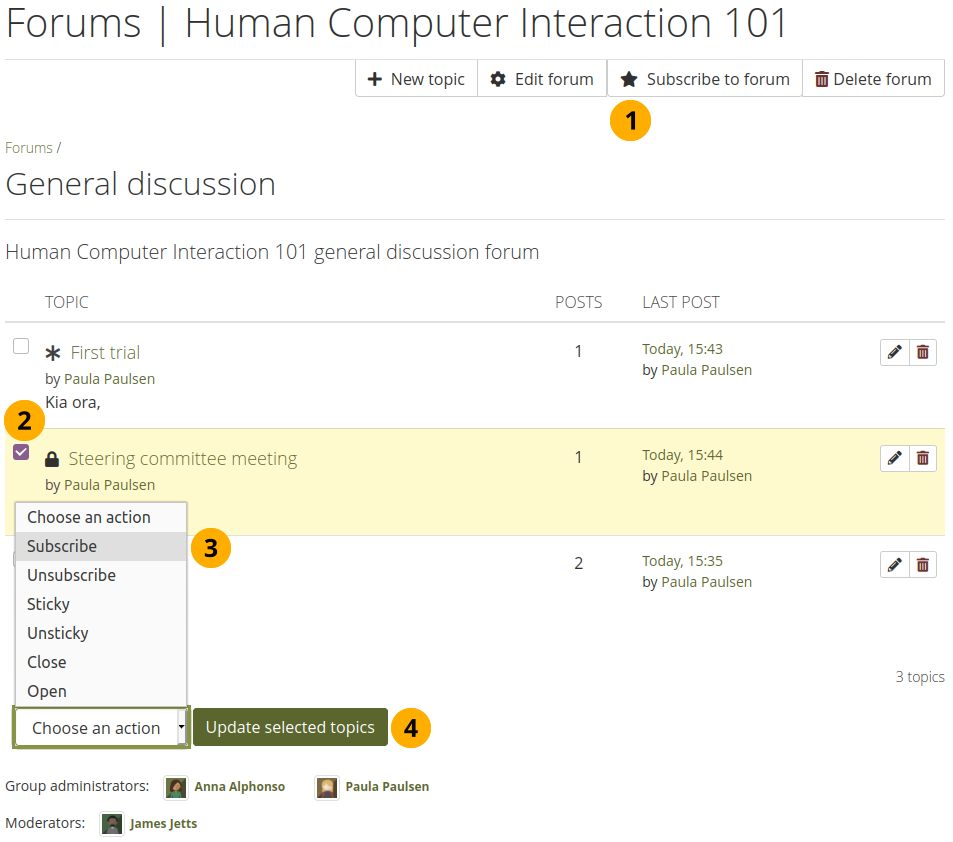
Tick the check box in front of the individual forum topic(s) to which you wish to subscribe.
Choose the option Subscribe from the Choose an action drop-down menu. You only see ‘Subscribe’ and ‘Unsubscribe’ as regular group member. Administrators see more options.
Click the Update selected topics button to save your changes.
The forum topics to which you are subscribed, get the Subscribed star icon .
6.4.3.7. Unsubscribe from individual forum topics
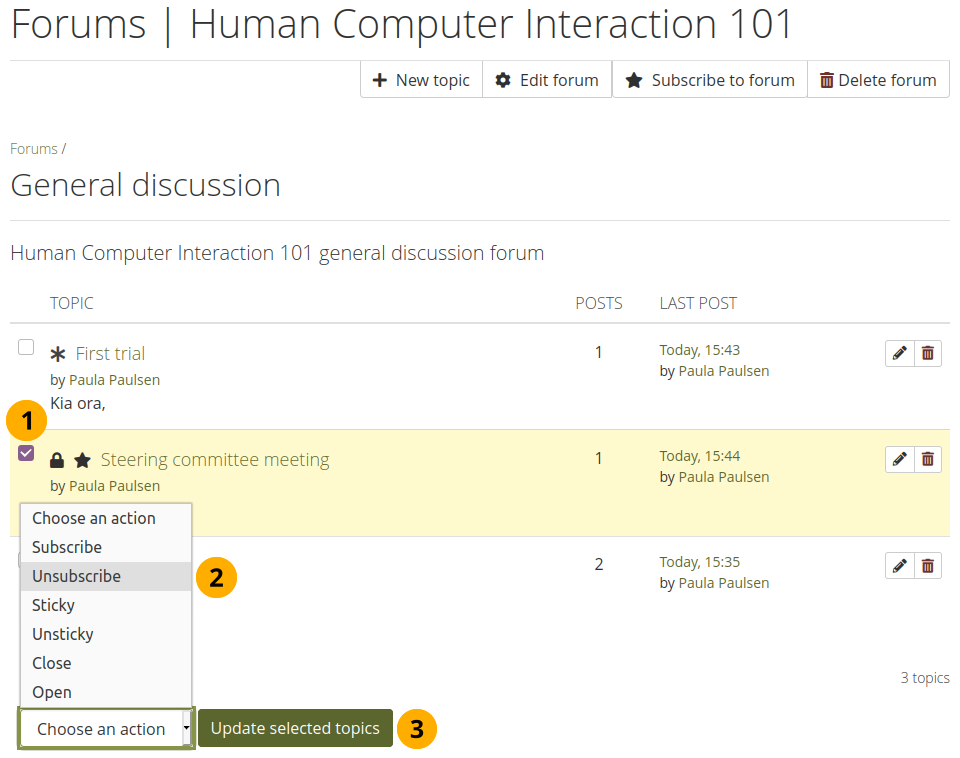
To complete the next steps, you will have to be subscribed to at least one forum topic. You can identify the subscribed topics because they have the Subscribed star icon next to their topic titles.
Unsubscribe from individual forum topics
Select the individual forum topic(s) from which you wish to unsubscribe.
Choose the option Unsubscribe from the Choose an action drop-down menu. You only see ‘Subscribe’ and ‘Unsubscribe’ as regular group member. Administrators see more options.
Click the Update selected topics button to save your changes. You are no longer subscribed to the topics that you had selected.
6.4.3.8. View objectionable content on forum topics and posts
Group members can report forum topics and individual forum posts as objectionable. When you want to report an entire forum as objectionable, then you need to report the first forum post as that started the forum topic.
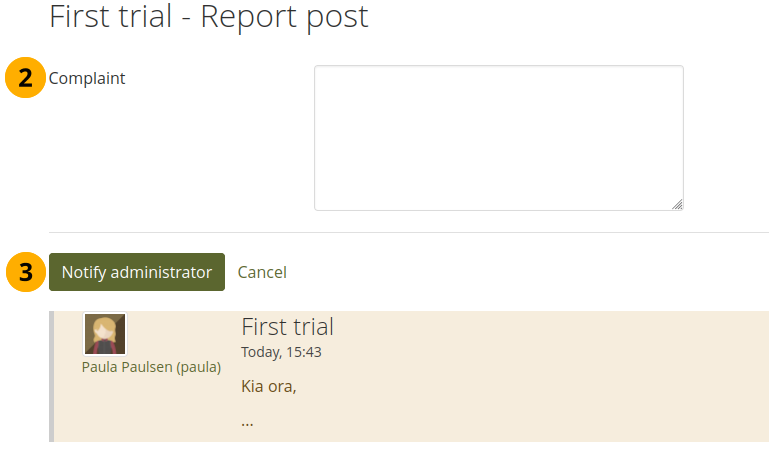
Report a forum post as objectionable
Click the Report link Report to report objectionable content on a forum post or topic. You see the post that you are reporting on the page.
Briefly write why you think the forum post does not comply with the terms and conditions of the site.
Click the Notify administrator button to send your report.
Group administrators, forum moderators, and site administrators receive a notification and can review the report.
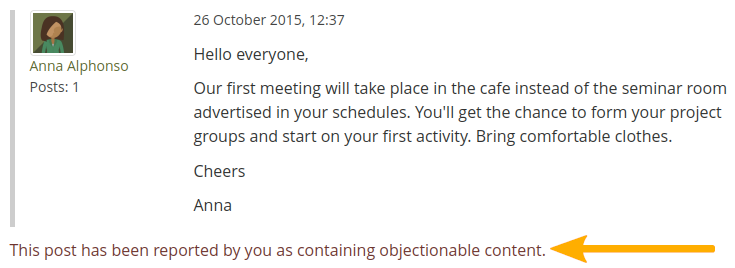
The person reporting a forum post or topic as objectionable content, sees it in the forum topic the following way:
What the person reporting objectionable content sees
Note
Other regular group members do not see that a forum topic or post was reported as objectionable.
When an administrator or forum moderator is in a forum that contains a topic or post that was reported as objectionable, they see the topic in question highlighted.
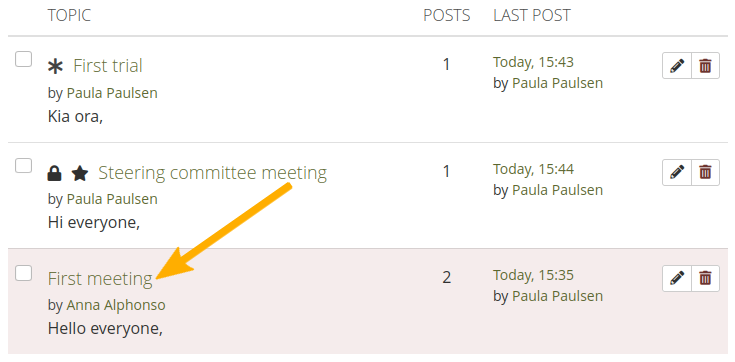
A forum topic containing objectionable content is highlighted in red in the list of forum topics
An administrator or forum moderator can see more details about the topic or post in question.
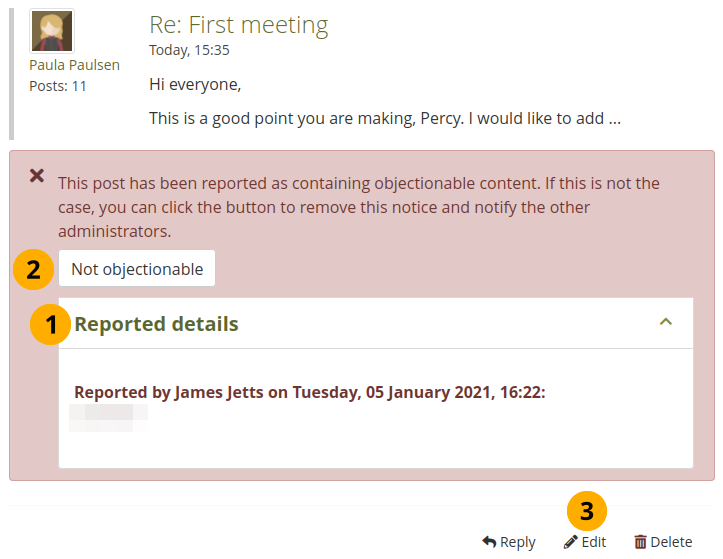
A forum post containing objectionable content is highlighted and contains additional information
Click the Reported details drop-down to see the explanation why somebody reported this post as objectionable.
Click the Not objectionable button if you think this post does not contain objectionable content. A notification is sent to the group administrators, forum moderators, and site administrators.
You can also edit the forum post if you want to remove part of it to make it nonobjectionable.
6.4.4. Pages and collections
Main menu → Engage → Groups → [Name of the group] → Pages and collections
Members of a group have access to certain portfolios. These can be:
pages and collections that are created in the group
pages and collections that are shared with the group
The latter are portfolios that people make accessible to the group from their personal portfolios by sharing them with the group. Members of the group cannot edit these portfolios.
Depending on the group settings, either only administrators (and tutors if it is a controlled group) or also regular group members can create and edit group portfolios.
Warning
Everybody who can edit a group page can add or delete blocks on that page. There is no version tracking that shows who has edited what. Group members should trust each other when collaborating on portfolios. Otherwise, it may be better if they only shared pages with a group.
6.4.4.1. Group homepage
The group homepage can only be edited by the group administrator. It contains a number of default blocks. You can add more blocks to it to customize the page for the group. Please refer to the overview of blocks for a list of all the blocks that you can use on the group homepage.
6.4.4.2. Regular group pages and collections
Creating, editing and sharing a group portfolio is very similar to creating, editing and sharing a personal portfolio.
Not all blocks are available when editing a group page though due to the different context. Please refer to the overview of blocks for a list of all the blocks that you can use in a group page.
When you leave a comment on a group page, only group administrators (and tutors if it is a controlled group) can delete feedback on pages.
See also
For submitting a portfolio to a group to receive instructor feedback, please refer to the feedback section.
Similarly to group homepages and personal portfolio pages, group portfolios can also have human-readable URLs if the site administrator activated clean URLs.
When you create or edit a group page, you can decide whether only the administrator shall have the right to edit the page with the Locked setting. With this setting you can allow the general editing of pages in the group, but still be able to lock down certain pages as administrator.
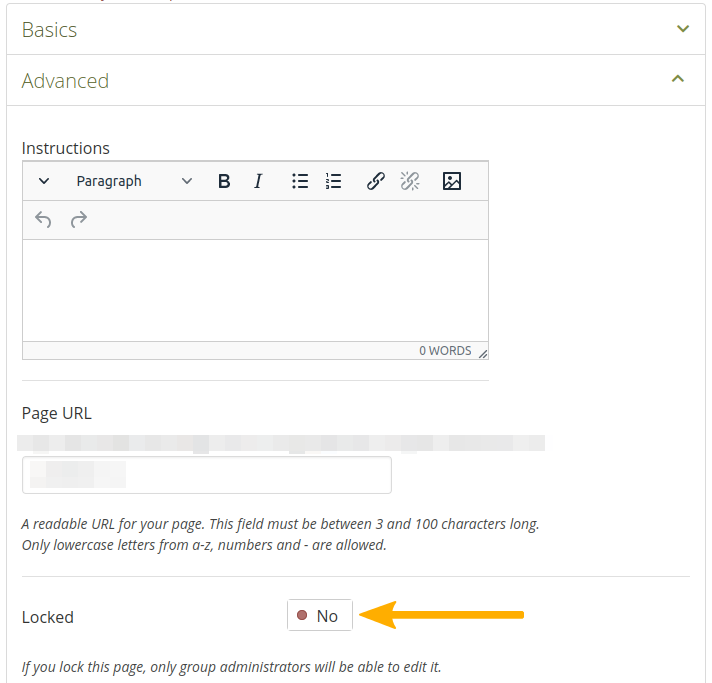
Lock a group page for editing by the administrator only
When a group page is created, group members (except the page creator) receive a notification unless the group administrator switched the setting Shared page notifications to ‘No’ in the group settings.
6.4.5. Journals
Main menu → Engage → Groups → [Name of the group] → Journals
You create group journals like regular personal journals.
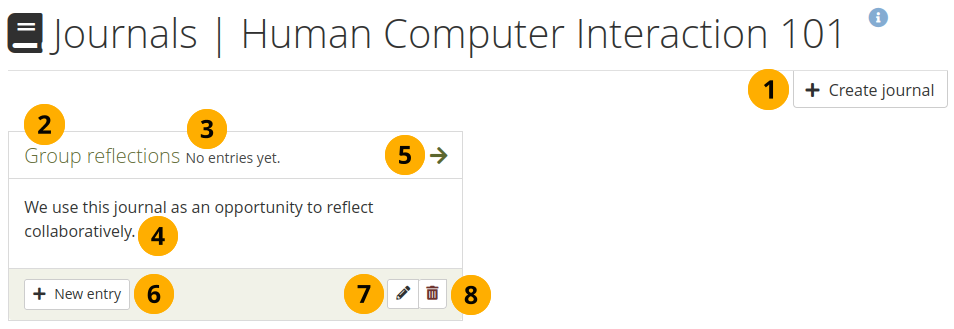
Group journals
You can create multiple journals. Click the Create journal button to set up a new journal.
Note
You can only create a journal if you have editing permissions in the group. If you can create and edit pages, you can add to journals.
All your journals are listed on Group → Name of the group → Journals with their titles. The titles link through to the individual journals.
You see how many entries you have in each journal.
You can see the description of the journal.
Click the Arrow icon to be taken to the journal and see all journal entries.
Click the New entry button to create a new journal entry directly from this screen.
Click the Edit button to make changes to your journal title, description or tags.
Click the Delete button to delete the journal and all its entries.
Warning
When you click the Delete button, you receive a confirmation message whether you really want to delete the journal or not. If you used the journal or an entry of it in a page, Mahara lets you know so you can decide whether to delete the journal or not. Once you agree to delete the journal, your journal and all its content are removed permanently.
6.4.6. Share
Main menu → Engage → Groups → [Name of the group] → Share
If you are allowed to edit pages and collections in a group, you can see the Share tab.
See also
The sharing of pages and collections works like in your personal porfolio. The group in which the page or collection was created is added automatically to the access permissions.
You can copy a group portfolio into the accounts of existing group members by setting the Copy for existing group members switch in the Advanced options. This is a good way to share templates with a wider group of people efficiently.
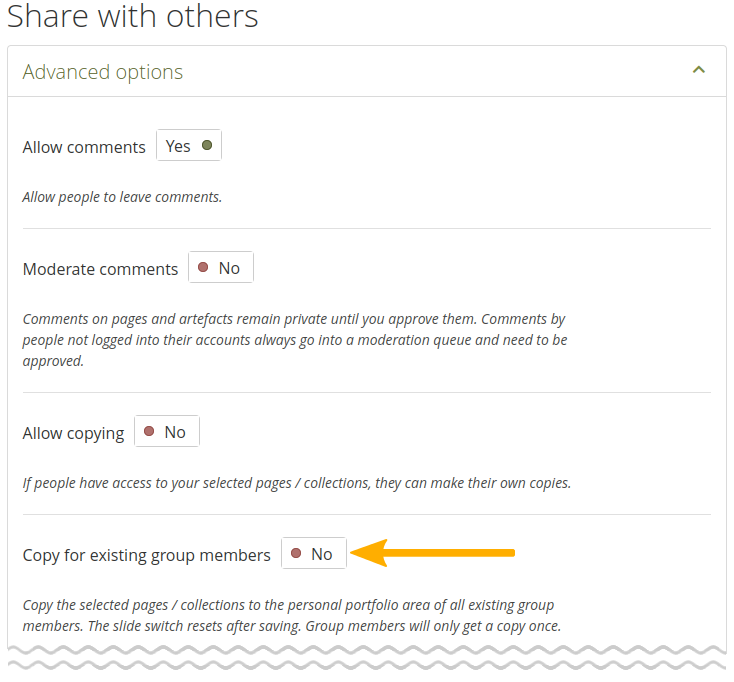
Copy a group portfolio automatically
Note
Only regular group members receive the copy of the portfolio. Group administrators and tutors do not get a copy.
The portfolio is copied only once. If changes are made to a page, they are not pushed to the copied page automatically. Also, when new members are added to the group and the template pushed automatically into their accounts, members who had already received the template will not get another copy.
6.4.7. Files
Main menu → Engage → Groups → [Name of the group] → Files
The Files area in a group holds all files that are uploaded by group members who have the permission to do so. The uploading process works like the one in the personal files.
The site administrator can set a group file quota to restrict unlimited uploading of files. The group quota is displayed in the sidebar when you are in the Files area.
In contrast to the files in your personal files area, there are a couple of additional settings:
Setting permissions on a group file
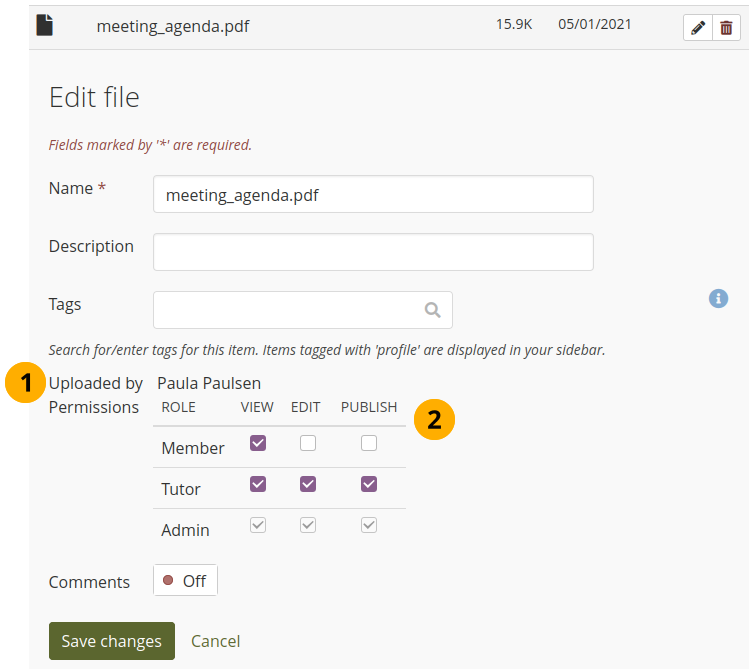
Uploaded by: You see the name of the person who uploaded a file to the group. That information is also displayed when you view the details page of the file in a portfolio.
Permissions: When you have the permission to upload a file, you can also determine additional permissions of who can view the file and edit its metadata. An administrator has all rights, but you can restrict them to regular group members or tutors.
View: You can see the file in the group files area and add it to a page.
Edit: You can edit the file name, description, tags and permissions.
Publish: You can include a group file in your personal portfolio pages.
Note
The group owner and the group member uploading a file retain access to the file even if other group members are not able to use it.
6.4.8. Plans
Main menu → Engage → Groups → [Name of the group] → Plans
You can set up a plan from scratch in a group or copy a template plan from your personal plans area.
You can set up two different types of plans:
Plans that can be completed in the group by group members. These are normal plans.
Assignment plans that learners complete in their personal portfolio area.
Note
If you want to set up an assignment plan, you need to set the ‘Create and edit’ permissions in the Group settings to ‘Everyone except ordinary members’ or ‘Group administrators’.
If you want to set a start and completion date automatically for each plan task, enter the editability dates in the Group settings.
6.4.8.1. Set up a plan
Set up a plan in a group
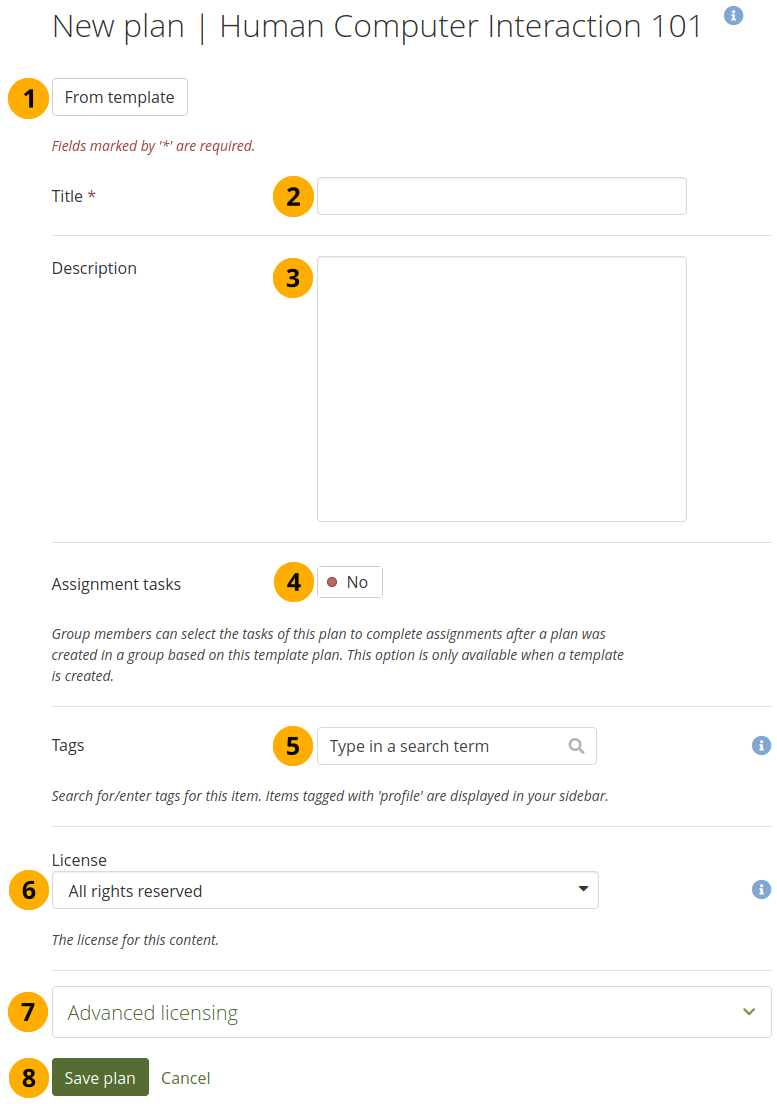
After having clicked the New plan button on the Plans overview page in a group…
Click the From template button if you want to copy one of the template plans from your personal area as new group plan. If you do, all tasks will be set up automatically and task pages as well as assignment portfolios copied into the group. You can still make any number of changes.
Note
When you select to create a plan from a template, a modal window opens where you can choose your template.
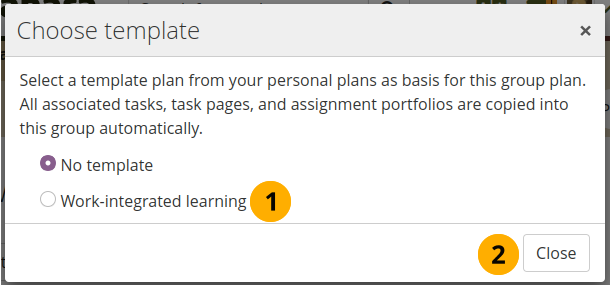
Select the plan template you want to use.
If you want to leave without selecting a template, click the Close button.
Title: Give your plan a title. This field is mandatory.
Description: Give your plan a description. It is visible when you select a plan for inclusion into a portfolio page and on the portfolio page itself.
Assignment tasks: Say ‘Yes’ for this option if you want learners to be able to choose certain plan tasks as activities and copy them into a plan in their personal portfolio area.
Tags: Add tags to your plan for easier searching later on.
License: You see this field if the site administrator turned on license metadata. Choose the license for the plan. You can set your default license in your account settings.
Advanced licensing: You see this option if the site administrator turned on license metadata. If you click it, you see two additional license fields, ‘Licensor’ and ‘Original URL’, that you can fill in if this in not your own plan.
Note
At the moment, you cannot display that license information on a portfolio page, but it is stored for future use when the functionality is expanded. You can view the license information on the artefact’s detail page though.
Click the Save plan button to keep your new plan. Click Cancel if you want to abort creating your plan or making changes to an existing plan.
6.4.8.2. View a plan as group administrator
Note
If the plan is an assignment plan, it doesn’t show a column for the completion status.
Group administrators and tutors can edit assignment plans, but they cannot complete them.
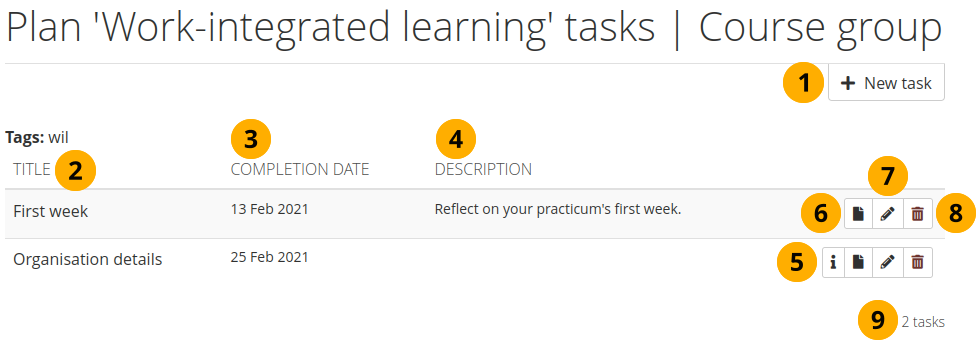
View plan tasks
Click the New task button to add a task to the plan.
Title: Shows the title of the task.
Completion date: The date when this task needs to be done.
Note
The start date and reminder time frame are not displayed.
Description: Additional information about the task.
Click the Task preview button next to a task to view the task page that is associated with this task if there is any.
Click the Open portfolio button next to a task to view the assignment portfolio that is associated with the task.
Click the Edit button to make changes to the task.
Click the Delete button to remove the task from this plan.
Note
Deleting the task does not delete the page in the group portfolio area.
The number of tasks in the plan is shown.
6.4.8.3. View an assignment plan as ordinary group member
Note
If the plan is an assignment plan, it doesn’t show a column for the completion status.
Ordinary group members can complete assignment plans, but they cannot edit them.
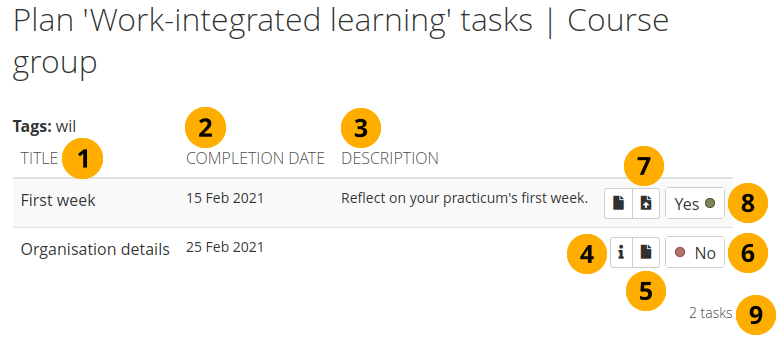
View plan tasks
Title: Shows the title of the task.
Completion date: The date when this task needs to be done.
Note
The start date and reminder time frame are not displayed.
Description: Additional information about the task.
Click the Task preview button next to a task to view the task page that is associated with this task if there is any.
Click the Open portfolio button next to a task to view the assignment portfolio that is associated with this task.
Click the No switch to add this task to your personal plan. It will turn into a Yes switch.
Note
When you click the switch, the assignment portfolio that is associated with the task (if there is any) is copied into your personal portfolio area.
The task page stays in the group, and you can access it by clicking the Task preview button in the plan in your personal area or here in the group plan area.
Click the Submit for assessment button to submit the assignment portfolio to the group.
Note
This button only becomes available when a task had been selected.
If you decide not to complete a task after all, you can click the Yes switch and turn it into No. The task is removed from your personal plan. If you have not yet edited the associated assignment portfolio, it will be deleted from your personal portfolio area.
The number of tasks in the group plan is shown.
Note
When you view the tasks in your personal plans area via Main menu → Create → Plans → [Name of the plan], you only see that tasks that you activated.
6.4.9. Report
Main menu → Engage → Groups → [Name of the group] → Report
When you are an administrator of a group, you can switch on the participation report in the group settings. The report provides you with information on who commented on what pages that were created in or shared with the group.
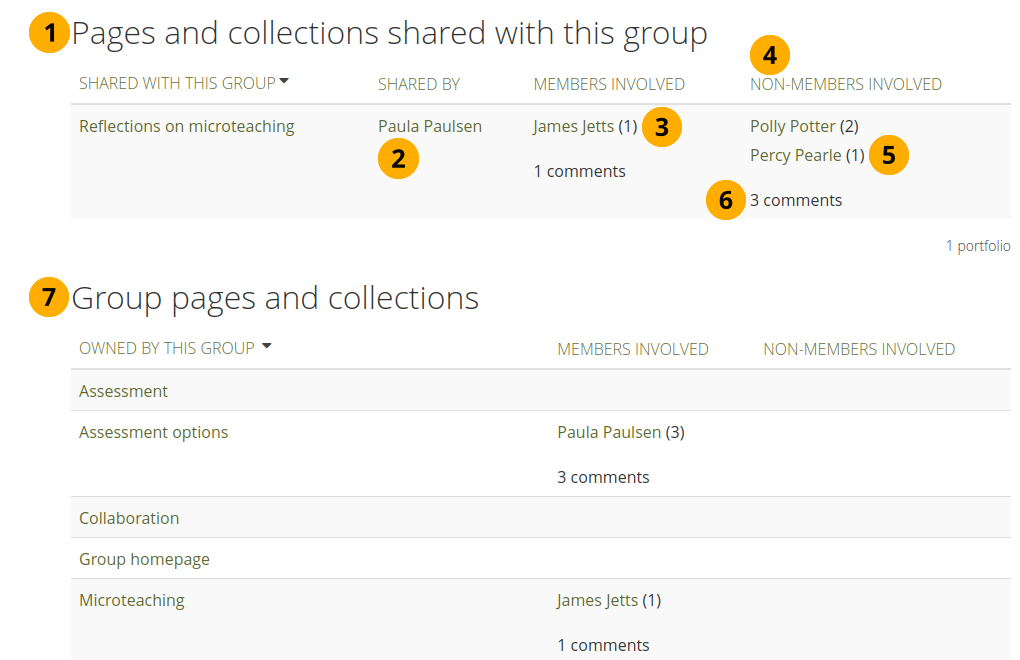
Participation report for a group
Portfolios shared with this group: List of all the portfolios that group members have shared with this group. submitted portfolios are displayed alongside shared portfolios.
Shared by: Displays the author of the page.
Members involved: Shows the group members who have commented on the pages publicly.
Non-members involved: Shows who has commented on the pages publicly but is not a member of the group.
Next to each person who commented on a page is the count for the number of comments they have left on that page. This also includes private comments.
The total count for the comments by members and non-members is displayed separately.
Portfolios owned by this group: List of all the portfolios that were created within the group.
Note
You can sort each of the columns. The column that is currently sorted, has a little ascending triangle or descending triangle next to it.