2. Maharaユーザマニュアル執筆者および翻訳者のための情報
by Kristina D.C. Hoeppner
This is a list in progress as I work on the user manual. There are a number of things for which I created conventions. I want to keep them in a central space so that others have access to them and that I can refer to them as well. ;-)
このリストは特定の順番に並べられていません。
2.1. Sphinxをインストールする
The Mahara user manual requires that Sphinx is installed on your computer. You can find information on how to install Sphinx on the Sphinx website.
2.2. コードを取得する
Maharaユーザマニュアルのコードはgitで管理されています。
- まだ作成していない場合、あなたのコンピュータのリポジトリを置く場所にフォルダを作成してください。例) code
- ターミナルでフォルダ「code」に入ってください: cd code
- コードをチェックアウトします:
- SSH経由:
git clone git@git.mahara.org:user-manual/manual.gitまたは - HTTS経由:
git clone https://git.mahara.org/user-manual/manual.git
- SSH経由:
- ターミナルでフォルダ「manual」に入ってください:
cd manual - ユーザマニュアルを英語のみでコンパイルしてください。次のコマンドはあなたがMahara 15.10をコンパイルする場合の例です:
make preview MAHARA=15.10 - Open the
index.htmlfile in a browser to view the manual. You can find it in the folderbuild/en/15.10.
2.3. スクリーンショット
- are placed using the 「figure」 directive.
- always include alt text and a figure description. That sets them apart from the text.
- are generally placed above a list if they are part of step-by-step instructions.
- should have as few instructions as possible about the steps that are to be taken in them. Preferably, only the step numbers so that they can be exchanged more easily and the text of the steps is translatable because it is text and not part of the image. That could also mean that translators can translate the steps but don’t immediately have to change the screenshots.
- get callouts that are pre-made and can be found in the Gimp file
/images_originals/z_callouts.xcf. - only get an arrow if an item is to be pointed out but there are no steps involved. The arrow can be found in the file
/images_originals/z_arrow.png. - that have callouts refer to the steps that need to be taken and that are explained below the figure.
- should only show the necessary area and not the entire screen or URL address bars etc. where not necessary.
ほとんどのスクリーンショットには*図*ディレクティブが追加されます。
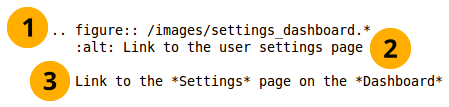
スクリーンショットを含む例
最初の行ではファイルのパスを提供します。
注釈
The * replaces the file extension and Sphinx chooses the file that is most appropriate. Thus, files could have different image extensions, or you could have the same screenshots in different file formats that are then chosen by the programme to best suit the end format of the manual.
For the Mahara user manual we use .png files in general as we work with screenshots. It is still good to use the * instead of the .png extension in case the file format is changed at some point.
The second line represents the alt text that is displayed when hovering over the image, when no images are displayed or when viewing the page via a screen reader.
3行目は空白行に続く必要があります。これは画像の説明としてスクリーンショットの下に表示されるテキストです。PDF出力の場合、説明は連続して番号付けされます。
If you don’t want to display all the information from a screen but only the top and the bottom part, you can use the file
/images_originals/z_omission.xcfand place it into your screenshot. The sinus waves were created using the gimp plugin Shape paths with the following settings:- Sine Wave
- 開始 X: 0
- Start Y: 200 and upon the second run 215 to get the gap between the lines
- Amplitude: 3
- Wavelength: 25
- 繰り返し数: 40 (スクリーンショットの幅に依存します)
- ストロークパスをチェックする
- ストローク色: CCCCCC
注釈
If you want to include an image inline with the text and don’t want to or can’t use the regular figure, you should create a substitution and place it into the shortcuts.rstext file. There are plenty of examples in that shortcuts file already.
2.4. 使用されている警告は次のとおりです
ノート: さらに少しだけ注意が必要なすべてのことです。
注釈
Notes can be placed directly within a bulleted list. As usual, an empty line before and after the note must be placed and the admonition must be indented by 3 spaces.
警告: 注意しながら実施する必要のあるすべてのことです。
警告
本当に重要な情報が分からなくなるため、すべてを警告内に入れないようにしてください。
seealso: for references to other documents if they need special attention. References to other documents can also be included in the text inline.
参考
The Sphinx user documentation is a great place to deepend your knowledge and understanding of using rST with Sphinx. If you have any questions, you can also check out the Sphinx discussion group.
todo: for keeping a running ToDo list. ToDo lists are currently disabled.
2.5. 規約
ナビゲーションメニューアイテムに関連するそれぞれのセクションにはパスの記述が必要です。例) コンテンツ → ファイル。正しい矢印を取得するには矢印 ( → ) をコピーしてください。
Buttons such as Save or Copy page and also portfolio sections such as Content, Portfolio etc. are highlighted as emphasized text (with a single *).
Little buttons can be included in the text like , . They are added through a substitution. All replacements are kept in the file shortcuts.rstext which is included in each file in which a substitution is used by placing 「
.. include:: /shortcuts.rstext」 in the first line of the file. Substitutions are referenced in the text as 「*Edit* button |edit|」 for example pointing out what the action is that you do with them. Translators should not edit the substitution 「|edit|」 itself, but only change 「*Edit* button」 taking care to include the * again without placing any spaces between the * and the text to ensure that the word appears highlighted.それぞれのセクションにインデックスエントリを作成してください。
New features receive an index entry as well in the form 「single: New in Mahara x, [the functionality that is new]」. Index entries can be placed either above an entire section or inline. Inline is preferable for small functional changes so that readers are directly taken to the new functionality. This can be done like so:
:index:`Decide on the sort order <single: New in Mahara 15.04; Sort order of files in the "Folder" block>`Long sections like the administration are broken up into several pages to make the editing more manageable instead of having everything on one very long page.
reStructuredText does not have a set hierarchy of heading levels. They depend on the individual files. However, to be consistent, the following convention exists:
- 見出し1 例) 1.: ===============
- 見出し2 例) 1.1.: —————
- 見出し3 例) 1.1.1.: ~~~~~~~~~~~~~~~
- 見出し4 例) 1.1.1.1.: ^^^^^^^^^^^^^^^
h4以下の見出しは控えてください。
The index page does not have headings besides the main heading. That prevents the table of contents and the other sections that have headings to be the main chapters of the manual. Keep index page headings to just bold with **.
2.6. インテキストフォーマット
- 箇条書きリストにはそれぞれの箇条書きの前に「*」記号が付けられます。
- 番号付きリストにはそれぞれの番号付きアイテムの先頭に「#.」が付けられます。
- If you require an indented bulleted or numbered list, place a free line before the indented list and then indent each line with 3 spaces. There also needs to be an empty line when the indented list ends.
- 強調テキストは1つの「*」開始および終了します。 例) ``*this*``は*this*のようになります。
- 太字テキストは2つの「*」で開始および終了します。例) ``**this**``は **this**のようになります。
2.7. ハイパーリンク
- 外部リンク: 「
`[text that is linked] <URL>`_」 - 翻訳者は 「[text that is linked]」 のみ置換してください。 - Internal references to which can be linked from elsewhere in the manual are created by placing 「
.. [reference_text]:」 in a line right before a heading. I usually leave an empty line between the reference and the heading. - Linking to an internal reference: 「
:ref:`[text that is linked] <the internal reference>`」 - Translators should only replace 「[text that is linked]」. - **`**はアクセントマークです。垂直の一重引用符ではありません。
- An in-text target can be achieved by placing the text to be linked within accent marks preceded by an underscrore:
_`the internal reference`. Referencing is the usual:ref:`[text that is linked] <the internal reference>`.
2.8. 翻訳者注意
- Do not change the target for internal links that is placed between < >. If you do, the reference cannot be found. There should always be an explanatory text right before the pointy brackets. You can change that.
- 同様にあなたはURLのテキストを変更することができます。あなたの言語のサイトへのURLを置換する以外、URL自体を変更することはできません。
- If you translate the screenshots and other images, please ensure that you keep the folder structure of the 「images」 folder as you can see in the respective branch of the manual version you are editing in Git, for example for Mahara 15.10.
- You can find original images used for the manual in the folder 「images_original」 and then their respective subfolders. You can use them for your own translations if you only want to exchange the background but keep the callouts.
- You do not have to redo any images that you do not 「translate」, e.g. block icons, general buttons around Mahara and the text editor buttons. Any images that are not in your translation will be taken from the English original.
- ユーザマニュアルは1日1回更新されます。新しい翻訳およびはマニュアルの編集に先立ってGitにアップロードされたイメージはLaunchpadより取得されます。
- 現在、すべてがSphinxで翻訳されているわけではありません。今後のバージョンで対応されることを希望します。
注釈
If you want to mention the names of the main translators of the user manual for your language, you can add a sentence right after 「The Mahara user manual is written by Mahara community members.」 That paragraph appears before the table of contents. There is no equivalent sentence in the English manual because it is not a translation.