4.13. Plans
Main menu → Create → Plans
Plans are simple ToDo lists. They are particularly well-suited to plan medium and long-term endeavours. A plan can consist of a number of individual activities with which completion dates are associated.
You could use the functionality to:
set yourself individual goals for a large task.
manage your personal learning activities and keep an eye on how many you have already accomplished during the time frame that you have set yourself.
keep track of workshops you have attended for your professional development over time.
Overview page of Plans
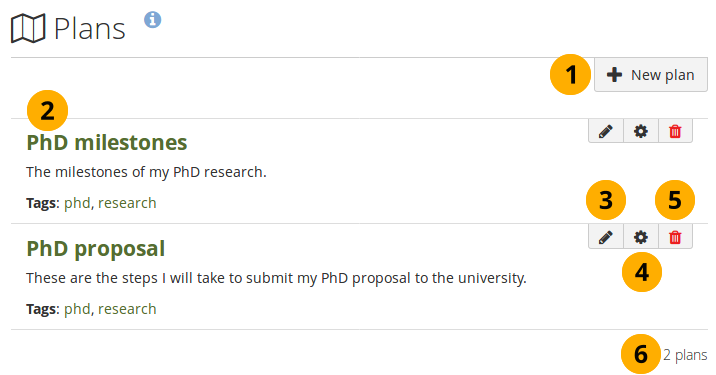
Click the New plan button to create a new plan.
Your existing plans, their descriptions and tags are displayed. Click a title to see all the tasks that you associated with that plan.
Click the Edit button to change the title, description, tags (and license) of your plan.
Click the Manage button to add and edit tasks for your plan.
Click the Delete button to delete your plan.
The number of plans you created is displayed.
4.13.1. Create a new plan
Create a new plan
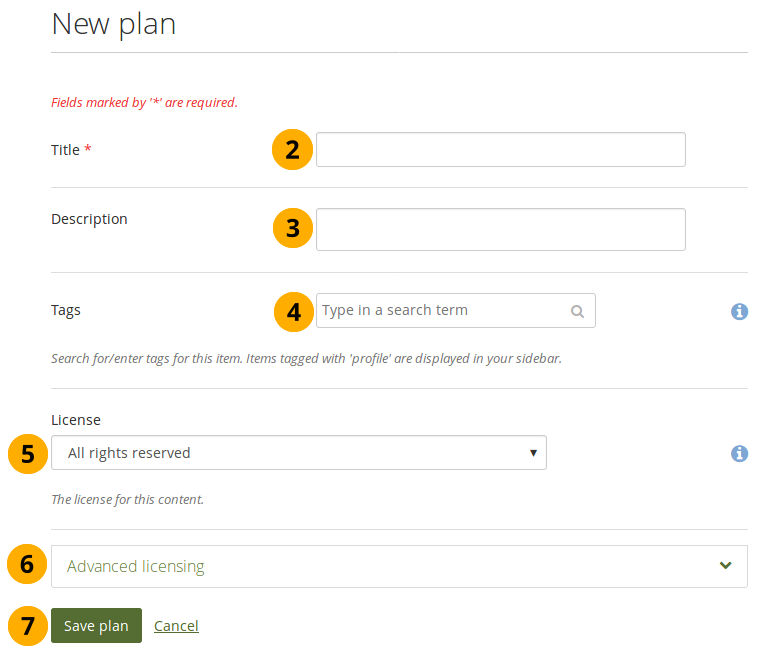
Click the New plan button on the Plans overview page.
Title: Give your plan a title. This field is mandatory.
Description: Give your plan a description. It is visible when you select a plan for inclusion into a portfolio page and on the portfolio page itself.
Tags: Add tags to your plan for easier searching later on. You can choose from your existing tags by starting to type a letter and then selecting the tag you want to use. You can also type a new tag, and it is added to your list of tags.
Zie ook
You can find more information on how to use the tag selector in the “Tags” section.
License: You see this field if the site administrator turned on license metadata. Choose the license for the plan. You can set your default license in your account settings.
Advanced licensing: You see this option if the site administrator turned on license metadata. If you click it, you see two additional license fields, “Licensor” and “Original URL”, that you can fill in if this in not your own plan.
Notitie
At the moment, you cannot display that license information on a portfolio page, but it is stored for future use when the functionality is expanded. You can view the license information on the artefact’s detail page though.
Click the Save plan button to keep your new plan.
Now you can add individual tasks to your plan.
4.13.2. Add tasks to a plan
There are several ways to add a task to a plan:
Click on Add task right after you saved your plan.
Click on Main menu → Create → Plans → the title of the plan → New task.
Click on Main menu → Create → Plans → the Manage tasks button → New task.
When editing a portfolio page that contains a plan, click the Add task button .
Once you are in the New task screen, you can create your new task.
Add a new task to a plan
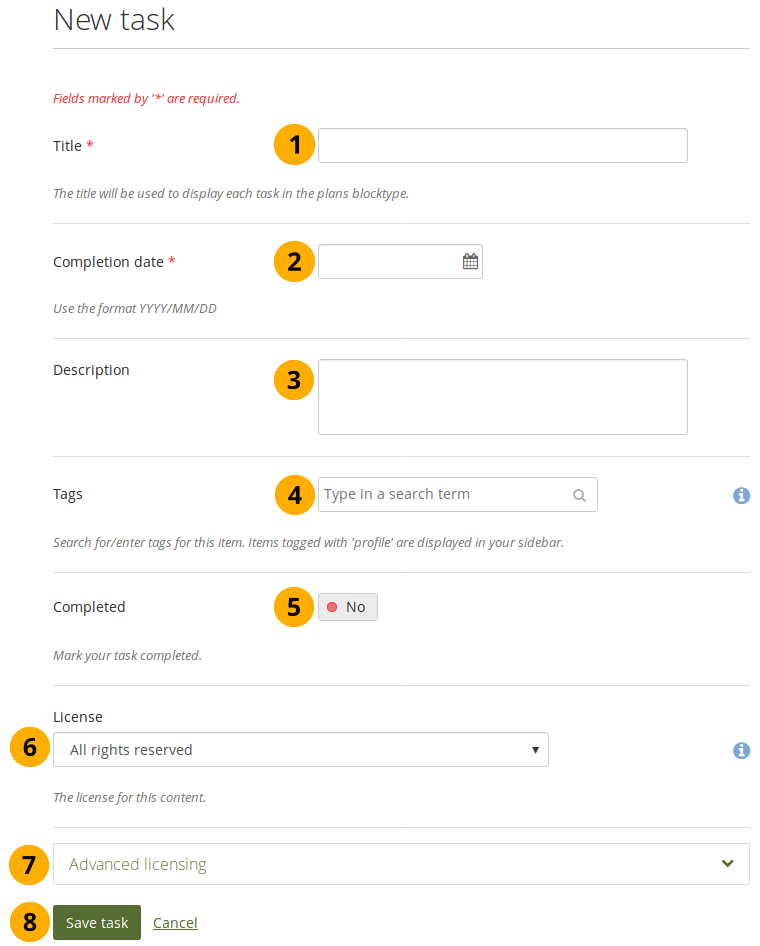
Title: Enter a title for your task. This field is mandatory.
Completion date: Provide a completion date. Click into the field to show the calendar or enter it directly in the format YYYY/MM/DD (Year - 4 digits / Month - 2 digits / Date - 2 digits), e.g. 2012/06/27. This field is mandatory and allows for tasks to be marked overdue automatically.
Description: Provide more detailed information about the task.
Tags: Add tags to your task for easier searching later on. You can choose from your existing tags by starting to type a letter and then selecting the tag you want to use. You can also type a new tag, and it is added to your list of tags.
Zie ook
You can find more information on how to use the tag selector in the “Tags” section.
Completed: Set to “Yes” if you have already completed the task.
License: You see this field if the site administrator turned on license metadata. Choose the license for the plan’s task. You can set your default license in your account settings.
Advanced licensing: You see this option if the site administrator turned on license metadata. If you click it, you see two additional license fields, “Licensor” and “Original URL”, that you can fill in if this in not your own plan’s tasks.
Notitie
At the moment, you cannot display that license information on a portfolio page, but it is stored for future use when the functionality is expanded.
Click the Save task button to finish editing your task.
Add more tasks immediately or at a later point.
4.13.3. Edit tasks in a plan
Click the Manage tasks button or the title of the plan on Main menu → Create → Plans.
Click the Edit button next to a task that you want to change.
Make your changes or mark a task as completed.
Click the Save task button and your changes are recorded.
4.13.4. View all tasks of a plan
You can view the tasks of the plan in two different ways if you are the author of the plan:
At Main menu → Create → Plans → Click on a plan.
Add a plan to one of your pages.
4.13.4.1. View a plan under Create
Plans under Create
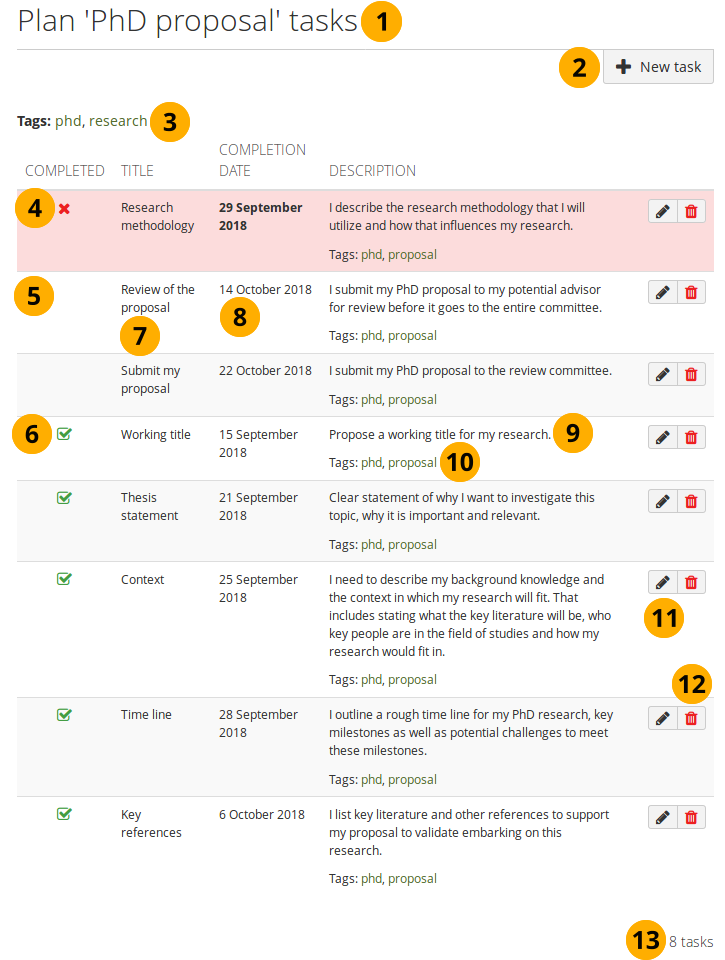
The title of the plan under which you created the tasks is shown.
Click the New task button to create a new task in this plan.
Tags: The tags that you associated with the plan are displayed.
Completed: The completion status of each task. Tasks that are overdue show the Overdue icon .
Completed: Tasks that are not yet completed don’t show any icon.
Completed: The completion status of each task. Tasks that are completed display the Completed icon .
Notitie
Not completed and overdue tasks are displayed at the top of a plan when there are already completed tasks so that they can be viewed more easily. All other tasks are displayed in chronological order.
Title: The title of each task is shown.
Completion date: You can see the completion date for each task.
Description: The description for each task is displayed.
Tags: The tags that you associated with a task are shown.
Click the Edit button to make changes to a task.
Click the Delete button to delete a task.
The number of tasks in your plan is displayed.
4.13.4.2. View a plan on a portfolio page
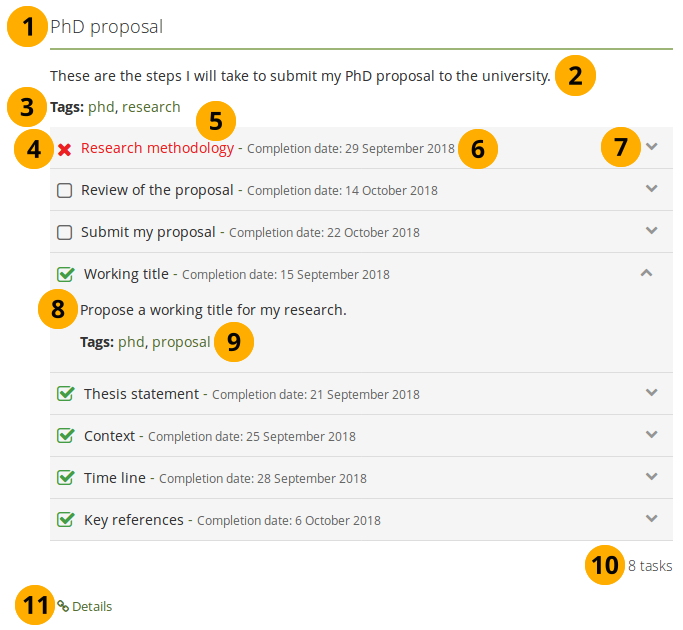
Plan on a portfolio page
The title of the plan. You can change that as part of the block title.
The plan’s description is displayed.
Tags: The tags that you added for this plan are displayed.
The completion status of each task is displayed:
Tasks that are completed display the Completed icon .
Tasks that are overdue show the Overdue icon .
Tasks that are not yet completed show the Not completed icon .
Notitie
You can click the completion icon to change the status of a task and mark it completed or revoke the completion.
Title: The title of each task is shown.
Completion date: You can see the completion date for each task.
Click the title of the task or the Down arrow to see details for this task. Click the Up arrow to hide the details.
The description of this task is shown.
Tags: The tags that you added for the task are displayed.
The number of tasks in this plan is displayed.
By clicking the Details link Details, you are taken to the artefact’s details page.
4.13.4.3. Edit a plan on a page in edit mode
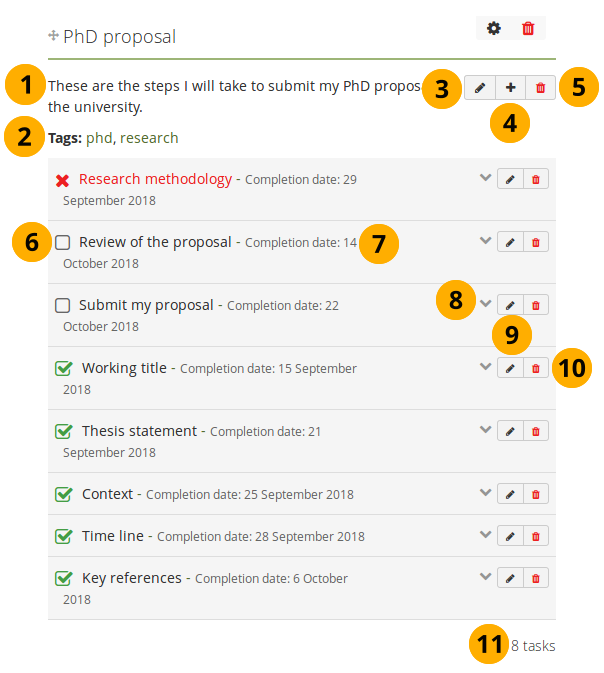
Make changes to your plan
The plan’s description is displayed.
Tags: The tags that you added for this plan are displayed.
Click the Edit plan button to make changes to the basic information about your plan. You will be redirected back to this page.
Click the Add task button to create a new task within the plan. You will be redirected back to this page upon saving your new task.
Click the Delete plan button to delete your plan permanently.
Click the completion icon to change the status of a task. The completion status of each task is displayed:
Tasks that are completed display the Completed icon .
Tasks that are overdue show the Overdue icon .
Tasks that are not yet completed show the Not completed icon .
Notitie
You can click the completion icon to change the status of a task and mark it completed or revoke the completion.
View the title and completion date of a task.
Click the title of the task or the Down arrow to see details for this task. Click the Up arrow to hide the details.
Click the Edit task button to make changes to a task. You will be redirected back to this page after you finished editing.
Click the Delete task button to remove the task from your plan and delete it permanently. You will be redirected back to this page after you finished editing.
The number of tasks in this plan is displayed.