6.1. Files, images and video
These artefacts are internal Mahara ones to display:
- links to files that you have uploaded
- folders that contain files
- show images
- embed audio and video files
6.1.1. File(s) to download

Select files that viewers of your portfolio can download.
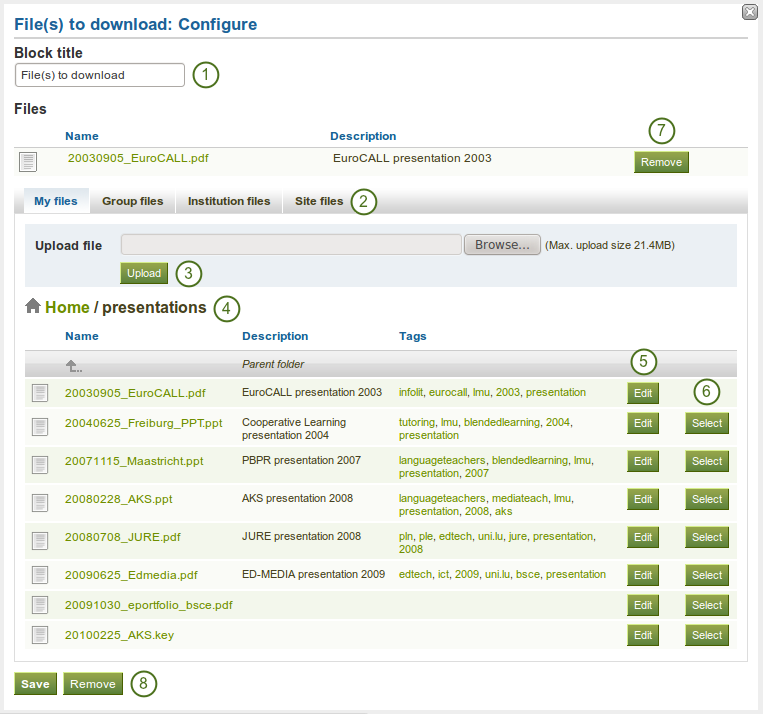
Configure the File(s) to download block
- Block title: Choose a title for your document block.
- Files area: Choose from which files area you would like to select a file. If you are not a member of a group and not an admin, you may only see My files. If you have access to files elsewhere, these contexts are shown as well, e.g. Group files, Institution files and Site files.
- Upload file: You do not have to go back to your Files area in Content in order to upload a file. You can do so directly from this screen.
- Folder path: The breadcrumbs show in which folder you are currently.
- You can still edit any component of the file, i.e. its file name, description and tags by clicking on the Edit button.
- Choose the file or files you wish to display by clicking on the Select button.
- Click the Remove button to not display a specific file in this block anymore.
- Click the Save button to accept your changes, or click the Cancel button to leave the block’s content as it is. The Remove button is shown only when you place the block into the page and have not yet added any artefacts.
Note
You cannot re-order files once you have selected them. You would need to remove them and select them again in the correct order.
Warning
When you place group, institution or site files into a page, beware that these files may not be available at some point anymore when the person in charge deletes them.
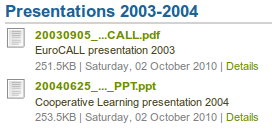
When the block is placed on the portfolio page, the following information is displayed:
- file name
- file description
- size
- upload date
- a link to more details
Details about files that can be downloaded.
When a user clicks on the Details link, he is taken to the details page for that particular file and sees some more metadata. He could also report the file, print the page or add the page to his watchlist.
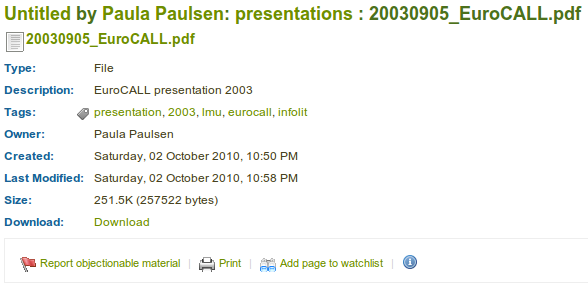
More details about a file that can be downloaded.
Note
If you allowed comments on files, a setting that you can add when you edit a file, users could also leave comments on an artefact file directly and not just on a page.
6.1.2. Folder

Select files that viewers of your portfolio can download.
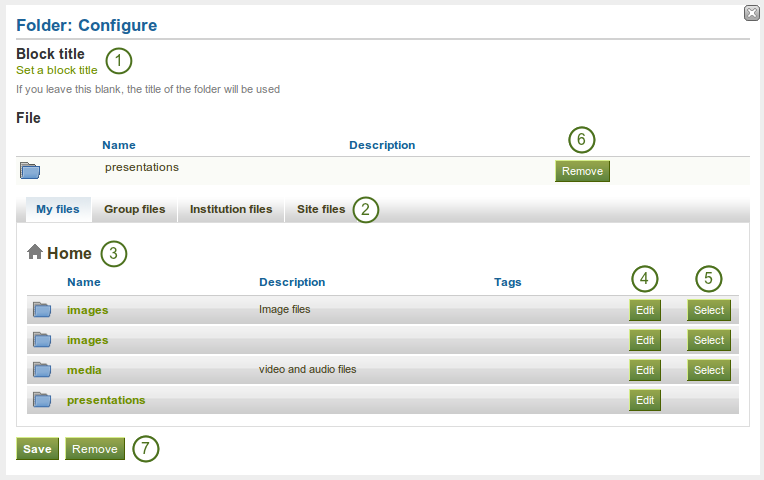
Configure the Folder block
- Block title: If you leave the title blank, the title of the folder that you choose to display will be used.
- Files area: Choose from which files area you would like to select a file. If you are not a member of a group and not an admin, you may only see My files. If you have access to files elsewhere, these contexts are shown as well, e.g. Group files, Institution files and Site files.
- Folder path: The breadcrumbs show in which folder you are currently.
- You can edit any component of the folder, i.e. its name, description and tags by clicking on the Edit button.
- Choose the folder you wish to display by clicking on the Select button.
- Click the Remove button if you wish to revert your choice.
- Click the Save button to accept your changes, or click the Cancel button to leave the block’s content as it is. The Remove button is shown only when you place the block into the page and have not yet added any artefacts.
Warning
When you place a folder with group, institution or site files into a page, beware that these files may not be available at some point anymore when the person in charge deletes them.
6.1.3. Image gallery

Select a folder with images or individual images to show in a gallery or embed an external image gallery.
6.1.3.1. Image gallery with uploaded images
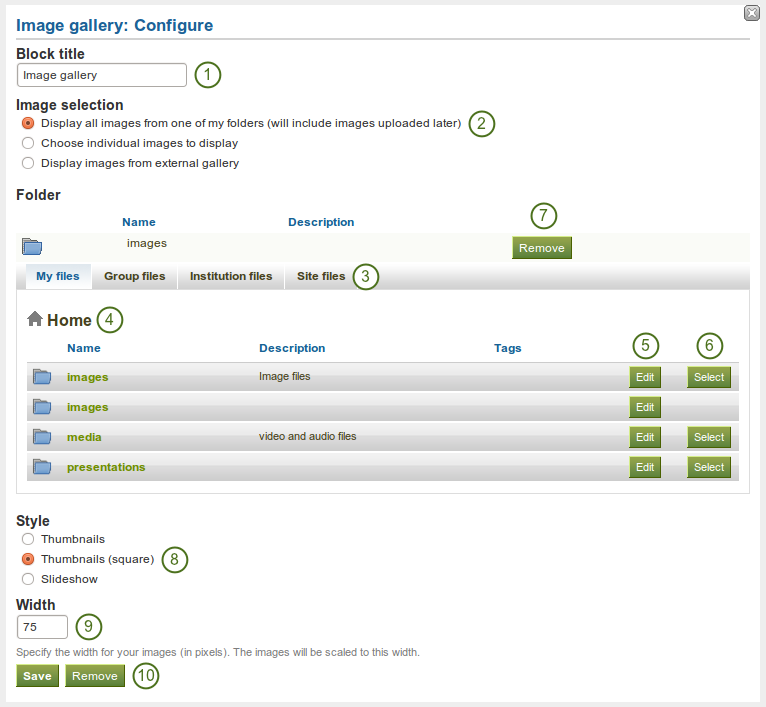
Configure the Image gallery block with internal images
- Block title: Choose a title for your image gallery block.
- Image selection: You can choose to display all images from a specific folder or you can select the images individually.
- Files area: Choose from which files area you would like to select a file. If you are not a member of a group and not an admin, you may only see My files. If you have access to files elsewhere, these contexts are shown as well, e.g. Group files, Institution files and Site files.
- Folder path: The breadcrumbs show in which folder you are currently.
- You can edit any component of the folder, i.e. its name, description and tags by clicking on the Edit button.
- Choose the folder you wish to display by clicking on the Select button.
- If you want to revert your selection, click the Remove button.
- Style: Decide to show all selected images as thumbnails or as slideshow where you only see one image at a time. If you select the option “Thumbnails (square)”, all your images will have the same size.
- Width: Specify the width (in pixels) for your images. The images are scaled to this width.
- Click the Save button to accept your changes, or click the Cancel button to leave the block’s content as it is. The Remove button is shown only when you place the block into the page and have not yet added any artefacts.
Note
If you selected to display an entire folder in your image gallery, new images that you upload to that folder are added to your gallery automatically.
Warning
When you place group, institution or site files into a page, beware that these files may not be available at some point anymore when the person in charge deletes them.
6.1.3.2.  Image gallery from external images
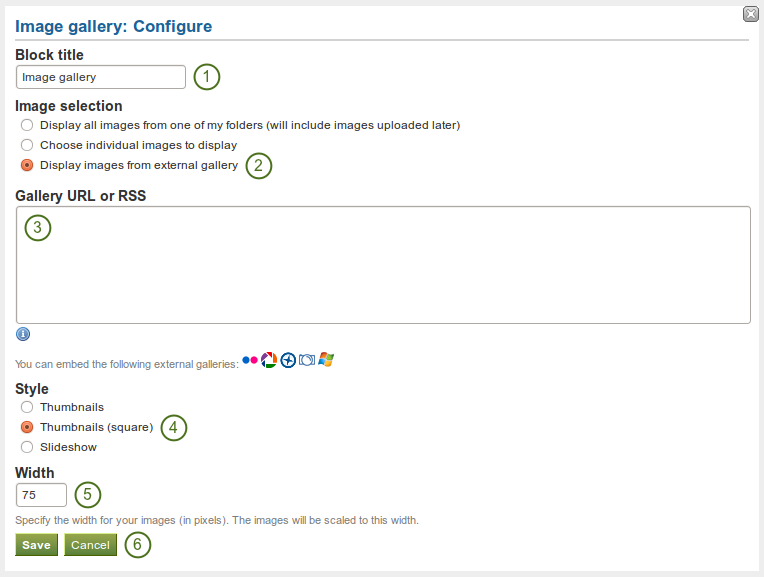
Configure the Image gallery block with external images
- Block title: Choose a title for your image gallery block.
- Image selection: Select the option “Display images from external gallery”.
- Gallery URL or RSS: Copy the link to the external gallery and past it into the text box. You can embed the following external galleries:
- Flickr, e.g. http://www.flickr.com/photos/12345678@N01/sets/98765432123456789/
- Panoramio, e.g. http://www.panoramio.com/user/123456
- Photobucket, e.g. http://s1234.photobucket.com/albums/ee123/username/ or http://s1234.photobucket.com/albums/ee123/username/AlbumName/
- Picasa, e.g. http://picasaweb.google.com/user.name/AlbumName#
- Windows Live Photo Gallery, e.g. http://cid-123456ab7890cd12.photos.live.com/self.aspx/AlbumName/photo.jpg
- Style: Decide to show all selected images as thumbnails or as slideshow where you only see one image at a time. If you select the option “Thumbnails (square)”, all your images will have the same size.
- Width: Specify the width (in pixels) for your images. The images are scaled to this width.
- Click the Save button to accept your changes, or click the Cancel button to leave the block’s content as it is. The Remove button is shown only when you place the block into the page and have not yet added any artefacts.
Note
- To use Flickr, the site admin has to provide a valid API key.
- To use Photobucket, the site admin has to provide a valid API key and a secret API key.
- For Windows Live Photo Gallery to work properly, the link to one of the photos inside the album must be copied and pasted into the text box in order to show the entire album.
6.1.4. Some HTML

Display the content of an HTML file in a page.
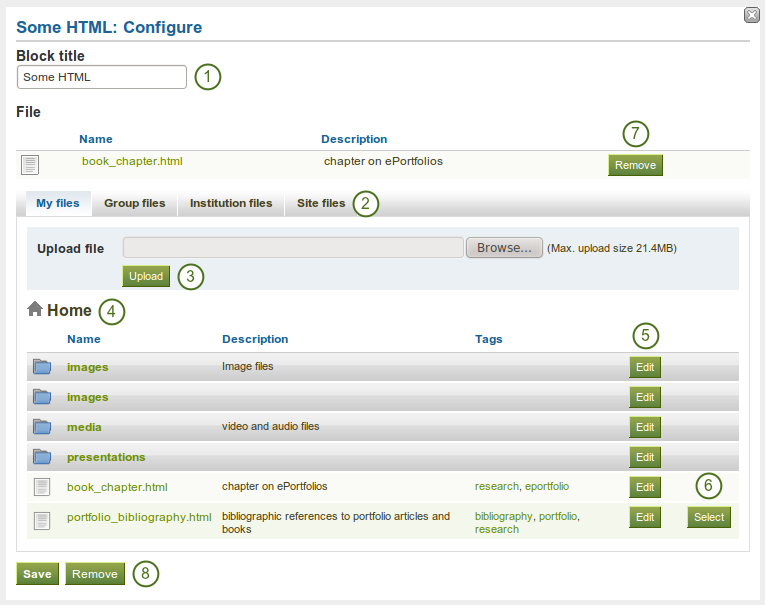
Configure the HTML block
- Block title: Choose a title for your block.
- Files area: Choose from which files area you would like to select a file. If you are not a member of a group and not an admin, you may only see My files. If you have access to files elsewhere, these contexts are shown as well, e.g. Group files, Institution files and Site files.
- Upload file: You do not have to go back to your Files area in Content in order to upload a file. You can do so directly from this screen.
- Folder path: The breadcrumbs show in which folder you are currently.
- You can still edit any component of the file, i.e. its file name, description and tags by clicking on the Edit button.
- Choose the file you wish to display by clicking on the Select button.
- Click the Remove button to not display that file in this block anymore.
- Click the Save button to accept your changes, or click the Cancel button to leave the block’s content as it is. The Remove button is shown only when you place the block into the page and have not yet added any artefacts.
Note
You can only display a self-contained HTML file in a page, but not an entire site because the links to the files are not retained correctly when you upload files.
Warning
When you place group, institution or site files into a page, beware that these files may not be available at some point anymore when the person in charge deletes them.
6.1.5. Image

Display a single image in a block.
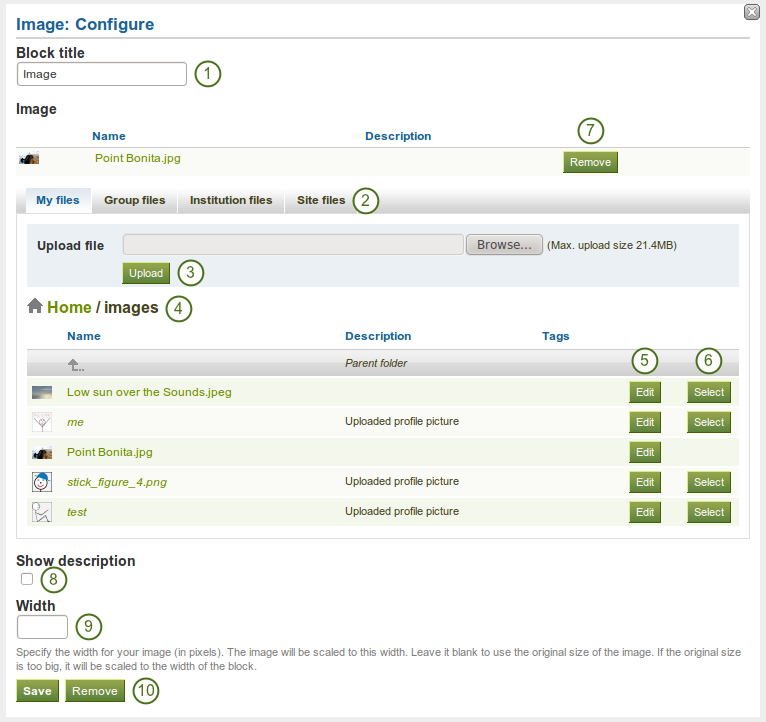
Configure the Image block
- Block title: Choose a title for your block.
- Files area: Choose from which files area you would like to select a file. If you are not a member of a group and not an admin, you may only see My files. If you have access to files elsewhere, these contexts are shown as well, e.g. Group files, Institution files and Site files.
- Upload file: You do not have to go back to your Files area in Content in order to upload a file. You can do so directly from this screen.
- Folder path: The breadcrumbs show in which folder you are currently.
- You can still edit any component of the file, i.e. its file name, description and tags by clicking on the Edit button.
- Choose the file you wish to display by clicking on the Select button.
- Click the Remove button to not display that file in this block anymore.
- If your image has a description you can choose to display it. The description could contain the source of the photo for example.
- Choose the width (in pixels) for your photo. If you do not provide a number, the image will be scaled to the width of the block.
- Click the Save button to accept your changes, or click the Cancel button to leave the block’s content as it is. The Remove button is shown only when you place the block into the page and have not yet added any artefacts.
Warning
When you place group, institution or site files into a page, beware that these files may not be available at some point anymore when the person in charge deletes them.
6.1.6. Embedded media

Display an embedded video or audio file from your uploaded files. You can display mp3, mp4 and flv files per default.
Note
If you wish to display other file types, the site administrator must allow other media formats. These will not be displayed with the built-in media player but require that you have the correct media player installed to display these videos.
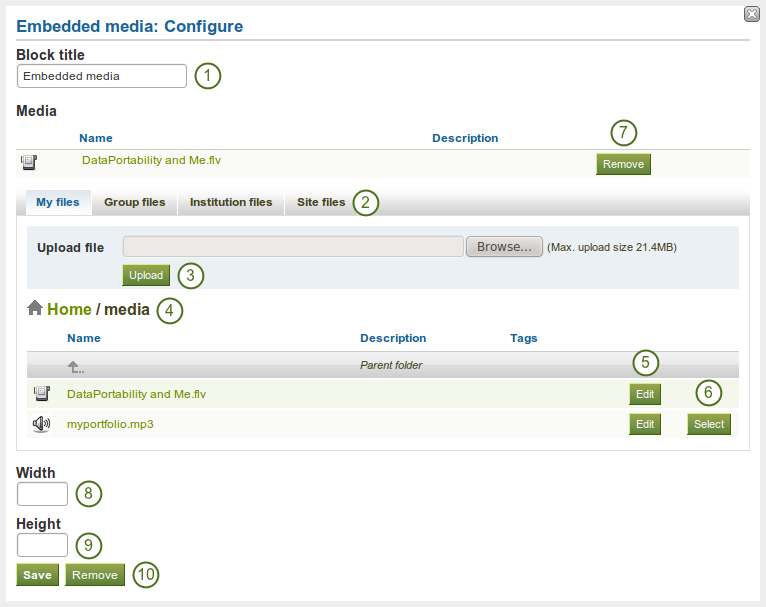
Configure the Embedded media block
- Block title: Choose a title for your block.
- Files area: Choose from which files area you would like to select a file. If you are not a member of a group and not an admin, you may only see My files. If you have access to files elsewhere, these contexts are shown as well, e.g. Group files, Institution files and Site files.
- Upload file: You do not have to go back to your Files area in Content in order to upload a file. You can do so directly from this screen.
- Folder path: The breadcrumbs show in which folder you are currently.
- You can still edit any component of the file, i.e. its file name, description and tags by clicking on the Edit button.
- Choose the file you wish to display by clicking on the Select button.
- Click the Remove button to not display that file in this block anymore.
- Width: Choose the width (in pixels) for your video.
- Height: Choose the height (in pixels) for your video.
- Click the Save button to accept your changes, or click the Cancel button to leave the block’s content as it is. The Remove button is shown only when you place the block into the page and have not yet added any artefacts.
Note
Only the files that you are allowed to embed are displayed. If you uploaded a mp4 file but it does not show here, you may have to check if it has the correct codec. Only H.264 mp4 files can be embedded.
Warning
When you place group, institution or site files into a page, beware that these files may not be available at some point anymore when the person in charge deletes them.