8.6. Extensions
Site administration → Extensions
Extensions in Mahara serve to provide certain functionality in the system. Extensions can be installed at any point and also be hidden.
8.6.1. Plugin administration
Site administration → Extensions → Plugin administration
The Plugin administration lists all the plugins that are currently installed on your Mahara instance and provides a link to the plugin configuration settings where available.
Plugins in Mahara are always installed and can be accessed if users know the URLs and would otherwise have access. Rather than enabling and disabling the functionality, plugins are hidden or made visible by clicking on the hide or show links beside the plugins. When hiding an artefact type plugin, Mahara stops the display of the blocks related to it.
In order to delete a plugin completely, you must delete the code and all database tables that pertain to the plugin.
Note
Core Mahara functionality can be made unavailable to users by hiding it. This may be useful if you connect Mahara to another system that already provides this functionality or if you do not wish your users to use that functionality. However, the decision about hiding a functionality should be considered thoroughly as it may also mean that users may not be able to have as many artefacts available to them.
In the following, only the plugins that have additional settings are discussed.
8.6.1.1.  Blocktype: File / gallery
You can provide additional image gallery settings and also allow your users to make Flickr and Photobucket image galleries available. The settings you make on this page will be the default settings for all users.
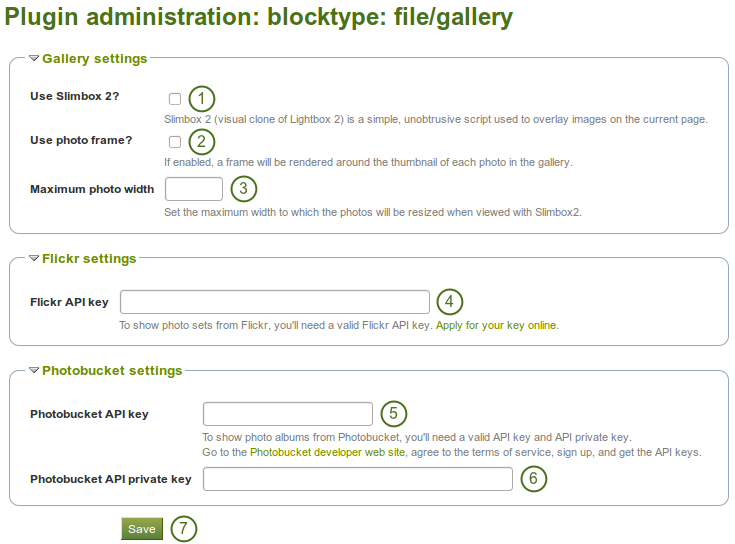
Configure the Image gallery block
- Use Slimbox2: Check this box if you want to use this script to overlay images on the current page.
- Use photo frame: Check this box if you want to put a frame around the thumbnail of each photo in photo galleries.
- Maximum photo width: Set the maximum width (in pixel) to which the photos will be resized when viewed with Slimbox2.
- Flickr API key: If you want to allow users to display photos from Flickr, you need a valid Flickr API key. You can apply for the key at Flickr.
- Photobucket API key: If you want to allow users to display photos from Photobucket, you need a valid API and private API key. You can get them from the developer page of Photobucket.
- Photobucket API private key: Provide the private API key from Photobucket that you will have received.
- Click the Save button to keep your changes.
8.6.1.2. Blocktype: File / internalmedia
Configure which file types users can embed into the Embedded media block. If you disable a file type that has already been used in a block, it will not be rendered any more.
Mahara comes with Flowplayer, a media player that can play FLV, MP4 (in H.264 format) and MP3 files. Videos are embedded and audio files played with the help of this player.
Other video file types can be enabled, but users must have the appropriate software installed on their computers and the respective plugin enabled in their browsers to play them.
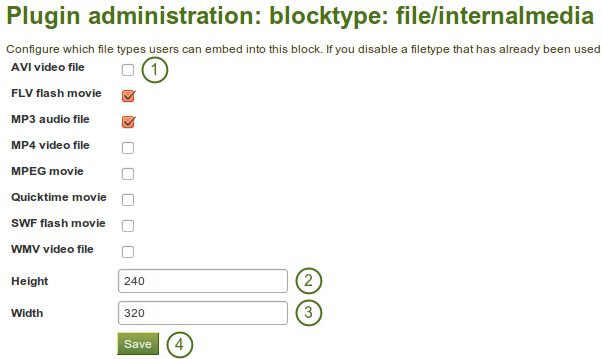
Configure the Embedded media block
- Select the file types that you wish your users to be able to show on their portfolio pages.
 Width: Choose the default width (in pixels) for a video.
 Height: Choose the default height (in pixels) for a video.
- Click the Save button to keep your changes.
Note
If you allow the embedding of file types that cannot be played by Flowplayer, some users may not have the necessary software installed for displaying these file types.
8.6.1.3. Block type: Wall
You can limit the number of characters that are allowed for wall posts in this configuration setting. Existing posts will not be changed.
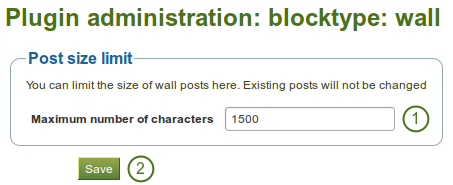
Configure wall settings
- Choose the maximum number of characters for your wall posts.
- Click the Save button to keep your changes.
8.6.1.4. Artefact type: Comments
Turn comment ratings on to enable 5-star ratings in the feedback section on artefacts and pages.
Note
Ratings cannot be on their own and require either a comment or a file attachment.

Enable comment ratings
- Click the check box to enable comment ratings.
- Click the Save button to keep your changes.
8.6.1.5. Artefact type: File
You can configure a variety of options connected to uploading files.
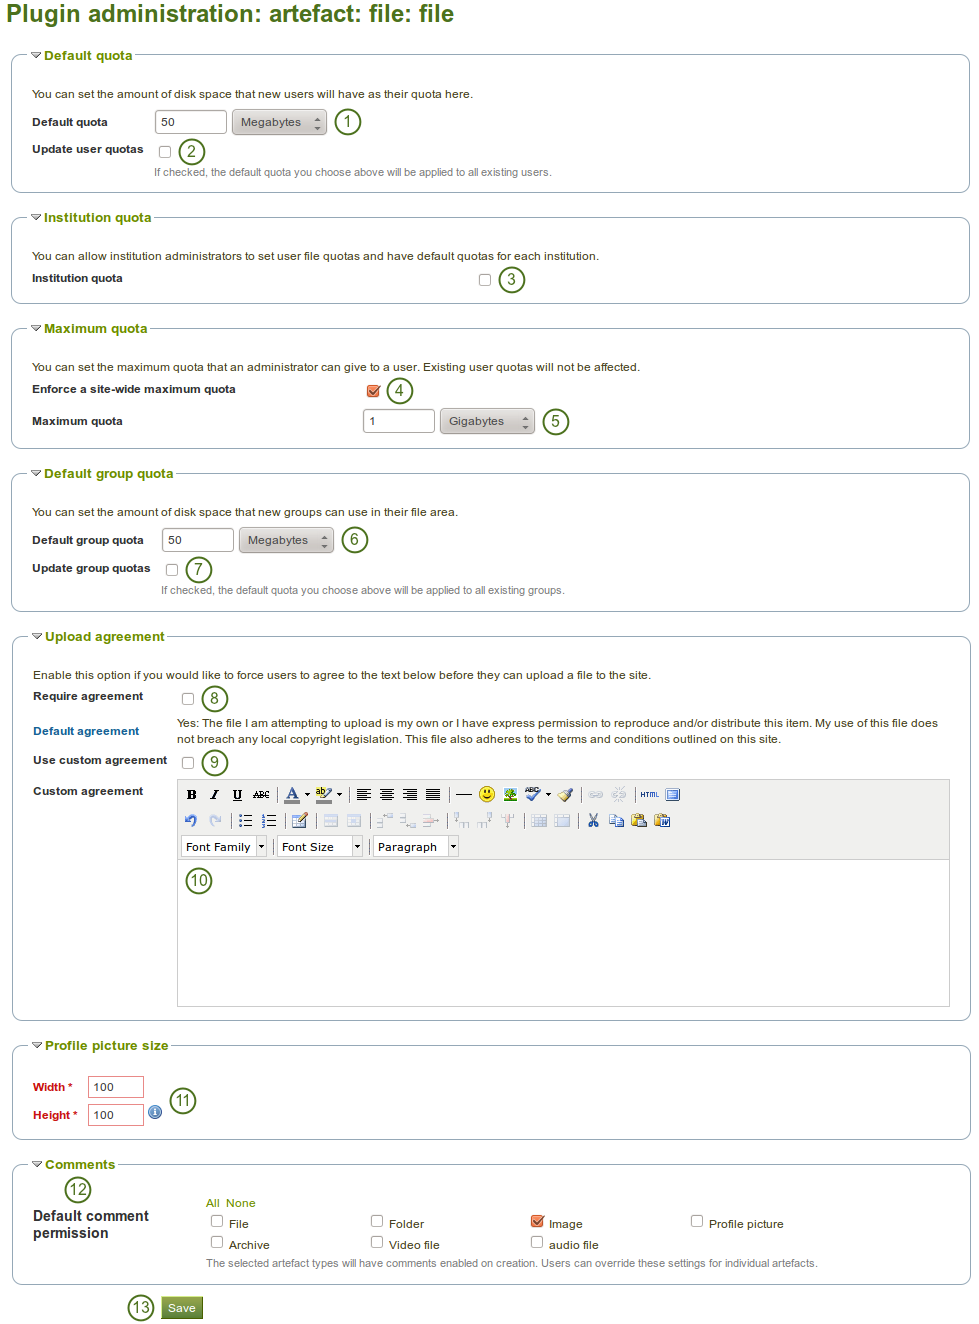
Configure the file plugin
- Default quota: You can set the amount of disk space that new users will have as their quota. Existing user quotas will not be changed.
 Update user quotas: Check this box if you want to update the file quota for existing users with the value under Default quota. Only then will they be updated.
 Institution quota: Check this box if you want to allow institution administrators to set user file quotas and have default quotas for each institution.
- Enforce a site-wide maximum quota: Check this box if you do not wish an administrator to go beyond the allowed maximum quota.
- Maximum quota: You can set the maximum quota that an administrator can give to a user. Existing user quotas will not be affected.
 Default group quota: You can set the amount of disk space that each group will have as its quota. Existing groups will not be affected.
 Update group quotas: Check this box if you want to update the file quota for existing groups with the value under Default quota. Only then will they be updated.
- Require agreement: Enable this option if you want to force users to agree to certain terms before they can upload a file to the site. They must accept this agreement before they are able to choose a file from their computer to upload to Mahara. A default agreement is provided and the text displayed.
- Use custom agreement: If you want to write your own upload agreement, check this box in addition to Require agreement.
- Custom agreement: If you want to use a custom upload agreement, write it here.
- Profile picture size: Choose the maximum size of the profile pictures for users (in pixels). All images uploaded to the profile pictures area will be resized to these dimensions.
- Default comment permission: Choose the artefact types which shall have comments enabled per default. Users can override these settings for individual artefacts in the files area. You can enable comments for:
- archive, i.e. compressed file
 audio file
- file
- folder
- image
- profile picture
 video file
- Click the Save button when you are finished making your changes.
8.6.1.6. Artefact type: Profile
For profile information you can decide which fields a user must provide when a user account is created manually or via CSV file. These fields are marked mandatory fields.
The profile fields marked searchable fields are available for all logged-in users to search on.
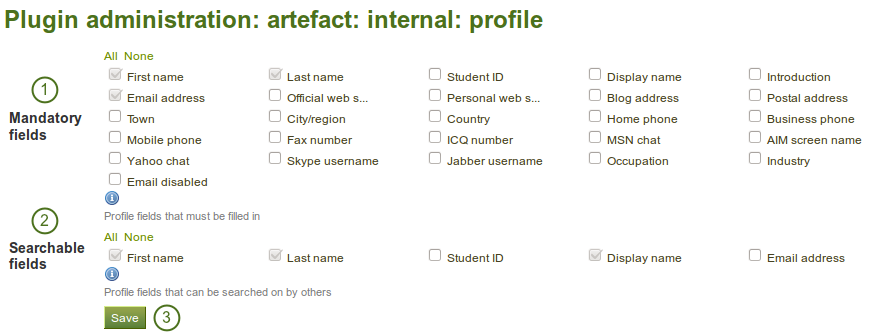
Choose mandatory and searchable profile fields
- Mandatory fields: Select the fields that you wish all users to fill in. Certain fields cannot be deselected.
- Searchable fields: Select the fields that can be searched on by others. Certain fields cannot be deselected.
- Click the Save button to keep your changes.
8.6.1.7. Authentication: SAML
If you wish to use SAML authentication any where on your site, you must provide the path to your SAML php file in these settings.

Prepare your site for SAML authentication
- SimpleSAMLphp lib directory: Provide the fully qualified path to the library directory of SimpleSAMLphp, e.g. if the full path to the bootstrap autoload.php is
/some_path_to/simplesamlphp_1_3/lib/_autoload.phpthen this value should be/some_path_to/simplesamlphp_1_3/ - SimpleSAMLphp config directory: Provide the fully qualified path to the configuration directory to be used for this Service Provider (SP) SimpleSAMLphp, e.g. if the full path to the config.php is
/some_path_to/simplesamlphp_1_3/config/config.phpthen this value should be/some_path_to/simplesamlphp_1_3/config/ - Click the Save button to keep your changes.
8.6.1.8.  Search: Internal search
If your site has a lot of users and uses a PostgreSQL database, user searches will be faster with exact user searching enabled. The setting will still work with MySQL databases, but is unlikely to significantly increase search performance.
The advantage of the exact user search is that if you have 20 users with the first name “Percy” but different last names, you may find the user you are looking for more quickly because you can search for “Percy Pearle” and the result list will not show “Percy Pearl”, “Percy Sutter”, “Percy Townsend” etc.
However, partial matches on profile fields will not return results, so if for example you have a user called “Percy”, then typing “Perc” into the search box will not find that user.

Configure the internal search plugin
- Exact user searches: Check this box if you want to enable exact user searches.
- Click the Save button to keep your changes.
8.6.1.9. Interaction: Forum
The post delay setting determines the time (in minutes) that users have for editing their forum posts before they are mailed out. Once a forum post has been mailed and further edits are made, the date, time and editor are mentioned in the post.

Set the edit time before the forum post is finalised
- Set the time in minutes before a post is finalised and further edits are marked.
- Click the Save button to keep your changes.
8.6.2. HTML filters
8.6.2.1. Custom filters
Site administration → Extensions → HTML filters
Mahara uses HTML Purifier to filter out malicious code that could threaten the security of the system. If you have code, e.g. iFrames or JavaScript that you wish to use and that otherwise gets filtered out, you will have to write a filter to circumvent that. Filters should always be specific to their purpose and not give ‘carte blanche’ to ensure security as much as possible.
Mahara already comes with a number of installed filters. Others can be uploaded and then installed. If you have created a new set of HTML filters, you can install them by unzipping the files into the folder /htdocs/lib/htmlpurifiercustom and then click the Install button.
Custom filters for iFrames that allow the embedding of media content such as YouTube and WikiEducator allow users to grab the URL of the page on which the media is displayed instead of having to find the actual embed code.
8.6.2.2.  SafeIframe feature of HTML Purifier
HTML Purifier now has the SafeIframe feature and this is implemented in Mahara as well. This feature allows you to specify the base URLs for media that you want your users to embed. These iFrames are then considered safe and will not be stripped out of a text box or journal entry where you can use them. You do not have to write a bespoke filter for using these iFrame sources.
Note
An admin interface for adding, editing and deleting these iFrame sources will be added in the next version of Mahara.
The following instructions can only be carried out by an administrator who has access to the server on which your Mahara site is housed.
- Open the file
htdocs/lib/web.php. - Search for the term safeiframesources.
- Add additional iFrame sources you want your users to use to the list of existing sources. Be careful to adhere to the Regex rules.
- Save the file. The iFrames are not stripped out anymore.
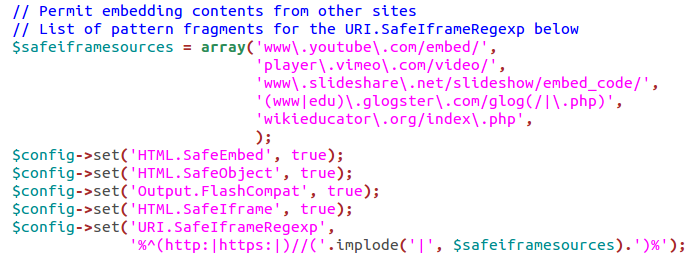
Code extract with the standard safe iFrame sources