6.4. Personal info
The artefact blocks in this tab allow you to include information that you provided in the profile into your portfolio. If you want to make changes to the text or the images, go to Content → Profile.
Furthermore, you can also put certain blocks on your profile page that only exist for that particular page:
- My friends
- My groups
- My pages
- Wall
6.4.1. My friends

Add a block that displays your friends’ profile pictures and their names to your profile page. This is a default block on your profile page.
You only need to place the block on your profile page. There is no further configuration possible.
6.4.2. My groups

Add a block that displays your groups to your profile page. It is a standard profile page block.
You only need to place the block on your profile page. There is no further configuration possible.
6.4.3. My pages

Add a block that displays your pages on your profile page. It is a standard profile page block. This block should stay on your profile page because other users can see all your pages to which they have acceess.
You only need to place the block on your profile page. There is no further configuration possible.
Note
When other users view your profile page, they only see the pages to which they have access. That also means that you see all your pages while others may see none or just a few.
6.4.4. Profile information

Add a block with profile fields to your page.  The “Contact information” block merged with the “Profile information” block as they displayed the same information.
Note
Only display as much information as you wish anybody to see. Especially when you make your pages available to the public, i.e. everybody on the Internet, or all logged-in users, decide carefully whether you want to display your street address and / or phone number.
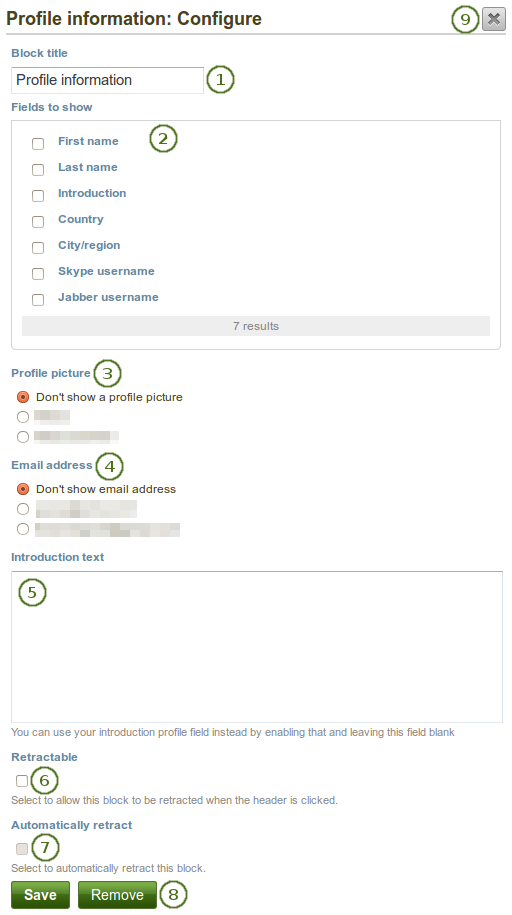
Configure the Profile information block
- Block title: Choose a title for your block.
- Fields to show: Decide which fields shall appear on the page. Put a check mark in front of each one that you want to show. Displayed are only the ones for which you provided content.
- Profile picture: Choose to display one of your profile pictures or none.
- Email address Decide whether to display one of your email addresses that you have entered in your profile under Content.
- Introduction text: If you do not want to display the introduction text from your profile, you can write another one just for this page here. However, it will be lost when you delete this block.
- Retractable: Tick this checkbox if you want to allow users to reduce the block to its heading on a page. The user can click the Retractable icon
 to just show the heading.
 - Automatically retract: Tick this checkbox if you want to show only the block’s heading when a user views the page. The user can click the Retracted icon
 to view the entire block.
 - Click the Save button to accept your changes, or click the Cancel button to leave the block’s content as it is. The Remove button is shown only when you place the block into the page for the first time.
- You can also click the Close button
 in the top right-hand corner to either remove a newly created block before it is being saved or to cancel any changes and leave the block’s content as it is.
6.4.5. Wall

Add a block that displays your wall on your profile page. It is a standard profile page block. Other users can leave messages for you, i.e. write on your wall, and they can decide whether everyone looking at your profile page can see them or only they and you.
You only need to place the block on your profile page. There is no further configuration possible.
When you view your wall (or someone else’s wall) on your profile page, you see the following.
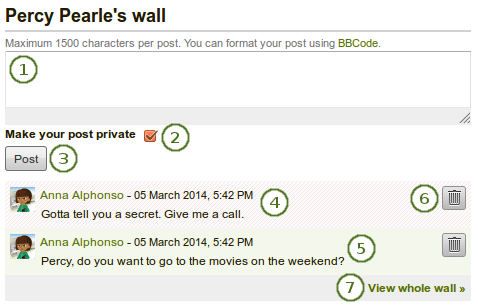
A wall on a profile page
Enter your message in the text box. You can use BBCode to format your message.
Note
BBCode gives you a way to include formatting like bold or italics in your messages.
For example, to make a word bold, you would write it like this: [b]hello[/b]. In your message, the word will show up as hello. The BBCode markers - the [b] and [/b] - disappear.
The following BBCodes are available:
- [b] and [/b] to make words bold - e.g. [b]ponies[/b].
- [i] and [/i] to make words italic - e.g. [i]amazing![/i].
- [img] and [/img] to insert an image - e.g. [img]http://mahara.org/favicon.ico[/img]
- [url] and [/url] to insert a link - e.g. [url]http://google.co.nz[/url] or [url=http://google.co.nz/]Google[/url]
Links in your message are automatically clickable.
Make your post private: Decide who shall see your wall post. If you make it private, only you and the person to whose wall you are posting will see the post.
Click the Post button to add your message to the wall.
A wall post always contains the name of the person who made the post, the date and the actual message. Wall posts that ae private are highlighted in a special color / pattern. In the default theme it red stripes.
A public wall post can be viewed by anyone who has access to the profile page.
Click the Delete button
 if you do not want to have a specific post on your wall. The post authors and you as owner of your wall can delete posts.
Click the View whole wall link to see older wall posts.
6.4.6. Résumé
You can display either your entire résumé or parts of it in any portfolio page. If you choose to display only parts of your résumé, you have more control over the arrangement of the information.
6.4.6.1. My entire résumé

Add a block with your entire résumé to your page.
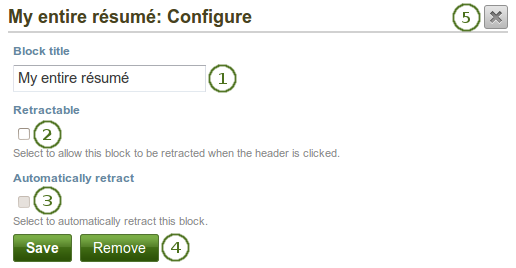
Configure the My entire résumé block
- Block title: Choose a title for your block.
- Retractable: Tick this checkbox if you want to allow users to reduce the block to its heading on a page. The user can click the Retractable icon to just show the heading.
- Automatically retract: Tick this checkbox if you want to show only the block’s heading when a user views the page. The user can click the Retracted icon to view the entire block.
- Click the Save button to accept your changes, or click the Cancel button to leave the block’s content as it is. The Remove button is shown only when you place the block into the page for the first time.
- You can also click the Close button in the top right-hand corner to either remove a newly created block before it is being saved or to cancel any changes and leave the block’s content as it is.
Note
When you use this block, you do not have control over the order in which the information is displayed, but Mahara decides that. In order to be more flexible, you can choose to display one résumé field at a time with the next block.
6.4.6.2. One résumé field

Add a block with one résumé field to your page.

Configure the One résumé field block
- Block title: The title of the résumé field you want to display is chosen automatically unless you provide a different one.
- Field to show: Choose the résumé information that you want to display. You can select one area at a time.
- You can jump to the résumé section directly from this pop-up window in order to fill in more content.
- Retractable: Tick this checkbox if you want to allow users to reduce the block to its heading on a page. The user can click the Retractable icon to just show the heading.
- Automatically retract: Tick this checkbox if you want to show only the block’s heading when a user views the page. The user can click the Retracted icon to view the entire block.
- Click the Save button to accept your changes, or click the Cancel button to leave the block’s content as it is. The Remove button is shown only when you place the block into the page for the first time.
- You can also click the Close button in the top right-hand corner to either remove a newly created block before it is being saved or to cancel any changes and leave the block’s content as it is.