14.1. Insert an image into text
You can add images to any text in two ways by using the same functionality:
- Link to the image that is available elsewhere online.
- Use an image that you have on Mahara.
Note
Images are easy to add to text. However, make sure that you have the permission to use the image you link or upload.
Insert an image into text
Go to the visual editor and click on the Image button
 .
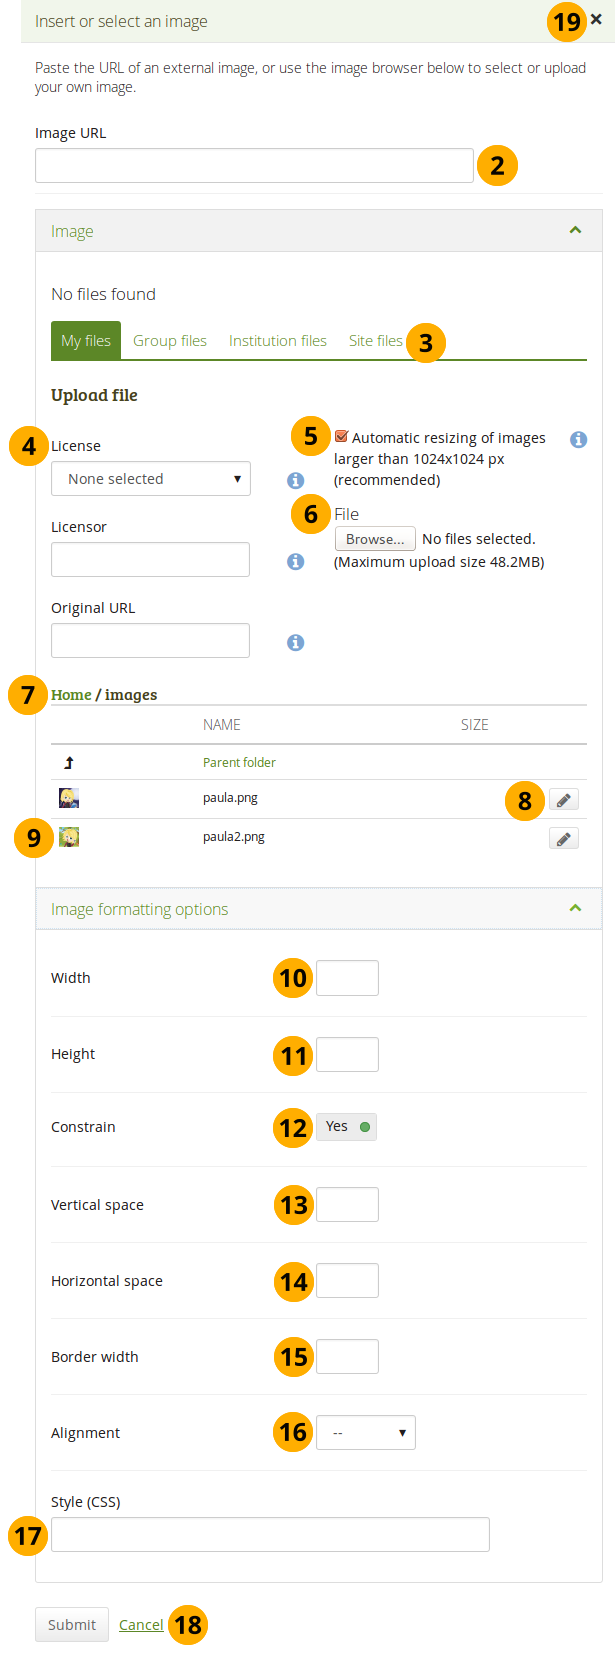
.Image URL: Paste or type the image URL to an external image into this field. It must start with http:// or https://. You can then skip to step 7. If you are inserting an image from Mahara itself, the URL will be added automatically in the next steps.
Files area: Choose from which files area you would like to select an image:
- My files: You see all the folders and files that you have created.
- Group files: You see all the folders and files that you are allowed to publish.
- Institution files: If you are an institution administrator, you will see institution folders and files.
- Site files: If you are a site administrator, you will see all site folders and files. Otherwise, you can only see the ones that are in the folder public in the Site files.
License information: You see these fields if the site administrator turned on license metadata. Additionally, if you are in an institution, your institution administrator may require you to provide a license.
- License: Your default license is displayed. You can set your default license in your account settings. You may choose a different license for each individual artefact.
- Licensor: If you are uploading a file that somebody else created, you can attribute the work to them here and provide their name for example.
- Original URL: If you are uploading somebody else’s file, provide a link to the original Internet address so that others can go there and view the original file.
If the site administrator turned on the image resizing option, you can decide whether you want to have your images resized if they are larger than the specified dimensions. This option is recommended to save space in your portfolio.
File: You do not have to go back to your Files area in Content in order to upload a file. You can do so directly from this screen.
Folder path: The breadcrumbs show in which folder you are currently. If you upload a file, it will be placed in this folder.
Click the Edit button to change any component of a folder or file, i.e. its name, description and tags. If you have a folder or file included in a page that you submitted for feedback, you will not be able to edit them.
Click into the row that contains the file you wish to select.
Width: Change the width of your image. If the image is recognised correctly, you have the image’s dimensions (in pixels) displayed directly.
Height: Change the height of your image. If the image is recognised correctly, you have the image’s dimensions (in pixels) displayed directly.
Note
If you want to change the size of your image proportionally, remove the value from here so you only have a new value for width.
Constrain: This switch should typically be set to “Yes” so that your image dimensions are changed proportionally.
Vertical space: Add more space (in pixels) above and below the image.
Horizontal space: Add more space (in pixels) to the left and righ of the image.
Border width: Add a simple black border to your image if you wish to do so. Here you can choose how wide that border will be.
Alignment: Decide where you want to place the image in relation to the text.
Style (CSS): Add CSS style information if you want to make specific changes beyond the basic settings. If you made any changes above, they will be placed into this field so you can change them directly here.
Click the Submit button to keep your changes. Alternatively, click Cancel if you want to abort inserting the image.
Click the Close button if you want to abort inserting an image.
If you are not happy with how the image looks, select it (it will get little square handles) and click on the Image button again to make adjustments.