
3.2. Portfolios
Main menu 🠆 Portfolios
Portfolios can be a page or a collection.
A page contains a selection of artefacts which you arrange and present to others. These may include:
selected files
résumé details
text (your added commentary, instructions or orientation)
journal posts
video and audio files
RSS feed to an external blog
etc.
A collection is a series of pages to facilitate the navigation through the content in a logical order without putting everything on a single page.
You can re-use the artefacts that you collected in as many pages as you like.
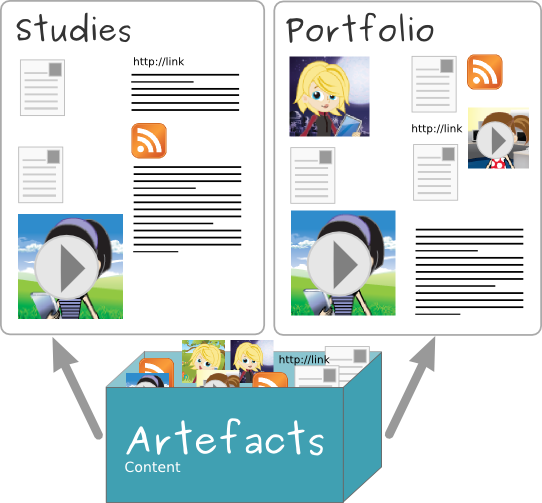
The same artefacts can appear in multiple pages
3.2.1. Overview page
On Portfolios, you can do the following.
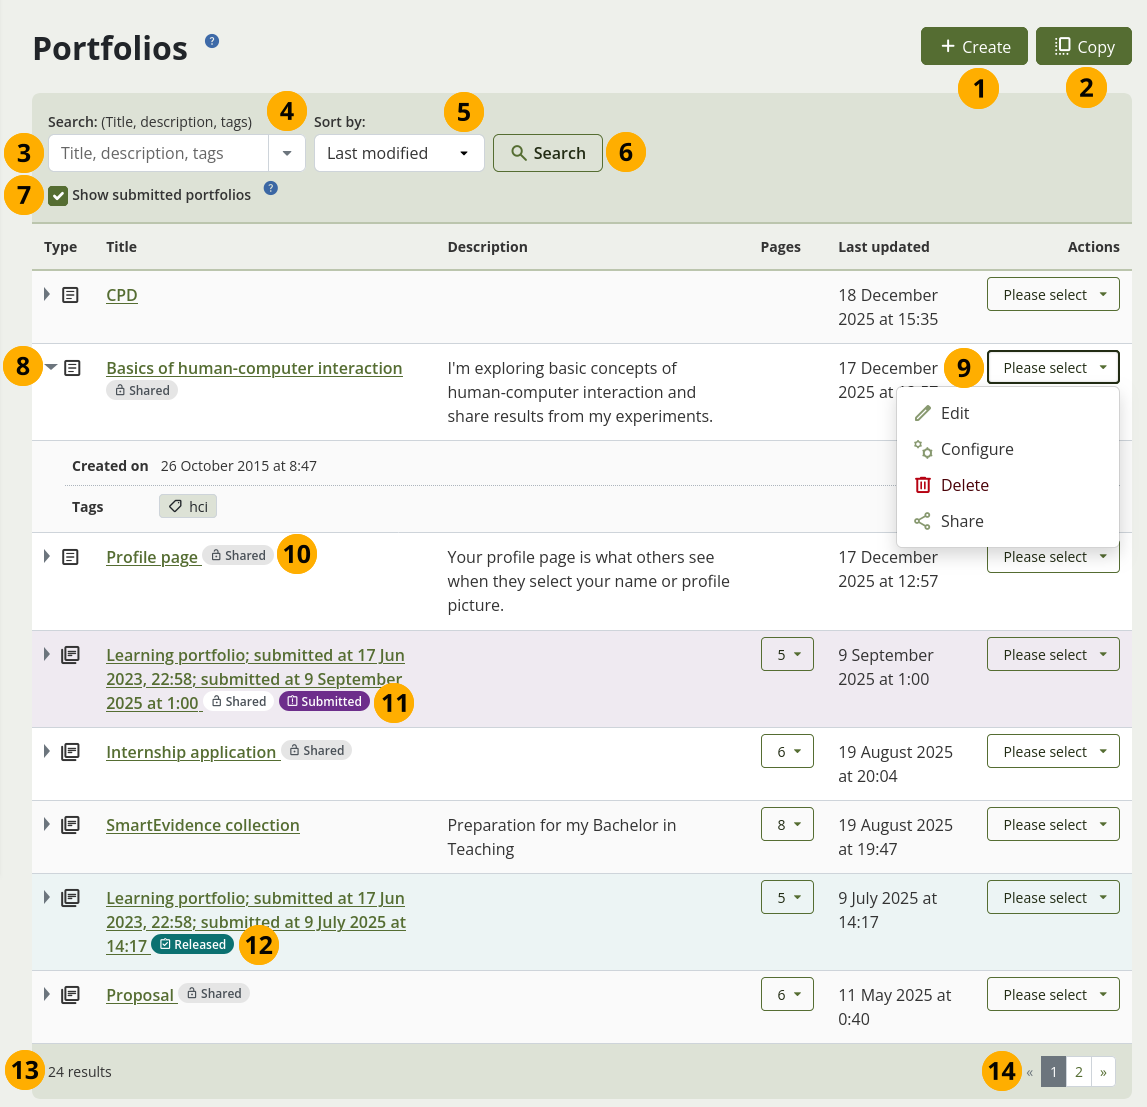
Overview page for ‘Portfolios’
Select the Create button to start a new page or collection from scratch.
Note
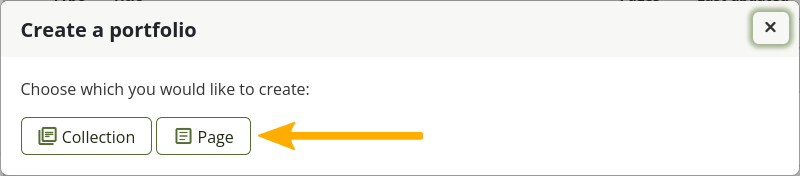
A modal opens in which you can choose whether to create a page or collection.
Select the Copy button to choose an existing page or collection as basis for a new portfolio. You see all your personal portfolios as well as portfolios of others that they allowed to be copied and to which you have access.
Search: Type your search term into the search field.
Use the drop-down arrow to limit your search. The available options are:
Title, description, tags: Search for your search term in the title, description, and tags of your portfolios.
Title, description: This is the default option. It searches in the title and description of your portfolios.
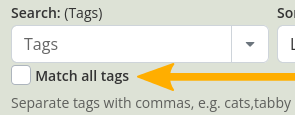
Tags: Search only within the tags of your portfolios.
Note
If you select to search only tags, you see an additional option to search for multiple tags and match on all of them.
Sort by: Decide on the sort order in which you wish to display your portfolios.
Alphabetical: Portfolios are displayed in alphabetical order.
Date created: List the portfolios in chronologically reverse order with the newest portfolios first.
Last modified: Display the portfolios in the order of their last modification with the most recent portfolios that have been changed first. This is the default display option.
Last viewed: Show the portfolios in the order in which they were viewed by you and others starting with the most recently viewed portfolios.
Most visited: Display the portfolios that have been visited most first in the list.
Most comments: List the portfolios in descending order based on the number of comments they have received.
Note
The search option and the sort order that you choose do not change when you navigate away from the overview page or log out. When you change either setting, it will be used until you change it again.
Select the Search button to search your portfolios based on your search term and / or sorting criteria.
Select the box Show submitted portfolios to also see all portfolio submissions you have made.
Note
When you check the box, the check mark is retained until you remove it again.
See details about the portfolio:
Select the arrow icon arrow_right to see more details.
Title: The title of the portfolio.
Description: The description of the portfolio.
Pages: The number of pages that are in the portfolio. Select the drop-down menu to see the page titles. You can select a page to go to it directly rather than to the first page of the collection.
Last updated: The date on which you updated the page.
Actions: Select an option from the drop-down menu.
Created on: The date on which you created this portfolio.
Tags: The tags you have associated with this portfolio.
Actions: The action menu items depend on the status of the portfolio, i.e. whether it is submitted for assessment, released, or a regular portfolio.
Edit: Make changes to your portfolio.
Manage pages: When you have a collection, you can add or remove pages from it.
Configure: Change settings in your portfolio.
Delete: Delete the portfolio. If you have a collection, all pages within the collection will also be deleted.
Share: Share your portfolio with others.
View original portfolio: If you submitted a portfolio or it has been released, you can access the original portfolio from this menu.
Original portfolio deleted: If you submitted a portfolio or it has been released, but you deleted the original portfolio, you can’t navigate to it any more.
Badge Shared: Indicator that you shared the portfolio with others. Hover over the badge to see with whom you have shared the portfolio.
Badge Submitted: You submitted the portfolio for assessment. Hover of the badge to see to which group you hav submitted the portfolio.
Badge Released: This portfolio was released from the submission but is still connected to the original. Go to the portfolio configuration to turn it into a full editable portfolio.
Note
You only see submitted and released portfolios when you select the option Show submitted portfolios.
The number of portfolios.
Use the paginator to navigate to more portfolios.
3.2.2. Add a page and edit its settings
You add a new page in your portfolio when you want to display artefacts together, e.g. for presenting them to others, for showing your progress in a project etc.
3.2.2.1. Basics
Create a portfolio page
On the Portfolios page, select the Create button. In the modal that comes up, select the Page button. You are taken to the Settings.
Note
You can make changes to the page settings later on as well.
If you cannot see these options, select the Arrow down icon keyboard_arrow_down to make them visible.
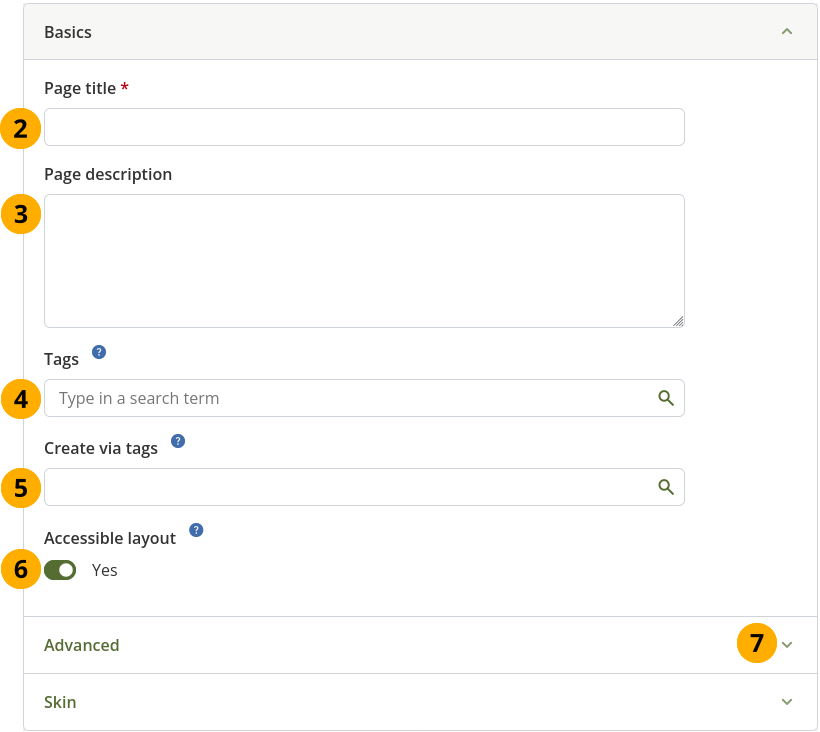
Page title: Provide a title for your page. This field cannot be left empty. If you do not enter a title, the default ‘Untitled’ will appear.
Page description: Write a brief description summarising your objective of this page. It will appear on the page itself.
Note
The page description is not displayed on the page itself any more, but rather used on the ‘Portfolios’ overview page and on the ‘Portfolio completion’ page.
If you used formatting options and images in your page description, this page description is turned into a section on your page so you don’t lose that content. You can then add a short description into your page settings.
Tags: Enter tags to find your page more easily at a later stage. You can choose from your existing tags by starting to type a letter and then selecting the tag you want to use. You can also type a new tag, select it, and it is added to your list of tags.
See also
You can find more information on how to use the tag selector in the ‘Tags’ section.
Create via tags: You can select one or more tags to populate the page with all artefacts and sections that have been tagged with them. If you select more than one tag, you only see content that matches all selected tags, i.e. it must match tag one and tag two.
Note
The page is only populated with already existing tagged content. If you tag new artefacts, they will not be added automatically. You will have to add them manually or use the ‘Create via tags’ functionality again. Only artefacts that are not already on the page are added. That also means if you previously deleted tagged content, it will be added again.
Content that is on tagged pages is not not added unless the artefacts themselves have been tagged.
Once you have added artefacts automatically, you can re-arrange and also remove them as needed. Since there are several possibilities of adding artefacts and sections to a page, the following content mappings are made when multiple artefacts of the same type are added:
1 image: Image section
2+ images: Image gallery
1 PDF: PDF section
2+ PDFs: Files to download section
1 audio / video: Internal media section (as long as the format is supported)
2+ audio / video: Files to download section
Generic file(s): Files to download section
Folder(s): 1 Folder section per folder
Journal(s): 1 Journal section per journal
Journal entry / entries: Journal section
Plan / tasks: The entire plan that contains the tagged content
Accessible layout: This option is available if you enabled the Accessible page creation option in your account settings. The following happens:
The page is set to one column. All sections will be placed underneath each other.
You can select the Add section button or navigate to it via the keyboard. A section is added at the top or bottom of the page. Drag-and-drop is disabled.
- You can change the position of a section:
Navigate to it.
Hold the Enter key pressed.
Use the Up and Down arrow on your keyboard to change the sections’ position.
Select the Arrow down icon keyboard_arrow_down to display the options in the next section.
Continue to the Advanced section or select the Save button at the bottom of the page.
3.2.2.2. Advanced
Select a skin for a page
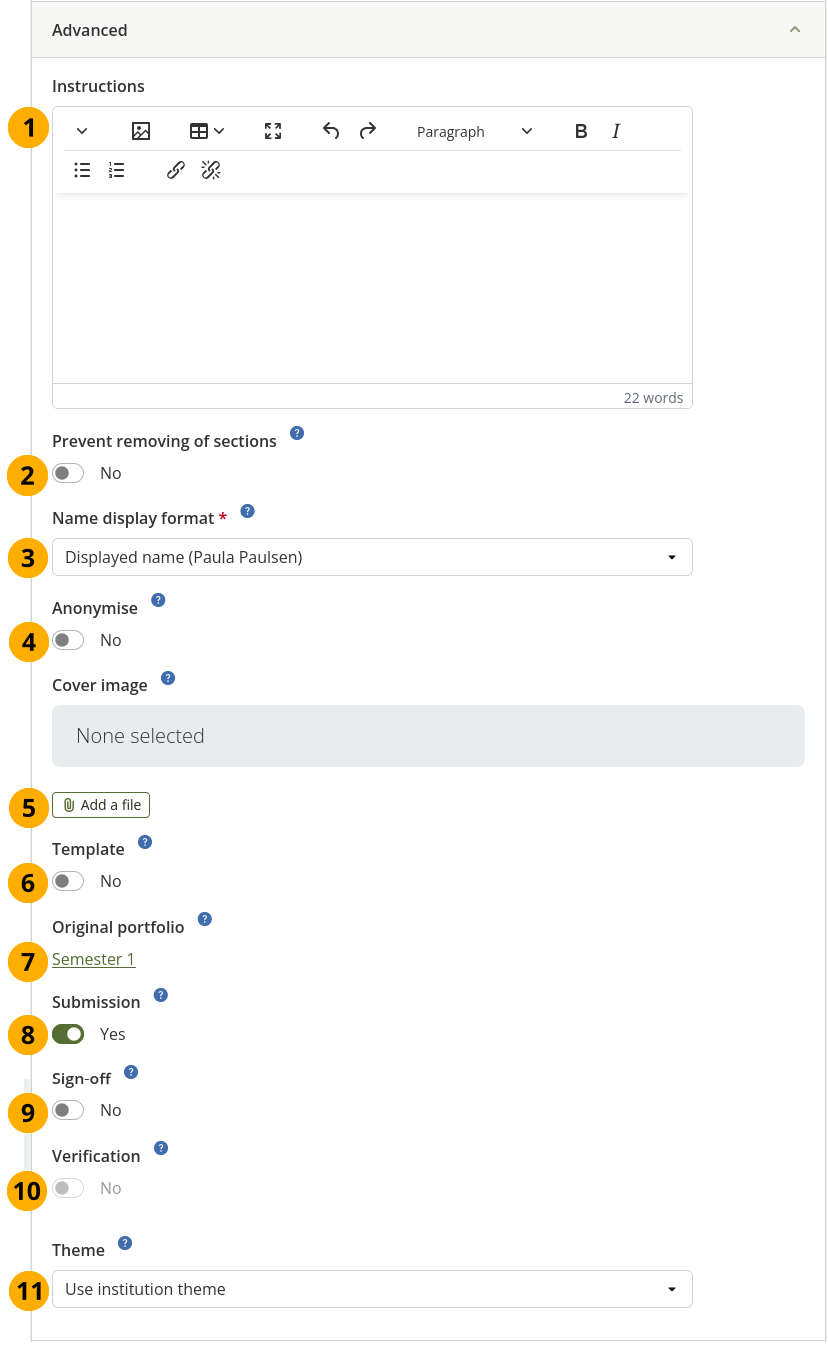
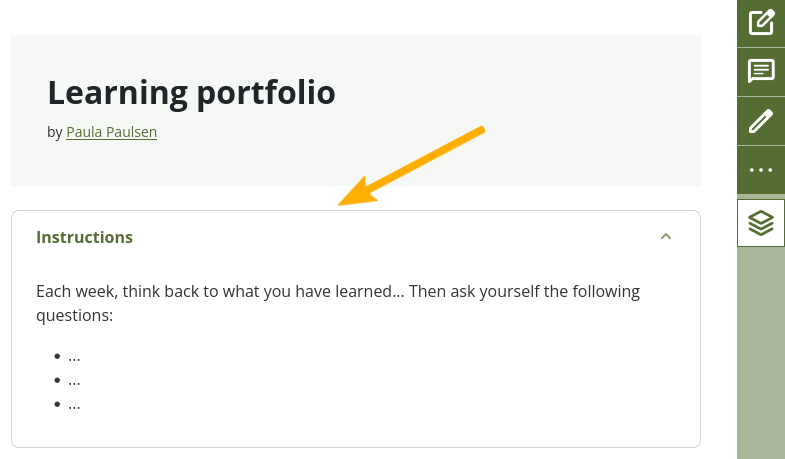
Page instructions: Write your instructions for setting up the page in the editor to scaffold the portfolio creation.
Note
The instructions are displayed in both Edit and Display mode of the page where you can collapse them if you don’t need them.
If you copied a template that had instructions, you are not able to change them on the immediate copy. You would need to make a copy of your copy to have all editing capabilities again.
Page URL: This option is only available if the site administrator allowed ‘Clean URLs’.
Choose the name for your page if you do not like the default one. It must be between 3 and 30 characters long. You can only use lowercase letters from a-z, numbers and - (hyphen).
If you are just setting up your page, the default URL ‘Untitled v.2’ (or similar) is displayed. As soon as you save the page, the URL is changed automatically to reflect your actual page title.
Warning
Though you can change the URL to your page at any point, you shouldn’t do that because people who already know the URL to your page will not be able to access it any more after you have changed it.
The original, internal Mahara URL, e.g.
https://mahara-university.org/view/view.php?id=789will still work.Prevent removing of sections: If you enable this option, you cannot remove sections from the page accidentally (or others if they work with a copy of a template). You can still add new sections, re-arrange them, but cannot delete them. You can change this setting if you want to delete sections later on.
Name display format: Choose how you want your name to appear on the page to others.
Anonymise: If the site administrator allowed anonymous pages, you can choose this option here. Instead of your (display) name, ‘Author’s name hidden’ will be displayed to everyone. Administrators and staff can still see your real name.
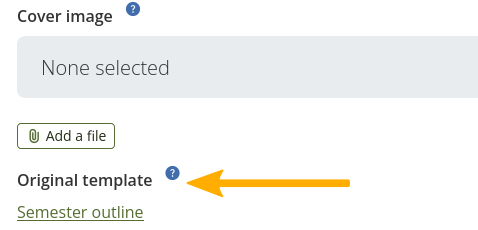
Cover image: Select the Add a file button to upload or select a picture that you want to display as cover image for your page when you are on the Portfolios overview page. This will help you distinguish between your pages and collections. For best results, your cover image should be 180px wide and 130px high.
Note
The cover image is currently not displayed in Mahara 26.04.
Template: You can mark any page as template. If a template is copied, the portfolio author will not be able to change page and artefact instructions on the copied page if there are any. These can only be changed if they make a copy of that copy.
Note
When a template page is copied, a link to the original template is placed into the page settings to make the template accessible and indicate that this page was copied from a template.
Original portfolio: If your portfolio has been released from assessment, you can select the link to be taken to the original portfolio, in case you want to make changes and re-submit the portfolio.
Submission: If your portfolio was submitted for assessment and returned to you, you can remove the submission flag from the portfolio so you can make changes to it. This is useful if you want to change your portfolio, but you can’t go back to the original or you have already repurposed the original.
Note
You see the options for Original portfolio and Submission also on the collection configuration screen when a portfolio was released. Setting the Submission option to ‘No’ removes the association to the original for the entire collection.
Sign-off: Enable sign-off when you want to allow the visual indicator for the page sign-off to be shown on the portfolio page. This is particularly useful if you use the portfolio completion functionality.
Note
Portfolio authors can sign off a page, and a manager can verify it.
The sign-off and verification process allows for a visual indicator on a portfolio page showing whether the page has been finished and whether a manager has verified it before it can go for the final assessment. The verification by a manager is optional.
When the sign-off functionality is used in a portfolio that is marked as template, its settings cannot be changed by the portfolio author, and it cannot be removed from the page. This prevents accidental changes to the settings or removal of this functionality altogether for portfolios that require it.
Verification: Enable verification when you want to allow someone with ‘Manager’ permissions to verify your page. This option requires that Sign-off is set to ‘Yes’.
Note
The manager cannot revoke the verification. This can only be done by the portfolio author in form of revoking the sign-off for the page.
Theme: If the site administrator allowed authors to choose their own page theme, you can choose between the available themes.
Continue to the Skins section or select the Save button at the bottom of the page.
3.2.2.3. Skins
Note
You see this option if the administrator allowed you to add skins to your portfolio pages.
Select a skin for a page
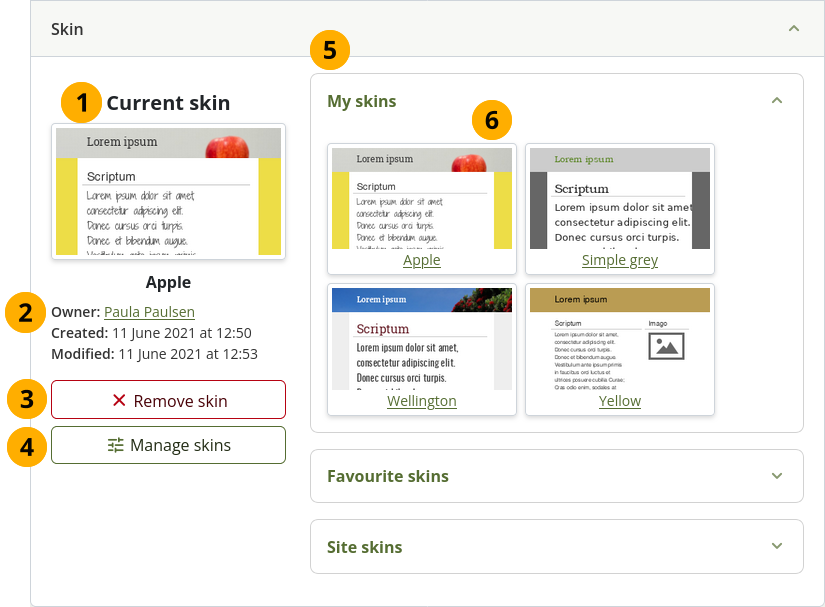
Current skin: If you already have a skin applied to the page, you see a preview image.
View the details of the skin:
Title of the skin
Owner
Creation date
Modification date
Select the Remove skin button to not use the selected skin on the page.
Select the Manage skins button to edit the skin, set up a new one, or favourite other people’s skins.
View the skins that are available to you:
My skins: Skins that you created.
Favourite skins: Skins of other people that you like and want to use.
Site skins: Skins created on the site level that are available to everybody.
Select a skin to apply it to your page.
Note
You only see the skin applied in Display mode of the page, but not in Edit mode.
Select the Save button at the bottom of the page and to continue to the ‘Edit’ screen.
3.2.2.4. Select a cover image
Note
The cover image is temporarily not displayed in Mahara 26.04.
You can upload or select an image for your cover image.
Add a cover image to your page
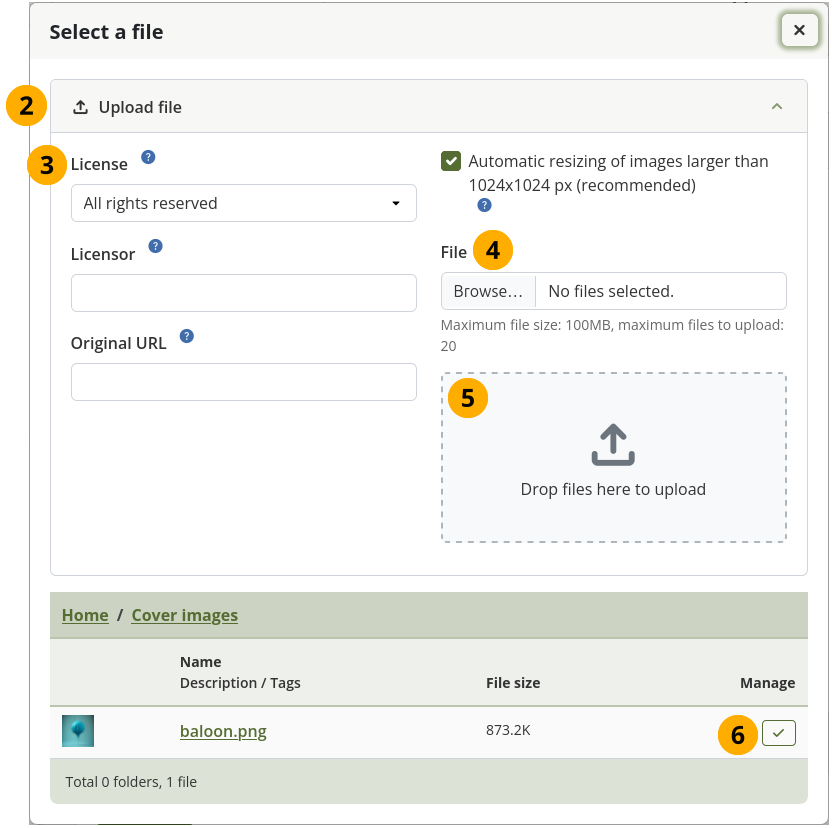
In the page settings, select the Add a file button on the Cover image option.
Uncollapse Upload file if you don’t already have a cover image you want to use.
Note
The recommended dimensions for a cover image are 180px wide by 130px high.
If licenses are turned on, you can select a license for the image your are uploading.
Select the Browse button to upload an image from your computer, or
Drag and drop and image from your computer into the drop zone, or
Select a previously uploaded image from your Mahara file storage.
3.2.3. Edit a page
3.2.3.1. Page navigation bar
You can add and remove content from a portfolio page on the Edit page screen.
The page navigation bar stays fixed in place on the right-hand side of the screen. That way, the buttons can be accessed on short and long pages without scrolling.
Note
If you are on a mobile device, the buttons move to the bottom of the screen.
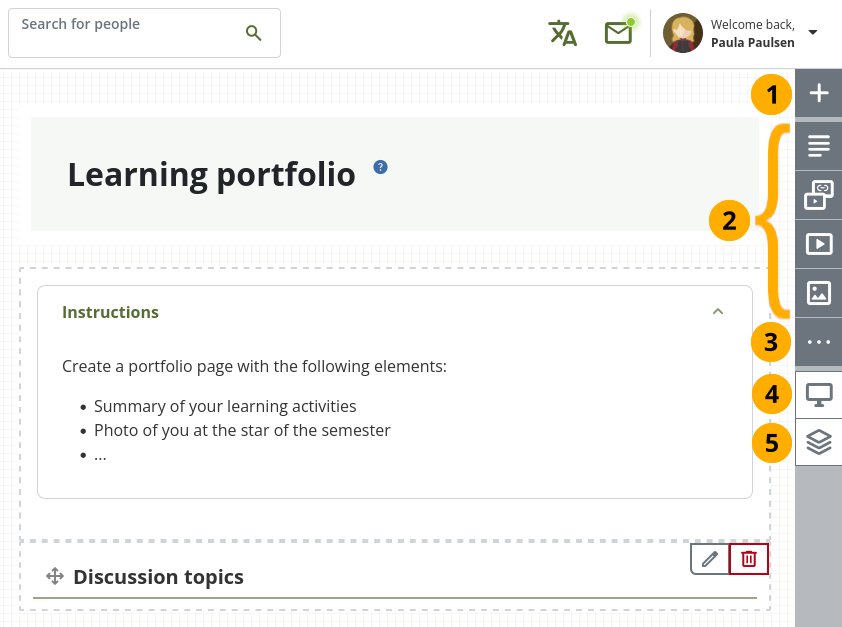
‘Edit page’ navigation bar
Select the Drag or select the button to add a new section button onto the page to place a section. Then you choose the type.
 Select one of the four shortcut buttons to directly add the respective content type to the page.
See also
The site administrator defines these four section types in the plugin administration area.
Select the More options button to access the following:
Configure: Update page settings like title and description and skin.
Share: Decide who shall have access to your page (or collection if the page is part of one). See ‘Edit access’ for more details.
Select the Display page button to review your page to see how others, who have access to it, will see it.
Select the Return to portfolios button to return to the Portfolios overview page.
3.2.3.2. Add content to a page
The layout can be created on the fly directly on the Edit screen of a page.
The layout functionality is based on the Gridstack plugin for jQuery. It is well-suited for responsive pages, adapts to the page width, and sections can be resized directly in edit mode.
An extension to this plugin is the accessibility options needed to allow people working with a keyboard only or a screenreader to continue being able to create and modify pages as well.
When a page is created with an accessible layout (this page option is available if you set the Accessible page creation option in your account settings to Yes), the following will happen:
The page is set to one column. All sections will be placed underneath each other.
The Add section button can be selected or navigated to via the keyboard and will add a section at the top or bottom of the page. Drag-and-drop is disabled.
You can change the position of a section by navigating to it, holding the Enter key pressed, and using the Up and Down arrow on your keyboard to change its position.
Note
Be careful when choosing 4 or more columns. Your portfolio page may look very good on your big 21” screen, but a person looking at it on a laptop or tablet may not have the same experience. In most cases, up to 3 columns is the best choice.
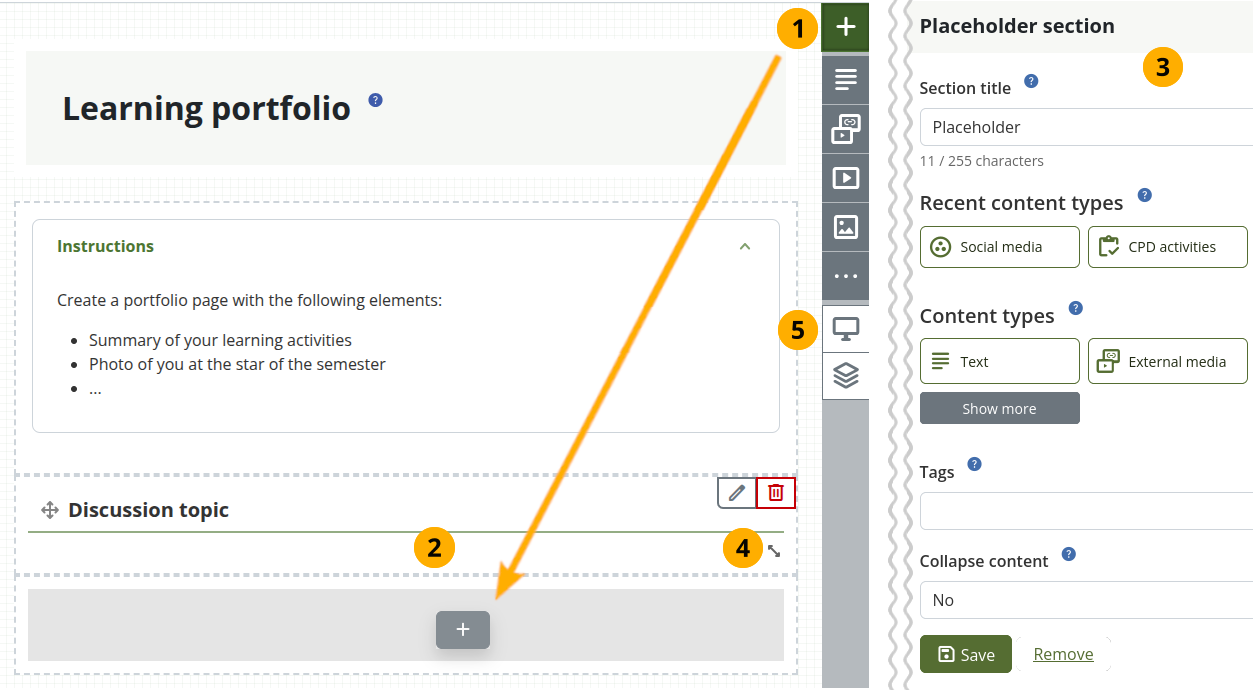
Drag a section onto a page and resize it
Drag the Drag to add a new section button onto the page.
Note
If you use only a keyboard to navigate Mahara, you can place sections using that when you enabled the accessible page creation in your account preferences and set you page to have an accessible layout in your page settings.
When you see a dotted line around a rectangle, you know where you can drop the section.
Note
The default section width is full width.
Once the section is on the page, the section configuration modal is displayed and you can select the section type that you want to use. You can also just change the section title and leave the placeholder section in place deciding on the type of artefact you want to add later. This is in particular interesting for the creation of templates as you can leave it up to your learners to decide what content they want to place under a heading.
See also
Refer to ‘Sections’ for more information on the different section types.
You can see your recently used content types above the full list for quick access to them.
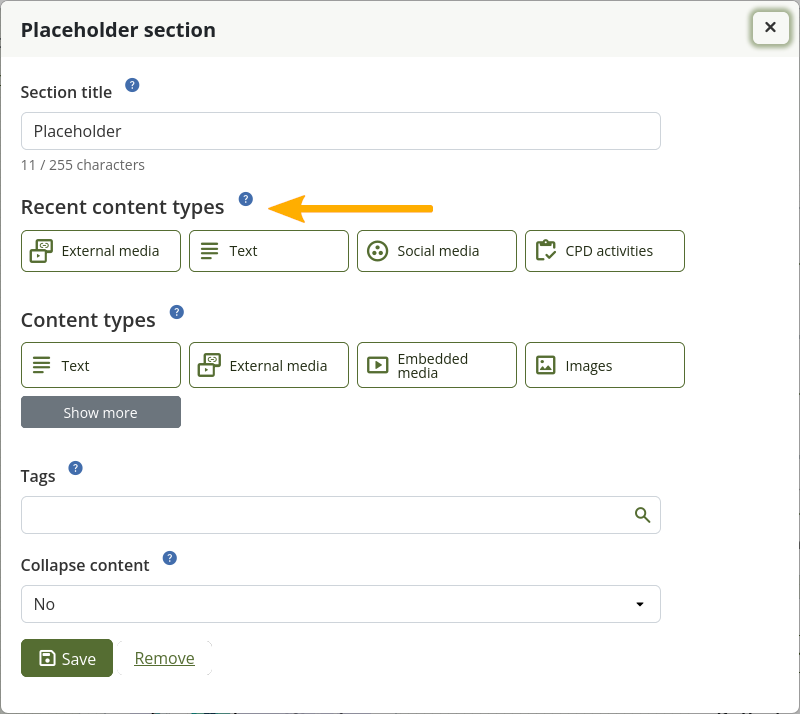
A site administrator can change the order of the section types seen in the placeholder section configuration.
Resize the width and / or height of a section by dragging the Resize icon
 in the bottom right corner of a section to change its dimensions.
Note
Content within the section will adjust automatically to the new size when no specific restricting dimensions are provided.
Select the Display page button to view your page and its content without the edit controls.
Remember:
You can align your sections into columns and rows. If a section in a second row is as wide as the section right above it and there is no other section in between, the section will snap up to the first section. You can still arrange sections into rows by resizing your sections to the correct width.
Sections that contain dynamic content, e.g. the journal sections, they may get longer with time and push other sections down.
You can re-arrange a section by selecting its heading and dragging and dropping it elsewhere.
You can change the settings of a section by selecting its Configure icon settings.
If your site allows the copying of sections, you see the Copy icon copy_all and can make a copy of the section on the same page.
Changes to the layout and arrangement of sections are saved automatically. As soon as you made changes inside sections or on the page itself, they are also visible to any visitor of your page.
3.2.3.3. Convert an existing page to the modern layout
In Mahara 19.10 we introduced a new page layout. Existing pages need to be converted to it in order to be editable.
When you attempt to edit an existing page that is not yet in the new layout, you are asked to convert it.
Once you have converted it, check what the page looks like and adjust the sections as needed.
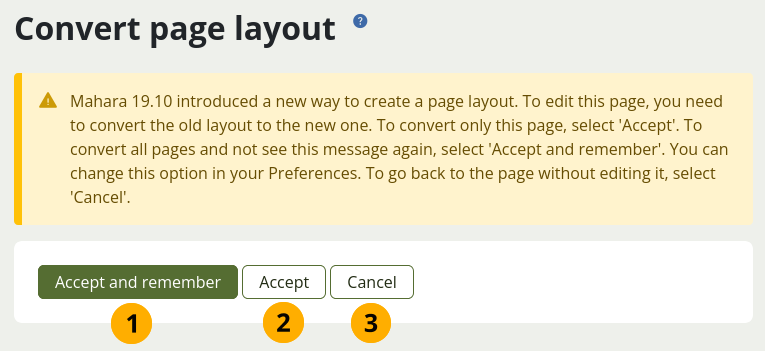
Accept to convert your page to the new layout
Select the Accept and remember button if you want to convert all your pages to the new layout whenever you enter the edit mode for the first time on a page that hasn’t yet been converted.
Note
If you do not want to have the automatic conversion done any more, you can revert it in your account preferences by setting the option Confirm before changing the page layout to ‘Yes’.
Select the Accept button if you want to convert just the current page but don’t yet want to make a decision about other pages.
Select the Cancel button to leave the page in the old layout. You can’t edit the page.
3.2.4. Share the portfolio
The Share screen is displayed for the selected page. You can only select the sharing options for the page that you are editing.
Note
If the page is part of the collection, you change the sharing permissions for the entire collection.
You can set a secret URL immediately rather than having to provide a secret URL separately from the other sharing options.
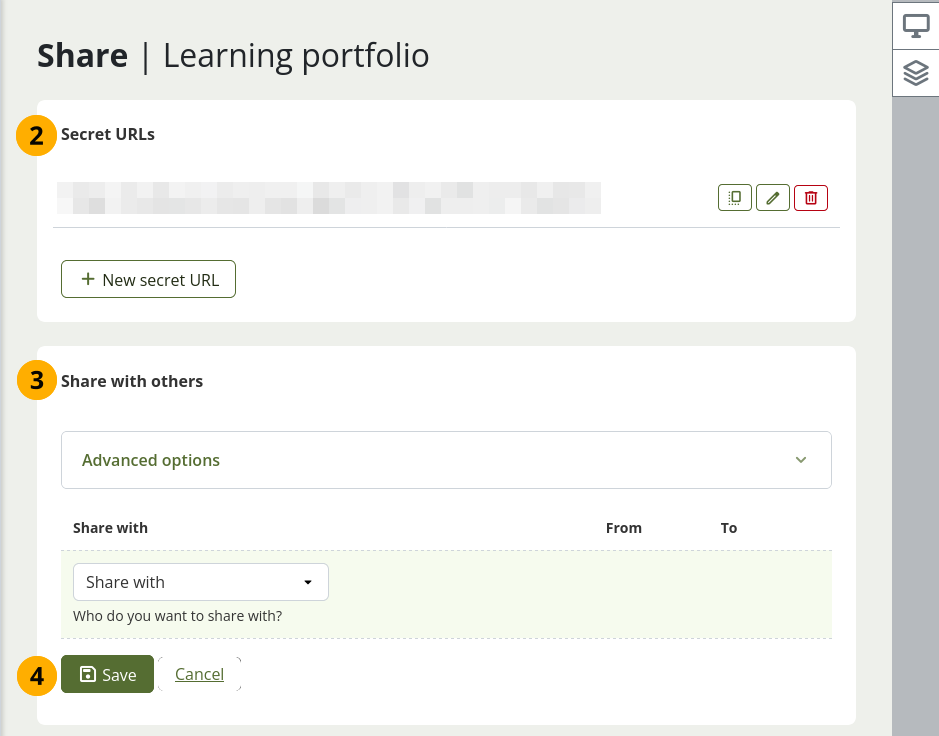
Share the portfolio you are editing
Select the Share button.
Secret URLs: Set up a secret URL for your page. For all available options, check out how to set up a secret URL.
Share with others: You can share your page with people who have an account on the site.
Select the Save button to make the changes to the sharing permissions or select Cancel to abort your changes.
3.2.5. View a page
You can view a page to check what it looks like when somebody else sees it. Go to the Portfolios overview page and select on the title of a page.
An example portfolio page
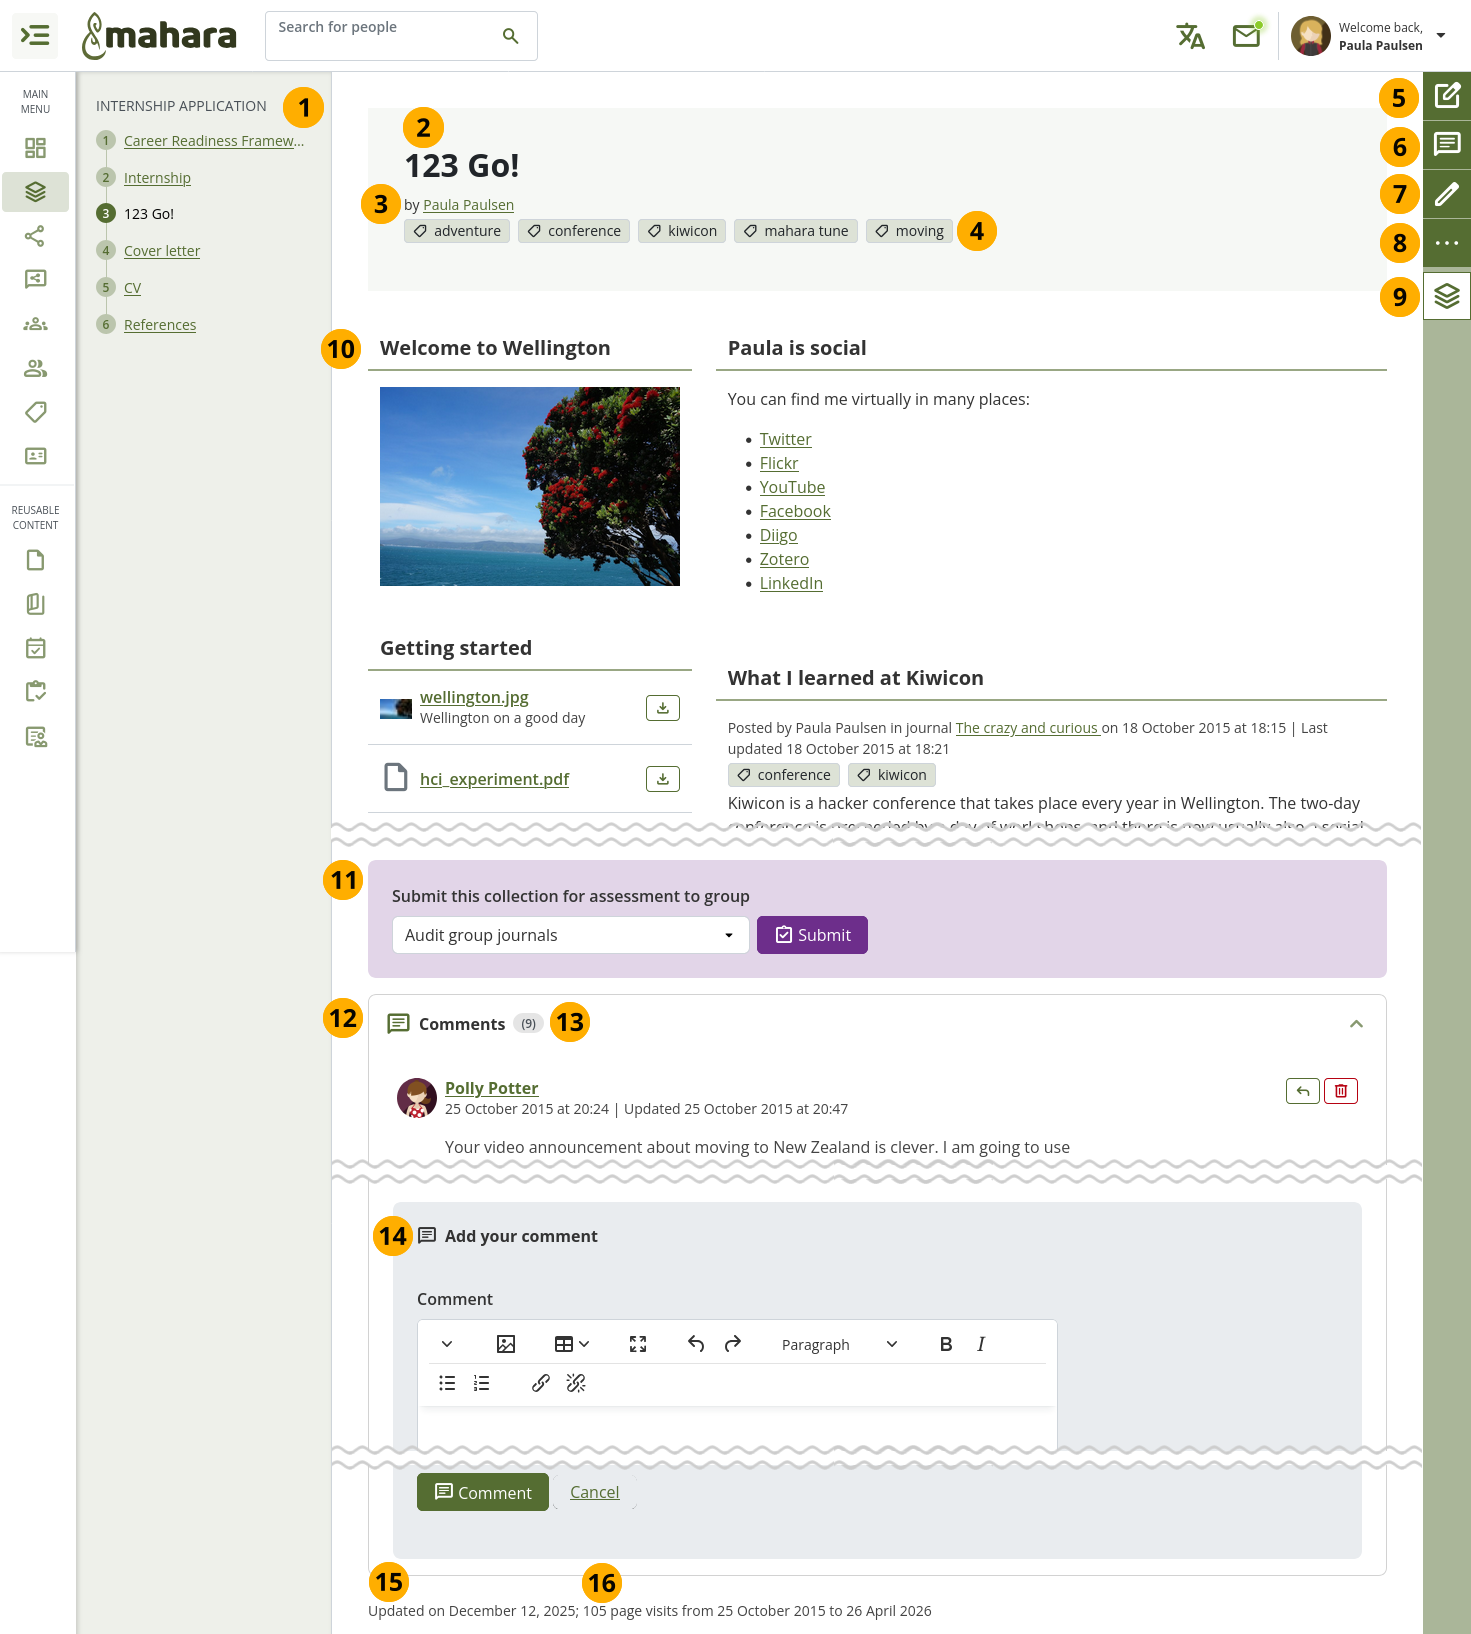
Collection title and navigation if the page is part of a collection.
Title of the page.
Author of the page.
Tags that you’ve given the page and artefacts displayed on the page.
Select the Quick edit button to edit certain content without needing to go into full Edit mode. This is useful for quick changes and additions to text.
Select the Comments and details button to see on which artefacts you can comment and what additional information is available for them. For example, you can download files, view metadata etc.
The Edit button is only visible if you are the page owner or belong to a group of people who can make changes to the page if it is a group, institution, or site page.
Select the More options button to reach additional page actions.
Note
On your own pages you can:
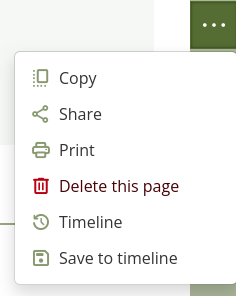
Select the Copy link copy_all to copy the page or collection.
Select the Share link share to change the access permissions for the page or collection.
Select the Print link print to open the print dialogue. Using this print functionality, your portfolio page is printed in the current layout, with collapsed sections or artefacts uncollapsed so you can see their content. Note: Links are not yet active and linked files or embedded media are not accessible.
Select the Delete this page link delete to delete your page.
Select the Timeline link history to view previous versions of your portfolio. This icon is only visible when you saved your page to your timeline.
Select the Save to timeline link save when you want to save a particular state of your page to your timeline so you can go back to it later and compare it to your current state. The comparison would be manual.
As someone viewing another person’s portfolio, you can:
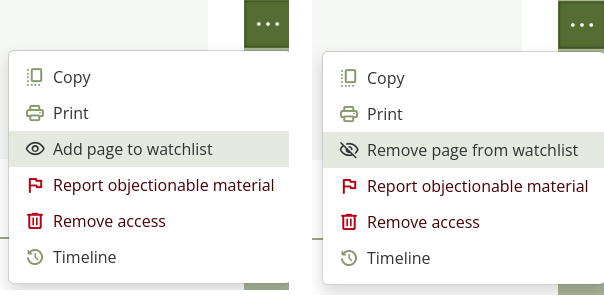
Select the Copy link copy_all to copy the page or collection. This option is only available if the portfolio author allowed copying.
Select the Print link print to open the print dialogue. Using this print functionality, your portfolio page is printed in the current layout, with collapsed sections or artefacts uncollapsed so you can see their content easily. Note: Links are not yet active and linked files or embedded media are not accessible.
Select the Reset statement link flag to have one of the statements you confirmed on the portfolio completion page reset. This option is only available on the portfolio completion page if you confirmed a statement.
Add or remove a page from your watchlist: Select the Add page to watchlist link visibility if you want to be informed when changes are made to the page. When you make changes to the page or a section on the page, a notification is triggered and sent to anyone who is watching the page. This is also the case when you add a new journal entry to a journal that is displayed on your page even when you do not add the entry via the page. If you no longer wish to receive these notifications, remove the page from your watchlist by selecting the link Remove page from watchlist visibility_off.
Select the Report objectionable material link flag if a page contains offensive artefacts. You can report them to the administrator and provide an explanation why you think the content is offensive. Once you have reported the material, you see Objectionable material reported instead of Report objectionable material. This option is not available on the portfolio completion and SmartEvidence pages.
Select the Remove access link delete if you don’t want to have access to the portfolio any more. The portfolio author will receive a notification, and you can provide a reason why you removed yourself from the portfolio. This link is only visible if the portfolio was shared with you directly. You don’t see it if you have access because you are a member of a group, institution, the site, or the portfolio is public.
Select the Timeline link history if you want to view an older version of the page. This link is only visible if the portfolio author saved anything to the timeline.
Select the Return to portfolios button to see the list of portfolios in your account, the group, institution, or site, depending on your context.
The artefacts that you placed in the page.
Note
You can select certain artefacts and see more details about them or comment on them without entering the Details mode. These are typically images, files to download, journal entries when in a list.
If you belong to a group that allows the submission of pages for feedback or assessment, you see the group displayed here or can choose it from the drop-down menu and can submit your page directly from here. For more information see the section on feedback for assessment.
Comments from people are displayed at the bottom of the page unless you display them with the comments section elsewhere on the page. Each comment includes:
Profile picture and name of the commentator that are linked to the profile page.
The comment itself.
The creation date of the comment and potentially the last update date and time of the comment.
Comment rating.
Any attachments.
A note if the comment is private only to the commentator and the portfolio page author.
Note
For more information on giving and receiving comments, please see section Feedback.
The total number of comments is displayed.
You and others can use the Add comment section to leave comments on the page.
See also
Please refer to the section on making comments to see how that can be done.
Display the last update date and time of the page.
See how many times others have viewed your page.
3.2.5.1. Quickly edit sections
The Quick edit mode allows you to quickly make changes to certain sections on the page without needing to go into full Edit mode. This makes it convenient to update your portfolio in fewer steps.
Quick edit mode is available for the following section types:
Course completion
CPD
Files
PDF
Text
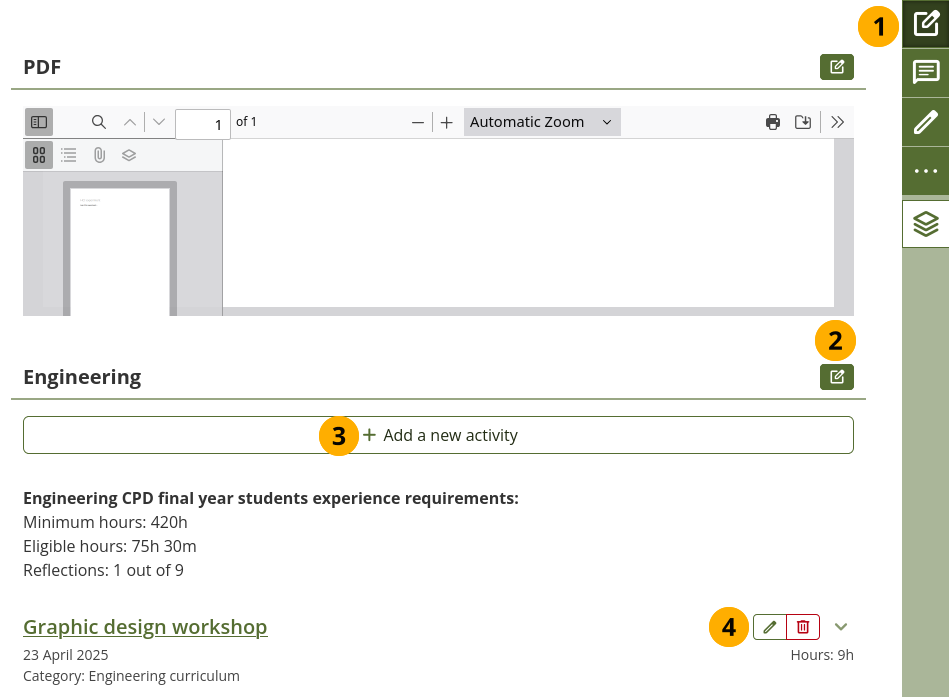
Enable ‘Quick edit’ mode on a page
Select the Quick edit button to enable Quick edit mode.
Note
You do not need to enable this mode every time you go to a page. It stays enabled until you disable it again, allowing you to use it across all your portfolios.
For sections that you can edit without going into full Edit mode, you see the Quick edit button . That opens the section configuration.
For CPD activities, you can add a new activity directly from the page by selecting the Add a new activity button.
For CPD activities, you can edit and delete activities in Quick edit mode directly from the page.
3.2.5.2. Add comments and view details
The Comments and details mode of a page allows you to see more details for an artefact and also add and view comments when the page author allowed that.
This functionality is sticky, meaning that you can refresh the page and continue being in the Comments and details mode without having to select the button again. Also when you view another page, you will stay in this mode until you select the button again.
This facilitates the assessment of portfolios as assessors do not have to select that button all the time but can perform their assessment quickly across multiple portfolios.
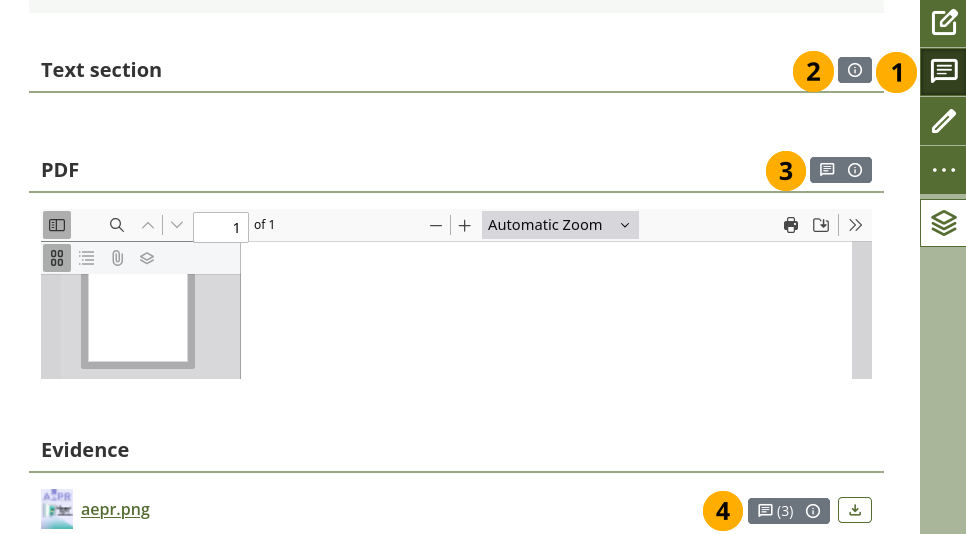
View details of the artefacts on a page
Select the Comments and details button to enable viewing of comments and details. All sections that contain artefacts where you can view details or comment show the relevant buttons.
Note
You stay in the Comments and details mode until you disable it again on any page.
Details: You see the Details button if there is metadata available for the artefact. You cannot comment on it though.
Comments and details: You see the Comments and details button to access the comments section for the artefact and metadata about it.
Comments (number) and details: If an artefact in a section already has comments, the number of comments is shown in parentheses of the Comments and details button .
See also
For details on commenting on artefacts, go to the section ‘View artefact comments’.
3.2.6. Track progress of a page
3.2.6.1. Sign off a page
When you enabled ‘Sign-off’ for your page and you view it, you can see the Page status in the page heading area to the right.
In Mahara 26.04, the sign-off and verification icons moved into the Page status area.
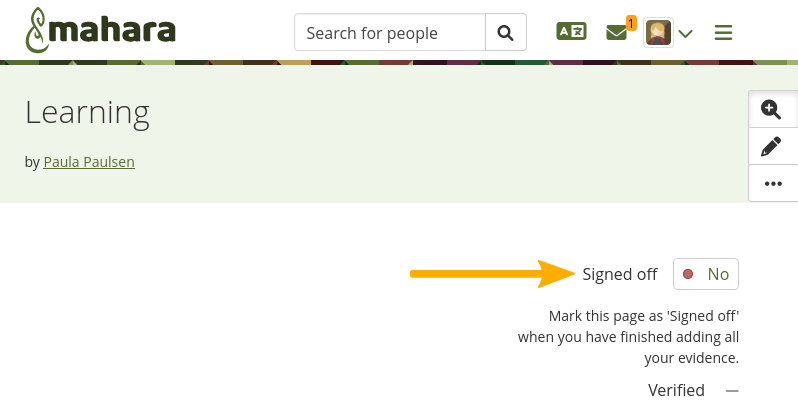
View the sign-off as portfolio author
When you are ready to sign off your page, select the left Circle icon circle. In addition, the Info icon help is displayed where you can see additional information about the sign-off and verification.
If the page also needs a verification, your manager can verify your page after you have signed it off.
3.2.6.2. Verify a page
As manager, you can see the sign-off and verification option in the Page status at the top of a page.

Verify a page as manager
The left icon is shown as signed off with the Green check icon check_circle.
When you are ready to verify a page that allows verification, select the Circle icon circle and follow the on-screen instructions. You can only verify a page when the portfolio author has signed it off.
Note
As manager, you cannot revoke the verification. Only the portfolio author can do so by revoking their sign-off.
You can select the Info icon help to find out when the portfolio author has signed off the page and when the verification had taken place.
3.2.6.3. Portfolio completion page
The Portfolio completion page shows in a quick overview how many sign-offs and verifications have already been done in the portfolio, and what still needs to be completed.
This page is only beneficial when you use the sign-off functionality on at least two of your portfolio pages.
Note
An institution or site administrator needs to enable this setting for your institution before you can use it.
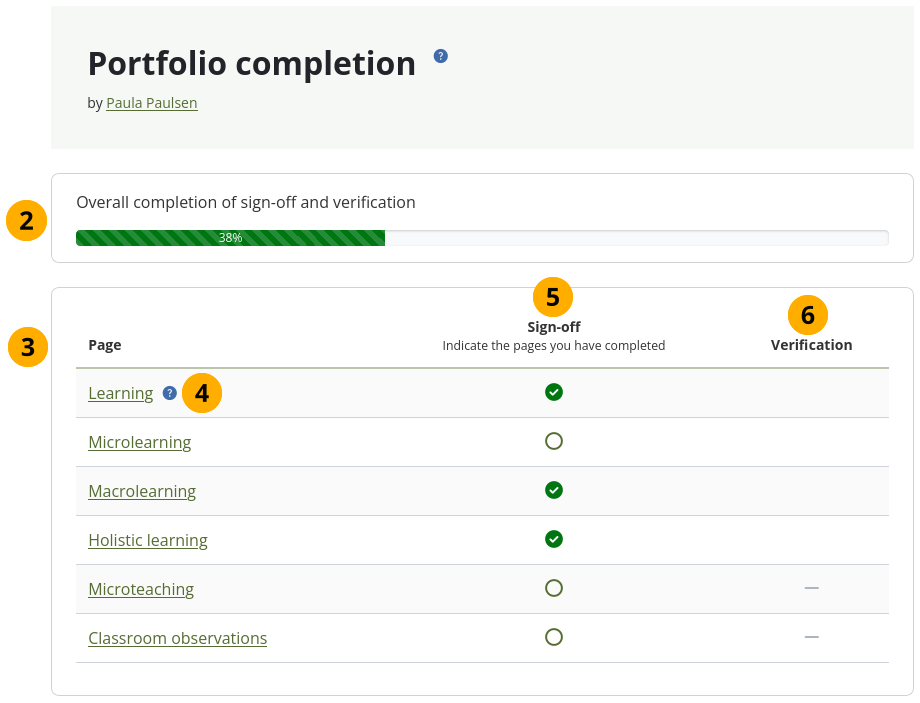
The portfolio completion page
Enable the portfolio completion page when you create or edit your collection. The page ‘Portfolio completion’ is added as first page in your collection.
Note
If you also add SmartEvidence to your collection, the SmartEvidence page becomes the second page in it.
Overall completion of sign-off and verification: The progress bar indicates how many percent of sign-offs and verifications combined have already been completed. If none of the pages require verification, only sign-offs are counted.
Page: Each page that is in the collection is listed and can be selected.
If the page has a description, it is available via the Help icon help.
Sign-off: When a page has been signed off, the icon is changed upon the next page load. As portfolio author, you can also select the sign-off icon here to change its status. It is changed on the page itself as well. There are two statuses:
Green check icon check_circle : The page has been signed off.
Circle icon circle : The page is awaiting sign-off.
Verification: Once a page has been signed off and still requires verification, a person who has the ‘Manager’ or ‘Peer and manager’ role can verify the page, either by selecting the icon on the portfolio completion progress page or on the portfolio page itself. The following statuses are available in the ‘Verification’ column:
Green check icon check_circle : The page has been verified.
Circle icon circle : The page is awaiting verification.
Grey line icon horizontal_rule : Verification is not yet possible because the page hasn’t been signed off yet.
3.2.7. Create a collection
If you want to organize your portfolio into multiple pages so as to find individual sections, you can create a collection that holds multiple pages.
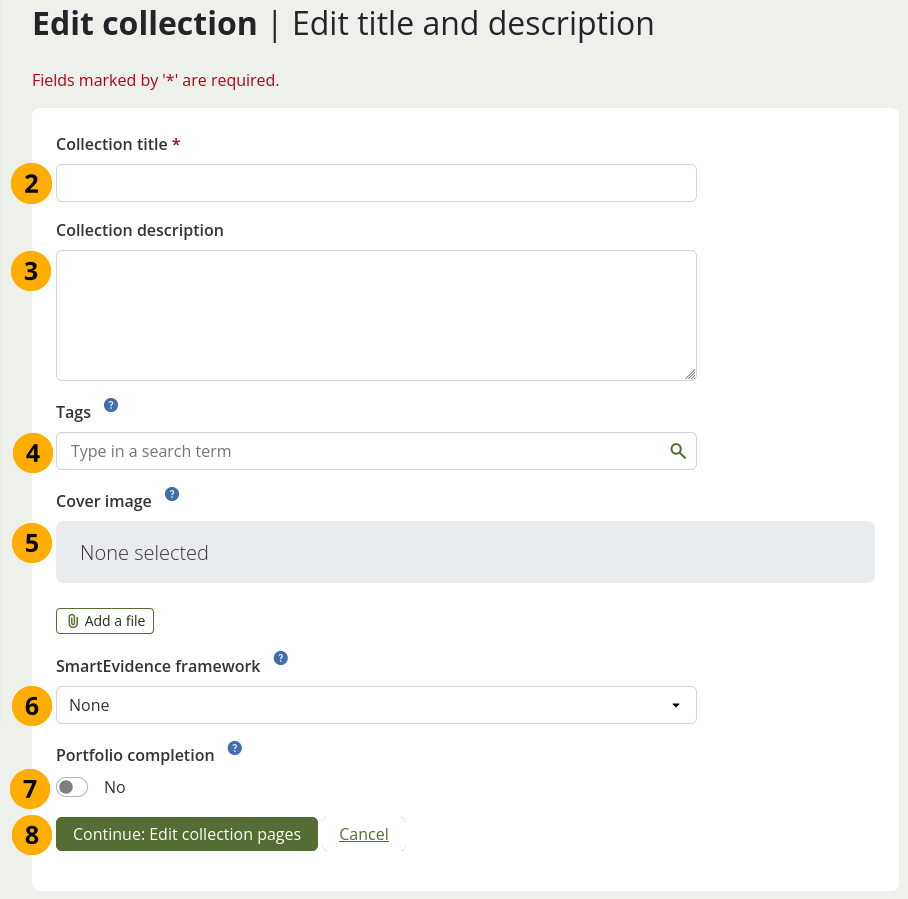
Create a collection
On the Portfolios page, select the Create button. In the modal that comes up, select the Collection button. On the next screen…
Collection title: Provide a title for your collection.
Collection description: Optionally, you can write a short description about your collection. You do not have a visual editor, but just a plain text box.
Tags: Enter tags to find your collection more easily at a later stage. You can choose from your existing tags by starting to type a letter and then selecting the tag you want to use. You can also type a new tag, and it is added to your list of tags.
Cover image: Select the Add a file button to upload or select a picture that you want to display as cover image for your collection when you are on the Portfolios overview page. This will help you distinguish between your pages and collections. For best results, your cover image should be 180px wide and 130px high.
See also
Check out how to add the cover image.
Cover images are temporarily not shown in Mahara 26.04.
SmartEvidence framework: Select the framework that you want to associate with your collection. You can change the collection as long as you have not put an annotation onto a page within the collection.
Note
This functionality is available if your institution administrator allowed the use of SmartEvidence.
Portfolio completion: Choose this option if you want to display a progress page showing all sign-offs and verifications for the pages within the collection.
Note
This functionality is available if your institution administrator enabled it in the institution settings.
Select the Continue: Edit collection pages button or select Cancel if you want to abort adding your collection.
3.2.8. Manage pages in a collection
3.2.8.1. Add one or more pages to a collection
In the next step after you have created your collection, you choose which portfolio pages you want to include. You see all the potential pages that you can use. If you had already placed a page into another collection, it is not shown here.
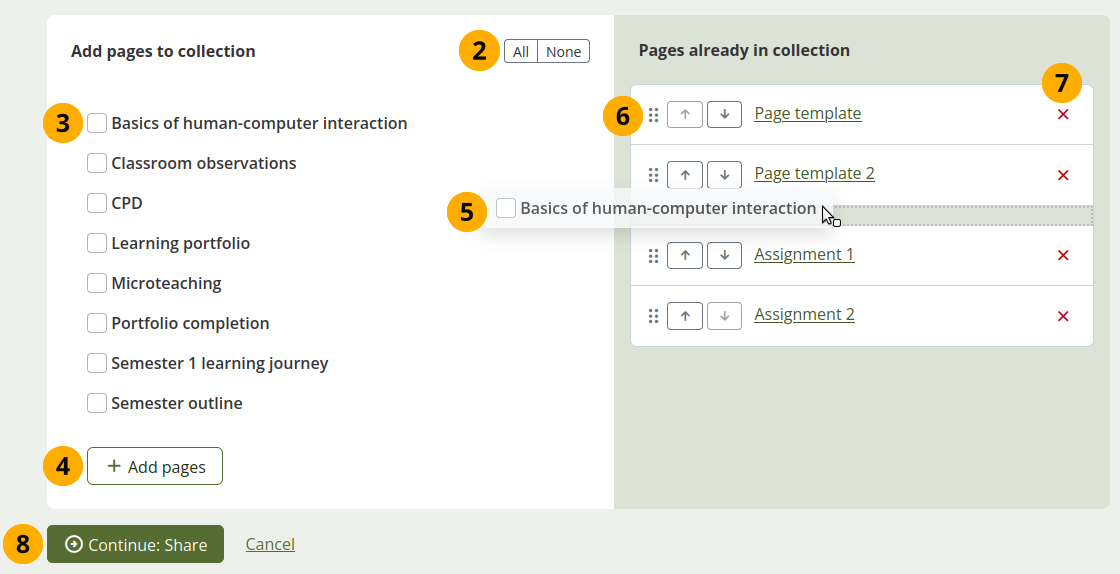
Manage the pages that are displayed within your collection
If you are not already in the page management, select the Manage pages option list_alt in the Actions drop-down menu on the Portfolios overview. On the next screen…
Select All button to add all pages available to the collection or the None button to revert your selection. Alternatively, …
Select individual pages that you want to include.
Select the Add pages button to add them to the ‘Pages already in collection’ side. Alternatively, …
Drag and drop the page into the second list.
To re-order the pages, drag the Move icon drag_indicator of a page up or down or use the Move up and Move down buttons to arrange your pages in a different order.
Select the Remove icon close to take a page out of a collection. The page itself is not deleted.
Select the Continue: Share button.
When you add pages to your collection that have different access permissions than the collection, the page’s access permissions are added to the collection and the page is available under the same access permissions as the entire collection because it is part of the collection.
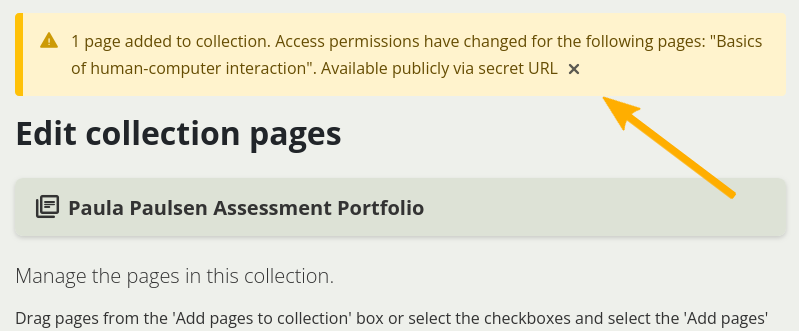
Notice about changes in permissions
If there is a change in access permissions, a warning will be displayed so that you are informed that changes have taken place.
View your collection by selecting on the collection title or any page that is part of your collection.
Note
On a mobile device, you can swipe left and right to navigate through a collection.

A collection with the page navigation bar
The title of the collection.
The collection navigation bar. The active page is highlighted.
The title of the page you are currently viewing.
3.2.8.2. Add a page during editing
When you are in ‘Edit’ mode of a page within a collection, you can add another page as the last page within that collection.
Note
Move the page to a different position in the collection in the ‘Manage pages’ dialogue.

A collection navigation in ‘Edit’ mode with ‘Add page’ link
The title of the collection.
The collection navigation.
The current active page is highlighted.
Select the Add page link to create a new page.
3.2.9. Copy a portfolio
You can copy a portfolio by:
Selecting the Copy button when you view a portfolio and are allowed to copy it.
Searching for it.
3.2.9.1. Copy a portfolio directly from its location
You can copy a page or collection directly when you view it by selecting the Copy icon copy_all after selecting the More options button when you see it in the menu.
The option is always available on your own pages and collections as well as on pages and collections owned by others when you have the permission to copy them.
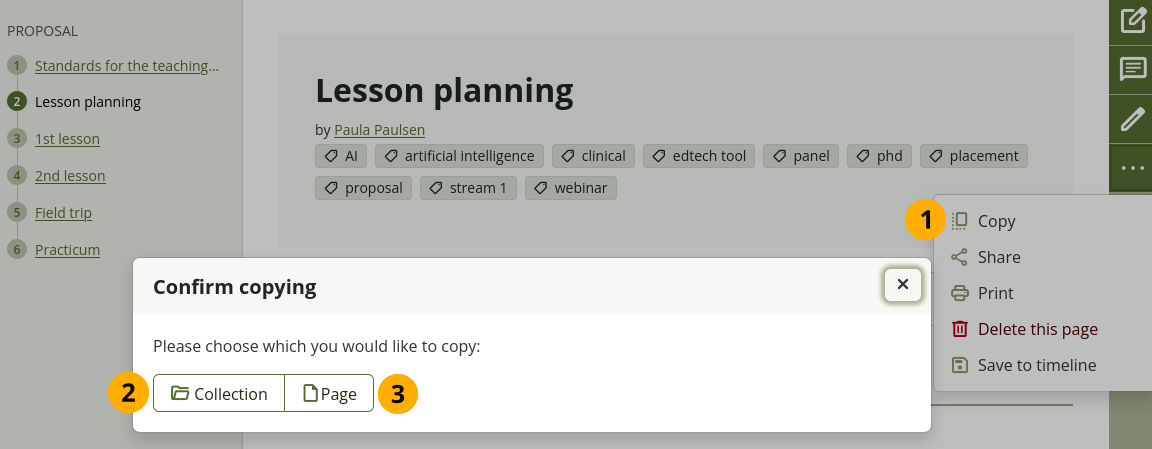
Copy a page or collection
Select the Copy icon copy_all in the More options menu when you want to copy a page or collection that you can duplicate.
If the page is part of a collection, you need to decide in the pop-up window whether you want to copy the entire collection by selecting the Collection button…
Or just the page that you can see currently by selecting the Page button.
Edit the page or collection as you would do any other.
Note
When you allow copying on public portfolios or portfolios shared via a secret URL, people who are not logged into Mahara can download the portfolio as a Leap2A export.
While the copying is in progress, you cannot select the Copy option again. This prevents that another copy is created while the first process is still running, which could cause problems with clean URLs.
3.2.9.2. Copy a portfolio by searching for it
You can duplicate your own pages or pages of others if they allowed you to do that.
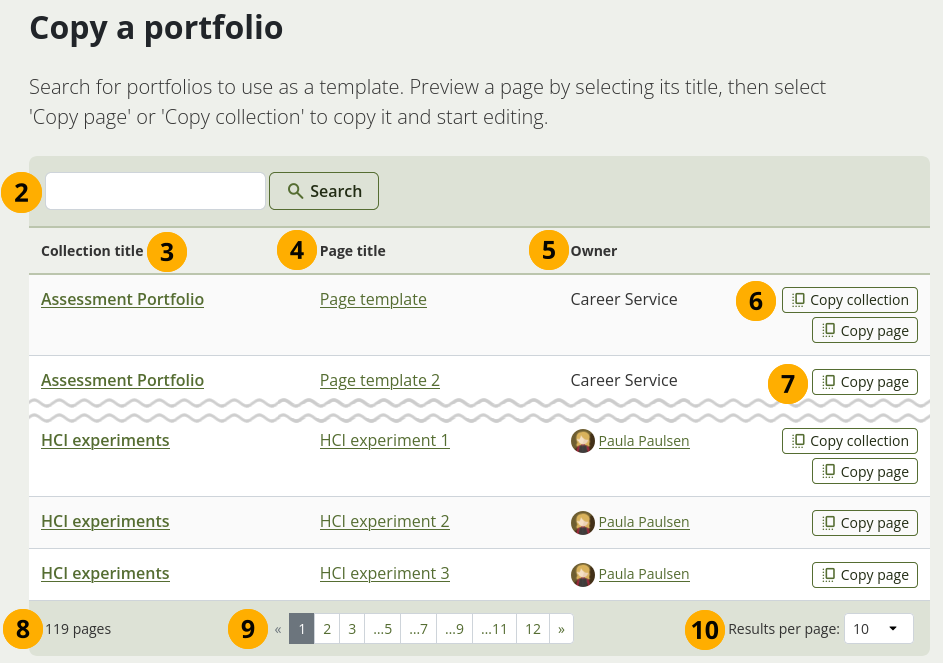
Copy a portfolio
Select the Copy button under Main menu 🠆 Portfolios. On the next screen…
Search: If there are many pages or collections from which you can choose, search here for a keyword in the page or collection title or for the name of the page owner.
Collection title: Select the title of a collection to preview it before copying it. The collection is opened.
Note
Results are listed alphabetically according to their collection title.
Page title: Select the title of the page to see a preview of it before you copy it. The page is opened.
Owner: Select the name of the owner to view their profile page.
Select the Copy collection button to copy an entire collection with multiple pages into your portfolio. All pages within this collection are copied. or
Select the Copy page button to copy one page only into your own portfolio.
You see the total number of pages you can copy.
You can navigate through the list of pages and collections to which you have access.
Results per page: Use this drop-down menu to change how many results you want to see per result page.
Edit the portfolio.
Note
If your copied pages and collections start with ‘Copy of’, the site administrator decided to have copies renamed.
3.2.10. Give others access to your portfolio
See also
Please refer to the section on sharing your pages and collections for further information.
3.2.11. Delete a portfolio
You can delete a portfolio at any time unless it has been submitted for feedback.
Warning
When you delete a page, text sections and external content sections are completely deleted. You cannot recover them. There is no revision history. Other artefacts are not deleted because they are stored in other parts of the site.
When you delete a collection, you also delete the pages within it.
If you are allowed to delete a page, you see the Delete this page option delete in the More options button when you view your page directly.
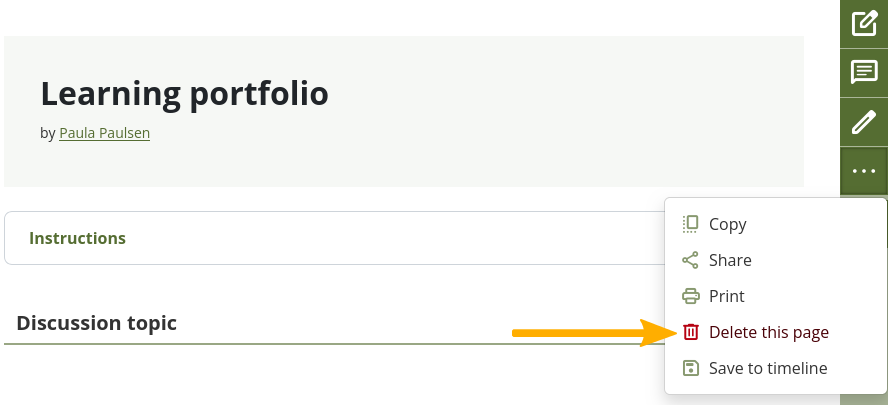
Select the ‘More options’ button to find the ‘Delete’ option
If you want to delete an entire collection, you can do so on Main menu 🠆 Portfolios by selecting the Actions drop-down menu for the portfolio and then the Delete icon delete.

Delete a collection
When you attempt to delete a page or collection, you get the chance to export the portfolio first so that you can make an archive. If your page is part of a collection, the warning message also contains the title and a link to the collection for you to check whether you really want to delete the page and thus make changes to your collection.
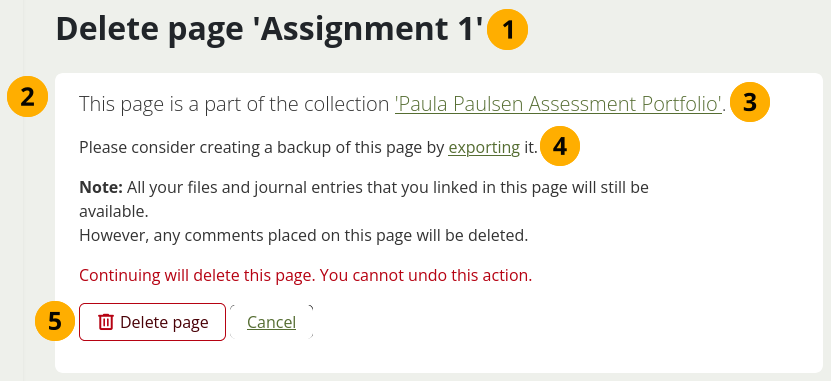
Warning when you attempt to delete a page that is in a collection
The title of the portfolio you are about to delete is displayed so you can double check it is the correct one.
An explicit warning about the deleting of the page is displayed. Deletion cannot be undone.
If you delete a page that is part of a collection, the collection is linked so you can view your collection and double-check deleting of the page is OK.
Before you continue deleting your portfolio, you may want to export it first so you have a copy in case you do need it later again. Select the export link to be taken to the options for the export.
Select the Delete page button if you want to continue with the page deletion or Cancel if you want to keep it.
The screen for deleting a collection looks similar.
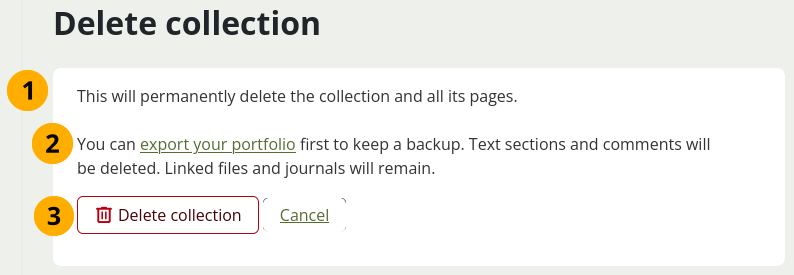
Warning when you attempt to delete a collection
An explicit warning about the deleting of the portfolio is displayed. Deletion cannot be undone.
Before you continue deleting your portfolio, you may want to export it first so you have a copy in case you do need it later again. Select the export link to be taken to the options for the export.
Select the Delete button if you want to continue with the portfolio deletion or Cancel if you want to keep it.
3.2.12. Timeline of a page’s development
Warning
This feature is experimental.
Portfolios often show progress over time. However, what did a particular portfolio page look like at the start of the development process, a month ago or two days ago? The timeline makes those changes over time visible and allows the viewer to go back in time and look at an old version of the portfolio page.
Note
Versions are not saved to the timeline automatically so as not to overload it with tiny changes in rapid succession. You can decide when you want to save a version of your portfolio to your timeline.
Jump between old versions of a portfolio
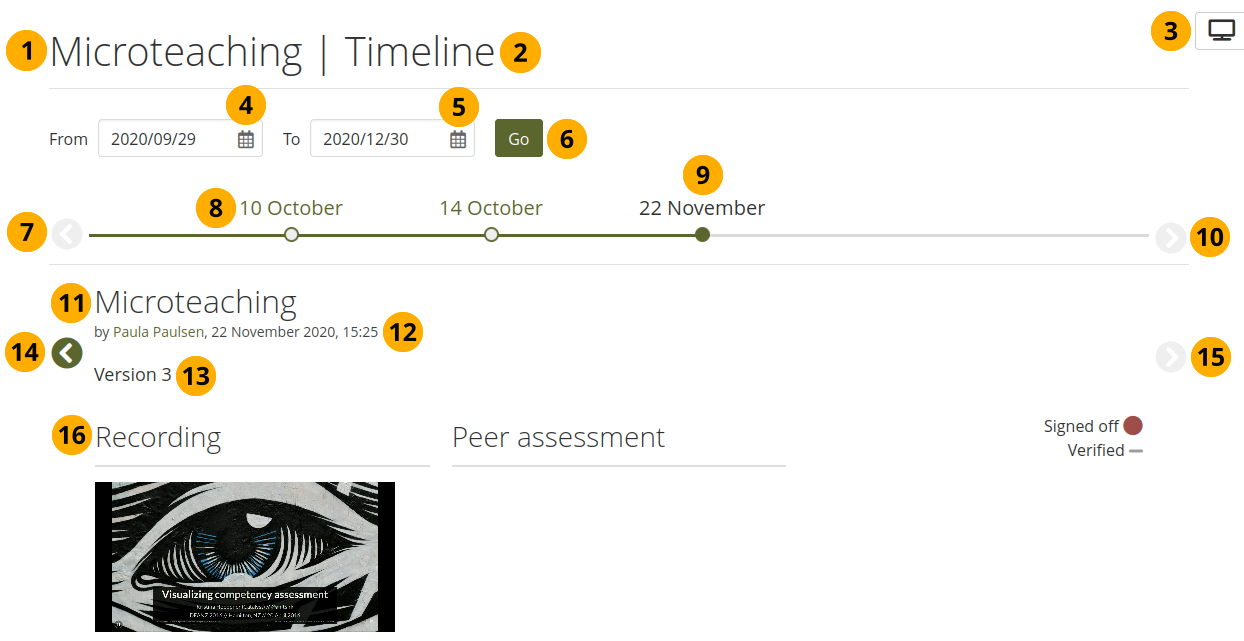
After you selected the Timeline link history on a page that has a timeline, you can see the page title.
The word ‘Timeline’ indicates that you are in the timeline view of the page.
You can always return to the live view of the page by selecting the Display page button .
From: Choose a starting date for the first version that you want to see.
To: Choose an end date. The default date is the one is tomorrow’s date so that any version saved to the timeline today are still displayed.
If there is no previous version, the Previous version button is greyed out arrow_circle_left.
The dates for which timeline versions are available.
The date of the active version that you are viewing is highlighted.
Select the Next version button arrow_circle_right to scroll to later versions of the page.
The page title is shown.
The date and time when the version was saved is displayed.
The version number is shown.
Select the Go to the previous version button arrow_circle_left to go to the previous version of the portfolio.
Select the Go to the next version button arrow_circle_right to advance to the next version.
The content of the page is displayed as it appeared in that version.